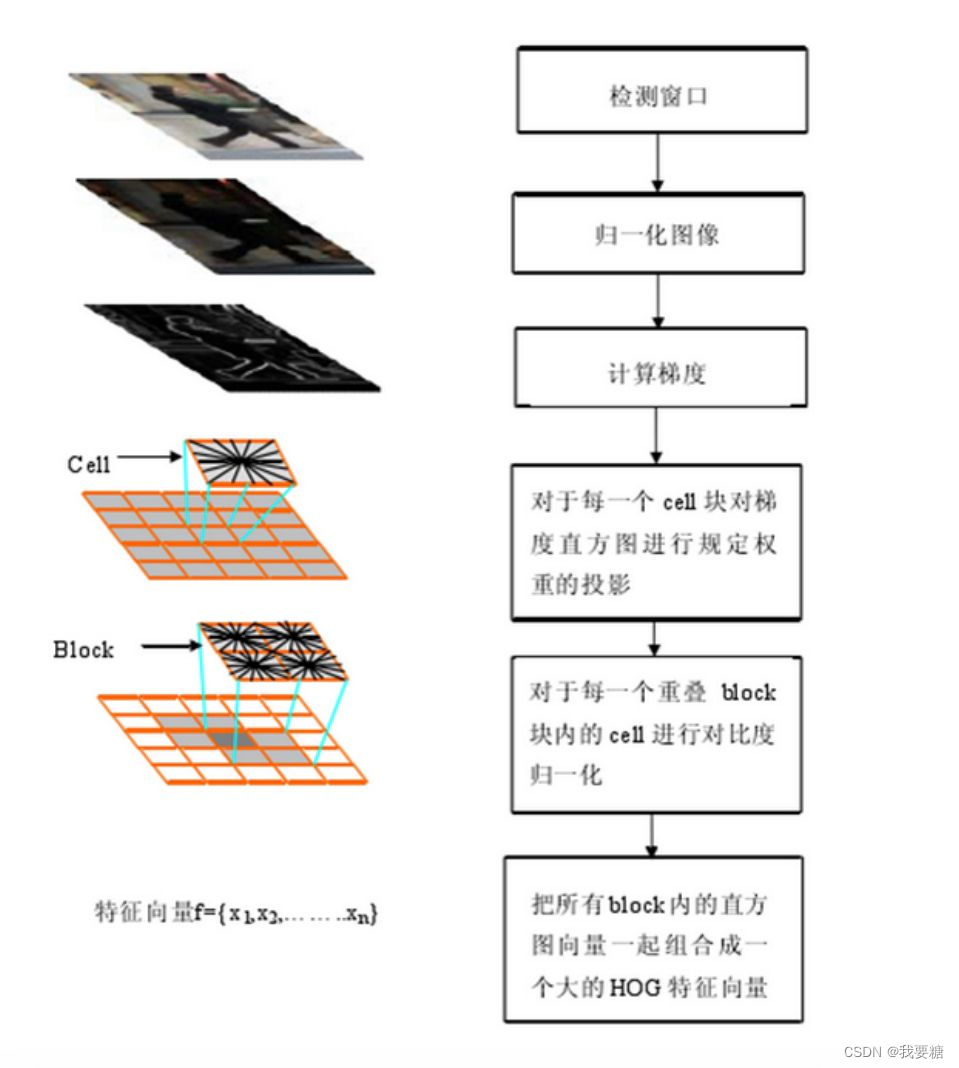
主要分三个部分进行描述,代码运行无问题,个人遇到的细节问题在最后阐述
一、读取保存在CSV中所有图片名,并从路径中读取相应图片
1. 关于导入库
若使用Qt或者C++进行编写程序,主要在官网下载opencv和eigen库,注意tar结尾文件为Linux系统相应配置,windows系统下载zip
下载链接为
opencv官网
Eigen官网
关于这两个库的导入,见另一篇博客
库的简单导入操作
#include <iostream>
//涉及文件读取和字符串类型
#include <string>
#include <fstream>
#include <sstream>
//涉及eigen矩阵运算和向量运算,以及opencv矩阵类型
#include <Eigen/Dense>
#include <vector>
#include <opencv2/opencv.hpp>
//eigen中矩阵和cv中矩阵类型转换
#include <opencv2/core/eigen.hpp>
#include <opencv2/highgui/highgui.hpp>
#include <opencv2/objdetect/objdetect.hpp>

//导入命名空间,在写代码时不用加上cv::等繁琐代码
using namespace std;
using namespace Eigen;
using namespace cv;
2. 读取文件部分
vector<string> read_pos_csv(){
    ifstream p;  //读入文件流,并打开数据文件
    p.open("D:\\test\\true_data.csv");
    if (!p)
    {
        cout << "打开文件失败!" << endl;
        exit(1);
    }
    string line;
    vector<string> strArray;
    int i = 0;
    while (getline(p, line))//getline(p, line)表示按行读取CSV文件中的数据,每一行的结果保存在line中
    {
        stringstream sin(line); //这里stringstream是一个字符串流类型,用line来初始化变量sin
        string str;
        //按照逗号进行分割
        while(getline(sin,str,',')) //getline每次把按照逗号分割之后的每一个字符串都保存在str中
        {
            strArray.push_back(str); //这里将str保存在lineArray中
            i++;
        }

    }
    p.close();
    cout << "读取数据完成" << endl;

    return strArray;
}
二、HOG处理部分
1. HOG 基本原理

对于这些参数的取值
1.检测窗口window
长宽一般都取2的幂次,例如64*128
2. cell
一般取8*8,如果计算梯度的话,需要选取幅度和角度两部分,即需要8*8*2=128个值进行存储,做两个矩阵分别存储,梯度通过差分来实现,按照固有的9个bin(角度范围)画成直方图,表示成一个一维数组
注意: 8*8是实际图片中包含自己感兴趣特征的区域大小,可按照实际情况自定义
9个bin是无符号梯度,范围为0-180°,即0,20,40,60,80,100,120,140,160;
需要按照比例分配不同的幅度到不同的bins中去
3. block
为包含更多的灰度对比信息,需要对于cell进行分组,一个block可以大小16*16,包含4个cell,遍历整张图像,即滑动block进行处理
最终向量大小:
一个16*16的block,包含4个直方图,每个直方图9个bins,即九个向量,那么4个就对应4*9=36,一个36*1的一维向量
block的计算方法
以64*128为例,
水平为 (64-8)/8=7
垂直为 (128-8)/8=15
即最终为7*15=105
向量维数为105*36*1=3780维
4.归一化处理,得到的向量都计算一下,变成[0,1]范围内的,移除了尺度信息
2. HOG 代码解释
MatrixXd get_hog_feature()
{
  int pos_sample = 332; //正样本个数
  int neg_sample = 926; //负样本个数
  char adpos[2048],adneg[1024]; // set buff avoid overflow
  HOGDescriptor hog(Size(32,32),Size(16,16),Size(8,8),Size(8,8),9); //定义hog算子的基本参数
  int DescriptorDim; //HOG Dimension
  Mat samFeatureMat, samLabelMat;

  vector<string> pos_pic_name; //字符串数组,存储的图片名
  vector<string> neg_pic_name;

  pos_pic_name = read_pos_csv();
  neg_pic_name = read_neg_csv();

//get pos_sample feature
  for (int i = 1;i <= pos_sample ;i++)
 {
    string str2_pos = "D:\\test\\" + pos_pic_name[i-1] + ".bmp";
    char* str3_pos;
    strcpy(str3_pos, str2_pos.c_str());
    const char* img_path_pos = str3_pos;

    sprintf_s(adpos, img_path_pos, i);

    Mat src_pos = imread(adpos);
    vector<float> descriptors;//HOG descriptor
    hog.compute(src_pos,descriptors);
    if ( i == 1)
    {
        DescriptorDim = descriptors.size();
        samFeatureMat = Mat::zeros(pos_sample +neg_sample , DescriptorDim, CV_32FC1);
        samLabelMat = Mat::zeros(pos_sample +neg_sample , 1, CV_32FC1);
    }
    for(int j=0; j<DescriptorDim; j++)
    {
        samFeatureMat.at<float>(i-1,j) = descriptors[j];
        samLabelMat.at<float>(i-1,0) = 1;
    }
 }

  // cv::Mat -> eigen::Matrix
  int row = samFeatureMat.rows;
  int col = samFeatureMat.cols;

  MatrixXd samFeatureMatrix(row, col);
  cv2eigen(samFeatureMat, samFeatureMatrix);
  return samFeatureMatrix;
}
三、PCA降维部分
1. PCA的主要步骤如下:
1.获取数据
2.减去均值
3.计算协方差矩阵
4.计算协方差矩阵的特征矢量和特征值
5.选择特征值最大的K个特征值对应的特征向量作为主成分
6.用主成分矩阵乘以原始数据得到降维后的数据
2. PCA的代码如下:
// PCA 降维
Mat pca_1(MatrixXd samFeatureMatrix, int featureNum, int k){
    // using PCA to reduce the number of features
    // input	samFeatureMatrix: Hog features
    //          featureNum: feature dimension
    //			k: number of features needed
    // output	features: projections in column

    MatrixXd X = samFeatureMatrix; //copy

    // 去均值化
    RowVectorXd meanVecRow = X.colwise().mean();
    X.rowwise() -= meanVecRow;

    // 计算方差
    MatrixXd cov = X.transpose()*X / X.rows();

	// 计算投影矩阵
    EigenSolver<MatrixXd> solver(cov);
    MatrixXd eigenVecors = solver.eigenvectors().real();
    MatrixXd projection = eigenVecors.block(0, 0, featureNum, k);

    // eigen::Matrix -> cv::mat
    Mat projectionMat;
    eigen2cv(projection, projectionMat);

    return projectionMat;
}
四、主函数部分
注意变量类型的定义和返回值,PCA降维所得到的维度一般可以选择初始维度的一半,可以保证方差在95%,再根据实际情况做上下调整即可
维度从324维降为100维的调用情况
// test
int main(){
    MatrixXd descriptorValues;
    descriptorValues = get_hog_feature();
    pca_1(descriptorValues, 324, 100);
    return 0;
}
六、遇到的问题总结
1.读取图片的函数sprintf_s中的图片路径应为常量类型,所以由于多次循环导致的路径+图片改变了,需要另外定义常量,将路径赋值给它;
2.注意字符串数组的赋值操作,c_str()的使用;
3.调试的时候,在多个位置增加输出操作,帮助判断哪里有问题;
4.注意原理的理解以及已有库的直接调用,减少工作量;
5.调用不同库的时候的元素类型的转换,cv->eigen 以及 eigen->cv
7.开个专栏总结复习下C++的知识(getline的基本操作,面向对象,重载,封装等)
