论文 Focal Loss for Dense Object Detection
论文地址:RetinaNet-Focal Loss![]() https://arxiv.org/pdf/1708.02002.pdf论文代码:
https://arxiv.org/pdf/1708.02002.pdf论文代码:
RetinaNet-Focal Loss![]() https://github.com/yhenon/pytorch-retinanet
https://github.com/yhenon/pytorch-retinanet
简介
问题:
应用于对可能的目标位置进行定期密集采样的一阶段检测可能更快、更简单,但是迄今为止其准确率落后于二阶段检测器。
所以,简单的一阶段检测器能达到二阶段检测器相同的精度?
主要贡献:
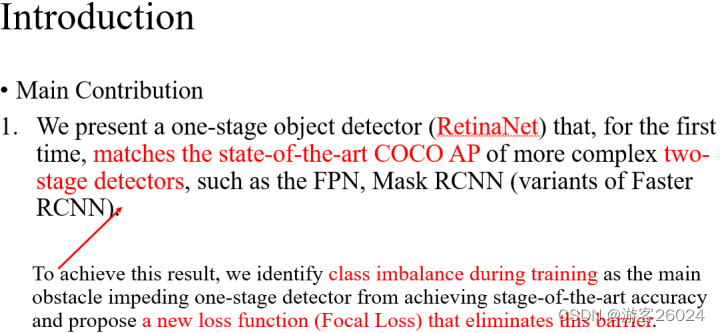
1.我们提出了一阶段目标检测器(RetinaNet),首先RetinaNet达到更复杂二阶段检测器的最先进的COCO精度,为了达到这个结果,我们确定了在训练期间类别不平衡为一阶段检测器达到最先进精度的主要障碍,并且提出了一个新的损失函数(Focal Loss)来消除障碍。
以前看过的论文以及博客:
若一幅图的目标有限,但是anchor-based目标检测算法会产生很多anchor,大多数框住的是负样本(背景类),极少数框住正样本(前景类),这样就会造成负样本(背景类)远远多于正样本(前景类),如下图(不严谨的举例),这是在anchor-based一阶段目标检测算法中无法完全解决却能缓解的根本问题[笔者认为]。
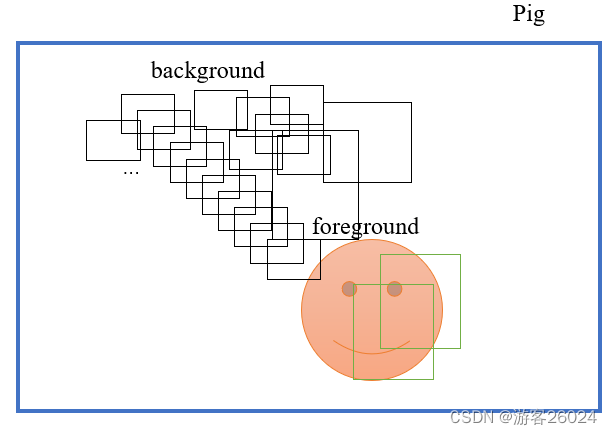
并且这种在训练期间造成的正负样本不平衡,会产生两个问题:
(1)训练没有效果,因为大多数的位置都是简单的负样本,这些简单的负样本贡献了没有用的学习信号。
(2)简单的负样本能压倒训练并且使模型退化。
现目前来看的缓解办法有两种:硬采样的方式(Hard Sampling Methods)与 软采样的方式(Soft Sampling Methods)参考论文:
Imbalance Problems in Object Detection: A Review![]() https://arxiv.org/abs/1909.00169
https://arxiv.org/abs/1909.00169
Hard Sampling Methods: It addresses imbalance by selecting a subset of positive and negative examples(with desired quantities) from a given set of labeled BBs.
类似的RCNN二阶段检测算法的two-stage cased 和sampling heuristics。
two-stage cased中的第一阶段(RPN,或者SS, EdgeBoxes)迅速地将候选目标位置下降到一定的小数量(1-2K)过滤到大量的背景类。
在第二分类阶段,或者启发式采样,固定正负样本1:3的比例,或者使用OHEM等方式。
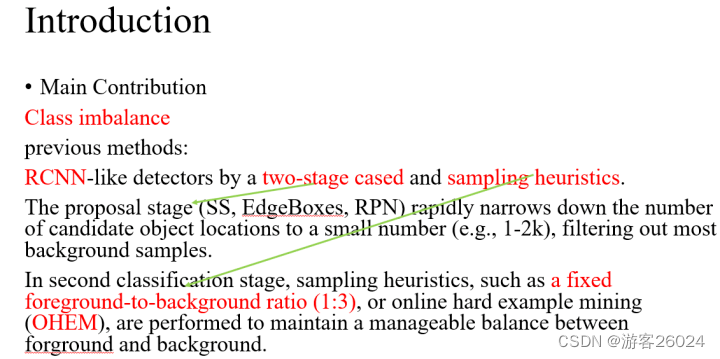
这样的Hard Sampling Methods是有缺陷的,因为它舍去了部分的样本,导致结果产生误差(粗略讲)。
Soft Sampling Methods:This way, unlike hard sampling, no sample is discarded and the whole dataset is utilized for updating the parameters. A straightforward approach is to use constant coefficients for both the foreground and background classes.
Soft Sampling Methods,也是我们此篇论文使用的方式,它使用了所用的数据集来更新参数,直接的方式是为前景类与背景类使用常系数。
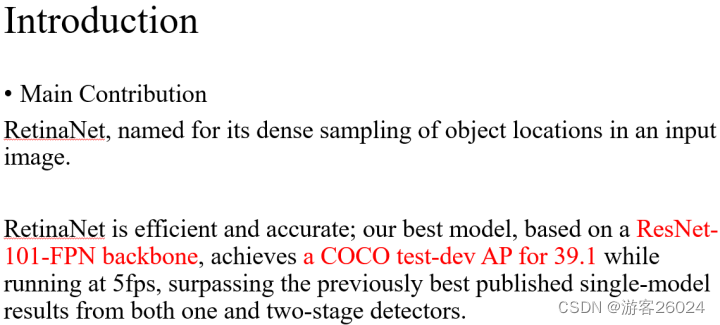
我们提出的焦点损失函数,更加有效的替代了以前的方法(Hard Sampling Methods)来解决正负样本类别在训练期间不平衡的问题。且这个损失函数动态缩放交叉熵损失函数,在正确类别增加时,缩放因子下降到0。直观地,这个缩放因子能自动的降低在训练期间简单样本贡献的权重和迅速关注模型中的困难样本。

使用ResNet-101-FPN backbone的RetinaNet能达到COCO test-dev AP for 39.1。超过了以前最好的一阶段或者二阶段模型(2017年以前)。
流程图
骨干网络(提取特征)-> Neck -> 头网络(分类子任务,回归子任务)(如果在训练时,计算损失;如果在推理时,计算类概率 与 anchor nms)
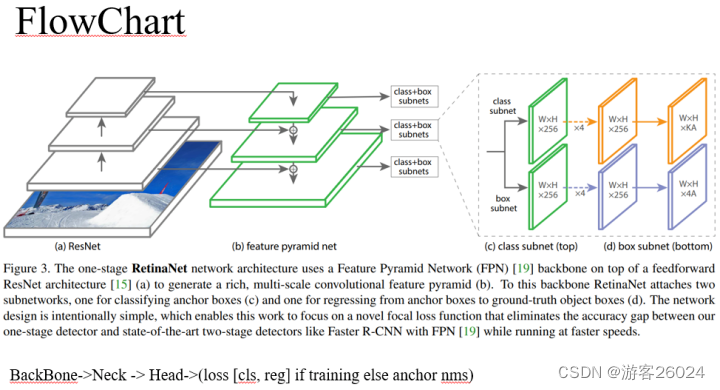
值得注意的是,在RetinaNet的论文中直接写了将FPN当作BackBone,由于此篇论文由2017年提出,当时没有规范网络架构。现在来看ResNet更适合为RetinaNet做BackBone,FPN做Neck。
将FlowChart.1换成FlowChart.2来理解。
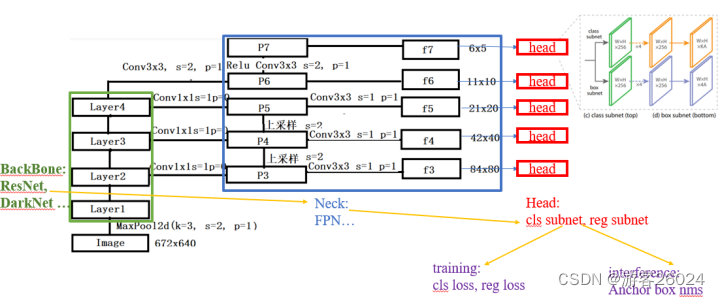
首先,对于FPN而言,通过自顶向下路径和横向连接增强了标准卷积网络,因此该网络从单一分辨率的输入图像有效地构成了一个丰富多尺度特征金子塔。
分析
从ResNet-Backbone出来的[C3, C4, C5],都经历了一层kernel_size=1, stride=1,padding=0的卷积,产生P3, P4, P5
P4, P5做上采样与P3, P4特征融合,成为新的P3, P4
将此时的P3, P4, P5又经历了一层kernel_size=3, stride=1, padding=1的卷积作为输出P3(图中f3), P4(图中f4), P5(图中f5)。
C5经历一层kernel_size=3, stride=2,padding=1的卷积,产生P6
P6经历ReLU与一层kernel_size=3, stride=2,padding=1的卷积,产生P7
产生卷积的channels=256
画图:
--C5 --- 3x3 conv downsample --- P6 out --- relu+3x3 conv downsample --- P7 out
  |
  | 1x1 conv reduce channel to 256
  |
  P5----------- Upsample -----------|
  |                                 |
  | 3x3 conv                        |
  |                                 |
  P5 out                            |
                                    |
--C4                                |
  |                                 |
  | 1x1 conv reduce channel to 256  |
  |                                 |
  P4------- element-wise add -------|
  |
  |
  |
  P4----------- Upsample -----------|
  |                                 |
  | 3x3 conv                        |
  |                                 |
  P4 out                            |
                                    |
--C3                                |
  |                                 |
  | 1x1 conv reduce channel to 256  |
  |                                 |
  P3------- element-wise add -------|
  |
  |3x3 conv
  |
  P3 out
代码:
class FPN(nn.Module):
    def __init__(self, C3_inplanes, C4_inplanes, C5_inplanes, planes=256):
        super(FPN, self).__init__()
        # planes = 256 channels
        self.P3_1 = nn.Conv2d(C3_inplanes, planes, kernel_size=1, stride=1, padding=0)
        self.P3_2 = nn.Conv2d(planes, planes, kernel_size=3, stride=1, padding=1)
        self.P4_1 = nn.Conv2d(C4_inplanes, planes, kernel_size=1, stride=1, padding=0)
        self.P4_2 = nn.Conv2d(planes, planes, kernel_size=3, stride=1, padding=1)
        self.P5_1 = nn.Conv2d(C5_inplanes, planes, kernel_size=1, stride=1, padding=0)
        self.P5_2 = nn.Conv2d(planes, planes, kernel_size=3, stride=1, padding=1)
        self.P6 = nn.Conv2d(C5_inplanes, planes, kernel_size=3, stride=2, padding=1)
        self.P7 = nn.Sequential(
            nn.ReLU(inplace=True),
            nn.Conv2d(planes, planes, kernel_size=3, stride=2, padding=1))

    def forward(self, inputs):
        [C3, C4, C5] = inputs
        P5 = self.P5_1(C5)
        P4 = self.P4_1(C4)
        P4 = F.interpolate(P5, size=(P4.shape[2], P4.shape[3]),
                           mode='nearest') + P4
        P3 = self.P3_1(C3)
        P3 = F.interpolate(P4, size=(P3.shape[2], P3.shape[3]),
                           mode='nearest') + P3
        P6 = self.P6(C5)
        P7 = self.P7(P6)

        P5 = self.P5_2(P5)
        P4 = self.P4_2(P4)
        P3 = self.P3_2(P3)

        del C3, C4, C5
        return [P3, P4, P5, P6, P7]
FPN参考:
每天进步一点点:【庖丁解牛】从零实现RetinaNet(三):FPN、heads、Anchor、网络结构![]() https://zhuanlan.zhihu.com/p/149686052
https://zhuanlan.zhihu.com/p/149686052
我们使用平移不变的anchor boxes类似于在RPN中。在金子塔P3到P7上,anchors的面积 到
。在金子塔的每一级中原始的anchor
分辨率中我们添加anchor的size
,则会产生A=9个anchor。
...
    if ratios is None:
        ratios = np.array([0.5, 1, 2])

    if scales is None:
        # based on the reference of the base_size, like the operation of uniformization
        scales = np.array([2 ** 0, 2 ** (1.0 / 3.0), 2 ** (2.0 / 3.0)])

    #  compute the total number of anchors
    num_anchors = len(ratios) * len(scales)
...
每个anchor被分配一个长度为K分类目标的one-hot向量,其中K是目标类别的数量,以及4-向量的box回归目标。我们使用赋值规则的RPN,但修改为多类检测和调整阈值。
...
    # add A anchors (1, A, 4) to
    # cell K shifts (K, 1, 4) to get
    # shift anchors (K, A, 4)
    # reshape to (K*A, 4) shifted anchors

    A = anchors.shape[0]
    K = shifts.shape[0]
    all_anchors = (anchors.reshape((1, A, 4)) + shifts.reshape((1, K, 4)).transpose((1, 0, 2)))
    all_anchors = all_anchors.reshape((K * A, 4))
...
具体来说,使用IoU阈值为0.5分配给gt目标框,如果阈值为 则为背景。由于每个anchor最多分配给一个目标框,我们将其长度为K的标签向量中对应项设为1,其他所有项设为0。如果anchor没有被赋值,在
中可能会发生重叠,那么在训练过程中anchor将被忽略。回归框计算为每个anchor与其指定对象之间的偏移量,如果没有指定,则省略。
...
# set 0 background (IoU_max < 0.4)
            # (num_anchor, 1)
            targets[torch.lt(IoU_max, 0.4), :] = 0

            # set positive_indices (IoU_max > 0.5), return [f, t, f, f, t, ...]
            # (num_anchor, 1)
            positive_indices = torch.ge(IoU_max, 0.5)

            # count num
            num_positive_anchors = positive_indices.sum()

            # (num_anchor, 4)
            assigned_annots = bbox_annot[IoU_argmax, :]

            targets[positive_indices, :] = 0
...其次,对于Head而言:
分类子网络:对每A个anchor和K个类,预测目标出现在每个空间位置的概率。
class clsHead(nn.Module):
    def __init__(self,
                 inplanes,
                 num_anchors=9,
                 num_classes=80,
                 prior=0.01,
                 planes=256):
        super(clsHead, self).__init__()
        self.num_anchors = num_anchors
        self.num_classes = num_classes
        self.cls_head = nn.Sequential(
            nn.Conv2d(inplanes, planes, kernel_size=3, stride=1, padding=1),
            nn.ReLU(inplace=True),

            nn.Conv2d(planes, planes, kernel_size=3, stride=1, padding=1),
            nn.ReLU(inplace=True),

            nn.Conv2d(planes, planes, kernel_size=3, stride=1, padding=1),
            nn.ReLU(inplace=True),

            nn.Conv2d(planes, planes, kernel_size=3, stride=1, padding=1),
            nn.ReLU(inplace=True),

            nn.Conv2d(planes, num_anchors * num_classes, kernel_size=3, stride=1, padding=1),
            nn.Sigmoid())

        for m in self.modules():
            if isinstance(m, nn.Conv2d):
                nn.init.normal_(m.weight, std=0.01)
                if m.bias is not None:
                    nn.init.constant_(m.bias, val=0)

        b = -math.log((1.0 - prior) / prior)
        self.cls_head[-2].bias.data.fill_(b)
        self.cls_head[-2].weight.data.fill_(0)

    def forward(self, x):
        x = self.cls_head(x)
        # shape of x: (batch_size, C, W, H) with C = num_classes * num_anchors
        # shape of out: (batch_size, W, H, num_classes * num_anchors)
        out = x.permute(0, 2, 3, 1)
        batch_size, width, height, channels = out.shape
        out = out.view(batch_size, width, height, self.num_anchors, self.num_classes)
        # shape: (batch_size, W*H*num_anchors, num_classes)
        out = out.contiguous().view(out.shape[0], -1, self.num_classes)
        del x
return out回归子网络:每个空间位置终止于4A个线性输出,对于每个空间位置的每个Aanchor,这4个输出预测anchor与gt之间的相对偏移量。
class regHead(nn.Module):
    def __init__(self,
                 inplanes,
                 num_anchors=9,
                 planes=256):
        super(regHead, self).__init__()
        self.reg_head = nn.Sequential(
            nn.Conv2d(inplanes, planes, kernel_size=3, stride=1, padding=1),
            nn.ReLU(inplace=True),

            nn.Conv2d(planes, planes, kernel_size=3, stride=1, padding=1),
            nn.ReLU(inplace=True),

            nn.Conv2d(planes, planes, kernel_size=3, stride=1, padding=1),
            nn.ReLU(inplace=True),

            nn.Conv2d(planes, planes, kernel_size=3, stride=1, padding=1),
            nn.ReLU(inplace=True),

            nn.Conv2d(inplanes, num_anchors * 4, kernel_size=3, stride=1, padding=1))

        for m in self.modules():
            if isinstance(m, nn.Conv2d):
                nn.init.normal_(m.weight, std=0.01)
                if m.bias is not None:
                    nn.init.constant_(m.bias, val=0)

        self.reg_head[-1].weight.data.fill_(0)
        self.reg_head[-1].bias.data.fill_(0)

    def forward(self, x):
        out = self.reg_head(x)
        # shape of x: (batch_size, C, W, H), with C = 4*num_anchors
        # shape of out: (batch_size, W, H, 4*num_anchors)
        out = out.permute(0, 2, 3, 1)

        # shape : (batch_size, W*H*num_anchors, 4)
        out = out.contiguous().view(out.shape[0], -1, 4)
        del x
return out训练:之后讲(损失函数)
推理:为了提高速度,在阈值检测器置信度为0.05之后,我们仅从每个FPN的金子塔级中最多1K的最高得分预测中解码预测,之后合并所有FPN金子塔级别预测值,并用0.5为阈值非最大抑制来产生最终的检测。
...
   for i in range(cls_heads.shape[2]):
                scores = torch.squeeze(cls_heads[:, :, i])
                scores_over_thresh = (scores > 0.05)
                if scores_over_thresh.sum() == 0:
                    # no boxes to NMS, just continue
                    continue
                scores = scores[scores_over_thresh]
                anchorBoxes = torch.squeeze(transformed_anchors)
                anchorBoxes = anchorBoxes[scores_over_thresh]
                anchors_nms_idx = nms(anchorBoxes, scores, 0.5)
...
初始化
分类子网络
...
        for m in self.modules():
            if isinstance(m, nn.Conv2d):
                nn.init.normal_(m.weight, std=0.01)
                if m.bias is not None:
                    nn.init.constant_(m.bias, val=0)

        b = -math.log((1.0 - prior) / prior)
        self.cls_head[-2].bias.data.fill_(b)
        self.cls_head[-2].weight.data.fill_(0)
...
回归子网络
...
        for m in self.modules():
            if isinstance(m, nn.Conv2d):
                nn.init.normal_(m.weight, std=0.01)
                if m.bias is not None:
                    nn.init.constant_(m.bias, val=0)

        self.reg_head[-1].weight.data.fill_(0)
        self.reg_head[-1].bias.data.fill_(0)
...
RetinaNet 网络
...
    def freeze_bn(self):
        """
        Freeze BatchNorm layers.
        """
        for layer in self.modules():
            if isinstance(layer, nn.BatchNorm2d):
                layer.eval()
...
算法
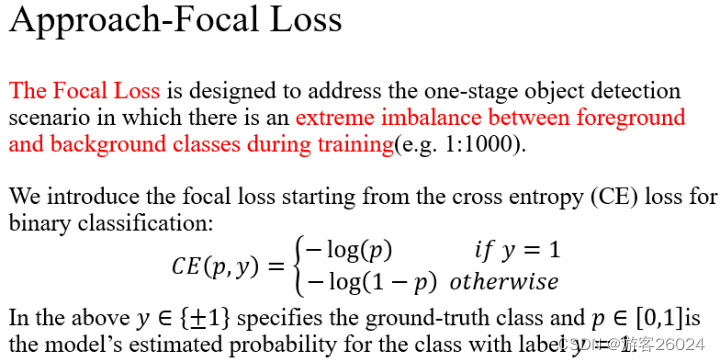
焦点损失函数被设计用来解决一阶段目标检测场景中前景与背景类别在训练时极端的不平衡。
首先,引二分类交叉熵损失函数:
为 gt (label), 并且
为模型类别评估的概率。如果
,gt中为正样本,则
。如果
, gt中为负样本背景类,则
。
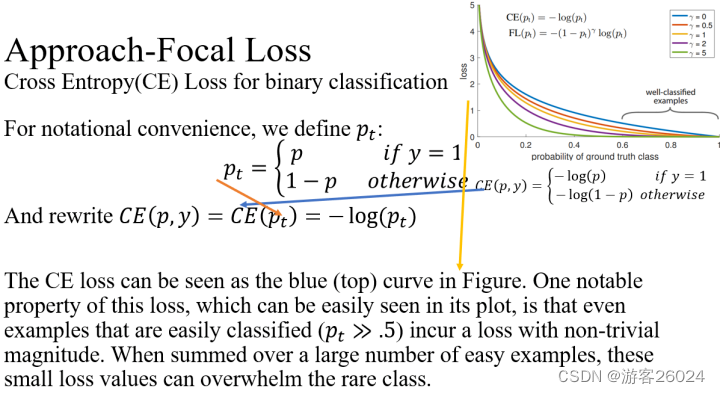
 ?方便地,我们定义
 :

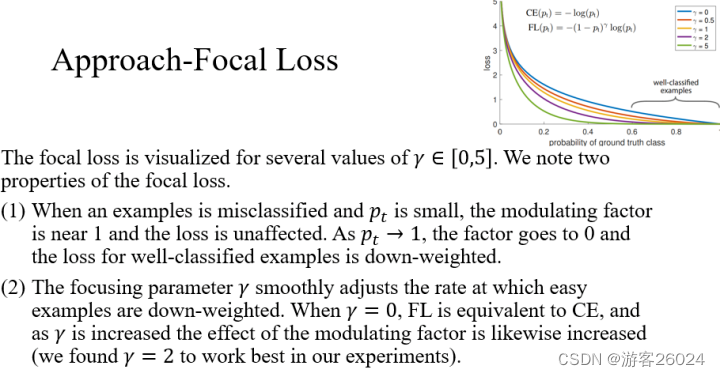
此时复写, 在下图右侧中交叉熵损失函数为蓝色(顶部)曲线。一个显著的损失特征,在这个右侧图中能被简单看出,易分类样本
造成了重大损失。即大量的简单样本->这些小样本的总和,能压倒稀有样本(困难样本等)。?
一个常规的方法来解决类别不平衡是引入一个权重因子 :如果是正样本,则 ;如果是负样本,则
。
所以给标准交叉熵损失函数,引入权重因子,则
交叉熵损失函数:

这种损失是对交叉熵损失的简单扩展,我们认为这是我们提出的焦点损失的实验基准线(baseline),其结果对应表(1)。

平衡正负样本的重要性,但是它不能区分简单/困难样本。
取而代之,我们提出改变损失函数来降低简单样本,关注训练中的困难样本。
更常规地,我们在交叉熵损失函数中提出添加一个调节因子,并且微调关注参数
。我们定义焦点损失函数:
。
时,我们注意到两个焦点损失函数:
(1)当一个样本是误分类并且较小,调节因子
接近于1 ,损失没有影响。
当,调节因子
变为0,并且对于易分类的样本损失权重下降。
(2)聚焦参数平滑地调节了简单样本权重。
当,焦点损失函数等于交叉熵损失函数。
随着的增加,调节因子的影响也同样增加(我们发现
在我们实验中效果最好)。
给FL添加,则
焦点损失:
?
直观地,调节因子减少了简单样本的损失贡献,并且扩展了样本接受低损失的范围。
例如当时,
分类样本的损失(FL)比交叉熵损失(CE)低100倍。
分类样本的损失(FL)比交叉熵损失(CE)低1000倍。
这又增加了纠正误分类样本的重要性(当,误分类样本的损失最多降低4倍)。
我们在实验中采用这种 ,因为它比非
的精度略有提高。最后,我们注意到损失层的实现结合了计算概率的sigmoid操作和损失计算,从而产生了更大的数值稳定性。
代码
class FocalLoss(nn.Module):
    # coco xywh -> xyxy
    def forward(self, cls_heads, reg_heads, anchors, annots):
        alpha = 0.25
        gamma = 2.0
        batch_size = cls_heads.shape[0]
        cls_losses = []
        reg_losses = []

        # (..., 4) 4 indicate location
        anchor = anchors[0, :, :]

        # anchor is xyxy, so change it to xywh
        anchor_widths = anchor[:, 2] - anchor[:, 0]
        anchor_heights = anchor[:, 3] - anchor[:, 1]
        anchor_ctr_x = anchor[:, 0] + 0.5 * anchor_widths
        anchor_ctr_y = anchor[:, 1] + 0.5 * anchor_heights

        for j in range(batch_size):
            # (batch_size, ?, num_classes)
            cls_head = cls_heads[j, :, :]
            # (batch_size, ?, 4)
            reg_head = reg_heads[j, :, :]

            # (batch_size, ?, 5)
            # (x, y, w, h, cls)
            bbox_annot = annots[j]
            # delete the bbox marked -1
            bbox_annot = bbox_annot[bbox_annot[:, 4] != -1]

            # limit (1e-4, 1.0 - 1e-4)
            cls_head = torch.clamp(cls_head, 1e-4, 1.0 - 1e-4)

...首先讨论分类损失:
这里的cls_head是从分类子网络sigmoid出来的概率值,并且截断在0.0001~0.9999之间。
如果这里没有bbox,即:

?(1) 选择则二分类交叉熵
,即:
bce = -(torch.log(1.0 - cls_head))(2) ,即:
alpha_factor = 1. - alpha_factor(3)则
即:
focal_weight = cls_head(4) ,即:
torch.pow(focal_weight, gamma)(5) ,即:
focal_weight = alpha_factor * torch.pow(focal_weight, gamma)(6) ,将(1)与(5)合并,即:
cls_loss = focal_weight * bce整理后代码:
            # if there is no bbox.
            if bbox_annot.shape[0] == 0:
                if torch.cuda.is_available():
                    alpha_factor = torch.ones(cls_head.shape).cuda() * alpha
                else:
                    alpha_factor = torch.ones(cls_head.shape) * alpha
                # (1-a)
                alpha_factor = 1. - alpha_factor
                focal_weight = cls_head
                focal_weight = alpha_factor * torch.pow(focal_weight, gamma)

                bce = -(torch.log(1.0 - cls_head))
                cls_loss = focal_weight * bce
                cls_losses.append(cls_loss.sum())

                if torch.cuda.is_available():
                    reg_losses.append(torch.tensor(0).float().cuda())
                else:
                    reg_losses.append(torch.tensor(0).float())

                continue
如果这里有bbox,bbox框住了target:
(1) 如果targets为正样本,alpha_factor=0.25;如果不是,则alpha_factor=0.75,即:
alpha_factor = torch.where(torch.eq(targets, 1.), alpha_factor, 1. - alpha_factor)(2) 如果targets为正样本,focal_weight=1-cls_head;如果不是,则focal_weight=cls_head,即:
focal_weight = torch.where(torch.eq(targets, 1.), 1. - cls_head, cls_head)(3) 即:
focal_weight = alpha_factor * torch.pow(focal_weight, gamma)(4) ,
为gt标签,
为概率值, 即:
bce = -(targets * torch.log(cls_head) + (1.0 - targets) * torch.log(1.0 - cls_head))(5) ,(3)与(4)合并,即:
cls_loss = focal_weight * bce整理后的代码:
            # a = 0.25 if targets == 1 else 0.75
            alpha_factor = torch.where(torch.eq(targets, 1.), alpha_factor, 1. - alpha_factor)
            focal_weight = torch.where(torch.eq(targets, 1.), 1. - cls_head, cls_head)
            focal_weight = alpha_factor * torch.pow(focal_weight, gamma)

            bce = -(targets * torch.log(cls_head) + (1.0 - targets) * torch.log(1.0 - cls_head))

            cls_loss = focal_weight * bce

            if torch.cuda.is_available():
                # if != -1
                cls_loss = torch.where(torch.ne(targets, -1.0), cls_loss, torch.zeros(cls_loss.shape).cuda())
            else:
                cls_loss = torch.where(torch.ne(targets, -1.0), cls_loss, torch.zeros(cls_loss.shape))

            cls_losses.append(cls_loss.sum() / torch.clamp(num_positive_anchors.float(), min=1.0))
...其次讨论回归损失:
...
                # smooth L1 Loss
                reg_diff = torch.abs(targets - reg_head[positive_indices, :])

                # reg_loss = 0.5*9.0*torch.pow(reg_diff,2) if reg_diff < 1.0/9.0 else reg_diff - 0.5/9.0
                reg_loss = torch.where(
                    torch.le(reg_diff, 1.0 / 9.0),
                    0.5 * 9.0 * torch.pow(reg_diff, 2),
                    reg_diff - 0.5 / 9.0
                )
                reg_losses.append(reg_loss.mean())
...
Experiments
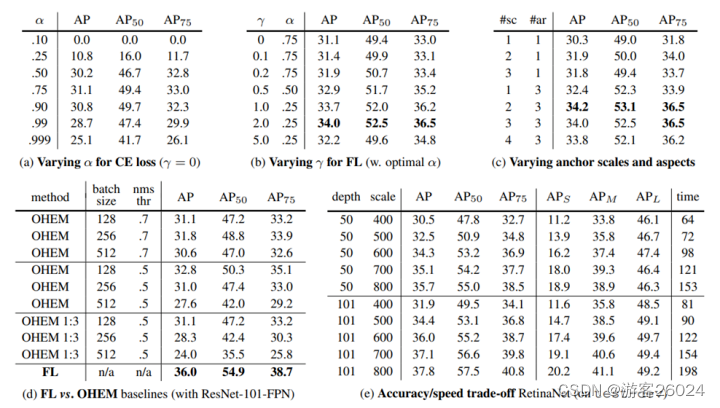
实验在COCO test-dev中进行测试。
-
由表(a)可知,
其
时取得最好的AP为31.1,AP0.5 为49.4, AP0.75为33.0。
2. 由表(b)可知,FL中改变 ,当
,
时取得最好的AP为34.0,AP0.5为52.5,PA0.75为36.5。
3. 由表(c)可知,使用2-3比例与3横纵比anchor会产生良好的效果,在此之后性能饱和。即当scales=2, aspects ratio=2时取得最好的AP为34.2,AP0.5为53.1,AP0.75为36.5。
4. 由表(d)可知,使用Hard Sampling Methods(OHEM)与使用Soft Sampling Methods(FL),FL取得最好的AP为36.0,AP0.5为54.9,AP0.75为38.7。
5. 由表(e)可知,Accuracy/Speed trade-off RetinaNet,depth越大,scale越大精度越高,时间越久。
6. 由下表可知,RetinaNet(RetinaNet-101-FPN)在2017年成功超过其他检测算法,AP为39.1,AP0.5为59.1,AP0.75为42.3,APs为21.8,APm为42.7,APl为50.2。

?
收工!
