参考沐神
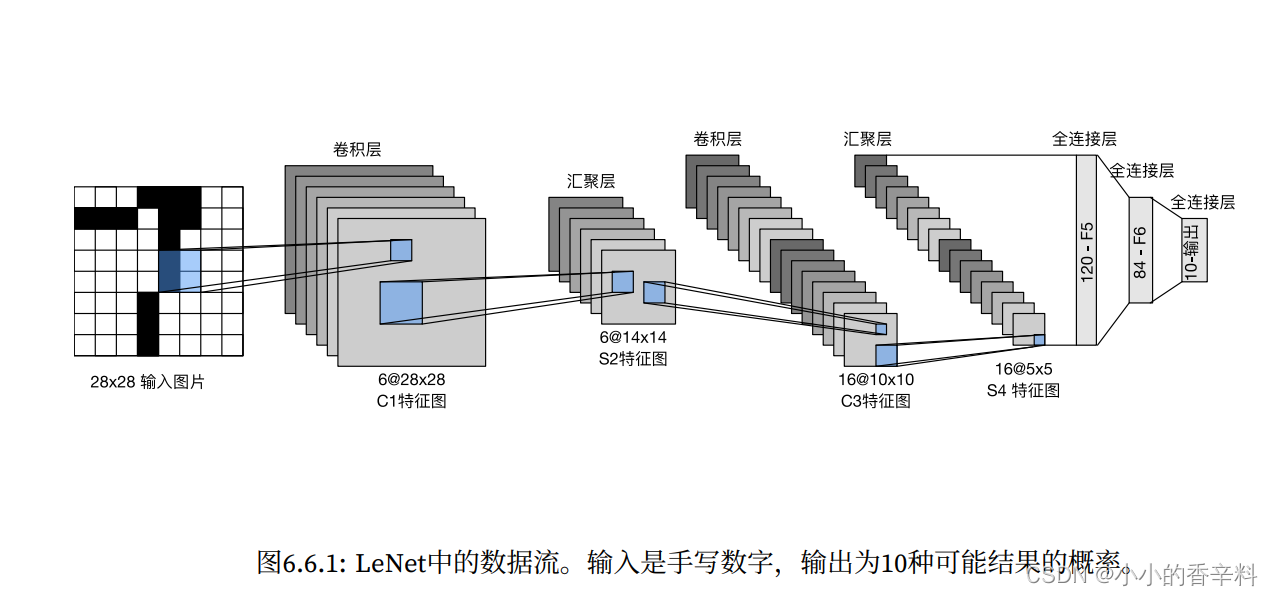
LeNet的结构图

这里沐神稍微做了一点小小的变化,就是最后全连接后面的高斯连接层去掉了,其他和LeNet是完全一样的!
LeNet流程?
输入图片为28*28,经过2次卷积+池化操作,最后接3个全连接层。
具体来说:
- 输入通道数为1,长宽为28*28的图片,可以是批量输入,则对应数字应进行适当修改。这里以1*1*28*28为例,即1张通道数为1的28*28的图片。
- 使用大小为5*5卷积核对输入卷积,设定输出通道数为6,得到大小为28*28的c1特征图。然后将c1过一下sigmoid函数。
- 对c1使用平均池化得到大小为14*14的特征图s2(池化操作不改变通道数)
- 使用大小为5*5卷积核对特征图s2卷积,设定输出通道数为16,得到大小为10*10的c3特征图。然后将c3过一下sigmoid函数。
- 对c3使用平均池化得到大小为5*5的特征图s2(池化操作不改变通道数)
- 使用nn.Flatten()将除了第一个维度外的其他维度拉成一个维度,也就是降成二维(批量大小,通道数*长*宽),即(1,16*5*5)。
- 使用步骤6拉成二维就能使用全连接层了,使用3个全连接层,每层后跟一个sigmoid即可。三层全连接的输入输出分别为(16*5*5, 120)->sigmoid->(120, 84)->sigmoid->(84, 10)。因为这里用的是mnist_fashion数据集,共有10类,故最后一层全连接输出10类。
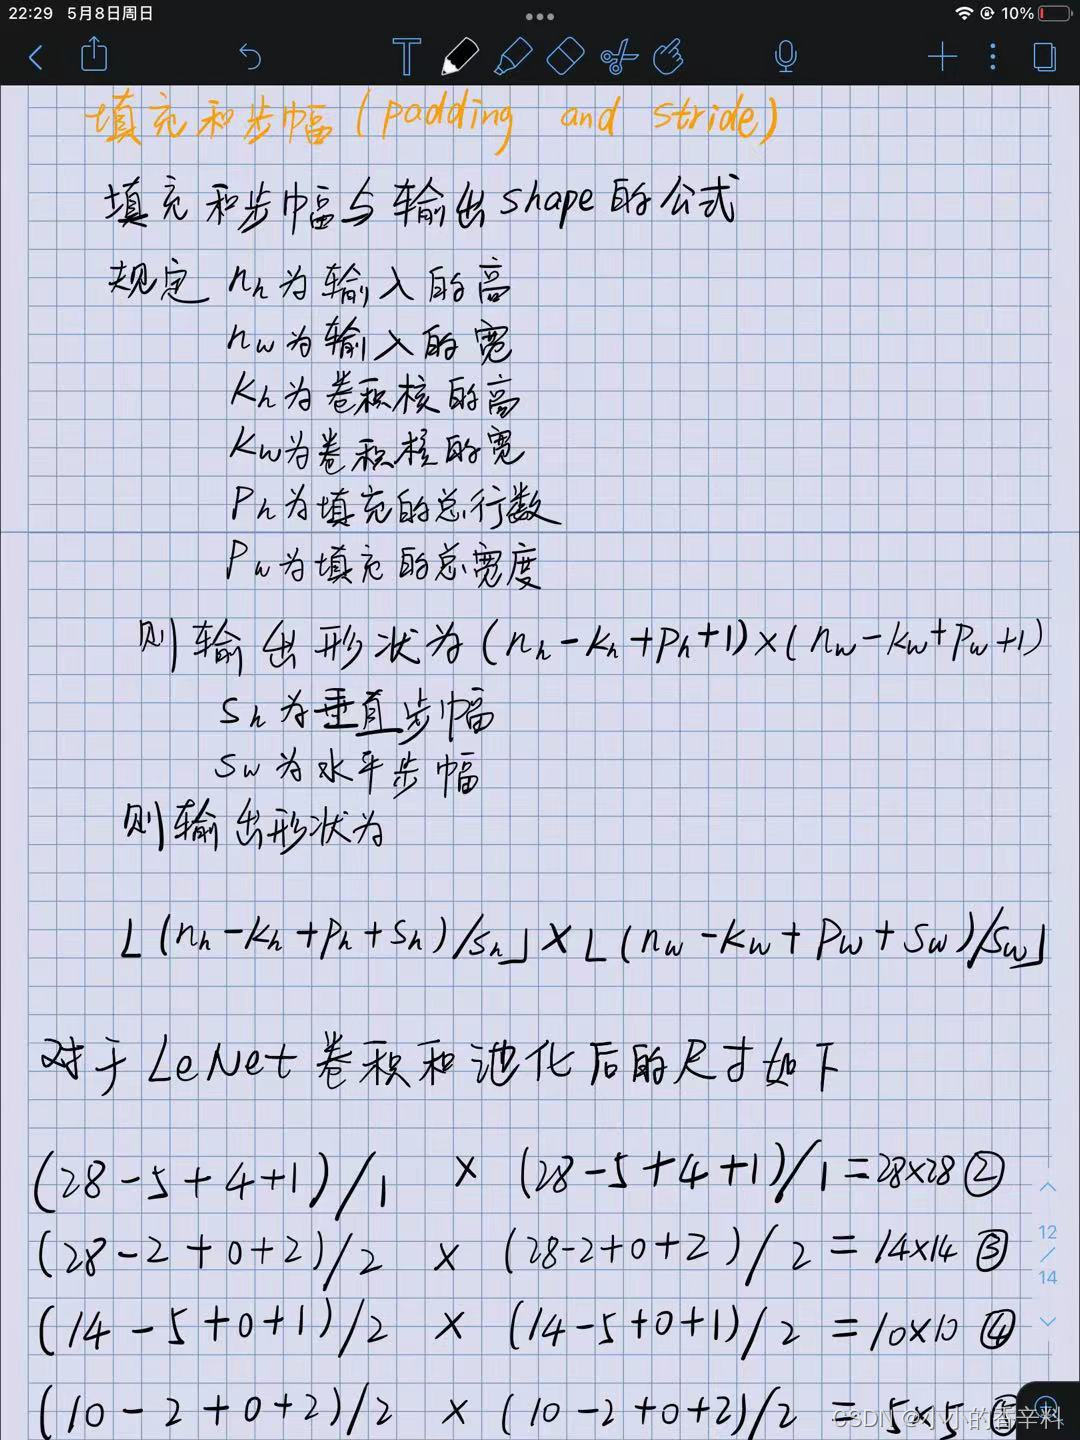
关于图片原始尺寸经过卷积层、池化层后的尺寸,使用下面公式计算。?

代码如下:
#!/usr/bin/env python
# -*- coding: UTF-8 -*-
"""
@Project :深度学习入门
@File :LeNet实现.py
@Author :little_spice
@Date :2022/5/7 18:04
"""
import torch
from d2l import torch as d2l
from torch import nn


# LeNet结构
net = nn.Sequential(
    # 这里padding=2是为了和LeNet图片尺寸保持一致,LeNet使用数据集图片大小为32*32
    # 我们这里为28*28,padding=2后得到(28+4)*(28+4)
    nn.Conv2d(1,6,kernel_size=5,padding=2),nn.Sigmoid(),
    nn.AvgPool2d(kernel_size=2,stride=2),
    nn.Conv2d(6,16,kernel_size=5),nn.Sigmoid(),
    nn.AvgPool2d(kernel_size=2,stride=2),
    nn.Flatten(),
    nn.Linear(16*5*5,120),nn.Sigmoid(),
    nn.Linear(120,84),nn.Sigmoid(),
    nn.Linear(84,10)
)

X = torch.rand(size=(1, 1, 28, 28), dtype=torch.float32)
for layer in net:
    X = layer(X)
    # print(layer.__class__.__name__,'output shape: \t',X.shape)

batch_size=256
train_iter,test_iter = d2l.load_data_fashion_mnist(batch_size)

# 使用gpu评估精度
def evaluate_accuracy_gpu(net,data_iter,device=None):
    """使用gpu计算模型的精度"""
    if isinstance(net,nn.Module):
        net.eval()
        if not device:
            device = next(iter(net.parameters())).device
    # 正确预测的数量,总预测的数量
    metric = d2l.Accumulator(2)
    with torch.no_grad():
        for X,y in data_iter:
            if isinstance(X,list):
                X = [x.to(device) for x in X]
            else:
                X = X.to(device)
            y = y.to(device)
            metric.add(d2l.accuracy(net(X),y),y.numel())
    return  metric[0]/metric[1]

def train_ch6(net,train_iter,test_iter,num_epochs,lr,device):
    """用gpu训练模型"""
    def init_weights(m):
        if type(m)==nn.Linear or type(m)==nn.Conv2d:
            nn.init.xavier_normal_(m.weight)
    net.apply(init_weights)
    print('training on ',device)
    net.to(device)
    optimizer = torch.optim.SGD(net.parameters(),lr=lr)
    loss = nn.CrossEntropyLoss()
    # xlim限值x轴范围
    animator = d2l.Animator(xlabel='epoch',xlim=[1,num_epochs],legend=['train loss','train acc','test acc'])
    timer, num_batches = d2l.Timer(),len(train_iter)
    for epoch in range(num_epochs):
        # 训练损失之和,训练准确数之和,样本数
        metric = d2l.Accumulator(3)
        net.train()
        for i,(X,y) in enumerate(train_iter):
            timer.start()
            optimizer.zero_grad()
            X,y = X.to(device),y.to(device)
            y_hat = net(X)
            # pytorch自动帮我们求了平均loss,如果要求总体loss还要对l乘X.shape[0]
            l = loss(y_hat,y)
            l.backward()
            optimizer.step()
            with torch.no_grad():
                metric.add(l*X.shape[0],d2l.accuracy(y_hat,y),X.shape[0])
            timer.stop()
            # 平均loss
            train_l = metric[0]/metric[2]
            # 计算训练准确率
            train_acc = metric[1]/metric[2]
            if (i+1)%(num_batches/5) == 0 or i==num_batches-1:
                animator.add(epoch+(i+1)/num_batches,(train_l,train_acc,None))
        test_acc = evaluate_accuracy_gpu(net,test_iter)
        animator.add(epoch+1,(None,None,test_acc))
    print(f'loss:{train_l:.3f},train_acc:{train_acc:.3f},test_acc:{test_acc:.3f}')
    print(f'{metric[2] * num_epochs / timer.sum():.1f} examples/sec 'f'on {str(device)}')

lr, num_epochs = 0.9, 10
train_ch6(net, train_iter, test_iter, num_epochs, lr, d2l.try_gpu())
