YOLOv5目标检测
YOLOv5目标检测
一、环境
- ubuntu 18.04 64bit
- GTX 1070Ti
- anaconda with python 3.8
- pytorch 1.7
- cuda 10.1
二、前言
YOLOV5最近更新了v6.0版本,v5.0与v6.0有那些区别:
这个新版本在 V5.0 的基础上集成了很多的新特性,而且在网络结构上也做了微调,引入了全新的更小( Nano )的模型 P5(YOLOv5n) P6(YOLOv5n6)。Nano 模型保持了 yolov5s 模型的深度( depth ),宽度( width ) 则是从0.5降到了0.25,经过这个操作后,总参数减少了 75%,从 7.5M 缩小到了 1.9M,这样的话,就非常适合于移动端或者是 CPU 的环境。

-
新特性
-
整合了
Roboflowroboflow前面我们提过了,它公开了很多非常有用的数据集,在v6.0上可以直接使用他们的数据集,参考 github.com/ultralytics…,非常的方便 -
支持
tensorflow和keras模型的导出使用
python export.py --include saved_model pb tflite tfjs就可以完成tensorFlow、keras、tflite和tf.js模型的导出 -
同时支持
OpenCV DNN和ONNX Runtime导出的
onnx同时支持opencv dnn和onnx runtimepython export --weights yolov5s.pt --include onnx --opset 12 --dynamic 复制代码在检测的时候也可以使用指定的
onnx,python detect.py --weights yolov5s.onnx --dnn -
模型结构
- 用
Conv(k=6, s=2, p=2)代替Focus层,主要是为了方便模型导出 - 使用
SPPF代替SPP层 - 减少
P3主干层C3 - 将
SPPF放在主干的后面 - 在最后一个
C3主干层中重新引入快捷方式 - 更新超参数
- 用
-
增加了
Flask REST API提供了
web api的支持,远端测试非常方便,常见的开放平台都是这么做的
三、项目开发
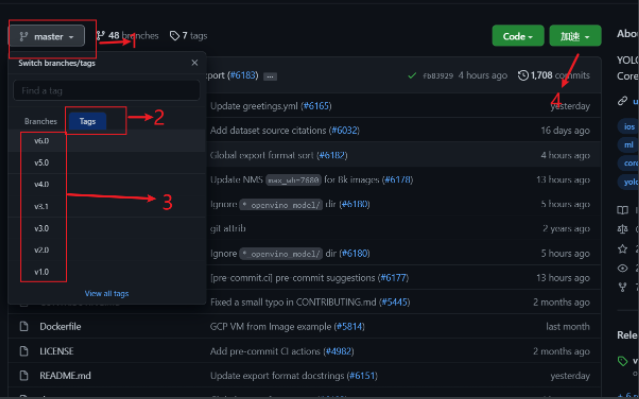
1.YOLOV5项目下载
现在已经更新到v6.0版本,根据自己项目的特性,选择版本
下载网址
2.解压YOLOV5并部署环境
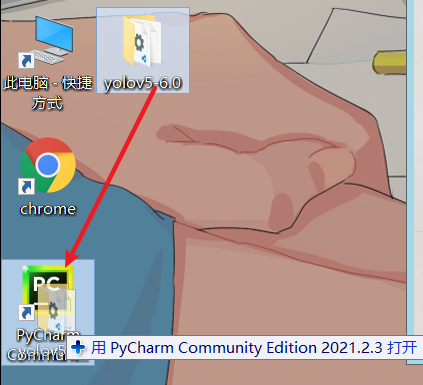
- 解压后,在PyCharm中打开
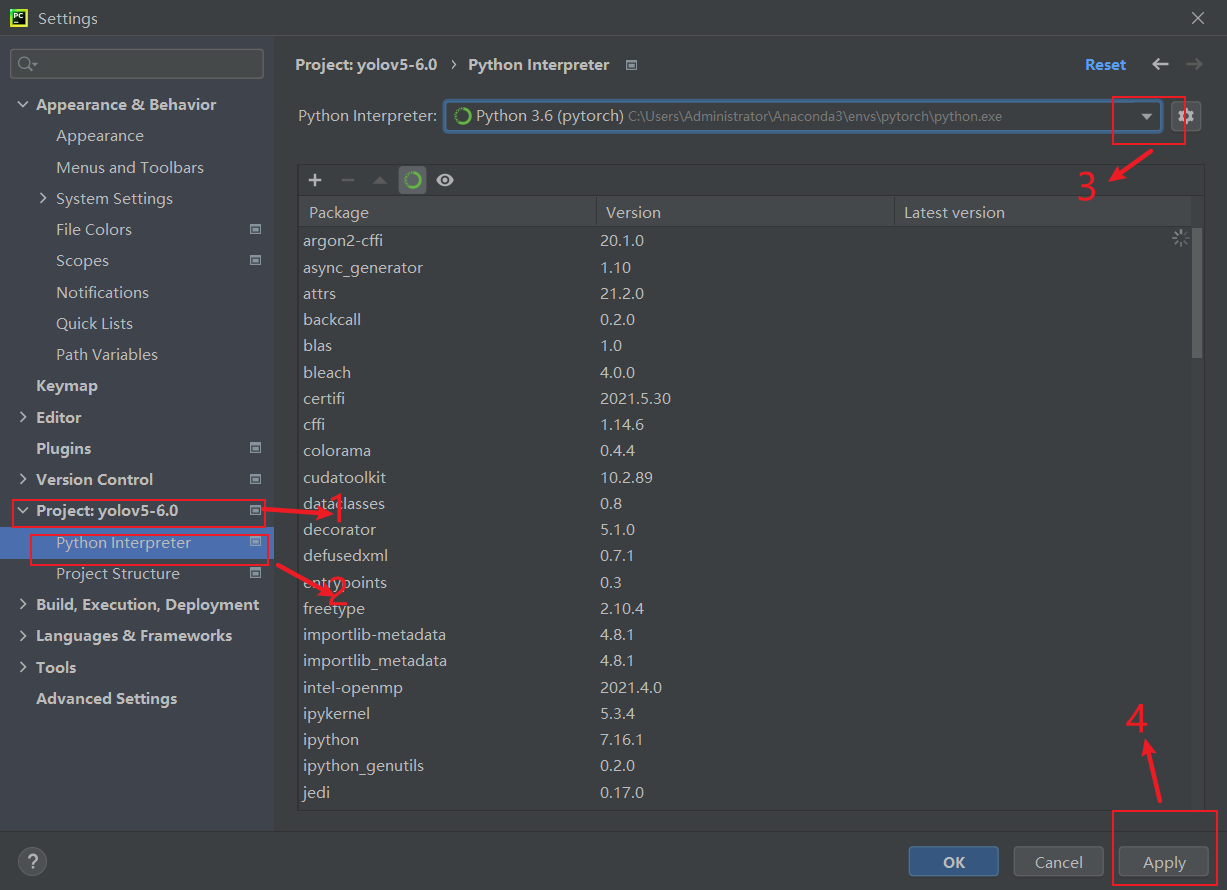
- Pytorch环境配置
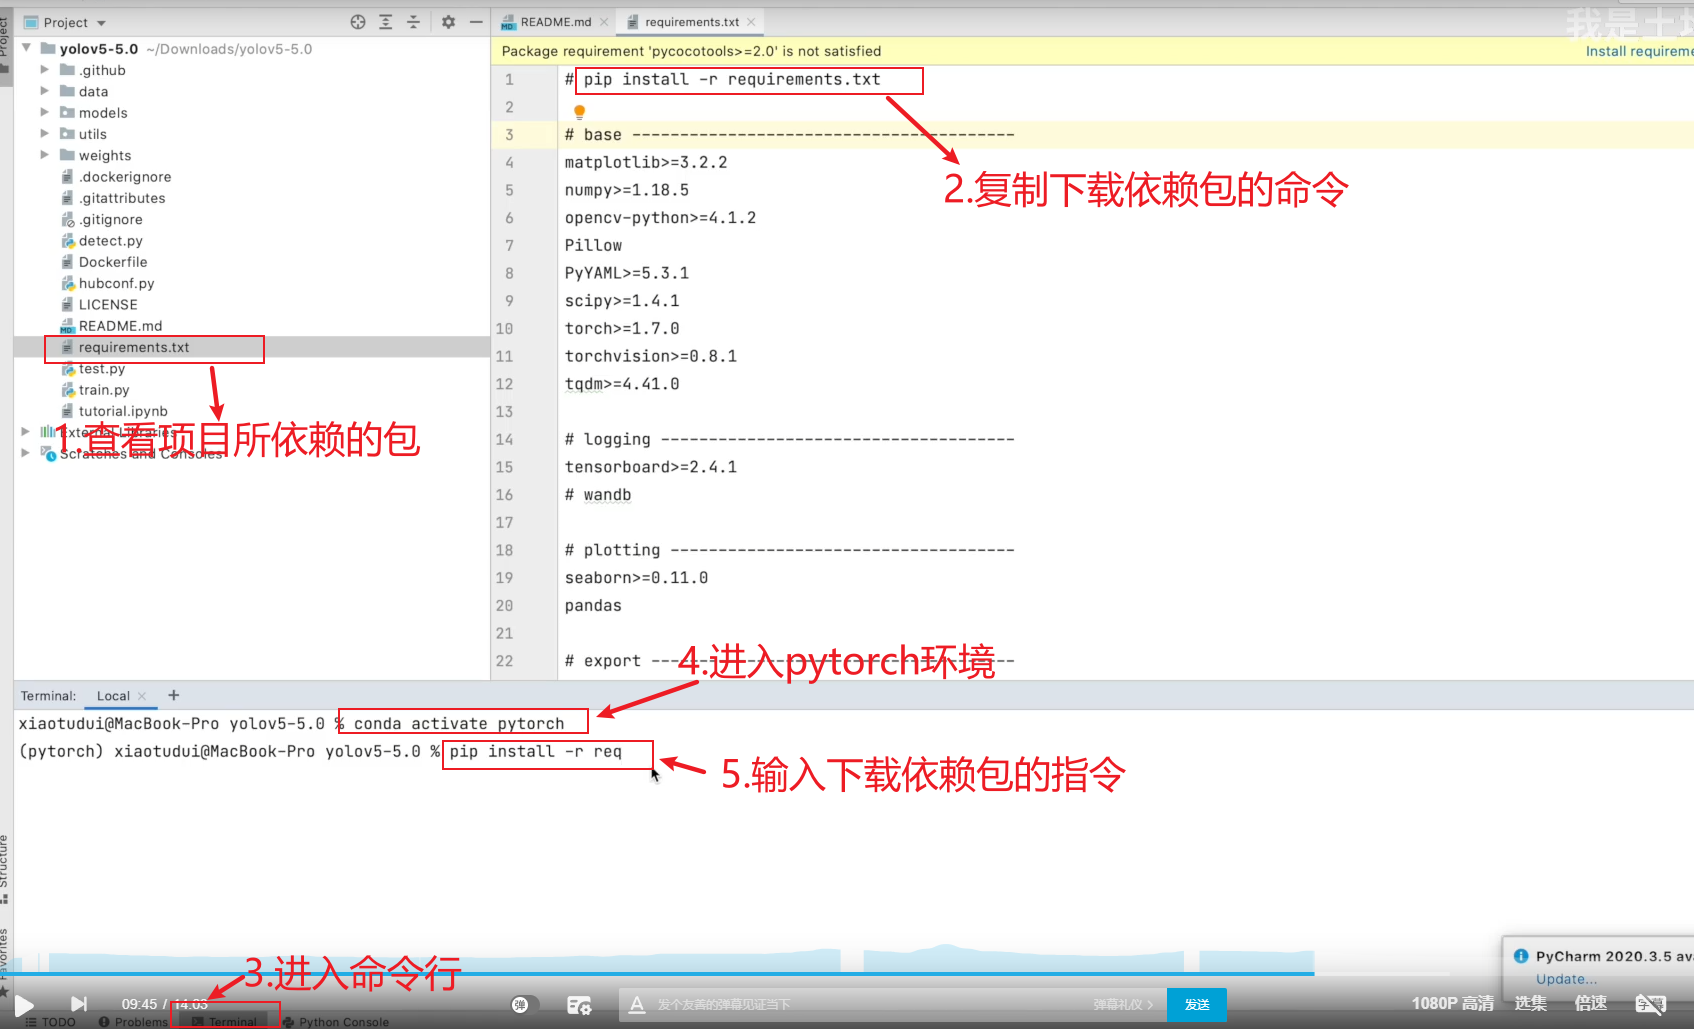
- 下载依赖包
3.YOLOV5详解
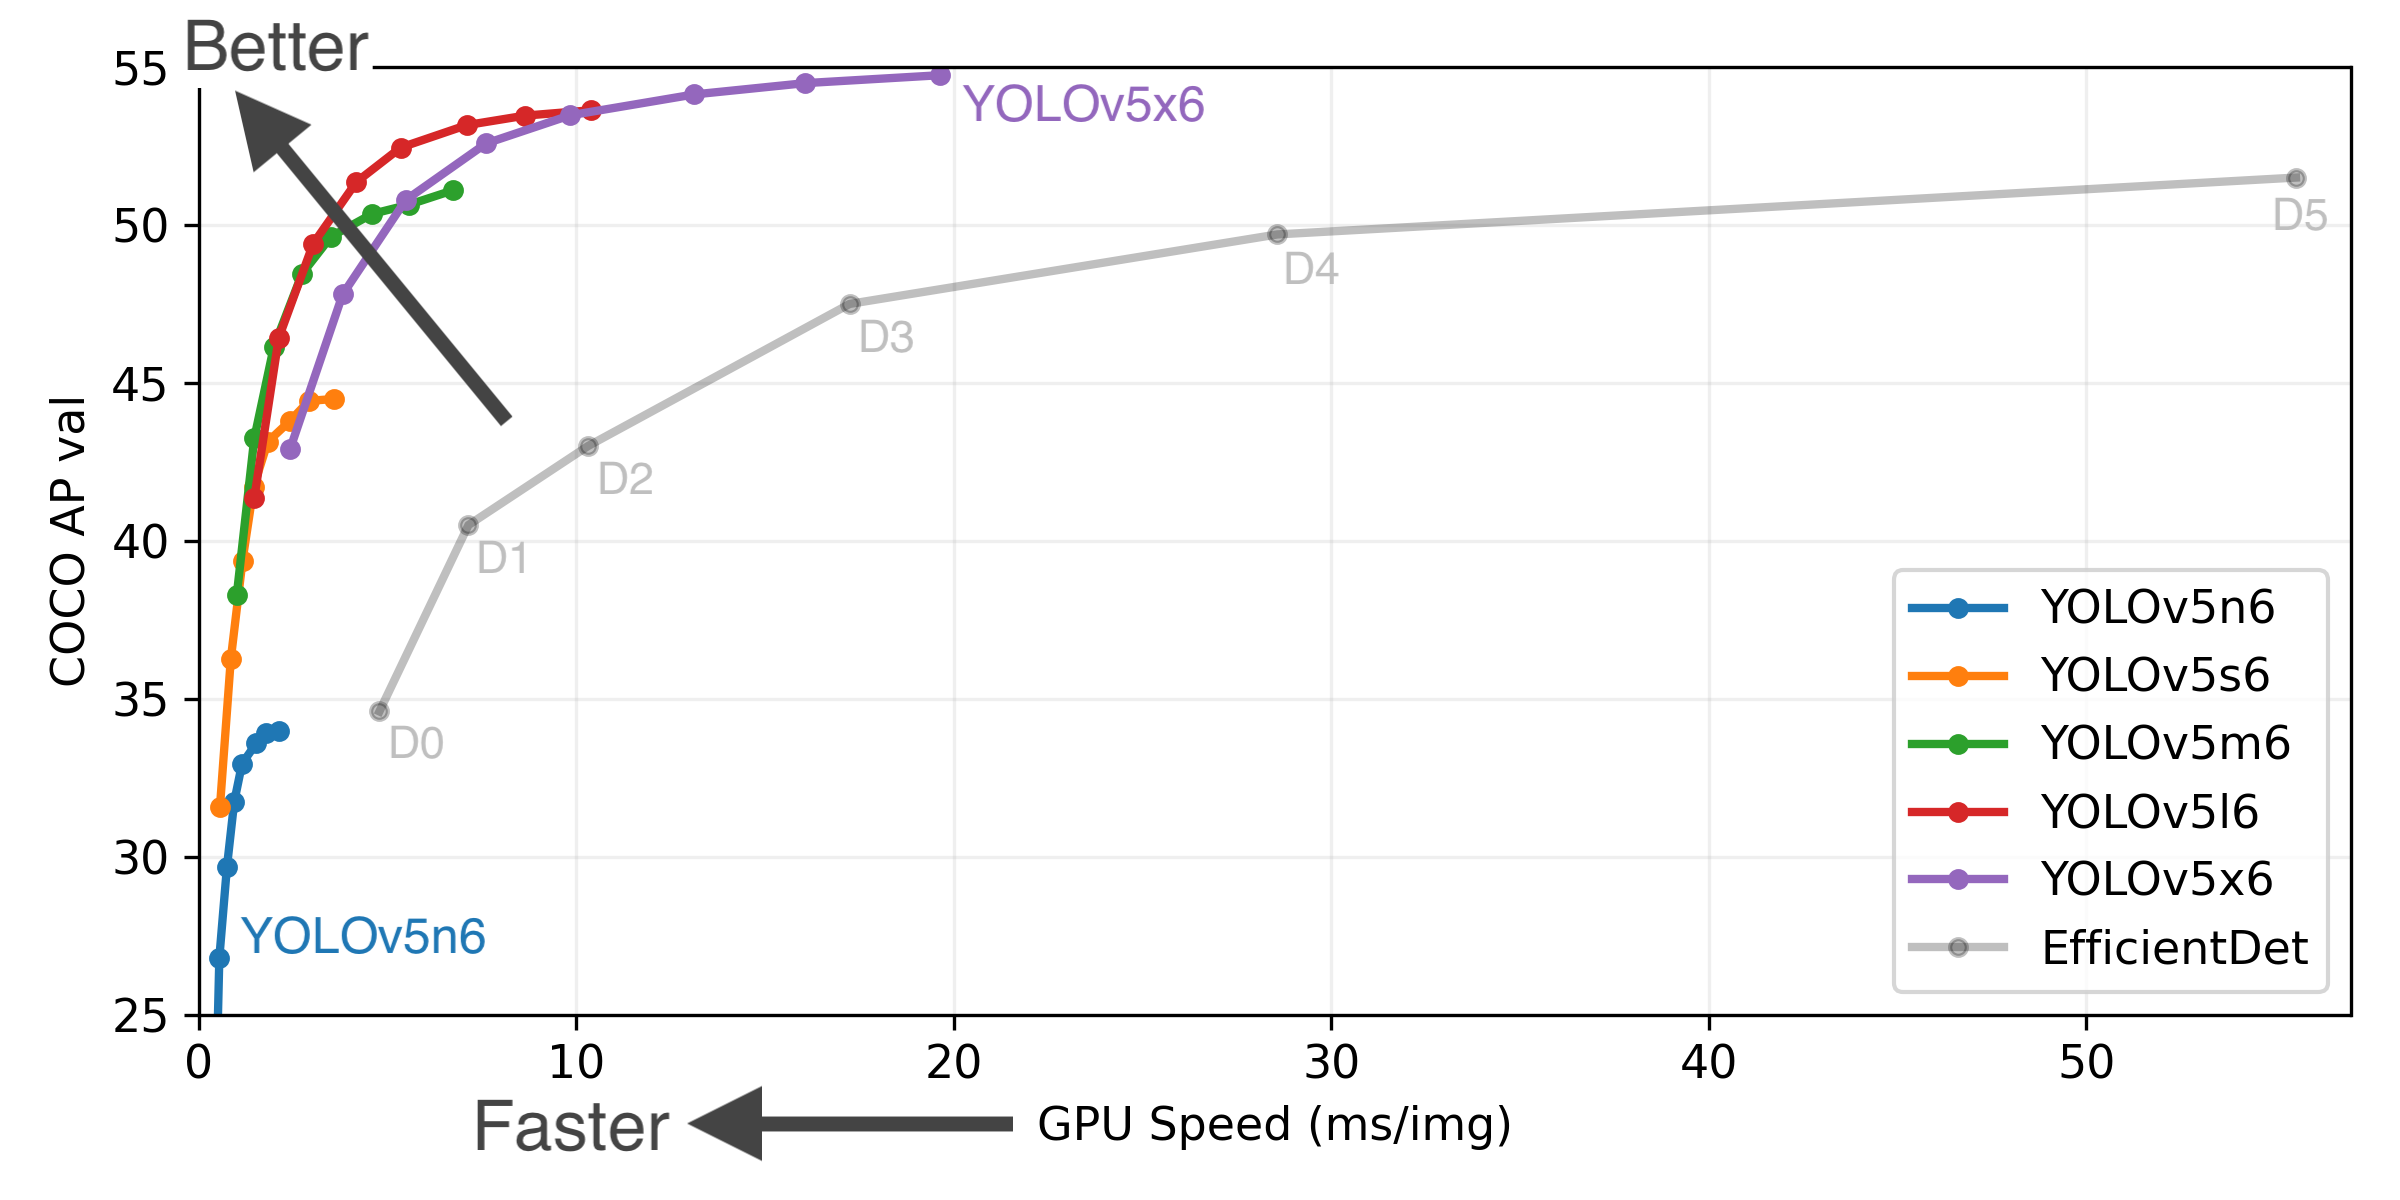
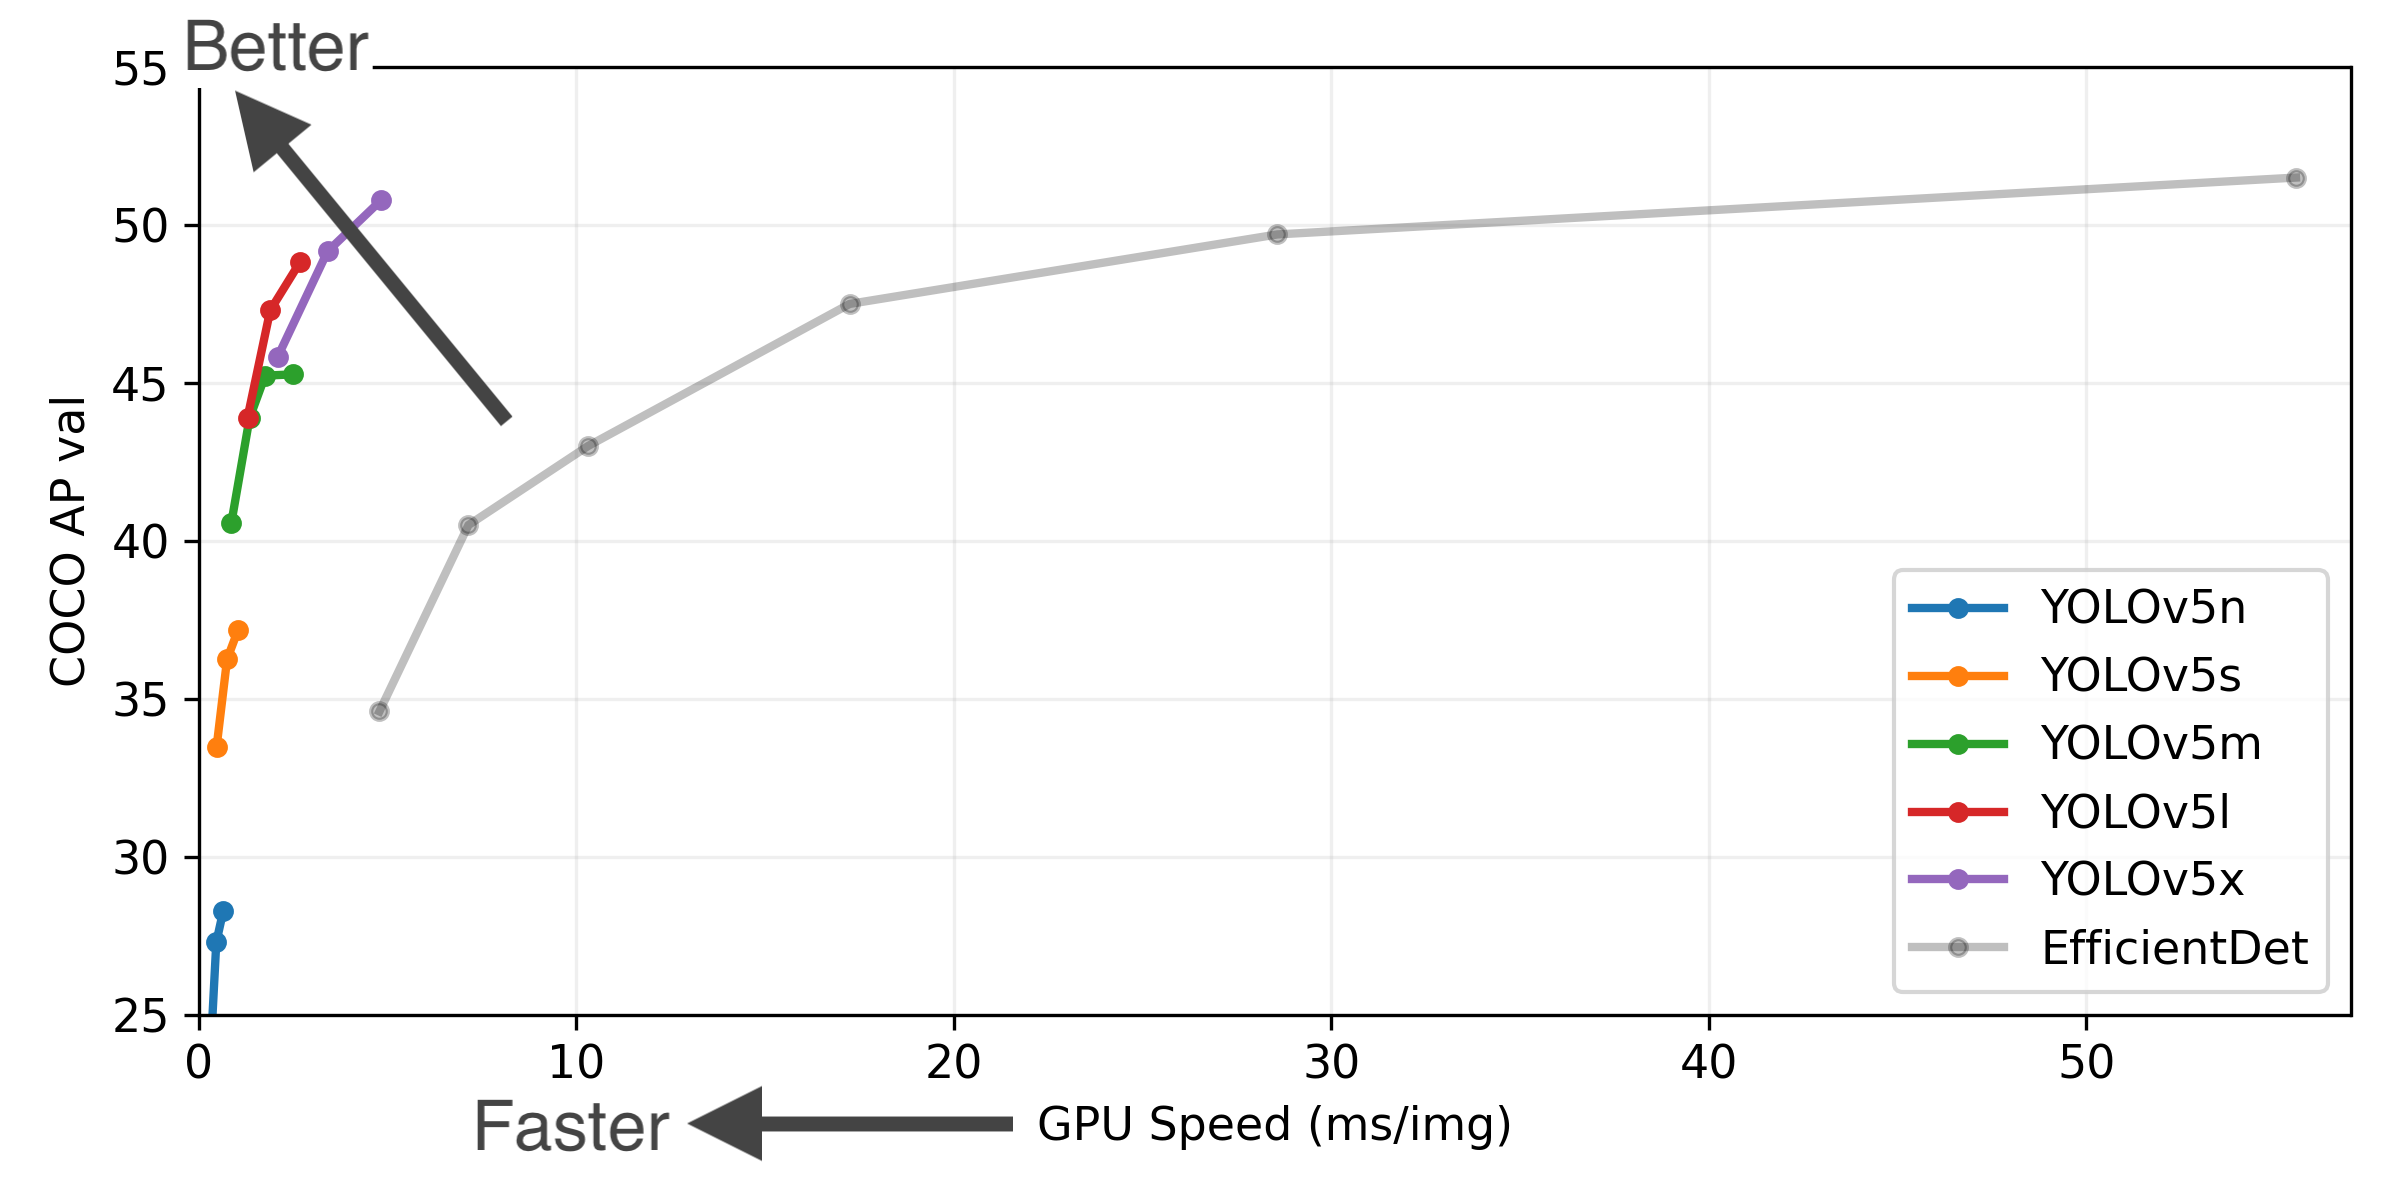
3.1 YOLOV5预训练模型比较
| Model | size (pixels) | mAPval 0.5:0.95 | mAPval 0.5 | Speed CPU b1 (ms) | Speed V100 b1 (ms) | Speed V100 b32 (ms) | params (M) | FLOPs @640 (B) |
|---|---|---|---|---|---|---|---|---|
| YOLOv5n | 640 | 28.4 | 46.0 | 45 | 6.3 | 0.6 | 1.9 | 4.5 |
| YOLOv5s | 640 | 37.2 | 56.0 | 98 | 6.4 | 0.9 | 7.2 | 16.5 |
| YOLOv5m | 640 | 45.2 | 63.9 | 224 | 8.2 | 1.7 | 21.2 | 49.0 |
| YOLOv5l | 640 | 48.8 | 67.2 | 430 | 10.1 | 2.7 | 46.5 | 109.1 |
| YOLOv5x | 640 | 50.7 | 68.9 | 766 | 12.1 | 4.8 | 86.7 | 205.7 |
| YOLOv5n6 | 1280 | 34.0 | 50.7 | 153 | 8.1 | 2.1 | 3.2 | 4.6 |
| YOLOv5s6 | 1280 | 44.5 | 63.0 | 385 | 8.2 | 3.6 | 16.8 | 12.6 |
| YOLOv5m6 | 1280 | 51.0 | 69.0 | 887 | 11.1 | 6.8 | 35.7 | 50.0 |
| YOLOv5l6 | 1280 | 53.6 | 71.6 | 1784 | 15.8 | 10.5 | 76.8 | 111.4 |
| YOLOv5x6 + TTA | 1280 1536 | 54.7 55.4 | 72.4 72.3 | 3136 - | 26.2 - | 19.4 - | 140.7 - | 209.8 - |
3.2 通过指令运行项目
- nstall下载依赖
Python>=3.6.0 is required with all requirements.txt installed including PyTorch>=1.7:
$ git clone https://github.com/ultralytics/yolov5
$ cd yolov5
$ pip install -r requirements.txt
- Inference推理
使用 YOLOv5 和 PyTorch Hub 进行推理。模型会自动从最新的 YOLOv5 版本下载。
import torch
# Model
model = torch.hub.load('ultralytics/yolov5', 'yolov5s')  # or yolov5m, yolov5l, yolov5x, custom
# Images
img = 'https://ultralytics.com/images/zidane.jpg'  # or file, Path, PIL, OpenCV, numpy, list
# Inference
results = model(img)
# Results
results.print()  # or .show(), .save(), .crop(), .pandas(), etc.
要对数据/图像中的示例图像运行推理,请执行以下操作:
# --weights yolov5s.pt指定yolov5s.pt为项目的权重;
# --conf 0.25指定0.25为失信度;
# --source data/images指定文件路径
$ python detect.py --source data/images --weights yolov5s.pt --conf 0.25

# 运行结果如下
Namespace(agnostic_nms=False, augment=False, classes=None, conf_thres=0.25, device='', exist_ok=False, img_size=640, iou_thres=0.45, name='exp', project='runs/detect', save_conf=False, save_txt=False, source='data/images/', update=False, view_img=False, weights=['yolov5s.pt'])
YOLOv5 v4.0-96-g83dc1b4 torch 1.7.0+cu101 CUDA:0 (Tesla V100-SXM2-16GB, 16160.5MB)

Fusing layers...
Model Summary: 224 layers, 7266973 parameters, 0 gradients, 17.0 GFLOPS
image 1/2 /content/yolov5/data/images/bus.jpg: 640x480 4 persons, 1 bus, Done. (0.010s)
image 2/2 /content/yolov5/data/images/zidane.jpg: 384x640 2 persons, 1 tie, Done. (0.011s)
Results saved to runs/detect/exp2
Done. (0.103s)
- Inference with detect.py 通过 detect.py 推理
detect.py 在各种源上运行推理,从最新的YOLOv5版本自动下载模型,并将结果保存到运行/检测(runs/detect.)。
$ python detect.py --source 0  # webcam
                            file.jpg  # image
                            file.mp4  # video
                            path/  # directory
                            path/*.jpg  # glob
                            'https://youtu.be/NUsoVlDFqZg'  # YouTube
                            'rtsp://example.com/media.mp4'  # RTSP, RTMP, HTTP stream 通过传输协议可以实现实时检测
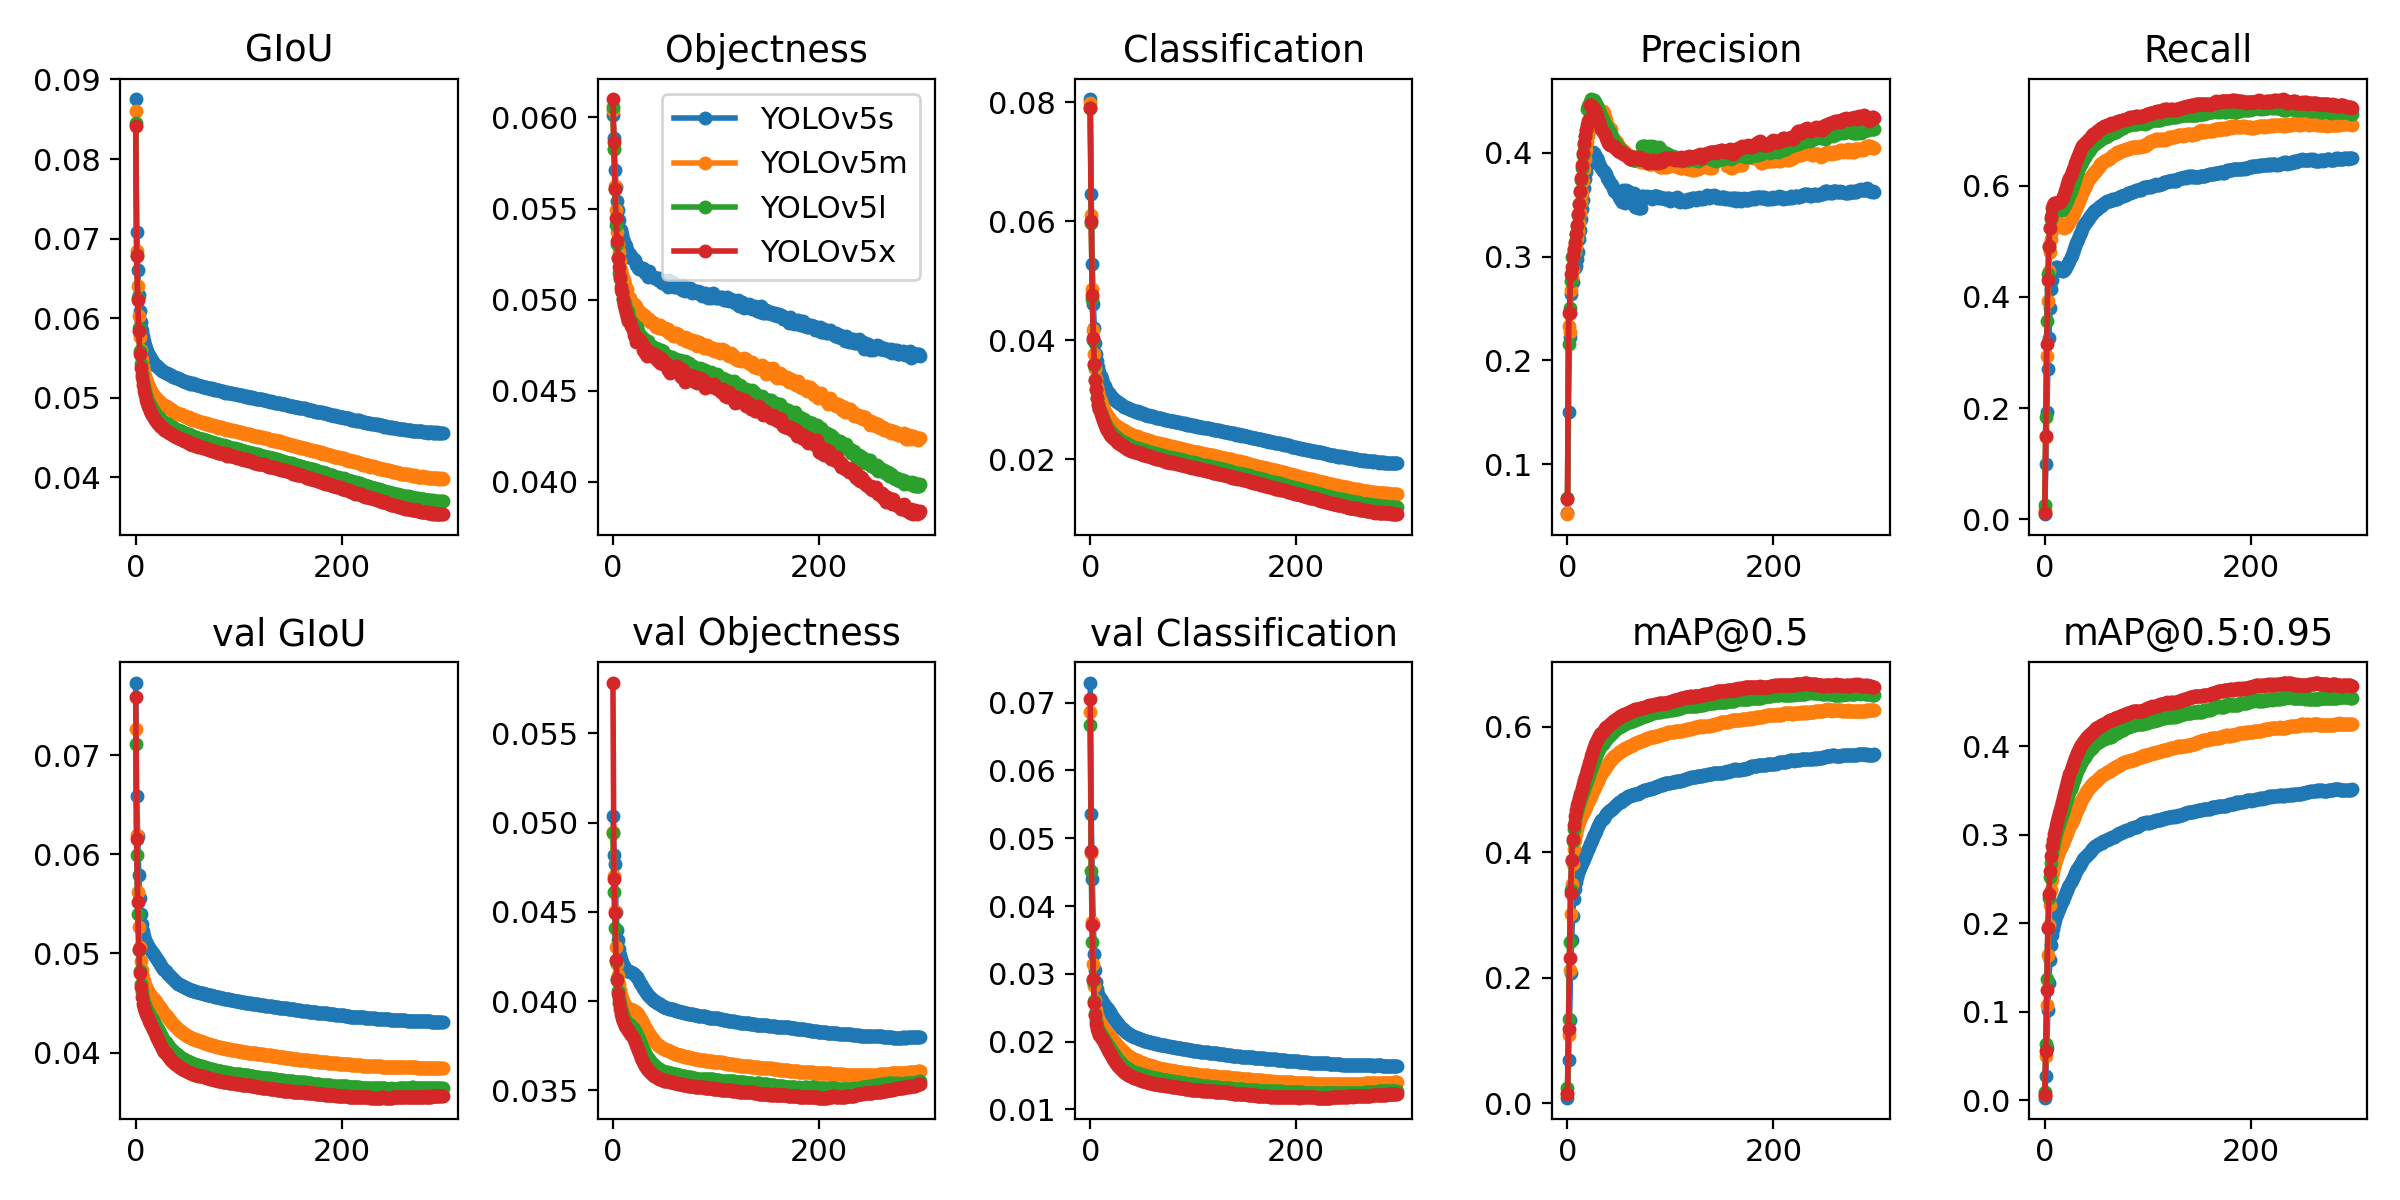
- Training 训练模型
运行以下命令以重现 COCO 数据集上的结果(首次使用时会自动下载数据集)。在单个 V100 上,YOLOv5s/m/l/x 的训练时间为 2/4/6/8 天(多 GPU 时间更快)。使用 GPU 允许的最大批大小(显示 16 GB 设备的批大小)。
$ python train.py --data coco.yaml --cfg yolov5s.yaml --weights '' --batch-size 64
                                         yolov5m                                40
                                         yolov5l                                24
                                         yolov5x                                16
3.3 YOLOV5参数讲解
- detect.py文件中main函数详解
# --weights  default='yolov5s.pt'权重文件的路径地址
   parser.add_argument('--weights', nargs='+', type=str, default='yolov5s.pt', help='model.pt path(s)')
# --source   default='data/images'给神经网络指定数据输入,可以用来实时检测和验证模型使用,输入0是使用电脑自带摄像
    parser.add_argument('--source', type=str, default='data/images', help='source')  # file/folder, 0 for webcam
# --img-size   default=640指定输入图片的分辨率,输出的图片格式不会被改变(只是在网络运算过程中把图片进行一个缩放或扩大方便运算)
    parser.add_argument('--img-size', type=int, default=640, help='inference size (pixels)')
# --conf-thres  default=0.25置信度(只要大于0.25,就显示出目标)
    parser.add_argument('--conf-thres', type=float, default=0.25, help='object confidence threshold')
# --iou-thres  default=0.45目标上的框,iou是选出最适合的一个框(iou=交集部分/并集部分)
    parser.add_argument('--iou-thres', type=float, default=0.45, help='IOU threshold for NMS')
# --device  default=''设备
    parser.add_argument('--device', default='', help='cuda device, i.e. 0 or 0,1,2,3 or cpu')
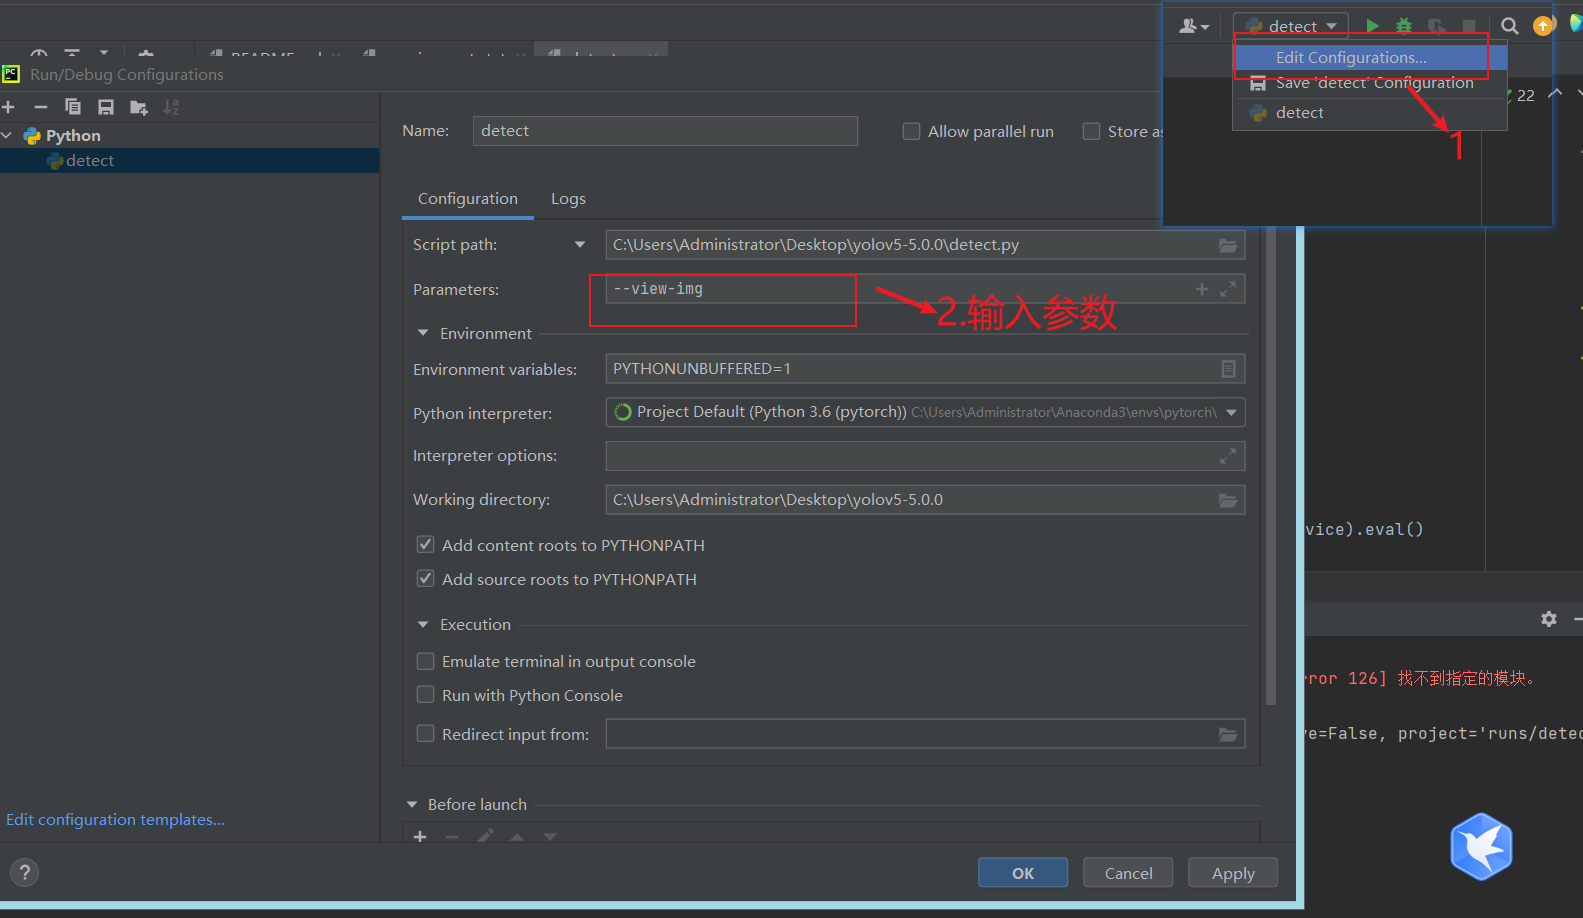
# --view-img action='store_true'指只要设定这个参数,参数值就是True,显不显示运行结果
    parser.add_argument('--view-img', action='store_true', help='display results')
# --save-txt action='store_true'同上,保存结果设置成一个txt,保存框的位置和置信度等信息
    parser.add_argument('--save-txt', action='store_true', help='save results to *.txt')
    parser.add_argument('--save-conf', action='store_true', help='save confidences in --save-txt labels')
    parser.add_argument('--nosave', action='store_true', help='do not save images/videos')
# --classes nargs='+'可以设置为0,2,3等,如果参数是0,作用是只保存第0个类,其他类都不保存
    parser.add_argument('--classes', nargs='+', type=int, help='filter by class: --class 0, or --class 0 2 3')
# --agnostic-nms 增强的一个检测
    parser.add_argument('--agnostic-nms', action='store_true', help='class-agnostic NMS')
    parser.add_argument('--augment', action='store_true', help='augmented inference')
# --update 去掉优化器等参数,只保留网络模型
    parser.add_argument('--update', action='store_true', help='update all models')
# --project  default='runs/detect'把结果文件保存到什么位置
    parser.add_argument('--project', default='runs/detect', help='save results to project/name')
# --name default='exp' 保存结果文件的命名
    parser.add_argument('--name', default='exp', help='save results to project/name')
# --exist-ok 把新一轮检测的结果保存在一个创建的新的文件夹内,如果是false只会保存在上一个文件夹,默认是True
    parser.add_argument('--exist-ok', action='store_true', help='existing project/name ok, do not increment')
可以通过pycharm设置参数
- train.py文件中main参数详解
# 未解释的不太重要或者用不上,想了解的 参数+Ctrl+F,在源码中查看

# --weights default='yolov5s.pt'训练模型的路径,初始化网络模型的参数,yolov5s.pt是YOLOV5预训练好的模型
# 若想训练自己的模型可设置它为空  如default=''
# 同时也可以放入你之前训练好的模型,做参数初始化,进行下一轮训练
    parser.add_argument('--weights', type=str, default='yolov5s.pt', help='initial weights path')
# --cfg default='' 模型参数设置文件的路径
    parser.add_argument('--cfg', type=str, default='', help='model.yaml path')
# --data 指定训练数据集路径
    parser.add_argument('--data', type=str, default='data/coco128.yaml', help='data.yaml path')
# --hyp 超参数文件路径地址
    parser.add_argument('--hyp', type=str, default='data/hyp.scratch.yaml', help='hyperparameters path')
# --epochs:训练轮次
    parser.add_argument('--epochs', type=int, default=300)
# --batch-size:喂入批次文件的多少(一次喂入16张)
    parser.add_argument('--batch-size', type=int, default=16, help='total batch size for all GPUs')
# --img-size:输入图片尺寸
    parser.add_argument('--img-size', nargs='+', type=int, default=[640, 640], help='[train, test] image sizes')
# --rect:是否采用矩形训练,默认False,减少一些不必要的信息,比如裁剪数据集的阴影部分,加快训练速度
    parser.add_argument('--rect', action='store_true', help='rectangular training')
# --resume:接着打断训练上次的结果接着训练,必须指定上次模型训练文件的路径
    parser.add_argument('--resume', nargs='?', const=True, default=False, help='resume most recent training')
# --nosave:不保存模型,默认False,True是只保存最后一次训练模型的权重数据文件
    parser.add_argument('--nosave', action='store_true', help='only save final checkpoint')
# --notest:不进行test,默认False
    parser.add_argument('--notest', action='store_true', help='only test final epoch')
# --noautoanchor:不自动调整anchor,默认False(锚点和锚框)
    parser.add_argument('--noautoanchor', action='store_true', help='disable autoanchor check')
# --evolve:是否进行超参数进化,默认False
    parser.add_argument('--evolve', action='store_true', help='evolve hyperparameters')
# --bucket:谷歌云盘bucket,一般不会用到
    parser.add_argument('--bucket', type=str, default='', help='gsutil bucket')
# --cache-images:是否提前缓存图片到内存,以加快训练速度,默认False
    parser.add_argument('--cache-images', action='store_true', help='cache images for faster training')
# --image-weights:使用加权图像选择进行训练,作者测试过,但效果布不能得到保证
    parser.add_argument('--image-weights', action='store_true', help='use weighted image selection for training')
# --device:训练的设备,cpu;0(表示一个gpu设备cuda:0);0,1,2,3(多个gpu设备)
    parser.add_argument('--device', default='', help='cuda device, i.e. 0 or 0,1,2,3 or cpu')
# --multi-scale:是否进行多尺度训练,默认False
    parser.add_argument('--multi-scale', action='store_true', help='vary img-size +/- 50%%')
# --single-cls:数据集是否只有一个类别,默认False
    parser.add_argument('--single-cls', action='store_true', help='train multi-class data as single-class')
# --adam:是否使用adam优化器
    parser.add_argument('--adam', action='store_true', help='use torch.optim.Adam() optimizer')
# --sync-bn:是否使用跨卡同步BN,在DDP模式使用
    parser.add_argument('--sync-bn', action='store_true', help='use SyncBatchNorm, only available in DDP mode')
# --local_rank:DDP参数,请勿修改
    parser.add_argument('--local_rank', type=int, default=-1, help='DDP parameter, do not modify')
# --workers:最大工作核心数
    parser.add_argument('--workers', type=int, default=8, help='maximum number of dataloader workers')
# --project:训练模型的保存位置
    parser.add_argument('--project', default='runs/train', help='save to project/name')

    parser.add_argument('--entity', default=None, help='W&B entity')
# --name:模型保存的目录名称
    parser.add_argument('--name', default='exp', help='save to project/name')
# --exist-ok:模型目录是否存在,不存在就创建
    parser.add_argument('--exist-ok', action='store_true', help='existing project/name ok, do not increment')
# --quad 默认False,对数据进行的处理方式
    parser.add_argument('--quad', action='store_true', help='quad dataloader')
# --linear-lr 学习速率,开启按照线性方式
    parser.add_argument('--linear-lr', action='store_true', help='linear LR')
# --label-smoothing 标签平滑
    parser.add_argument('--label-smoothing', type=float, default=0.0, help='Label smoothing epsilon')
    parser.add_argument('--upload_dataset', action='store_true', help='Upload dataset as W&B artifact table')
    parser.add_argument('--bbox_interval', type=int, default=-1, help='Set bounding-box image logging interval for W&B')
    parser.add_argument('--save_period', type=int, default=-1, help='Log model after every "save_period" epoch')
 # --artifact_alias 这个参数貌似未实现,注释不影响运行
    parser.add_argument('--artifact_alias', type=str, default="latest", help='version of dataset artifact to be used')
- –cfg 模型参数设置文件的路径

- –hyp 超参数文件路径地址

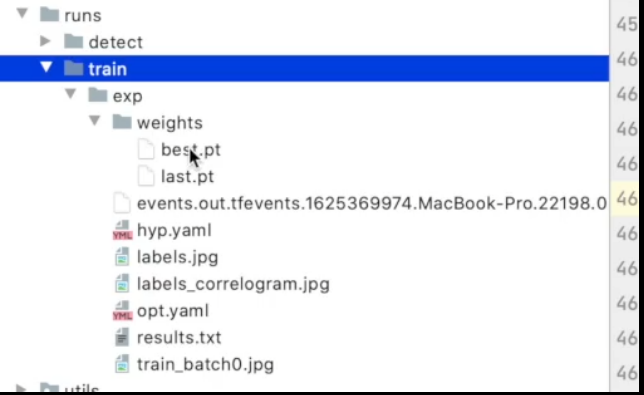
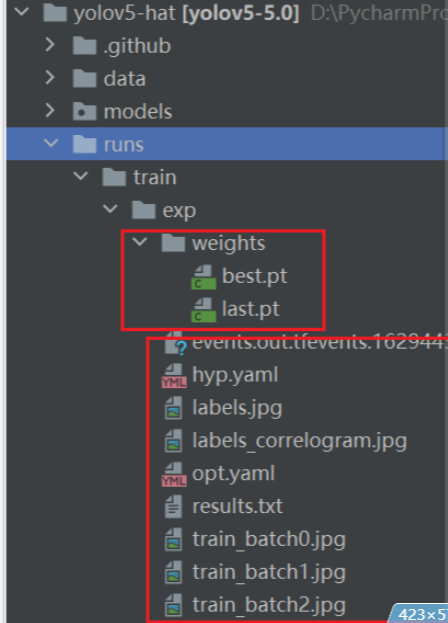
- run文件(训练结果目录文件详解)
训练最好效果的网络模型参数
训练最后一个的网络模型参数
tensorboard日志文件
训练模型的一些超参数
标注模型的一些分布
标注的一些相关矩阵
训练过程中参数的一些设置
训练结果的记录
训练的一些图片

- –resume


四、训练自己数据集
1.半人工标注和仿真数据集
比较麻烦,但自己省事,不太建议使用
可以去看看土堆大佬的视频
2.人工标注
2.1 labelimg介绍
Labelimg是一款开源的数据标注工具,可以标注三种格式。
   1  VOC标签格式,保存为xml文件。

   2  yolo标签格式,保存为txt文件。

   3 createML标签格式,保存为json格式。
2.2 labelimg的安装
? 这里主要讲的是在window系统中的安装,首先打开cmd命令行(快捷键:win+R)。进入cmd命令行控制台。输入如下的命令:
pip install labelimg -i https://pypi.tuna.tsinghua.edu.cn/simple
? 运行如上命令后,系统就会自动下载labelimg相关的依赖。由于这是一个很轻量的工具,所以下载起来很快,当出现如下红色框框中的告诉我们成功安装的时候,说明labelimg安装成功了。

2.3 使用labelimg文件格式
VOC2007的目录结构为:
├── VOC2007
│├── JPEGImages 存放需要打标签的图片文件
│├── Annotations 存放标注的标签文件
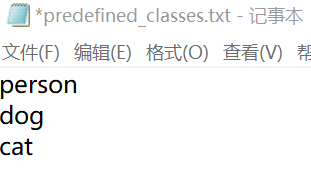
│├── predefined_classes.txt 定义自己要标注的所有类别(这个文件可有可无,但是在我们定义类别比较多的时候,最好有这个创建一个这样的txt文件来存放类别)
例:比如要训练三个类
JPEGImages文件:

predefined_classes.txt文件
2.4 打开labelimg
- DOS窗口进入VOC2007文件下

-
输入如下的命令打开labelimg。
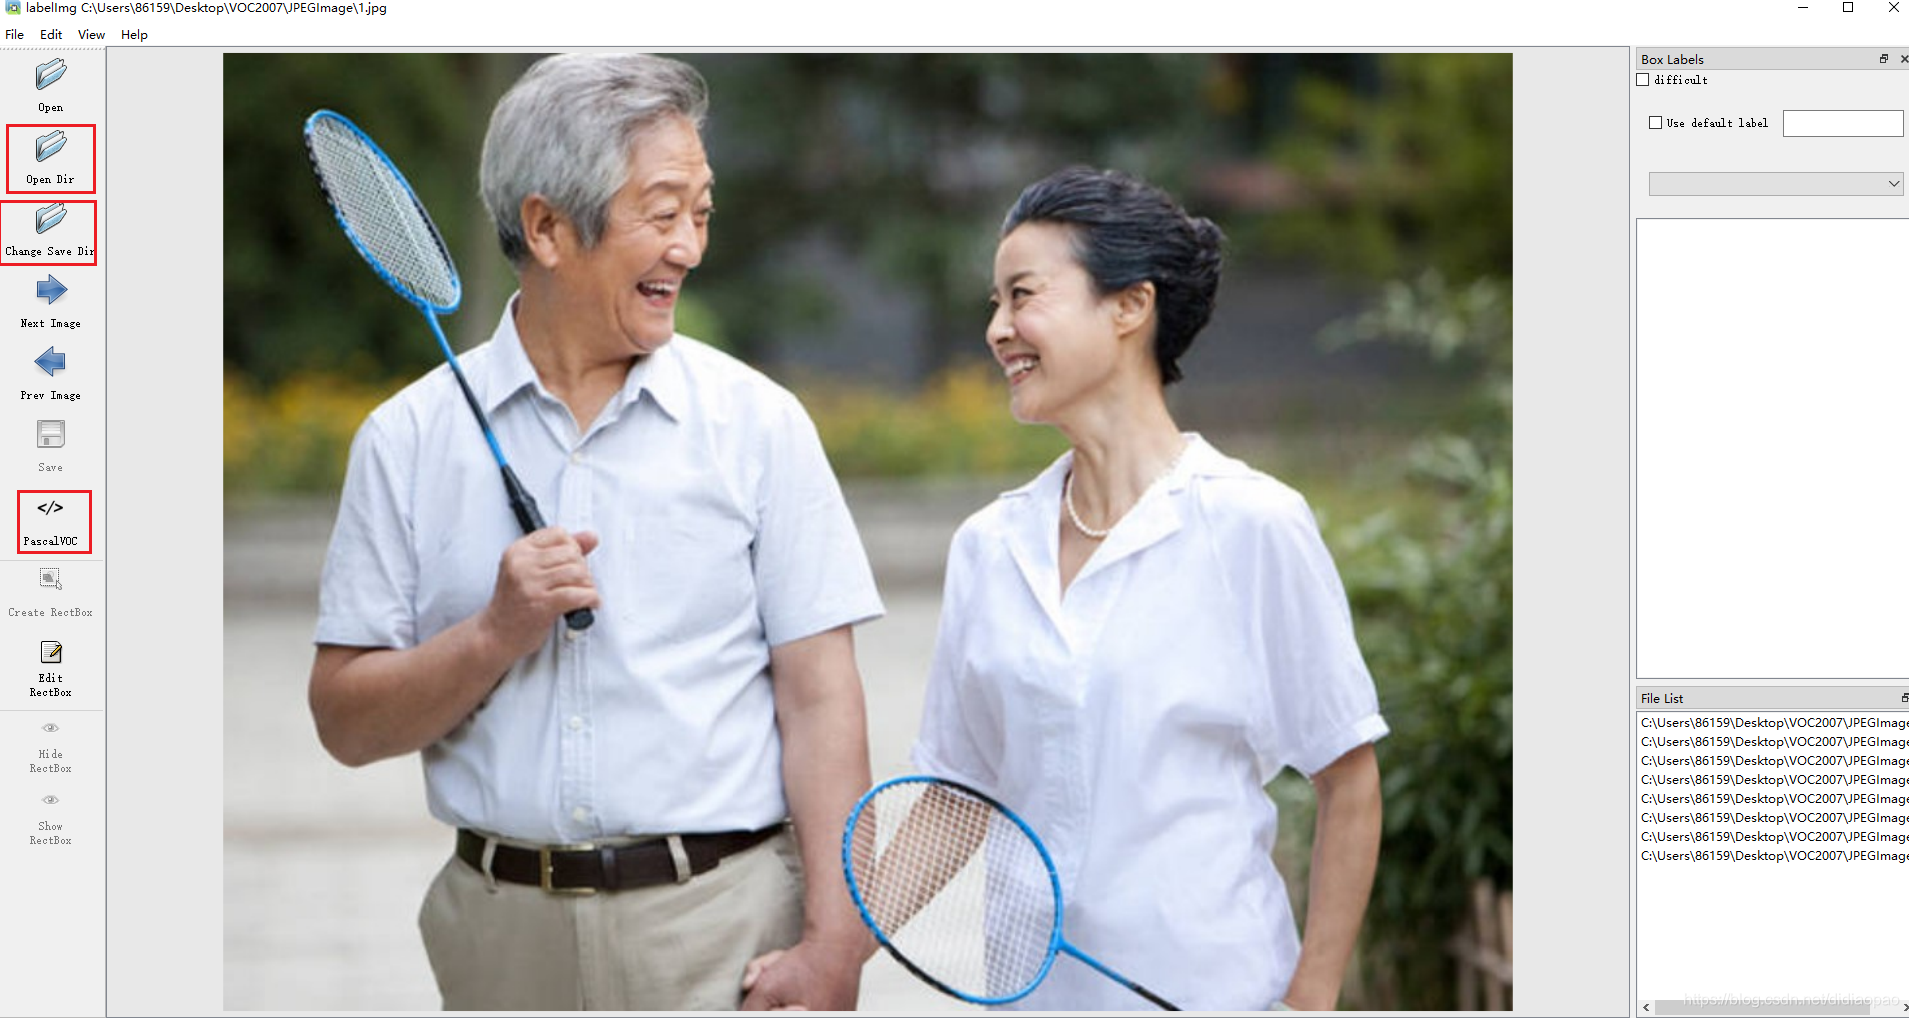
这个命令的意思是打开labelimg工具;打开JPEGImage文件夹,初始化predefined_classes.txt里面定义的类。
labelimg JPEGImages predefined_classes.txt
- 运行如上的命令就会打开这个工具
-
工具的使用
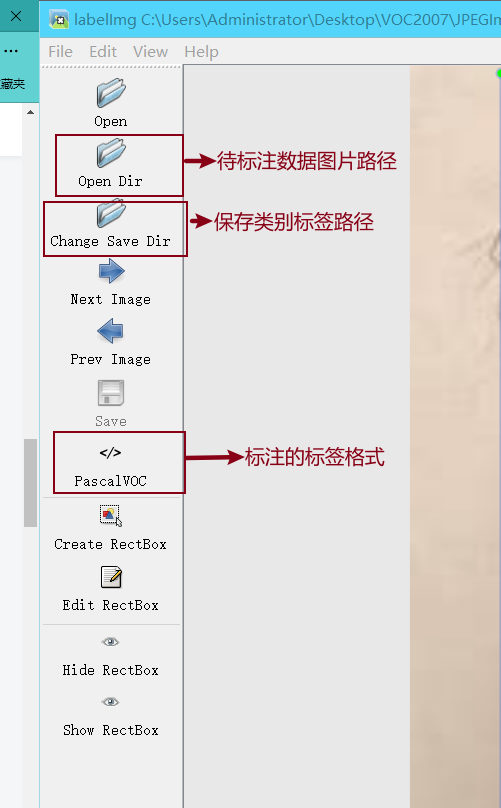

- 常用快捷键如下
A:切换到上一张图片
D:切换到下一张图片
W:调出标注十字架
del :删除标注框框
Ctrl+u:选择标注的图片文件夹
Ctrl+r:选择标注好的label标签存在的文件夹
- 标签打完以后可以去Annotations 文件下看到标签文件已经保存

五、数据集格式转化及训练集和验证集划分
yolov5训练所需要的文件格式是yolo(txt格式),需要对xml格式的标签文件转换为txt文件。
同时训练自己的yolov5检测模型的时候,数据集需要划分为训练集和验证集。这里提供了一份代码将xml格式的标注文件转换为txt格式的标注文件,并按比例划分为训练集和验证集
import xml.etree.ElementTree as ET
import pickle
import os
from os import listdir, getcwd
from os.path import join
import random
from shutil import copyfile

classes = ["hat", "person"]
#classes=["ball"]

TRAIN_RATIO = 80

def clear_hidden_files(path):
    dir_list = os.listdir(path)
    for i in dir_list:
        abspath = os.path.join(os.path.abspath(path), i)
        if os.path.isfile(abspath):
            if i.startswith("._"):
                os.remove(abspath)
        else:
            clear_hidden_files(abspath)

def convert(size, box):
    dw = 1./size[0]
    dh = 1./size[1]
    x = (box[0] + box[1])/2.0
    y = (box[2] + box[3])/2.0
    w = box[1] - box[0]
    h = box[3] - box[2]
    x = x*dw
    w = w*dw
    y = y*dh
    h = h*dh
    return (x,y,w,h)

def convert_annotation(image_id):
    in_file = open('VOCdevkit/VOC2007/Annotations/%s.xml' %image_id)
    out_file = open('VOCdevkit/VOC2007/YOLOLabels/%s.txt' %image_id, 'w')
    tree=ET.parse(in_file)
    root = tree.getroot()
    size = root.find('size')
    w = int(size.find('width').text)
    h = int(size.find('height').text)

    for obj in root.iter('object'):
        difficult = obj.find('difficult').text
        cls = obj.find('name').text
        if cls not in classes or int(difficult) == 1:
            continue
        cls_id = classes.index(cls)
        xmlbox = obj.find('bndbox')
        b = (float(xmlbox.find('xmin').text), float(xmlbox.find('xmax').text), float(xmlbox.find('ymin').text), float(xmlbox.find('ymax').text))
        bb = convert((w,h), b)
        out_file.write(str(cls_id) + " " + " ".join([str(a) for a in bb]) + '\n')
    in_file.close()
    out_file.close()

wd = os.getcwd()
wd = os.getcwd()
data_base_dir = os.path.join(wd, "VOCdevkit/")
if not os.path.isdir(data_base_dir):
    os.mkdir(data_base_dir)
work_sapce_dir = os.path.join(data_base_dir, "VOC2007/")
if not os.path.isdir(work_sapce_dir):
    os.mkdir(work_sapce_dir)
annotation_dir = os.path.join(work_sapce_dir, "Annotations/")
if not os.path.isdir(annotation_dir):
        os.mkdir(annotation_dir)
clear_hidden_files(annotation_dir)
image_dir = os.path.join(work_sapce_dir, "JPEGImages/")
if not os.path.isdir(image_dir):
        os.mkdir(image_dir)
clear_hidden_files(image_dir)
yolo_labels_dir = os.path.join(work_sapce_dir, "YOLOLabels/")
if not os.path.isdir(yolo_labels_dir):
        os.mkdir(yolo_labels_dir)
clear_hidden_files(yolo_labels_dir)
yolov5_images_dir = os.path.join(data_base_dir, "images/")
if not os.path.isdir(yolov5_images_dir):
        os.mkdir(yolov5_images_dir)
clear_hidden_files(yolov5_images_dir)
yolov5_labels_dir = os.path.join(data_base_dir, "labels/")
if not os.path.isdir(yolov5_labels_dir):
        os.mkdir(yolov5_labels_dir)
clear_hidden_files(yolov5_labels_dir)
yolov5_images_train_dir = os.path.join(yolov5_images_dir, "train/")
if not os.path.isdir(yolov5_images_train_dir):
        os.mkdir(yolov5_images_train_dir)
clear_hidden_files(yolov5_images_train_dir)
yolov5_images_test_dir = os.path.join(yolov5_images_dir, "val/")
if not os.path.isdir(yolov5_images_test_dir):
        os.mkdir(yolov5_images_test_dir)
clear_hidden_files(yolov5_images_test_dir)
yolov5_labels_train_dir = os.path.join(yolov5_labels_dir, "train/")
if not os.path.isdir(yolov5_labels_train_dir):
        os.mkdir(yolov5_labels_train_dir)
clear_hidden_files(yolov5_labels_train_dir)
yolov5_labels_test_dir = os.path.join(yolov5_labels_dir, "val/")
if not os.path.isdir(yolov5_labels_test_dir):
        os.mkdir(yolov5_labels_test_dir)
clear_hidden_files(yolov5_labels_test_dir)

train_file = open(os.path.join(wd, "yolov5_train.txt"), 'w')
test_file = open(os.path.join(wd, "yolov5_val.txt"), 'w')
train_file.close()
test_file.close()
train_file = open(os.path.join(wd, "yolov5_train.txt"), 'a')
test_file = open(os.path.join(wd, "yolov5_val.txt"), 'a')
list_imgs = os.listdir(image_dir) # list image files
prob = random.randint(1, 100)
print("Probability: %d" % prob)
for i in range(0,len(list_imgs)):
    path = os.path.join(image_dir,list_imgs[i])
    if os.path.isfile(path):
        image_path = image_dir + list_imgs[i]
        voc_path = list_imgs[i]
        (nameWithoutExtention, extention) = os.path.splitext(os.path.basename(image_path))
        (voc_nameWithoutExtention, voc_extention) = os.path.splitext(os.path.basename(voc_path))
        annotation_name = nameWithoutExtention + '.xml'
        annotation_path = os.path.join(annotation_dir, annotation_name)
        label_name = nameWithoutExtention + '.txt'
        label_path = os.path.join(yolo_labels_dir, label_name)
    prob = random.randint(1, 100)
    print("Probability: %d" % prob)
    if(prob < TRAIN_RATIO): # train dataset
        if os.path.exists(annotation_path):
            train_file.write(image_path + '\n')
            convert_annotation(nameWithoutExtention) # convert label
            copyfile(image_path, yolov5_images_train_dir + voc_path)
            copyfile(label_path, yolov5_labels_train_dir + label_name)
    else: # test dataset
        if os.path.exists(annotation_path):
            test_file.write(image_path + '\n')
            convert_annotation(nameWithoutExtention) # convert label
            copyfile(image_path, yolov5_images_test_dir + voc_path)
            copyfile(label_path, yolov5_labels_test_dir + label_name)
train_file.close()
test_file.close()
-
数据集的格式结构必须如下

Annotations里面存放着xml格式的标签文件
JPEGImages里面存放着照片数据文件
- 注意事项

classes里面必须正确填写xml里面已经标注好的类
TRAIN_RATIO是训练集和验证集的比例,
当等于80的时候,说明划分80%给训练集,20%给验证集。
- 运行结果
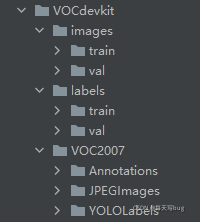
在VOCdevkit目录下生成images和labels文件夹
文件夹下分别生成了train文件夹和val文件夹
分别保存训练集的照片和txt格式的标签,还有验证集的照片和txt格式的标签
images文件夹和labels文件夹就是训练yolov5模型所需的训练集和验证集
YOLOLabels文件夹,里面存放着所有的txt格式的标签文件
六、利用YOLOV5训练自己的目标检测模型
1.代码目录介绍
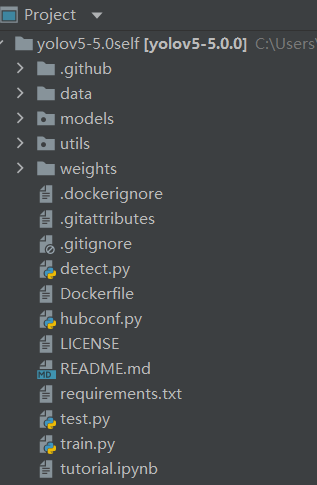
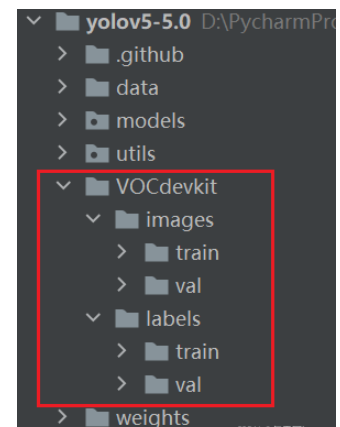
├── data:主要是存放一些超参数的配置文件(这些文件(yaml文件)是用来配置训练集和测试集还有验证集的路径的,其中还包括目标检测的种类数和种类的名称);还有一些官方提供测试的图片。如果是训练自己的数据集的话,那么就需要修改其中的yaml文件。但是自己的数据集不建议放在这个路径下面,而是建议把数据集放到yolov5项目的同级目录下面。
├── models:里面主要是一些网络构建的配置文件和函数,其中包含了该项目的四个不同的版本,分别为是s、m、l、x。从名字就可以看出,这几个版本的大小。他们的检测测度分别都是从快到慢,但是精确度分别是从低到高。这就是所谓的鱼和熊掌不可兼得。如果训练自己的数据集的话,就需要修改这里面相对应的yaml文件来训练自己模型。
├── utils:存放的是工具类的函数,里面有loss函数,metrics函数,plots函数等等。
├── weights:放置训练好的权重参数。
├── detect.py:利用训练好的权重参数进行目标检测,可以进行图像、视频和摄像头的检测。
├── train.py:训练自己的数据集的函数。
├── test.py:测试训练的结果的函数。
├──requirements.txt:这是一个文本文件,里面写着使用yolov5项目的环境依赖包的一些版本,可以利用该文本导入相应版本的包。
2.利用labelimg标注数据和数据的准备
目录格式如下:
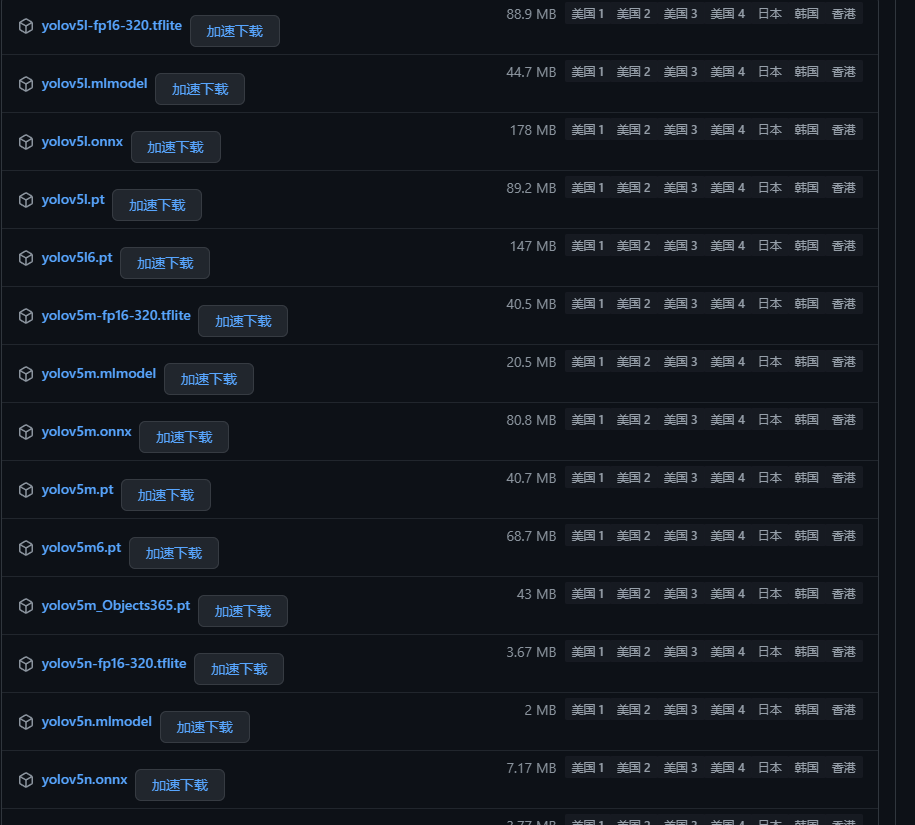
3.获得预训练权重
一般为了缩短网络的训练时间,并达到更好的精度,我们一般加载预训练权重进行网络的训练。而yolov5的5.0版本给我们提供了几个预训练权重,我们可以对应我们不同的需求选择不同的版本的预训练权重。通过如下的图可以获得权重的名字和大小信息,可以预料的到,预训练权重越大,训练出来的精度就会相对来说越高,但是其检测的速度就会越慢。预训练权重可以通过这个网址进行下载
4.训练自己的模型
4.1修改数据配置文件
- data目录下的voc.yaml文件
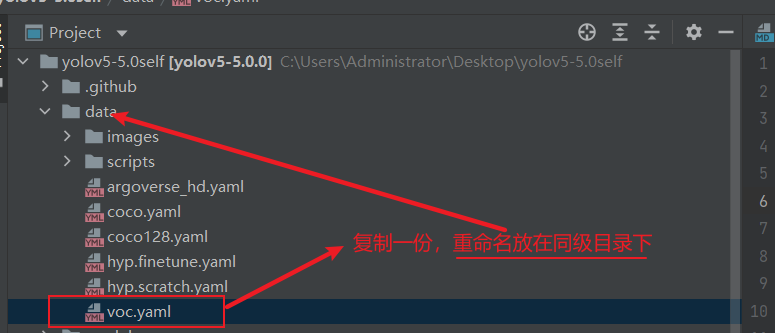

4.2修改模型配置文件
- models目录下的预训练权重文件(yolov5s.yaml)
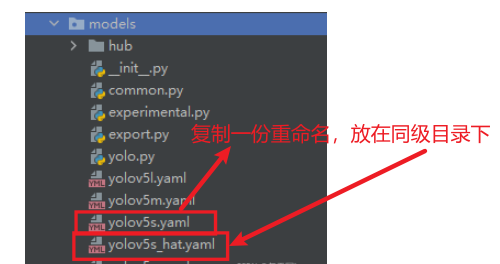

4.3训练自己的模型启用tensorbord查看参数
- train.py
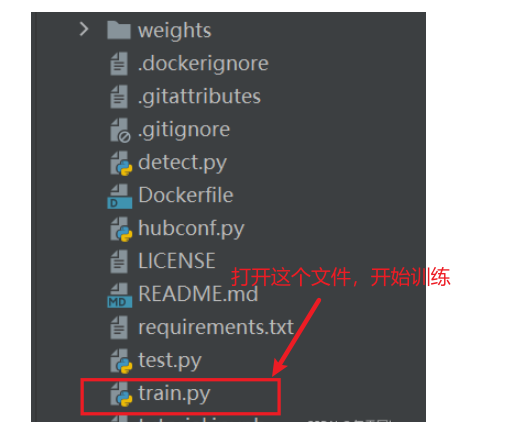
修改如下参数:

注意:路径都是相对路径

如果出现下列问题:

则说明GPU显存溢出报错,要修改如下参数
# 一次喂入多少张图片
parser.add_argument('--batch-size', type=int, default=16, help='total batch size for all GPUs')
# 最大工作核心数
parser.add_argument('--workers', type=int, default=8, help='maximum number of dataloader workers')
# 如果还不行那就再调小一点
如果出现下列问题:

则说明虚拟内存不够用,要修改以下参数:
utils路径下找到datasets.py这个文件,将里面的第81行里面的参数nw改完0就可以了
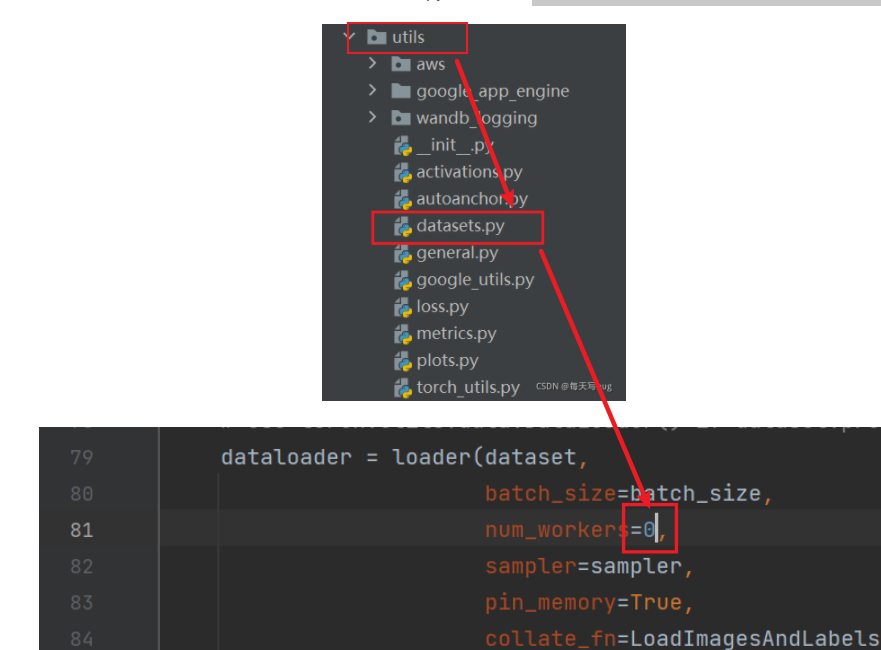
4.4启用tensorbord查看参数

tensorboard --logdir=runs/train
已经训练好了,但是我们还想用tensorbord查看此模型的训练过程,输入如下命令
tensorboard --logdir=runs
4.5推理测试
等到数据训练好了以后,就会在主目录下产生一个run文件夹,在run/train/exp/weights目录下会产生两个权重文件,一个是最后一轮的权重文件,一个是最好的权重文件,一会我们就要利用这个最好的权重文件来做推理测试。除此以外还会产生一些验证文件的图片等一些文件。
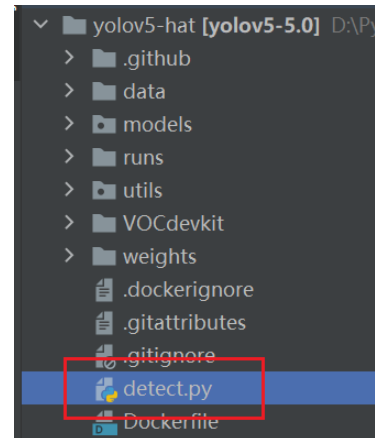
打开detect.py文件进行验证
修改detect.py中main函数的参数
# 传入训练好的最好的权重
parser.add_argument('--weights', nargs='+', type=str, default='runs/train/exp/weights/best.pt', help='model.pt path(s)')
# 对图片进行测试推理,将如下参数修改成图片的路径(对视频推理也在这修改)
 parser.add_argument('--source', type=str, default='000295.jpg', help='source')
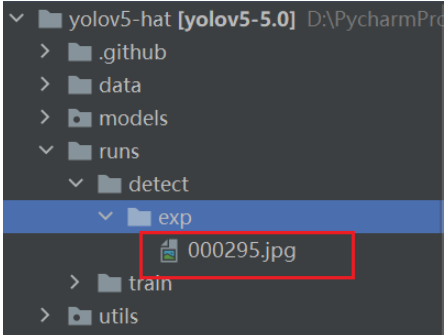
推测结束后,run文件下会生成一个detect目录,推理结果会保存在exp目录
如果要对摄像头进行测试:
# 对摄像头进行测试,只需将路径改写为0就好了
 parser.add_argument('--source', type=str, default='0', help='source')
找到utils目录下的datasets.py文件
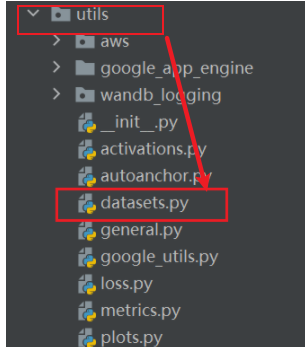
找到第279行代码,给两个url参数加上str就可以

七、生成数据文件解释
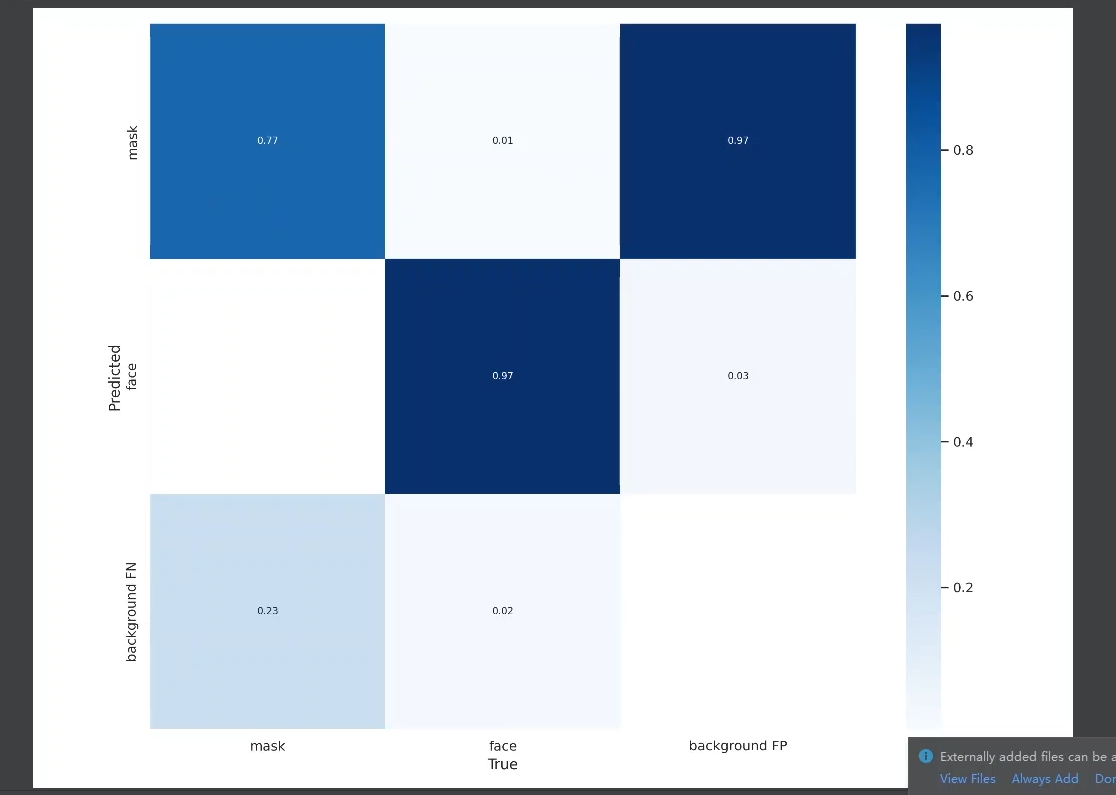
混淆矩阵:指明在类别上的一个精度
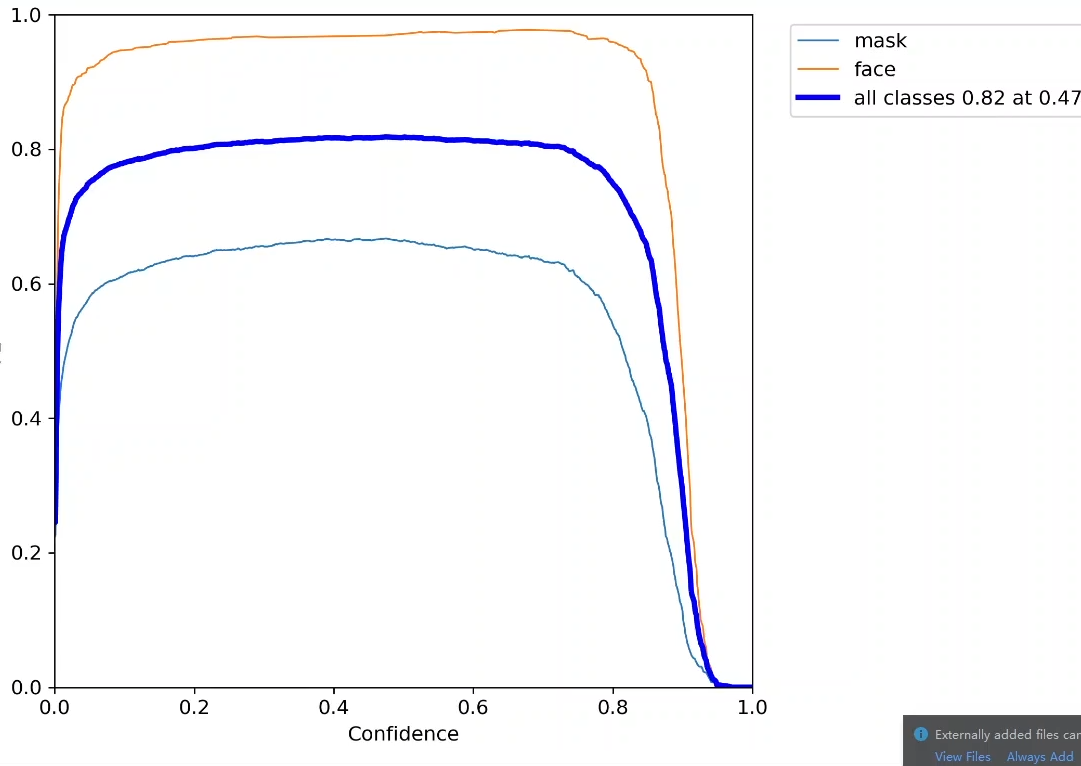
fi指标:衡量精度
hyp.yaml :表明超参数的
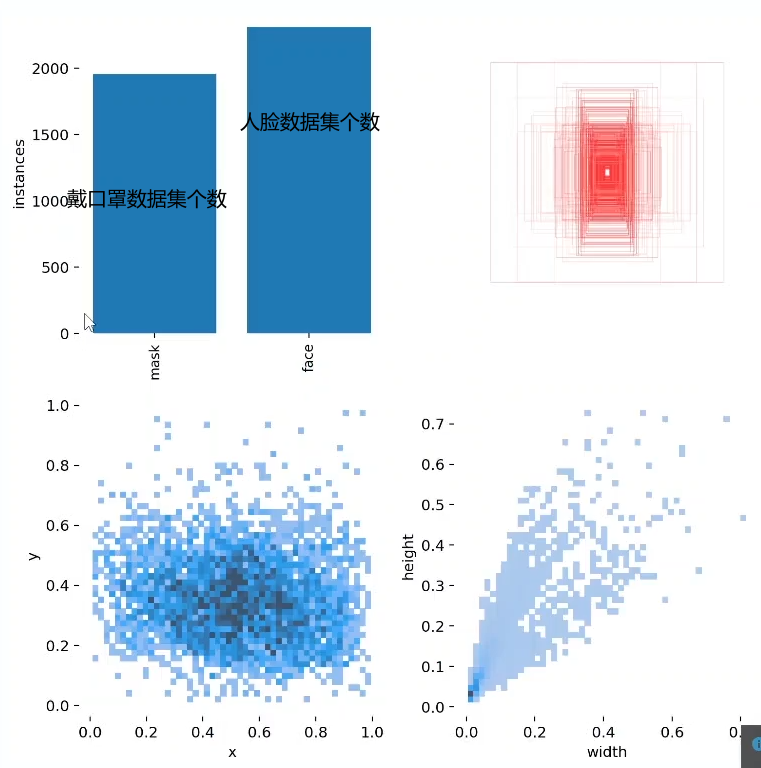
labels.jpg
labels_correlogram.jpg
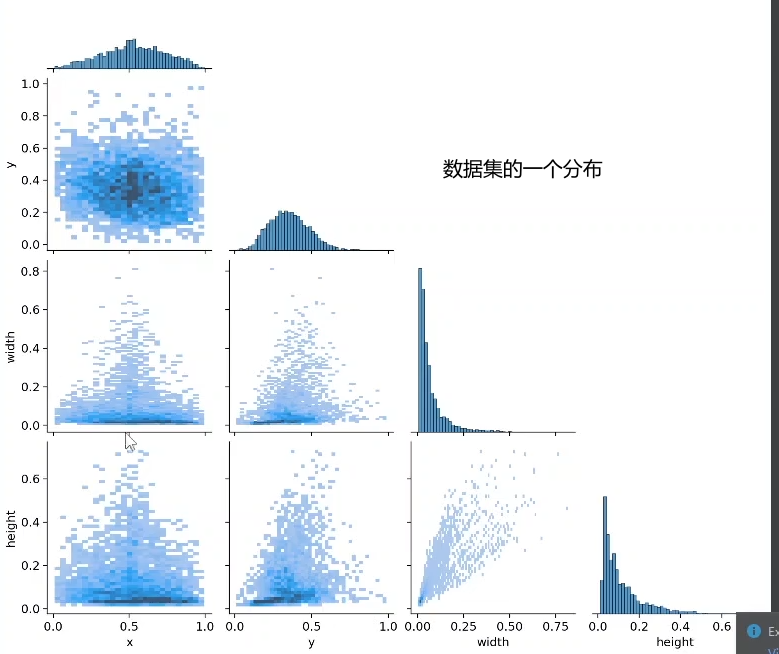
nchup_yolov5s.out : 训练的一个记录
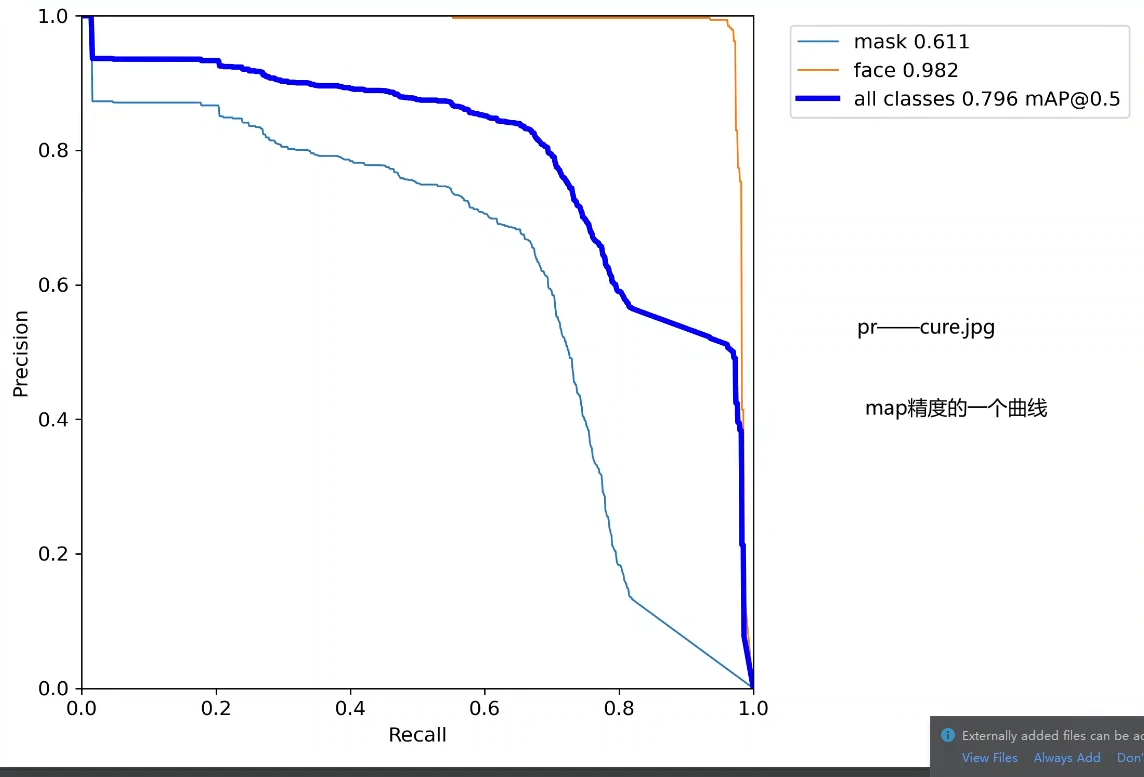
results.jpg 训练过程中的一个变化
八、番外(测距)
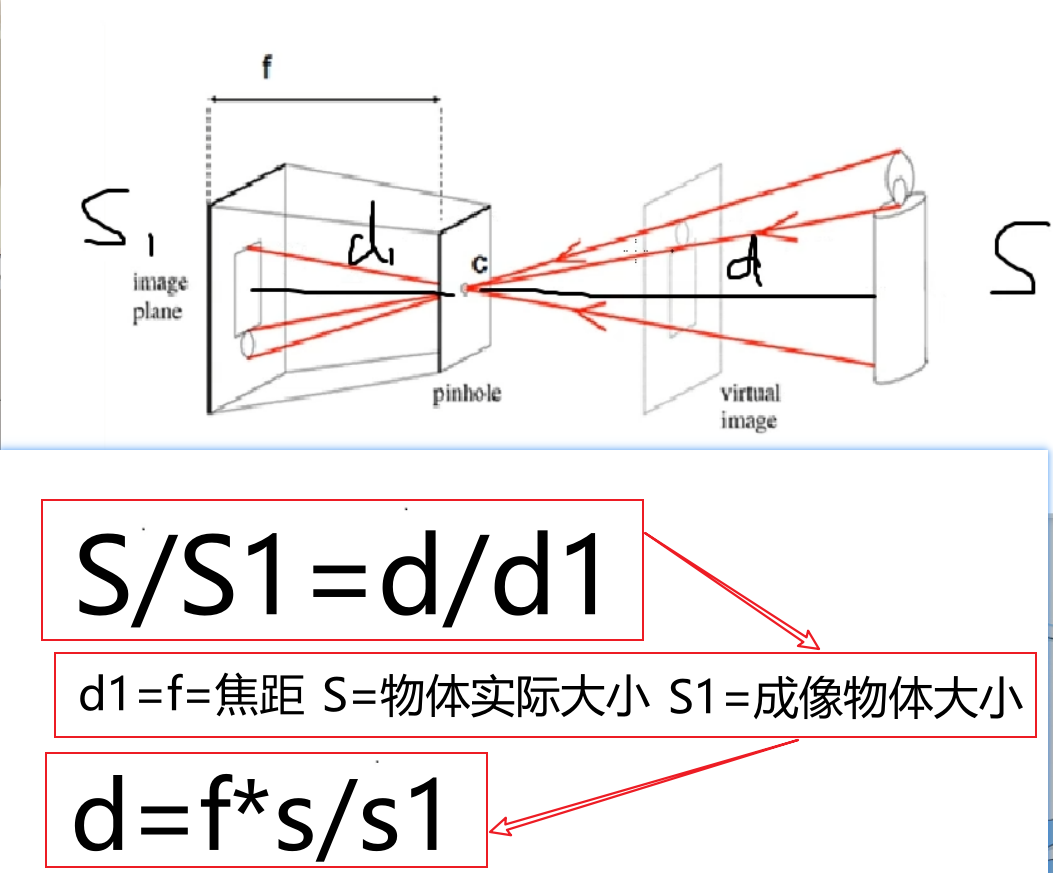
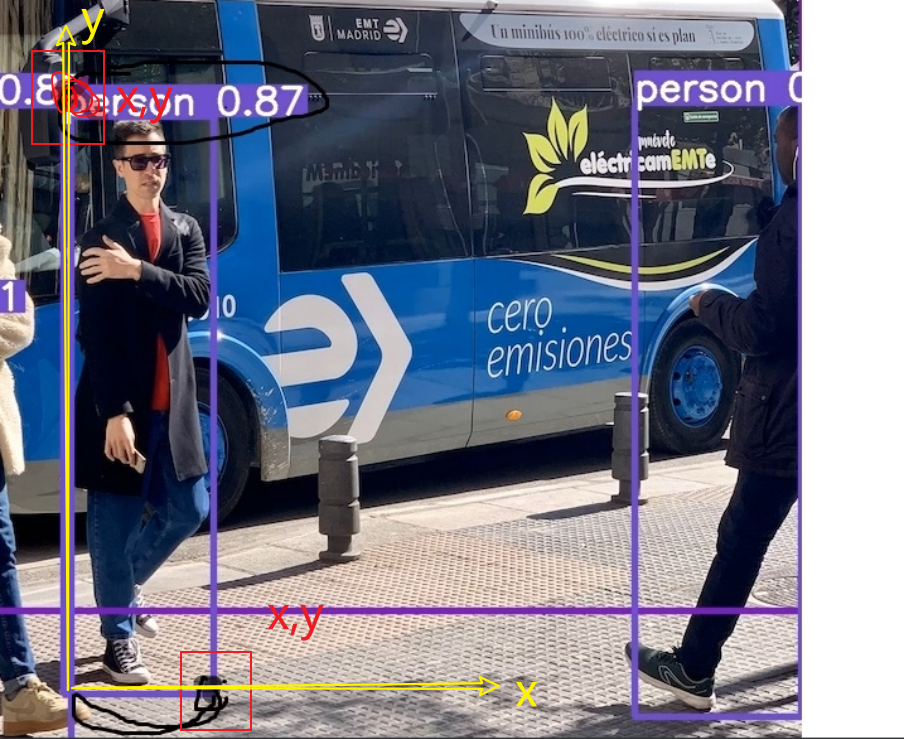
进入pytorch环境指令 conda activate pytorch
