我之前学过yoloV1到yoloV3,但对于图像检测这些明显还不够,所以把yoloV5提上日程,以下是我学习yoloV5的笔记,主要参考此链接。
注:此篇博客非100%原创,主要是学习博客,如侵就删。
文章目录
YoloV5的网络结构:
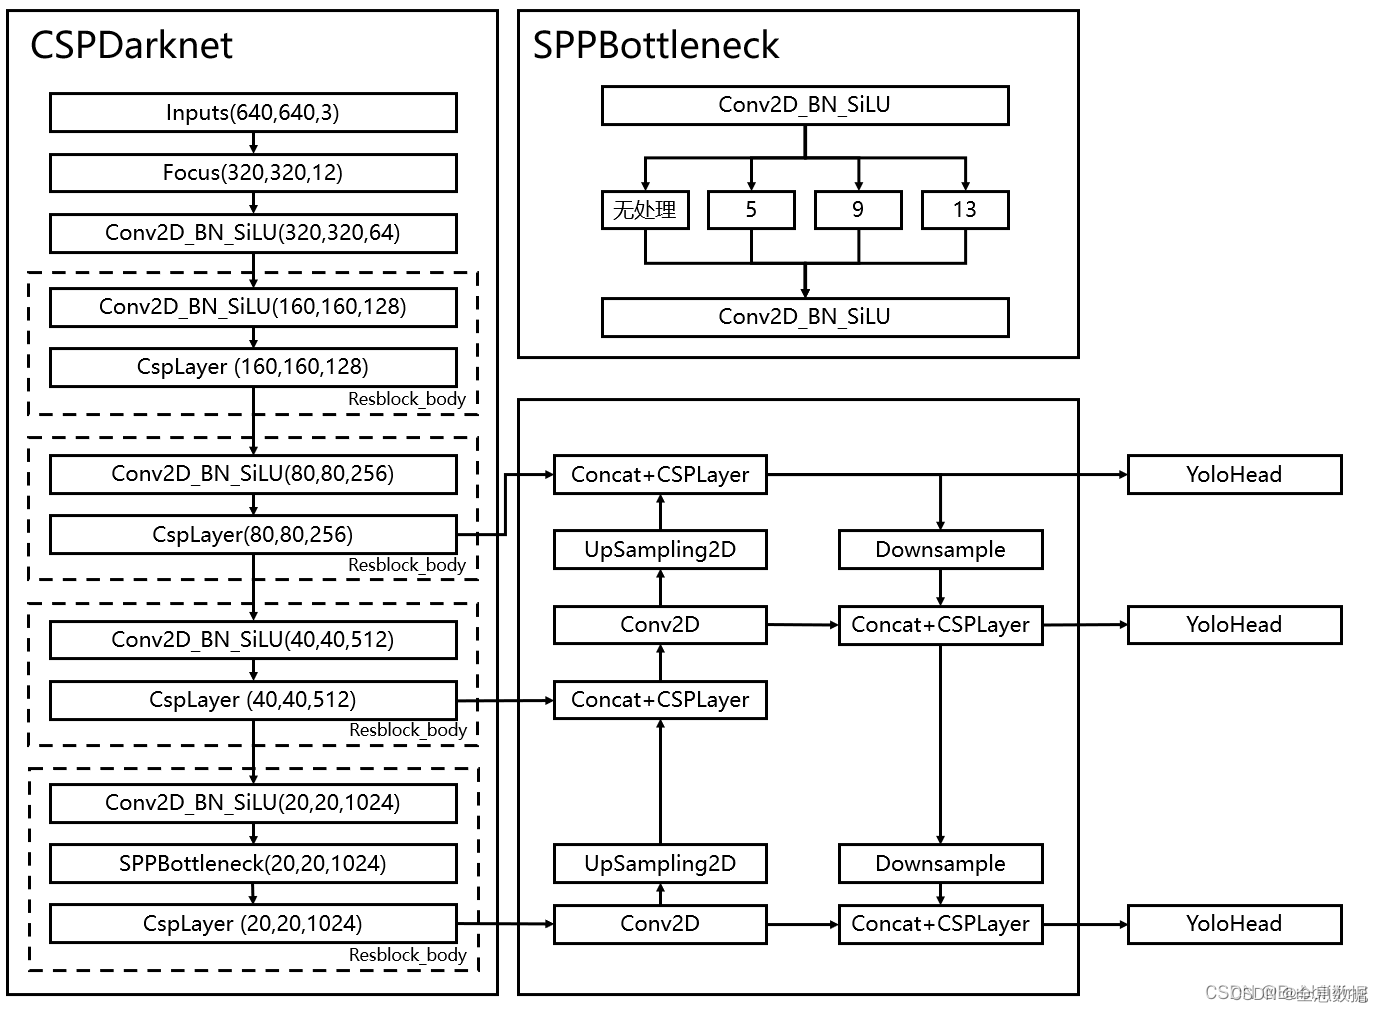
一、网络结构
1、主干网络(backbone)
下面介绍主干网络用到的网络结构
1.1 BottleNeck
作用:
1、结合不同层次的信息,使网络做的更深;
2、残差网络的特点是容易优化,并且能够通过增加相当的深度来提高准确率;
3、其内部的残差块使用了跳跃连接,缓解了在深度神经网络中增加深度带来的梯度消失问题。

import torch
import torch.nn as nn


class Bottleneck(nn.Module):
    def __init__(self, c1, c2, e, shortcut=True):
        super(Bottleneck, self).__init__()
        self.c_ = int(c1 * e)  # hidden channels
        self.conv1 = nn.Conv2d(c1, self.c_, 1, 1)
        self.conv2 = nn.Conv2d(self.c_, c2, 3, 1, 1)
        self.add = shortcut and c1 == c2

    def forward(self, x):
        return x + self.conv2(self.conv1(x)) if self.add else self.conv2(self.conv1(x))


if __name__ == '__main__':
    x = torch.randn(2, 3, 3, 3)
    print(x.shape)
    out = Bottleneck(3, 3, 0.5)(x)
    print(out.shape)
输出:
torch.Size([2, 3, 3, 3])
torch.Size([2, 3, 3, 3])
1.2 CSPnet
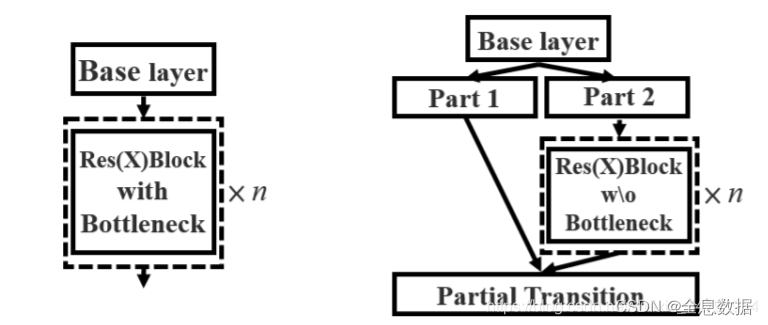
作用:
1、
过程:
1、输入的feature map先做1×1卷积,然后再进行Bottleneck,得到f1;
2、输入的feature map只做1×1卷积,得到f2;
3、对f1和f2进行堆叠,再进行1×1卷积得到f3;
class CspNet(nn.Module):
    def __init__(self, c1, c2, e, n=1):
        super(CspNet, self).__init__()
        c_ = int(c1 * e)
        self.conv1 = nn.Conv2d(c1, c_, 1, 1)
        self.conv2 = nn.Conv2d(c1, c_, 1, 1)
        self.conv3 = nn.Conv2d(2 * c_, c2, 1, 1)
        self.m = nn.Sequential(*[Bottleneck(c_, c_, 0.5) for _ in range(n)])

    def forward(self, x):
        return self.conv3(torch.cat((self.m(self.conv1(x)), self.conv2(x)), dim=1))


if __name__ == '__main__':
    x = torch.randn(2, 5, 3, 3)
    print(x.shape)
    out = CspNet(5, 5, 0.5)(x)
    print(out.shape)
输出:
torch.Size([2, 5, 3, 3])
torch.Size([2, 5, 3, 3])
1.3 Focus结构
定义:
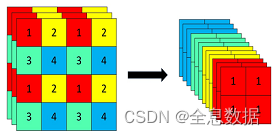
使用了Focus网络结构,这个网络结构是在YoloV5里面使用到比较有趣的网络结构,具体操作是在一张图片中每隔一个像素拿到一个值,这个时候获得了四个独立的特征层,然后将四个独立的特征层进行堆叠,此时宽高信息就集中到了通道信息,输入通道扩充了四倍。拼接起来的特征层相对于原先的三通道变成了十二个通道,下图很好的展示了Focus结构,一看就能明白。
import torch
import torch.nn as nn


class Focus(nn.Module):
    def __init__(self, c1, c2):
        super(Focus, self).__init__()
        self.conv1 = nn.Conv2d(c1 * 4, c2, 1, 1)

    def forward(self, x):
        return self.conv1(
            torch.cat((x[..., ::2, ::2], x[..., ::2, 1::2], x[..., 1::2, ::2], x[..., 1::2, 1::2]), dim=1))


if __name__ == '__main__':
    x = torch.randn(2, 3, 4, 4)
    print(x.shape)
    out = Focus(3, 3)(x)
    print(out.shape)
输出:
torch.Size([2, 3, 4, 4])
torch.Size([2, 3, 2, 2])
1.4 Silu激活函数
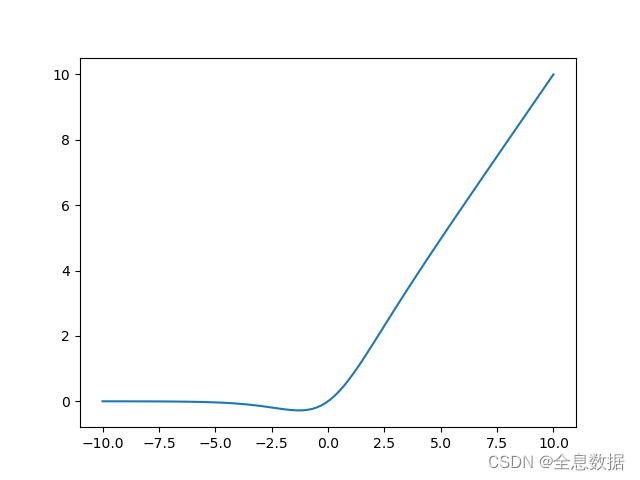
silu激活函数结合了relu和sigmoid函数,具备无上界有下界、平滑、非单调的特性。SiLU在深层模型上的效果优于 ReLU。可以看做是平滑的ReLU激活函数。
import matplotlib.pyplot as pl
import torch
import torch.nn as nn
import numpy as np


class SiLU(nn.Module):
    @staticmethod
    def forward(x):
        return x * torch.sigmoid(x)


# x=torch.randn(2,3,3,3)
x = np.linspace(-10, 10, 100)
out = SiLU.forward(torch.from_numpy(x))
print(out.shape)  # torch.Size([100])
fig = pl.figure()
pl.plot(x, out)
pl.show()
输出:
1.5 SPP结构
定义:
使用不同大小的池化核对feature map分别进行池化,然后进行堆叠之后再卷积;
作用:
通过不同大小的池化核进行池化,会提高网络的感受野。在YoloV4中,SPP是用在FPN里面的,在YoloV5中,SPP模块被用在了主干特征提取网络中。
import torch
import torch.nn as nn


class SPP(nn.Module):
    def __init__(self, c1, c2, k=[5, 7, 13]):
        super(SPP, self).__init__()
        c_ = int(c1 // 2)  # hidden channel
        self.conv1 = nn.Conv2d(c1, c_, 1, 1)
        self.conv2 = nn.Conv2d(c_ * (len(k) + 1), c2, 1, 1)
        self.m = nn.ModuleList([nn.MaxPool2d(kernel_size=_, stride=1, padding=_ // 2) for _ in k])

    def forward(self, x):
        x = self.conv1(x)
        return self.conv2(torch.cat([x] + [m(x) for m in self.m], dim=1))


if __name__ == '__main__':
    x = torch.randn(2, 3, 26, 26)
    out = SPP(3, 3)(x)
    print(out.shape)
输出:
torch.Size([2, 3, 26, 26])
1.6 整个主干(backbone)实现代码
import torch
import torch.nn as nn


class SiLU(nn.Module):
    @staticmethod
    def forward(x):
        return x * torch.sigmoid(x)


def autopad(k, p=None):
    if p is None:
        p = k // 2 if isinstance(k, int) else [x // 2 for x in k]
    return p


class Focus(nn.Module):
    def __init__(self, c1, c2, k=1, s=1, p=None, g=1, act=True):  # ch_in, ch_out, kernel, stride, padding, groups
        super(Focus, self).__init__()
        self.conv = Conv(c1 * 4, c2, k, s, p, g, act)

    def forward(self, x):
        return self.conv(torch.cat([x[..., ::2, ::2], x[..., 1::2, ::2], x[..., ::2, 1::2], x[..., 1::2, 1::2]], 1))


class Conv(nn.Module):
    def __init__(self, c1, c2, k=1, s=1, p=None, g=1, act=True):
        super(Conv, self).__init__()
        self.conv = nn.Conv2d(c1, c2, k, s, autopad(k, p), groups=g, bias=False)
        self.bn = nn.BatchNorm2d(c2, eps=0.001, momentum=0.03)
        self.act = SiLU() if act is True else (act if isinstance(act, nn.Module) else nn.Identity())

    def forward(self, x):
        return self.act(self.bn(self.conv(x)))

    def fuseforward(self, x):
        return self.act(self.conv(x))


class Bottleneck(nn.Module):
    # Standard bottleneck
    def __init__(self, c1, c2, shortcut=True, g=1, e=0.5):  # ch_in, ch_out, shortcut, groups, expansion
        super(Bottleneck, self).__init__()
        c_ = int(c2 * e)  # hidden channels
        self.cv1 = Conv(c1, c_, 1, 1)
        self.cv2 = Conv(c_, c2, 3, 1, g=g)
        self.add = shortcut and c1 == c2

    def forward(self, x):
        return x + self.cv2(self.cv1(x)) if self.add else self.cv2(self.cv1(x))


class C3(nn.Module):
    # CSP Bottleneck with 3 convolutions
    def __init__(self, c1, c2, n=1, shortcut=True, g=1, e=0.5):  # ch_in, ch_out, number, shortcut, groups, expansion
        super(C3, self).__init__()
        c_ = int(c2 * e)  # hidden channels
        self.cv1 = Conv(c1, c_, 1, 1)
        self.cv2 = Conv(c1, c_, 1, 1)
        self.cv3 = Conv(2 * c_, c2, 1)  # act=FReLU(c2)
        self.m = nn.Sequential(*[Bottleneck(c_, c_, shortcut, g, e=1.0) for _ in range(n)])
        # self.m = nn.Sequential(*[CrossConv(c_, c_, 3, 1, g, 1.0, shortcut) for _ in range(n)])

    def forward(self, x):
        return self.cv3(torch.cat((self.m(self.cv1(x)), self.cv2(x)), dim=1))


class SPP(nn.Module):
    # Spatial pyramid pooling layer used in YOLOv3-SPP
    def __init__(self, c1, c2, k=(5, 9, 13)):
        super(SPP, self).__init__()
        c_ = c1 // 2  # hidden channels
        self.cv1 = Conv(c1, c_, 1, 1)
        self.cv2 = Conv(c_ * (len(k) + 1), c2, 1, 1)
        self.m = nn.ModuleList([nn.MaxPool2d(kernel_size=x, stride=1, padding=x // 2) for x in k])

    def forward(self, x):
        x = self.cv1(x)
        return self.cv2(torch.cat([x] + [m(x) for m in self.m], 1))


class CSPDarknet(nn.Module):
    def __init__(self, base_channels, base_depth):
        super().__init__()
        # -----------------------------------------------#
        #   输入图片是640, 640, 3
        #   初始的基本通道是64
        # -----------------------------------------------#

        # -----------------------------------------------#
        #   利用focus网络结构进行特征提取
        #   640, 640, 3 -> 320, 320, 12 -> 320, 320, 64
        # -----------------------------------------------#
        self.stem = Focus(3, base_channels, k=3)
        # -----------------------------------------------#
        #   完成卷积之后,320, 320, 64 -> 160, 160, 128
        #   完成CSPlayer之后,160, 160, 128 -> 160, 160, 128
        # -----------------------------------------------#
        self.dark2 = nn.Sequential(
            Conv(base_channels, base_channels * 2, 3, 2),
            C3(base_channels * 2, base_channels * 2, base_depth),
        )
        # -----------------------------------------------#
        #   完成卷积之后,160, 160, 128 -> 80, 80, 256
        #   完成CSPlayer之后,80, 80, 256 -> 80, 80, 256
        # -----------------------------------------------#
        self.dark3 = nn.Sequential(
            Conv(base_channels * 2, base_channels * 4, 3, 2),
            C3(base_channels * 4, base_channels * 4, base_depth * 3),
        )

        # -----------------------------------------------#
        #   完成卷积之后,80, 80, 256 -> 40, 40, 512
        #   完成CSPlayer之后,40, 40, 512 -> 40, 40, 512
        # -----------------------------------------------#
        self.dark4 = nn.Sequential(
            Conv(base_channels * 4, base_channels * 8, 3, 2),
            C3(base_channels * 8, base_channels * 8, base_depth * 3),
        )
        # -----------------------------------------------#
        #   完成卷积之后,40, 40, 512 -> 20, 20, 1024
        #   完成SPP之后,20, 20, 1024 -> 20, 20, 1024
        #   完成CSPlayer之后,20, 20, 1024 -> 20, 20, 1024
        # -----------------------------------------------#
        self.dark5 = nn.Sequential(
            Conv(base_channels * 8, base_channels * 16, 3, 2),
            SPP(base_channels * 16, base_channels * 16),
            C3(base_channels * 16, base_channels * 16, base_depth, shortcut=False),
        )

    def forward(self, x):
        x = self.stem(x)
        x = self.dark2(x)
        # -----------------------------------------------#
        #   dark3的输出为80, 80, 256,是一个有效特征层
        # -----------------------------------------------#
        x = self.dark3(x)
        feat1 = x
        # -----------------------------------------------#
        #   dark4的输出为40, 40, 512,是一个有效特征层
        # -----------------------------------------------#
        x = self.dark4(x)
        feat2 = x
        # -----------------------------------------------#
        #   dark5的输出为20, 20, 1024,是一个有效特征层
        # -----------------------------------------------#
        x = self.dark5(x)
        feat3 = x
        return feat1, feat2, feat3


if __name__ == '__main__':
    x = torch.randn(2, 3, 640, 640)
    out = CSPDarknet(64, 3)(x)
    for item in out:
        print(item.shape)
输出:
torch.Size([2, 256, 80, 80])
torch.Size([2, 512, 40, 40])
torch.Size([2, 1024, 20, 20])
2、FPN(特征金字塔)
作用:进行加强特征提取
过程:
1、在backbone提取到3个有效特征层,当输入为[2, 3, 640, 640],则3个有效特征层分别为:[2, 256,80, 80],[2, 512, 40, 40],[2, 1024, 20, 20],然后利用这3个有效特征层进行FPN的构建;
2、feat3=(20,20,1024)的特征层进行1次1X1卷积调整通道后获得P5,P5进行上采样UmSampling2d后与feat2=(40,40,512)特征层进行结合,然后使用CSPLayer进行特征提取获得P5_upsample,此时获得的特征层为(40,40,512)。
3、P5_upsample=(40,40,512)的特征层进行1次1X1卷积调整通道后获得P4,P4进行上采样UmSampling2d后与feat1=(80,80,256)特征层进行结合,然后使用CSPLayer进行特征提取P3_out,此时获得的特征层为(80,80,256)。
4、P3_out=(80,80,256)的特征层进行一次3x3卷积进行下采样,下采样后与P4堆叠,然后使用CSPLayer进行特征提取P4_out,此时获得的特征层为(40,40,512)。
5、P4_out=(40,40,512)的特征层进行一次3x3卷积进行下采样,下采样后与P5堆叠,然后使用CSPLayer进行特征提取P5_out,此时获得的特征层为(20,20,1024)。
代码:
假设类别数:80
import torch
import torch.nn as nn

from nets.CSPdarknet import CSPDarknet, C3, Conv


# ---------------------------------------------------#
#   yolo_body
# ---------------------------------------------------#
class YoloBody(nn.Module):
    def __init__(self, anchors_mask, num_classes, phi):
        super(YoloBody, self).__init__()
        depth_dict = {'s': 0.33, 'm': 0.67, 'l': 1.00, 'x': 1.33, }
        width_dict = {'s': 0.50, 'm': 0.75, 'l': 1.00, 'x': 1.25, }
        dep_mul, wid_mul = depth_dict[phi], width_dict[phi]

        base_channels = int(wid_mul * 64)  # 64
        base_depth = max(round(dep_mul * 3), 1)  # 3
        # -----------------------------------------------#
        #   输入图片是640, 640, 3
        #   初始的基本通道是64
        # -----------------------------------------------#

        # ---------------------------------------------------#
        #   生成CSPdarknet53的主干模型
        #   获得三个有效特征层,他们的shape分别是:
        #   80,80,256
        #   40,40,512
        #   20,20,1024
        # ---------------------------------------------------#
        self.backbone = CSPDarknet(base_channels, base_depth)

        self.upsample = nn.Upsample(scale_factor=2, mode="nearest")

        self.conv_for_feat3 = Conv(base_channels * 16, base_channels * 8, 1, 1)
        self.conv3_for_upsample1 = C3(base_channels * 16, base_channels * 8, base_depth, shortcut=False)

        self.conv_for_feat2 = Conv(base_channels * 8, base_channels * 4, 1, 1)
        self.conv3_for_upsample2 = C3(base_channels * 8, base_channels * 4, base_depth, shortcut=False)

        self.down_sample1 = Conv(base_channels * 4, base_channels * 4, 3, 2)
        self.conv3_for_downsample1 = C3(base_channels * 8, base_channels * 8, base_depth, shortcut=False)

        self.down_sample2 = Conv(base_channels * 8, base_channels * 8, 3, 2)
        self.conv3_for_downsample2 = C3(base_channels * 16, base_channels * 16, base_depth, shortcut=False)

        self.yolo_head_P3 = nn.Conv2d(base_channels * 4, len(anchors_mask[2]) * (5 + num_classes), 1)
        self.yolo_head_P4 = nn.Conv2d(base_channels * 8, len(anchors_mask[1]) * (5 + num_classes), 1)
        self.yolo_head_P5 = nn.Conv2d(base_channels * 16, len(anchors_mask[0]) * (5 + num_classes), 1)

    def forward(self, x):
        #  backbone
        feat1, feat2, feat3 = self.backbone(x)

        P5 = self.conv_for_feat3(feat3)
        P5_upsample = self.upsample(P5)
        P4 = torch.cat([P5_upsample, feat2], 1)
        P4 = self.conv3_for_upsample1(P4)

        P4 = self.conv_for_feat2(P4)
        P4_upsample = self.upsample(P4)
        P3 = torch.cat([P4_upsample, feat1], 1)
        P3 = self.conv3_for_upsample2(P3)

        P3_downsample = self.down_sample1(P3)
        P4 = torch.cat([P3_downsample, P4], 1)
        P4 = self.conv3_for_downsample1(P4)

        P4_downsample = self.down_sample2(P4)
        P5 = torch.cat([P4_downsample, P5], 1)
        P5 = self.conv3_for_downsample2(P5)

        # ---------------------------------------------------#
        #   第三个特征层
        #   y3=(batch_size,75,80,80)
        # ---------------------------------------------------#
        out2 = self.yolo_head_P3(P3)
        # ---------------------------------------------------#
        #   第二个特征层
        #   y2=(batch_size,75,40,40)
        # ---------------------------------------------------#
        out1 = self.yolo_head_P4(P4)
        # ---------------------------------------------------#
        #   第一个特征层
        #   y1=(batch_size,75,20,20)
        # ---------------------------------------------------#
        out0 = self.yolo_head_P5(P5)
        return out0, out1, out2


if __name__ == '__main__':
    x = torch.randn(2, 3, 640, 640)
    out = YoloBody([[1, 2, 3], [4, 5, 6], [7, 8, 9]], 80, "l")(x)
    for item in out:
        print(item.shape)
输出:
torch.Size([2, 255, 20, 20])
torch.Size([2, 255, 40, 40])
torch.Size([2, 255, 80, 80])
3、利用Yolo Head获取预测结果
下面复制于原链接:
利用FPN特征金字塔,我们可以获得三个加强特征,这三个加强特征的shape分别为(20,20,1024)、(40,40,512)、(80,80,256),然后我们利用这三个shape的特征层传入Yolo Head获得预测结果。
对于每一个特征层,我们可以获得利用一个卷积调整通道数,最终的通道数和需要区分的种类个数相关,在YoloV5里,每一个特征层上每一个特征点存在3个先验框。
如果使用的是voc训练集,类则为20种,最后的维度应该为75 = 3x25,三个特征层的shape为(20,20,75),(40,40,75),(80,80,75)。
最后的75可以拆分成3个25,对应3个先验框的25个参数,25可以拆分成4+1+20。
前4个参数用于判断每一个特征点的回归参数,回归参数调整后可以获得预测框;
第5个参数用于判断每一个特征点是否包含物体;
最后20个参数用于判断每一个特征点所包含的物体种类。
如果使用的是coco训练集,类则为80种,最后的维度应该为255 = 3x85,三个特征层的shape为(20,20,255),(40,40,255),(80,80,255)
最后的255可以拆分成3个85,对应3个先验框的85个参数,85可以拆分成4+1+80。
前4个参数用于判断每一个特征点的回归参数,回归参数调整后可以获得预测框;
第5个参数用于判断每一个特征点是否包含物体;
最后80个参数用于判断每一个特征点所包含的物体种类。
代码同上。
二、预测结果的解码
1、预测框和先验框(anchor)的解析
以下是摘录于原博客:
由第二步我们可以获得三个特征层的预测结果,shape分别为(N,20,20,255),(N,40,40,255),(N,80,80,255)的数据。
但是这个预测结果并不对应着最终的预测框在图片上的位置,还需要解码才可以完成。在YoloV5里,每一个特征层上每一个特征点存在3个先验框。
每个特征层最后的255可以拆分成3个85,对应3个先验框的85个参数,我们先将其reshape一下,其结果为(N,20,20,3,85),(N,40.40,3,85),(N,80,80,3,85)。
其中的85可以拆分成4+1+80。
前4个参数用于判断每一个特征点的回归参数,回归参数调整后可以获得预测框;
第5个参数用于判断每一个特征点是否包含物体;
最后80个参数用于判断每一个特征点所包含的物体种类。
以(N,20,20,3,85)这个特征层为例,该特征层相当于将图像划分成20x20个特征点,如果某个特征点落在物体的对应框内,就用于预测该物体。
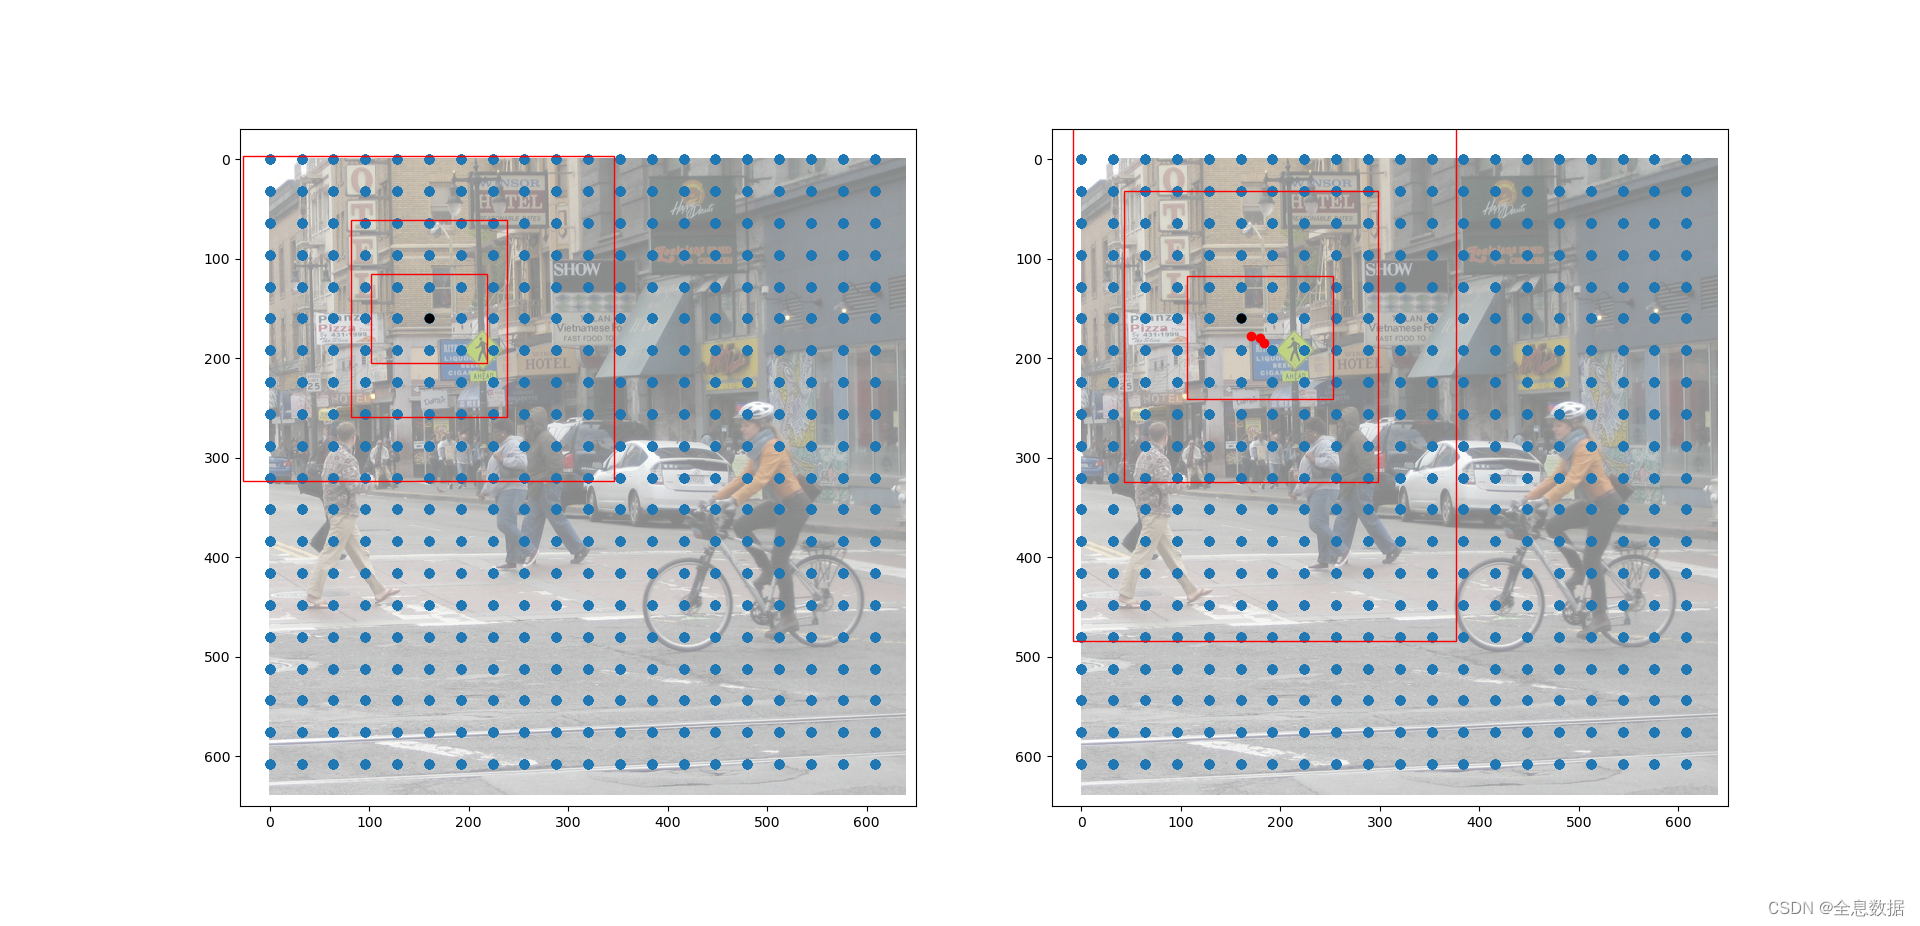
如图所示,蓝色的点为20x20的特征点,此时我们对左图黑色点的三个先验框进行解码操作演示:
1、进行中心预测点的计算,利用Regression预测结果前两个序号的内容对特征点的三个先验框中心坐标进行偏移,偏移后是右图红色的三个点;
2、进行预测框宽高的计算,利用Regression预测结果后两个序号的内容求指数后获得预测框的宽高;
3、此时获得的预测框就可以绘制在图片上了。
这是我的理解:
decode_box()就是把yolo head得出的3个feature map进行进一步的处理,如果设定batch-size为2,类别数为80,则输出的3个feature map为torch.Size([2, 255, 20, 20]),torch.Size([2, 255, 40, 40]),torch.Size([2, 255, 80, 80]),经过对feature map的reshape调整shape为:torch.Size([2, 3,20, 20, 85]),torch.Size([2, 3,40, 40, 85]),torch.Size([2, 3,80, 80, 85]),最后一个85维分别是:前4维是预测框的下x, y, w, h,第5维是预测框的置信度,第6维到第85维是类别80类。
然后对前4维进行调整,详见代码,调整后的框即为我们预测的框。
最后对我们预测的框进行归一化,再和置信度、种类进行堆叠之后的shape为:torch.Size([2, 3*20,*20, 85]),然后将堆叠后的feature map传给non_max_suppression()。
代码:
下面的代码我费了好长时间才看懂,这个链接有助于看懂下面的代码
关于调整anchor_w 和anchor_h的size,请先看一下这段代码,很详细,应该能看懂
import numpy as np
import torch
anchors = np.array([[116, 90], [156, 198], [373, 326], [30, 61], [62, 45], [59, 119], [10, 13], [16, 30], [33, 23]])
print(anchors.shape)
anchors_mask = [[6, 7, 8], [3, 4, 5], [0, 1, 2]]
scaled_anchors = [(anchor_width / 32, anchor_height / 32) for anchor_width, anchor_height in
                          anchors[anchors_mask[2]]]
print(scaled_anchors)
print(torch.FloatTensor(scaled_anchors))
print(torch.FloatTensor(scaled_anchors).shape)
# 输出:
(9, 2)
[(3.625, 2.8125), (4.875, 6.1875), (11.65625, 10.1875)]
tensor([[ 3.6250,  2.8125],
        [ 4.8750,  6.1875],
        [11.6562, 10.1875]])
torch.Size([3, 2])
------------------------------------
batch_size=2
input_height=input_width=20
anchor_w = torch.FloatTensor(scaled_anchors).index_select(1, torch.LongTensor([0]))  # 取出anchor的width
anchor_h = torch.FloatTensor(scaled_anchors).index_select(1, torch.LongTensor([1]))  # 取出anchor的high
print(anchor_w)
print(anchor_h)
# 输出:
tensor([[ 3.6250],
        [ 4.8750],
        [11.6562]])
tensor([[ 2.8125],
        [ 6.1875],
        [10.1875]])
-------------------------------------
anchor_w = anchor_w.repeat(batch_size, 1)
print(anchor_w)
print(anchor_w.shape)
# 输出:
tensor([[ 3.6250],
        [ 4.8750],
        [11.6562],
        [ 3.6250],
        [ 4.8750],
        [11.6562]])
torch.Size([6, 1])
----------------------------------------
anchor_w=anchor_w.repeat(1, 1, input_height * input_width)
print(anchor_w)
print(anchor_w.shape)
# 输出:
tensor([[[ 3.6250,  3.6250,  3.6250,  ...,  3.6250,  3.6250,  3.6250],
         [ 4.8750,  4.8750,  4.8750,  ...,  4.8750,  4.8750,  4.8750],
         [11.6562, 11.6562, 11.6562,  ..., 11.6562, 11.6562, 11.6562],
         [ 3.6250,  3.6250,  3.6250,  ...,  3.6250,  3.6250,  3.6250],
         [ 4.8750,  4.8750,  4.8750,  ...,  4.8750,  4.8750,  4.8750],
         [11.6562, 11.6562, 11.6562,  ..., 11.6562, 11.6562, 11.6562]]])
torch.Size([1, 6, 400])
---------------------------------------------
anchor_w=anchor_w.view([2,3,20,20])
print(anchor_w)
print(anchor_w.shape)
# 输出:
tensor([[[[ 3.6250,  3.6250,  3.6250,  ...,  3.6250,  3.6250,  3.6250],
          [ 3.6250,  3.6250,  3.6250,  ...,  3.6250,  3.6250,  3.6250],
          [ 3.6250,  3.6250,  3.6250,  ...,  3.6250,  3.6250,  3.6250],
          ...,
          [ 3.6250,  3.6250,  3.6250,  ...,  3.6250,  3.6250,  3.6250],
          [ 3.6250,  3.6250,  3.6250,  ...,  3.6250,  3.6250,  3.6250],
          [ 3.6250,  3.6250,  3.6250,  ...,  3.6250,  3.6250,  3.6250]],

         [[ 4.8750,  4.8750,  4.8750,  ...,  4.8750,  4.8750,  4.8750],
          [ 4.8750,  4.8750,  4.8750,  ...,  4.8750,  4.8750,  4.8750],
          [ 4.8750,  4.8750,  4.8750,  ...,  4.8750,  4.8750,  4.8750],
          ...,
          [ 4.8750,  4.8750,  4.8750,  ...,  4.8750,  4.8750,  4.8750],
          [ 4.8750,  4.8750,  4.8750,  ...,  4.8750,  4.8750,  4.8750],
          [ 4.8750,  4.8750,  4.8750,  ...,  4.8750,  4.8750,  4.8750]],

         [[11.6562, 11.6562, 11.6562,  ..., 11.6562, 11.6562, 11.6562],
          [11.6562, 11.6562, 11.6562,  ..., 11.6562, 11.6562, 11.6562],
          [11.6562, 11.6562, 11.6562,  ..., 11.6562, 11.6562, 11.6562],
          ...,
          [11.6562, 11.6562, 11.6562,  ..., 11.6562, 11.6562, 11.6562],
          [11.6562, 11.6562, 11.6562,  ..., 11.6562, 11.6562, 11.6562],
          [11.6562, 11.6562, 11.6562,  ..., 11.6562, 11.6562, 11.6562]]],


        [[[ 3.6250,  3.6250,  3.6250,  ...,  3.6250,  3.6250,  3.6250],
          [ 3.6250,  3.6250,  3.6250,  ...,  3.6250,  3.6250,  3.6250],
          [ 3.6250,  3.6250,  3.6250,  ...,  3.6250,  3.6250,  3.6250],
          ...,
          [ 3.6250,  3.6250,  3.6250,  ...,  3.6250,  3.6250,  3.6250],
          [ 3.6250,  3.6250,  3.6250,  ...,  3.6250,  3.6250,  3.6250],
          [ 3.6250,  3.6250,  3.6250,  ...,  3.6250,  3.6250,  3.6250]],

         [[ 4.8750,  4.8750,  4.8750,  ...,  4.8750,  4.8750,  4.8750],
          [ 4.8750,  4.8750,  4.8750,  ...,  4.8750,  4.8750,  4.8750],
          [ 4.8750,  4.8750,  4.8750,  ...,  4.8750,  4.8750,  4.8750],
          ...,
          [ 4.8750,  4.8750,  4.8750,  ...,  4.8750,  4.8750,  4.8750],
          [ 4.8750,  4.8750,  4.8750,  ...,  4.8750,  4.8750,  4.8750],
          [ 4.8750,  4.8750,  4.8750,  ...,  4.8750,  4.8750,  4.8750]],

         [[11.6562, 11.6562, 11.6562,  ..., 11.6562, 11.6562, 11.6562],
          [11.6562, 11.6562, 11.6562,  ..., 11.6562, 11.6562, 11.6562],
          [11.6562, 11.6562, 11.6562,  ..., 11.6562, 11.6562, 11.6562],
          ...,
          [11.6562, 11.6562, 11.6562,  ..., 11.6562, 11.6562, 11.6562],
          [11.6562, 11.6562, 11.6562,  ..., 11.6562, 11.6562, 11.6562],
          [11.6562, 11.6562, 11.6562,  ..., 11.6562, 11.6562, 11.6562]]]])
torch.Size([2, 3, 20, 20])
def decode_box(self, inputs):
    outputs = []
    for i, input in enumerate(inputs):
        # -----------------------------------------------#
        #   输入的input一共有三个,他们的shape分别是
        #   batch_size = 1
        #   batch_size, 3 * (4 + 1 + 80), 20, 20
        #   batch_size, 255, 40, 40
        #   batch_size, 255, 80, 80
        # -----------------------------------------------#
        batch_size = input.size(0)
        input_height = input.size(2)
        input_width = input.size(3)

        # -----------------------------------------------#
        #   输入为640x640时
        #   stride_h = stride_w = 32、16、8
        # -----------------------------------------------#
        stride_h = self.input_shape[0] / input_height
        stride_w = self.input_shape[1] / input_width
        # -------------------------------------------------#
        #   此时获得的scaled_anchors大小是相对于特征层的
        #   scaled_anchors.shape:torch.Size([3, 2])
        # -------------------------------------------------#
        scaled_anchors = [(anchor_width / stride_w, anchor_height / stride_h) for anchor_width, anchor_height in
                          self.anchors[self.anchors_mask[i]]]

        # -----------------------------------------------#
        #   输入的input一共有三个,他们的shape分别是
        #   batch_size, 3, 20, 20, 85
        #   batch_size, 3, 40, 40, 85
        #   batch_size, 3, 80, 80, 85
        # -----------------------------------------------#
        prediction = input.view(batch_size, len(self.anchors_mask[i]),
                                self.bbox_attrs, input_height, input_width).permute(0, 1, 3, 4, 2).contiguous()

        # -----------------------------------------------#
        #   先验框的中心位置的调整参数
        # -----------------------------------------------#
        x = torch.sigmoid(prediction[..., 0])  # shape:torch.Size([b-s, 3, 20, 20])
        y = torch.sigmoid(prediction[..., 1])
        # -----------------------------------------------#
        #   先验框的宽高调整参数
        # -----------------------------------------------#
        w = torch.sigmoid(prediction[..., 2])
        h = torch.sigmoid(prediction[..., 3])
        # -----------------------------------------------#
        #   获得置信度,是否有物体
        # -----------------------------------------------#
        conf = torch.sigmoid(prediction[..., 4])
        # -----------------------------------------------#
        #   种类置信度
        # -----------------------------------------------#
        pred_cls = torch.sigmoid(prediction[..., 5:])  # shape:torch.Size([b-s, 3, 20, 20, 80])

        FloatTensor = torch.cuda.FloatTensor if x.is_cuda else torch.FloatTensor
        LongTensor = torch.cuda.LongTensor if x.is_cuda else torch.LongTensor

        # ----------------------------------------------------------#
        #   生成网格,先验框中心,网格左上角
        #   batch_size,3,20,20
        # ----------------------------------------------------------#
        grid_x = torch.linspace(0, input_width - 1, input_width).repeat(input_height, 1).repeat(
            batch_size * len(self.anchors_mask[i]), 1, 1).view(x.shape).type(FloatTensor)
        grid_y = torch.linspace(0, input_height - 1, input_height).repeat(input_width, 1).t().repeat(
            batch_size * len(self.anchors_mask[i]), 1, 1).view(y.shape).type(FloatTensor)

        # ----------------------------------------------------------#
        #   按照网格格式生成先验框的宽高
        #   batch_size,3,20,20
        # ----------------------------------------------------------#
        anchor_w = FloatTensor(scaled_anchors).index_select(1, LongTensor([0]))
        anchor_h = FloatTensor(scaled_anchors).index_select(1, LongTensor([1]))
        anchor_w = anchor_w.repeat(batch_size, 1).repeat(1, 1, input_height * input_width).view(w.shape)
        anchor_h = anchor_h.repeat(batch_size, 1).repeat(1, 1, input_height * input_width).view(h.shape)

        # ----------------------------------------------------------#
        #   利用预测结果对先验框进行调整
        #   首先调整先验框的中心,从先验框中心向右下角偏移
        #   再调整先验框的宽高。
        #   x 0 ~ 1 => 0 ~ 2 => -0.5, 1.5 => 负责一定范围的目标的预测
        #   y 0 ~ 1 => 0 ~ 2 => -0.5, 1.5 => 负责一定范围的目标的预测
        #   w 0 ~ 1 => 0 ~ 2 => 0 ~ 4 => 先验框的宽高调节范围为0~4倍
        #   h 0 ~ 1 => 0 ~ 2 => 0 ~ 4 => 先验框的宽高调节范围为0~4倍
        # ----------------------------------------------------------#
        pred_boxes = FloatTensor(prediction[..., :4].shape)
        pred_boxes[..., 0] = x.data * 2. - 0.5 + grid_x
        pred_boxes[..., 1] = y.data * 2. - 0.5 + grid_y
        pred_boxes[..., 2] = (w.data * 2) ** 2 * anchor_w
        pred_boxes[..., 3] = (h.data * 2) ** 2 * anchor_h

        # ----------------------------------------------------------#
        #   将输出结果归一化成小数的形式
        #   output的shape:torch.Size([b-s, 3*20*20, 85])
        # ----------------------------------------------------------#
        _scale = torch.Tensor([input_width, input_height, input_width, input_height]).type(FloatTensor)
        output = torch.cat((pred_boxes.view(batch_size, -1, 4) / _scale,
                            conf.view(batch_size, -1, 1), pred_cls.view(batch_size, -1, self.num_classes)), -1)
        outputs.append(output.data)
    return outputs
2、得分筛选与非极大抑制(NMS)
前面的 预测框和先验框(anchor)的解析 已经得到我们预测的所有框,得分筛选与非极大抑制(NMS)对所有框进行筛选。
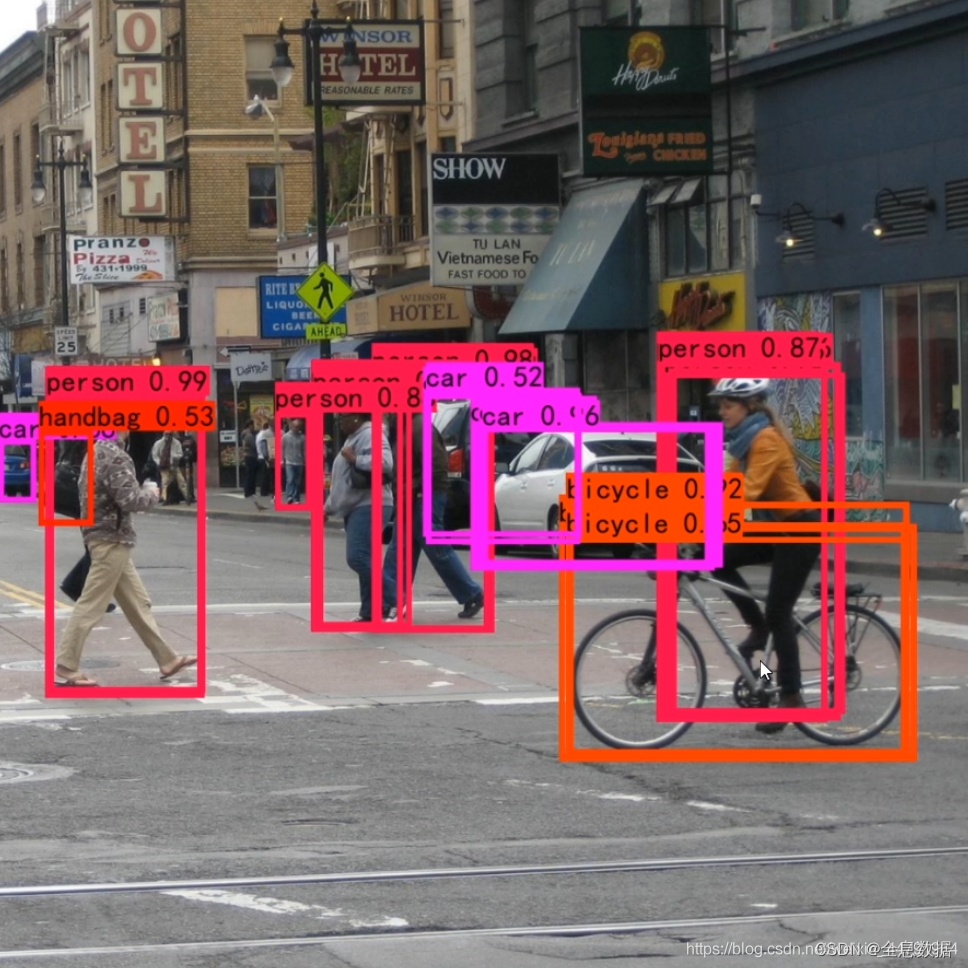
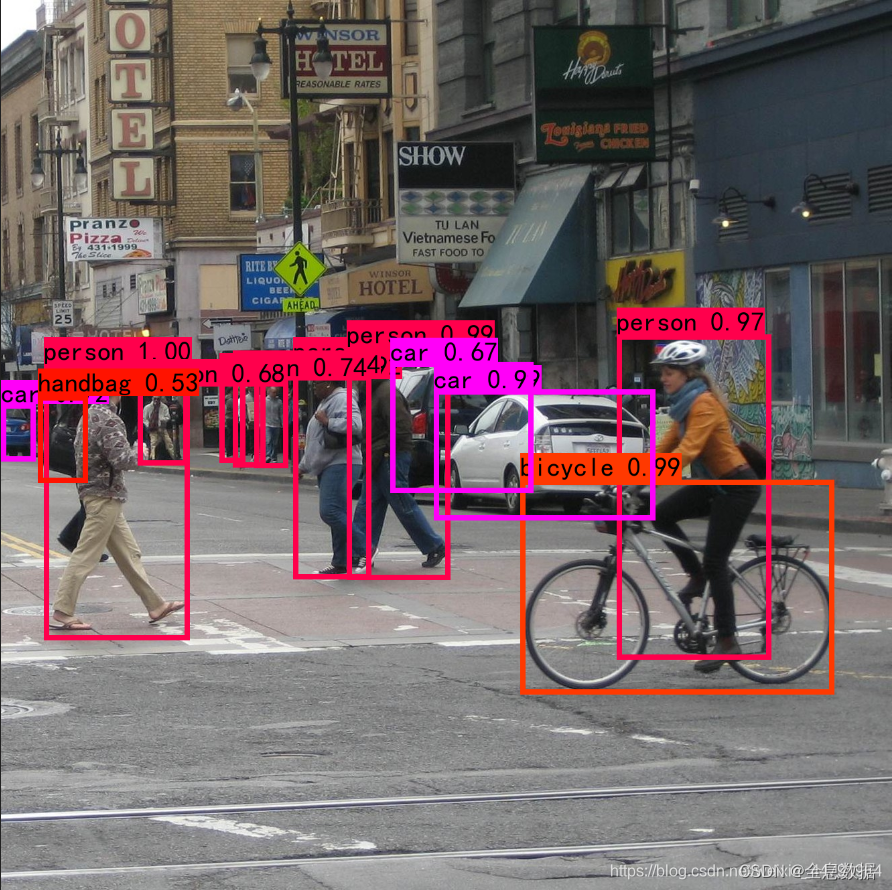
下面2个图是没有进行NMS的预测框和有NMS的预测框,摘自链接博客;
下面这段摘录于链接博客:
得到最终的预测结果后还要进行得分排序与非极大抑制筛选。
得分筛选就是筛选出得分满足confidence置信度的预测框。 非极大抑制就是筛选出一定区域内属于同一种类得分最大的框。
得分筛选与非极大抑制的过程可以概括如下:
1、找出该图片中得分大于门限函数的框。在进行重合框筛选前就进行得分的筛选可以大幅度减少框的数量。
2、对种类进行循环,非极大抑制的作用是筛选出一定区域内属于同一种类得分最大的框,对种类进行循环可以帮助我们对每一个类分别进行非极大抑制。
3、根据得分对该种类进行从大到小排序。
4、每次取出得分最大的框,计算其与其它所有预测框的重合程度,重合程度过大的则剔除。
得分筛选与非极大抑制后的结果就可以用于绘制预测框了。
下面是得分筛选与非极大抑制(NMS)的过程:
1、首先对所有的预测框进行坐标的调整,从中心宽高格式调整为左上和右下坐标格式;
2、然后对每一个图片进行遍历,通过torch.max函数得到每一个预测框的预测种类和及其种类置信度;然后再对每一个预测框预测的种类和种类置信度进行筛选,不满足条件的将被删去;
3、筛选过后的预测框的 (x1, y1, x2, y2, conf, obj_conf, class_conf, class_pred)组合成新的张量detections;
4、取出上面的detections的种类,并去重;
5、对每一个种类进行循环,先挑选出detections中所有属于同一个种类的张量,并命名为detections_class,然后根据预测框的置信度和种类置信度进行从大到小的排序,最大的当然就是最佳的预测框,并添加(append)到max_detections列表里,然后计算属于同一种类的预测框和最佳预测框的IOU,如果IOU>nms_thres将被删去,即同一区域下的预测框被删去;
6、剩下的不在同一区域的同种类的预测框detections_class得以继续保留,然后再把保留的最佳预测框添加到max_detections,继续第5步骤,直到detections_class为0;
def bbox_iou(self, box1, box2, x1y1x2y2=True):
    """
        计算IOU
    """
    if not x1y1x2y2:
        b1_x1, b1_x2 = box1[:, 0] - box1[:, 2] / 2, box1[:, 0] + box1[:, 2] / 2
        b1_y1, b1_y2 = box1[:, 1] - box1[:, 3] / 2, box1[:, 1] + box1[:, 3] / 2
        b2_x1, b2_x2 = box2[:, 0] - box2[:, 2] / 2, box2[:, 0] + box2[:, 2] / 2
        b2_y1, b2_y2 = box2[:, 1] - box2[:, 3] / 2, box2[:, 1] + box2[:, 3] / 2
    else:
        b1_x1, b1_y1, b1_x2, b1_y2 = box1[:, 0], box1[:, 1], box1[:, 2], box1[:, 3]
        b2_x1, b2_y1, b2_x2, b2_y2 = box2[:, 0], box2[:, 1], box2[:, 2], box2[:, 3]

    inter_rect_x1 = torch.max(b1_x1, b2_x1)
    inter_rect_y1 = torch.max(b1_y1, b2_y1)
    inter_rect_x2 = torch.min(b1_x2, b2_x2)
    inter_rect_y2 = torch.min(b1_y2, b2_y2)

    inter_area = torch.clamp(inter_rect_x2 - inter_rect_x1, min=0) * \
                 torch.clamp(inter_rect_y2 - inter_rect_y1, min=0)

    b1_area = (b1_x2 - b1_x1) * (b1_y2 - b1_y1)
    b2_area = (b2_x2 - b2_x1) * (b2_y2 - b2_y1)

    iou = inter_area / torch.clamp(b1_area + b2_area - inter_area, min=1e-6)

    return iou


def non_max_suppression(self, prediction, num_classes, input_shape, image_shape, letterbox_image, conf_thres=0.5,
                        nms_thres=0.4):
    # ----------------------------------------------------------#
    #   将预测结果的格式转换成左上角右下角的格式。
    #   prediction  [batch_size, num_anchors, 85]
    # ----------------------------------------------------------#
    box_corner = prediction.new(prediction.shape)
    box_corner[:, :, 0] = prediction[:, :, 0] - prediction[:, :, 2] / 2
    box_corner[:, :, 1] = prediction[:, :, 1] - prediction[:, :, 3] / 2
    box_corner[:, :, 2] = prediction[:, :, 0] + prediction[:, :, 2] / 2
    box_corner[:, :, 3] = prediction[:, :, 1] + prediction[:, :, 3] / 2
    prediction[:, :, :4] = box_corner[:, :, :4]

    output = [None for _ in range(len(prediction))]
    for i, image_pred in enumerate(prediction):
        # ----------------------------------------------------------#
        #   对种类预测部分取max。
        #   class_conf  [num_anchors, 1]    种类置信度
        #   class_pred  [num_anchors, 1]    种类
        # ----------------------------------------------------------#
        class_conf, class_pred = torch.max(image_pred[:, 5:5 + num_classes], 1, keepdim=True)

        # ----------------------------------------------------------#
        #   利用置信度进行第一轮筛选
        # ----------------------------------------------------------#
        conf_mask = (image_pred[:, 4] * class_conf[:, 0] >= conf_thres).squeeze()

        # ----------------------------------------------------------#
        #   根据置信度进行预测结果的筛选
        # ----------------------------------------------------------#
        image_pred = image_pred[conf_mask]
        class_conf = class_conf[conf_mask]
        class_pred = class_pred[conf_mask]
        if not image_pred.size(0):
            continue
        # -------------------------------------------------------------------------#
        #   detections  [num_anchors, 7]
        #   7的内容为:x1, y1, x2, y2, obj_conf, class_conf, class_pred
        # -------------------------------------------------------------------------#
        detections = torch.cat((image_pred[:, :5], class_conf.float(), class_pred.float()), 1)

        # ------------------------------------------#
        #   获得预测结果中包含的所有种类
        # ------------------------------------------#
        unique_labels = detections[:, -1].cpu().unique()

        if prediction.is_cuda:
            unique_labels = unique_labels.cuda()
            detections = detections.cuda()

        for c in unique_labels:
            # ------------------------------------------#
            #   获得某一类得分筛选后全部的预测结果
            # ------------------------------------------#
            detections_class = detections[detections[:, -1] == c]

            # #------------------------------------------#
            # #   使用官方自带的非极大抑制会速度更快一些!
            # #------------------------------------------#
            # keep = nms(
            #     detections_class[:, :4],
            #     detections_class[:, 4] * detections_class[:, 5],
            #     nms_thres
            # )
            # max_detections = detections_class[keep]

            # 按照存在物体的置信度排序
            _, conf_sort_index = torch.sort(detections_class[:, 4] * detections_class[:, 5], descending=True)
            detections_class = detections_class[conf_sort_index]
            # 进行非极大抑制
            max_detections = []
            while detections_class.size(0):
                # 取出这一类置信度最高的,一步一步往下判断,判断重合程度是否大于nms_thres,如果是则去除掉
                max_detections.append(detections_class[0].unsqueeze(0))
                if len(detections_class) == 1:
                    break
                ious = self.bbox_iou(max_detections[-1], detections_class[1:])
                detections_class = detections_class[1:][ious < nms_thres]
            # 堆叠
            max_detections = torch.cat(max_detections).data

            # Add max detections to outputs
            output[i] = max_detections if output[i] is None else torch.cat((output[i], max_detections))

        if output[i] is not None:
            output[i] = output[i].cpu().numpy()
            box_xy, box_wh = (output[i][:, 0:2] + output[i][:, 2:4]) / 2, output[i][:, 2:4] - output[i][:, 0:2]
            output[i][:, :4] = self.yolo_correct_boxes(box_xy, box_wh, input_shape, image_shape, letterbox_image)
    return output
