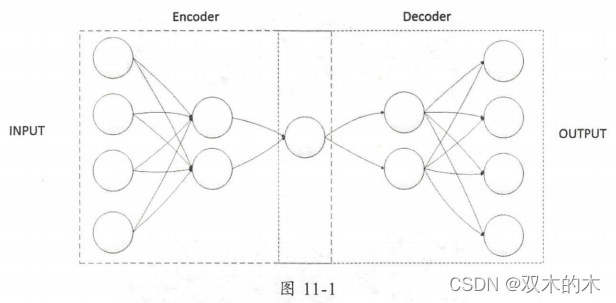
上一章《深度学习之pytorch实战计算机视觉》第10章 循环神经网络(代码可跑通)介绍了循环神经网络,接下来看自动编译器。自动编码器( AutoEncoder )是一种可以进行无监督学习的神经网络模型。一般而言,一个完整的自动编码器主要由两部分组成,分别是用于核心特征提取的编码部分(Encoder)和可以实现数据重构的解码部分(Decoder)。下面介绍自动编码器中编码部分和解码部分的具体内容,本章节的案例是马赛克图片除码处理。
11.1 自动编码器入门
在自动编码器中负责编码的部分也叫作编码器(Encoder),而负责解码的部分也叫解码器(Decoder)。编码器主要负责对原始的输入数据进行压缩并提取数据中的核心特征,而解码器主要是对在编码器提取的核心特征进行展开并重新构造之前的输入数据。看一下具体流程:

那么自动编码器模型这种先编码后解码的神经网络模型到底有什么作用?自动编码器模型的最大用途就是实现输入数据的清洗,比如去除输入数据中的噪声数据、对输入数据的某些关键特征进行增强和放大等。例如,假设我们现在有一些被打上了马赛克的图片需要进行除码处理,这时就可以通过自动编码器模型来解决,可以将这个除码的过程看作对数据进行除噪的过程,这也是我们接下来会实现的实践案例(马赛克图片除码处理)。
11.2 PyTorch之自动编码实战
看一个去除马赛克的问题。要训练这个模型,首先生成一部分有马赛克的图片,实现图片打码操作的代码如下(先不运行):
noisy_images = img_example + 0.5*np.random.randn(*img_example.shape)
noisy_images = np.clip(noisy_images,0.,1.)我们使用的MNIST数据集的图片像素点范围是0到1,所以处理马赛克的一种简单方式是对原始图片的像素点进行打乱,同理,我们通过对输入的原始图片加上一个维度响度的随机数字来处理马赛克。
同样先导库和读取数据集,代码如下:
import torch
import torchvision
from torchvision import datasets, transforms
from torch.autograd import Variable
import numpy as np
import matplotlib.pyplot as plt
import os

#和第6章很多代码相似
device = torch.device("cuda:0" if torch.cuda.is_available() else "cpu")
# 数据预处理
# transform = transforms.Compose([transforms.ToTensor(),
#                                 transforms.Normalize(mean = [0.5,0.5,0.5],std = [0.5,0.5,0.5])])
transform = transforms.Compose([transforms.ToTensor(),
                               transforms.Normalize(mean = [0.5],std = [0.5])])

# 读取数据,之前下载过,现在直接读取
dataset_train = datasets.MNIST(root = './data/',
                              transform = transform,
                              train = True,
                              download = False)
dataset_test = datasets.MNIST(root = './data/',
                             transform = transform,
                             train = False)
# 加载数据
train_loader = torch.utils.data.DataLoader(dataset = dataset_train,
                                        batch_size = 64,
                                        shuffle = True)
test_loader = torch.utils.data.DataLoader(dataset = dataset_test,
                                       batch_size = 64,
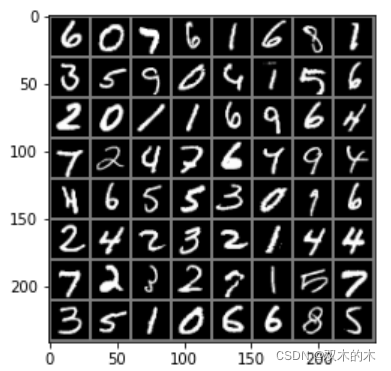
shuffle = True)随机选取一个批次,查看原始图像(马赛克之前的原图),代码如下:
#获取一个批次的图片和标签
images,labels = next(iter(train_loader))
print("images.shape:",images.shape) #images.shape: torch.Size([64, 1, 28, 28])
img_example = torchvision.utils.make_grid(images) #将一个批次的图片构造成网格模式
img_example = img_example.numpy().transpose(1,2,0)
std = [0.5]#[0.5,0.5,0.5]
mean = [0.5]#[0.5,0.5,0.5]
img_example = img_example*std + mean
# print([labels[i] for i in range(64)])  #打印这个批次数据的全部标签
plt.imshow(img_example)  #显示图片
plt.show()
输出图像:

接着使用最开始的图片打码代码,得到处理后的图片,代码:
noisy_images = img_example + 0.5*np.random.randn(*img_example.shape)
noisy_images = np.clip(noisy_images,0.,1.)#截取函数,将数组a中的所有数限定到范围a_min和a_max中
print("noisy_images.shape:",noisy_images.shape)#noisy_images.shape: (242, 242, 3)
plt.imshow(noisy_images)
plt.show()
输出打码之后的图像:

我们现在已经有了获取大量马赛克图片的方法,下面搭建自动编码器模型。最常用的两种方式分别是使用线性变换和卷积变换来构建模型中的神经网络,下面先看如何使用线性变换的方式来实现。
11.2.1 通过线性变换实现自动编码器模型
线性变换主要使用线性映射和激活函数作为神经网络结构的主要组成部分,代码如下:
class AutoEncoder(torch.nn.Module):
    def __init__(self):
        super(AutoEncoder,self).__init__()
        self.encoder = torch.nn.Sequential(
            torch.nn.Linear(28*28,128),
            torch.nn.ReLU(),
            torch.nn.Linear(128,64),
            torch.nn.ReLU(),
            torch.nn.Linear(64,32),
            torch.nn.ReLU()
        )
        self.decoder = torch.nn.Sequential(
            torch.nn.Linear(32,64),
            torch.nn.ReLU(),
            torch.nn.Linear(64,128),
            torch.nn.ReLU(),
            torch.nn.Linear(128,28*28)
        )

    def forward(self,input):
        output = self.encoder(input)
        output = self.decoder(output)
        return output

model1 = AutoEncoder()
print(model1)
model1.to(device)以上代码中self.encoder对应编码部分,实现了输入数据的数据量从224到128再到64最后到32的压缩过程,最后的32个数据就是提取的核心特征。self.decoder对应解码部分,实现了从32到64再到128最后到224的逆向解压过程。
输出结果如下:
AutoEncoder(
  (encoder): Sequential(
    (0): Linear(in_features=784, out_features=128, bias=True)
    (1): ReLU()
    (2): Linear(in_features=128, out_features=64, bias=True)
    (3): ReLU()
    (4): Linear(in_features=64, out_features=32, bias=True)
    (5): ReLU()
  )
  (decoder): Sequential(
    (0): Linear(in_features=32, out_features=64, bias=True)
    (1): ReLU()
    (2): Linear(in_features=64, out_features=128, bias=True)
    (3): ReLU()
    (4): Linear(in_features=128, out_features=784, bias=True)
  )
)
设置损失函数和优化器:
optimizer = torch.optim.Adam(model1.parameters())
loss_f = torch.nn.MSELoss()  #均方误差,衡量的是去码后和原图的无车
接着对模型进行训练,代码如下:
# 训练模型
epoch_n = 10
for epoch in range(epoch_n):
    running_loss = 0.0
    print('Epoch{}/{}'.format(epoch,epoch_n))
    print('-'*10)

    for data in train_loader:
        X_train,_ = data

        noisy_X_train = X_train + 0.5*torch.randn(X_train.shape)
        noisy_X_train = torch.clamp(noisy_X_train,0.,1.)
        X_train,noisy_X_train = Variable(X_train.view(-1,28*28).to(device)),Variable(noisy_X_train.view(-1,28*28).to(device))
        train_pred = model1(noisy_X_train)
        loss = loss_f(train_pred,X_train)

        optimizer.zero_grad()
        loss.backward()
        optimizer.step()

        running_loss += loss.data.item()

print('Loss is:{:.4f}'.format(running_loss/len(dataset_train))) 总体的训练流程:我们首先获取一个批次的图片,然后对这个批次的图片进行打码处理并裁剪到指定的像素值范围内,在 MNIST 数据集使用的图片中每个像素点的数字值在0到1之间。在得到了经过打码处理的图片后,将其输入搭建好的自动编码器模型中,经过模型处理后输出预测图片,用这个预测图片和原始图片进行损失值计算,通过这个损失值对模型进行后向传播,最后得到去除图片马赛克效果的模型。我的输出结果如下:
Epoch0/10
----------
Loss is:0.0032
Epoch1/10
----------
Loss is:0.0019
Epoch2/10
----------
Loss is:0.0017
Epoch3/10
----------
Loss is:0.0015
Epoch4/10
----------
Loss is:0.0014
Epoch5/10
----------
Loss is:0.0013
Epoch6/10
----------
Loss is:0.0013
Epoch7/10
----------
Loss is:0.0013
Epoch8/10
----------
Loss is:0.0012
Epoch9/10
----------
Loss is:0.0012
可以看到,损失值在不断减少,0.0012已经在一个足够小的范围内。
最后,使用一部分测试数据集来验证我们的模型,代码如下:
#对结果进行测试
# device = torch.device("cuda:0" if torch.cuda.is_available() else "cpu")
data_loader_test = torch.utils.data.DataLoader(dataset = dataset_test,
                                               batch_size = 64,
                                               shuffle = True)
X_test,_= next(iter(data_loader_test))
img1 = torchvision.utils.make_grid(X_test)
img1 = img1.numpy().transpose(1,2,0)
std = [0.5,0.5,0.5]
mean= [0.5,0.5,0.5]
img1 = img1 * std + mean
noisy_X_test = img1 + 0.5*np.random.randn(*img1.shape)
noisy_X_test = np.clip(noisy_X_test,0.,1.)
plt.figure()
plt.imshow(noisy_X_test)

img2 = X_test + 0.5*torch.randn(*X_test.shape)
img2 = torch.clamp(img2,0,1)
img2 = Variable(img2.view(-1,28*28).to(device))
# img2 = Variable(img2.view(-1,28*28).cuda())
test_pred = model1(img2)
img_test = test_pred.data.view(-1,1,28,28)
img2 = torchvision.utils.make_grid(img_test)
# img2 = img2.numpy().transpose(1,2,0)  #error
img2 = img2.cpu().numpy().transpose(1,2,0)
img2 = img2*std+mean
img2 = np.clip(img2,0,1)
plt.figure()
plt.imshow(img2)
结果如下:

虽然上图的输出图像有些模糊,但是基本达到了和原图一致的辨识度,而且图片中的乱码基本被清除了。
使用线性变换部分的完整代码如下:
import torch
import torchvision
from torchvision import datasets, transforms
from torch.autograd import Variable
import numpy as np
import matplotlib.pyplot as plt
import os

device = torch.device("cuda:0" if torch.cuda.is_available() else "cpu")
#和第6章很多代码相似
# 数据预处理
# transform = transforms.Compose([transforms.ToTensor(),
#                                 transforms.Normalize(mean = [0.5,0.5,0.5],std = [0.5,0.5,0.5])])
transform = transforms.Compose([transforms.ToTensor(),
                               transforms.Normalize(mean = [0.5],std = [0.5])])


# 读取数据,之前下载过,现在直接读取
dataset_train = datasets.MNIST(root = './data/',
                              transform = transform,
                              train = True,
                              download = False)
dataset_test = datasets.MNIST(root = './data/',
                             transform = transform,
                             train = False)
# 加载数据
train_loader = torch.utils.data.DataLoader(dataset = dataset_train,
                                        batch_size = 64,
                                        shuffle = True)
test_loader = torch.utils.data.DataLoader(dataset = dataset_test,
                                       batch_size = 64,
                                       shuffle = True)

images,labels = next(iter(train_loader))  #获取一个批次的图片和标签
print("images.shape:",images.shape) #images.shape: torch.Size([64, 1, 28, 28])
img_example = torchvision.utils.make_grid(images) #将一个批次的图片构造成网格模式
img_example = img_example.numpy().transpose(1,2,0)
std = [0.5]#[0.5,0.5,0.5]
mean = [0.5]#[0.5,0.5,0.5]
img_example = img_example*std + mean
# print([labels[i] for i in range(64)])  #打印这个批次数据的全部标签
plt.imshow(img_example)  #显示图片
plt.show()

noisy_images = img_example + 0.5*np.random.randn(*img_example.shape)
noisy_images = np.clip(noisy_images,0.,1.)#截取函数,将数组a中的所有数限定到范围a_min和a_max中
print("noisy_images.shape:",noisy_images.shape)#noisy_images.shape: (242, 242, 3)
plt.imshow(noisy_images)
plt.show()

#搭建模型
class AutoEncoder(torch.nn.Module):
    def __init__(self):
        super(AutoEncoder,self).__init__()
        self.encoder = torch.nn.Sequential(
            torch.nn.Linear(28*28,128),
            torch.nn.ReLU(),
            torch.nn.Linear(128,64),
            torch.nn.ReLU(),
            torch.nn.Linear(64,32),
            torch.nn.ReLU()
        )
        self.decoder = torch.nn.Sequential(
            torch.nn.Linear(32,64),
            torch.nn.ReLU(),
            torch.nn.Linear(64,128),
            torch.nn.ReLU(),
            torch.nn.Linear(128,28*28)
        )

    def forward(self,input):
        output = self.encoder(input)
        output = self.decoder(output)
        return output

model1 = AutoEncoder()
# print(model1)
model1.to(device)

# 设置损失函数和优化器
optimizer = torch.optim.Adam(model1.parameters())
loss_f = torch.nn.MSELoss()

# 训练模型
epoch_n = 10
for epoch in range(epoch_n):
    running_loss = 0.0
    print('Epoch{}/{}'.format(epoch,epoch_n))
    print('-'*10)

    for data in train_loader:
        X_train,_ = data

        noisy_X_train = X_train + 0.5*torch.randn(X_train.shape)
        noisy_X_train = torch.clamp(noisy_X_train,0.,1.)
        X_train,noisy_X_train = Variable(X_train.view(-1,28*28).to(device)),Variable(noisy_X_train.view(-1,28*28).to(device))
        train_pred = model1(noisy_X_train)
        loss = loss_f(train_pred,X_train)

        optimizer.zero_grad()
        loss.backward()
        optimizer.step()

        running_loss += loss.data.item()

    print('Loss is:{:.4f}'.format(running_loss/len(dataset_train)))

#对结果进行测试
# device = torch.device("cuda:0" if torch.cuda.is_available() else "cpu")
data_loader_test = torch.utils.data.DataLoader(dataset = dataset_test,
                                               batch_size = 64,
                                               shuffle = True)
X_test,_= next(iter(data_loader_test))
img1 = torchvision.utils.make_grid(X_test)
img1 = img1.numpy().transpose(1,2,0)
std = [0.5,0.5,0.5]
mean= [0.5,0.5,0.5]
img1 = img1 * std + mean
noisy_X_test = img1 + 0.5*np.random.randn(*img1.shape)
noisy_X_test = np.clip(noisy_X_test,0.,1.)
plt.figure()
plt.imshow(noisy_X_test)

img2 = X_test + 0.5*torch.randn(*X_test.shape)
img2 = torch.clamp(img2,0,1)
img2 = Variable(img2.view(-1,28*28).to(device)) #error
# img2 = Variable(img2.view(-1,28*28).cuda())
test_pred = model1(img2)
img_test = test_pred.data.view(-1,1,28,28)
img2 = torchvision.utils.make_grid(img_test)
# img2 = img2.numpy().transpose(1,2,0)  #error
img2 = img2.cpu().numpy().transpose(1,2,0)
img2 = img2*std+mean
img2 = np.clip(img2,0,1)
plt.figure()
plt.imshow(img2)

#报存模型,可选
torch.save(model1,"MNIST_E_D1.pth")
11.2.2 通过卷积变换实现自动编码器模型
以卷积变换和线性变换方式构建的自动编码器会有较大区别,而且相对复杂一些。卷积变换的方式仅使用卷积层、最大池化层、上采样层和激活函数作为神经网络结构的主要组成部分,代码如下(先不运行,后面有完整代码):
class AutoEncoderCNN(torch.nn.Module):
    def __init__(self):
        super(AutoEncoderCNN,self).__init__()
        self.encoder = torch.nn.Sequential(
            torch.nn.Conv2d(1,64,kernel_size=3,stride=1,padding=1),
            torch.nn.ReLU(),
            torch.nn.MaxPool2d(kernel_size=2,stride=2),
            torch.nn.Conv2d(64,128,kernel_size=3,stride=1,padding=1),
            torch.nn.ReLU(),
            torch.nn.MaxPool2d(kernel_size=2,stride=2)
        )
        self.decoder = torch.nn.Sequential(
            torch.nn.Upsample(scale_factor=2,mode="nearest"),
            torch.nn.Conv2d(128,64,kernel_size=3,stride=1,padding=1),
            torch.nn.ReLU(),
            torch.nn.Upsample(scale_factor=2,mode="nearest"),
            torch.nn.Conv2d(64,1,kernel_size=3,stride=1,padding=1)
        )

    def forward(self,input):
        output = self.encoder(input)
        output = self.decoder(output)
        return output
输出结构如下:
AutoEncoderCNN(
  (encoder): Sequential(
    (0): Conv2d(1, 64, kernel_size=(3, 3), stride=(1, 1), padding=(1, 1))
    (1): ReLU()
    (2): MaxPool2d(kernel_size=2, stride=2, padding=0, dilation=1, ceil_mode=False)
    (3): Conv2d(64, 128, kernel_size=(3, 3), stride=(1, 1), padding=(1, 1))
    (4): ReLU()
    (5): MaxPool2d(kernel_size=2, stride=2, padding=0, dilation=1, ceil_mode=False)
  )
  (decoder): Sequential(
    (0): Upsample(scale_factor=2.0, mode=nearest)
    (1): Conv2d(128, 64, kernel_size=(3, 3), stride=(1, 1), padding=(1, 1))
    (2): ReLU()
    (3): Upsample(scale_factor=2.0, mode=nearest)
    (4): Conv2d(64, 1, kernel_size=(3, 3), stride=(1, 1), padding=(1, 1))
  )
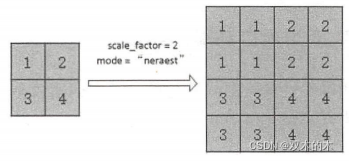
)在以上代码中出现了一个我们之前从来没有接触过的上采样层,即 torch.nn.Upsample 类。这个类的作用就是对我们提取到的核心特征进行解压,实现图片的重写构建,入参有两个,分别是scale_factor和mode:前者用于确定上采样的倍数;后者用于定义图片重构的模式,可选择的模式有 nearest、linear、bilinear和trilinear,其中nearest是最邻近法,linear是线性插值法,bilinear是双线性插值法,trilinear是三线性插值法。因为在我们的代码中使用的是最邻近法,所以这里通过一张图片来看一下最邻近法的具体工作方式。

由于采用卷积方式和线型方式的代码很类似,这里直接附上代码(可运行):
import torch
import torchvision
from torchvision import datasets, transforms
from torch.autograd import Variable
import numpy as np
import matplotlib.pyplot as plt
import os
%matplotlib inline

device = torch.device("cuda:0" if torch.cuda.is_available() else "cpu")
#和第6章很多代码相似
# 数据预处理
# transform = transforms.Compose([transforms.ToTensor(),
#                                 transforms.Normalize(mean = [0.5,0.5,0.5],std = [0.5,0.5,0.5])])
transform = transforms.Compose([transforms.ToTensor(),
                               transforms.Normalize(mean = [0.5],std = [0.5])])


# 读取数据,之前下载过,现在直接读取
dataset_train = datasets.MNIST(root = './data/',
                              transform = transform,
                              train = True,
                              download = False)
dataset_test = datasets.MNIST(root = './data/',
                             transform = transform,
                             train = False)
# 加载数据
train_loader = torch.utils.data.DataLoader(dataset = dataset_train,
                                        batch_size = 64,
                                        shuffle = True)
test_loader = torch.utils.data.DataLoader(dataset = dataset_test,
                                       batch_size = 64,
                                       shuffle = True)

images,labels = next(iter(train_loader))  #获取一个批次的图片和标签
print("images.shape:",images.shape) #images.shape: torch.Size([64, 1, 28, 28])
img_example = torchvision.utils.make_grid(images) #将一个批次的图片构造成网格模式
img_example = img_example.numpy().transpose(1,2,0)
std = [0.5]#[0.5,0.5,0.5]
mean = [0.5]#[0.5,0.5,0.5]
img_example = img_example*std + mean
# print([labels[i] for i in range(64)])  #打印这个批次数据的全部标签
plt.imshow(img_example)  #显示图片
plt.show()

noisy_images = img_example + 0.5*np.random.randn(*img_example.shape)
noisy_images = np.clip(noisy_images,0.,1.)#截取函数,将数组a中的所有数限定到范围a_min和a_max中
print("noisy_images.shape:",noisy_images.shape)#noisy_images.shape: (242, 242, 3)
plt.imshow(noisy_images)
plt.show()
分别输出原图和马赛克图:

接着构建模型和训练,代码如下:?
class AutoEncoderCNN(torch.nn.Module):
    def __init__(self):
        super(AutoEncoderCNN,self).__init__()
        self.encoder = torch.nn.Sequential(
            torch.nn.Conv2d(1,64,kernel_size=3,stride=1,padding=1),
            torch.nn.ReLU(),
            torch.nn.MaxPool2d(kernel_size=2,stride=2),
            torch.nn.Conv2d(64,128,kernel_size=3,stride=1,padding=1),
            torch.nn.ReLU(),
            torch.nn.MaxPool2d(kernel_size=2,stride=2)
        )
        self.decoder = torch.nn.Sequential(
            torch.nn.Upsample(scale_factor=2,mode="nearest"),
            torch.nn.Conv2d(128,64,kernel_size=3,stride=1,padding=1),
            torch.nn.ReLU(),
            torch.nn.Upsample(scale_factor=2,mode="nearest"),
            torch.nn.Conv2d(64,1,kernel_size=3,stride=1,padding=1)
        )

    def forward(self,input):
        output = self.encoder(input)
        output = self.decoder(output)
        return output

model2 = AutoEncoderCNN()
model2.to(device)

# 设置损失函数和优化器
optimizer = torch.optim.Adam(model2.parameters())
loss_f = torch.nn.MSELoss()

# 训练模型
epoch_n = 10
for epoch in range(epoch_n):
    running_loss = 0.0
    print('Epoch{}/{}'.format(epoch,epoch_n))
    print('-'*10)

    for data in train_loader:
        X_train,_ = data

        noisy_X_train = X_train + 0.5*torch.randn(X_train.shape)
        noisy_X_train = torch.clamp(noisy_X_train,0.,1.)
        X_train,noisy_X_train = Variable(X_train.to(device)),Variable(noisy_X_train.to(device))
        train_pred = model2(noisy_X_train)
        loss = loss_f(train_pred,X_train)

        optimizer.zero_grad()
        loss.backward()
        optimizer.step()

        running_loss += loss.data.item()

    print('Loss is:{:.4f}'.format(running_loss/len(dataset_train)))
训练的输出结果为:
Epoch0/10
----------
Loss is:0.0009
Epoch1/10
----------
Loss is:0.0005
Epoch2/10
----------
Loss is:0.0004
Epoch3/10
----------
Loss is:0.0004
Epoch4/10
----------
Loss is:0.0004
Epoch5/10
----------
Loss is:0.0004
Epoch6/10
----------
Loss is:0.0003
Epoch7/10
----------
Loss is:0.0003
Epoch8/10
----------
Loss is:0.0003
Epoch9/10
----------
Loss is:0.0003对模型进行测试:
#对结果进行测试
# device = torch.device("cuda:0" if torch.cuda.is_available() else "cpu")
data_loader_test = torch.utils.data.DataLoader(dataset = dataset_test,
                                               batch_size = 64,
                                               shuffle = True)
X_test,_= next(iter(data_loader_test))
img1 = torchvision.utils.make_grid(X_test)
img1 = img1.numpy().transpose(1,2,0)
std = [0.5,0.5,0.5]
mean= [0.5,0.5,0.5]
img1 = img1 * std + mean
noisy_X_test = img1 + 0.5*np.random.randn(*img1.shape)
noisy_X_test = np.clip(noisy_X_test,0.,1.)
plt.figure()
plt.imshow(noisy_X_test)

img2 = X_test + 0.5*torch.randn(*X_test.shape)
img2 = torch.clamp(img2,0,1)
# img2 = Variable(img2.view(-1,28*28).to(device)) #error
# 稍作修改如下:
img2 = Variable(img2.view(-1,1,28,28).to(device))
# img2 = Variable(img2.view(-1,28*28).cuda())
test_pred = model2(img2) #error
img_test = test_pred.data.view(-1,1,28,28)
img2 = torchvision.utils.make_grid(img_test)
# img2 = img2.numpy().transpose(1,2,0)  #error
img2 = img2.cpu().numpy().transpose(1,2,0)
img2 = img2*std+mean
img2 = np.clip(img2,0,1)
plt.figure()
plt.imshow(img2)
输出马赛克图片和处理之后的图片,如下:

最后的输出图片表明结果在可视化上没有问题,而且去码效果更好,还原出来额定图片内容更清晰。
11.3 小结
以上就是实验部分。本章处理的问题比较简单,案例中使用的自动编码器模型也不复杂,如果输入的数据有更高维度,那么可以尝试增加模型层次。这里介绍的主要是一种方法,使用自动编码器这种非监督学习的神经网络模型同样能解决很多和计算机视觉相关的问题 ,虽然监督学习方法在目前仍然是主流,但是结合无监督学习和监督学习可以处理更多、更复杂的问题。
说明:记录学习笔记,如果错误欢迎指正!写文章不易,转载请联系我。
