导论
OpenMV内置了好几个有关神经网络的模型,我们可以利用它们来进行基本物体的识别以及笑脸检测,数字识别等,这一节主要讲解下利用cifar_10进行识别
cifar_10是一个用于普适物体识别的数据集,"10"的意思是它可以分辨十种不同的物体,比如飞机、船、汽车、鸟、猫、狗、青蛙、路、卡车等等…
cifar_10由6万张32*32的RGB彩图构成,共有10个分类,一共有5万张的训练以及1万张的测试用于交叉验证
这个数据集最大的特点在于将数据集迁移到了普适的物体上,而且应用于多分类,他的一个子类数据集cifar_100可以达到100类,同已经成熟的人脸识别相比,普适物体的识别挑战很大,数据中含有大量的噪声、特征以及识别的物体大小不一、角度不一、比例不一等,
因此cifar_10相对于传统的图像识别数据集来说,它的挑战是巨大的,但其应用的效果是非常不错的
在OpenMV的IDE中内置了已经训练好的适用于OpenMV上面的模型网络,我们可以直接在OpenMV IDE工具——机器视觉——CNN网络库里面打开
在我们的OpenMV上推荐用cifar10_fast.network这一个神经网络,这个神经网络的模型稍微小一点,相对于cifar10.network来说,cifar10_fast.network运算速度更快,并且耗费的内存更小,如果我们直接使用cifar10.network,在我们的OpenMV上很可能会超出内存
利用神经网络进行特征识别(已停用)
在这个例程中我们首先获取OpenMV摄像头中的图像,然后对我们的图像进行特征识别,再将其与我们的神经网络模型进行对比,来得到一个相似度,通过这个相似度来判断是否其属于数据集中的某个物体,进而达到物体识别的应用
运行此例程前,请先在
OpenMV IDE->工具->机器视觉->CNN网络库中,将相应的神经网络文件保存到OpenMV的SD内存卡中哦。
注意!在对OpenMV进行文件操作后(如保存神经网络文件到OpenMV的U盘中),需要重置OpenMV!OpenMV IDE->工具->重置OpenMV Cam
当前nn模块被删除了!所以没用…当了解吧🥀
# cifar10在图像区域中心识别例程
#
# CIFAR是一个卷积网络,旨在将其视野分类为几种不同的对象类型,并处理RGB视频数据。
#
# 在此示例中,我们将LeNet检测器窗口滑动到图像上,并获取可能存在对象的激活列表。 请注意,使用带有滑动窗口的CNN非常昂贵,因此对于穷举搜索而言,不要期望CNN是实时的。


import sensor, image, time, os, nn # 导入模块 "os系统" 和 "神经网络neural network"

sensor.reset()                         # 复位并初始化传感器。

sensor.set_pixformat(sensor.RGB565)    #设置图像色彩格式,有RGB565色彩图和GRAYSCALE灰度图两种

sensor.set_framesize(sensor.QVGA)      # 将图像大小设置为QVGA (320x240)

sensor.set_windowing((128, 128))       # 设置窗口大小为128 x128窗口。
sensor.skip_frames(time=750)           # 不要让自动增益运行太长时间。
sensor.set_auto_gain(False)            # 关掉自动增益。
sensor.set_auto_exposure(False)        # 关掉自动曝光。


# 在我们OpenMV的IDE中内置了2个cifar_10的神经网络 ——> 稍微大一点的"cifar10.network" + 小一点的"cifar10_fast.network"
# 加载cifar10网络。OpenMV3 M7上使用此网络可能会超出内存。
#net = nn.load('/cifar10.network')

# 更快,更小,更准确。建议OpenMV3 M7上使用此网络。
net = nn.load('/cifar10_fast.network') # nn.load()函数:将神经网络从 .network 二进制文件加载到内存中。
                            #神经网络的层/权值/偏置/等,存储在MicroPython堆上。 返回一个可以在图像上进行操作的 "Net对象"

# 设置我们检测的标签
labels = ['airplane', 'automobile', 'bird', 'cat', 'deer', 'dog', 'frog', 'horse', 'ship', 'truck']

clock = time.clock()
while(True):
    clock.tick()

    img = sensor.snapshot() # 先截取一张图片

    # net.search(image, roi, threshold=0.6, min_scale=1.0, scale_mul=0.5, x_overlap=0, y_overlap=0, contrast_threshold=1, softmax=False)
    # 以“滑动窗口”方式在图像roi上运行网络。 网络检测器窗口以多种比例滑过图像

    # 将在图像中搜索网络中的roi(如果未指定roi,则搜索整个图像)。
    # 如果其中一个分类器(汽车类、船类、狗类、猫类......)输出大于阈值,说明检测到有相似物体,则在每个位置查看图像,并把符合要求的对象位置和标签将存储在对象列表中并返回。

    # “threshold”-->用于判断当前我们检测的图像块与神经网络模型的匹配相似程度
    # 如果相似程度大于threshold的话,就认为这一幅图像的这一块和我们神经网络中的分类器是相匹配的

    # “min_scale”-->设置网络模型(是我们要对照的模板!)的缩放比例,在默认值"1"下,网络不会缩放。但是,值为0.5将允许用于检测图像大小为50%的对象…
    # 在每个 "min_scale" 比例下,使用 "x_overlap(0-1)" 和 "y_overlap(0-1)" 作为指导,在ROI中移动检测窗口。

    # “scale_mul”-->控制滑动窗口的大小比例!

    # “x_overlap与y_overlap”-->如果将overlap设置为0.5,则每个检测窗口将与前一个检测窗口重叠50%。
    # 请注意,计算工作重叠越多,负载越多,但同样也越准确。

    # 最后,对于在x/y维度上滑动网络之后的多尺度匹配,检测窗口将通过 "scale_mul(0-1)" 缩小到 "min_scale*(0-1)"。
    # 例如,如果scale_mul为0.5,则检测窗口将缩小50%。
    # 请注意,在较低比例下,如果x_overlap和y_overlap较小,则搜索区域会更多...

    # “contrast_threshold”-->会跳过平坦区域。即OpenMV会自动筛选没有图像的区域

    # 设置x_overlap = -1会强制窗口始终保持在x方向的ROI中心。
    # 如果y_overlap不为-1,则该方法将搜索所有垂直位置。

    # 设置y_overlap = -1会强制窗口始终在y方向的ROI中居中。
    # 如果x_overlap不是-1,则该方法将在所有水平位置搜索。

    # 返回神经网络检测结果的 nn_class 对象列表。

# net.search()在图像中进行神经网络的匹配查找
    for obj in net.search(img, threshold=0.6, min_scale=0.4, scale_mul=0.8, \
            x_overlap=-1, y_overlap=-1, contrast_threshold=0.5):

        print("Detected %s - Confidence %f%%" % (labels[obj.index()], obj.value()))
        img.draw_rectangle(obj.rect(), color=(255, 0, 0))
    print(clock.fps())
对于net.search()方法
以“滑动窗口”方式在图像roi上运行神经网络进行匹配
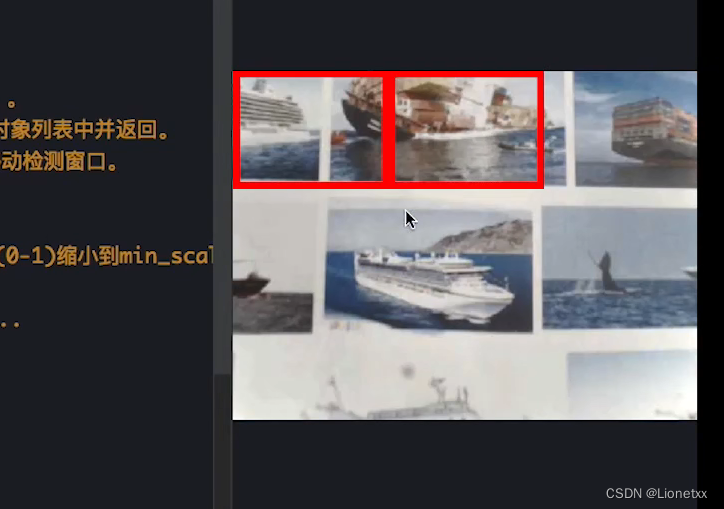
“x_overlap与y_overlap”–>如果将overlap设置为0.5,则每个检测窗口将与前一个检测窗口重叠50%。
x_overlap = 0.5,y_overlap = 0.5
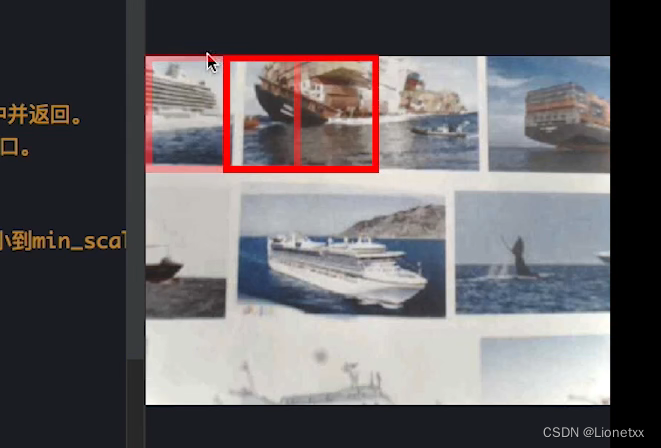
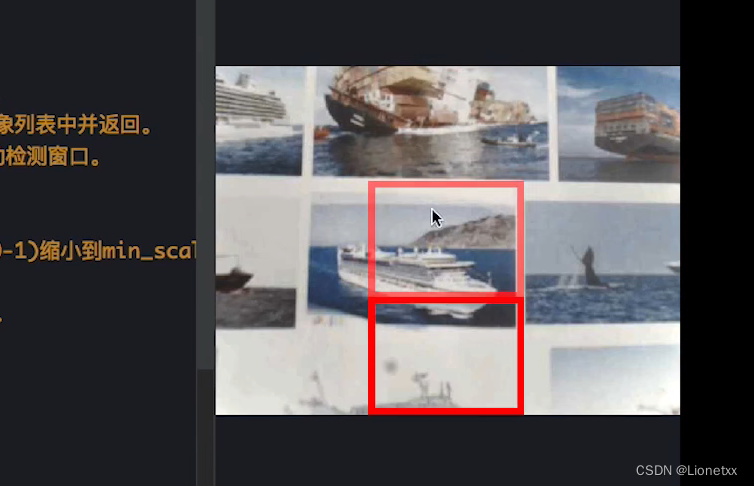
设置x_overlap = -1会强制窗口始终保持在x方向的ROI中心。
如果y_overlap不为-1,则该方法将搜索所有垂直位置。
神经网络检测函数
模块nn已经被OpenMV停用了,换成了tf
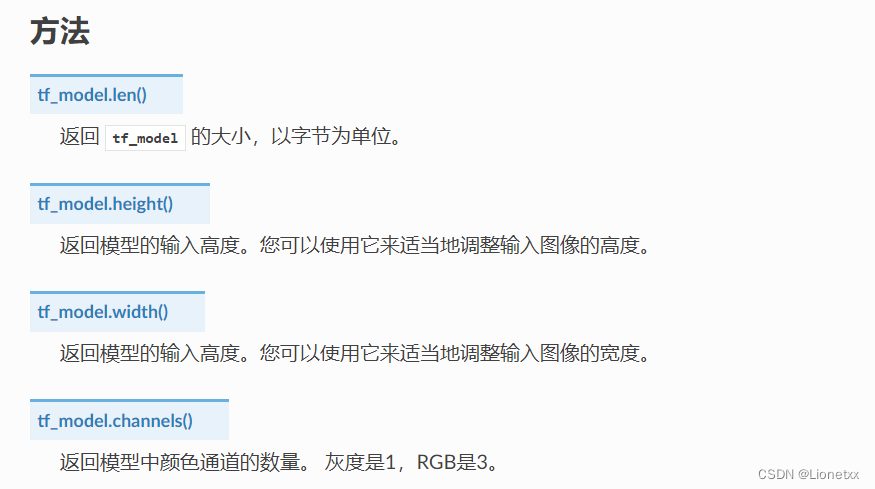
所用到的函数
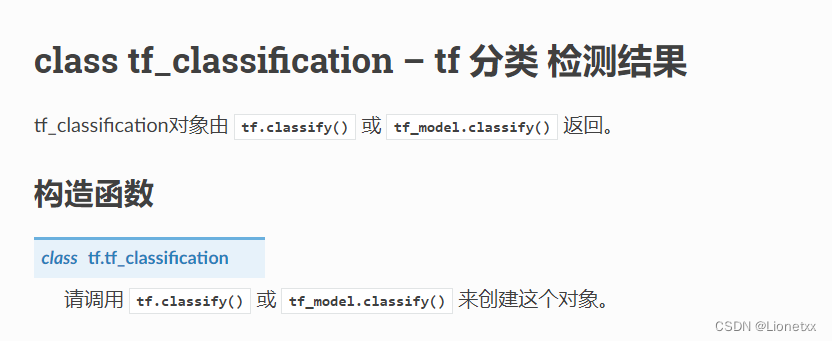
tf.classify()
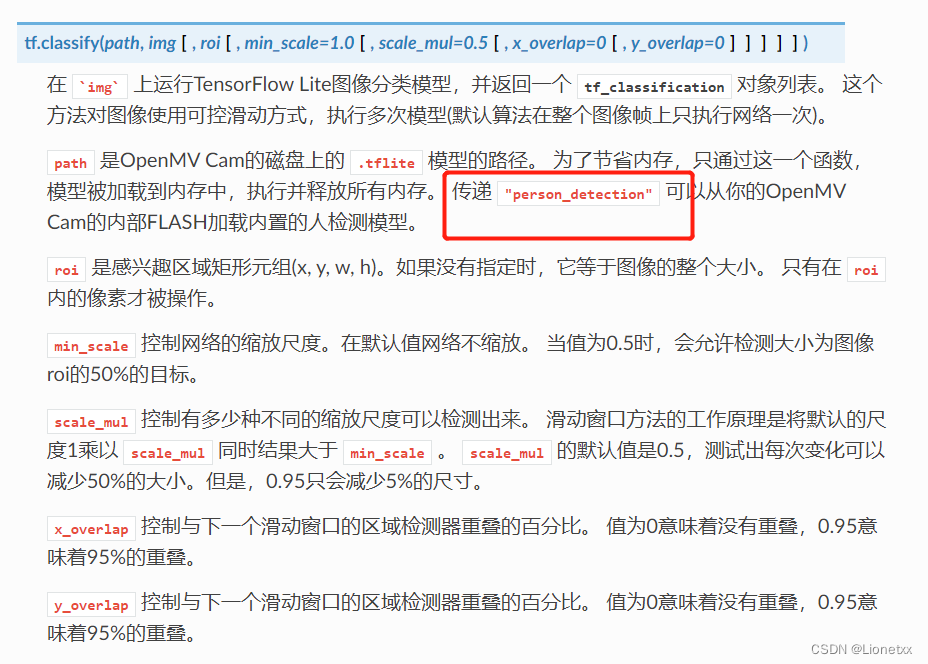
tf.segment(path, img[, roi])

tf.load()
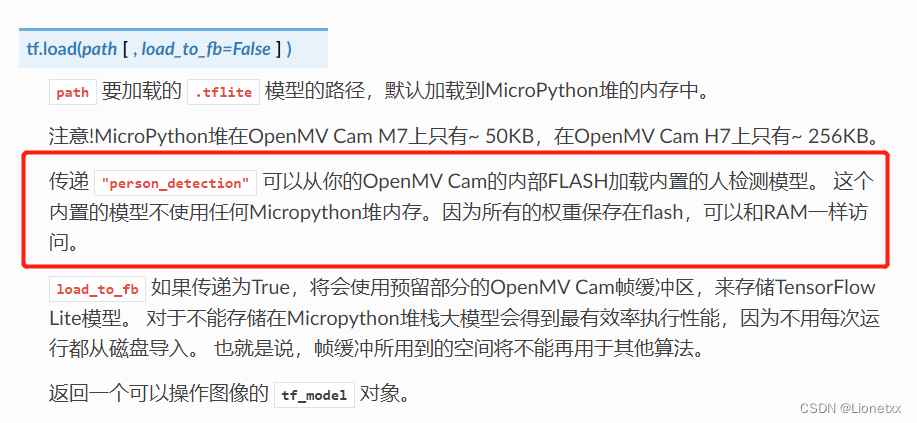
tf.free_from_fb()

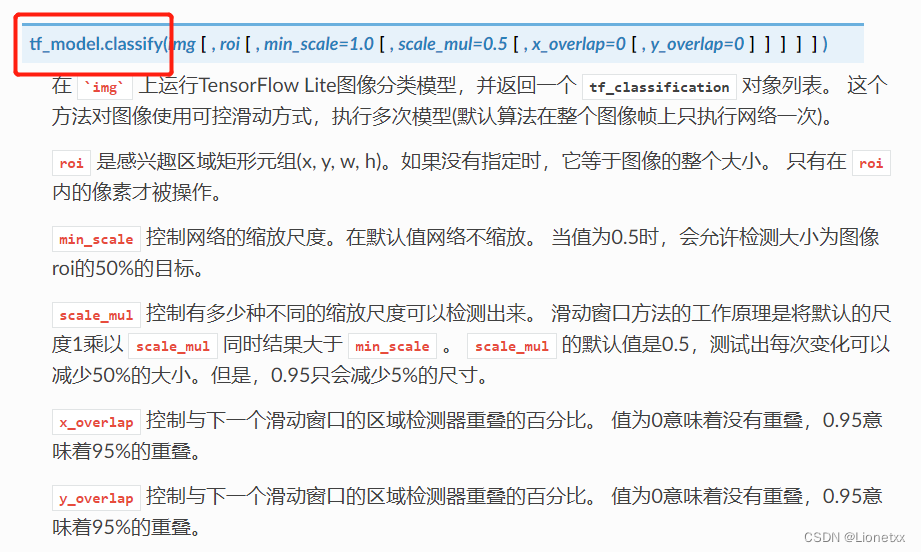
检测函数tf.classify()返回值
如 for obj in tf.classify(mobilenet, img, min_scale=1.0, scale_mul=0.5, x_overlap=0.0, y_overlap=0.0):
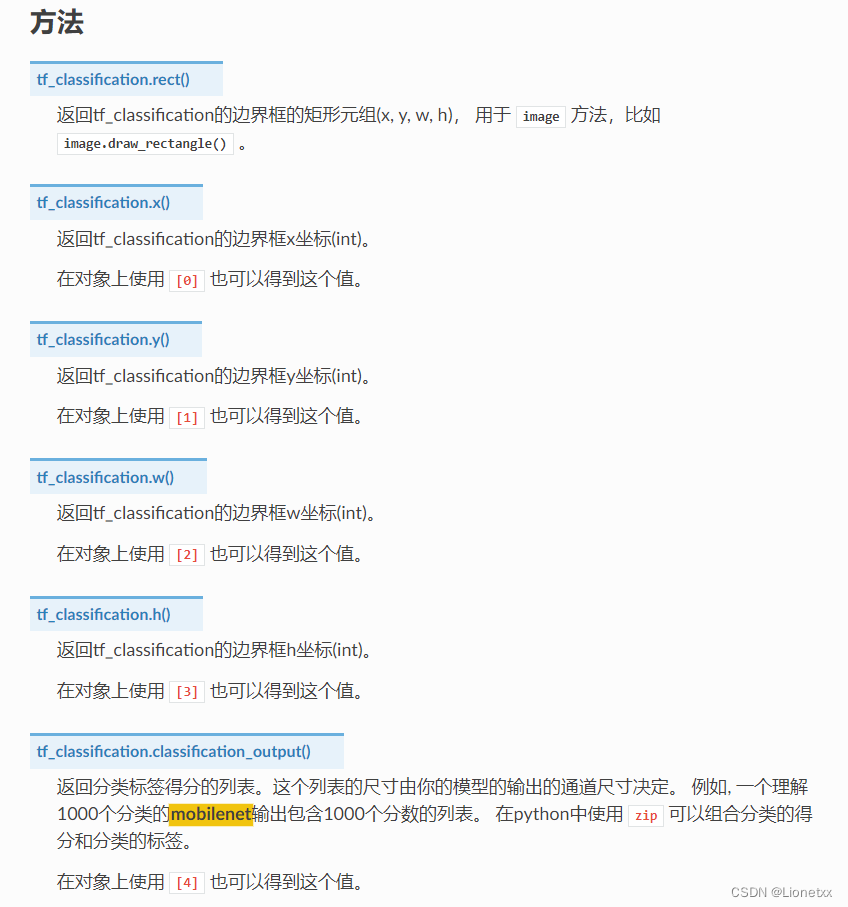
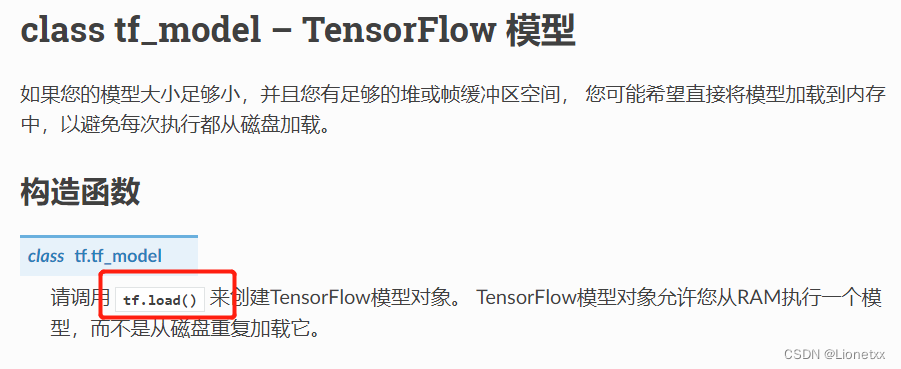
加载神经网络函数tf.load()返回值
如net = tf.load('person_detection')

例程1.图像中央人检测
利用了内置的人检测神经网络模型person_detection(该网络位于OpenMV Cam的固件中)
例程tf_person_detection_search_just_center TensorFlow图像中央人检测
# TensorFlow Lite 人检测例程
#
# Google的“人检测模型”会检测到是否有人。
#
# 在此示例中,我们将探测器窗口滑到图像上方,并获取激活列表。
# 请注意,使用带有滑动窗口的CNN计算极为复杂,因此对于详尽搜索,不要期望CNN是实时的。

import sensor, image, time, os, tf

sensor.reset()                         # 复位并初始化传感器。

sensor.set_pixformat(sensor.GRAYSCALE) # Set pixel format to RGB565 (or GRAYSCALE)
#设置图像色彩格式,有RGB565色彩图和GRAYSCALE灰度图两种

sensor.set_framesize(sensor.QVGA)      # 将图像大小设置为QVGA (320x240)

sensor.set_windowing((240, 240))       # 设置240x240窗口。
sensor.skip_frames(time=2000)          # 等待一段时间,让相机设置生效。

# 加载内置的人检测神经网络模型(该网络位于OpenMV Cam的固件中)。
net = tf.load('person_detection')
labels = ['unsure', 'person', 'no_person']

clock = time.clock()
while(True):
    clock.tick()

    img = sensor.snapshot()

    # net.classify()将在图像的roi上运行网络(如果没有指定roi,则在整个图像上运行)
    # 将为每个位置生成一个分类得分输出向量。
    # 在每个比例下,检测窗口都以x_overlap(0-1)和y_overlap(0-1)为指导在ROI中移动。
    # 如果将重叠设置为0.5,那么每个检测窗口将与前一个窗口重叠50%。
    # 请注意,重叠越多,计算工作量就越大。
    # 最后,对于在网络沿x/y方向滑动后的多尺度匹配,检测窗口将由scale_mul(0-1)缩小到min_scale(0-1)。
    # 下降到min_scale(0-1)。例如,如果scale_mul为0.5,则检测窗口将缩小50%。
    # 请注意,如果x_overlap和y_overlap较小,则在较小的比例下可以搜索更多区域...

    # 设置x_overlap=-1可以使窗口始终保持在ROI的中心位置。
    # 如果y_overlap不是-1,该方法将在所有垂直位置进行搜索。

    # 设置y_overlap=-1可以使窗口始终保持在ROI的中心位置。
    # 如果x_overlap不是-1,该方法将在所有水平位置进行搜索。

    # 默认设置只是进行一次检测...更改它们以搜索图像...
    for obj in net.classify(img, min_scale=0.5, scale_mul=0.5, x_overlap=-1, y_overlap=-1):
        print("**********\nDetections at [x=%d,y=%d,w=%d,h=%d]" % obj.rect())
        for i in range(len(obj.output())):
            print("%s = %f" % (labels[i], obj.output()[i]))
        img.draw_rectangle(obj.rect())
        img.draw_string(obj.x()+3, obj.y()-1, labels[obj.output().index(max(obj.output()))], mono_space = False)
    print(clock.fps(), "fps")
例程2.整幅图像人脸检测
利用了内置的人检测神经网络模型person_detection(该网络位于OpenMV Cam的固件中)
例程tf_person_detection_search_whole_window TensorFlow整幅图像人检测
# TensorFlow Lite 人检测例程
#
# Google的“人检测模型”会检测到是否有人。
#
# 在此示例中,我们将探测器窗口滑到图像上方,并获取激活列表。
# 请注意,使用带有滑动窗口的CNN计算极为复杂,因此对于详尽搜索,不要期望CNN是实时的。

import sensor, image, time, os, tf

sensor.reset()                         # 复位并初始化传感器。

sensor.set_pixformat(sensor.GRAYSCALE) # Set pixel format to RGB565 (or GRAYSCALE)
#设置图像色彩格式,有RGB565色彩图和GRAYSCALE灰度图两种

sensor.set_framesize(sensor.QVGA)      # 将图像大小设置为QVGA (320x240)

sensor.set_windowing((240, 240))       # 设置240x240窗口。
sensor.skip_frames(time=2000)          # 等待一段时间,让相机设置生效。

# 加载内置的人检测神经网络模型(该网络位于OpenMV Cam的固件中)。
net = tf.load('person_detection')
labels = ['unsure', 'person', 'no_person']

clock = time.clock()
while(True):
    clock.tick()

    img = sensor.snapshot()

    # net.classify()将在图像的roi上运行网络(如果没有指定roi,则在整个图像上运行)
    # 将为每个位置生成一个分类得分输出向量。
    # 在每个比例下,检测窗口都以x_overlap(0-1)和y_overlap(0-1)为指导在ROI中移动。
    # 如果将重叠设置为0.5,那么每个检测窗口将与前一个窗口重叠50%。
    # 请注意,重叠越多,计算工作量就越大。
    # 最后,对于在网络沿x/y方向滑动后的多尺度匹配,检测窗口将由scale_mul(0-1)缩小到min_scale(0-1)。
    # 下降到min_scale(0-1)。例如,如果scale_mul为0.5,则检测窗口将缩小50%。
    # 请注意,如果x_overlap和y_overlap较小,则在较小的比例下可以搜索更多区域...

    # 默认设置只是进行一次检测...更改它们以搜索图像...
    for obj in net.classify(img, min_scale=1.0, scale_mul=0.5, x_overlap=0.0, y_overlap=0.0):
        print("**********\nDetections at [x=%d,y=%d,w=%d,h=%d]" % obj.rect())
        for i in range(len(obj.output())):
            print("%s = %f" % (labels[i], obj.output()[i]))
        img.draw_rectangle(obj.rect())
        img.draw_string(obj.x()+3, obj.y()-1, labels[obj.output().index(max(obj.output()))], mono_space = False)
    print(clock.fps(), "fps")