讨论的问题
梯度消失/梯度爆炸
梯度小于1,反向传播过程中,每过一层都要乘以小于1的数,最终趋于0,即梯度消失
梯度大于1,反向传播过程中,每过一层都要乘以大于1的数,最终趋于无穷,即梯度爆炸
解决方法
数据进行标准化处理
权重初始化
Batch Norm
Batch Normalization
使一批Batch特征矩阵的channel满足均值为0,方差为1的分布规律
文中亮点
超深的网络结构
提出残差(residual)模块
使用Batch Normalization加速训练(丢弃dropout)
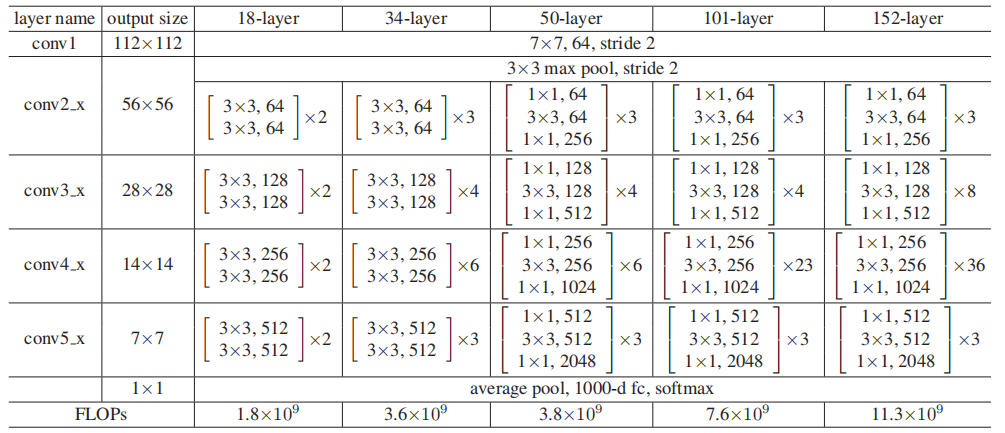
主分支经过一系列卷积 和 输入特征矩阵进行相加 最后relu
主分支与shortcut的shape必须相同
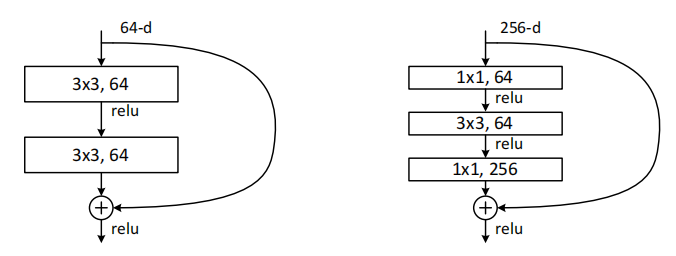
层数多时采用第二种结构的意义:减少参数计算量
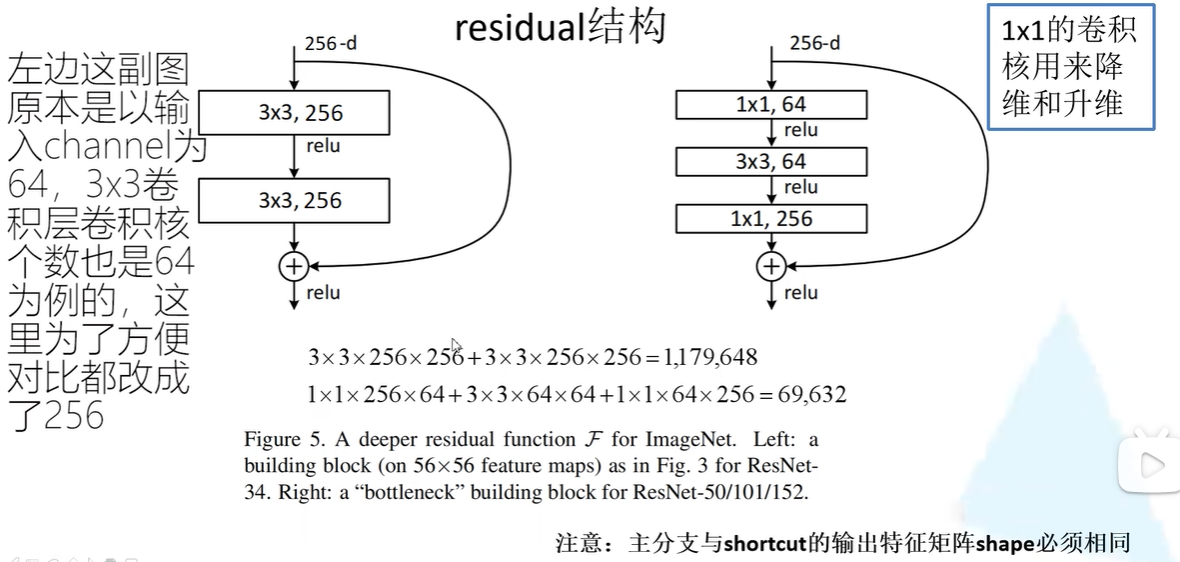
虚线结构
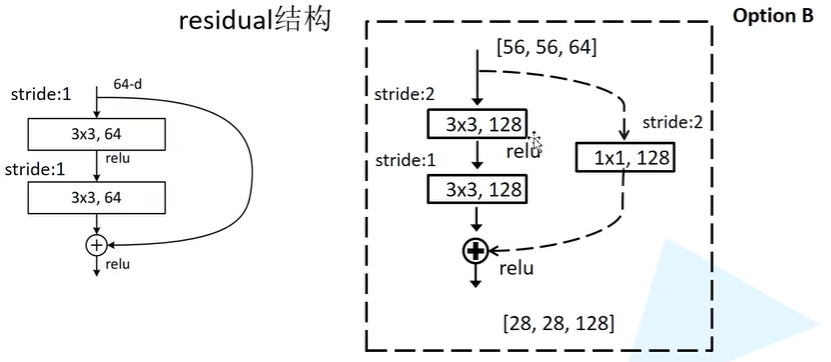
### 虚线残差结构/下采样的意义(要保证输入和输出的特征矩阵shape一致)
1、实线结构(左)的输入和输出shape一样可以直接进行相加
2、conv3\4\5的第一层卷积都起到变维的作用,拿34-layer的conv3举例(右)
输入特征矩阵size是56×56×64,conv3期望的输出特征矩阵size是28×28×128,无法直接相加,输入特征矩阵需先经过虚线结构变维度再和主分支相加
虚线:卷积核stride=2、padding=1实现高宽减半;channel=128实现通道数一致
主分支:第一层高宽减半,channel翻倍实现通道数一致;第二层高宽不变,通道数一致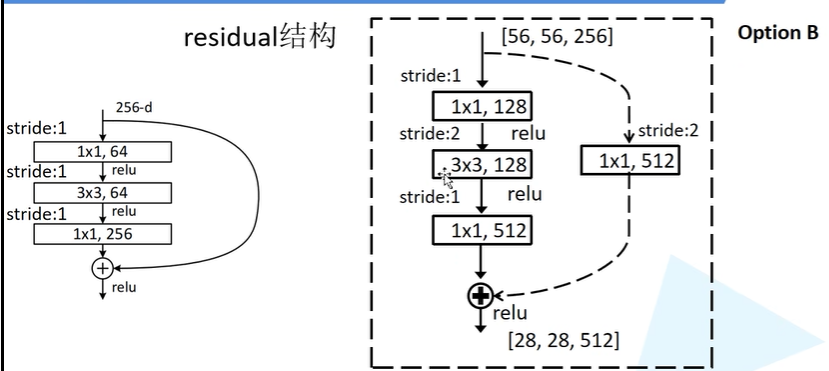
### 讲解
主分支:
1×1×128仅仅起到降维作用,channel数减半
3×3×128将高宽减半	stride=2、padding=1
1×1×512增加深度
虚线结构:
经过1×1×512将高宽减半,channel=512保持通道数一致	stride=2、padding=1
###先降维作用
减少计算量
综上
conv2/3/4/5_x的残差结构的第一层都必须为虚线结构
保证输入和输出特征矩阵shape的一致
**注:**后面三种结构在con_2的第一层也是虚线结构,但是输入和输出特征矩阵shape一致,所以只需调整深度(channel)
实验
D:\Desktop\workspaces\PyCharm\03_resnet
model.py
import os
import torch.nn as nn
import torch
os.environ['TORCH_HOME'] = 'D:/DownLoad/Data/torch-model'


### 基于18、34层的基本残差结构块
#   downsample对应虚线的残差结构
#   conv3\4\5的第一层卷积都起到变维的作用,上一层的W*H要缩放到期望大小
class BasicBlock(nn.Module):
    # 主分支卷积核个数(通道数)基数=64
    expansion = 1

    def __init__(self, in_channel, out_channel, stride=1, downsample=None, **kwargs):
        super(BasicBlock, self).__init__()
        self.conv1 = nn.Conv2d(in_channels=in_channel, out_channels=out_channel,
                               kernel_size=3, stride=stride, padding=1, bias=False)
        self.bn1 = nn.BatchNorm2d(out_channel)
        self.relu = nn.ReLU()
        self.conv2 = nn.Conv2d(in_channels=out_channel, out_channels=out_channel,
                               kernel_size=3, stride=1, padding=1, bias=False)
        self.bn2 = nn.BatchNorm2d(out_channel)
        self.downsample = downsample

    def forward(self, x):
        ## 虚线残差的输出
        identity = x
        # 设置了下采样则将输入先进行下采样缩放大小(对应虚线结构),否则跳过
        if self.downsample is not None:
            identity = self.downsample(x)

        ## 主线输出
        out = self.conv1(x)
        out = self.bn1(out)
        out = self.relu(out)

        out = self.conv2(out)
        out = self.bn2(out)

        ## 捷径+主线输出后再激活
        out += identity
        out = self.relu(out)

        return out

### 基于50、101、152的残差结构
class Bottleneck(nn.Module):
    """
    注意:原论文中,在虚线残差结构的主分支上,第一个1x1卷积层的步距是2,第二个3x3卷积层步距是1。
    但在pytorch官方实现过程中是第一个1x1卷积层的步距是1,第二个3x3卷积层步距是2,
    这么做的好处是能够在top1上提升大概0.5%的准确率。
    可参考Resnet v1.5 https://ngc.nvidia.com/catalog/model-scripts/nvidia:resnet_50_v1_5_for_pytorch
    """
    ## 4×64=256
    expansion = 4

    def __init__(self, in_channel, out_channel, stride=1, downsample=None,
                 groups=1, width_per_group=64):
        super(Bottleneck, self).__init__()

        width = int(out_channel * (width_per_group / 64.)) * groups

        self.conv1 = nn.Conv2d(in_channels=in_channel, out_channels=width,
                               kernel_size=1, stride=1, bias=False)  # squeeze channels
        self.bn1 = nn.BatchNorm2d(width)
        # -----------------------------------------
        self.conv2 = nn.Conv2d(in_channels=width, out_channels=width, groups=groups,
                               kernel_size=3, stride=stride, bias=False, padding=1)
        self.bn2 = nn.BatchNorm2d(width)
        # -----------------------------------------
        self.conv3 = nn.Conv2d(in_channels=width, out_channels=out_channel*self.expansion,
                               kernel_size=1, stride=1, bias=False)  # unsqueeze channels
        self.bn3 = nn.BatchNorm2d(out_channel*self.expansion)
        self.relu = nn.ReLU(inplace=True)
        self.downsample = downsample

    def forward(self, x):
        identity = x
        if self.downsample is not None:
            identity = self.downsample(x)

        out = self.conv1(x)
        out = self.bn1(out)
        out = self.relu(out)

        out = self.conv2(out)
        out = self.bn2(out)
        out = self.relu(out)

        out = self.conv3(out)
        out = self.bn3(out)

        out += identity
        out = self.relu(out)

        return out


class ResNet(nn.Module):

    def __init__(self,
                 # 残差块类别
                 block,
                 # 残差块总个数
                 blocks_num,
                 # 训练集分类个数
                 num_classes=1000,
                 # 为了方便基于resnet搭建更加复杂的结构
                 include_top=True,
                 groups=1,
                 width_per_group=64):

        super(ResNet, self).__init__()
        self.include_top = include_top
        # 经过3×3最大池化后的通道数64
        self.in_channel = 64

        self.groups = groups
        self.width_per_group = width_per_group

        # 第一层7×7卷积层,输入通道为RGB(3),输出为64,s=2\p=3使图片缩小一半
        self.conv1 = nn.Conv2d(3, self.in_channel, kernel_size=7, stride=2,
                               padding=3, bias=False)
        # 批量归一防止梯度消失
        self.bn1 = nn.BatchNorm2d(self.in_channel)
        # 激活
        self.relu = nn.ReLU(inplace=True)
        # 第一层池化 图片高宽设为一般,参数设置如下
        self.maxpool = nn.MaxPool2d(kernel_size=3, stride=2, padding=1)

        ### 下面进入残差结构
        # conv2_x的一系列残差结构,通过make_layer方法生成,第一层虚线残差不用改变shape,stride=1(false)即可
        self.layer1 = self._make_layer(block, 64, blocks_num[0])
        # conv3/4/5的第一层虚线残差要将高宽减半,stride=2
        self.layer2 = self._make_layer(block, 128, blocks_num[1], stride=2)
        self.layer3 = self._make_layer(block, 256, blocks_num[2], stride=2)
        self.layer4 = self._make_layer(block, 512, blocks_num[3], stride=2)
        # 能搭建更复杂结构的相管变量
        if self.include_top:
            # 自适应平均池化所得特征矩阵高宽都是1×1
            self.avgpool = nn.AdaptiveAvgPool2d((1, 1))  # output size = (1, 1)
            # 全连接层 输入的通道数为经过残差结果后最终的通道数      输出通道为我们要进行分类的个数,上面设置为1000
            self.fc = nn.Linear(512 * block.expansion, num_classes)

        ## 卷积进行初始化
        for m in self.modules():
            if isinstance(m, nn.Conv2d):
                nn.init.kaiming_normal_(m.weight, mode='fan_out', nonlinearity='relu')

    ### 创建conv2/3/4/5_x的函数
    #   channel:conv2/3/4/5对应的各种深度的残差结构主分支上的第一个卷积核的个数/通道数
    #   一个卷积层的残差结构个数
    def _make_layer(self, block, channel, block_num, stride=1):
        downsample = None
        ## 对50/101/152层的结构,第一层为虚线残差,进行下采样
        ## 对18/34层的网络直接跳过这个if,因为输入输出shape一致,无需下采样
        ## conv2_x的第一层下采样只需增加channel,不要改变高宽(stride为默认的1即可)因为输入输出shape都为64×64
        if stride != 1 or self.in_channel != channel * block.expansion:
            downsample = nn.Sequential(
                #  out_channel = channel * block.expansion 对应171行的最终输出通道数
                nn.Conv2d(self.in_channel, channel * block.expansion, kernel_size=1, stride=stride, bias=False),
                nn.BatchNorm2d(channel * block.expansion))

        layers = []
        ## 搭积木,在数组里搭建每一层的残差结构,由残差块组成
        #  第一层残差块,要单独进行虚线残差
        layers.append(block(self.in_channel,
                            channel,
                            ## 18/32layer是none;高层是计算后的downsample
                            downsample=downsample,
                            stride=stride,
                            groups=self.groups,
                            width_per_group=self.width_per_group))
        # 输出通道
        self.in_channel = channel * block.expansion

        # 将后续的残差模块一并填入
        # 默认从0开始,第一层虚线层(下采样)已经搭建好,从1开始
        for _ in range(1, block_num):
            # 下一层的输入就是第一层计算好的输出self.in_channell
            layers.append(block(self.in_channel,
                                # channel就是make_layer一开始传入的channel
                                channel,
                                groups=self.groups,
                                width_per_group=self.width_per_group))
        # 将列表转换为非关键字传入
        # 返回搭建好的残差结构
        return nn.Sequential(*layers)

    ## 正向传播
    def forward(self, x):
        x = self.conv1(x)
        x = self.bn1(x)
        x = self.relu(x)
        x = self.maxpool(x)

        x = self.layer1(x)
        x = self.layer2(x)
        x = self.layer3(x)
        x = self.layer4(x)

        if self.include_top:
            # 平均池化下采样
            x = self.avgpool(x)
            # 展平
            x = torch.flatten(x, 1)
            # 全连接输出
            x = self.fc(x)
        return x


def resnet34(num_classes=1000, include_top=True):
    # https://download.pytorch.org/models/resnet34-333f7ec4.pth
    return ResNet(BasicBlock, [3, 4, 6, 3], num_classes=num_classes, include_top=include_top)


def resnet50(num_classes=1000, include_top=True):
    # https://download.pytorch.org/models/resnet50-19c8e357.pth
    return ResNet(Bottleneck, [3, 4, 6, 3], num_classes=num_classes, include_top=include_top)


def resnet101(num_classes=1000, include_top=True):
    # https://download.pytorch.org/models/resnet101-5d3b4d8f.pth
    return ResNet(Bottleneck, [3, 4, 23, 3], num_classes=num_classes, include_top=include_top)


def resnext50_32x4d(num_classes=1000, include_top=True):
    # https://download.pytorch.org/models/resnext50_32x4d-7cdf4587.pth
    groups = 32
    width_per_group = 4
    return ResNet(Bottleneck, [3, 4, 6, 3],
                  num_classes=num_classes,
                  include_top=include_top,
                  groups=groups,
                  width_per_group=width_per_group)


def resnext101_32x8d(num_classes=1000, include_top=True):
    # https://download.pytorch.org/models/resnext101_32x8d-8ba56ff5.pth
    groups = 32
    width_per_group = 8
    return ResNet(Bottleneck, [3, 4, 23, 3],
                  num_classes=num_classes,
                  include_top=include_top,
                  groups=groups,
                  width_per_group=width_per_group)
train.py
迁移学习
迁移训练下载官方预训练模型的权重
torchvison.models.resnet
下载34,浏览器访问链接即可下载
model_urls = {
    "resnet18": "https://download.pytorch.org/models/resnet18-f37072fd.pth",
    "resnet34": "https://download.pytorch.org/models/resnet34-b627a593.pth",
    "resnet50": "https://download.pytorch.org/models/resnet50-0676ba61.pth",
    "resnet101": "https://download.pytorch.org/models/resnet101-63fe2227.pth",
    "resnet152": "https://download.pytorch.org/models/resnet152-394f9c45.pth",
    "resnext50_32x4d": "https://download.pytorch.org/models/resnext50_32x4d-7cdf4587.pth",
    "resnext101_32x8d": "https://download.pytorch.org/models/resnext101_32x8d-8ba56ff5.pth",
    "wide_resnet50_2": "https://download.pytorch.org/models/wide_resnet50_2-95faca4d.pth",
    "wide_resnet101_2": "https://download.pytorch.org/models/wide_resnet101_2-32ee1156.pth",
}
编辑数据集
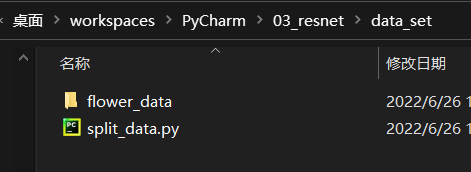
更改数据集相应的目录,split_data.py脚本将数据集分为训练和验证

import os
import sys
import json

import torch
import torch.nn as nn
import torch.optim as optim
from torchvision import transforms, datasets
from tqdm import tqdm
import torchvision.models.resnet

from model import resnet34


def main():
    device = torch.device("cuda" if torch.cuda.is_available() else "cpu")
    print("using {} device.".format(device))

    data_transform = {
        "train": transforms.Compose([transforms.RandomResizedCrop(224),
                                     transforms.RandomHorizontalFlip(),
                                     transforms.ToTensor(),
                                     transforms.Normalize([0.485, 0.456, 0.406], [0.229, 0.224, 0.225])]),
        "val": transforms.Compose([transforms.Resize(256),
                                   transforms.CenterCrop(224),
                                   transforms.ToTensor(),
                                   transforms.Normalize([0.485, 0.456, 0.406], [0.229, 0.224, 0.225])])}

    data_root = os.path.abspath(os.path.join(os.getcwd(), "../"))  # get data root path
    image_path = os.path.join(data_root, "data_set", "flower_data")  # flower data set path
    assert os.path.exists(image_path), "{} path does not exist.".format(image_path)
    train_dataset = datasets.ImageFolder(root=os.path.join(image_path, "train"),
                                         transform=data_transform["train"])
    train_num = len(train_dataset)

    # {'daisy':0, 'dandelion':1, 'roses':2, 'sunflower':3, 'tulips':4}
    flower_list = train_dataset.class_to_idx
    cla_dict = dict((val, key) for key, val in flower_list.items())
    # write dict into json file
    json_str = json.dumps(cla_dict, indent=4)
    with open('class_indices.json', 'w') as json_file:
        json_file.write(json_str)

    batch_size = 16
    nw = min([os.cpu_count(), batch_size if batch_size > 1 else 0, 8])  # number of workers
    print('Using {} dataloader workers every process'.format(nw))

    train_loader = torch.utils.data.DataLoader(train_dataset,
                                               batch_size=batch_size, shuffle=True,
                                               num_workers=nw)

    validate_dataset = datasets.ImageFolder(root=os.path.join(image_path, "val"),
                                            transform=data_transform["val"])
    val_num = len(validate_dataset)
    validate_loader = torch.utils.data.DataLoader(validate_dataset,
                                                  batch_size=batch_size, shuffle=False,
                                                  num_workers=nw)

    print("using {} images for training, {} images for validation.".format(train_num,
                                                                           val_num))
    ### 载入预训练模型
    # 实例化resnet34
    net = resnet34()
    # load pretrain weights
    # download url: https://download.pytorch.org/models/resnet34-333f7ec4.pth
    # 保存权重的地址
    model_weight_path = "../resnet34-pre.pth"
    assert os.path.exists(model_weight_path), "file {} does not exist.".format(model_weight_path)
    # 网络加载权重
    net.load_state_dict(torch.load(model_weight_path, map_location='cpu'))
    # for param in net.parameters():
    #     param.requires_grad = False

    # change fc layer structure 经过全连接层后的特征矩阵的深度
    in_channel = net.fc.in_features
    # 根据数据集的类别进行更改,花数据集只有5个类别
    net.fc = nn.Linear(in_channel, 5)
    net.to(device)

    # define loss function
    loss_function = nn.CrossEntropyLoss()

    # construct an optimizer
    params = [p for p in net.parameters() if p.requires_grad]
    optimizer = optim.Adam(params, lr=0.0001)

    epochs = 3
    best_acc = 0.0
    save_path = './resNet34.pth'
    train_steps = len(train_loader)
    for epoch in range(epochs):
        # train
        net.train()
        running_loss = 0.0
        train_bar = tqdm(train_loader, file=sys.stdout)
        for step, data in enumerate(train_bar):
            images, labels = data
            optimizer.zero_grad()
            logits = net(images.to(device))
            loss = loss_function(logits, labels.to(device))
            loss.backward()
            optimizer.step()

            # print statistics
            running_loss += loss.item()

            train_bar.desc = "train epoch[{}/{}] loss:{:.3f}".format(epoch + 1,
                                                                     epochs,
                                                                     loss)

        # validate
        net.eval()
        acc = 0.0  # accumulate accurate number / epoch
        with torch.no_grad():
            val_bar = tqdm(validate_loader, file=sys.stdout)
            for val_data in val_bar:
                val_images, val_labels = val_data
                outputs = net(val_images.to(device))
                # loss = loss_function(outputs, test_labels)
                predict_y = torch.max(outputs, dim=1)[1]
                acc += torch.eq(predict_y, val_labels.to(device)).sum().item()

                val_bar.desc = "valid epoch[{}/{}]".format(epoch + 1,
                                                           epochs)

        val_accurate = acc / val_num
        print('[epoch %d] train_loss: %.3f  val_accuracy: %.3f' %
              (epoch + 1, running_loss / train_steps, val_accurate))

        if val_accurate > best_acc:
            best_acc = val_accurate
            torch.save(net.state_dict(), save_path)

    print('Finished Training')


if __name__ == '__main__':
    main()
输出: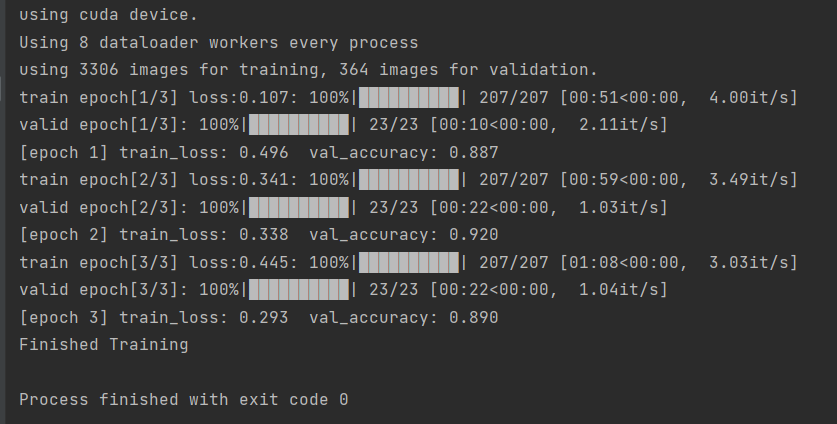
predict.py
import os
import json

import torch
from PIL import Image
from torchvision import transforms
import matplotlib.pyplot as plt

from model import resnet34


def main():
    device = torch.device("cuda:0" if torch.cuda.is_available() else "cpu")

    data_transform = transforms.Compose(
        [transforms.Resize(256),
         transforms.CenterCrop(224),
         transforms.ToTensor(),
         transforms.Normalize([0.485, 0.456, 0.406], [0.229, 0.224, 0.225])])

    # load image
    img_path = "../tulip.jpg"
    assert os.path.exists(img_path), "file: '{}' dose not exist.".format(img_path)
    img = Image.open(img_path)
    plt.imshow(img)
    # [N, C, H, W]
    img = data_transform(img)
    # expand batch dimension
    img = torch.unsqueeze(img, dim=0)

    # read class_indict
    json_path = './class_indices.json'
    assert os.path.exists(json_path), "file: '{}' dose not exist.".format(json_path)

    with open(json_path, "r") as f:
        class_indict = json.load(f)

    # create model
    model = resnet34(num_classes=5).to(device)

    # load model weights
    weights_path = "./resNet34.pth"
    assert os.path.exists(weights_path), "file: '{}' dose not exist.".format(weights_path)
    model.load_state_dict(torch.load(weights_path, map_location=device))

    # prediction
    model.eval()
    with torch.no_grad():
        # predict class
        output = torch.squeeze(model(img.to(device))).cpu()
        predict = torch.softmax(output, dim=0)
        predict_cla = torch.argmax(predict).numpy()

    print_res = "class: {}   prob: {:.3}".format(class_indict[str(predict_cla)],
                                                 predict[predict_cla].numpy())
    plt.title(print_res)
    for i in range(len(predict)):
        print("class: {:10}   prob: {:.3}".format(class_indict[str(i)],
                                                  predict[i].numpy()))
    plt.show()


if __name__ == '__main__':
    main()
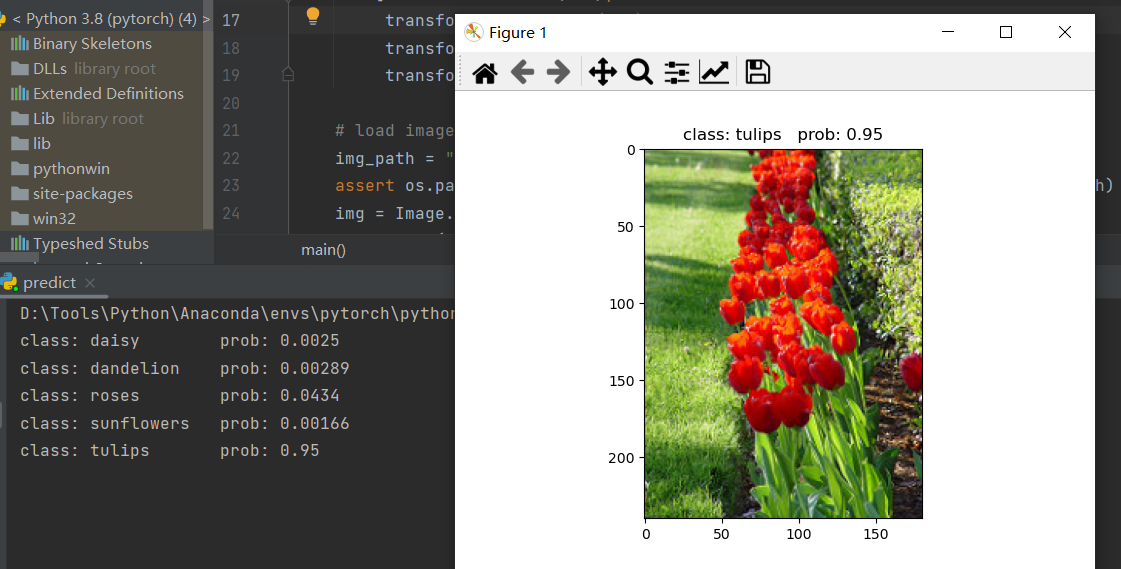
输出: