- 模型训练和评价
卷积神经网络的训练主要分为五个部分,分别是数据集的准备,进行神经网络训练一般是需要大量的数据集,并对数据集划分。然后是模型的配置,根据实际问题构建模型的各个部分。第三部分是模型的训练,将数据集放到构建好的模型中进行训练,并保存训练好的模型。第四部分是评价模型的训练结果,本模型是输出交叉熵和准确率,便于评估训练好的模型的性能。最后是利用模型对图片进行识别预测。
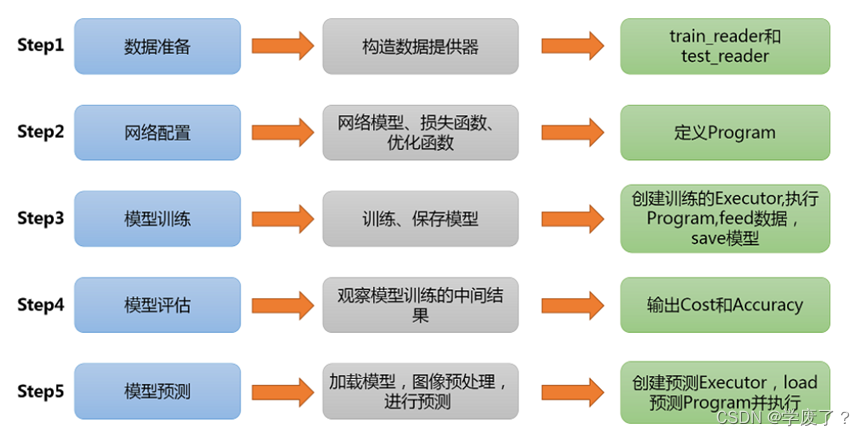
图3-1 模型训练的基本框架
3.1 数据集介绍
Cifar-10(80 Million Tiny Images)是由 Hinton 的学生 Alex Krizhevsky、Ilya Sutskever 收集的一个用于普适物体识别的计算机视觉数据集,它包含 60000 张 32 X 32 的 RGB 彩色图片,总共 10 个分类。其中,包括 50000 张用于训练集,10000 张用于测试集。
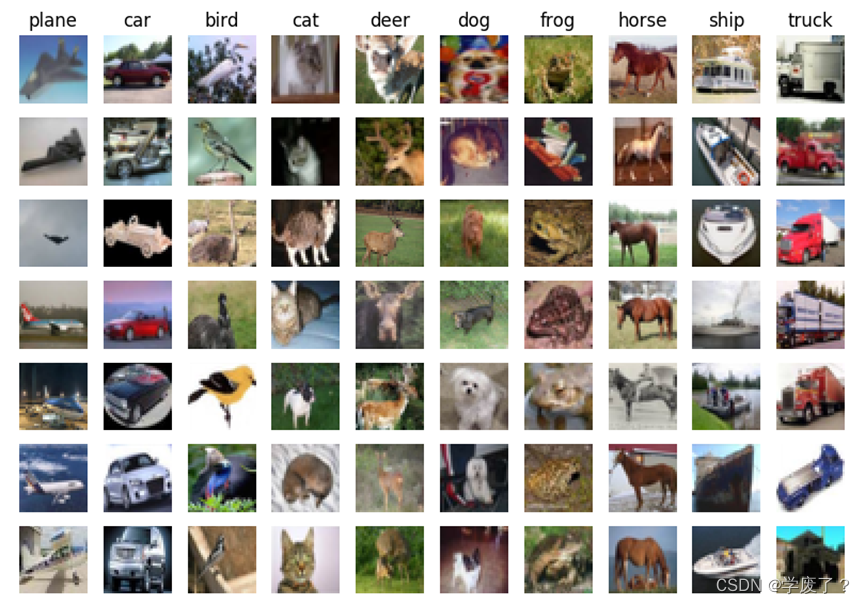 图3-1 数据集部分样本
3.2 数据集预处理
数据集除了需要划分为训练集和测试集外,还需要对图片信息进行处理。要对图像进行预处理。
首先将图片大小调整为32*32,接着将图像转换成一维向量,最后再对一维向量进行归一化处理。下图为程序代码。
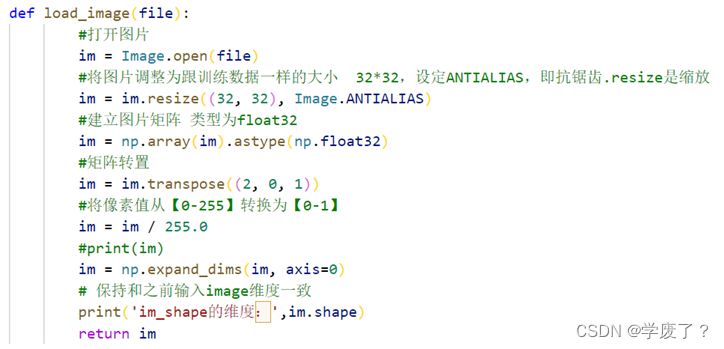
图3-2 图片预处理程序
3.3 参数设置
表3-1 模型参数
| 参数名 | 参数值 |
| 训练用时 | 773.3s |
| 数据切分 | 0.8 |
| 卷积层数 | 3 |
| 卷积核大小和滑移步长 | 2×2,2 |
| 优化算法 | Adam |
| 学习率 | 0.001 |
| 激活函数 | Softmax |
-
- ?CNN模型训练
在CNN模型中,卷积神经网络能够更好的利用图像的结构信息。下面定义了一个较简单的卷积神经网络。显示了其结构:输入的二维图像,先经过三次卷积层、池化层和Batchnorm,再经过全连接层,最后使用softmax分类作为输出层。
 图3-3 卷积神经网络结构
首先定义运算场所 fluid.CPUPlace()和 fluid.CUDAPlace(0)分别表示运算场所为CPU和GPU。Executor:接收传入的program,通过run()方法运行program。然后,定义数据映射器,DataFeeder 负责将reader(读取器)返回的数据转成一种特殊的数据结构,使它们可以输入到 Executor。最后,训练并保存模型Executor接收传入的program,并根据feed map(输入映射表)和fetch_list(结果获取表) 向program中添加feed operators(数据输入算子)和fetch operators(结果获取算子)。 feed map为该program提供输入数据。fetch_list提供program训练结束后用户预期的变量。每一个Pass训练结束之后,再使用验证集进行验证,并打印出相应的损失值cost和准确率acc。
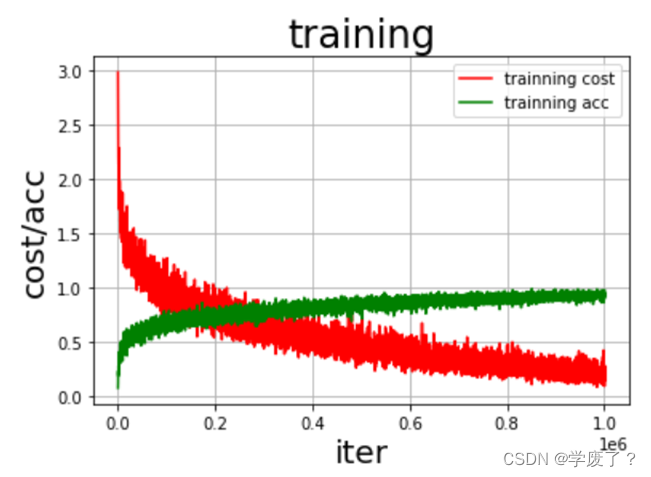 图3-4 损失值cost和准确率acc变化曲线图
-
- 评价指标
-
-
- 交叉熵损失函数
-
熵的物理意义是对体系混乱程度的一种度量方式。后来,香农将熵的概念引入到信息论中,提出了所谓的“信息熵”概念,从概率论的角度来看,就是说某个事件发生的不确定性越大,信息熵就越大。下文中提到的熵都是指“信息熵”。信息熵的公式如下:

交叉熵是信息论中的一个重要概念,主要用于度量两个概率分布间的差异性。公式如下:
其中:M为类别的数量;yic为符号函数,如果样本i的真实类别等于c取1,否则取0;为观测样本i属于类别c的预测概率。
-
-
- 准确率
-
那么预测为正就有两种可能了,一种就是把正类预测为正类(TP),另一种就是把负类预测为正类(FP)。
?
图3-5 混淆矩阵
精确率是针对我们预测结果而言的,它表示的是预测为正的样本中有多少是真正的正样本。也就是
P=TPTP+FP
召回率是针对我们原来的样本而言的,它表示的是样本中的正例有多少被预测正确了。那也有两种可能,一种是把原来的正类预测成正类(TP),另一种就是把原来的正类预测为负类(FN)。
R=TPTP+NP
精确率是所有预测正确的占总体的比重
Acc=TP+TNTP+FP+FN+TN
3.5训练结果
???
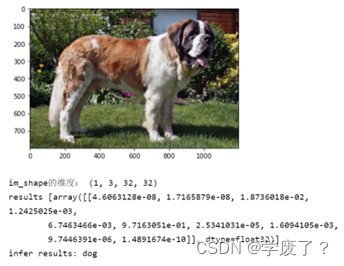
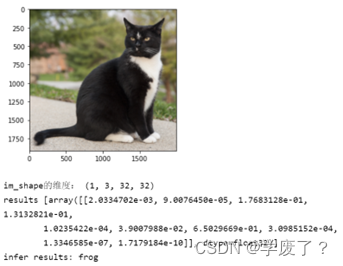
图3-6 模型对图片的识别结果
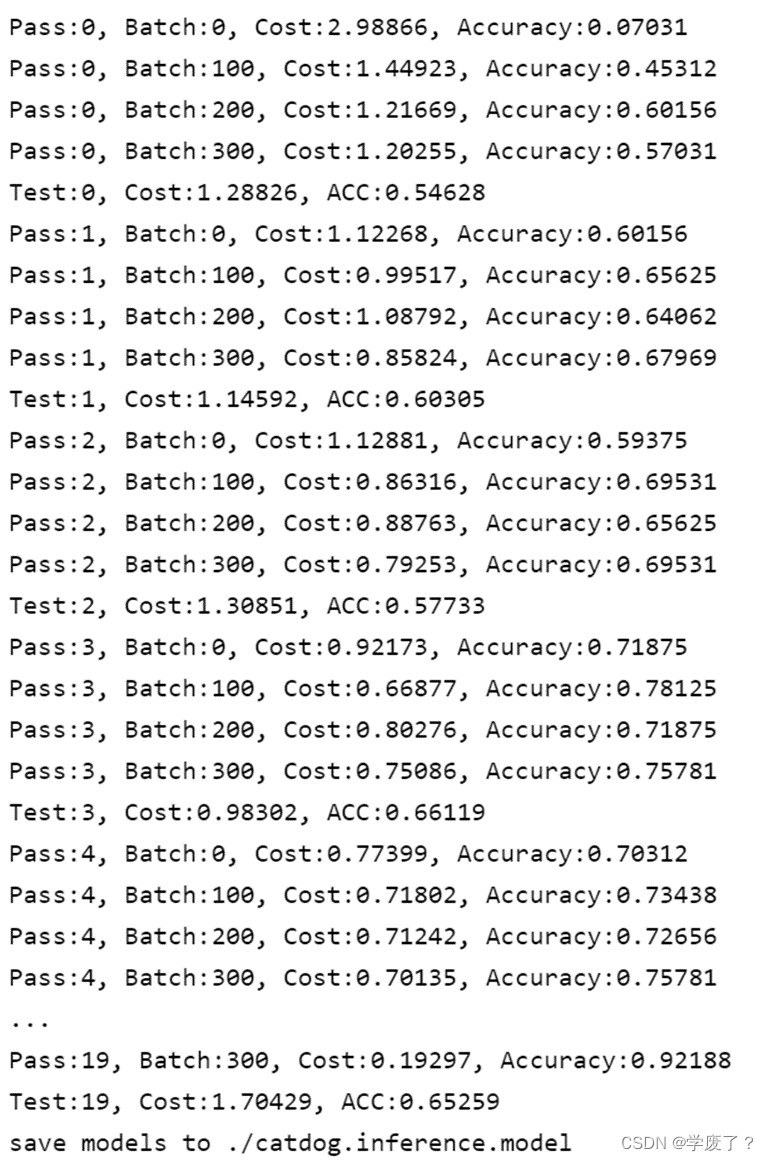
图3-7 训练集和测试集准确率
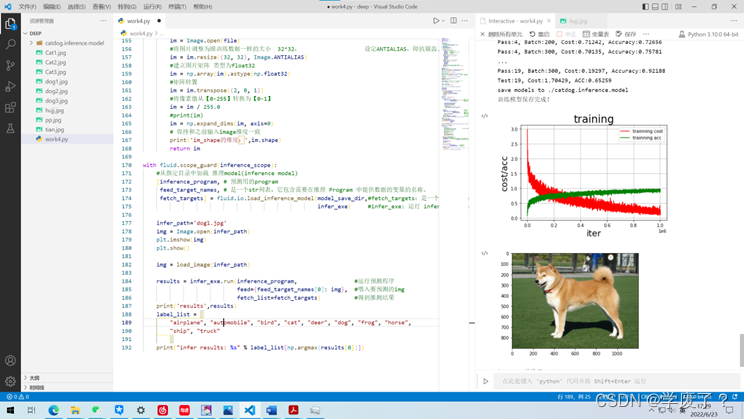
图3-8 卷积神经网络运行平台
#导入需要的包
import paddle as paddle
import paddle.fluid as fluid
import numpy as np
from PIL import Image
import matplotlib.pyplot as plt
import os

BATCH_SIZE = 128
#用于训练的数据提供器
train_reader = paddle.batch(
    paddle.reader.shuffle(paddle.dataset.cifar.train10(),
                          buf_size=128*100),
    batch_size=BATCH_SIZE)
#用于测试的数据提供器
test_reader = paddle.batch(
    paddle.dataset.cifar.test10(),
    batch_size=BATCH_SIZE)

def convolutional_neural_network(img):
    # 第一个卷积-池化层
    conv_pool_1 = fluid.nets.simple_img_conv_pool(
        input=img,         # 输入图像
        filter_size=5,     # 滤波器的大小
        num_filters=20,    # filter 的数量。它与输出的通道相同
        pool_size=2,       # 池化核大小2*2
        pool_stride=2,     # 池化步长
        act="relu")        # 激活类型
    conv_pool_1 = fluid.layers.batch_norm(conv_pool_1)
    # 第二个卷积-池化层
    conv_pool_2 = fluid.nets.simple_img_conv_pool(
        input=conv_pool_1,
        filter_size=5,
        num_filters=50,
        pool_size=2,
        pool_stride=2,
        act="relu")
    conv_pool_2 = fluid.layers.batch_norm(conv_pool_2)
    # 第三个卷积-池化层
    conv_pool_3 = fluid.nets.simple_img_conv_pool(
        input=conv_pool_2,
        filter_size=5,
        num_filters=50,
        pool_size=2,
        pool_stride=2,
        act="relu")
    # 以softmax为激活函数的全连接输出层,10类数据输出10个数字
    prediction = fluid.layers.fc(input=conv_pool_3, size=10, act='softmax')
    return prediction

#定义输入数据
data_shape = [3, 32, 32]
paddle.enable_static()
images = fluid.layers.data(name='images', shape=data_shape, dtype='float32')
label = fluid.layers.data(name='label', shape=[1], dtype='int64')

# 获取分类器,用cnn进行分类
predict =  convolutional_neural_network(images)

# 获取损失函数和准确率
cost = fluid.layers.cross_entropy(input=predict, label=label) # 交叉熵
avg_cost = fluid.layers.mean(cost)                            # 计算cost中所有元素的平均值
acc = fluid.layers.accuracy(input=predict, label=label)       #使用输入和标签计算准确率

# 获取测试程序
test_program = fluid.default_main_program().clone(for_test=True)

# 定义优化方法
optimizer =fluid.optimizer.Adam(learning_rate=0.001)
optimizer.minimize(avg_cost)
print("完成")

# 定义使用CPU还是GPU,使用CPU时use_cuda = False,使用GPU时use_cuda = True
use_cuda = False
place = fluid.CUDAPlace(0) if use_cuda else fluid.CPUPlace()

# 创建执行器,初始化参数

exe = fluid.Executor(place)
exe.run(fluid.default_startup_program())

feeder = fluid.DataFeeder( feed_list=[images, label],place=place)

all_train_iter=0
all_train_iters=[]
all_train_costs=[]
all_train_accs=[]

def draw_train_process(title,iters,costs,accs,label_cost,lable_acc):
    plt.title(title, fontsize=24)
    plt.xlabel("iter", fontsize=20)
    plt.ylabel("cost/acc", fontsize=20)
    plt.plot(iters, costs,color='red',label=label_cost)
    plt.plot(iters, accs,color='green',label=lable_acc)
    plt.legend()
    plt.grid()
    plt.show()

EPOCH_NUM = 20
model_save_dir = "/home/aistudio/work/catdog.inference.model"

for pass_id in range(EPOCH_NUM):
    # 开始训练
    for batch_id, data in enumerate(train_reader()):                        #遍历train_reader的迭代器,并为数据加上索引batch_id
        train_cost,train_acc = exe.run(program=fluid.default_main_program(),#运行主程序
                             feed=feeder.feed(data),                        #喂入一个batch的数据
                             fetch_list=[avg_cost, acc])                    #fetch均方误差和准确率


        all_train_iter=all_train_iter+BATCH_SIZE
        all_train_iters.append(all_train_iter)
        all_train_costs.append(train_cost[0])
        all_train_accs.append(train_acc[0])

        #每100次batch打印一次训练、进行一次测试
        if batch_id % 100 == 0:
            print('Pass:%d, Batch:%d, Cost:%0.5f, Accuracy:%0.5f' %
            (pass_id, batch_id, train_cost[0], train_acc[0]))


    # 开始测试
    test_costs = []                                                         #测试的损失值
    test_accs = []                                                          #测试的准确率
    for batch_id, data in enumerate(test_reader()):
        test_cost, test_acc = exe.run(program=test_program,                 #执行测试程序
                                      feed=feeder.feed(data),               #喂入数据
                                      fetch_list=[avg_cost, acc])           #fetch 误差、准确率
        test_costs.append(test_cost[0])                                     #记录每个batch的误差
        test_accs.append(test_acc[0])                                       #记录每个batch的准确率

    # 求测试结果的平均值
    test_cost = (sum(test_costs) / len(test_costs))                         #计算误差平均值(误差和/误差的个数)
    test_acc = (sum(test_accs) / len(test_accs))                            #计算准确率平均值( 准确率的和/准确率的个数)
    print('Test:%d, Cost:%0.5f, ACC:%0.5f' % (pass_id, test_cost, test_acc))

#保存模型
# 如果保存路径不存在就创建
if not os.path.exists(model_save_dir):
    os.makedirs(model_save_dir)
print ('save models to %s' % (model_save_dir))
fluid.io.save_inference_model(model_save_dir,
                              ['images'],
                              [predict],
                              exe)
print('训练模型保存完成!')
draw_train_process("training",all_train_iters,all_train_costs,all_train_accs,"trainning cost","trainning acc")

infer_exe = fluid.Executor(place)
inference_scope = fluid.core.Scope()

def load_image(file):
        #打开图片
        im = Image.open(file)
        #将图片调整为跟训练数据一样的大小  32*32,                   设定ANTIALIAS,即抗锯齿.resize是缩放
        im = im.resize((32, 32), Image.ANTIALIAS)
        #建立图片矩阵 类型为float32
        im = np.array(im).astype(np.float32)
        #矩阵转置
        im = im.transpose((2, 0, 1))
        #将像素值从【0-255】转换为【0-1】
        im = im / 255.0
        #print(im)
        im = np.expand_dims(im, axis=0)
        # 保持和之前输入image维度一致
        print('im_shape的维度:',im.shape)
        return im

with fluid.scope_guard(inference_scope):
    #从指定目录中加载 推理model(inference model)
    [inference_program, # 预测用的program
     feed_target_names, # 是一个str列表,它包含需要在推理 Program 中提供数据的变量的名称。
     fetch_targets] = fluid.io.load_inference_model(model_save_dir,#fetch_targets:是一个 Variable 列表,从中我们可以得到推断结果。
                                                    infer_exe)     #infer_exe: 运行 inference model的 executor

    infer_path='tian.jpg'
    img = Image.open(infer_path)
    plt.imshow(img)
    plt.show()

    img = load_image(infer_path)

    results = infer_exe.run(inference_program,                 #运行预测程序
                            feed={feed_target_names[0]: img},  #喂入要预测的img
                            fetch_list=fetch_targets)          #得到推测结果
    print('results',results)
    label_list = [
        "airplane", "automobile", "bird", "cat", "deer", "dog", "frog", "horse",
        "ship", "truck"
        ]
    print("infer results: %s" % label_list[np.argmax(results[0])])