文章目录
前言
ResNet是一种卷积神经网络(CNN)架构,它克服了 "梯度消失 "问题,使得构建具有多达数千个卷积层的网络成为可能,其性能优于较浅的网络。
同时,本文与VGG16使用相同的数据集,所以有许多操作与我的另一篇博客CV-Model【3】:VGG16相同,若有看不懂的地方,可以进行一些参考。
有关ResNet有关论文的分析可以参考我的这一篇论文CV-Paper【1】:Deep Residual Learning for Image Recognition
1. 配置环境
1.1. 导入所需的库
import numpy as np
import torch
import torch.nn as nn
from torchvision import datasets
from torchvision import transforms
from torch.utils.data.sampler import SubsetRandomSampler

import time

import matplotlib.pyplot as plt

RANDOM_SEED = 123
BATCH_SIZE = 256
NUM_EPOCHS = 50
DEVICE = torch.device('cuda' if torch.cuda.is_available() else 'cpu')
DEVICE
1.2. 下载数据集
1.2.1. 准备训练集和验证集
def get_train_valid_loader(data_dir,
                           batch_size,
                           random_seed,
                           valid_size=0.1,
                           shuffle=True,
                           num_workers=0):

    # 数据集中每个通道 (R, G, B) 的平均值和标准偏差来定义变量normalize。
    normalize = transforms.Normalize(
        mean=[0.4914, 0.4822, 0.4465],
        std=[0.2023, 0.1994, 0.2010],
    )

    # 定义验证集的transforms
    valid_transform = transforms.Compose([
        # 重设图片大小
        transforms.Resize((120, 120)),
        # 随机裁剪
        transforms.RandomCrop((110, 110)),
        transforms.ToTensor(),
        normalize,
    ])

    # 定义训练集的transforms
    train_transform = transforms.Compose([
        # 重设图片大小
        transforms.Resize((120, 120)),
        # 随机裁剪
        transforms.RandomCrop((110, 110)),
        transforms.ToTensor(),
        normalize,
        ])

    # 下载数据集
    train_dataset = datasets.CIFAR10(
        root=data_dir, train=True,
        download=True, transform=train_transform,
    )
    valid_dataset = datasets.CIFAR10(
        root=data_dir, train=True,
        download=True, transform=valid_transform,
    )

    # 获取训练集的标签
    num_train = len(train_dataset)
    indices = list(range(num_train))
    # 找到训练集和验证集划分的区间
    split = int(np.floor(valid_size * num_train))

    # 打乱数据集,若进行多次训练,每次训练获得的数据集将有不同
    if shuffle:
        np.random.seed(random_seed)
        np.random.shuffle(indices)

    # 划分训练集和验证集
    train_idx, valid_idx = indices[split:], indices[:split]
    train_sampler = SubsetRandomSampler(train_idx)
    valid_sampler = SubsetRandomSampler(valid_idx)

    train_loader = torch.utils.data.DataLoader(
        train_dataset, batch_size=batch_size, num_workers=num_workers, drop_last=True, sampler=train_sampler)

    valid_loader = torch.utils.data.DataLoader(
        valid_dataset, batch_size=batch_size, num_workers=num_workers, sampler=valid_sampler)

    return train_loader, valid_loader
1.2.2. 准备测试集
def get_test_loader(data_dir,
                    batch_size,
                    shuffle=False,
                    num_workers=0):
    normalize = transforms.Normalize(
        mean=[0.485, 0.456, 0.406],
        std=[0.229, 0.224, 0.225],
    )

    # 定义测试集的transform
    transform = transforms.Compose([
        # 重设图片大小
        transforms.Resize((120, 120)),
        # 随机裁剪
        transforms.RandomCrop((110, 110)),
        transforms.ToTensor(),
        normalize,
    ])

    dataset = datasets.CIFAR10(
        root=data_dir, train=False,
        download=True, transform=transform,
    )

    data_loader = torch.utils.data.DataLoader(
        dataset, batch_size=batch_size, num_workers=num_workers, shuffle=shuffle)

    return data_loader
1.2.3. 下载数据集
# CIFAR10 dataset
train_loader, valid_loader = get_train_valid_loader(data_dir = 'autodl-tmp/data/', batch_size = BATCH_SIZE, random_seed = RANDOM_SEED)

test_loader = get_test_loader(data_dir = 'autodl-tmp/data/', batch_size = BATCH_SIZE)

# 验证数据集中的内容
for images, labels in train_loader:
    print('Image batch dimensions:', images.shape)
    print('Image label dimensions:', labels.shape)
    print('Class labels of 10 examples:', labels[:10])
    break
2. 搭建神经网络
2.1. 神经网络的结构
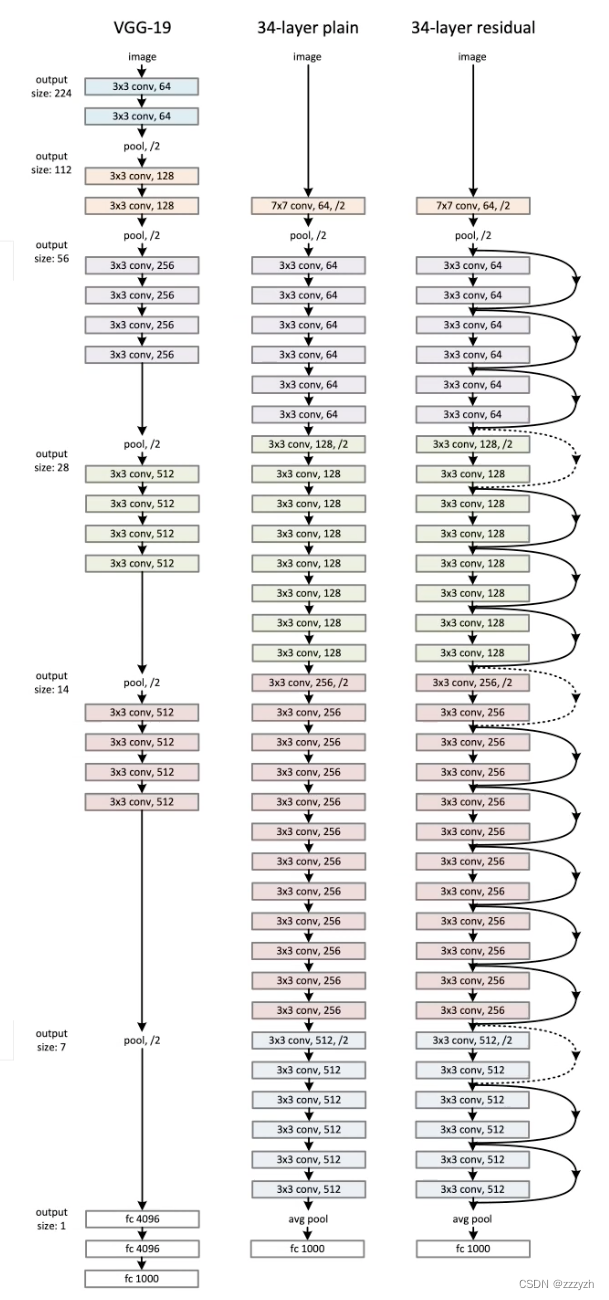
Resnet(Deep residual network, ResNet),深度残差神经网络,卷积神经网络历史在具有划时代意义的神经网络。与Alexnet和VGG不同的是,网络结构上就有很大的改变,在大家为了提升卷积神经网络的性能在不断提升网络深度的时候,大家发现随着网络深度的提升,网络的效果变得越来越差,甚至出现了网络的退化问题,80层的网络比30层的效果还差,深度网络存在的梯度消失和爆炸问题越来越严重,这使得训练一个优异的深度学习模型变得更加艰难,在这种情况下,网络结构图
为了解决这个问题,我们使用对上一层的参考来计算某一层的输出。在ResNet中,前一层的输出,称为残差,被添加到当前层的输出中。下图直观地展示了这一操作
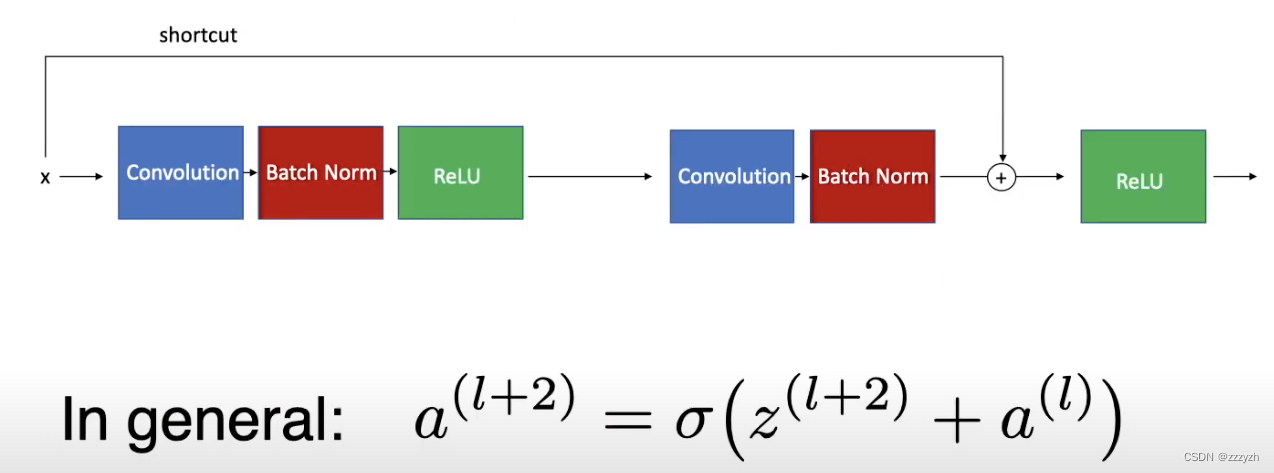
Residual Block
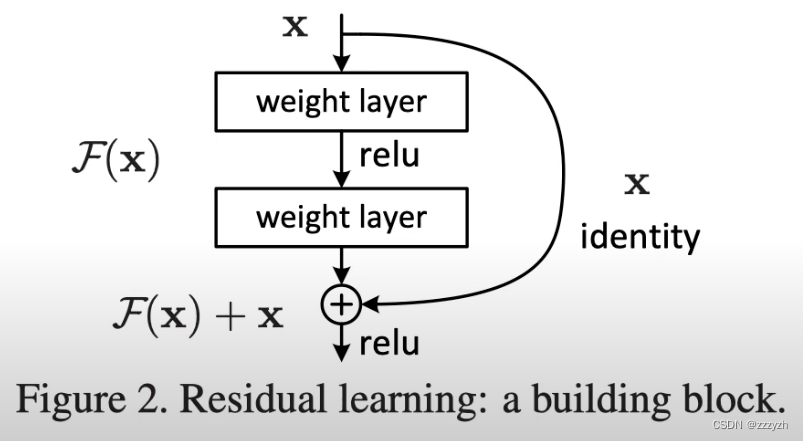
Residual Block是ResNet网络的基本构建块。为了使非常深的卷积结构成为可能,ResNet在一组卷积块的输出中增加了中间输入。跳过连接的目的是允许更平滑的梯度流动,并确保重要的特征一直延续到最后一层。它们不会给网络增加计算负荷。下图说明了一个残差块,其中。
- x是ResNet块的输入–前几层的输出
- F(x)是一个有几个卷积块的小型神经网络
2.2. ResNet
2.2.1. BasicBlock
def conv3x3(in_planes, out_planes, stride=1, groups=1, dilation=1):
    return torch.nn.Conv2d(in_planes, out_planes, kernel_size=3, stride=stride,
                     padding=dilation, groups=groups, bias=False, dilation=dilation)

def conv1x1(in_planes, out_planes, stride=1):
    return torch.nn.Conv2d(in_planes, out_planes, kernel_size=1, stride=stride, bias=False)

class BasicBlock(nn.Module):

    """实现ResNet的基本块"""

	expansion: int = 1

    def __init__(self, in_planes, planes, stride=1, down_sample=None,
                 groups=1, base_width=64, dilation=1, norm_layer=None):

        """
        in_channels:此块输入的通道数
        planes:输出的通道数
        stride:在第一个卷积层的步长
        down_sample:是否进行下采样
        groups:分组卷积
        base_width:宽度
        dilation:空洞卷积
        norm_layer:批标准化
        """

        super().__init__()
        if norm_layer is None:
            norm_layer = torch.nn.BatchNorm2d
        if groups != 1 or base_width != 64:
            raise ValueError('BasicBlock only supports groups=1 and base_width=64')
        if dilation > 1:
            raise NotImplementedError("Dilation > 1 not supported in BasicBlock")

        # 当步长(stride)不为1时,self.conv1 和 self.down_sample 都需要对输入进行下采样
        self.conv1 = conv3x3(in_planes, planes, stride)
        self.bn1 = norm_layer(planes)
        self.relu = torch.nn.ReLU(inplace=True)
        self.conv2 = conv3x3(planes, planes)
        self.bn2 = norm_layer(planes)
        self.down_sample = down_sample
        self.stride = stride

    def forward(self, x):

        """在这里就是构造残差块的基本结构"""

        # 进行恒等映射
        identity = x

        out = self.conv1(x)
        out = self.bn1(out)
        out = self.relu(out)

        out = self.conv2(out)
        out = self.bn2(out)

        # 如果 down_sample 不是空值(需要下采样)的话
        # 就在后方进行下采样层相应的操作,因为在上述分析模块部分已经说到,
        # 在虚线部分,会因为通道数不一致,要进行下采样操作,使得通道数一致。
        if self.down_sample is not None:
            identity = self.down_sample(x)

        # 将此基本结构块的输入与本结构块的最后一层的输出进行叠加形成最终的输出
        out += identity
        out = self.relu(out)

        # 返回此结构块的输出 也就是下一个残差块的基本结构的输入
        return out
- nn.ReLU(inplace=True)
inplace为True,将计算得到的值直接覆盖之前的值- 产生的计算结果不会有影响。利用in-place计算可以节省内(显)存,同时还可以省去反复申请和释放内存的时间。但是会对原变量覆盖,只要不带来错误就用。
- 因此当inplace=True时,就是对从上层网络nn.Conv2d中传递下来的tensor直接进行修改,这样能够节省运算内存,不用多存储其他变量。
- down_sample(下采样)
对于一幅图像I尺寸为M x N,对其进行s倍下采样,即得到(M/s) * (N/s)尺寸的得分辨率图像,当然s应该是M和N的公约数才行,如果考虑的是矩阵形式的图像,就是把原始图像s*s窗口内的图像变成一个像素,这个像素点的值就是窗口内所有像素的均值- 使用池化 pooling(池化 / 降采样) 的技术下采样,目的就是用来降低特征的维度并保留有效信息,一定程度上避免过拟合。
- 常见的下采样算法
- farthest point sampling(FPS):采样点分布均匀,时间复杂度高
- grid sampling(GS):采样点分布较为均匀,时间复杂度一般,采样点个数具有不确定性
- random sampling(RS):采样点分布具有随机性,时间复杂度低
2.2.2. Bottleneck
# 拓展ResNet以适应更多层的模块
class Bottleneck(torch.nn.Module):

    """
    注意:原论文中,在虚线残差结构的主分支上,第一个1x1卷积层的stride是2,第二个3x3卷积层stride是1。
    但在pytorch官方实现过程中是第一个1x1卷积层的stride是1,第二个3x3卷积层stride是2,
    这么做的好处是能够在top1上提升大概0.5%的准确率。
    """

    # 通道数变化的系数
    expansion = 4

    def __init__(self, in_channels, planes, stride=1, down_sample=None,
                 groups=1, base_width=64, dilation=1, norm_layer=None):

        """
        in_channels:此块输入的通道数
        channels:输出的通道数
        stride:在第一个卷积层的步长
        down_sample:是否进行下采样
        groups:分组卷积
        base_width:宽度
        dilation:空洞卷积
        norm_layer:批标准化
        """

        super().__init__()

        # 设置批度归一化
        if norm_layer is None:
            norm_layer = torch.nn.BatchNorm2d # 使一批feature map满足均值为0,方差为1的分布规律

        # resnext50_32x4d 和resnext101_32x8d 会使用
        width = int(planes * (base_width / 64.)) * groups

        # 定义三个卷积过程
        self.conv1 = conv1x1(in_channels, width)
        self.bn1 = norm_layer(width)

        self.conv2 = conv3x3(width, width, stride, groups, dilation)
        self.bn2 = norm_layer(width)

        self.conv3 = conv1x1(width, planes * self.expansion)
        self.bn3 = norm_layer(planes * self.expansion)
        self.relu = torch.nn.ReLU(inplace=True)
        # 下采样
        self.down_sample = down_sample
        self.stride = stride

    def forward(self, x):
        identity = x

        out = self.conv1(x)
        out = self.bn1(out)
        out = self.relu(out)

        out = self.conv2(out)
        out = self.bn2(out)
        out = self.relu(out)

        out = self.conv3(out)
        out = self.bn3(out)

        if self.down_sample is not None:
            identity = self.down_sample(x)

        out += identity
        out = self.relu(out)

        return out
2.2.3. ResNet
class ResNet(torch.nn.Module):

    def __init__(self, block, layers, num_classes, zero_init_residual=False, groups=1,
                 width_per_group=64, replace_stride_with_dilation=None, norm_layer=None):

        """
        block:传入实例化BasicBlock,就是上一部分代码的基本块
        layers:块的个数此为一个列表,列表长度为ResNet的块数
        num_classes:分类数量
        zero_init_residual:残差初始化
        groups:分组卷积
        width_per_group:
        replace_stride_with_dilation:替换扩张长度
        norm_layer:批归一化
        """

        super().__init__()

        if norm_layer is None:
            norm_layer = torch.nn.BatchNorm2d
        self._norm_layer = norm_layer

        self.in_channels = 64
        self.dilation = 1

        # 元组中的每个元素都表示我们是否应该用扩张卷积来代替2x2的步长
        if replace_stride_with_dilation is None:
            replace_stride_with_dilation = [False, False, False]
        if len(replace_stride_with_dilation) != 3:
            raise ValueError("replace_stride_with_dilation should be None "
                             "or a 3-element tuple, got {}".format(replace_stride_with_dilation))

        self.groups = groups
        self.base_width = width_per_group
        self.conv1 = torch.nn.Conv2d(3, self.in_channels, kernel_size=7, stride=2, padding=3,
                                     bias=False)
        self.bn1 = norm_layer(self.in_channels)
        # 过激活函数,增加非线性表达
        self.relu = torch.nn.ReLU(inplace=True)
        self.max_pool = torch.nn.MaxPool2d(kernel_size=3, stride=2, padding=1)

        # 进行ResNet的4个block [3, 4, 6, 3]
        self.layer1 = self._make_layer(block, 64, layers[0])
        self.layer2 = self._make_layer(block, 128, layers[1], stride=2,
                                       dilate=replace_stride_with_dilation[0])
        self.layer3 = self._make_layer(block, 256, layers[2], stride=2,
                                       dilate=replace_stride_with_dilation[1])
        self.layer4 = self._make_layer(block, 512, layers[3], stride=2,
                                       dilate=replace_stride_with_dilation[2])
        # 自适应的平均池化
        self.avg_pool = torch.nn.AdaptiveAvgPool2d((1, 1))
        # 全连接层
        self.fc = torch.nn.Linear(512 * block.expansion, num_classes)

        # 遍历每一个模块进行模块的权重的初始化
        for m in self.modules():
            if isinstance(m, torch.nn.Conv2d):
                torch.nn.init.kaiming_normal_(m.weight, mode='fan_out', nonlinearity='relu')
            elif isinstance(m, (torch.nn.BatchNorm2d, torch.nn.GroupNorm)):
                torch.nn.init.constant_(m.weight, 1)
                torch.nn.init.constant_(m.bias, 0)

        # 对每个剩余分支中的最后一个BN进行Zero-initialize
        # 这样,残差分支以零开始,每个残差块的行为就像一个身份。
        # 这可以使模型提高0.2~0.3%
        if zero_init_residual:
            for m in self.modules():
                if isinstance(m, Bottleneck):
                    torch.nn.init.constant_(m.bn3.weight, 0)
                elif isinstance(m, BasicBlock):
                    torch.nn.init.constant_(m.bn2.weight, 0)

    # 此函数为构造每个block的函数
    def _make_layer(self, block, planes, blocks,
                    stride=1, dilate=False):
        norm_layer = self._norm_layer

        down_sample = None

        # 步长不为1,因为需要down_sample进行对于不同残差块之间的统一,上一个残差块的输出与本残差块的输出宽高保持一致
        # 如果步长不为1,也就是每个大部分的第一个基本块的第一个卷积层,或者输入通道与通道不匹配,也就是ResNet更多层会出现通道数发生变化
        # 导致通道数不匹配,所以要进行下采样,统一通道数
        previous_dilation = self.dilation
        if dilate:
            self.dilation *= stride
            stride = 1
        if stride != 1 or self.in_channels != planes * block.expansion:
            down_sample = torch.nn.Sequential(
                conv1x1(self.in_channels, planes * block.expansion, stride),
                norm_layer(planes * block.expansion),
            )

        # 定义一个层列表
        layers = []
        # 添加基本块
        layers.append(block(self.in_channels, planes, stride, down_sample, self.groups,
                            self.base_width, previous_dilation, norm_layer))
        # 注意,只有在不同block的情况下才进行此操作,因为上个block跟下个block的channel不一样
        self.in_channels = planes * block.expansion
        # 进行循环,通过小的基本块,构造一个block
        for _ in range(1, blocks):
            layers.append(block(self.in_channels, planes, groups=self.groups,
                                base_width=self.base_width, dilation=self.dilation,
                                norm_layer=norm_layer))

        return torch.nn.Sequential(*layers)

    def forward(self, x):
        x = self.conv1(x)
        x = self.bn1(x)
        x = self.relu(x)
        x = self.max_pool(x)

        x = self.layer1(x)
        x = self.layer2(x)
        x = self.layer3(x)
        x = self.layer4(x)

        x = self.avg_pool(x)
        x = torch.flatten(x, 1)
        x = self.fc(x)
        return x
2.2.4. 多种网络架构
## 对于不同层的resnet网络 ,所传入的参数设定
def resnet34(num_classes=1000):
    return ResNet(BasicBlock, [3, 4, 6, 3], num_classes=num_classes)


def resnet50(num_classes=1000):
    return ResNet(Bottleneck, [3, 4, 6, 3], num_classes=num_classes)

def resnet101(num_classes=1000):
    return ResNet(Bottleneck, [3, 4, 23, 3], num_classes=num_classes)

def resnext50_32x4d(num_classes=1000):
    groups = 32
    width_per_group = 4
    return ResNet(Bottleneck, [3, 4, 6, 3],
                  num_classes=num_classes,
                  groups=groups,
                  width_per_group=width_per_group)

def resnext101_32x8d(num_classes=1000):
    groups = 32
    width_per_group = 8
    return ResNet(Bottleneck, [3, 4, 23, 3],
                  num_classes=num_classes,
                  groups=groups,
                  width_per_group=width_per_group)
3. 训练模型
3.1. 实例化模型并设置优化器
以ResNet-34作为示范
# ResNet-34
model = ResNet(BasicBlock, layers=[3, 4, 6, 3], num_classes=10)
model = model.to(DEVICE)

optimizer = torch.optim.SGD(model.parameters(), momentum=0.9, lr=0.1)
scheduler = torch.optim.lr_scheduler.ReduceLROnPlateau(optimizer,
                                                       factor=0.1,
                                                       mode='max',
                                                       verbose=True)
3.2. 定义计算准确度的函数
def compute_accuracy(model, data_loader, device):

    with torch.no_grad():

        correct_pred, num_examples = 0, 0

        for i, (features, targets) in enumerate(data_loader):

            features = features.to(device)
            targets = targets.float().to(device)

            logits = model(features)
            _, predicted_labels = torch.max(logits, 1)

            num_examples += targets.size(0)
            # 累加每批次的预测正确的样本数,以获得一个测试周期的所有预测正确的样本数
            correct_pred += (predicted_labels == targets).sum().item()
    return correct_pred/num_examples * 100
3.3. 训练模型
def train_model(model, num_epochs, train_loader,
                valid_loader, test_loader, optimizer,
                device, logging_interval=50,
                scheduler=None,
                scheduler_on='valid_acc'):

    # 系统时钟的时间戳
    start_time = time.time()
    minibatch_loss_list, train_acc_list, valid_acc_list = [], [], []

    for epoch in range(num_epochs):

        model.train()
        for batch_idx, (features, targets) in enumerate(train_loader):

            features = features.to(device)
            targets = targets.to(device)

            # 前向与后向传播
            logits = model(features)
            loss = torch.nn.functional.cross_entropy(logits, targets)
            optimizer.zero_grad()
            loss.backward()

            # 更新模型参数
            optimizer.step()

            # 打印日志
            minibatch_loss_list.append(loss.item())
            if not batch_idx % logging_interval:
                print(f'Epoch: {epoch+1:03d}/{num_epochs:03d} '
                      f'| Batch {batch_idx:04d}/{len(train_loader):04d} '
                      f'| Loss: {loss:.4f}')

        model.eval()
        with torch.no_grad():
            train_acc = compute_accuracy(model, train_loader, device=device)
            valid_acc = compute_accuracy(model, valid_loader, device=device)
            print(f'Epoch: {epoch+1:03d}/{num_epochs:03d} '
                  f'| Train: {train_acc :.2f}% '
                  f'| Validation: {valid_acc :.2f}%')
            train_acc_list.append(train_acc)
            valid_acc_list.append(valid_acc)

        elapsed = (time.time() - start_time)/60
        print(f'Time elapsed: {elapsed:.2f} min')

        if scheduler is not None:

            if scheduler_on == 'valid_acc':
                scheduler.step(valid_acc_list[-1])
            elif scheduler_on == 'minibatch_loss':
                scheduler.step(minibatch_loss_list[-1])
            else:
                raise ValueError(f'Invalid `scheduler_on` choice.')

    # 计算运行时间
    elapsed = (time.time() - start_time)/60
    print(f'Total Training Time: {elapsed:.2f} min')

    test_acc = compute_accuracy(model, test_loader, device=device)
    print(f'Test accuracy {test_acc :.2f}%')

    return minibatch_loss_list, train_acc_list, valid_acc_list


# 训练模型
minibatch_loss_list, train_acc_list, valid_acc_list = train_model(
    model=model,
    num_epochs=NUM_EPOCHS,
    train_loader=train_loader,
    valid_loader=valid_loader,
    test_loader=test_loader,
    optimizer=optimizer,
    device=DEVICE,
    scheduler=scheduler,
    scheduler_on='valid_acc',
    logging_interval=100)
# 保存模型参数
torch.save(model.state_dict(), 'model/VGG16/vgg_16_model.pth') # 只保存模型的参数,不保存模型
torch.save(optimizer.state_dict(), 'model/VGG16/vgg_16_optimizer.pth') # 保存优化器的参数,如学习率等
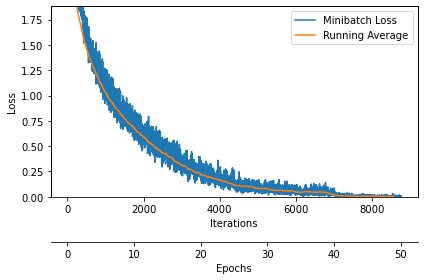
3.4. 绘制训练损失曲线
def plot_training_loss(minibatch_loss_list, num_epochs, iter_per_epoch, averaging_iterations=100):

    plt.figure()
    ax1 = plt.subplot(1, 1, 1)
    ax1.plot(range(len(minibatch_loss_list)),
             (minibatch_loss_list), label='Minibatch Loss')

    if len(minibatch_loss_list) > 1000:
        ax1.set_ylim([
            0, np.max(minibatch_loss_list[1000:])*1.5
            ])
    ax1.set_xlabel('Iterations')
    ax1.set_ylabel('Loss')

    ax1.plot(np.convolve(minibatch_loss_list,
                         np.ones(averaging_iterations,)/averaging_iterations,
                         mode='valid'),
             label='Running Average')
    ax1.legend()

    # 设置双坐标轴
    ax2 = ax1.twiny()
    newlabel = list(range(num_epochs+1))

    newpos = [e*iter_per_epoch for e in newlabel]

    ax2.set_xticks(newpos[::10])
    ax2.set_xticklabels(newlabel[::10])

    ax2.xaxis.set_ticks_position('bottom')
    ax2.xaxis.set_label_position('bottom')
    ax2.spines['bottom'].set_position(('outward', 45))
    ax2.set_xlabel('Epochs')
    ax2.set_xlim(ax1.get_xlim())

    plt.tight_layout()

    plt.savefig("model/VGG16/plot_training_loss.pdf")

plot_training_loss(minibatch_loss_list=minibatch_loss_list,
                   num_epochs=NUM_EPOCHS,
                   iter_per_epoch=len(train_loader),
                   averaging_iterations=200)
plt.show()
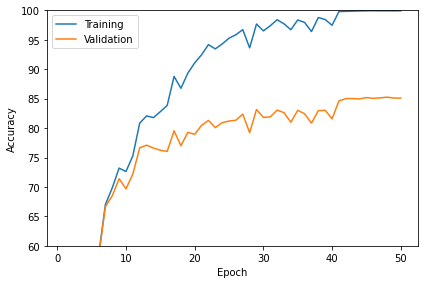
3.5. 绘制准确度曲线
def plot_accuracy(train_acc_list, valid_acc_list):

    num_epochs = len(train_acc_list)

    plt.plot(np.arange(1, num_epochs+1),
             train_acc_list, label='Training')
    plt.plot(np.arange(1, num_epochs+1),
             valid_acc_list, label='Validation')

    plt.xlabel('Epoch')
    plt.ylabel('Accuracy')
    plt.legend()

    plt.tight_layout()

    plt.savefig("model/VGG16/plot_acc_training_validation.pdf")

plot_accuracy(train_acc_list=train_acc_list,
              valid_acc_list=valid_acc_list)
plt.ylim([60, 100])
plt.show()
4. 预测
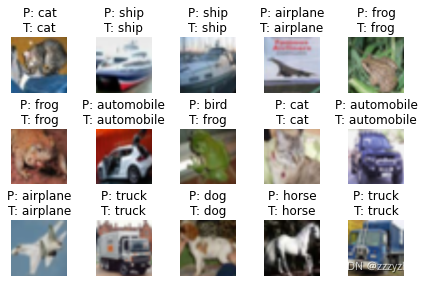
4.1. 示例
class UnNormalize(object):
    def __init__(self, mean, std):
        self.mean = mean
        self.std = std

    def __call__(self, tensor):
        for t, m, s in zip(tensor, self.mean, self.std):
            t.mul_(s).add_(m)
        return tensor

def show_examples(model, data_loader, unnormalizer=None, class_dict=None):


    for batch_idx, (features, targets) in enumerate(data_loader):

        with torch.no_grad():
            features = features
            targets = targets
            logits = model(features)
            predictions = torch.argmax(logits, dim=1)
        break

    fig, axes = plt.subplots(nrows=3, ncols=5,
                             sharex=True, sharey=True)

    if unnormalizer is not None:
        for idx in range(features.shape[0]):
            features[idx] = unnormalizer(features[idx])
    nhwc_img = np.transpose(features, axes=(0, 2, 3, 1))

    if nhwc_img.shape[-1] == 1:
        nhw_img = np.squeeze(nhwc_img.numpy(), axis=3)

        for idx, ax in enumerate(axes.ravel()):
            ax.imshow(nhw_img[idx], cmap='binary')
            if class_dict is not None:
                ax.title.set_text(f'P: {class_dict[predictions[idx].item()]}'
                                  f'\nT: {class_dict[targets[idx].item()]}')
            else:
                ax.title.set_text(f'P: {predictions[idx]} | T: {targets[idx]}')
            ax.axison = False

    else:

        for idx, ax in enumerate(axes.ravel()):
            ax.imshow(nhwc_img[idx])
            if class_dict is not None:
                ax.title.set_text(f'P: {class_dict[predictions[idx].item()]}'
                                  f'\nT: {class_dict[targets[idx].item()]}')
            else:
                ax.title.set_text(f'P: {predictions[idx]} | T: {targets[idx]}')
            ax.axison = False
    plt.tight_layout()
    plt.show()

model.cpu()
unnormalizer = UnNormalize(mean=[0.485, 0.456, 0.406], std=[0.229, 0.224, 0.225])
class_dict = {0: 'airplane',
              1: 'automobile',
              2: 'bird',
              3: 'cat',
              4: 'deer',
              5: 'dog',
              6: 'frog',
              7: 'horse',
              8: 'ship',
              9: 'truck'}

show_examples(model=model, data_loader=test_loader, unnormalizer=unnormalizer, class_dict=class_dict)
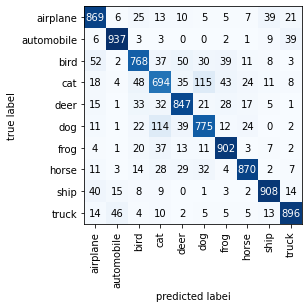
4.2. 打印矩阵
from itertools import product

def compute_confusion_matrix(model, data_loader, device):

    all_targets, all_predictions = [], []
    with torch.no_grad():

        for i, (features, targets) in enumerate(data_loader):

            features = features.to(device)
            targets = targets
            logits = model(features)
            _, predicted_labels = torch.max(logits, 1)
            all_targets.extend(targets.to('cpu'))
            all_predictions.extend(predicted_labels.to('cpu'))

    all_predictions = all_predictions
    all_predictions = np.array(all_predictions)
    all_targets = np.array(all_targets)

    class_labels = np.unique(np.concatenate((all_targets, all_predictions)))
    if class_labels.shape[0] == 1:
        if class_labels[0] != 0:
            class_labels = np.array([0, class_labels[0]])
        else:
            class_labels = np.array([class_labels[0], 1])
    n_labels = class_labels.shape[0]
    lst = []
    z = list(zip(all_targets, all_predictions))
    for combi in product(class_labels, repeat=2):
        lst.append(z.count(combi))
    mat = np.asarray(lst)[:, None].reshape(n_labels, n_labels)
    return mat

def plot_confusion_matrix(conf_mat,
                          hide_spines=False,
                          hide_ticks=False,
                          figsize=None,
                          cmap=None,
                          colorbar=False,
                          show_absolute=True,
                          show_normed=False,
                          class_names=None):

    if not (show_absolute or show_normed):
        raise AssertionError('Both show_absolute and show_normed are False')
    if class_names is not None and len(class_names) != len(conf_mat):
        raise AssertionError('len(class_names) should be equal to number of'
                             'classes in the dataset')

    total_samples = conf_mat.sum(axis=1)[:, np.newaxis]
    normed_conf_mat = conf_mat.astype('float') / total_samples

    fig, ax = plt.subplots(figsize=figsize)
    ax.grid(False)
    if cmap is None:
        cmap = plt.cm.Blues

    if figsize is None:
        figsize = (len(conf_mat)*1.25, len(conf_mat)*1.25)

    if show_normed:
        matshow = ax.matshow(normed_conf_mat, cmap=cmap)
    else:
        matshow = ax.matshow(conf_mat, cmap=cmap)

    if colorbar:
        fig.colorbar(matshow)

    for i in range(conf_mat.shape[0]):
        for j in range(conf_mat.shape[1]):
            cell_text = ""
            if show_absolute:
                cell_text += format(conf_mat[i, j], 'd')
                if show_normed:
                    cell_text += "\n" + '('
                    cell_text += format(normed_conf_mat[i, j], '.2f') + ')'
            else:
                cell_text += format(normed_conf_mat[i, j], '.2f')
            ax.text(x=j,
                    y=i,
                    s=cell_text,
                    va='center',
                    ha='center',
                    color="white" if normed_conf_mat[i, j] > 0.5 else "black")

    if class_names is not None:
        tick_marks = np.arange(len(class_names))
        plt.xticks(tick_marks, class_names, rotation=90)
        plt.yticks(tick_marks, class_names)

    if hide_spines:
        ax.spines['right'].set_visible(False)
        ax.spines['top'].set_visible(False)
        ax.spines['left'].set_visible(False)
        ax.spines['bottom'].set_visible(False)
    ax.yaxis.set_ticks_position('left')
    ax.xaxis.set_ticks_position('bottom')
    if hide_ticks:
        ax.axes.get_yaxis().set_ticks([])
        ax.axes.get_xaxis().set_ticks([])

    plt.xlabel('predicted label')
    plt.ylabel('true label')
    return fig, ax

mat = compute_confusion_matrix(model=model, data_loader=test_loader, device=torch.device('cpu'))
plot_confusion_matrix(mat, class_names=class_dict.values())
plt.show()
总结
在反向传播过程中会出现梯度消失的现象。当神经网络训练算法试图找到使损失函数达到最小值的权重时,如果有太多的层,梯度就会变得非常小,直到消失,优化就无法继续。
ResNet使用 "身份捷径连接 "解决了这个问题。它的操作分为两个阶段。
- 在第一个阶段,ResNet创建了多个最初未使用的层,并跳过这些层,重新使用之前层的激活函数。
- 在第二个阶段,网络再次重新训练,"残余 "卷积层被扩展。这使得探索特征空间的其他部分成为可能,而这些部分在浅层卷积网络结构中会被遗漏。