文章目录
功能设计:
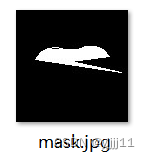
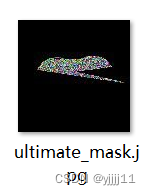
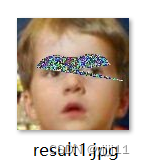
实现PIL格式对人脸图像的读入,将PIL图像转换为cv2格式后使用dlib对图像进行特征点提取和局部区域颜色填充,得到掩码图像(图1),再对掩码图像和生成的PIL格式的随机噪声图像进行相乘,得到图2,将图2与人脸图像相加得到添加扰动后人脸图像图3
图1

图2
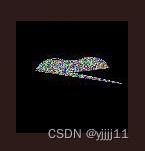
图3

程序设计:
1、加载库
import torch
import torch.nn as nn
import torch.nn.functional as F
import torch.optim as optim
import cv2
import dlib
import faceblendCommon as face
import numpy as np
import os
import json

import PIL
from PIL import Image
from PIL.ImageChops import add, subtract, multiply
from torchvision import datasets, transforms
2、设计归一化模块
将PIL格式图像转化为Tensor格式,同时进行归一化处理
transform = transforms.Compose([
    transforms.ToTensor(),
    # ToTensor把一个PIL Image或numpy.ndarray (H x W x C)(注意C(channel)的位置)从[0, 255]转变为
    # 一个torch.FloatTensor大小为(C x H x W),并且把像素归一化为[0.0, 1.0]
    transforms.Normalize(mean=[0.485, 0.456, 0.406],std=[0.229, 0.224, 0.225]) # 使用ImageNet的均值与标准差
])
3、产生随机噪声的函数
def random_noise(nc, width, height):
    '''
    Generator a random noise image from tensor.

    If nc is 1, the Grayscale image will be created.
    If nc is 3, the RGB image will be generated.

    Args:
        nc (int): (1 or 3) number of channels.
        width (int): width of output image.
        height (int): height of output image.
    Returns:
        PIL Image.
    '''
    img = torch.rand(nc, width, height)
    img = transforms.ToPILImage()(img)
    return img
4、计算余弦相似度模块
class CosineSimilarity(nn.Module):
    r"""Returns cosine similarity between :math:`x_1` and :math:`x_2`, computed along dim.
    .. math ::
        \text{similarity} = \dfrac{x_1 \cdot x_2}{\max(\Vert x_1 \Vert _2 \cdot \Vert x_2 \Vert _2, \epsilon)}.
    Args:
        dim (int, optional): Dimension where cosine similarity is computed. Default: 1
        eps (float, optional): Small value to avoid division by zero.
            Default: 1e-8
    Shape:
        - Input1: :math:`(\ast_1, D, \ast_2)` where D is at position `dim`
        - Input2: :math:`(\ast_1, D, \ast_2)`, same shape as the Input1
        - Output: :math:`(\ast_1, \ast_2)`
    Examples::
        >>> input1 = torch.randn(100, 128)
        >>> input2 = torch.randn(100, 128)
        >>> cos = nn.CosineSimilarity(dim=1, eps=1e-6)
        >>> output = cos(input1, input2)
    """
    __constants__ = ['dim', 'eps']

    def __init__(self, dim=1, eps=1e-8):
        super(CosineSimilarity, self).__init__()
        self.dim = dim
        self.eps = eps

    def forward(self, x1, x2):
        return F.cosine_similarity(x1, x2, self.dim, self.eps)
5、导入图片
pic1.jpg和pic2.jpg都是人脸图像,其中 pic是目标图像,
分别设置成PIL、Tensor、cv2格式
im1 = Image.open('TestImage/pic1.jpg')
im2 = Image.open('TestImage/pic2.jpg')


img_PIL_tensor1 = transform(im1)
img_PIL_tensor2 = transform(im2)


img1 = cv2.cvtColor(np.asarray(im1),cv2.COLOR_RGB2BGR)
img2 = cv2.cvtColor(np.asarray(im2),cv2.COLOR_RGB2BGR)
6、设置检测器
# 正向人脸检测器    detector是使用卷积神经网络(CNN)进行人脸检测的检测算子,返回的是所有的检测到的人脸区域
detector = dlib.cnn_face_detection_model_v1('mmod_human_face_detector.dat')
# 加载特征点提取模型
predictor_path = 'shape_predictor_68_face_landmarks.dat'
predictor = dlib.shape_predictor(predictor_path)
# 加载面部识别模型
face_rec_model_path = 'dlib_face_recognition_resnet_model_v1.dat'
facerec = dlib.face_recognition_model_v1(face_rec_model_path)
7、得到人脸关键点
PREDICTOR_PATH = r"shape_predictor_68_face_landmarks.dat"
faceDetector = dlib.get_frontal_face_detector()
landmarkDetector = dlib.shape_predictor(PREDICTOR_PATH)
landmarks = face.getLandmarks(faceDetector, landmarkDetector, img1)
8、为眼部区域制作掩码
eyesPoints = landmarks[16:28]
mask = np.zeros((img1.shape[0], img1.shape[1], 3), dtype=np.float32)

cv2.fillConvexPoly(mask, np.int32(eyesPoints), (255, 255, 255))

path = 'TestImage\\mask.jpg'  # use r here as in windows sometimes there is a Unicode problem
cv2.imwrite(path, mask)  # use path here
得到的mask.jpg
9、生成随机噪声
random_noise(3, 112, 112).save('TestImage\\random-noise.jpg')
im5 = Image.open('TestImage/random-noise.jpg')
img_PIL_tensor5 = transform(im5)
得到的random-noise.jpg
10、将随机噪声和掩码相乘
im6 = multiply(im4,im5)
im6.save('TestImage\\ultimate_mask.jpg')
得到的ultimate_mask.jpg
11、得到添加扰动后的人脸
img1 = ultimatemask + img1
path = 'TestImage\\result1.jpg'
cv2.imwrite(path, img1)  # use path here
得到的result1.jpg:
完整代码
# 加载库
import torch
import torch.nn as nn
import torch.nn.functional as F
import torch.optim as optim
import cv2
import dlib
import faceblendCommon as face
import numpy as np
import os
import json

import PIL
from PIL import Image
from PIL.ImageChops import add, subtract, multiply
from torchvision import datasets, transforms

transform = transforms.Compose([
    transforms.ToTensor(),
    # ToTensor把一个PIL Image或numpy.ndarray (H x W x C)(注意C(channel)的位置)从[0, 255]转变为
    # 一个torch.FloatTensor大小为(C x H x W),并且把像素归一化为[0.0, 1.0]
    transforms.Normalize(mean=[0.485, 0.456, 0.406],std=[0.229, 0.224, 0.225]) # 使用ImageNet的均值与标准差
])


def random_noise(nc, width, height):
    '''Generator a random noise image from tensor.

    If nc is 1, the Grayscale image will be created.
    If nc is 3, the RGB image will be generated.

    Args:
        nc (int): (1 or 3) number of channels.
        width (int): width of output image.
        height (int): height of output image.
    Returns:
        PIL Image.
    '''
    img = torch.rand(nc, width, height)
    img = transforms.ToPILImage()(img)
    return img


class CosineSimilarity(nn.Module):
    r"""Returns cosine similarity between :math:`x_1` and :math:`x_2`, computed along dim.
    .. math ::
        \text{similarity} = \dfrac{x_1 \cdot x_2}{\max(\Vert x_1 \Vert _2 \cdot \Vert x_2 \Vert _2, \epsilon)}.
    Args:
        dim (int, optional): Dimension where cosine similarity is computed. Default: 1
        eps (float, optional): Small value to avoid division by zero.
            Default: 1e-8
    Shape:
        - Input1: :math:`(\ast_1, D, \ast_2)` where D is at position `dim`
        - Input2: :math:`(\ast_1, D, \ast_2)`, same shape as the Input1
        - Output: :math:`(\ast_1, \ast_2)`
    Examples::
        >>> input1 = torch.randn(100, 128)
        >>> input2 = torch.randn(100, 128)
        >>> cos = nn.CosineSimilarity(dim=1, eps=1e-6)
        >>> output = cos(input1, input2)
    """
    __constants__ = ['dim', 'eps']

    def __init__(self, dim=1, eps=1e-8):
        super(CosineSimilarity, self).__init__()
        self.dim = dim
        self.eps = eps

    def forward(self, x1, x2):
        return F.cosine_similarity(x1, x2, self.dim, self.eps)


im1 = Image.open('TestImage/pic1.jpg')
im2 = Image.open('TestImage/pic2.jpg')


img_PIL_tensor1 = transform(im1)
img_PIL_tensor2 = transform(im2)


img1 = cv2.cvtColor(np.asarray(im1),cv2.COLOR_RGB2BGR)
img2 = cv2.cvtColor(np.asarray(im2),cv2.COLOR_RGB2BGR)


# 正向人脸检测器    detector是使用卷积神经网络(CNN)进行人脸检测的检测算子,返回的是所有的检测到的人脸区域
detector = dlib.cnn_face_detection_model_v1('mmod_human_face_detector.dat')
# 加载特征点提取模型
predictor_path = 'shape_predictor_68_face_landmarks.dat'
predictor = dlib.shape_predictor(predictor_path)
# 加载面部识别模型
face_rec_model_path = 'dlib_face_recognition_resnet_model_v1.dat'
facerec = dlib.face_recognition_model_v1(face_rec_model_path)


# 做出掩码
PREDICTOR_PATH = r"shape_predictor_68_face_landmarks.dat"
faceDetector = dlib.get_frontal_face_detector()
landmarkDetector = dlib.shape_predictor(PREDICTOR_PATH)
landmarks = face.getLandmarks(faceDetector, landmarkDetector, img1)

# 为眼部制作一个掩码
eyesPoints = landmarks[16:28]
mask = np.zeros((img1.shape[0], img1.shape[1], 3), dtype=np.float32)

cv2.fillConvexPoly(mask, np.int32(eyesPoints), (255, 255, 255))

path = 'TestImage\\mask.jpg'  # use r here as in windows sometimes there is a Unicode problem
cv2.imwrite(path, mask)  # use path here
im4 = Image.open('TestImage/mask.jpg')
img_PIL_tensor4 = transform(im4)

random_noise(3, 112, 112).save('TestImage\\random-noise.jpg')
im5 = Image.open('TestImage/random-noise.jpg')
img_PIL_tensor5 = transform(im5)


im6 = multiply(im4,im5)
im6.save('TestImage\\ultimate_mask.jpg')

# res = img_PIL_tensor3 * img_PIL_tensor5
# res = torch.mul(img_PIL_tensor5,img_PIL_tensor4)
# ultimate_mask = transforms.ToPILImage()(res)
# ultimate_mask.save('TestImage\\ultimate-mask.jpg')
ultimatemask = cv2.cvtColor(np.asarray(im6),cv2.COLOR_RGB2BGR)

img1 = ultimatemask + img1
path = 'TestImage\\result1.jpg'  # use r here as in windows sometimes there is a Unicode problem
cv2.imwrite(path, img1)  # use path here