说明:这几篇文章是讲解SSD,从算法原理、代码到部署到rk3588芯片上的过程。环境均是TF2.2,具体的安装过程请参考网上其他的文章。
一、SSD简介
? ? ? ? SSD算法是一个优秀的one-stage目标检测算法。能够一次就完成目标的检测和分类过程。主要是的思路是利用CNN提前特征之后,在图像上进行不同位置的密集抽样,抽样时采用不同尺度和长宽比,物体分类和预测框回归同时完成,所以速度很快。
二、SSD实现思路
? ? ? ? 1. 主干网络
? ??
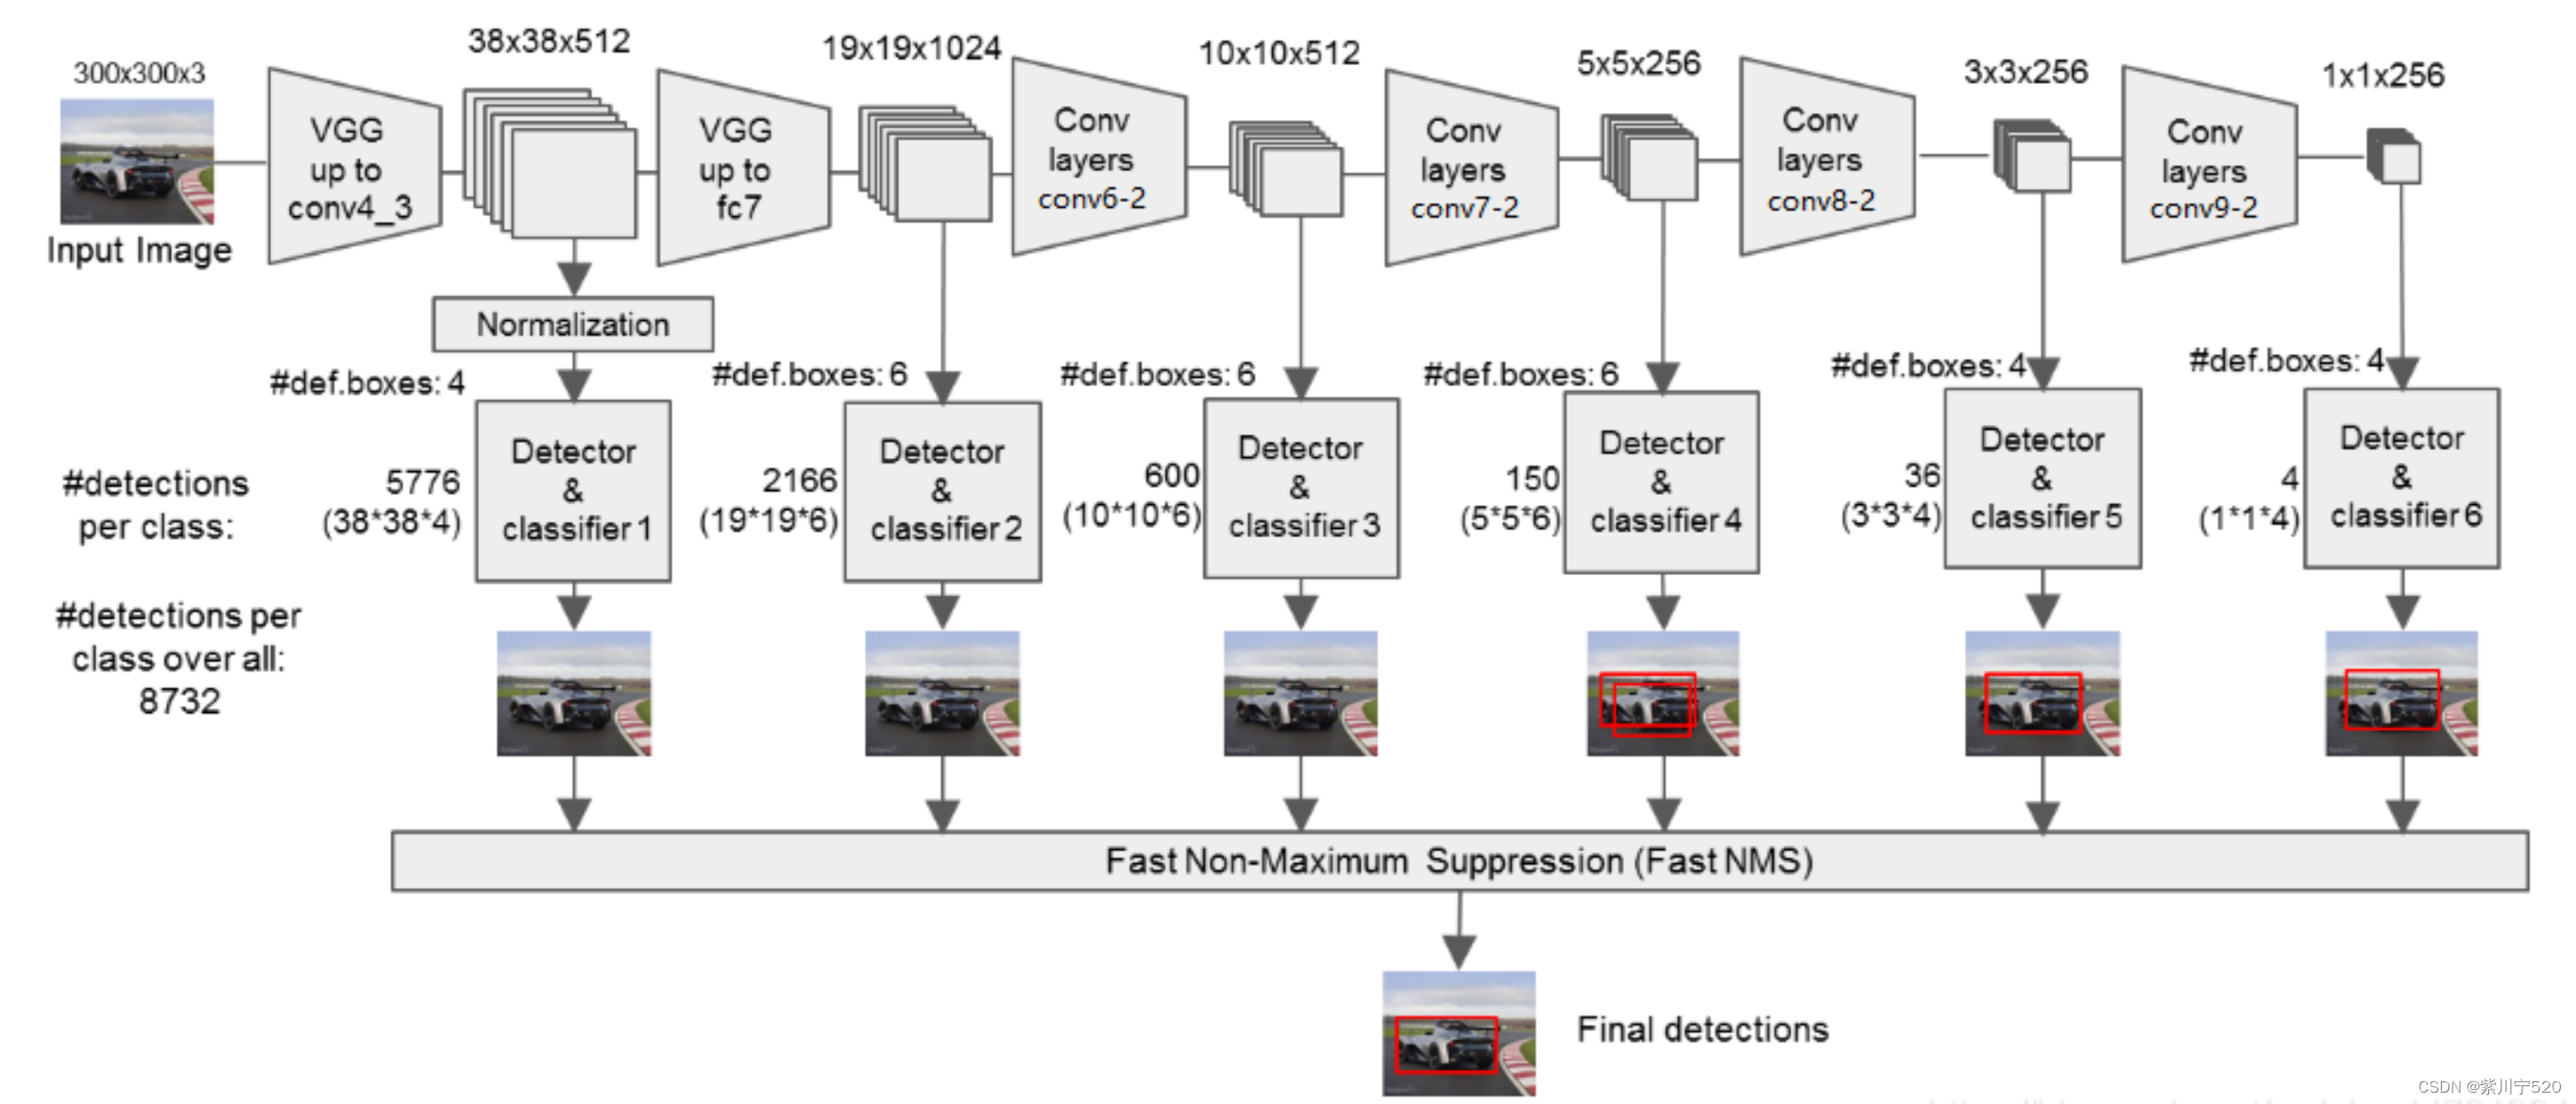
? ? ? ? ? ? ? ? ? ? ? ? ? ? ? ? ? ? ? ? ? ? ? ? ? ? ? ? 图1 SSD结构图
?这张图,清楚的表明了SSD的网络结构。SSD的主干网络是VGG,但对VGG进行了修改,主要是:
? ? ? ? 1) 将VGG的FC6、FC7转化为卷积层
? ? ? ? 2)去掉所有的Dropout和F8层
? ? ? ? 3)新增了Conv6、Conv7、Conv8、Conv9
总的过程:
1)输入:输入的图像为300×300×3(RGB三个通道)
2)Conv1,两次[3, 3]卷积,输出[300,300,64],再[2,2]最大池化,步长为2,输出[150,150,64]
3)Conv2,两次[3, 3]卷积,输出[150,150,128],再[2,2]最大池化,步长为2,输出[75,75,128]
4)Conv3,三次[3, 3]卷积,输出[75,75,256],再[2,2]最大池化,步长为2,输出[38,38,256]
5)Conv4,三次[3, 3]卷积,输出[38,38,512],再[2,2]最大池化,步长为2,输出[19,19,512]
6)Conv5,三次[3, 3]卷积,输出[19,19,512],再[3,3]最大池化,步长为1,输出[19,19,512]
7)FC6、FC7,一次[3,3]卷积和一次[1,1]卷积,输出通道为1024,输出[19,19,1024]
8) Conv6,一次[1,1]卷积,调整通道数,一次步长2的[3,3]卷积,输出[10,10,512]
8) Conv7,一次[1,1]卷积,调整通道数,一次步长2的[3,3]卷积,输出[5,5,256]
9) Conv8,一次[1,1]卷积,调整通道数,一次padding为valid的[3,3]卷积,输出[3,3,256]
10) Conv9,一次[1,1]卷积,调整通道数,一次padding为valid的[3,3]卷积,输出[1,1,256]
2. 主干网络代码
SSD的网络整体结构比较清晰,下面是是实现代码
class Normalize(Layer):
    def __init__(self, scale, **kwargs):
        self.axis = 3
        self.scale = scale
        super(Normalize, self).__init__(**kwargs)

    def build(self, input_shape):
        self.input_spec = [InputSpec(shape=input_shape)]
        shape = (input_shape[self.axis],)
        init_gamma = self.scale * np.ones(shape)
        self.gamma = K.variable(init_gamma, name='{}_gamma'.format(self.name))

    def call(self, x, mask=None):
        output = K.l2_normalize(x, self.axis)
        output *= self.gamma
        return output

# class_num是检测的目标种类,必须有
# input_shape一般为[300, 300, 3]
def ssd_net(class_num, input_shape=[300, 300, 3], weight_decay=5e-4):
    # ssd的前几层网络是vgg,
    input_tensor = Input(shape=input_shape)
    print('input_tensor: ' + str(input_tensor))

    # SSD网络模型 net是字典
    net = {}

    # Block 0  输入层
    net['input'] = input_tensor

	# Block 1  300,300,3 -> 150,150,64
    # 2次[3, 3]网络卷积,输出的特征层为64,输出为[300, 300, 64],再2×2最大池化,该最大池化步长为2,输出为[150, 150, 64]
    net['conv1_1'] = Conv2D(64, kernel_size=(3, 3), activation='relu', padding='same', kernel_regularizer=l2(weight_decay), name='conv1_1')(net['input'])
    net['conv1_2'] = Conv2D(64, kernel_size=(3, 3), activation='relu', padding='same', kernel_regularizer=l2(weight_decay), name='conv1_2')(
        net['conv1_1'])
    net['pool1'] = MaxPooling2D((2, 2), strides=(2, 2), padding='same', name='pool1')(net['conv1_2'])

    # Block 2  150,150,64 -> 75,75,128
    # 2次[3, 3]网络卷积,输出的特征层为128,输出为[150, 150, 128],再2×2最大池化,该最大池化步长为2,输出为[75, 75, 128]
    net['conv2_1'] = Conv2D(128, kernel_size=(3, 3), activation='relu', padding='same', kernel_regularizer=l2(weight_decay), name='conv2_1')(
        net['pool1'])
    net['conv2_2'] = Conv2D(128, kernel_size=(3, 3), activation='relu', padding='same', kernel_regularizer=l2(weight_decay), name='conv2_2')(
        net['conv2_1'])
    net['pool2'] = MaxPooling2D((2, 2), strides=(2, 2), padding='same',  name='pool2')(net['conv2_2'])

    # Block 3   75,75,128 -> 38,38,256
    # 3次[3, 3]网络卷积,输出的特征层为256,输出为[75, 75, 256],再2×2最大池化,该最大池化步长为2,输出为[38, 38, 256]
    net['conv3_1'] = Conv2D(256, kernel_size=(3, 3), activation='relu', padding='same', kernel_regularizer=l2(weight_decay), name='conv3_1')(
        net['pool2'])
    net['conv3_2'] = Conv2D(256, kernel_size=(3, 3), activation='relu', padding='same', kernel_regularizer=l2(weight_decay), name='conv3_2')(
        net['conv3_1'])
    net['conv3_3'] = Conv2D(256, kernel_size=(3, 3), activation='relu', padding='same', kernel_regularizer=l2(weight_decay), name='conv3_3')(
        net['conv3_2'])
    net['pool3'] = MaxPooling2D((2, 2), strides=(2, 2), padding='same', name='pool3')(net['conv3_3'])

    # Block 4   38,38,256 -> 19,19,512
    # 3次[3, 3]网络卷积,输出的特征层为512,输出为[38, 38, 512],再2×2最大池化,该最大池化步长为2,输出为[19, 19, 512]
    net['conv4_1'] = Conv2D(512, kernel_size=(3, 3), activation='relu', padding='same', kernel_regularizer=l2(weight_decay), name='conv4_1')(
        net['pool3'])
    net['conv4_2'] = Conv2D(512, kernel_size=(3, 3), activation='relu', padding='same', kernel_regularizer=l2(weight_decay), name='conv4_2')(
        net['conv4_1'])
    net['conv4_3'] = Conv2D(512, kernel_size=(3, 3), activation='relu', padding='same', kernel_regularizer=l2(weight_decay), name='conv4_3')(
        net['conv4_2'])
    net['pool4'] = MaxPooling2D((2, 2), strides=(2, 2), padding='same', name='pool4')(net['conv4_3'])

    # Block 5   19,19,512 -> 19,19,512
    # 3次[3, 3]网络卷积,输出的特征层为512,输出为[19, 19, 512],再3×3最大池化,该最大池化步长为1,输出为[19, 19, 512]
    net['conv5_1'] = Conv2D(512, kernel_size=(3, 3), activation='relu', padding='same', kernel_regularizer=l2(weight_decay), name='conv5_1')(
        net['pool4'])
    net['conv5_2'] = Conv2D(512, kernel_size=(3, 3), activation='relu', padding='same', kernel_regularizer=l2(weight_decay), name='conv5_2')(
        net['conv5_1'])
    net['conv5_3'] = Conv2D(512, kernel_size=(3, 3), activation='relu', padding='same', kernel_regularizer=l2(weight_decay), name='conv5_3')(
        net['conv5_2'])
    net['pool5'] = MaxPooling2D((3, 3), strides=(1, 1), padding='same', name='pool5')(net['conv5_3'])

    # FC6         19,19,512 -> 19,19,1024
    # 1次[3, 3]网络卷积,1次[1, 1]网络卷积,分别为fc6和fc7,输出的特征层为1024,输出为[19, 19, 1024]
    net['fc6'] = Conv2D(1024, kernel_size=(3, 3), dilation_rate=(6, 6), activation='relu', padding='same',
                        kernel_regularizer=l2(weight_decay), name='fc6')(net['pool5'])
    # FC7         19,19,1024 -> 19,19,1024
    net['fc7'] = Conv2D(1024, kernel_size=(1, 1), activation='relu', padding='same', kernel_regularizer=l2(weight_decay), name='fc7')(net['fc6'])
    #  ---------------------- 以上是VGG网络(fc6、fc7有修改)------------------------ #

    # Block 6     19,19,512 -> 10,10,512
    # 1次[1, 1]网络卷积,调整通道数,1次步长为2的[3, 3]卷积网络,输出通道为512,输出为[10, 10, 512]
    net['conv6_1'] = Conv2D(256, kernel_size=(1, 1), activation='relu', padding='same', kernel_regularizer=l2(weight_decay), name='conv6_1')(net['fc7'])
    # 表示将上一层的输出上下左右补充一行(一列)0,行数+2,列数+2。
    # Zeropadding2D即为2D输入的零填充层。为2D输入的零填充层,
    # 为下一层卷积做准备,保证卷积之后,尺寸不变
    net['conv6_2'] = ZeroPadding2D(padding=((1, 1), (1, 1)), name='conv6_padding')(net['conv6_1'])
    net['conv6_2'] = Conv2D(512, kernel_size=(3, 3), strides=(2, 2), activation='relu', kernel_regularizer=l2(weight_decay), name='conv6_2')(
        net['conv6_2'])

    # Block 7      10,10,512 -> 5,5,256
    # 1次[1, 1]网络卷积,调整通道数,1次步长为2的[3, 3]卷积网络,输出通道为256,输出为[5, 5, 256]
    net['conv7_1'] = Conv2D(128, kernel_size=(1, 1), activation='relu', padding='same', kernel_regularizer=l2(weight_decay), name='conv7_1')(
        net['conv6_2'])
    net['conv7_2'] = ZeroPadding2D(padding=((1, 1), (1, 1)), name='conv7_padding')(net['conv7_1'])
    net['conv7_2'] = Conv2D(256, kernel_size=(3, 3), strides=(2, 2), activation='relu', padding='valid', kernel_regularizer=l2(weight_decay),
                            name='conv7_2')(net['conv7_2'])

    # Block 8      5,5,256 -> 3,3,256
    # 1次[1, 1]网络卷积,调整通道数,1次padding为valid的[3, 3]卷积网络,输出通道为256,输出为[3, 3, 256]
    net['conv8_1'] = Conv2D(128, kernel_size=(1, 1), activation='relu', padding='same', kernel_regularizer=l2(weight_decay), name='conv8_1')(
        net['conv7_2'])
    net['conv8_2'] = Conv2D(256, kernel_size=(3, 3), strides=(1, 1), activation='relu', padding='valid', kernel_regularizer=l2(weight_decay),
                            name='conv8_2')(net['conv8_1'])

    # Block 9      3,3,256 -> 1,1,256
    # 1次[1, 1]网络卷积,调整通道数,1次padding为valid的[3, 3]卷积网络,输出通道为256,输出为[1, 1, 256]
    net['conv9_1'] = Conv2D(128, kernel_size=(1, 1), activation='relu', padding='same', kernel_regularizer=l2(weight_decay), name='conv9_1')(
        net['conv8_2'])
    net['conv9_2'] = Conv2D(256, kernel_size=(3, 3), strides=(1, 1), activation='relu', padding='valid', kernel_regularizer=l2(weight_decay),
                            name='conv9_2')(net['conv9_1'])
    # ----------------------------主干特征提取网络结束--------------------------- #

    # -----------------------将提取到的主干特征进行处理--------------------------- #
    # 对conv4_3的通道进行l2标准化处理
    # 38,38,512
    net['conv4_3_norm'] = Normalize(20, name='conv4_3_norm')(net['conv4_3'])
    num_priors = 4
    # 预测框的处理
    # num_priors表示每个网格点先验框的数量,4是x,y,h,w的调整
    net['conv4_3_norm_mbox_loc'] = Conv2D(num_priors * 4, kernel_size=(3, 3), padding='same', kernel_regularizer=l2(weight_decay),
                                          name='conv4_3_norm_mbox_loc')(net['conv4_3_norm'])
    net['conv4_3_norm_mbox_loc_flat'] = Flatten(name='conv4_3_norm_mbox_loc_flat')(net['conv4_3_norm_mbox_loc'])
    # num_priors表示每个网格点先验框的数量,class_num是所分的类
    net['conv4_3_norm_mbox_conf'] = Conv2D(num_priors * class_num, kernel_size=(3, 3), padding='same', kernel_regularizer=l2(weight_decay),
                                           name='conv4_3_norm_mbox_conf')(net['conv4_3_norm'])
    net['conv4_3_norm_mbox_conf_flat'] = Flatten(name='conv4_3_norm_mbox_conf_flat')(net['conv4_3_norm_mbox_conf'])

    # 对fc7层进行处理
    # 19,19,1024
    num_priors = 6
    # 预测框的处理
    # num_priors表示每个网格点先验框的数量,4是x,y,h,w的调整
    net['fc7_mbox_loc'] = Conv2D(num_priors * 4, kernel_size=(3, 3), padding='same', kernel_regularizer=l2(weight_decay), name='fc7_mbox_loc')(
        net['fc7'])
    net['fc7_mbox_loc_flat'] = Flatten(name='fc7_mbox_loc_flat')(net['fc7_mbox_loc'])
    # num_priors表示每个网格点先验框的数量,class_num是所分的类
    net['fc7_mbox_conf'] = Conv2D(num_priors * class_num, kernel_size=(3, 3), padding='same', kernel_regularizer=l2(weight_decay), name='fc7_mbox_conf')(
        net['fc7'])
    net['fc7_mbox_conf_flat'] = Flatten(name='fc7_mbox_conf_flat')(net['fc7_mbox_conf'])

    # 对conv6_2进行处理
    # 10,10,512
    num_priors = 6
    # 预测框的处理
    # num_priors表示每个网格点先验框的数量,4是x,y,h,w的调整
    net['conv6_2_mbox_loc'] = Conv2D(num_priors * 4, kernel_size=(3, 3), padding='same',kernel_regularizer=l2(weight_decay),  name='conv6_2_mbox_loc')(
        net['conv6_2'])
    net['conv6_2_mbox_loc_flat'] = Flatten(name='conv6_2_mbox_loc_flat')(net['conv6_2_mbox_loc'])
    # num_priors表示每个网格点先验框的数量,class_num是所分的类
    net['conv6_2_mbox_conf'] = Conv2D(num_priors * class_num, kernel_size=(3, 3), padding='same', kernel_regularizer=l2(weight_decay),
                                      name='conv6_2_mbox_conf')(net['conv6_2'])
    net['conv6_2_mbox_conf_flat'] = Flatten(name='conv6_2_mbox_conf_flat')(net['conv6_2_mbox_conf'])

    # 对conv7_2进行处理
    # 5,5,256
    num_priors = 6
    # 预测框的处理
    # num_priors表示每个网格点先验框的数量,4是x,y,h,w的调整
    net['conv7_2_mbox_loc'] = Conv2D(num_priors * 4, kernel_size=(3, 3), padding='same', kernel_regularizer=l2(weight_decay), name='conv7_2_mbox_loc')(
        net['conv7_2'])
    net['conv7_2_mbox_loc_flat'] = Flatten(name='conv7_2_mbox_loc_flat')(net['conv7_2_mbox_loc'])
    # num_priors表示每个网格点先验框的数量,class_num是所分的类
    net['conv7_2_mbox_conf'] = Conv2D(num_priors * class_num, kernel_size=(3, 3), padding='same', kernel_regularizer=l2(weight_decay),
                                      name='conv7_2_mbox_conf')(net['conv7_2'])
    net['conv7_2_mbox_conf_flat'] = Flatten(name='conv7_2_mbox_conf_flat')(net['conv7_2_mbox_conf'])

    # 对conv8_2进行处理
    # 3,3,256
    num_priors = 4
    # 预测框的处理
    # num_priors表示每个网格点先验框的数量,4是x,y,h,w的调整
    net['conv8_2_mbox_loc'] = Conv2D(num_priors * 4, kernel_size=(3, 3), padding='same', kernel_regularizer=l2(weight_decay), name='conv8_2_mbox_loc')(
        net['conv8_2'])
    net['conv8_2_mbox_loc_flat'] = Flatten(name='conv8_2_mbox_loc_flat')(net['conv8_2_mbox_loc'])
    # num_priors表示每个网格点先验框的数量,class_num是所分的类
    net['conv8_2_mbox_conf'] = Conv2D(num_priors * class_num, kernel_size=(3, 3), padding='same', kernel_regularizer=l2(weight_decay),
                                      name='conv8_2_mbox_conf')(net['conv8_2'])
    net['conv8_2_mbox_conf_flat'] = Flatten(name='conv8_2_mbox_conf_flat')(net['conv8_2_mbox_conf'])

    # 对conv9_2进行处理
    # 1,1,256
    num_priors = 4
    # 预测框的处理
    # num_priors表示每个网格点先验框的数量,4是x,y,h,w的调整
    net['conv9_2_mbox_loc'] = Conv2D(num_priors * 4, kernel_size=(3, 3), padding='same', kernel_regularizer=l2(weight_decay), name='conv9_2_mbox_loc')(
        net['conv9_2'])
    net['conv9_2_mbox_loc_flat'] = Flatten(name='conv9_2_mbox_loc_flat')(net['conv9_2_mbox_loc'])
    # num_priors表示每个网格点先验框的数量,class_num是所分的类
    net['conv9_2_mbox_conf'] = Conv2D(num_priors * class_num, kernel_size=(3, 3), padding='same', kernel_regularizer=l2(weight_decay),
                                      name='conv9_2_mbox_conf')(net['conv9_2'])
    net['conv9_2_mbox_conf_flat'] = Flatten(name='conv9_2_mbox_conf_flat')(net['conv9_2_mbox_conf'])

	# 最终的模型,输入层是net['input'],输出层为net['predictions']
    model = Model(net['input'], net['predictions'])
    # print('add net finish!')
    return model
????????到这里这里,图1中最上部横着的主干网络基本介绍完了。这个部分主要用来提取特征,下面开始介绍使用特征部分。
????????在图1中,可以看到,Conv4第三次卷积、FC7、Conv6第二次卷积、Conv7第二次卷积、Conv8第二次卷积、Conv9第二次卷积,都往下走,这6层得到的结果将进一步处理,通过他们得到不同尺寸的特征结果。这部分也是SSD算法能够识别不同尺寸物体的原因。
3.先验框
????????在进一步说明上述六层特征层之前,先说明下先验框。

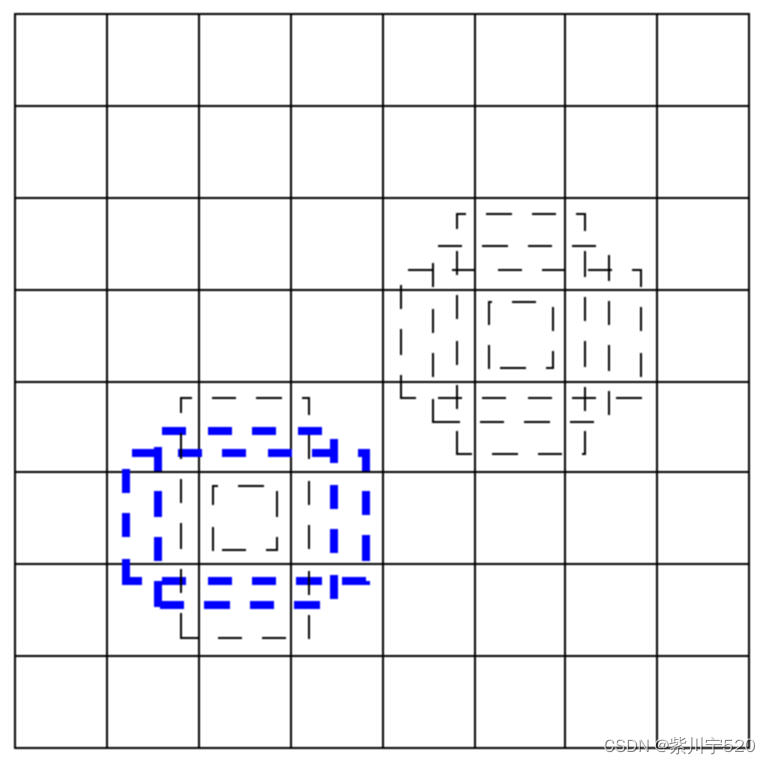
? ? ? ? ? ? ? ? ? ? ? ? ? ? ? ? ? ? ? ? ? ?图2? 分成8×8
? ? ? ? 假设一张图[300,300],分成[8,8](注:SSD网络部分没有图像是分成[8,8],仅仅举例使用)?先验框就是图2中虚线部分。假设物体在左下方四个虚线框框里面,则通过这四个虚线框框能够找到物体。四个虚线框框尺寸不是固定,具体的参数需要训练。无论物体多大,总能够通过将图像分成某个比例,有一个虚线框框将其框住(仅仅简单说明,实际上还有一个图像放不下一个物体、物体只有一部分在图像中)?。所以,训练SSD模型,实际上就是训练虚线框框(x,y,w,h)这四个参数与实际物体的关系。而实际物体的具体(x,y,w,h)是提取通过软件标注好。加上物体的名字,一共是(x,y,w,h,name)五个参数。
? ? ? ? 这些虚线框框,叫做先验框,训练SSD模型,就是训练这些先验框的参数。在SSD中,不是直接训练(x,y,w,h)?,而是训练物体真实坐标与提取设定好先验框(x0,y0,w0,h0)之间的比例关系。训练之前需要转化一次,预测时,也需要将结果转化回来并显示。
对于六层特征层,先验框每一个像素点设置的数量为[4,6,6,6,4,4](每一层分好之后,分辨率都不一样)
????????对于Conv4来说,图像变成了[38,38]分辨率(与刚才说明的[8,8]相对应),每个像素点的先验框数量为4,则该层的先验框数量为38×38×4=5776。同理,其他的几层先验框数量分别为2166,600,150,36,4,一共8732个。所以,可以说,SSD模型,实际就是在[300,300]大小的图像上,设置一共8732个先验框,每个先验框大小、位置不同,去识别物体。对于一个物体来说,可能被多个先验框识别出来,因此,需要对识别出来的先验框进行非极大值抑制操作,选择最合适的做为最终结果。
? ? ? ? 对于这六层特征层来说,每一层都需要进行anchors_num×4的卷积(上面说的就是这个过程,4我理解的表示(x,y,w,h)),除此之外,还需要进行anchors_num×classes_num的卷积,用于预测物体的种类,每个先验框都有自己的物体种类名字。
先验框部分代码,这部分是获取8732个先验框
# 计算每个有效特征层的anchor box
# 六层分别为
# 38*38*4  19*19*6 10*10*6 5*5*6 3*3*4 1*1*4
#  5576     2166    600     150   36     4
class AnchorBox():
    def __init__(self, input_shape, min_size, max_size=None, aspect_ratios=None, flip=True):
        self.input_shape = input_shape

        self.min_size = min_size
        self.max_size = max_size

        self.aspect_ratios = []  # aspect_ratios 结果 [1, 1.0, 2, 0.5]
        for ar in aspect_ratios:
            self.aspect_ratios.append(ar)
            self.aspect_ratios.append(1.0 / ar)
        # print('AnchorBox aspect_ratios ' + str(self.aspect_ratios))
    def call(self, layer_shape, mask=None):
        # --------------------------------- #
        #   获取输入进来的特征层的宽和高
        #   比如38x38
        # --------------------------------- #
        layer_height = layer_shape[0]
        layer_width = layer_shape[1]
        # print('AnchorBox layer_height ' + str(layer_height))
        # print('AnchorBox layer_width ' + str(layer_width))
        # --------------------------------- #
        #   获取输入进来的图片的宽和高
        #   比如300x300
        # --------------------------------- #
        img_height = self.input_shape[0]
        img_width = self.input_shape[1]
        # print('AnchorBox img_height ' + str(img_height))
        # print('AnchorBox img_width ' + str(img_width))

        box_widths = []
        box_heights = []
        # --------------------------------- #
        #   self.aspect_ratios一般有两个值
        #   [1, 1, 2, 1/2]
        #   [1, 1, 2, 1/2, 3, 1/3]
        # --------------------------------- #
        for ar in self.aspect_ratios:
            # print('AnchorBox box_widths ' + str(len(box_widths)))
            # 首先添加一个较小的正方形
            if ar == 1 and len(box_widths) == 0:
                box_widths.append(self.min_size)
                box_heights.append(self.min_size)
            # 然后添加一个较大的正方形
            elif ar == 1 and len(box_widths) > 0:
                box_widths.append(np.sqrt(self.min_size * self.max_size))
                box_heights.append(np.sqrt(self.min_size * self.max_size))
            # 然后添加长方形
            elif ar != 1:
                box_widths.append(self.min_size * np.sqrt(ar))
                box_heights.append(self.min_size / np.sqrt(ar))
        # print('AnchorBox box_widths ' + str(box_widths))
        # print('AnchorBox box_heights ' + str(box_heights))
        # --------------------------------- #
        #   获得所有先验框的宽高1/2
        # --------------------------------- #
        box_widths = 0.5 * np.array(box_widths)
        box_heights = 0.5 * np.array(box_heights)
        # print('AnchorBox box_widths ' + str(box_widths))
        # print('AnchorBox box_heights ' + str(box_heights))
        # --------------------------------- #
        #   每一个特征层对应的步长
        #   每个特征层分成[layer_width,layer_height]大小,
        #   每个分成[layer_width,layer_height]之后的点对应[300, 300]上的长度
        #   比如[3, 3],每层步长step_x = 300 / 3 = 100,分成[3, 3]之后的点对应[300, 300]就是100个点
        # --------------------------------- #
        step_x = img_width / layer_width
        step_y = img_height / layer_height
        # print('AnchorBox layer_width ' + str(layer_width))
        # print('AnchorBox layer_height ' + str(layer_height))
        # print('AnchorBox step_x ' + str(step_x))
        # print('AnchorBox step_y ' + str(step_y))

        # --------------------------------- #
        #   生成网格中心
        #   在每个特征层上,从最左往右生成所有的网格中心点
        #   linx, liny 数量对应于 layer_width,layer_height  [3, 3]
        # --------------------------------- #
        linx = np.linspace(0.5 * step_x, img_width - 0.5 * step_x, layer_width)  #[ 50. 150. 250.]
        liny = np.linspace(0.5 * step_y, img_height - 0.5 * step_y, layer_height) #[ 50. 150. 250.]
        # print('AnchorBox linx ' + str(linx))
        # print('AnchorBox liny ' + str(liny))

        #将(x,y)方向上的序列转化成坐标形式,变成一个(layer_width×layer_height)大小的矩阵
        centers_x, centers_y = np.meshgrid(linx, liny)  # 生成正方形的矩阵,,,长宽一样 变成3×3矩阵
        # print('AnchorBox centers_x ' + str(centers_x))
        centers_x = centers_x.reshape(-1, 1)  # 将3×3矩阵压缩成一维的矩阵  9行,1列
        centers_y = centers_y.reshape(-1, 1)
        # print('AnchorBox centers_x ' + str(centers_x))
        # print('AnchorBox centers_y ' + str(centers_y))


        # 每一个先验框需要两个(centers_x, centers_y),前一个用来计算左上角,后一个计算右下角
        num_anchors_ = len(self.aspect_ratios)  # 4
        # print('AnchorBox num_anchors_ ' + str(num_anchors_))

        anchor_boxes = np.concatenate((centers_x, centers_y), axis=1)  # 将矩阵拼接起来,得到9个网格的中心点坐标,坐标(0, 0)是(50, 50),9行,每行一个坐标 一共9 × 2个数据,2个坐标
        # print('AnchorBox anchor_boxes ' + str(anchor_boxes))

        anchor_boxes = np.tile(anchor_boxes, (1, 2 * num_anchors_))  # 变成9行,16列(num_anchors_ * 4 = 16),将每行的坐标,重复8次
        # print('AnchorBox anchor_boxes ' + str(len(anchor_boxes)))
        # print('AnchorBox anchor_boxes ' + str(anchor_boxes))
        # 获得先验框的左上角和右下角
        anchor_boxes[:, ::4] -= box_widths    # 将每行的数据,从第一个开始,每隔4个,将其值减去box_widths,因为box_widths有四个元素,所以相当去anchor_boxes中的4个元素减去box_widths对应的元素
        anchor_boxes[:, 1::4] -= box_heights
        anchor_boxes[:, 2::4] += box_widths   # 将每行的数据,从第一个开始,每隔4个,将其值加上box_widths
        anchor_boxes[:, 3::4] += box_heights

        # 这里anchor_boxes变成了9行,每行16个元素
        # print('AnchorBox anchor_boxes ' + str(len(anchor_boxes)))
        # print('AnchorBox anchor_boxes ' + str(anchor_boxes))
        # --------------------------------- #
        #   将先验框变成小数的形式
        #   归一化
        # --------------------------------- #
        anchor_boxes[:, ::2] /= img_width
        anchor_boxes[:, 1::2] /= img_height
        anchor_boxes = anchor_boxes.reshape(-1, 4)  # 分成4列,行自动计算,这里行为36,每一行对应一个锚点框参数,这里默认锚点框 def anchor boxes为4
        # print('AnchorBox anchor_boxes ' + str(len(anchor_boxes)))
        # print('AnchorBox anchor_boxes ' + str(anchor_boxes))
        anchor_boxes = np.minimum(np.maximum(anchor_boxes, 0.0), 1.0)  # 这里去掉anchor_boxes中的负值
        # print('AnchorBox anchor_boxes ' + str(len(anchor_boxes)))
        # print('AnchorBox anchor_boxes ' + str(anchor_boxes))
        return anchor_boxes


#---------------------------------------------------#
#   用于计算共享特征层的大小
#   当(height, width) = (300, 300)是,输出的为[150, 75, 38, 19, 10, 5, 3, 1]
#   后面的[38, 19, 10, 5, 3, 1]是六个有效特征层对应的分辨率
#   [38, 38, 512], [19, 19, 1024], [10, 10, 512],
#   [ 5,  5, 256], [ 3,  3,  256], [ 1,  1, 256]
#---------------------------------------------------#
def get_img_output_length(height, width):
    filter_sizes    = [3, 3, 3, 3, 3, 3, 3, 3]
    padding         = [1, 1, 1, 1, 1, 1, 0, 0]
    stride          = [2, 2, 2, 2, 2, 2, 1, 1]
    feature_heights = []
    feature_widths  = []
    # print('get_img_output_length height ' + str(height))
    # print('get_img_output_length width ' + str(width))
    # print('get_img_output_length filter_sizes ' + str(len(filter_sizes)))
    for i in range(len(filter_sizes)):
        height  = (height + 2 * padding[i] - filter_sizes[i]) // stride[i] + 1
        width   = (width + 2 * padding[i] - filter_sizes[i]) // stride[i] + 1
        # print(str(i) + ' height ' + str(height)  + ' width ' + str(width))
        feature_heights.append(height)
        feature_widths.append(width)
    return np.array(feature_heights)[-6:], np.array(feature_widths)[-6:]


# 获取所有的anchor框,在六层有效层上获取,
def get_anchors(input_shape = [300,300], anchors_size = [30, 60, 111, 162, 213, 264, 315]):
    feature_heights, feature_widths = get_img_output_length(input_shape[0], input_shape[1])  # w,h = (300,300)
    aspect_ratios = [[1, 2], [1, 2, 3], [1, 2, 3], [1, 2, 3], [1, 2], [1, 2]]
    anchors = []
    # print('get_anchors feature_heights ' + str(feature_heights))
    # print('get_anchors feature_heights ' + str(feature_heights))

    for i in range(len(feature_heights)):
        # 计算每层有效特征层的锚点框 分别对应
        # 38*38*4  19*19*6 10*10*6 5*5*6 3*3*4 1*1*4
        #  5576     2166    600     150   36     4
        anchors.append(AnchorBox(input_shape, anchors_size[i], max_size = anchors_size[i+1],
                    aspect_ratios = aspect_ratios[i]).call([feature_heights[i], feature_widths[i]]))

    # print('get_anchors anchors ' + str(len(anchors)))
    anchors = np.concatenate(anchors, axis=0)
    return anchors
前面谈到的编码、解码部分。
# 获取真实框
class BBoxUtility(object):
    def __init__(self, num_classes, nms_thresh=0.45, top_k=300):
        self.num_classes = num_classes
        self._nms_thresh = nms_thresh
        self._top_k = top_k

    def ssd_correct_boxes(self, box_xy, box_wh, input_shape, image_shape, letterbox_image):
        # -----------------------------------------------------------------#
        #   把y轴放前面是因为方便预测框和图像的宽高进行相乘
        # -----------------------------------------------------------------#
        box_yx = box_xy[..., ::-1]
        box_hw = box_wh[..., ::-1]
        input_shape = np.array(input_shape)
        image_shape = np.array(image_shape)

        if letterbox_image:
            # -----------------------------------------------------------------#
            #   这里求出来的offset是图像有效区域相对于图像左上角的偏移情况
            #   new_shape指的是宽高缩放情况
            # -----------------------------------------------------------------#
            new_shape = np.round(image_shape * np.min(input_shape / image_shape))
            offset = (input_shape - new_shape) / 2. / input_shape
            scale = input_shape / new_shape

            box_yx = (box_yx - offset) * scale
            box_hw *= scale

        box_mins = box_yx - (box_hw / 2.)
        box_maxes = box_yx + (box_hw / 2.)
        boxes = np.concatenate([box_mins[..., 0:1], box_mins[..., 1:2], box_maxes[..., 0:1], box_maxes[..., 1:2]],
                               axis=-1)
        boxes *= np.concatenate([image_shape, image_shape], axis=-1)
        return boxes

    # 对回归结果进行处理,得到真实框的位置信息
    # 针对一张图片进行解码预测结果
    # mbox_loc 8732个预测框所对应目标的坐标信息,一个物体有四个数据表示(x, y, w, h)
    # anchors所有的锚点框 8732个
    def decode_boxes(self, mbox_loc, anchors, variances=[0.1, 0.1, 0.2, 0.2]):
        # 获得先验框的宽与高
        # 每个锚点框有四个数据,四条边分别与左上点的距离
        # print('decode_boxes mbox_loc ' + str(len(mbox_loc[0])))

        anchor_width = anchors[:, 2] - anchors[:, 0]  # 每个锚点框对应的w,h
        anchor_height = anchors[:, 3] - anchors[:, 1]
        # print('decode_boxes anchors ' + str(len(anchors)))
        # print('decode_boxes anchors ' + str(len(anchors[0])))
        # print('decode_boxes anchor_width ' + str(len(anchor_width)))
        # print('decode_boxes anchor_height ' + str(len(anchor_height)))
        # print('decode_boxes anchor_width ' + str(anchor_width))


        # 获得每个先验框的中心点
        anchor_center_x = 0.5 * (anchors[:, 2] + anchors[:, 0])
        anchor_center_y = 0.5 * (anchors[:, 3] + anchors[:, 1])

        # 真实框距离先验框中心的xy轴偏移情况
        #decode_bbox_center_x = mbox_loc[:, 0] * anchor_width * variances[0]
        # decode_bbox_center_x = anchor_center_x + mbox_loc[:, 0] * anchor_width * variances[0]
        # decode_bbox_center_x += anchor_center_x
        # decode_bbox_center_y = mbox_loc[:, 1] * anchor_height * variances[1]
        # decode_bbox_center_y += anchor_center_y


        # 对应的预测框和先验框进行融合
        # 每个先验框的距离是固定的,预测框是经过模型运算的,两者相乘表示真实框相对于先验框的距离,
        decode_bbox_center_x = anchor_center_x + mbox_loc[:, 0] * anchor_width * variances[0]
        decode_bbox_center_y = anchor_center_y + mbox_loc[:, 1] * anchor_height * variances[1]

        # print('decode_boxes decode_bbox_center_x ' + str(len(decode_bbox_center_x)))
        # print('decode_boxes decode_bbox_center_y ' + str(len(decode_bbox_center_y)))

        # 真实框的宽与高的求取
        decode_bbox_width = np.exp(mbox_loc[:, 2] * variances[2])  # 不知道为啥要用自然数e作为底数进行运算
        decode_bbox_width *= anchor_width
        decode_bbox_height = np.exp(mbox_loc[:, 3] * variances[3])
        decode_bbox_height *= anchor_height

        # 获取真实框的左上角与右下角
        decode_bbox_xmin = decode_bbox_center_x - 0.5 * decode_bbox_width
        decode_bbox_ymin = decode_bbox_center_y - 0.5 * decode_bbox_height
        decode_bbox_xmax = decode_bbox_center_x + 0.5 * decode_bbox_width
        decode_bbox_ymax = decode_bbox_center_y + 0.5 * decode_bbox_height

        # 真实框的左上角与右下角进行堆叠
        # 所有得到结果的左上角与右下角数据进行合并
        decode_bbox = np.concatenate((decode_bbox_xmin[:, None],
                                      decode_bbox_ymin[:, None],
                                      decode_bbox_xmax[:, None],
                                      decode_bbox_ymax[:, None]), axis=-1)
        # 防止超出0与1
        decode_bbox = np.minimum(np.maximum(decode_bbox, 0.0), 1.0)
        return decode_bbox

    # 解码ssd模型得到的预测结果
    # anchors所有的锚点框
    # image_shape 输入图像尺寸 不确定,可以为如1330×1330
    # input_shape是SSD算法模型输入尺寸,固定为300×300
    def decode_box(self, predictions, anchors, image_shape, input_shape, letterbox_image,
                   variances=[0.1, 0.1, 0.2, 0.2], confidence=0.5):
        # print('decode_box anchors ' + str(len(anchors)))
        # print('decode_box image_shape ' + str(image_shape))
        # print('decode_box input_shape ' + str(input_shape))
        # ---------------------------------------------------#
        #   :4是回归预测结果
        # ---------------------------------------------------#
        mbox_loc = predictions[:, :, :4]   # 取得所有预测框的坐标信息,一共8732
        # print('decode_box mbox_loc ' + str(len(mbox_loc[0])))
        # print('decode_box mbox_loc ' + str(mbox_loc))
        # ---------------------------------------------------#
        #   获得种类的置信度
        # ---------------------------------------------------#
        mbox_conf = predictions[:, :, 4:]   #获得所有预测框的置信度,一共8732
        # print('decode_box mbox_conf ' + str(len(mbox_conf[0])))
        # print('decode_box mbox_conf ' + str(mbox_conf))
        results = []
        # ----------------------------------------------------------------------------------------------------------------#
        #   对每一张图片进行处理,由于在predict.py的时候,我们只输入一张图片,所以for i in range(len(mbox_loc))只进行一次
        # ----------------------------------------------------------------------------------------------------------------#
        for i in range(len(mbox_loc)):
            results.append([])
            # --------------------------------#
            #   利用回归结果对先验框进行解码
            # --------------------------------#
            decode_bbox = self.decode_boxes(mbox_loc[i], anchors, variances)  # 得到所有的真是狂信息,一共四个数据,左上角和右下角
            # print('decode_box decode_bbox ' + str(len(decode_bbox)))
            # print('decode_box decode_bbox ' + str(len(decode_bbox[0])))

            # 处理所有的真实框
            for c in range(1, self.num_classes):
                # --------------------------------#
                #   取出属于该类的所有框的置信度
                #   判断是否大于门限
                # --------------------------------#
                c_confs = mbox_conf[i, :, c]  # 获取某个类别所有预测框的置信度
                c_confs_m = c_confs > confidence  # 置信度大于一定值
                # print('decode_box c_confs_m ' + '   ' + str(c)  + '  ' + str(len(c_confs[c_confs_m])))
                #  len(c_confs[c_confs_m]) 就是某个类别所有置信度大于confidence的数量
                #  c_confs[c_confs_m]就是对应的大于confidence预测框
                if len(c_confs[c_confs_m]) > 0:   #
                    # -----------------------------------------#
                    #   取出得分高于confidence的框
                    # -----------------------------------------#
                    # boxes_to_process,confs_to_process的元素数量等于len(c_confs[c_confs_m])
                    # 这里得到置信度大于confidence的预测框的物体信息
                    boxes_to_process = decode_bbox[c_confs_m]  # 解码预测框对应的物体信息
                    confs_to_process = c_confs[c_confs_m]     #  大于confidence的所有预测框的集合
                    # print('decode_box boxes_to_process ' + str(len(boxes_to_process)))
                    # print('decode_box boxes_to_process ' + str(len(confs_to_process)))
                    # -----------------------------------------#
                    #   进行iou的非极大抑制,某些预测框可能重复在某个物体上面,重复的只保留物体对应一个最大的预测框
                    #   idx的数量就是某个种类物体最终被检测出来多少个
                    # -----------------------------------------#
                    idx = tf.image.non_max_suppression(tf.cast(boxes_to_process, tf.float32),
                                                       tf.cast(confs_to_process, tf.float32),
                                                       self._top_k,
                                                       iou_threshold=self._nms_thresh).numpy()
                    # print('decode_box idx ' + str(idx))
                    # -----------------------------------------#
                    #   取出在非极大抑制中效果较好的内容
                    #   每个被检测的物体有一个对应的位置信息和置信度
                    #   good_boxes 保存某个种类的所有被检测出出来的物体的位置信息,confs保存对应的置信度,这两个的列表的长度一样
                    # -----------------------------------------#
                    good_boxes = boxes_to_process[idx]
                    confs = confs_to_process[idx][:, None]
                    # [:, None]的用法是将横着的列表转化为竖着的列表,,,
                    # 如[0.9922133  0.9003193  0.81056666]转化为 [[0.9922133 ]
                    #                                            [0.9003193 ]
                    #                                            [0.81056666]]
                    # print('decode_box good_boxes ' + str(good_boxes))
                    # print('decode_box confs ' + str(confs))
                    # print('decode_box confs ' + str(confs_to_process[idx]))


                    labels = (c - 1) * np.ones((len(idx), 1))  # np.ones生成一个len(idx) × 1矩阵,元素均为1
                    # -----------------------------------------#
                    #   将框的位置、label、置信度进行堆叠。
                    # -----------------------------------------#
                    c_pred = np.concatenate((good_boxes, labels, confs), axis=1)
                    # print('decode_box c_pred ' + str(c_pred))
                    # 添加进result里
                    results[-1].extend(c_pred)

            if len(results[-1]) > 0:
                results[-1] = np.array(results[-1])
                box_xy, box_wh = (results[-1][:, 0:2] + results[-1][:, 2:4]) / 2, results[-1][:, 2:4] - results[-1][:,
                                                                                                        0:2]
                results[-1][:, :4] = self.ssd_correct_boxes(box_xy, box_wh, input_shape, image_shape, letterbox_image)

        return results
????????个人认为SSD算法的核心部分代码大概这么多,剩下的比较好写了。GitHub链接暂时不放了,有些还没做好,等全部写好了再开源。
三、测试
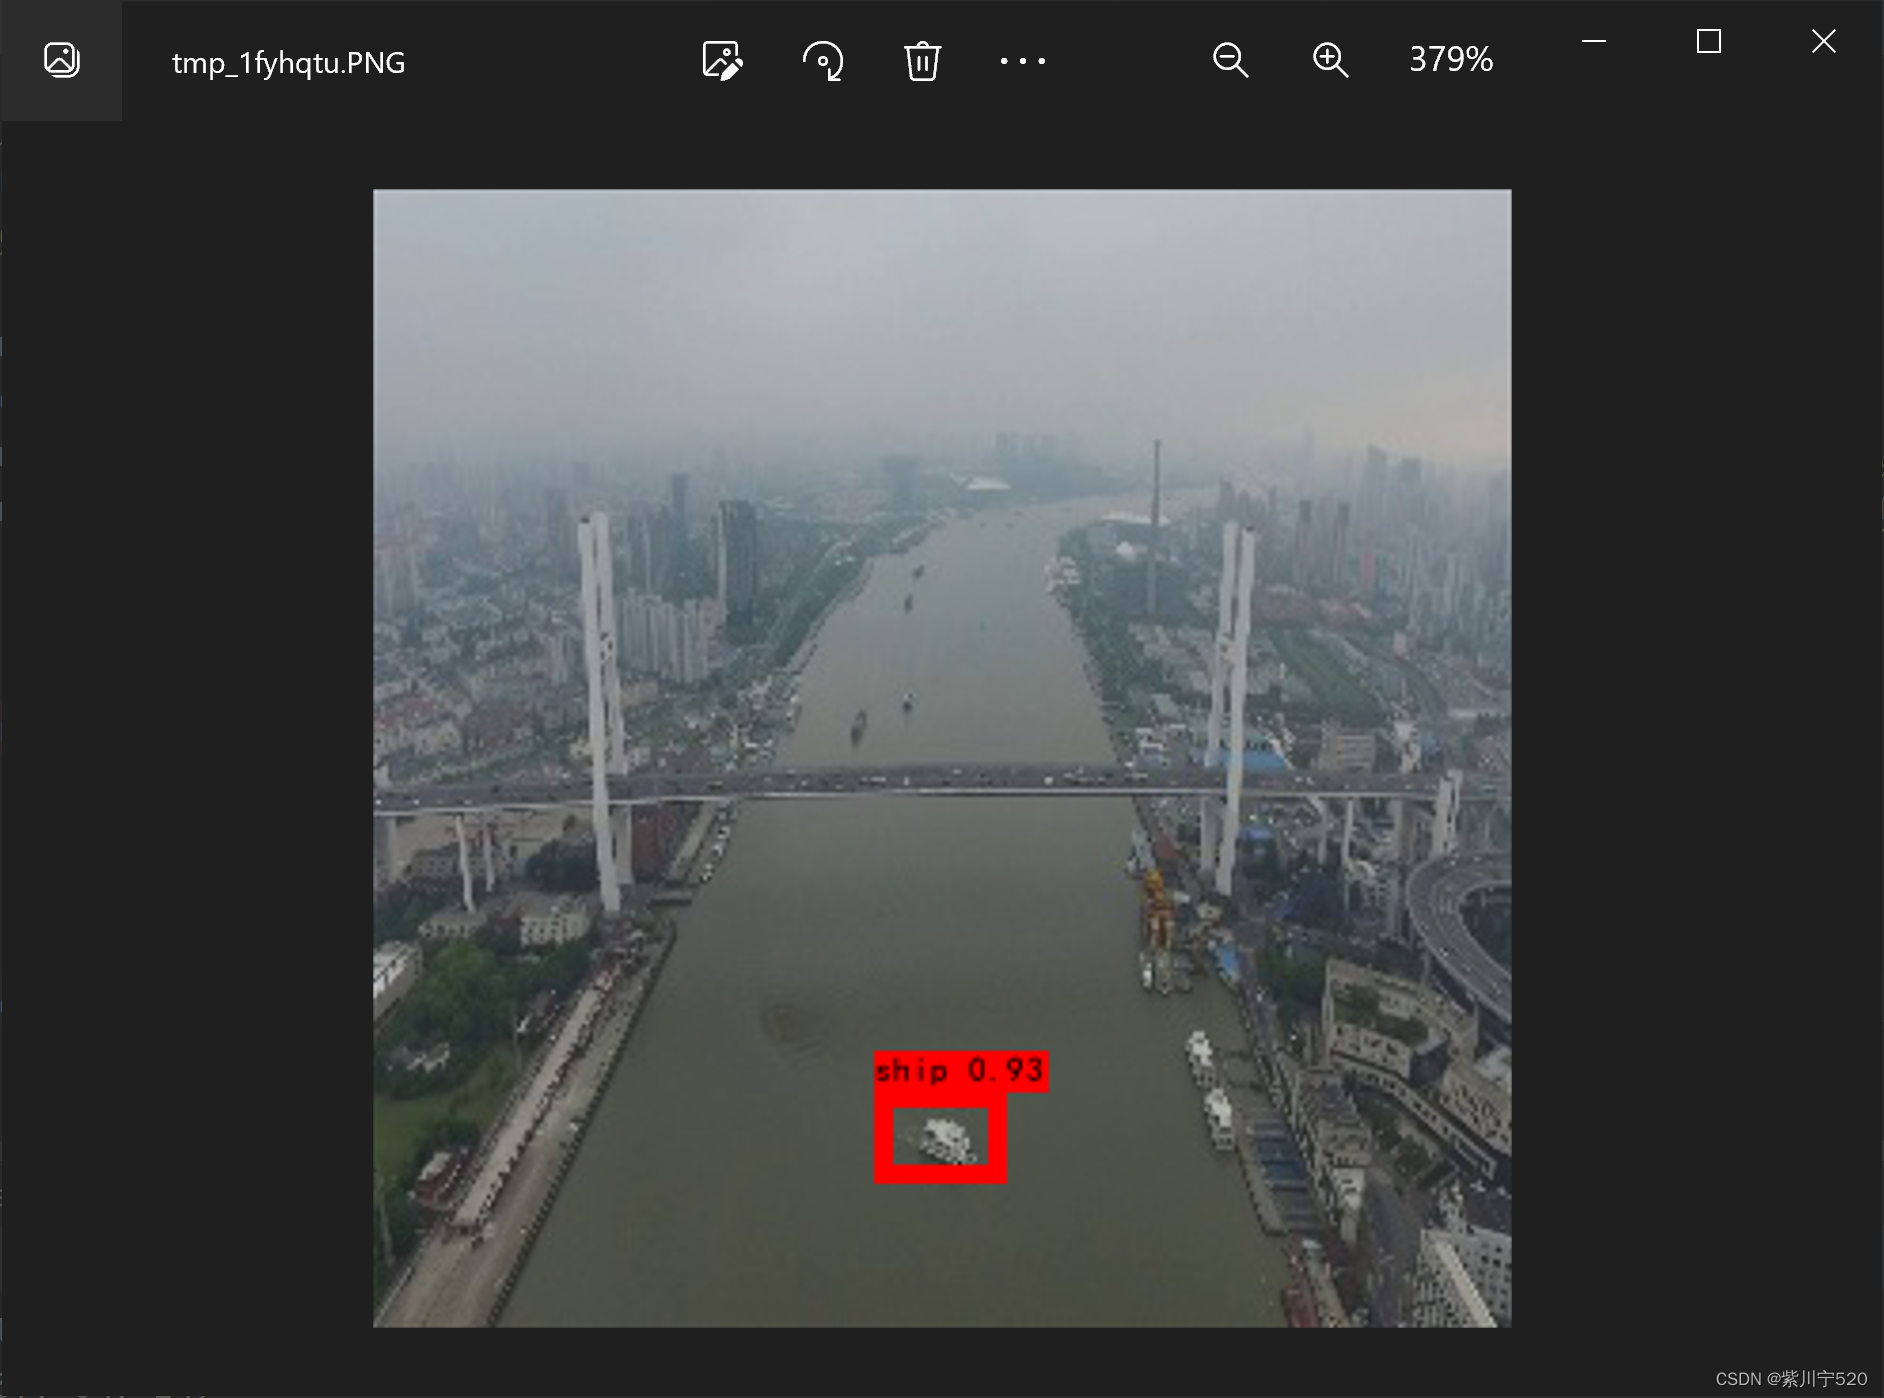
? ? ? ? SSD模型以及训练好,只用的是自制的数据集,标注软件是labelImg
? ? ? ? 终端输出结果![]()
????????图像输出,在图中标注了物体。

四、总结
? ? ? ? SSD算法速度和经度都还可以。算法简单的说就是,对一张[300,300]的图像,在上面分布一共8732个先验框,每个先验框负责识别一个区域,将结果进行回归,得到最终结果。