MobileNet详解
MobileNet网络是由google团队在2017年提出的,专注于移动端或者嵌入式设备中的轻量级CNN网络。相比传统卷积神经网络,在准确率小幅降低的前提下大大减少模型参数与运算量。相比VGG16准确率减少了0.9%,但模型参数只有VGG的1/32。
DW卷积
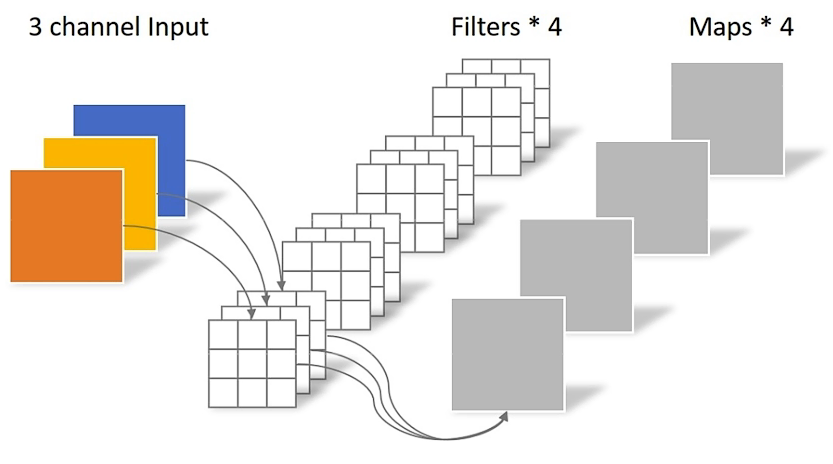
传统卷积
- 卷积核channel=输入特征矩阵channel
- 输出特征矩阵channel=卷积核个数
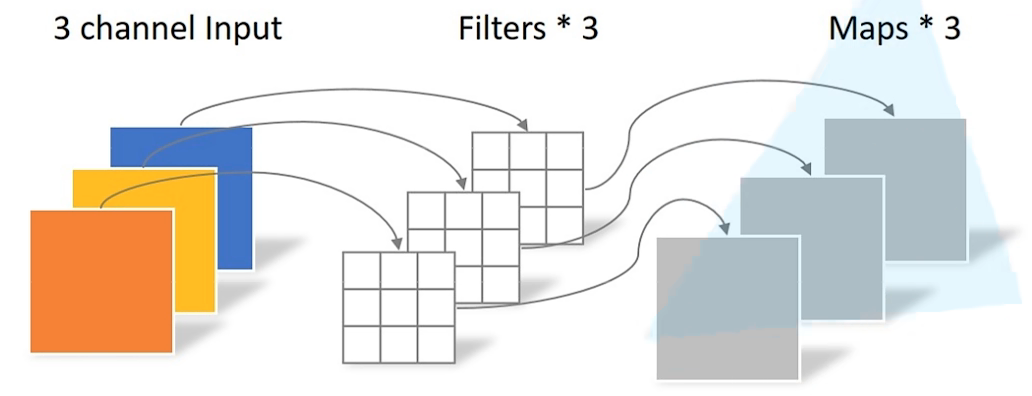
DW(Depthwise Conv)卷积
-
卷积核channel=1
-
输入特征矩阵channel=卷积核个数=输出特征矩阵channel
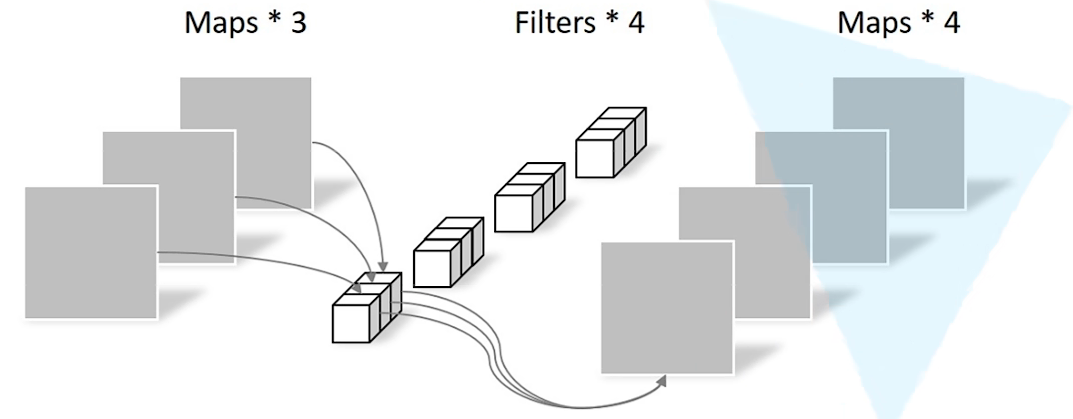
PW(Pointwise Conv)卷积
卷积核size=1的传统卷积
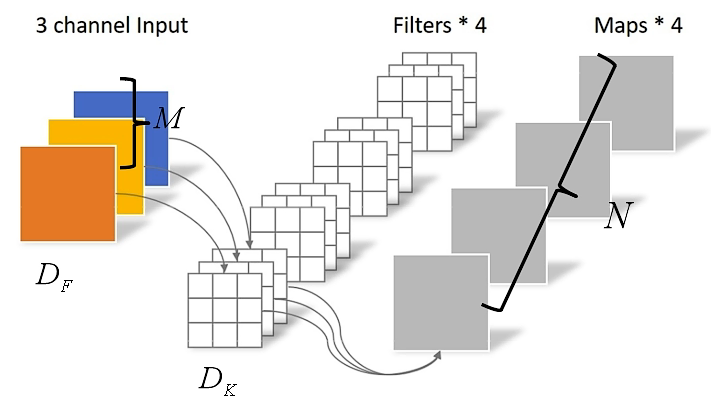
普通卷积计算量
D
K
?
D
K
?
M
?
N
?
D
F
?
D
F
D_K \cdot D_K \cdot M \cdot N \cdot D_F \cdot D_F
DK??DK??M?N?DF??DF?
DW + PW计算量
D
K
?
D
K
?
M
?
D
F
?
D
F
+
M
?
N
?
D
E
?
D
E
D_K \cdot D_K \cdot M \cdot D_F \cdot D_F + M \cdot N \cdot D_E \cdot D_E
DK??DK??M?DF??DF?+M?N?DE??DE?

理论上普通卷积计算量是DW+PW的8到9倍$\frac{DW+PW}{普通卷积} = \frac{1}{N} + \frac{1}{D_{K}^2} $
MobileNetV1
网络中的亮点:
- Depthwise Convolution(大大减少运算量和参数数量)
- 增加超参数α、β
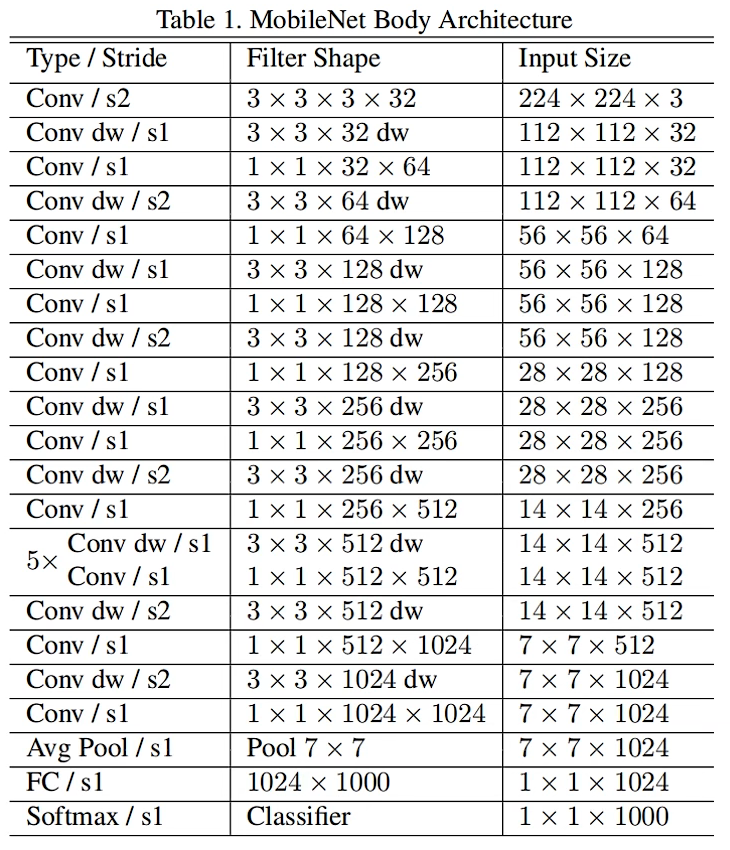
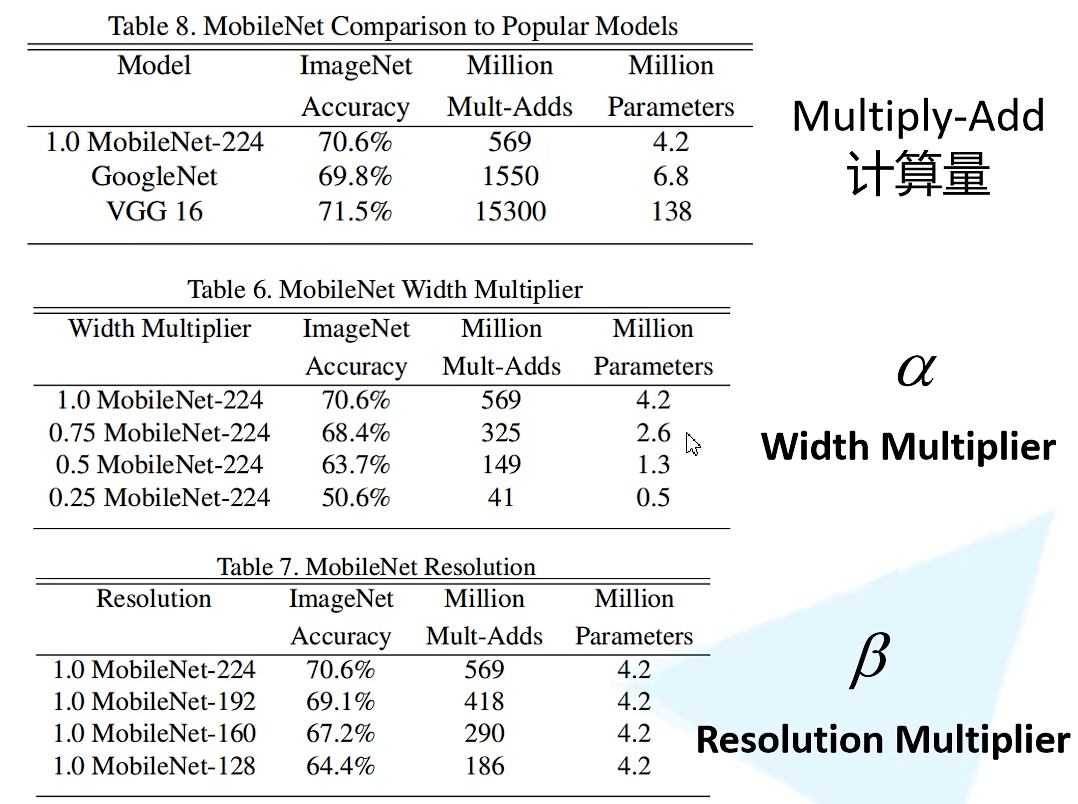
α \alpha α卷积核的个数, β \beta β输入图像的分辨率
depthwise部分的卷积核容易费掉,即卷积核参数大部分为零。
MobileNetV2
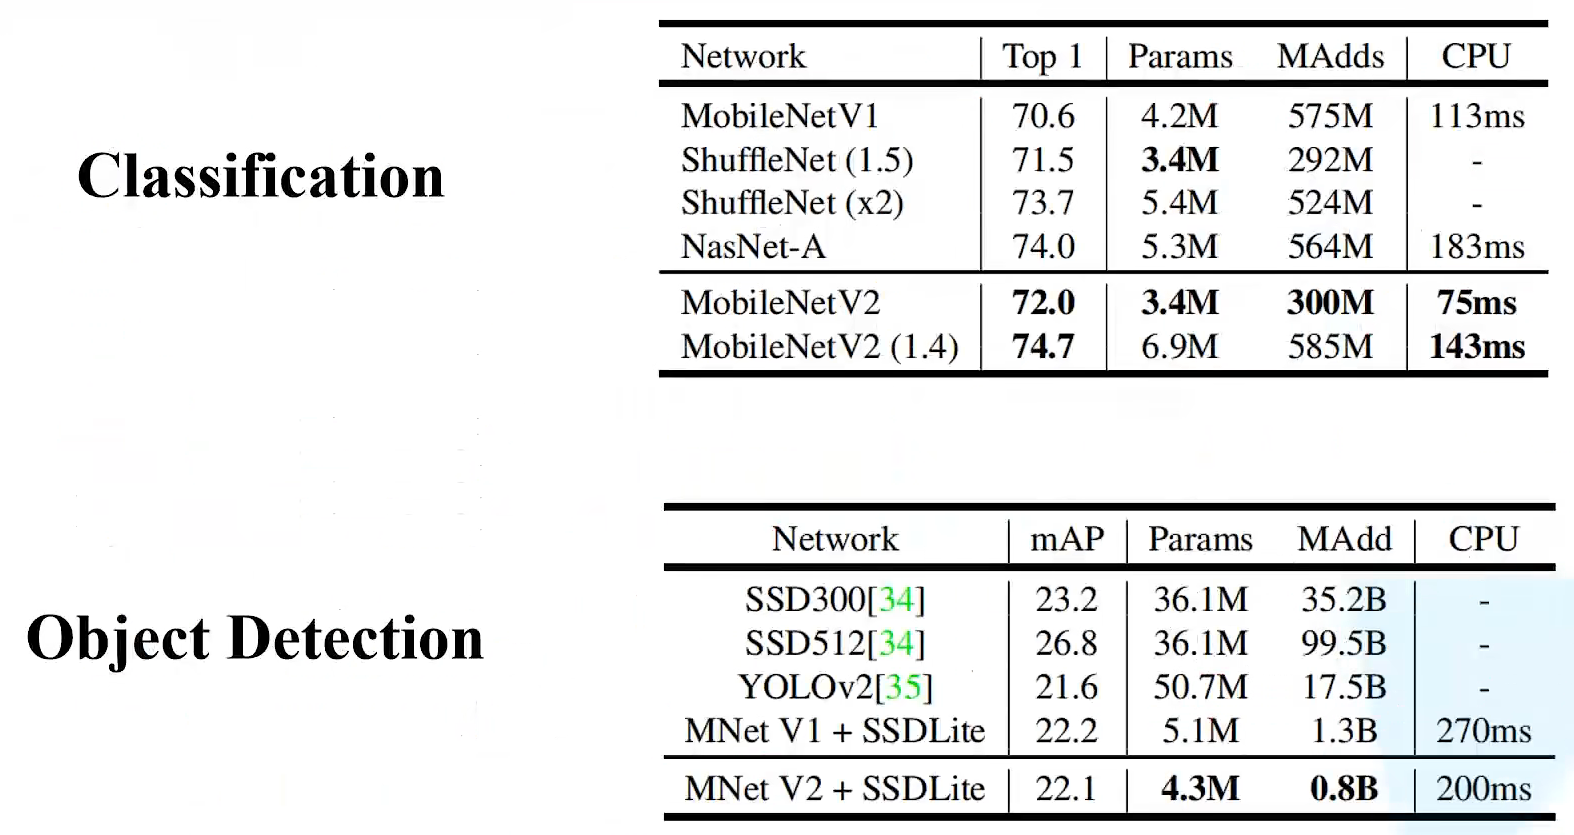
MobileNet v2网络是由google团队在2018年提出的,相比MobileNet V1网络,准确率更高,模型更小。
网络中的亮点
-
Inverted Residuals (倒残差结构)
-
Linear Bottlenecks
Inverted Residuals
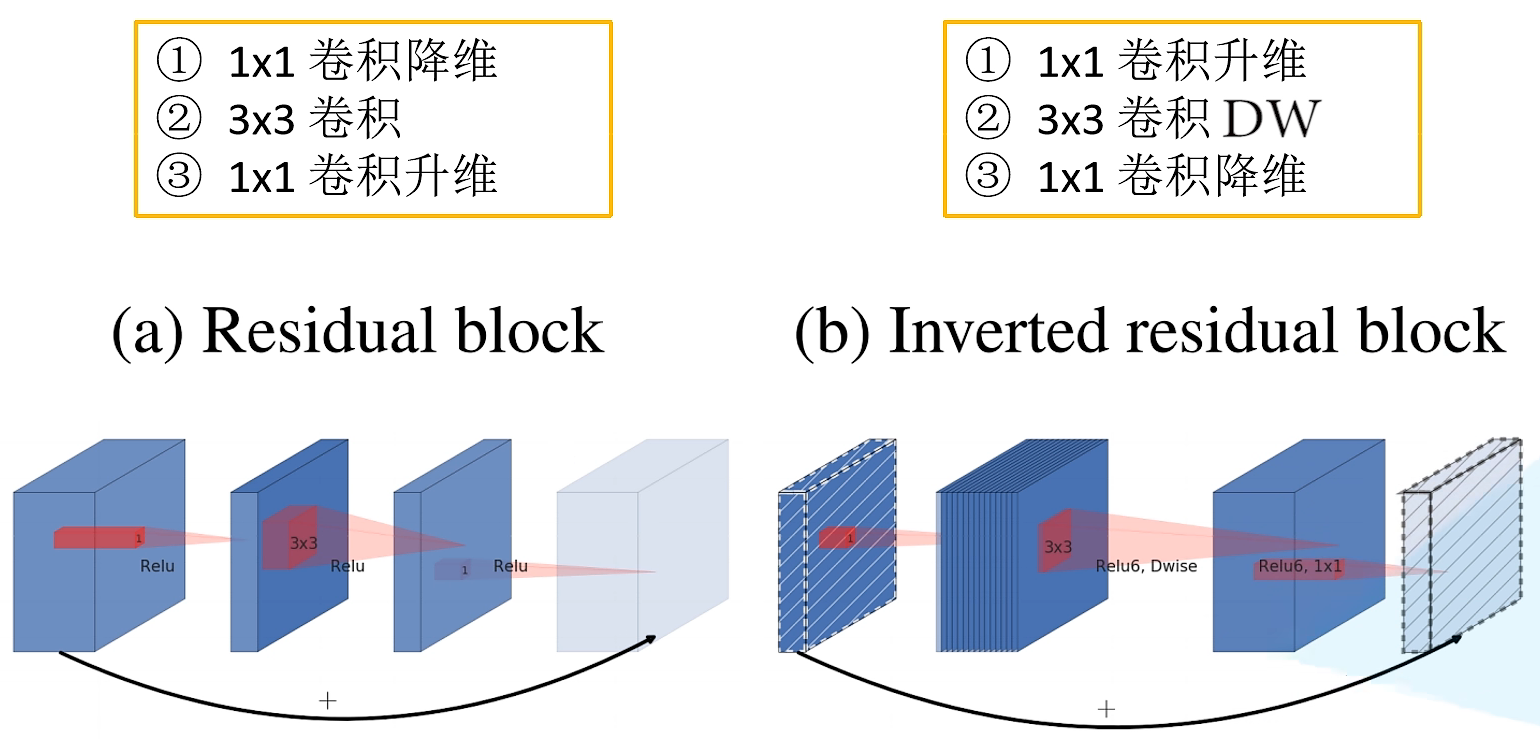
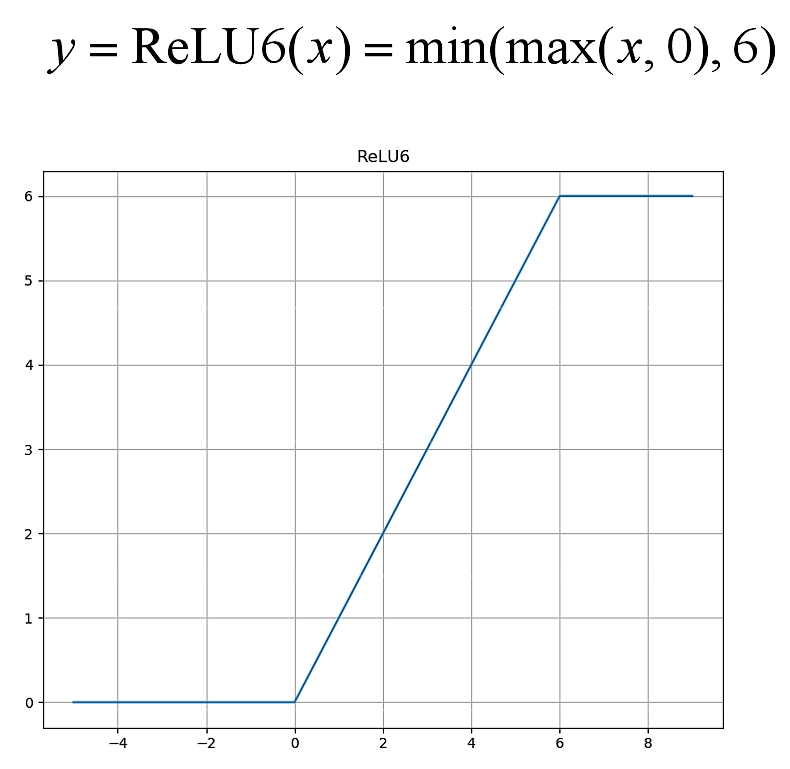
采用ReLU6激活函数
Linear Bottlenecks
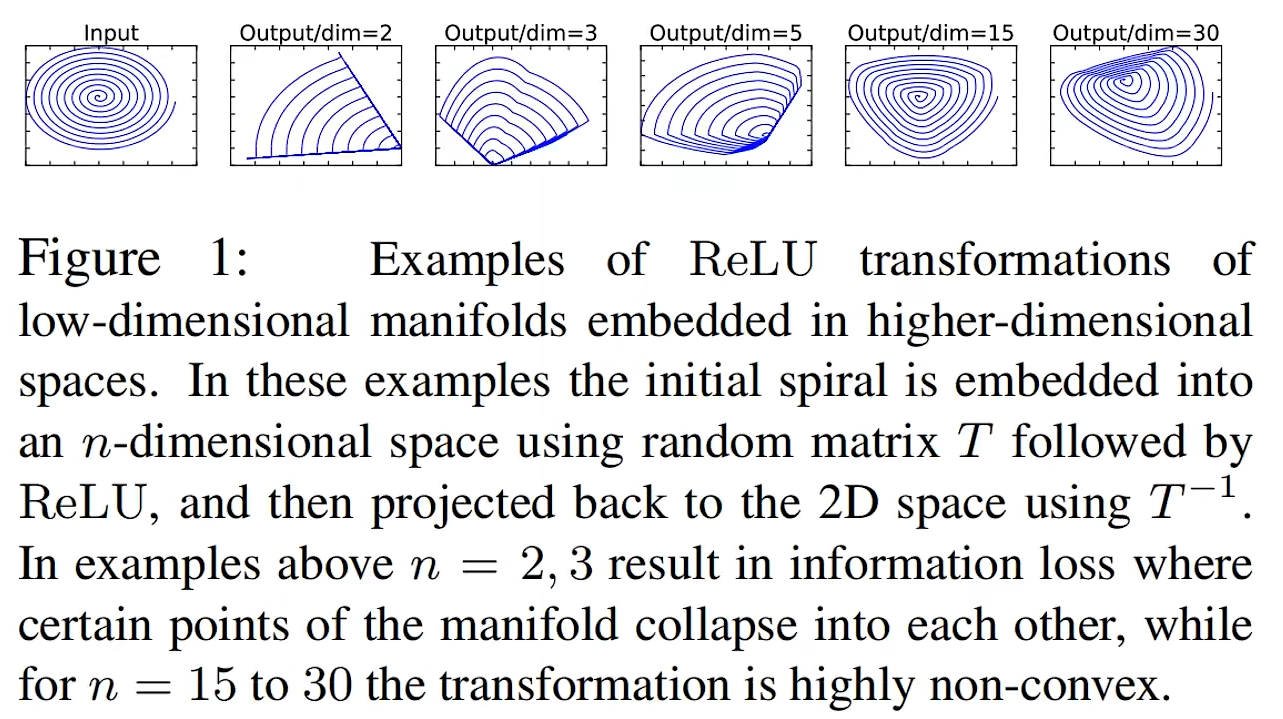
针对倒残差结构的最后一个
1
×
1
1 \times 1
1×1的卷积层,使用线性激活函数。ReLU激活函数对低维特征信息造成大量损失。
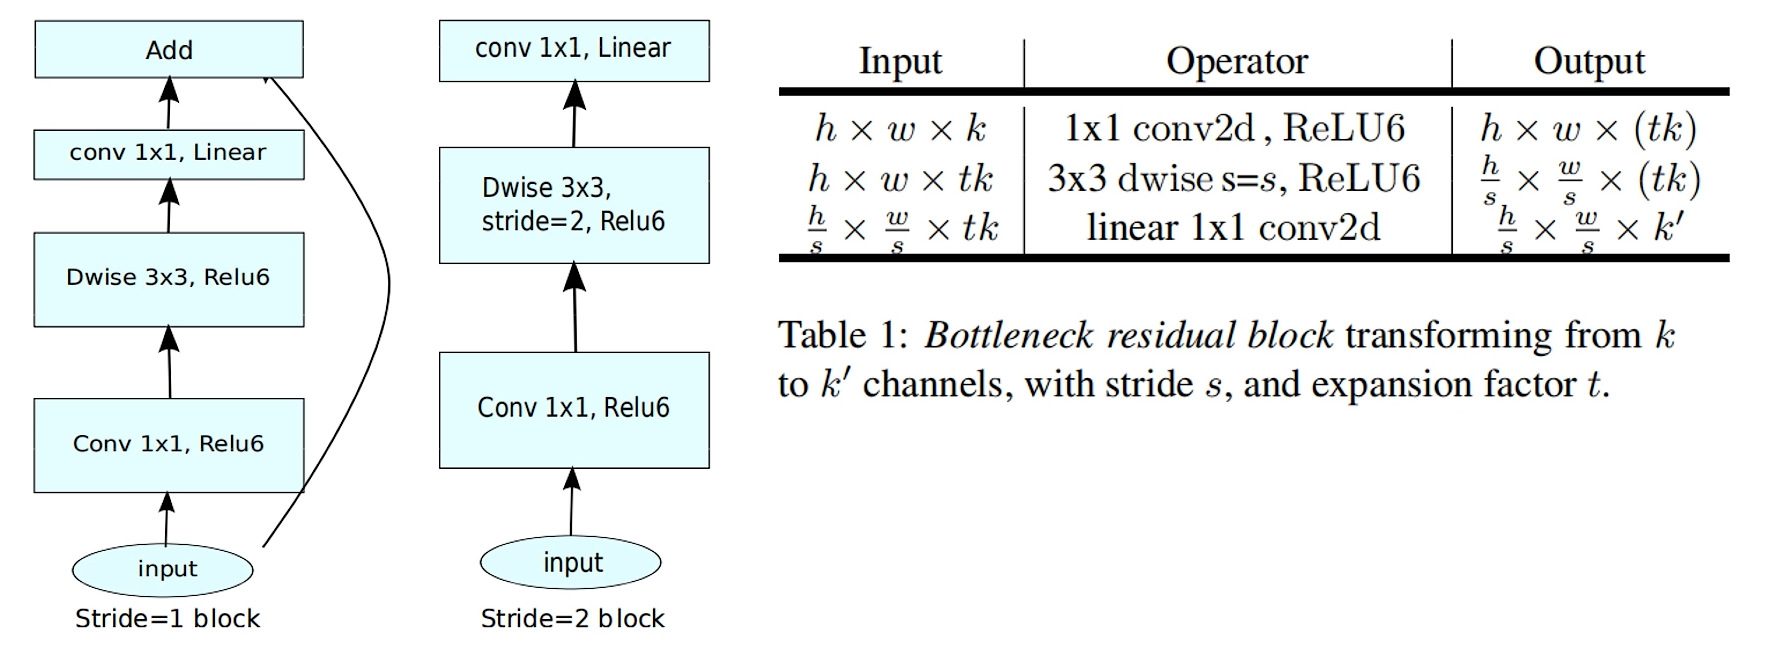
当stride=1且输入特征矩阵与输出特征矩阵shape相同时才有shortcut连接。
网络结构
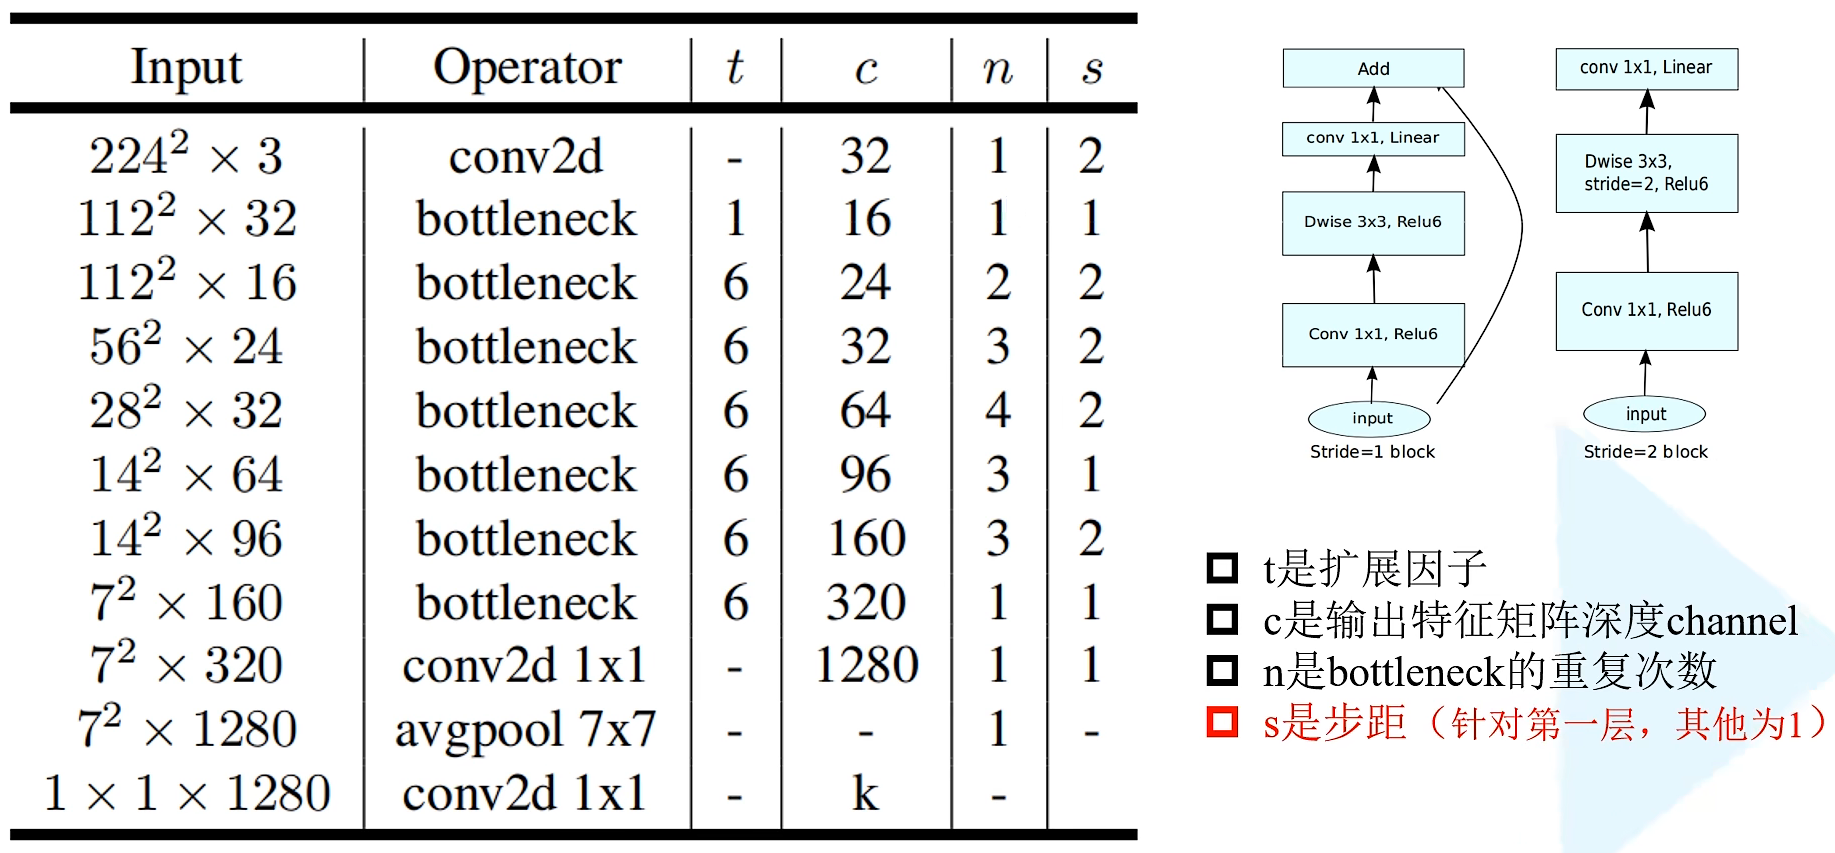
当一层有多个bottleneck(即
n
=?
2
n \not = 2
n=2时),仅第一个bottleneck的步距为s,剩下的bottleneck都为1。
MobileNetV3
-
更新Block(bneck)
-
使用NAS(Neural Architecture Search)搜索参数
-
重新设计耗时层结构
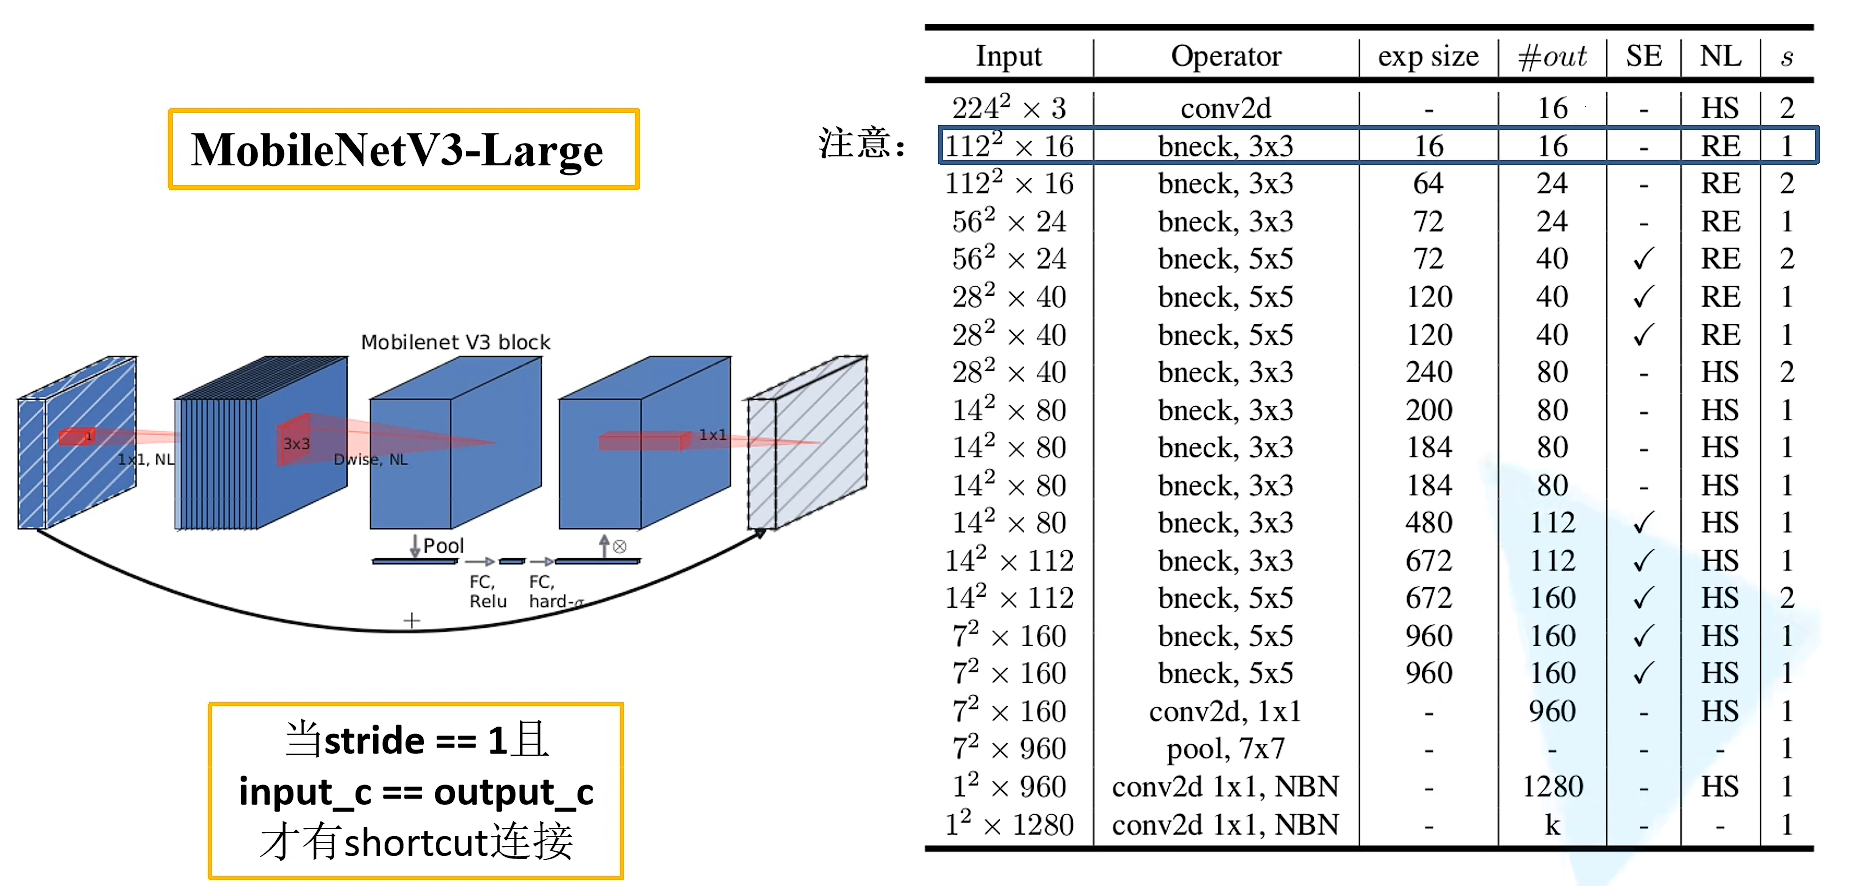
更新Block
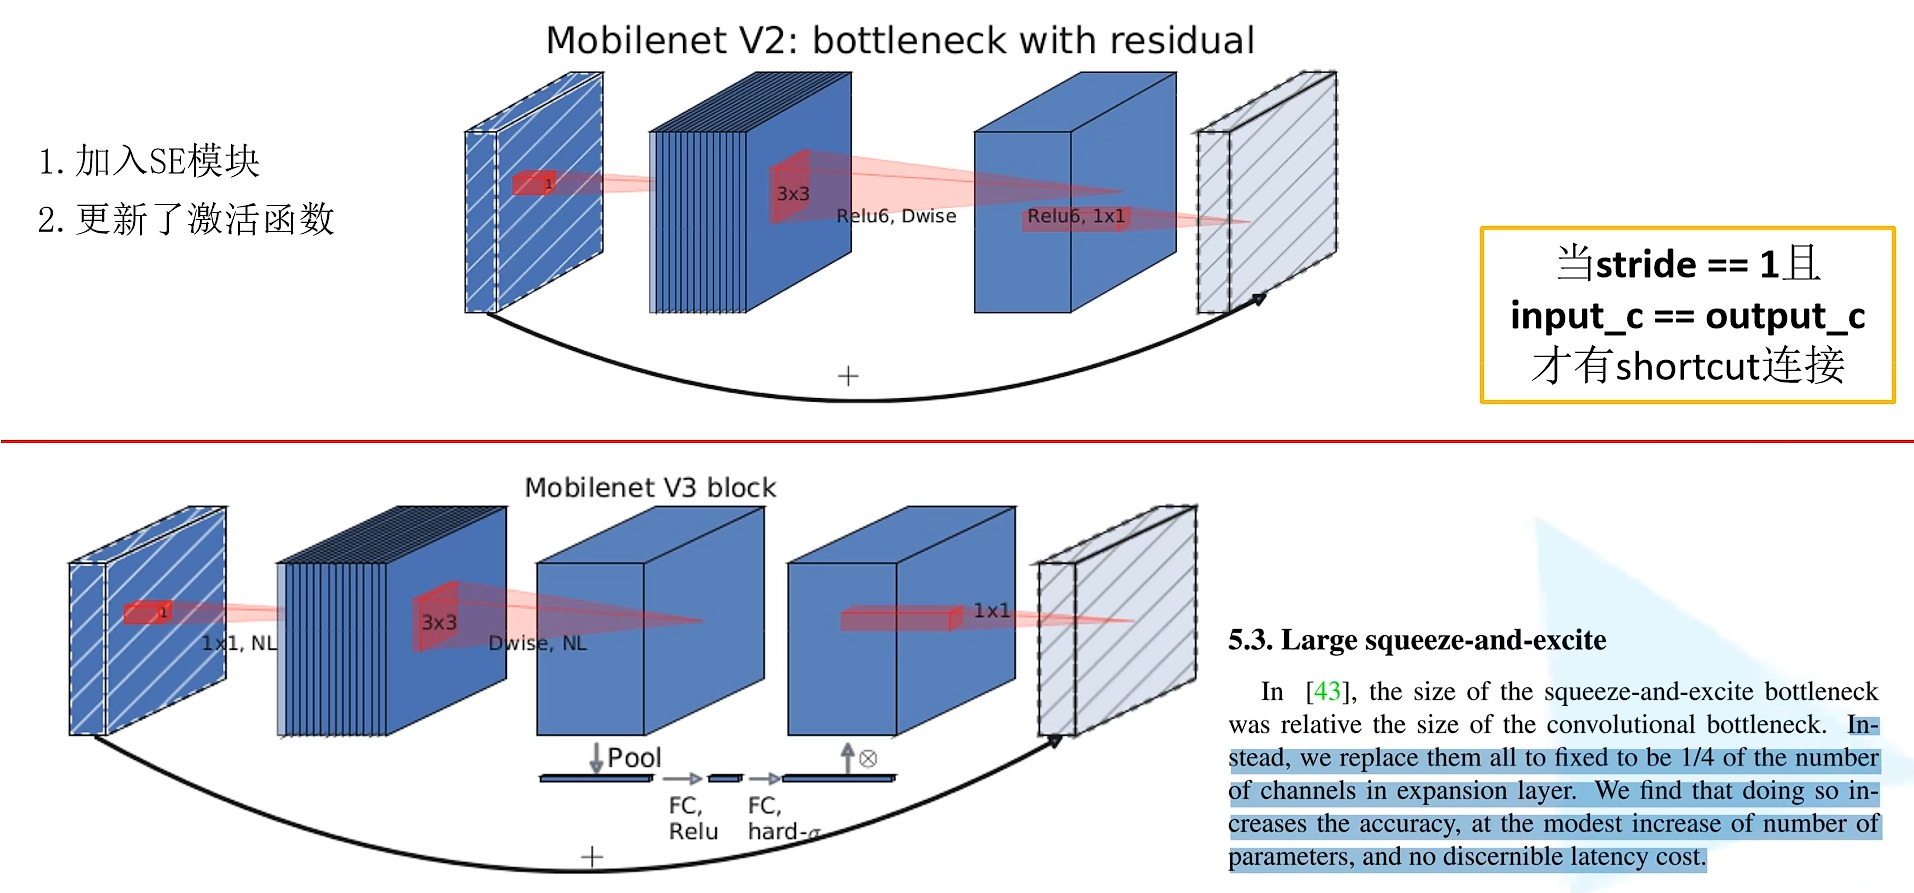
重新设计耗时层结构
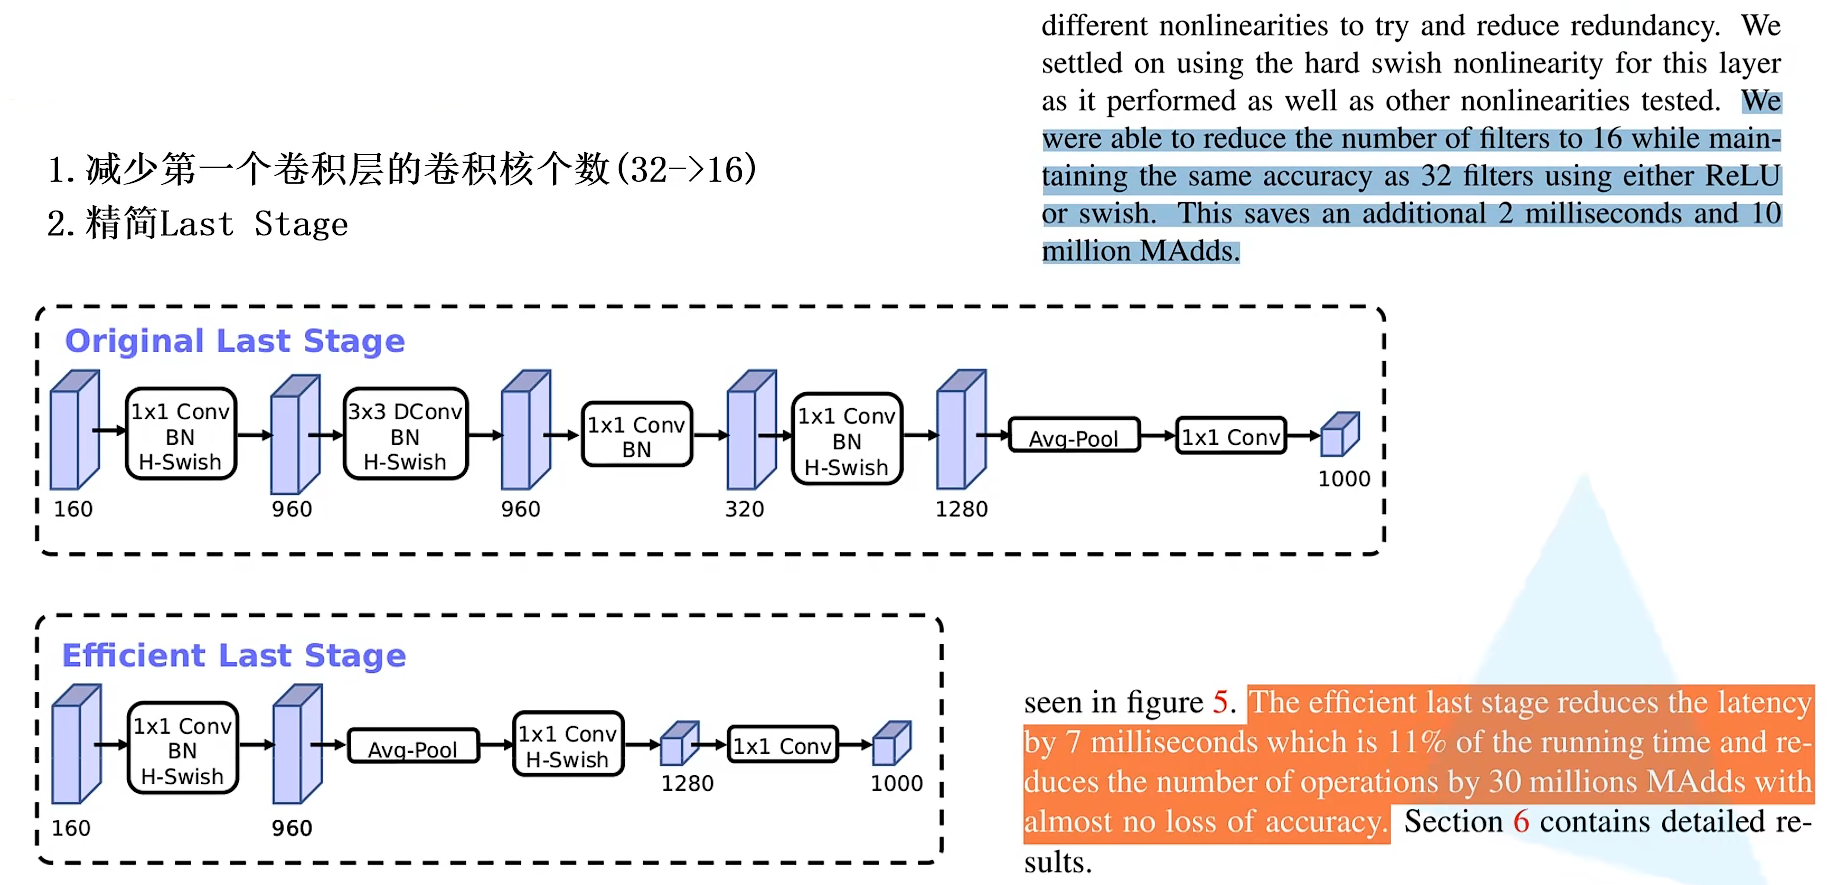
重新设计激活函数
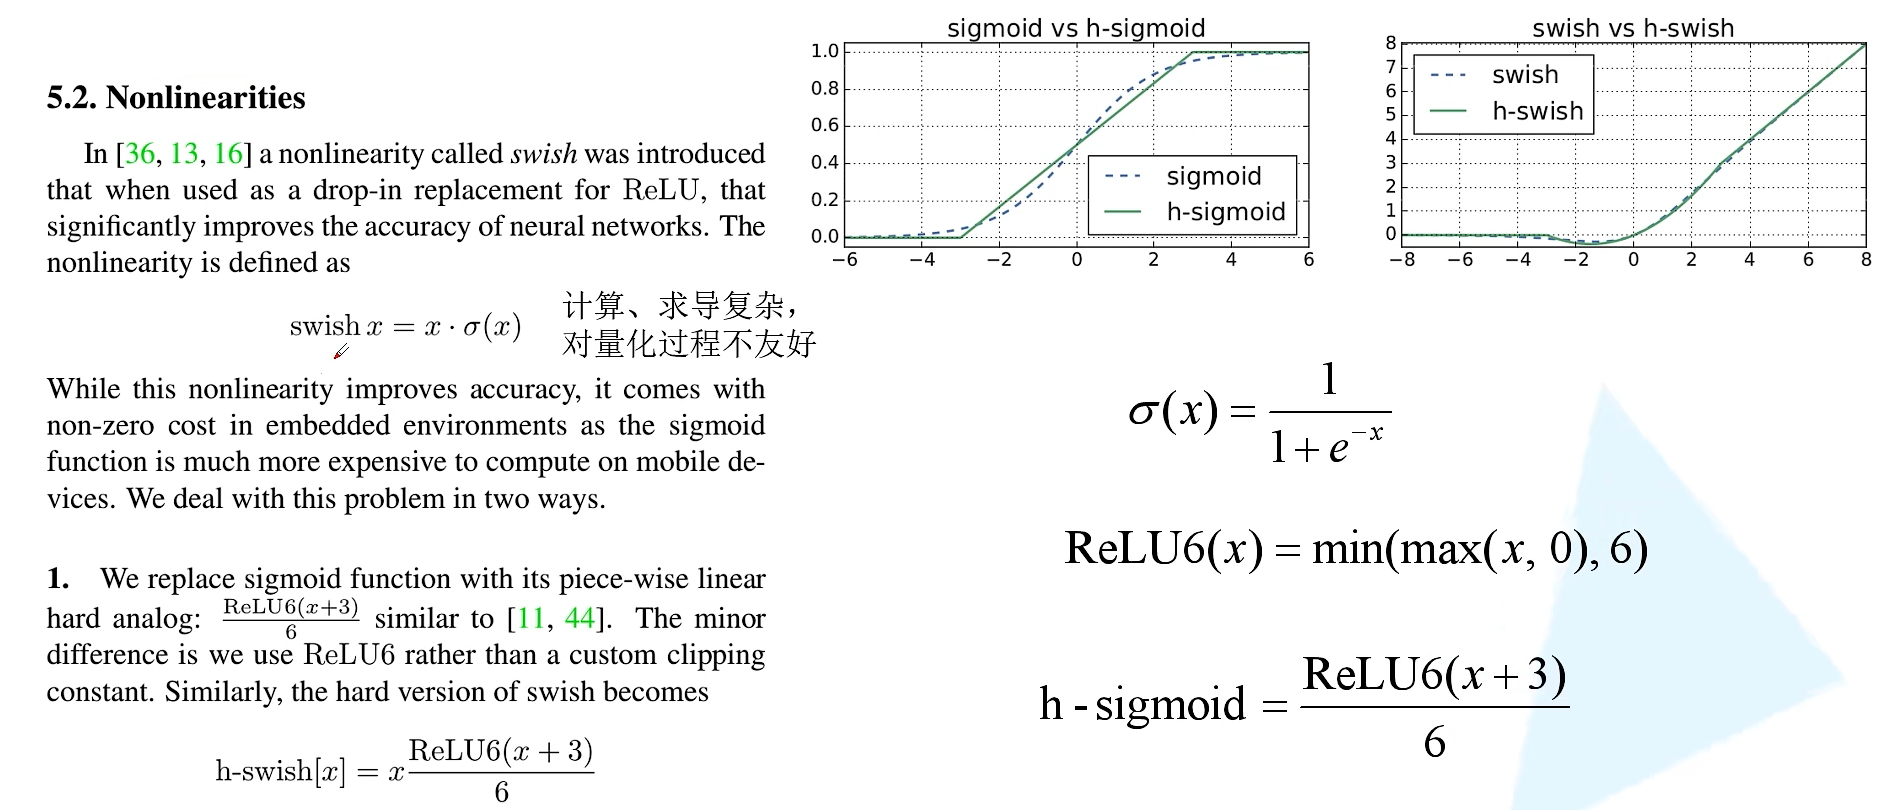
SE-Net
卷积核作为卷积神经网络的核心,通常被看做是在局部感受野上,将空间上(spatial)的信息和特征维度上(channel-wise)的信息进行聚合的信息聚合体。卷积神经网络由一系列卷积层、非线性层和下采样层构成,这样它们能够从全局感受野上去捕获图像的特征来进行图像的描述。
已经有很多工作在空间维度上来提升网络的性能,Squeeze-and-Excitation Networks (简称SENet)从特征通道之间的关系去考虑提升网络性能。其动机是希望显式地建模特征通道之间的相互依赖关系,在不引入一个新的空间维度的情况下进行特征通道间的融合,而是采用了一种全新的“特征重标定”策略。具体来说,就是通过学习的方式来自动获取到每个特征通道的重要程度,然后依照这个重要程度去提升有用的特征并抑制对当前任务用处不大的特征。
![[外链图片转存失败,源站可能有防盗链机制,建议将图片保存下来直接上传(img-t8HmjDjv-1659342565782)(img/【第四周】MobileNetV1, V2, V3/1577346401348442.png)]](https://img-blog.csdnimg.cn/1619cd31cd544411a907682ecac1a8aa.png)
Squeeze 操作
顺着空间维度来进行特征压缩,将每个二维的特征通道变成一个实数,这个实数某种程度上具有全局的感受野,并且输出的维度和输入的特征通道数相匹配。它表征着在特征通道上响应的全局分布,而且使得靠近输入的层也可以获得全局的感受野,这一点在很多任务中都是非常有用的。
Excitation 操作
通过参数来为每个特征通道生成权重,其中参数被学习用来显式地建模特征通道间的相关性。
Reweight 操作
将Excitation的输出的权重看做是进过特征选择后的每个特征通道的重要性,然后通过乘法逐通道加权到先前的特征上,完成在通道维度上的对原始特征的重标定。
![[外链图片转存失败,源站可能有防盗链机制,建议将图片保存下来直接上传(img-AMTcMuJX-1659342565783)(img/【第四周】MobileNetV1, V2, V3/1577346448967123.png)]](https://img-blog.csdnimg.cn/a648d0c25bda49848922bc98532df804.png)
这里使用global average pooling 作为Squeeze 操作。
紧接着两个Fully Connected 层组成一个Bottleneck结构去建模通道间的相关性,并输出和输入特征同样数目的权重。我们首先将特征维度降低到输入的1/16 ,然后经过ReLu激活后再通过一个Fully Connected 层升回到原来的维度。 这样做比直接用一个Fully Connected 层的好处在于:1)具有更多的非线性,可以更好地拟合通道间复杂的相关性;2)极大地减少了参数量和计算量。
然后通过一个Sigmoid的门获得0~1之间归一化的权重,最后通过一个Scale的操作来将归一化后的权重加权到每个通道的特征上。
将SE 嵌入到ResNet模块中的操作过程基本和SE-Inception一样,只不过是在Addition前对分支上Residual的特征进行了特征重标定。如果对Addition后主支上的特征进行重标定,由于在主干上存在0~1的scale操作,在网络较深BP优化时就会在靠近输入层容易出现梯度消散的情况,导致模型难以优化。
SENet构造非常简单,而且很容易被部署,不需要引入新的函数或者层。除此之外,它还在模型和计算复杂度上具有良好的特性。
import torch
import torch.nn as nn
import torch.nn.functional as F
import torchvision
import torchvision.transforms as transforms
import matplotlib.pyplot as plt
import numpy as np
import torch.optim as optim

class BasicBlock(nn.Module):
    def __init__(self, in_channels, out_channels, stride=1):
        super(BasicBlock, self).__init__()
        self.conv1 = nn.Conv2d(in_channels, out_channels, kernel_size=3, stride=stride, padding=1, bias=False)
        self.bn1 = nn.BatchNorm2d(out_channels)
        self.conv2 = nn.Conv2d(out_channels, out_channels, kernel_size=3, stride=1, padding=1, bias=False)
        self.bn2 = nn.BatchNorm2d(out_channels)

        # shortcut的输出维度和输出不一致时,用1*1的卷积来匹配维度
        self.shortcut = nn.Sequential()
        if stride != 1 or in_channels != out_channels:
            self.shortcut = nn.Sequential(
                nn.Conv2d(in_channels, out_channels, kernel_size=1, stride=stride, bias=False),
                nn.BatchNorm2d(out_channels))

        # 在 excitation 的两个全连接
        self.fc1 = nn.Conv2d(out_channels, out_channels//16, kernel_size=1)
        self.fc2 = nn.Conv2d(out_channels//16, out_channels, kernel_size=1)

    #定义网络结构
    def forward(self, x):
        #feature map进行两次卷积得到压缩
        out = F.relu(self.bn1(self.conv1(x)))
        out = self.bn2(self.conv2(out))

        # Squeeze 操作:global average pooling
        w = F.avg_pool2d(out, out.size(2))

        # Excitation 操作: fc(压缩到16分之一)--Relu--fc(激到之前维度)--Sigmoid(保证输出为 0 至 1 之间)
        w = F.relu(self.fc1(w))
        w = F.sigmoid(self.fc2(w))

        # 重标定操作: 将卷积后的feature map与 w 相乘
        out = out * w
        # 加上浅层特征图
        out += self.shortcut(x)
        #R elu激活
        out = F.relu(out)
        return out
Hybrid Spectral Network
高光谱图像
高光谱图像就是在光谱的维度进行了细致的分割,不仅仅是传统的黑,白,或者R、G、B的区别,而是在光谱维度上也有N个通道,例如:我们可以把400nm-1000nm分为300个通道,一次,通过高光谱设备获取的是一个数据立方,不仅有图像的信息,并且在光谱维度上进行展开,结果不仅可以获得图像上每个点的光谱数据,还可以获得任意一个谱段的影像信息。
高光谱成像技术是基于非常多的窄波段的影像数据技术,它将成像技术与光谱技术相结合,探测目标的二维几何空间和光谱信息,获取高分辨率的连续、窄波段的图像数据。
不同物质在不同波段光谱信号下的不同表现,可以绘制成一条关于光谱波段和光谱值之间的曲线,根据曲线的差异,我们可以对高光谱图像中不同物质进行分类。
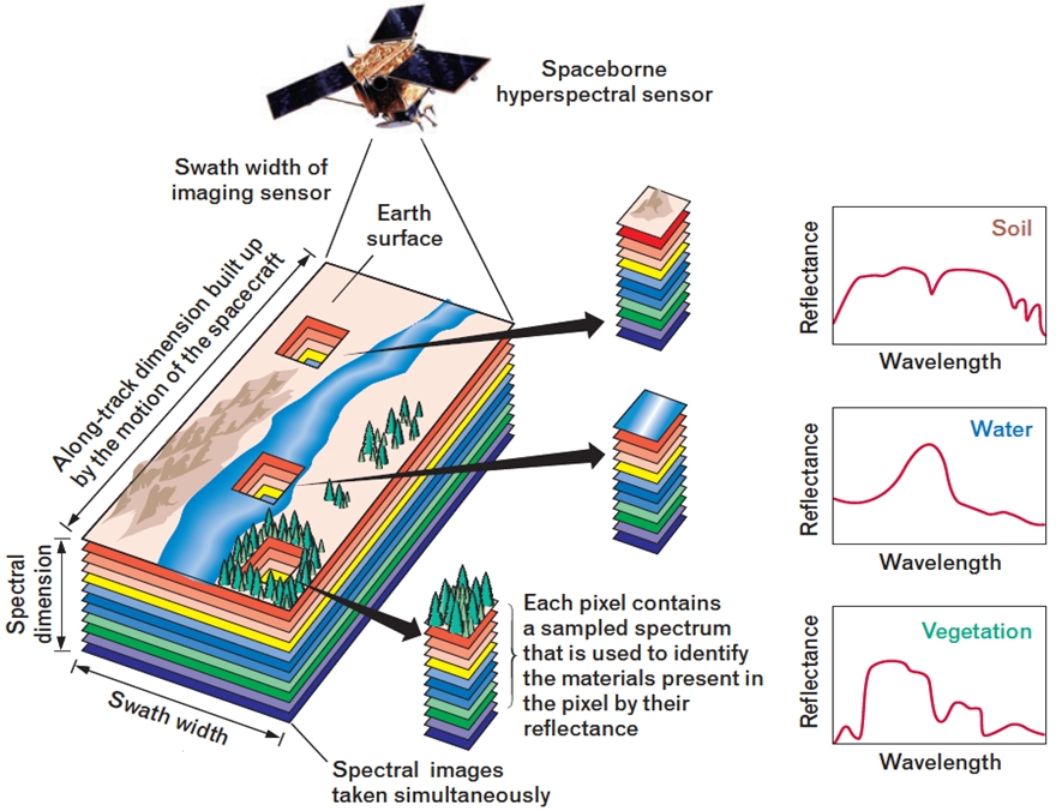
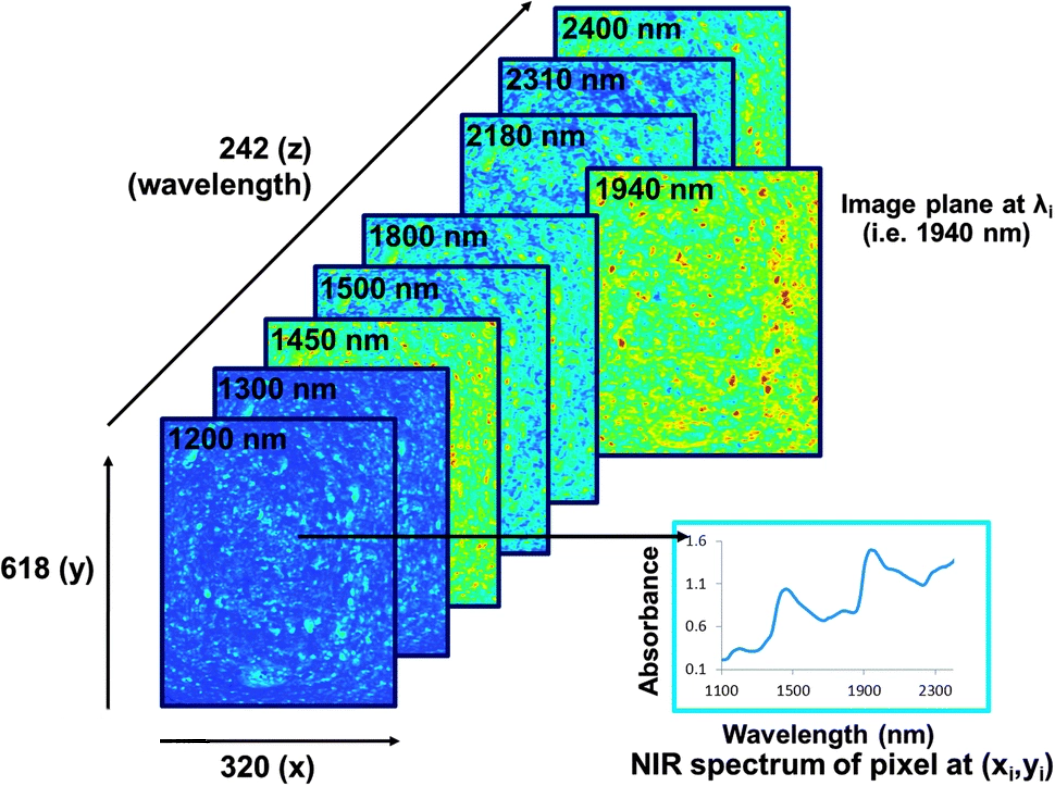
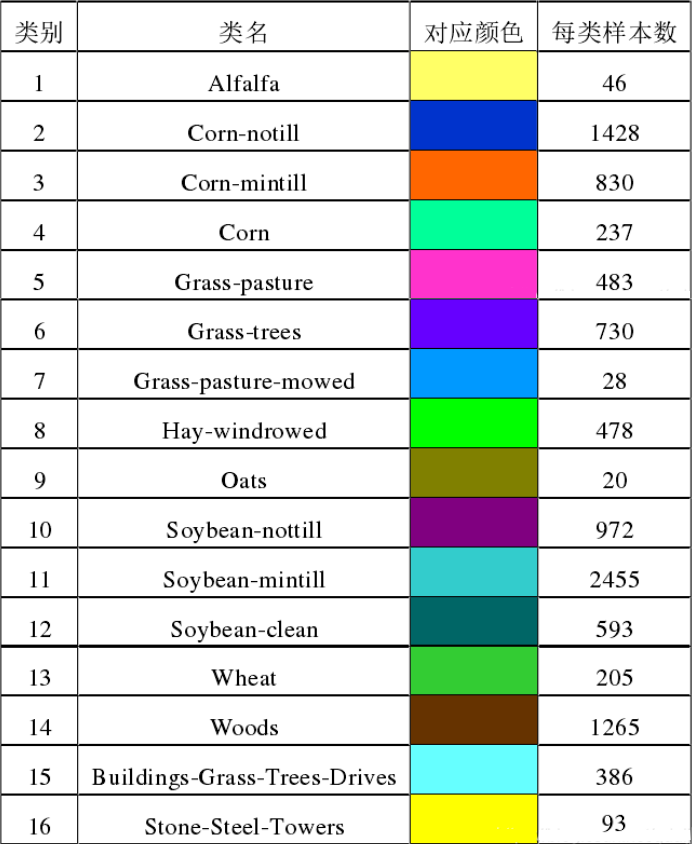
在论文中使用的高光谱图像数据集有一个是Indian Pines,它是最早的用于高光谱图像分类的测试数据。
该数据集总共有21025个像素,但是其中只有10249个像素是地物像素,其余10776个像素均为背景像素,我们需要剔除。最后,我们对着10249个像素进行16-分类,得到高光谱图像的分类。
HybridSN
仅使用2-D-CNN或3-D-CNN有一些缺点,例如缺少频道关系信息或模型非常复杂。这也阻止了这些方法在HSI空间上获得更高的准确性。主要原因是由于HSI是体积数据,也有光谱维度。
单独的2-D-CNN无法从光谱维度上提取良好的区分特征,同样,深 3-D-CNN的计算更加复杂,而论文中提出的HybridSN模型,克服了先前模型的这些缺点。3-D-CNN和2-D-CNN层以推荐的模型组装成合适的网络,充分利用光谱图和空间特征图,最大限度地提高精度。
![[外链图片转存失败,源站可能有防盗链机制,建议将图片保存下来直接上传(img-OqkHHIOS-1659342565784)(img/【第四周】MobileNetV1, V2, V3/image-20220801100222139.png)]](https://img-blog.csdnimg.cn/e8edc190b863483189f341942df5bf17.png)
为了首先消除频谱冗余,将传统主成分分析(PCA)应用于沿光谱带的原始HSI数据。PCA将光谱带的数量从D减少到B,而保持相同的空间尺寸。其中M是宽度,N是高度,B是PCA之后的光谱带数。
针对模型图左边第二个曲线箭头,论文中提到:为了利用图像分类技术, 将HSI数据立方体划分为小的重叠3-D补丁,其真实标签由中心像素的标签决定, 创建三维相邻补丁 P ∈ R S × S × B P\in R^{S×S×B} P∈RS×S×B。
模型图中第三、四、五个箭头代表三维卷积,
- conv1: ( 1, 30, 25, 25), 8个 7x3x3 的卷积核 ==> ( 8, 24, 23, 23)
- conv2: ( 8, 24, 23, 23),16个 5x3x3 的卷积核 ==> (16, 20, 21, 21)
- conv3: (16, 20, 21, 21),32个 3x3x3 的卷积核 ==> (32, 18, 19, 19)
第六个箭头代表二维卷积,但是从三维到二维,中间需要一个整形的过程,即减少一个维度的参数。
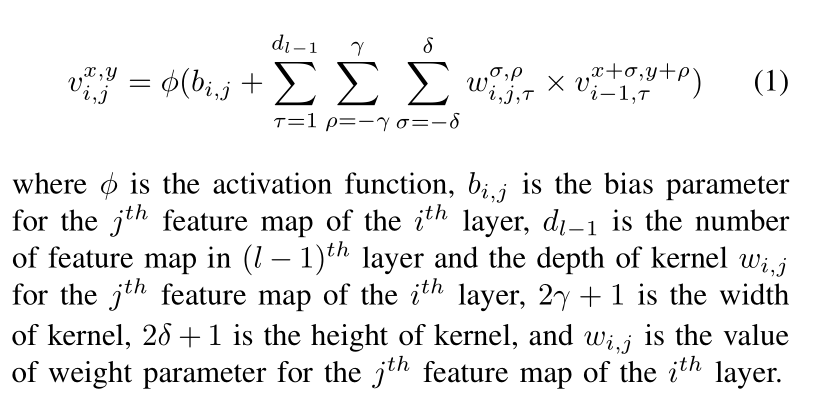
论文中提到,在二维卷积中,第
i
i
i层的第
j
j
j个特征映射中空间位置
(
x
,
y
)
(x,y)
(x,y)的激活值表示为
v
i
,
j
x
,
y
v^{x,y}_{i,j}
vi,jx,y?使用如下等式:
在三维卷积中,第
i
i
i层第
j
j
j个特征图的空间位置
(
x
,
y
,
z
)
(x,y,z)
(x,y,z)的激活值用
v
i
,
j
x
,
y
,
z
v^{x,y,z}_{i,j}
vi,jx,y,z?表示,如下:

整个网络结构:
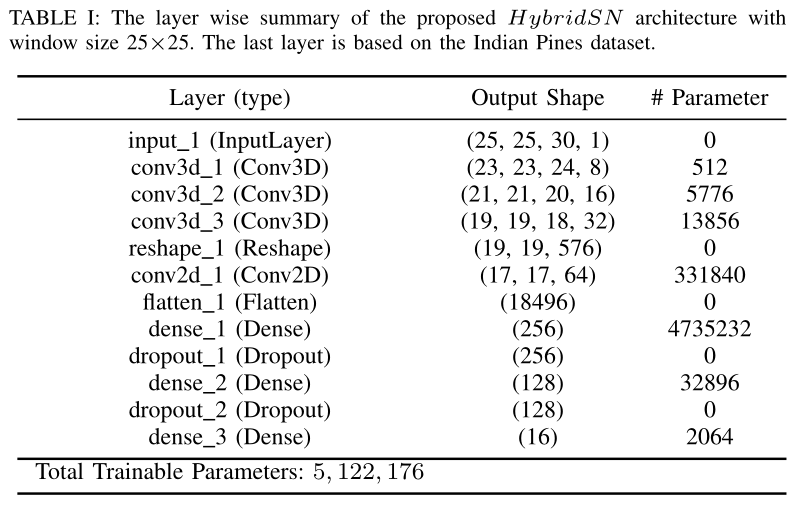
HybridSN
首先取得数据,并引入基本函数库。
! wget http://www.ehu.eus/ccwintco/uploads/6/67/Indian_pines_corrected.mat
! wget http://www.ehu.eus/ccwintco/uploads/c/c4/Indian_pines_gt.mat
! pip install spectral

import numpy as np
import matplotlib.pyplot as plt
import scipy.io as sio
from sklearn.decomposition import PCA
from sklearn.model_selection import train_test_split
from sklearn.metrics import confusion_matrix, accuracy_score, classification_report, cohen_kappa_score
import spectral
import torch
import torchvision
import torch.nn as nn
import torch.nn.functional as F
import torch.optim as optim
定义 HybridSN 类
from torch.nn.modules.activation import ReLU
class_num = 16

class HybridSN(nn.Module):
  def __init__(self):
    super(HybridSN, self).__init__()

    self.conv1 = nn.Sequential(
      nn.Conv3d(in_channels=1, out_channels=8, kernel_size=(7, 3, 3)),
      nn.BatchNorm3d(8),
      nn.ReLU(inplace=True)
    )

    self.conv2 = nn.Sequential(
      nn.Conv3d(in_channels=8, out_channels=16, kernel_size=(5, 3, 3)),
      nn.BatchNorm3d(16),
      nn.ReLU(inplace=True)
    )

    self.conv3 = nn.Sequential(
      nn.Conv3d(in_channels=16, out_channels=32, kernel_size=(3, 3, 3)),
      nn.BatchNorm3d(32),
      nn.ReLU(inplace=True)
    )

    self.conv4 = nn.Sequential(
      nn.Conv2d(in_channels=576, out_channels=64, kernel_size=(3, 3)),
      nn.BatchNorm2d(64),
      nn.ReLU(inplace=True)
    )

    self.fc1 = nn.Linear(in_features=18496, out_features=256)
    self.fc2 = nn.Linear(in_features=256, out_features=128)
    self.fc3 = nn.Linear(in_features=128, out_features=class_num)
    self.drop = nn.Dropout(p=0.4)

  def forward(self, x):
    out = self.conv1(x)
    out = self.conv2(out)
    out = self.conv3(out)
    out = out.reshape(out.shape[0], -1, 19, 19)
    out = self.conv4(out)
    out = out.reshape(out.shape[0],-1)
    out = F.relu(self.drop(self.fc1(out)))
    out = F.relu(self.drop(self.fc2(out)))
    out = self.fc3(out)

    return out

# 随机输入,测试网络结构是否通
# x = torch.randn(1, 1, 30, 25, 25)
# net = HybridSN()
# y = net(x)
# print(y.shape)
创建数据集
首先对高光谱数据实施PCA降维;然后创建 keras 方便处理的数据格式;然后随机抽取 10% 数据做为训练集,剩余的做为测试集。
首先定义基本函数
# 对高光谱数据 X 应用 PCA 变换
def applyPCA(X, numComponents):
    newX = np.reshape(X, (-1, X.shape[2]))
    pca = PCA(n_components=numComponents, whiten=True)
    newX = pca.fit_transform(newX)
    newX = np.reshape(newX, (X.shape[0], X.shape[1], numComponents))
    return newX

# 对单个像素周围提取 patch 时,边缘像素就无法取了,因此,给这部分像素进行 padding 操作
def padWithZeros(X, margin=2):
    newX = np.zeros((X.shape[0] + 2 * margin, X.shape[1] + 2* margin, X.shape[2]))
    x_offset = margin
    y_offset = margin
    newX[x_offset:X.shape[0] + x_offset, y_offset:X.shape[1] + y_offset, :] = X
    return newX

# 在每个像素周围提取 patch ,然后创建成符合 keras 处理的格式
def createImageCubes(X, y, windowSize=5, removeZeroLabels = True):
    # 给 X 做 padding
    margin = int((windowSize - 1) / 2)
    zeroPaddedX = padWithZeros(X, margin=margin)
    # split patches
    patchesData = np.zeros((X.shape[0] * X.shape[1], windowSize, windowSize, X.shape[2]))
    patchesLabels = np.zeros((X.shape[0] * X.shape[1]))
    patchIndex = 0
    for r in range(margin, zeroPaddedX.shape[0] - margin):
        for c in range(margin, zeroPaddedX.shape[1] - margin):
            patch = zeroPaddedX[r - margin:r + margin + 1, c - margin:c + margin + 1]
            patchesData[patchIndex, :, :, :] = patch
            patchesLabels[patchIndex] = y[r-margin, c-margin]
            patchIndex = patchIndex + 1
    if removeZeroLabels:
        patchesData = patchesData[patchesLabels>0,:,:,:]
        patchesLabels = patchesLabels[patchesLabels>0]
        patchesLabels -= 1
    return patchesData, patchesLabels

def splitTrainTestSet(X, y, testRatio, randomState=345):
    X_train, X_test, y_train, y_test = train_test_split(X, y, test_size=testRatio, random_state=randomState, stratify=y)
    return X_train, X_test, y_train, y_test
下面读取并创建数据集:
# 地物类别
class_num = 16
X = sio.loadmat('Indian_pines_corrected.mat')['indian_pines_corrected']
y = sio.loadmat('Indian_pines_gt.mat')['indian_pines_gt']

# 用于测试样本的比例
test_ratio = 0.90
# 每个像素周围提取 patch 的尺寸
patch_size = 25
# 使用 PCA 降维,得到主成分的数量
pca_components = 30

print('Hyperspectral data shape: ', X.shape)
print('Label shape: ', y.shape)

print('\n... ... PCA tranformation ... ...')
X_pca = applyPCA(X, numComponents=pca_components)
print('Data shape after PCA: ', X_pca.shape)

print('\n... ... create data cubes ... ...')
X_pca, y = createImageCubes(X_pca, y, windowSize=patch_size)
print('Data cube X shape: ', X_pca.shape)
print('Data cube y shape: ', y.shape)

print('\n... ... create train & test data ... ...')
Xtrain, Xtest, ytrain, ytest = splitTrainTestSet(X_pca, y, test_ratio)
print('Xtrain shape: ', Xtrain.shape)
print('Xtest  shape: ', Xtest.shape)

# 改变 Xtrain, Ytrain 的形状,以符合 keras 的要求
Xtrain = Xtrain.reshape(-1, patch_size, patch_size, pca_components, 1)
Xtest  = Xtest.reshape(-1, patch_size, patch_size, pca_components, 1)
print('before transpose: Xtrain shape: ', Xtrain.shape)
print('before transpose: Xtest  shape: ', Xtest.shape)

# 为了适应 pytorch 结构,数据要做 transpose
Xtrain = Xtrain.transpose(0, 4, 3, 1, 2)
Xtest  = Xtest.transpose(0, 4, 3, 1, 2)
print('after transpose: Xtrain shape: ', Xtrain.shape)
print('after transpose: Xtest  shape: ', Xtest.shape)


""" Training dataset"""
class TrainDS(torch.utils.data.Dataset):
    def __init__(self):
        self.len = Xtrain.shape[0]
        self.x_data = torch.FloatTensor(Xtrain)
        self.y_data = torch.LongTensor(ytrain)
    def __getitem__(self, index):
        # 根据索引返回数据和对应的标签
        return self.x_data[index], self.y_data[index]
    def __len__(self):
        # 返回文件数据的数目
        return self.len

""" Testing dataset"""
class TestDS(torch.utils.data.Dataset):
    def __init__(self):
        self.len = Xtest.shape[0]
        self.x_data = torch.FloatTensor(Xtest)
        self.y_data = torch.LongTensor(ytest)
    def __getitem__(self, index):
        # 根据索引返回数据和对应的标签
        return self.x_data[index], self.y_data[index]
    def __len__(self):
        # 返回文件数据的数目
        return self.len

# 创建 trainloader 和 testloader
trainset = TrainDS()
testset  = TestDS()
train_loader = torch.utils.data.DataLoader(dataset=trainset, batch_size=128, shuffle=True, num_workers=2)
test_loader  = torch.utils.data.DataLoader(dataset=testset,  batch_size=128, shuffle=False, num_workers=2)
Hyperspectral data shape:  (145, 145, 200)
Label shape:  (145, 145)

... ... PCA tranformation ... ...
Data shape after PCA:  (145, 145, 30)

... ... create data cubes ... ...
Data cube X shape:  (10249, 25, 25, 30)
Data cube y shape:  (10249,)

... ... create train & test data ... ...
Xtrain shape:  (1024, 25, 25, 30)
Xtest  shape:  (9225, 25, 25, 30)
before transpose: Xtrain shape:  (1024, 25, 25, 30, 1)
before transpose: Xtest  shape:  (9225, 25, 25, 30, 1)
after transpose: Xtrain shape:  (1024, 1, 30, 25, 25)
after transpose: Xtest  shape:  (9225, 1, 30, 25, 25)
开始训练
# 使用GPU训练,可以在菜单 "代码执行工具" -> "更改运行时类型" 里进行设置
device = torch.device("cuda:0" if torch.cuda.is_available() else "cpu")

# 网络放到GPU上
net = HybridSN().to(device)
criterion = nn.CrossEntropyLoss()
optimizer = optim.Adam(net.parameters(), lr=0.001)

# 开始训练
total_loss = 0
for epoch in range(100):
    for i, (inputs, labels) in enumerate(train_loader):
        inputs = inputs.to(device)
        labels = labels.to(device)
        # 优化器梯度归零
        optimizer.zero_grad()
        # 正向传播 + 反向传播 + 优化
        outputs = net(inputs)
        loss = criterion(outputs, labels)
        loss.backward()
        optimizer.step()
        total_loss += loss.item()
    print('[Epoch: %d]   [loss avg: %.4f]   [current loss: %.4f]' %(epoch + 1, total_loss/(epoch+1), loss.item()))

print('Finished Training')
[Epoch: 1]   [loss avg: 19.5844]   [current loss: 2.2236]
[Epoch: 2]   [loss avg: 16.0000]   [current loss: 1.4301]
[Epoch: 3]   [loss avg: 13.5599]   [current loss: 0.9643]
[Epoch: 4]   [loss avg: 11.6337]   [current loss: 0.7105]
[Epoch: 5]   [loss avg: 10.0389]   [current loss: 0.4395]
[Epoch: 6]   [loss avg: 8.8303]   [current loss: 0.2407]
[Epoch: 7]   [loss avg: 7.8381]   [current loss: 0.1715]
[Epoch: 8]   [loss avg: 7.0392]   [current loss: 0.1103]
[Epoch: 9]   [loss avg: 6.3954]   [current loss: 0.0850]
[Epoch: 10]   [loss avg: 5.8631]   [current loss: 0.0484]
[Epoch: 11]   [loss avg: 5.4049]   [current loss: 0.1184]
[Epoch: 12]   [loss avg: 5.0116]   [current loss: 0.1239]
[Epoch: 13]   [loss avg: 4.6704]   [current loss: 0.0740]
[Epoch: 14]   [loss avg: 4.3656]   [current loss: 0.0205]
[Epoch: 15]   [loss avg: 4.1010]   [current loss: 0.0327]
[Epoch: 16]   [loss avg: 3.8714]   [current loss: 0.0280]
[Epoch: 17]   [loss avg: 3.6668]   [current loss: 0.0512]
[Epoch: 18]   [loss avg: 3.4766]   [current loss: 0.0080]
[Epoch: 19]   [loss avg: 3.3089]   [current loss: 0.0375]
[Epoch: 20]   [loss avg: 3.1551]   [current loss: 0.0063]
[Epoch: 21]   [loss avg: 3.0158]   [current loss: 0.0049]
[Epoch: 22]   [loss avg: 2.8960]   [current loss: 0.0428]
[Epoch: 23]   [loss avg: 2.7826]   [current loss: 0.0779]
[Epoch: 24]   [loss avg: 2.6782]   [current loss: 0.0567]
[Epoch: 25]   [loss avg: 2.5847]   [current loss: 0.0071]
[Epoch: 26]   [loss avg: 2.4922]   [current loss: 0.0516]
[Epoch: 27]   [loss avg: 2.4073]   [current loss: 0.0138]
[Epoch: 28]   [loss avg: 2.3343]   [current loss: 0.0248]
[Epoch: 29]   [loss avg: 2.2654]   [current loss: 0.0944]
[Epoch: 30]   [loss avg: 2.1967]   [current loss: 0.0047]
[Epoch: 31]   [loss avg: 2.1312]   [current loss: 0.0048]
[Epoch: 32]   [loss avg: 2.0680]   [current loss: 0.0246]
[Epoch: 33]   [loss avg: 2.0120]   [current loss: 0.0565]
[Epoch: 34]   [loss avg: 1.9580]   [current loss: 0.0040]
[Epoch: 35]   [loss avg: 1.9072]   [current loss: 0.0296]
[Epoch: 36]   [loss avg: 1.8595]   [current loss: 0.0075]
[Epoch: 37]   [loss avg: 1.8127]   [current loss: 0.0049]
[Epoch: 38]   [loss avg: 1.7683]   [current loss: 0.0023]
[Epoch: 39]   [loss avg: 1.7287]   [current loss: 0.0472]
[Epoch: 40]   [loss avg: 1.6908]   [current loss: 0.0506]
[Epoch: 41]   [loss avg: 1.6527]   [current loss: 0.0130]
[Epoch: 42]   [loss avg: 1.6156]   [current loss: 0.0036]
[Epoch: 43]   [loss avg: 1.5809]   [current loss: 0.0260]
[Epoch: 44]   [loss avg: 1.5468]   [current loss: 0.0052]
[Epoch: 45]   [loss avg: 1.5146]   [current loss: 0.0217]
[Epoch: 46]   [loss avg: 1.4828]   [current loss: 0.0051]
[Epoch: 47]   [loss avg: 1.4529]   [current loss: 0.0176]
[Epoch: 48]   [loss avg: 1.4231]   [current loss: 0.0010]
[Epoch: 49]   [loss avg: 1.3954]   [current loss: 0.0353]
[Epoch: 50]   [loss avg: 1.3698]   [current loss: 0.0009]
[Epoch: 51]   [loss avg: 1.3445]   [current loss: 0.0053]
[Epoch: 52]   [loss avg: 1.3196]   [current loss: 0.0099]
[Epoch: 53]   [loss avg: 1.2956]   [current loss: 0.0164]
[Epoch: 54]   [loss avg: 1.2722]   [current loss: 0.0056]
[Epoch: 55]   [loss avg: 1.2501]   [current loss: 0.0006]
[Epoch: 56]   [loss avg: 1.2284]   [current loss: 0.0044]
[Epoch: 57]   [loss avg: 1.2086]   [current loss: 0.0006]
[Epoch: 58]   [loss avg: 1.1886]   [current loss: 0.0010]
[Epoch: 59]   [loss avg: 1.1705]   [current loss: 0.0097]
[Epoch: 60]   [loss avg: 1.1521]   [current loss: 0.0008]
[Epoch: 61]   [loss avg: 1.1344]   [current loss: 0.0001]
[Epoch: 62]   [loss avg: 1.1172]   [current loss: 0.0056]
[Epoch: 63]   [loss avg: 1.1016]   [current loss: 0.0064]
[Epoch: 64]   [loss avg: 1.0868]   [current loss: 0.0178]
[Epoch: 65]   [loss avg: 1.0741]   [current loss: 0.0257]
[Epoch: 66]   [loss avg: 1.0674]   [current loss: 0.0535]
[Epoch: 67]   [loss avg: 1.0555]   [current loss: 0.0115]
[Epoch: 68]   [loss avg: 1.0449]   [current loss: 0.0736]
[Epoch: 69]   [loss avg: 1.0371]   [current loss: 0.1449]
[Epoch: 70]   [loss avg: 1.0269]   [current loss: 0.0515]
[Epoch: 71]   [loss avg: 1.0193]   [current loss: 0.0283]
[Epoch: 72]   [loss avg: 1.0093]   [current loss: 0.0576]
[Epoch: 73]   [loss avg: 0.9980]   [current loss: 0.0195]
[Epoch: 74]   [loss avg: 0.9864]   [current loss: 0.0095]
[Epoch: 75]   [loss avg: 0.9746]   [current loss: 0.0385]
[Epoch: 76]   [loss avg: 0.9645]   [current loss: 0.0139]
[Epoch: 77]   [loss avg: 0.9550]   [current loss: 0.1231]
[Epoch: 78]   [loss avg: 0.9449]   [current loss: 0.0402]
[Epoch: 79]   [loss avg: 0.9345]   [current loss: 0.0021]
[Epoch: 80]   [loss avg: 0.9244]   [current loss: 0.0119]
[Epoch: 81]   [loss avg: 0.9168]   [current loss: 0.0020]
[Epoch: 82]   [loss avg: 0.9088]   [current loss: 0.0023]
[Epoch: 83]   [loss avg: 0.9006]   [current loss: 0.0344]
[Epoch: 84]   [loss avg: 0.8927]   [current loss: 0.0765]
[Epoch: 85]   [loss avg: 0.8828]   [current loss: 0.0108]
[Epoch: 86]   [loss avg: 0.8736]   [current loss: 0.0029]
[Epoch: 87]   [loss avg: 0.8647]   [current loss: 0.0084]
[Epoch: 88]   [loss avg: 0.8561]   [current loss: 0.0017]
[Epoch: 89]   [loss avg: 0.8484]   [current loss: 0.0444]
[Epoch: 90]   [loss avg: 0.8408]   [current loss: 0.0044]
[Epoch: 91]   [loss avg: 0.8327]   [current loss: 0.0009]
[Epoch: 92]   [loss avg: 0.8249]   [current loss: 0.0085]
[Epoch: 93]   [loss avg: 0.8175]   [current loss: 0.0292]
[Epoch: 94]   [loss avg: 0.8094]   [current loss: 0.0105]
[Epoch: 95]   [loss avg: 0.8018]   [current loss: 0.0015]
[Epoch: 96]   [loss avg: 0.7946]   [current loss: 0.0396]
[Epoch: 97]   [loss avg: 0.7880]   [current loss: 0.0086]
[Epoch: 98]   [loss avg: 0.7815]   [current loss: 0.0079]
[Epoch: 99]   [loss avg: 0.7744]   [current loss: 0.0035]
[Epoch: 100]   [loss avg: 0.7674]   [current loss: 0.0001]
Finished Training
模型测试
count = 0
# 模型测试
for inputs, _ in test_loader:
    inputs = inputs.to(device)
    outputs = net(inputs)
    outputs = np.argmax(outputs.detach().cpu().numpy(), axis=1)
    if count == 0:
        y_pred_test =  outputs
        count = 1
    else:
        y_pred_test = np.concatenate( (y_pred_test, outputs) )

# 生成分类报告
classification = classification_report(ytest, y_pred_test, digits=4)
print(classification)
# 第一次分类结果
              precision    recall  f1-score   support

         0.0     0.9070    0.9512    0.9286        41
         1.0     0.9892    0.9300    0.9587      1285
         2.0     0.9552    0.9987    0.9764       747
         3.0     0.9810    0.9718    0.9764       213
         4.0     0.9954    0.9931    0.9942       435
         5.0     0.9703    0.9939    0.9820       657
         6.0     0.9615    1.0000    0.9804        25
         7.0     0.9977    1.0000    0.9988       430
         8.0     0.9412    0.8889    0.9143        18
         9.0     0.9742    0.9909    0.9824       875
        10.0     0.9694    0.9878    0.9785      2210
        11.0     0.9660    0.9588    0.9624       534
        12.0     0.9714    0.9189    0.9444       185
        13.0     0.9973    0.9895    0.9934      1139
        14.0     0.9913    0.9885    0.9899       347
        15.0     0.9359    0.8690    0.9012        84

    accuracy                         0.9776      9225
   macro avg     0.9690    0.9644    0.9664      9225
weighted avg     0.9778    0.9776    0.9774      9225

# 第二次分类结果
              precision    recall  f1-score   support

         0.0     0.9524    0.9756    0.9639        41
         1.0     0.9876    0.9331    0.9596      1285
         2.0     0.9562    0.9933    0.9744       747
         3.0     0.9589    0.9859    0.9722       213
         4.0     0.9795    0.9908    0.9851       435
         5.0     0.9746    0.9939    0.9842       657
         6.0     0.8276    0.9600    0.8889        25
         7.0     0.9977    0.9977    0.9977       430
         8.0     0.8889    0.8889    0.8889        18
         9.0     0.9729    0.9863    0.9796       875
        10.0     0.9711    0.9878    0.9794      2210
        11.0     0.9551    0.9551    0.9551       534
        12.0     0.9817    0.8703    0.9226       185
        13.0     0.9956    0.9921    0.9938      1139
        14.0     0.9856    0.9885    0.9871       347
        15.0     0.9155    0.7738    0.8387        84

    accuracy                         0.9755      9225
   macro avg     0.9563    0.9546    0.9544      9225
weighted avg     0.9757    0.9755    0.9753      9225
问题思考
3D卷积和2D卷积的区别?
2D卷积的卷积核大小为 ( c , h , w ) (c, h, w) (c,h,w),能从二维的数据中提取良好的区分特征,但无法从三维的数据中提取良好的区分特征。
3D卷积的卷积核大小为 ( c , d , h , w ) (c,d,h,w) (c,d,h,w), d d d就是多出来的第三维,根据具体应用,在视频中就是时间维,在HSI中就是层数维。3D卷积能从三维的数据中提取良好的区分特征,但计算更加复杂。
每次分类的结果都不一样?
没有使用model.eval()将模型设置为测试模式。
在train模式下,dropout网络层会按照设定的参数p设置保留激活单元的概率(保留概率=p);batchnorm层会继续计算数据的mean和var等参数并更新。
在eval模式下,dropout层会让所有的激活单元都通过,而batchnorm层会停止计算和更新mean和var,直接使用在训练阶段已经学出的mean和var值。
实测在正确设置模式后分类的结果不再发生改变。
如何改进高光谱图像的分类性能?
引入注意力机制和残差结构,加深网络深度。