ǰ��
���Ķ���Jetson Xavier NX�ϲ���YOLOv5-5.0�Ĺ��̽���ȫ���������ܽᡣ
NX����
�ڴ�֮ǰ,����Ҫ�˽�һ��Jetson Xavier NX(���¼��NX)��NX��NVIDIA2020�귢����һ��Ӧ���ڱ�ԵAI�ij��������,NANO ��Ĵ�С,ȴ������ 10 W�����¿��ṩ 14 TOPS,���� 15 W�����¿��ṩ 21 TOPS,�dz��ʺ��ڴ�С���ʷ�������ϵͳ��ƾ�� 384 �� CUDA ���ġ�48 �� Tensor Core �� 2 �� NVDLA ����,�����Բ������ж���ִ�������,��ͬʱ�������Զ���������ĸ߷ֱ������ݡ����� NX,���ǿ���ʹ�������� NVIDIA ������ջ,ͨ�����ٿ��������ִ� AI ����Ϳ��,�Ӷ�ʵ�����ѧϰ�Լ�������Ӿ��������ͼ�Ρ���ý��ȡ�
��ôNX��ʲô����?û��,�ͳ�������ģ��:
 ͼ1 Jetson Xavier NX ͼ1 Jetson Xavier NX
|
 ͼ2 Jetson Xavier NX�������� ͼ2 Jetson Xavier NX��������
|
����ͼ1�ǹٷ�ԭװNX,һ��ֻ��sodimm�ӿڵİ���,û�з���,USB�����ڵȽӿ�,ͼ2Ϊ��������,�ṩ��������ӿڡ�NX�����Ӳ��ģ��������ʾ:
 ͼ3 NX����ģ����� ͼ3 NX����ģ�����
|
 ͼ4 NX����ģ����� ͼ4 NX����ģ�����
|
�汾����(SD | eMMC)
ĿǰNX�������汾:SD���۵İ汾,�ʹ�eMMC�洢оƬ�İ汾:
- ��SD���۵İ汾����ʹ��microSD����¼ϵͳ��ֱ�Ӳ���ʹ��,Ҳ֧��ͨ�������SDKManager����ˢ��ϵͳʹ��
- ��eMMC�洢оƬ�İ汾,����Ϊ16G,��֧��microSD����¼ϵͳ��ʽ,֧�������SDKManager����ˢ��ϵͳʹ��
�����汾���˴��ʽ��ͬ,����������ͬ,��¼��ϵͳ��ʹ�ò��첻��
������
NX�Ĺ�����������ʾ:

�ؼ�����:
- NX��arm64�ܹ���,��x86�и����Բ�ͬ,���ºܶණ����������,�����ڲ����ʱ��������ʵ�������
- 4��USB�ӿ�(����~)
- ����ͷ֧��CSI-2�ӿ�,��Ҳ������USB����ͷ(��������ʵ��)
?
Jetpack4.6.1�����
���ڿ���!!������װ��:
- ��USB�ӿڵļ���
- ��USB�ӿڵ����
- 1��ĸ��ĸ�Ű���
- ��������NX�ϵ�FC REC��GND����,ʹNX����ָ�ģʽ
- USB-a��USB-b������
- ��������NX���Լ��ĵ���
- ��HDMI�ӿڵ���ʾ��
- ��Դ��
��¼ϵͳ(OS)
���²��������Լ��ĵ�����,������Ҫ��Linuxϵͳ,������˫ϵͳ,Ҳ�����������,�����DZ��Ļ���:
- Jetson Xavier NX(developer kit version)
- VMware 16
- Ubuntu18.04
- Jetpack4.6.1
1��SDKmanager��װ
ֱ�����������:SDKmanager,�������,���Ƚ���ע��(����+���뼴��),֮������.deb��ʽ�ļ�,���Զ����ص�Downloads�ļ�����:

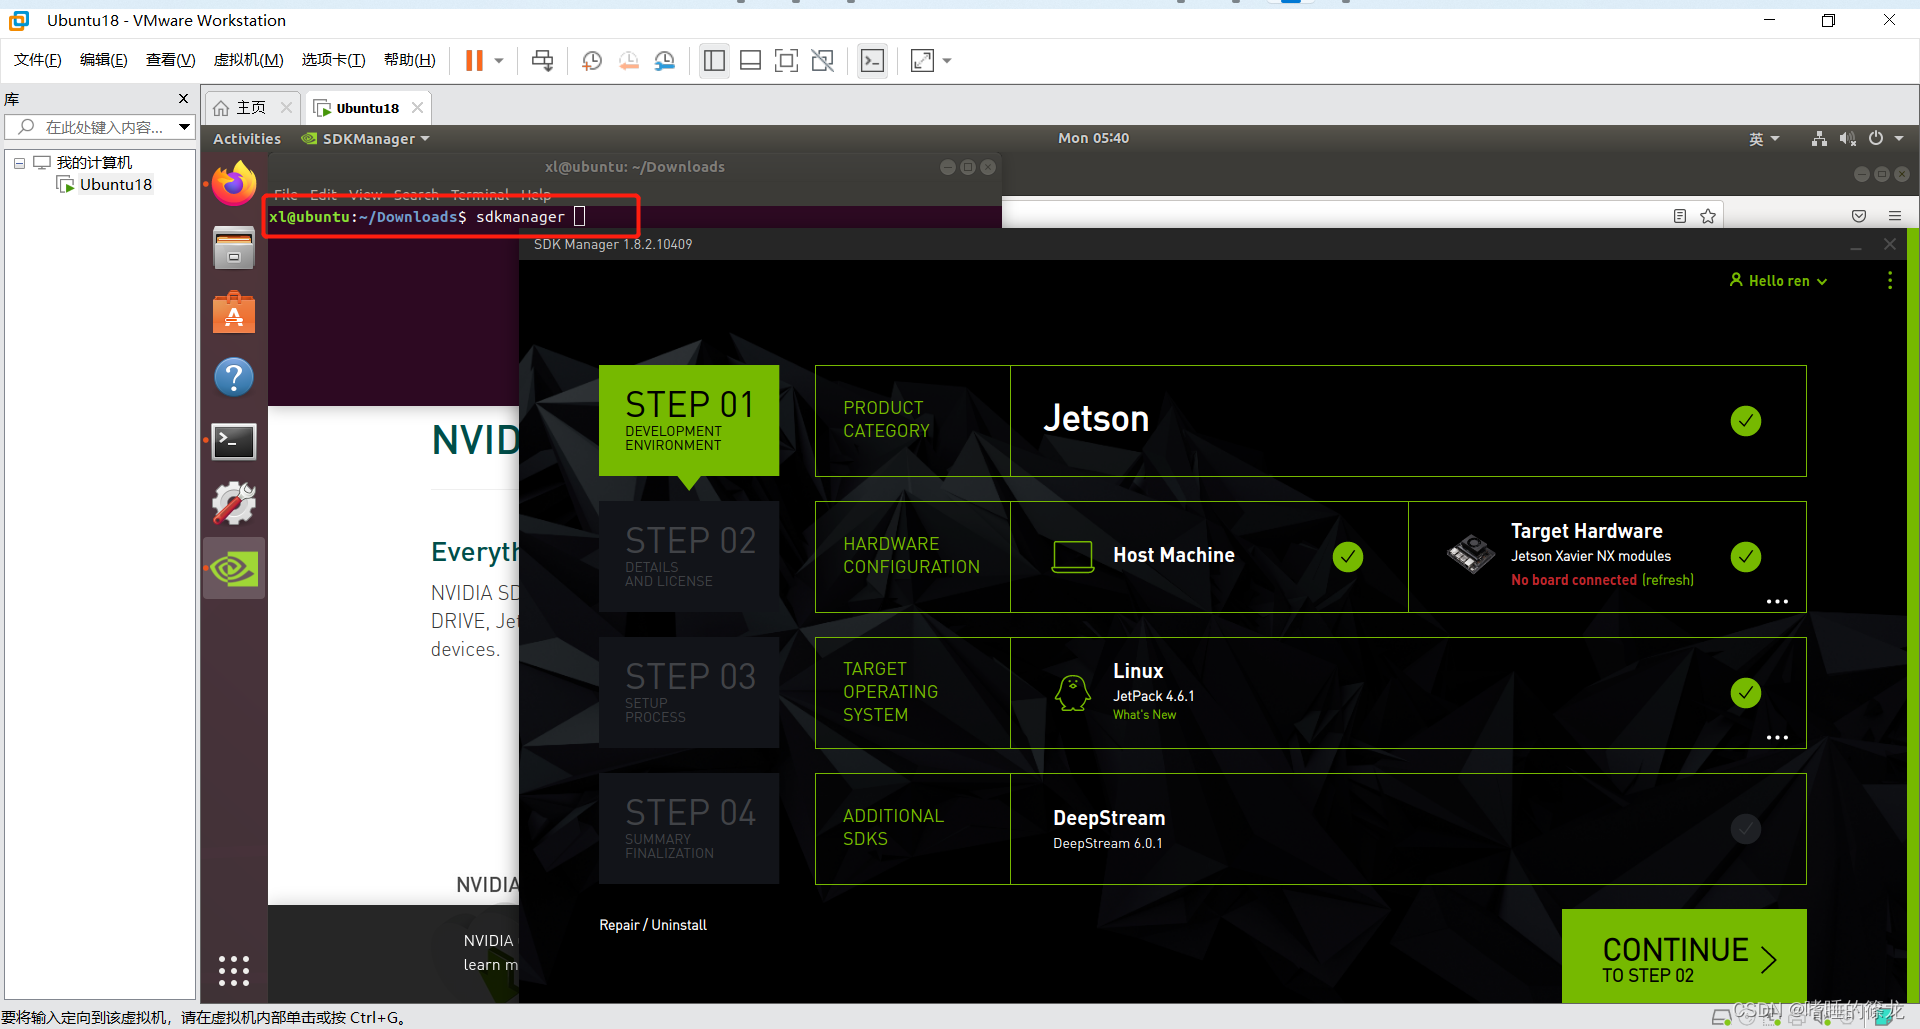
���Ŵ�Terminal,cd��Downloads,ls�鿴�Ƿ�������,���sudo apt install ./sdkmanager_1.8.3-10409_amd64.deb���а�װ:
xl@ubuntu:~$ cd Downloads/
xl@ubuntu:~/Downloads$ ls
nvidia  sdkmanager_1.8.3-10409_amd64.deb
xl@ubuntu:~/Downloads$ sudo apt install ./sdkmanager_1.8.3-10409_amd64.deb
֮����Terminal������sdkmanager����,��Ӧ�ô���(��һ�δ����login in����,���ǵ�¼֮ǰע��NVIDIA�˺ź�����):
2������NX���Լ�����
���ڿ�ʼ�������ǵ�װ��,������ͼ��ʾ��������:
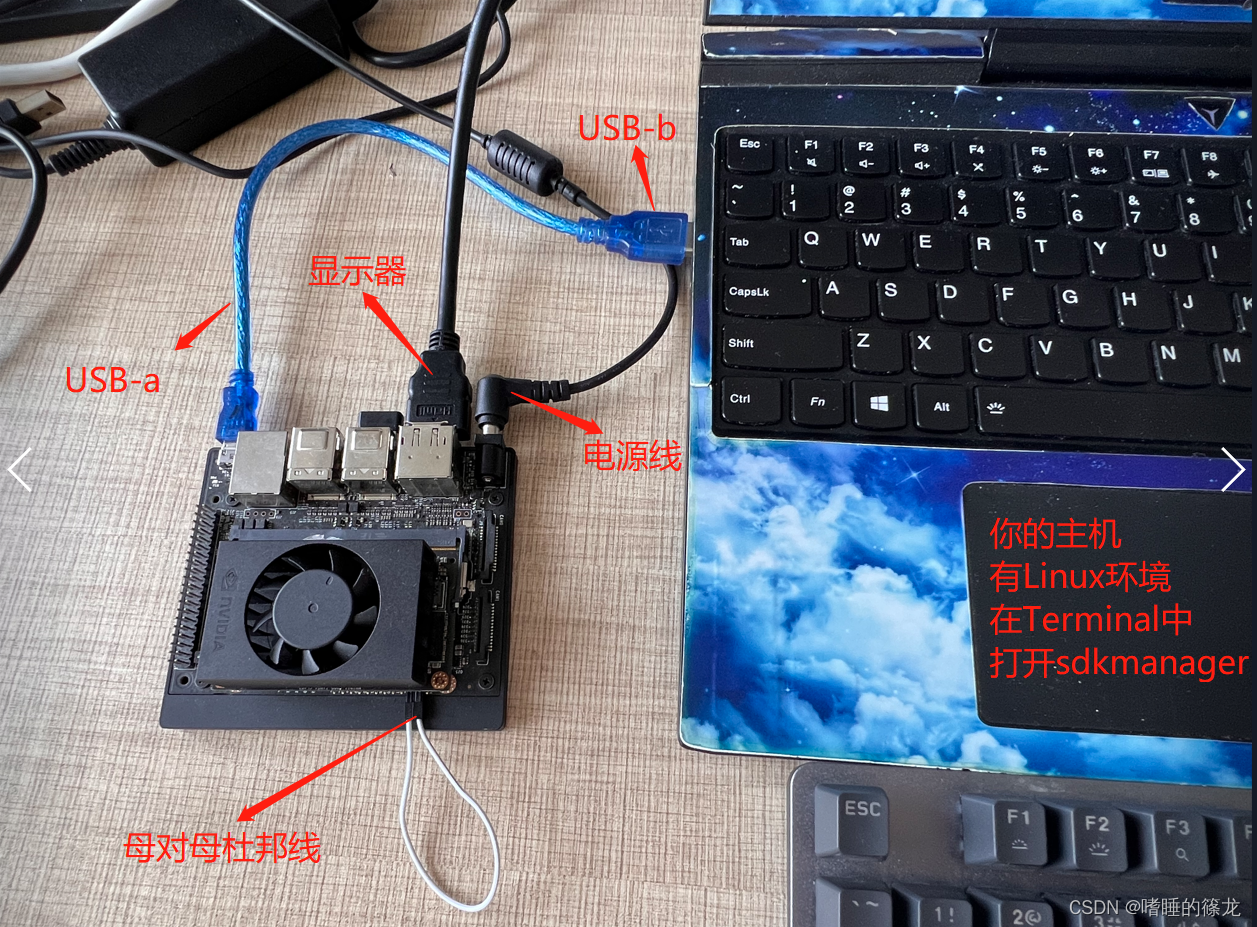
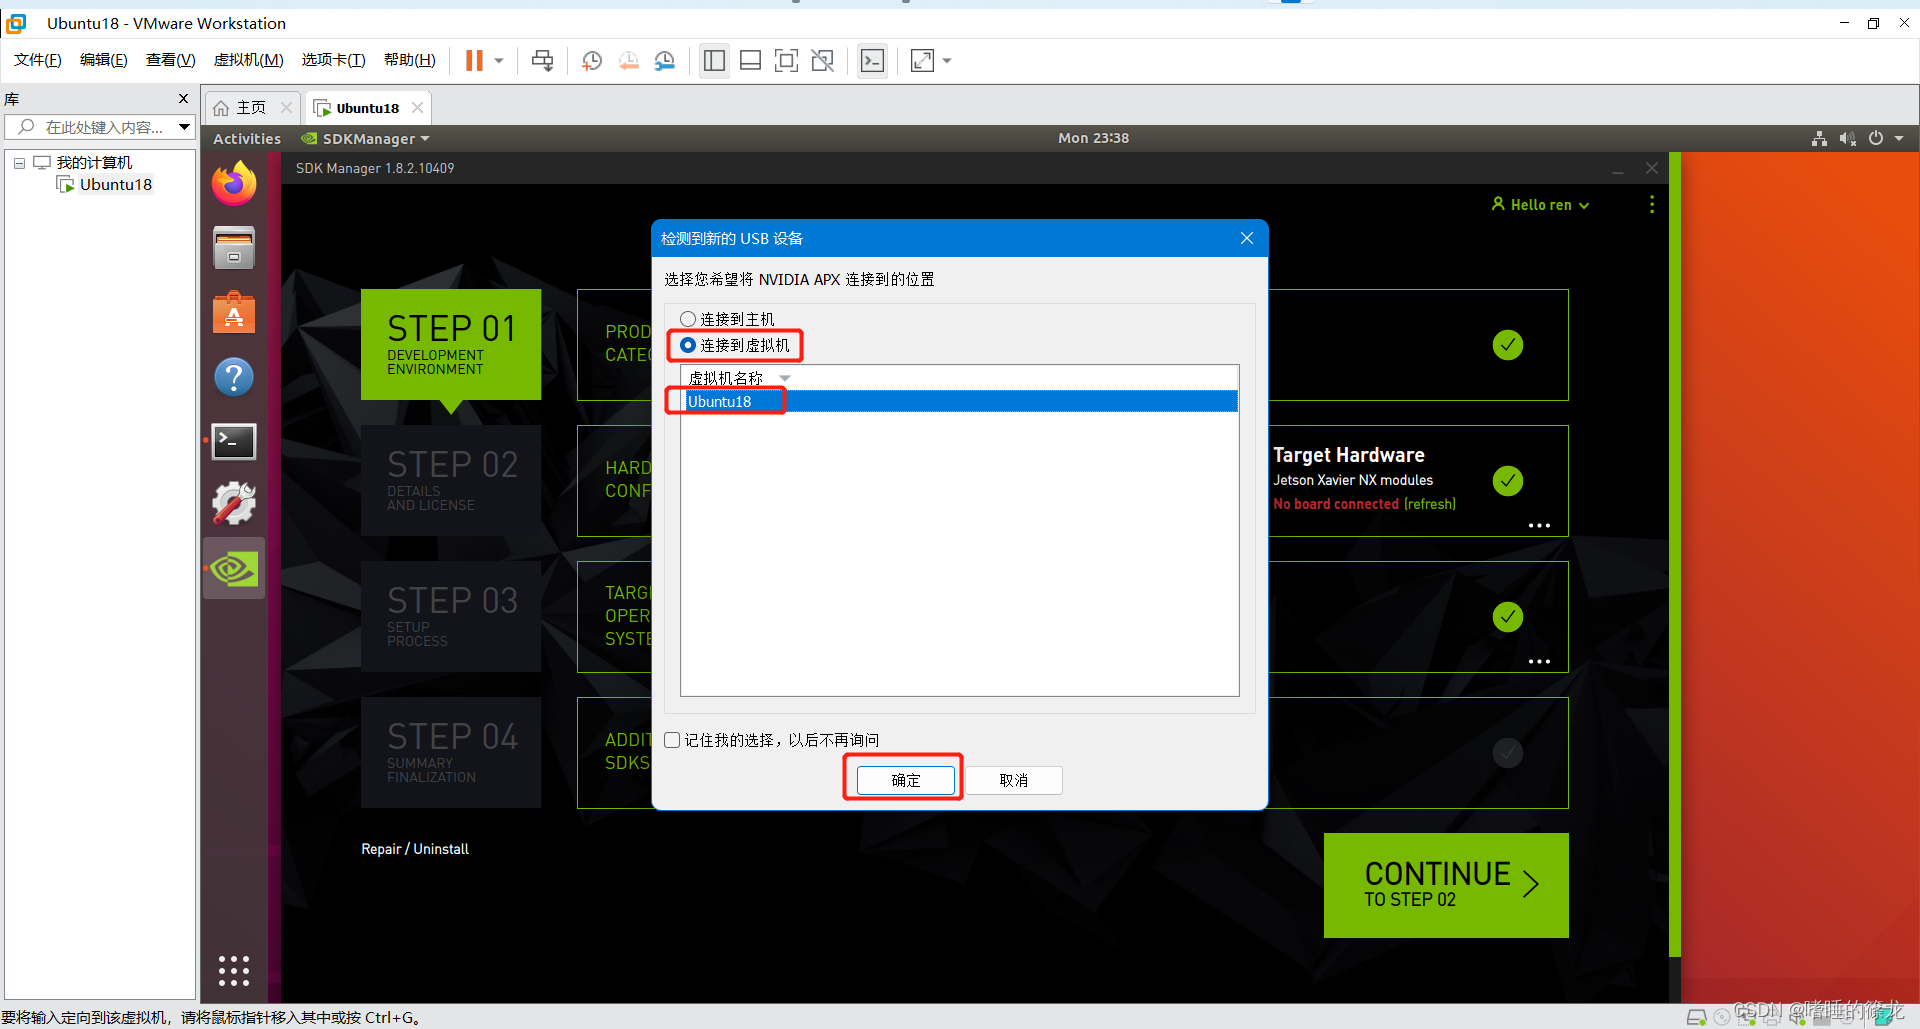
����˳��û��ǿ��Ҫ��,�����������USB-b(���������),���Ӻú���Ի��Զ������ʾ������Ϣ,����ѡ�����ӵ�������е�Ubuntu18ϵͳ,ȷ������
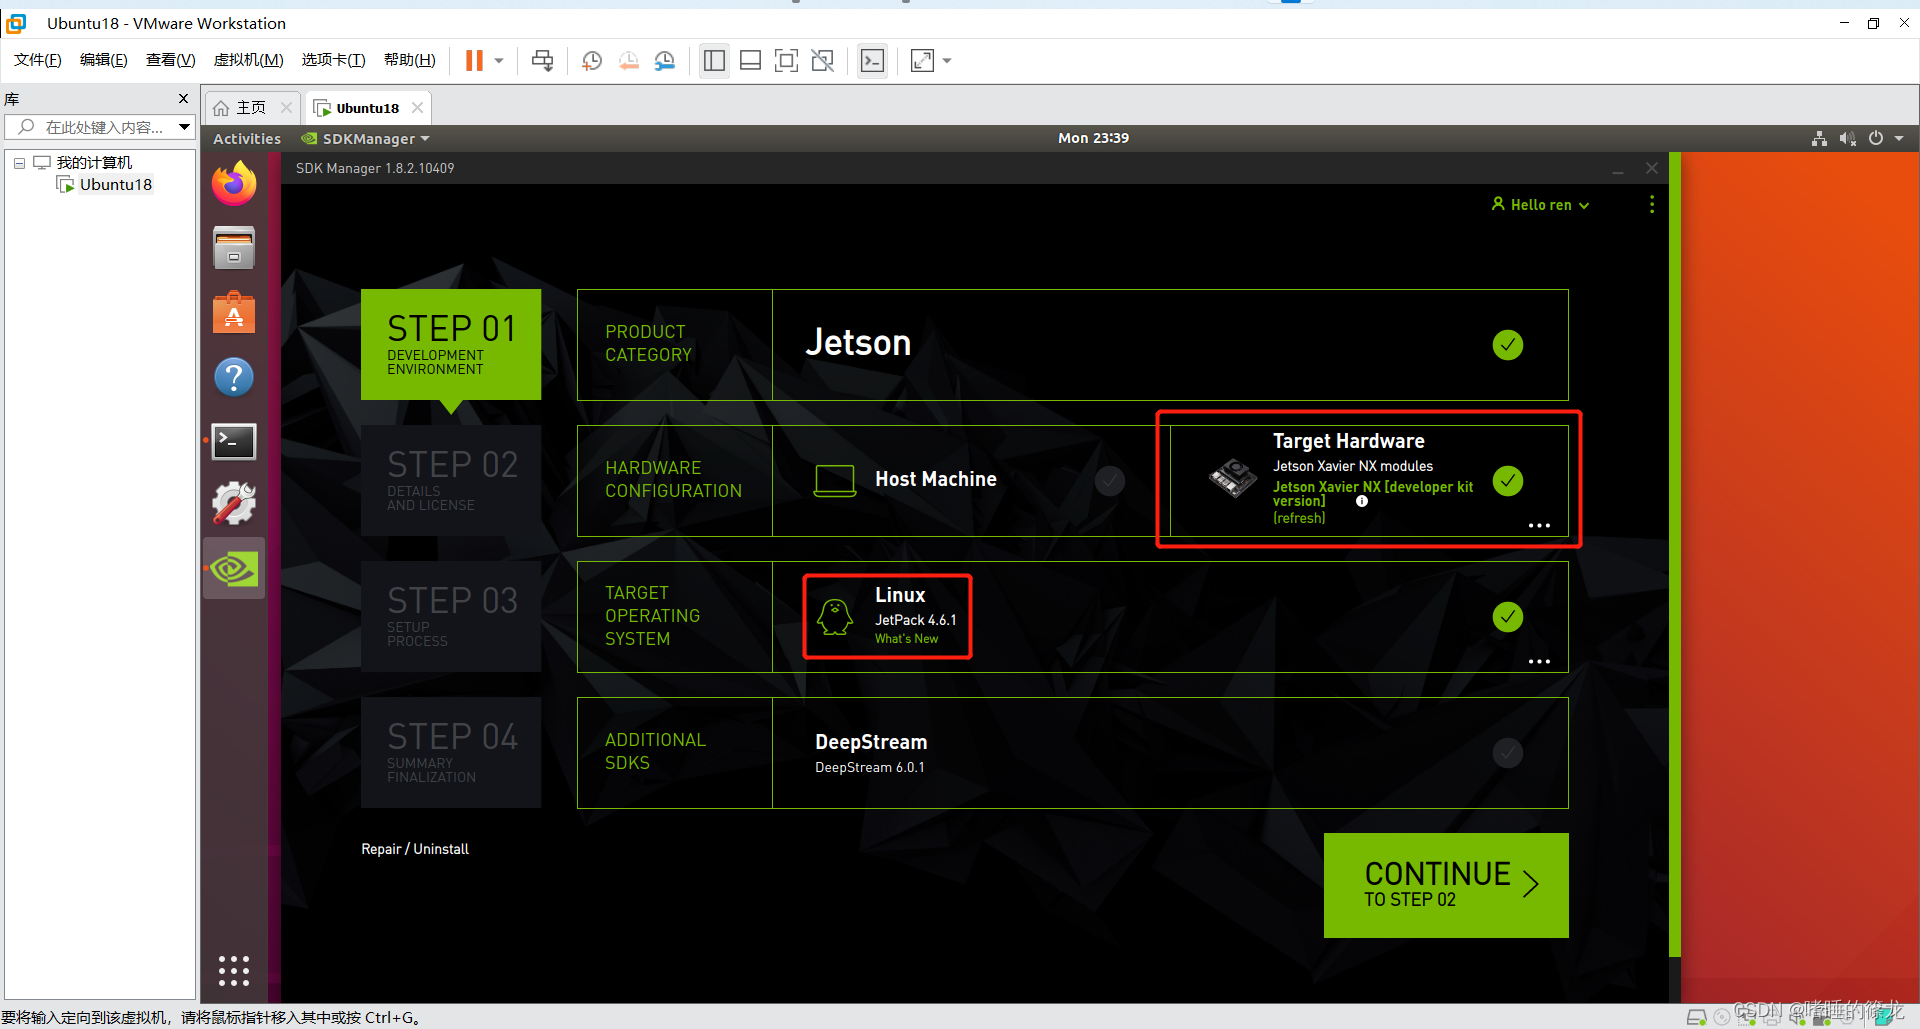
֮��������ͻ��Զ���ʾNX�汾��Ϣ,����ѡ��ڶ����������汾,OK����

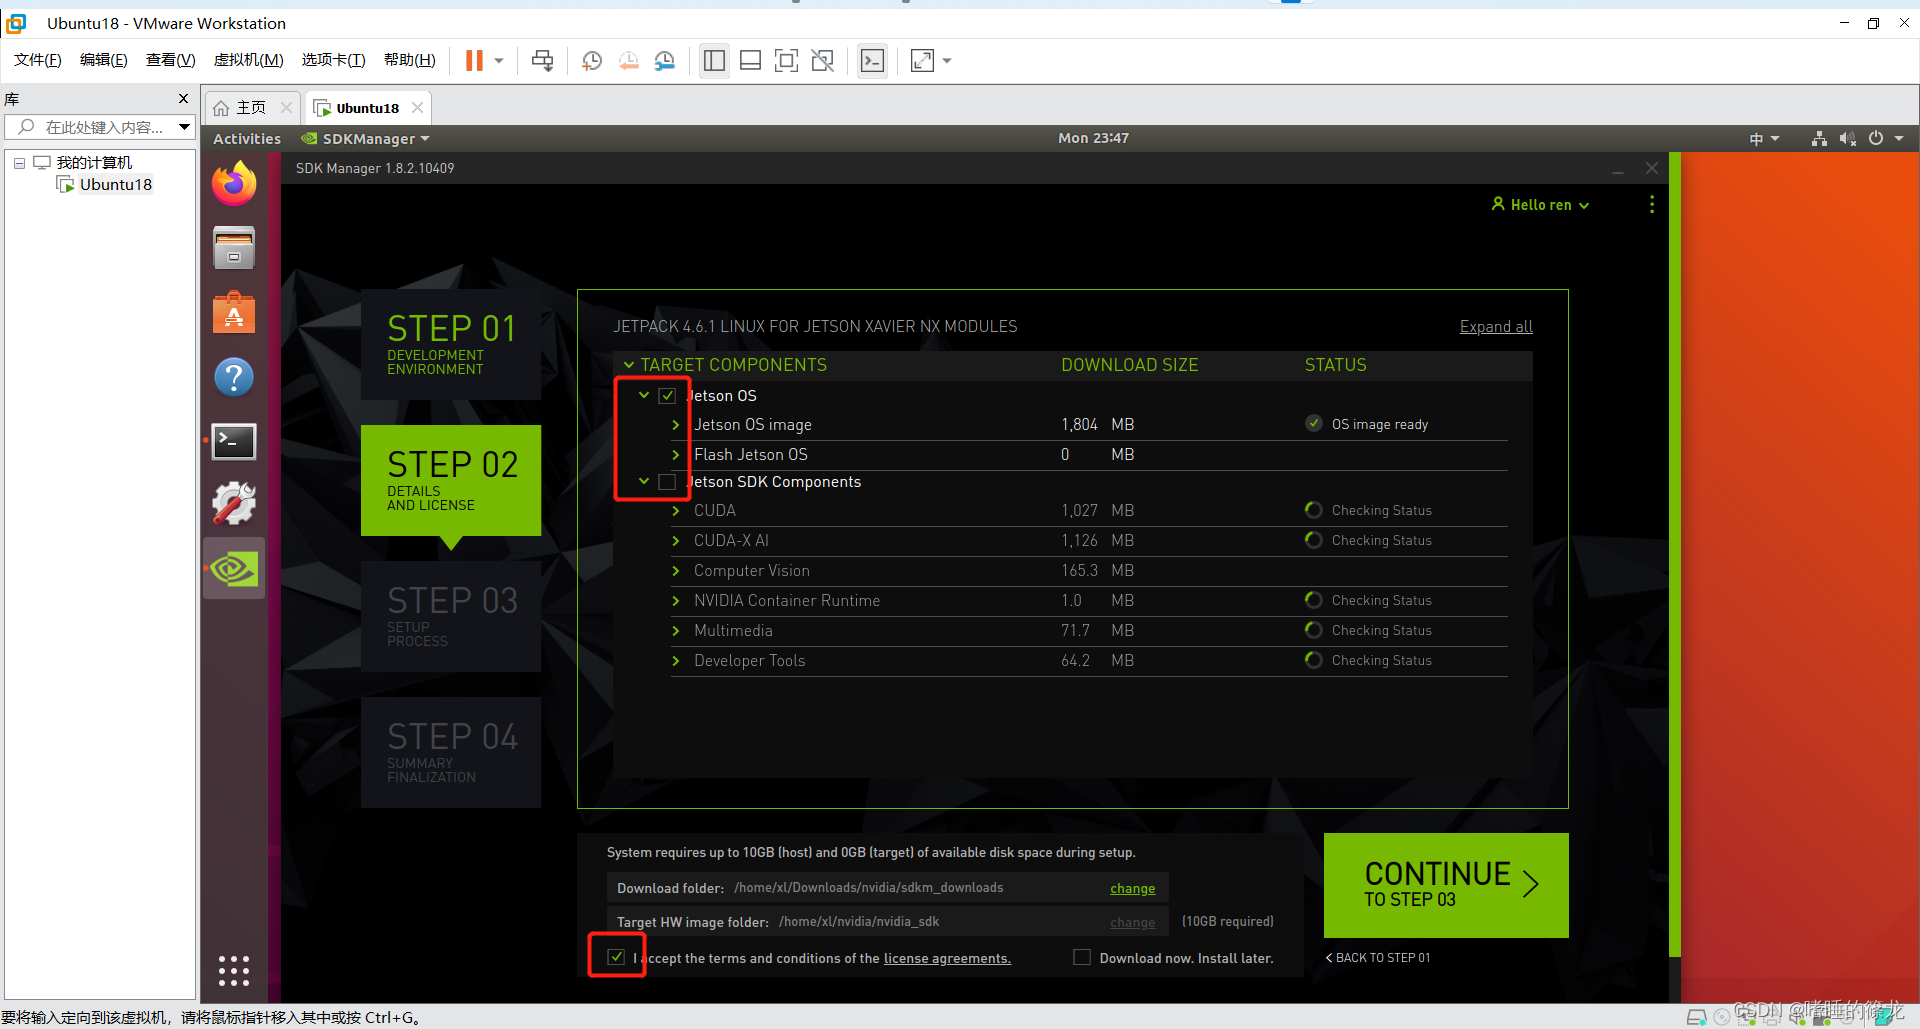
3��STEP01
֮�����ʽ��ʼʹ��SDKManager��¼ϵͳ��~~!!ѡ������:
- ȡ��ѡ��
Host Machine - ѡ��
Jetpack 4.6.1 - ȡ��ѡ��
DeepStream
���CONTINUE
4��STEP02
����ֻѡ����¼OSϵͳ,ȡ��ѡ����¼SDK���(����ֻ�п�����16G,�Ⱥ���װ��SSD��̬Ӳ����װҲ����!!)
���½���ѡ�����ؿռ�,SDKManager�Ὣ����ļ����ص��������֮��,��ת�Ƶ�NX��ȥ��������Ǵ������ļ��ĵط�,ѡ��������·��֮��,������½ǵ��ҽ���,���CONTINUE
5��STEP03
֮��Ϳ�ʼ���غͰ�װ��(��������������,��һ������������ļ���������Ľ���,�ڶ����ǰ�װ����ļ���NX�ϵĽ���),Ҫע��,��Installing���е�50%��ʱ��,�ᵯ�������ǽ���һЩ����:
- ����ǵ�һ����¼,�������Զ�ģʽ(Automatic),���ᴴ��һ����ʱ�ľ���������,��ַΪ192.168.55.1,Ȼ�������µ��û���������
- ������ǵ�һ��,��ѡ���ֶ�ģʽ(Manual),��Ҫ�Լ���ȥ�����ϲ�ѯ��ǰ��IP��ַ
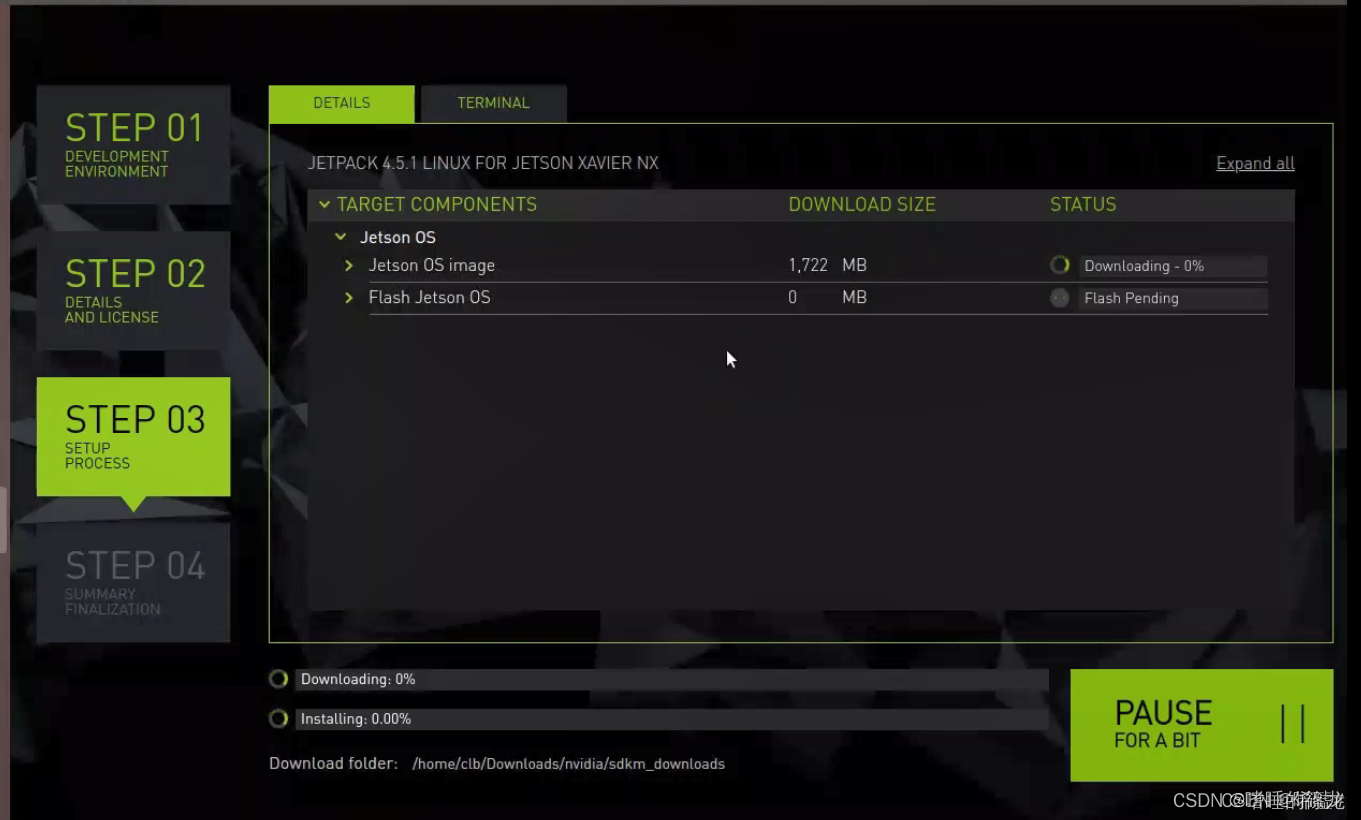
���0.5%���쳣����,�ɹ�֮��,���FINISH�˳�����
6��STEP04
��ϲ��!!����һ������¼�ɹ���!!!
?
SSD����
��¼���֮��,�ε��Ű���,USB-ab��,�����ӽ������,����,��ʾ��,Ȼ��!!
NXʹ��SSD�Ķ�ȡ�ٶ���SD����7��,��˴�SSD�����������NX��������,�����������NX������,���ֶ���Ϊ��~~
SSD����
����,����Ҫ��һ��SSD,Ȼ������嵽NX��:

Ȼ��,��NX��ͨ��Դ,��¼�˺�,����disk,��Disks
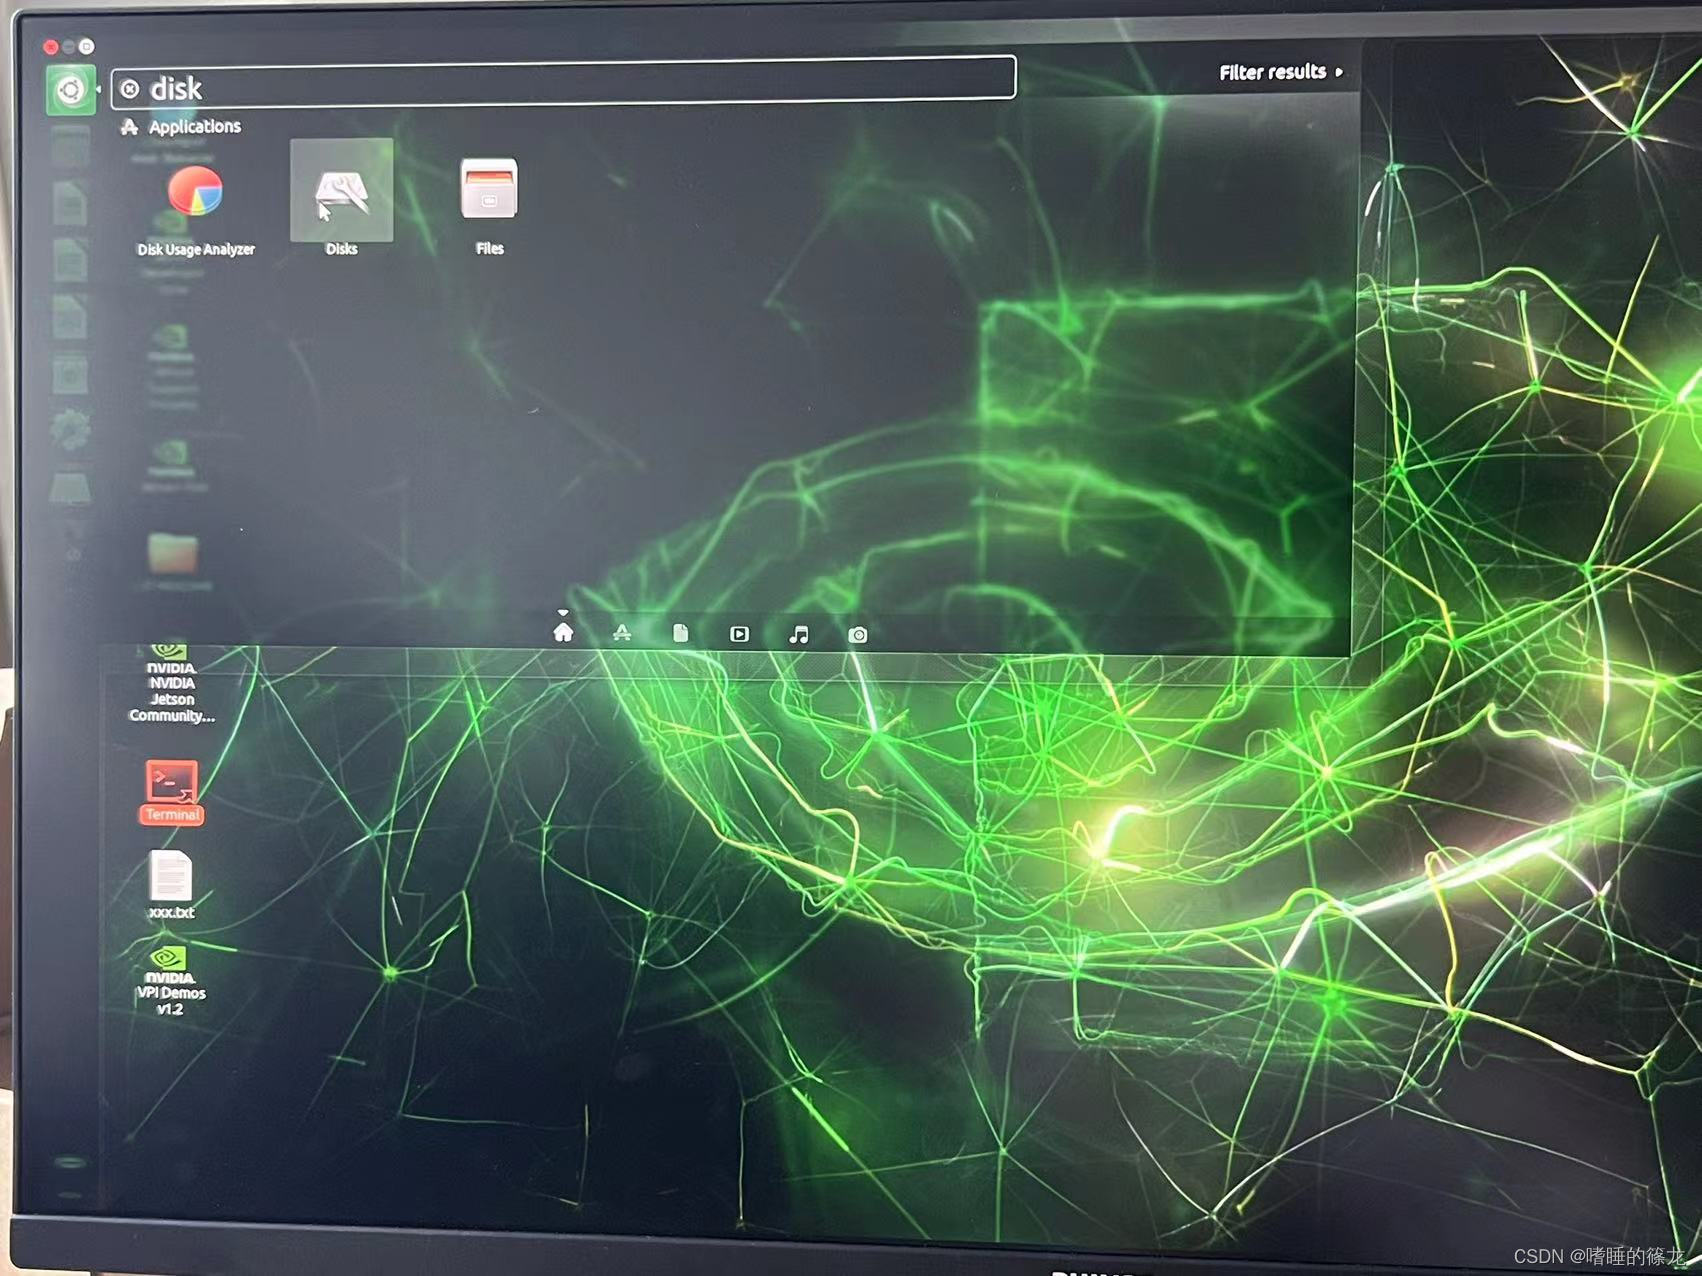
���Կ���NX�Ѿ���ʾSSD��Ϣ��,������Ͻ�ѡ��Format Disk,���и�ʽ��
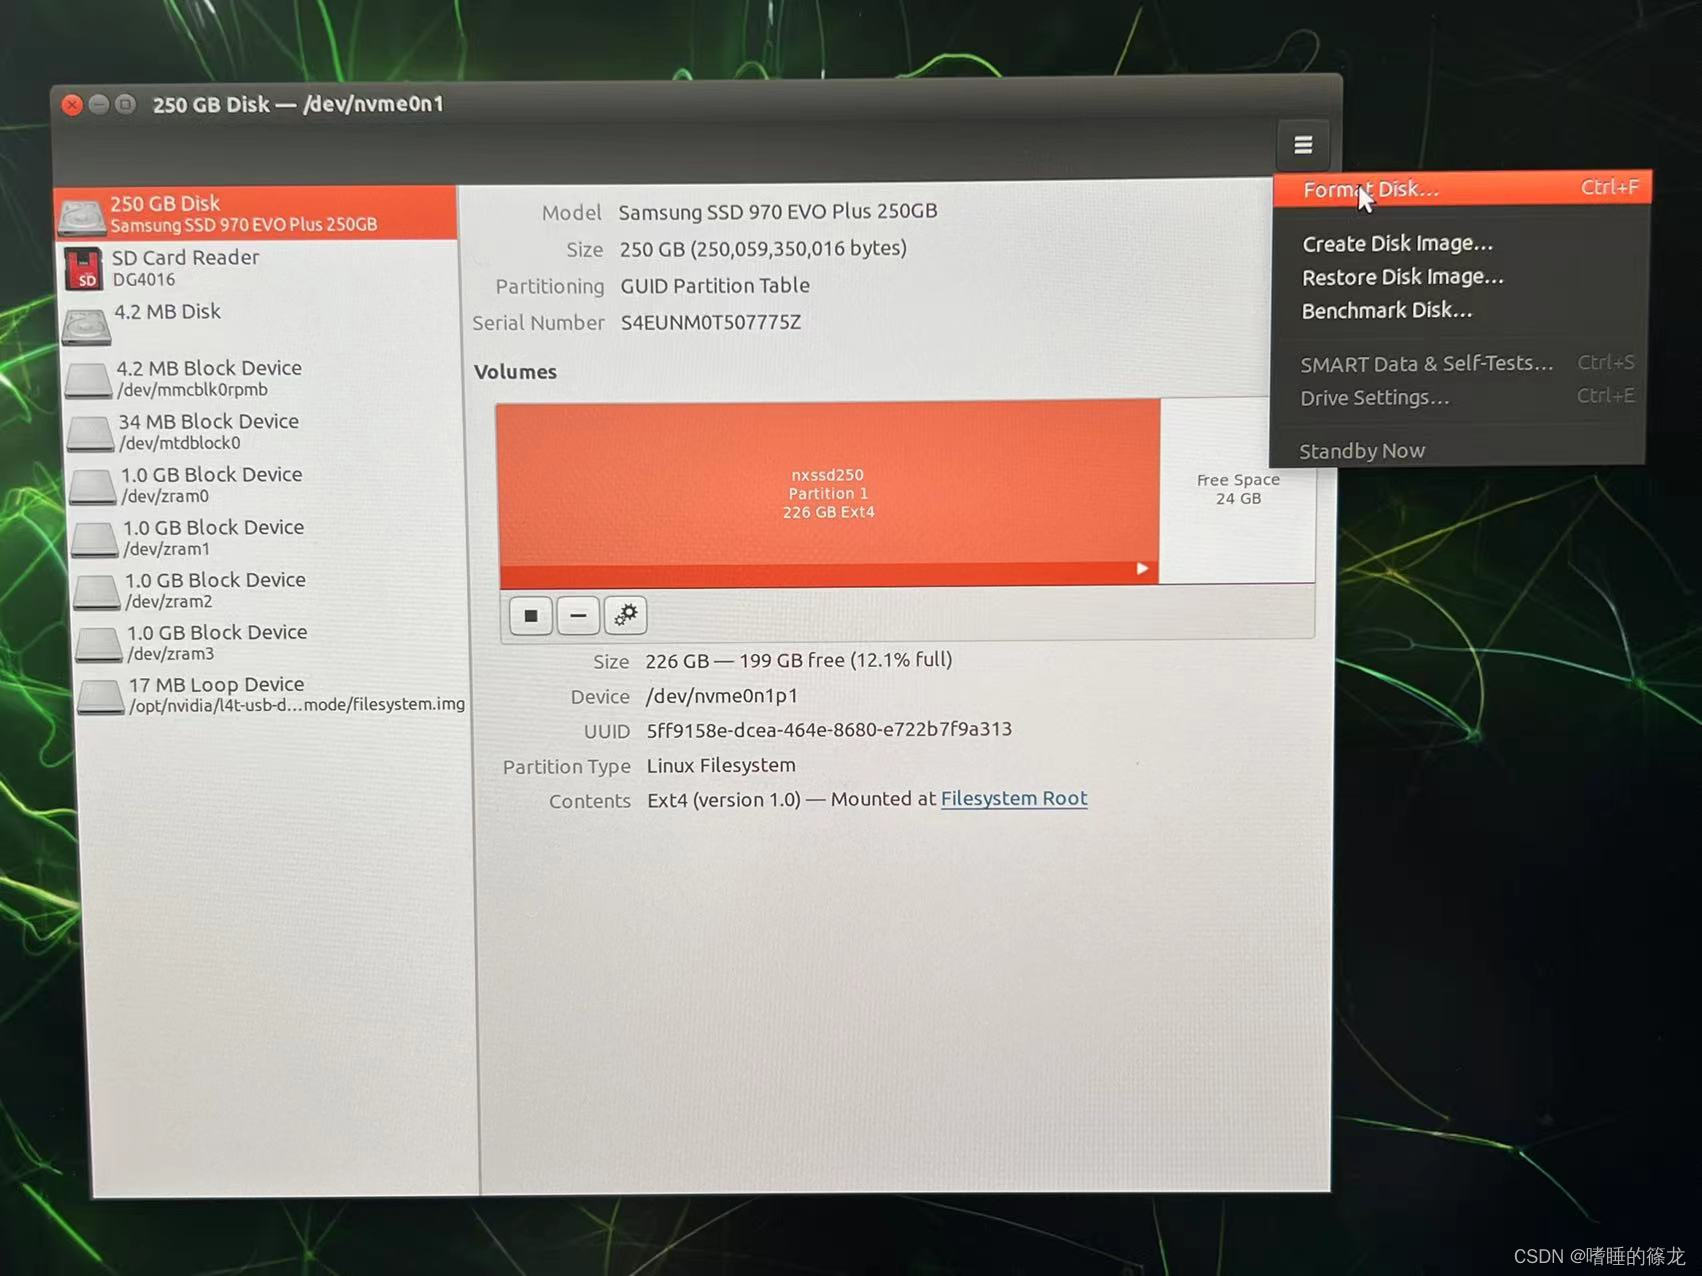
���Format
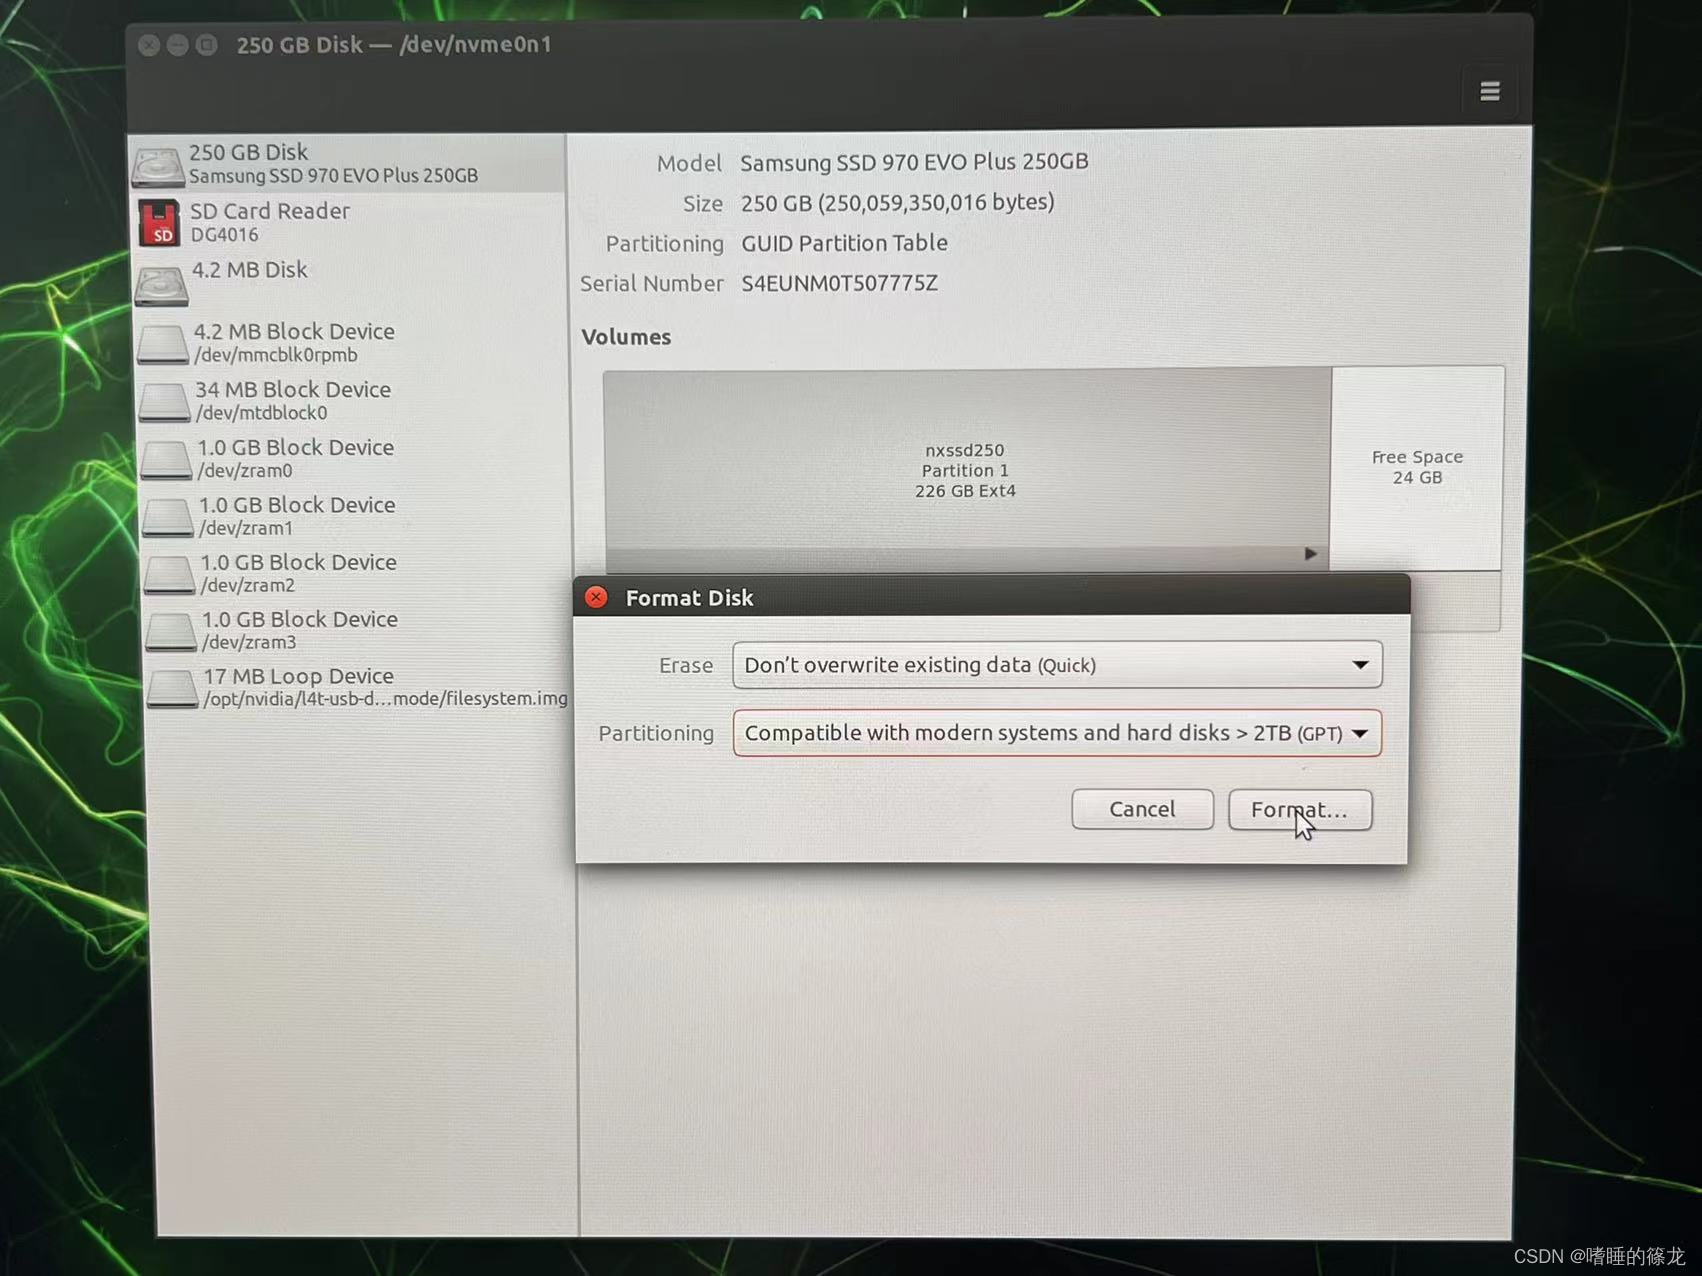
����֮����Կ���SSDȫ�������Free Space��

���ŵ���Ӻ�+,���пռ����,���Ը�Free Space16G,ʣ��ȫ�����ǵ�NX,���Next

���µľ�����,Ȼ��Create

�����ɹ�!!!

����������
������Ҫ���а�װ,ֱ������NX��Դ�Ľű�����:
- ����rootOnNVMe��Ŀ
- ����Դ�ļ����Ƶ��Լ���SSD
- ���ô� SSD ��������
- ������ʹ������Ч
git clone https://github.com/jetsonhacks/rootOnNVMe.git
cd rootOnNVMe
./copy-rootfs-ssd.sh
./setup-service.sh
sudo reboot
?
���ѧϰ�����
����,���ǵ�NX�����������SSD�����Ѿ���ɡ�����,�������ѧϰ��ػ�����װ,�Ա������ǿ��ֵ�ʹ��NX~~hhhh
��������/��������Ϣ
���ֱ�Ӵ�SDKManager����¼cuda,cudnn�����,��������±���:
Cannot contact to the device via SSH, validate that SSH service is running on the device
�����ʽ:��NX�����������(�Ϻ�)�����ԡ����̵���Ϣ��,�������
��¼SDK���
����¼OSϵͳ����,��ͬ����,���ﲻ�ò�Ű���Ŷ!!Jetpack4.6.1��������汾��Ϣ����:
- CUDA:10.2.300
- cuDNN:8.2.1.32
- TensorRT:8.2.1.8
- OpenCV:4.11
���Ӻý��ߺ�,��SDKManager,��STEP02��,ֻѡ��ڶ���Jetpack SDK Components,���CONTINUE

֮������������������������,Ȼ���鰲װ�����Ƿ���ȷ,֮�����ʽ��ʼ���غͰ�װ��,�����������,������������NX���˺�����,������ǵ��Install����

���廪Դ(��ѡ)
- ���±༭
source.list�ļ�
sudo vim /etc/apt/sources.list
- �����廪Դ
deb http://mirrors.tuna.tsinghua.edu.cn/ubuntu-ports/ bionic-updates main restricted universe multiverse
deb-src http://mirrors.tuna.tsinghua.edu.cn/ubuntu-ports/ bionic-updates main restricted universe multiverse
deb http://mirrors.tuna.tsinghua.edu.cn/ubuntu-ports/ bionic-security main restricted universe multiverse
deb-src http://mirrors.tuna.tsinghua.edu.cn/ubuntu-ports/ bionic-security main restricted universe multiverse
deb http://mirrors.tuna.tsinghua.edu.cn/ubuntu-ports/ bionic-backports main restricted universe multiverse
deb-src http://mirrors.tuna.tsinghua.edu.cn/ubuntu-ports/ bionic-backports main restricted universe multiverse
deb http://mirrors.tuna.tsinghua.edu.cn/ubuntu-ports/ bionic main universe restricted
deb-src http://mirrors.tuna.tsinghua.edu.cn/ubuntu-ports/ bionic main universe restricted
- ����Դ
sudo apt-get update
?
YOLOv5-5.0
����,����Ҫ��NX�ϰ�װYOLOv5-5.0�㷨��,���Ȱ�װAnaconda,���������,֮���¡YOLOv5-5.0�ֿNX,��װ����Ҫ�İ�,�������yolov5.pt������������
�����
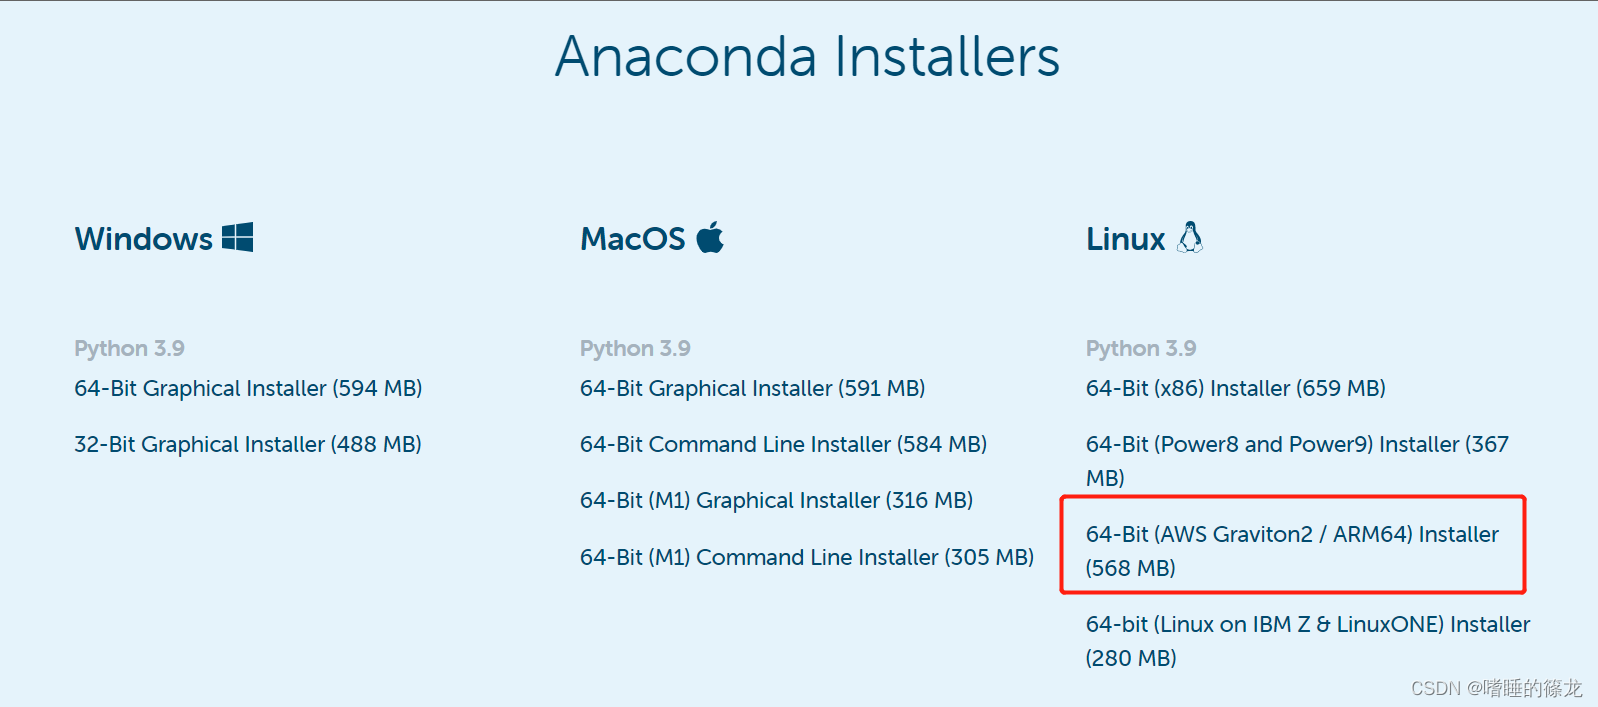
��NX��Chromium�������,ֱ������Anaconda,��������������,ע��Ҫ����ARM64�汾��,Ĭ�����ص�Downloads�ļ�����
Ҳ����ֱ��ʹ��wget����,��Terminal�н�������,ִ��bash������а�װ:
wget https://repo.anaconda.com/archive/Anaconda3-2022.05-Linux-aarch64.sh
bash Anaconda3-2022.05-Linux-aarch64.sh
֮��һ·Enter+yes,ֱ����װ���
���´�Terminal,������������ǰ������(base),���û�еĻ�,ִ��source activate����,�س�����
���洴��YOLOv5-5.0�������:
(base) nx@ubuntu:~$ conda create -n yolo python=3.6 -y
(base) nx@ubuntu:~$ conda activate yolo
����v5.0�ֿ�
��YOLOv5�����ҵ�v5.0�汾���ֿ�,ֱ�����ص�NX,Ȼ��cd��yolov5-5.0�ֿ�

��yolo�������,��װ��Ӧ��:
(base) nx@ubuntu:~$ conda activate yolo
(yolo) nx@ubuntu:~$ cd yolov5-5.0/
(yolo) nx@ubuntu:~/yolov5-5.0$ pip install -r requirements.txt
����Demo
����yolov5.pt��yolov5-5.0�ļ�����,ִ��detect.py���в���:(ע��,���ֱ��ִ��python detect.py,���Զ��������°汾��yolov5.pt,������5.0�汾��,��Ϊ5.0�汾�����°汾����ṹ��ͬ,��˻ᱨ��)
(yolo) nx@ubuntu:~/yolov5-5.0$ wget https://github.com/ultralytics/yolov5/releases/download/v5.0/yolov5s.pt
(yolo) nx@ubuntu:~/yolov5-5.0$ python detect.py
�������:
 bus bus
|
 zidane zidane
|
VScode����NX
�ο�:���������ߡ�VScode����Զ�̷�����+�������ܵ�¼
USB����ͷʵʱ���
����,��һ������ͷ,������USB����ͷ,���߹ٷ����õ�CSI-2�ӿ�����ͷ,�嵽NX��
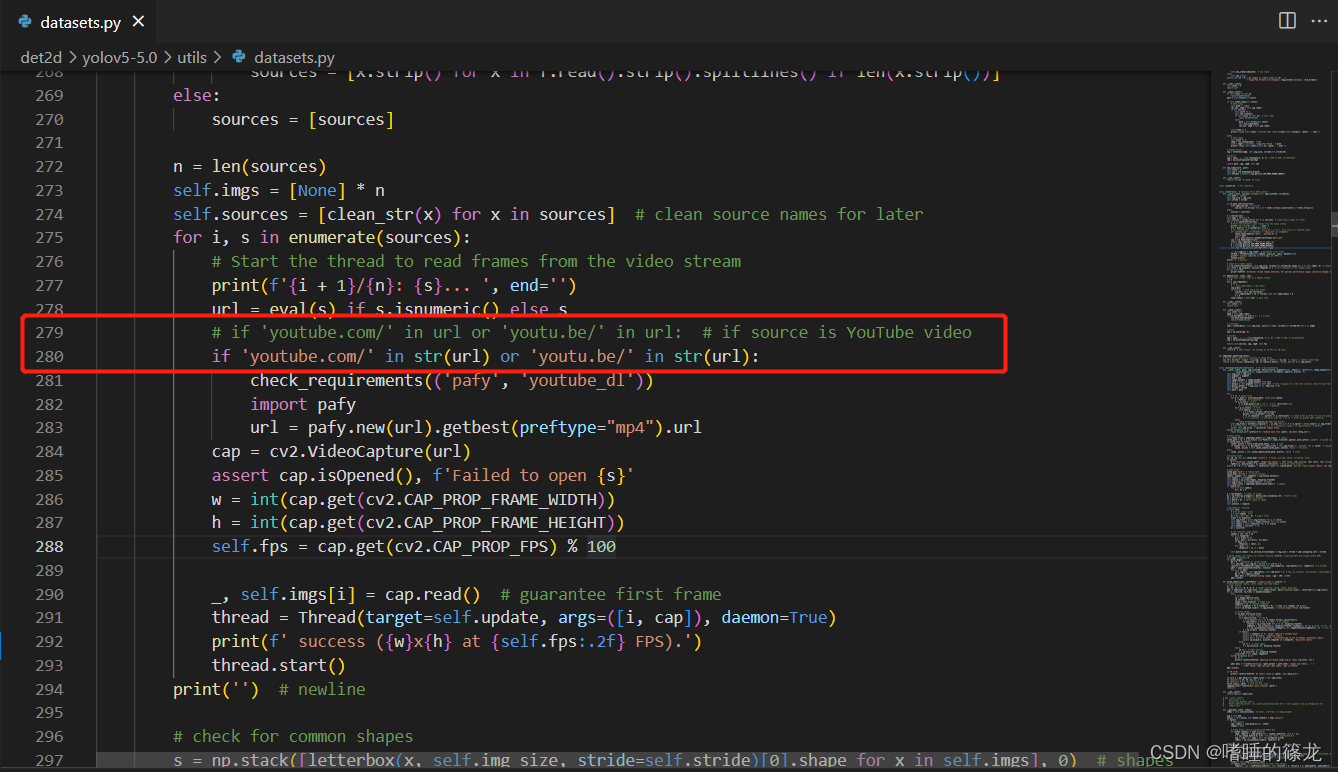
���,��datasets.py�е�280�д���Ϊ:if 'youtube.com/' in str(url) or 'youtu.be/' in str(url):
Ȼ��,Ϊ����ʾʵʱFPS,��Ҫ�����������ļ�: datasets.py��detect.py
1��datasets.py:��utils/datasets.py�ļ���LoadStreams���е�__next__������,����self.fps

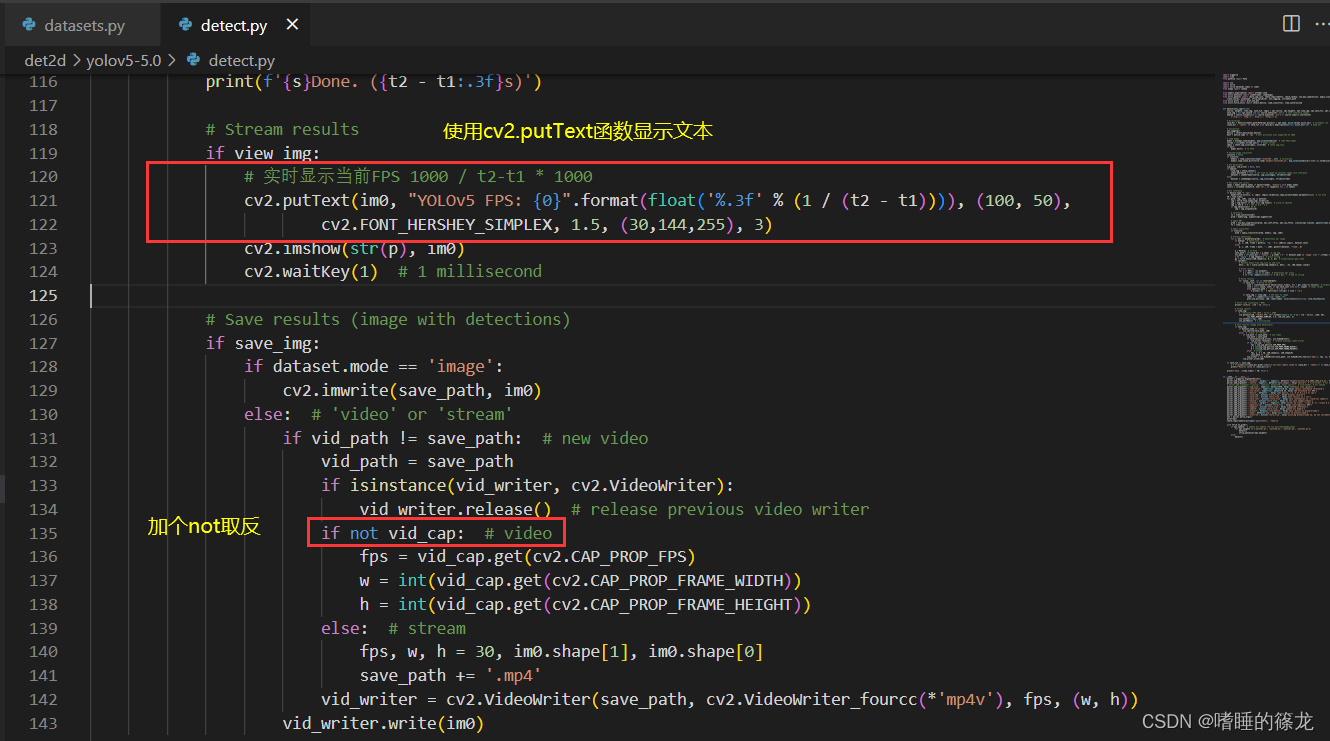
2��detect.py:ʹ��cv2.putText����,�ڵ�ǰframe����ʾ�ı�,����vid_capǰ�Ӹ�not,��ֹ����(ԭ��:���Ƿ��ص�ֻ��fpsֵ,������cap����),����ͼ��ʾ:
��������:
# Stream results
if view_img:
# ʵʱ��ʾ��ǰFPS 1000 / t2-t1 * 1000
cv2.putText(im0, "YOLOv5 FPS: {0}".format(float('%.3f' % (1 / (t2 - t1)))), (100, 50),
cv2.FONT_HERSHEY_SIMPLEX, 1.5, (30,144,255), 3)
cv2.imshow(str(p), im0)
cv2.waitKey(1) # 1 millisecond
# Save results (image with detections)
if save_img:
if dataset.mode == 'image':
cv2.imwrite(save_path, im0)
else: # 'video' or 'stream'
if vid_path != save_path: # new video
vid_path = save_path
if isinstance(vid_writer, cv2.VideoWriter):
vid_writer.release() # release previous video writer
if not vid_cap: # video
fps = vid_cap.get(cv2.CAP_PROP_FPS)
w = int(vid_cap.get(cv2.CAP_PROP_FRAME_WIDTH))
h = int(vid_cap.get(cv2.CAP_PROP_FRAME_HEIGHT))
else: # stream
fps, w, h = 30, im0.shape[1], im0.shape[0]
save_path += '.mp4'
vid_writer = cv2.VideoWriter(save_path, cv2.VideoWriter_fourcc(*'mp4v'), fps, (w, h))
vid_writer.write(im0)
���,��Terminal��ִ������:python detect.py --source 0,�������:
(PS:��FPSʵ����̫������/(��o��)/~~,������⾫�ȵ�������(��?����))
?
tensorrtxģ��ת��
������,�DZ��ĵ���ͷϷ:ʹ��TensorRT���ٲ���YOLOv5!!!!������������:
- ʹ��tensorrtx/yolov5�е�
gen_wts.py�ļ�,��yolov5-5.0�н�yolov5.ptת��Ϊyolov5.wts�ļ� - ��tensorrtx/yolov5�н��б���,���ɿ�ִ���ļ�yolov5
- ʹ��yolov5��ִ���ļ�������
yolov5.engine�ļ�,��TensorRTģ��
pt�C>wts(��yolov5-5.0)
����,����tensorrtx-yolov5-v5.0,ע��Ҫѡ��yolov5-5.0�汾,Ȼ��tensorrtx-yolov5-v5.0/yolov5/gen_wts.py���Ƶ�yolov5-5.0/��,Ȼ��ִ������Ϳ����ڵ�ǰĿ¼��,����yolov5.wts�ļ�
(yolo) nx@ubuntu:~/yolov5-5.0$ python gen_wts.py -w yolov5s.pt
wts�C>engine(��tensorrtx-yolov5-v5.0)
֮���л���tensorrtx-yolov5-v5.0/yolov5/Ŀ¼,�½�build�ļ���,Ȼ��cd��build�ļ�����,���б���:
(yolo) nx@ubuntu:~$ cd tensorrtx-yolov5-v5.0/yolov5/
(yolo) nx@ubuntu:~/tensorrtx-yolov5-v5.0/yolov5$ mkdir build
(yolo) nx@ubuntu:~/tensorrtx-yolov5-v5.0/yolov5$ cd build
(yolo) nx@ubuntu:~/tensorrtx-yolov5-v5.0/yolov5/build$ cmake ..
(yolo) nx@ubuntu:~/tensorrtx-yolov5-v5.0/yolov5/build$ make
!!��ʱҪע��!! �������Ҫת���Լ�ѵ����ģ��,��Ҫ�ڱ���ǰ��yololayer.h�еIJ���:
static constexpr int CLASS_NUM = 80; // ���ݼ��������
static constexpr int INPUT_H = 608;
static constexpr int INPUT_W = 608;
�����е�CLASS_NUM��Ϊ�Լ����������,Ȼ������ִ��������������
��ʱ�������,�����˿�ִ���ļ�yolov5,���ǿ����������ִ���ļ�������.engine�ļ�,���Ȱ���һ���õ���yolov5s.wts�ļ����Ƶ�buildĿ¼��,Ȼ��ִ��������������yolov5s.engine:
(yolo) nx@ubuntu:~/tensorrtx-yolov5-v5.0/yolov5/build$ sudo ./yolov5 -s yolov5s.wts yolov5s.engine s
ע��,����ָ�������һ������s��ʾģ�͵Ĺ�ģΪs,�������ʹ�õ�ģ��ģΪn,l��x,��Ҫ��s�ijɶ�Ӧ��n,l��x
�ɹ�����yolov5s.engine��Ϳ���ִ����������������һ��С����:
(yolo) nx@ubuntu:~/tensorrtx-yolov5-v5.0/yolov5/build$ ./yolov5 -d yolov5s.engine ../samples
��ʱ��buildĿ¼�»�õ����Ľ��ͼ,���Բ鿴����Ч��:
 bus bus
|
 zidane zidane
|
USB����ͷʵʱ���
������yolov5s.engine֮��,��yolov5.cpp����,����USB����ͷʵ��ʵʱ���,����ο���:Jetson nano + yolov5 + TensorRT����+����usb����ͷ,�����´���ֱ�����yolov5.cppԭ���Ĵ���:
#include <iostream>
#include <chrono>
#include "cuda_utils.h"
#include "logging.h"
#include "common.hpp"
#include "utils.h"
#include "calibrator.h"
#define USE_FP16 // set USE_INT8 or USE_FP16 or USE_FP32
#define DEVICE 0 // GPU id
#define NMS_THRESH 0.4
#define CONF_THRESH 0.5
#define BATCH_SIZE 1
// stuff we know about the network and the input/output blobs
static const int INPUT_H = Yolo::INPUT_H;
static const int INPUT_W = Yolo::INPUT_W;
static const int CLASS_NUM = Yolo::CLASS_NUM;
static const int OUTPUT_SIZE = Yolo::MAX_OUTPUT_BBOX_COUNT * sizeof(Yolo::Detection) / sizeof(float) + 1; // we assume the yololayer outputs no more than MAX_OUTPUT_BBOX_COUNT boxes that conf >= 0.1
const char* INPUT_BLOB_NAME = "data";
const char* OUTPUT_BLOB_NAME = "prob";
static Logger gLogger;
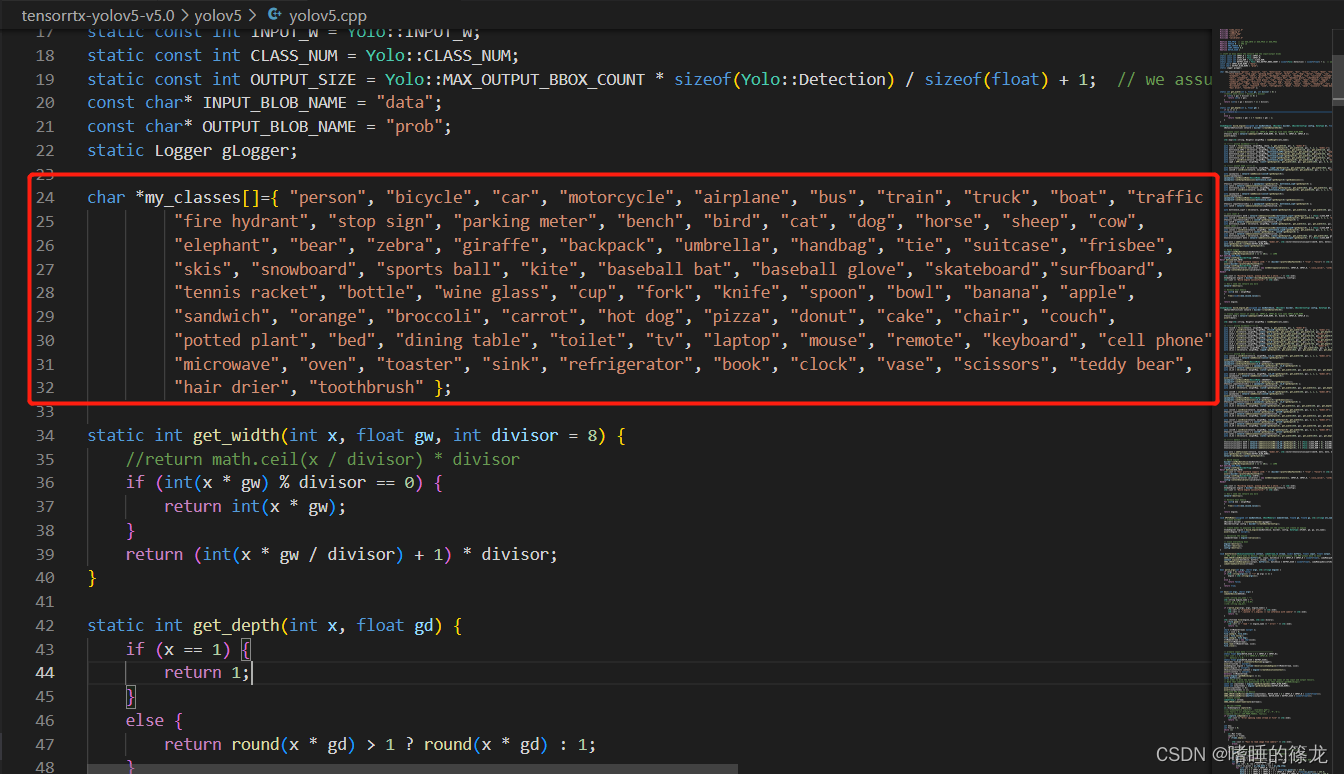
// ���ݼ������������
char *my_classes[]={ "person", "bicycle", "car", "motorcycle", "airplane", "bus", "train", "truck", "boat", "traffic light",
"fire hydrant", "stop sign", "parking meter", "bench", "bird", "cat", "dog", "horse", "sheep", "cow",
"elephant", "bear", "zebra", "giraffe", "backpack", "umbrella", "handbag", "tie", "suitcase", "frisbee",
"skis", "snowboard", "sports ball", "kite", "baseball bat", "baseball glove", "skateboard","surfboard",
"tennis racket", "bottle", "wine glass", "cup", "fork", "knife", "spoon", "bowl", "banana", "apple",
"sandwich", "orange", "broccoli", "carrot", "hot dog", "pizza", "donut", "cake", "chair", "couch",
"potted plant", "bed", "dining table", "toilet", "tv", "laptop", "mouse", "remote", "keyboard", "cell phone",
"microwave", "oven", "toaster", "sink", "refrigerator", "book", "clock", "vase", "scissors", "teddy bear",
"hair drier", "toothbrush" };
static int get_width(int x, float gw, int divisor = 8) {
//return math.ceil(x / divisor) * divisor
if (int(x * gw) % divisor == 0) {
return int(x * gw);
}
return (int(x * gw / divisor) + 1) * divisor;
}
static int get_depth(int x, float gd) {
if (x == 1) {
return 1;
}
else {
return round(x * gd) > 1 ? round(x * gd) : 1;
}
}
ICudaEngine* build_engine(unsigned int maxBatchSize, IBuilder* builder, IBuilderConfig* config, DataType dt, float& gd, float& gw, std::string& wts_name) {
INetworkDefinition* network = builder->createNetworkV2(0U);
// Create input tensor of shape {3, INPUT_H, INPUT_W} with name INPUT_BLOB_NAME
ITensor* data = network->addInput(INPUT_BLOB_NAME, dt, Dims3{ 3, INPUT_H, INPUT_W });
assert(data);
std::map<std::string, Weights> weightMap = loadWeights(wts_name);
/* ------ yolov5 backbone------ */
auto focus0 = focus(network, weightMap, *data, 3, get_width(64, gw), 3, "model.0");
auto conv1 = convBlock(network, weightMap, *focus0->getOutput(0), get_width(128, gw), 3, 2, 1, "model.1");
auto bottleneck_CSP2 = C3(network, weightMap, *conv1->getOutput(0), get_width(128, gw), get_width(128, gw), get_depth(3, gd), true, 1, 0.5, "model.2");
auto conv3 = convBlock(network, weightMap, *bottleneck_CSP2->getOutput(0), get_width(256, gw), 3, 2, 1, "model.3");
auto bottleneck_csp4 = C3(network, weightMap, *conv3->getOutput(0), get_width(256, gw), get_width(256, gw), get_depth(9, gd), true, 1, 0.5, "model.4");
auto conv5 = convBlock(network, weightMap, *bottleneck_csp4->getOutput(0), get_width(512, gw), 3, 2, 1, "model.5");
auto bottleneck_csp6 = C3(network, weightMap, *conv5->getOutput(0), get_width(512, gw), get_width(512, gw), get_depth(9, gd), true, 1, 0.5, "model.6");
auto conv7 = convBlock(network, weightMap, *bottleneck_csp6->getOutput(0), get_width(1024, gw), 3, 2, 1, "model.7");
auto spp8 = SPP(network, weightMap, *conv7->getOutput(0), get_width(1024, gw), get_width(1024, gw), 5, 9, 13, "model.8");
/* ------ yolov5 head ------ */
auto bottleneck_csp9 = C3(network, weightMap, *spp8->getOutput(0), get_width(1024, gw), get_width(1024, gw), get_depth(3, gd), false, 1, 0.5, "model.9");
auto conv10 = convBlock(network, weightMap, *bottleneck_csp9->getOutput(0), get_width(512, gw), 1, 1, 1, "model.10");
auto upsample11 = network->addResize(*conv10->getOutput(0));
assert(upsample11);
upsample11->setResizeMode(ResizeMode::kNEAREST);
upsample11->setOutputDimensions(bottleneck_csp6->getOutput(0)->getDimensions());
ITensor* inputTensors12[] = { upsample11->getOutput(0), bottleneck_csp6->getOutput(0) };
auto cat12 = network->addConcatenation(inputTensors12, 2);
auto bottleneck_csp13 = C3(network, weightMap, *cat12->getOutput(0), get_width(1024, gw), get_width(512, gw), get_depth(3, gd), false, 1, 0.5, "model.13");
auto conv14 = convBlock(network, weightMap, *bottleneck_csp13->getOutput(0), get_width(256, gw), 1, 1, 1, "model.14");
auto upsample15 = network->addResize(*conv14->getOutput(0));
assert(upsample15);
upsample15->setResizeMode(ResizeMode::kNEAREST);
upsample15->setOutputDimensions(bottleneck_csp4->getOutput(0)->getDimensions());
ITensor* inputTensors16[] = { upsample15->getOutput(0), bottleneck_csp4->getOutput(0) };
auto cat16 = network->addConcatenation(inputTensors16, 2);
auto bottleneck_csp17 = C3(network, weightMap, *cat16->getOutput(0), get_width(512, gw), get_width(256, gw), get_depth(3, gd), false, 1, 0.5, "model.17");
// yolo layer 0
IConvolutionLayer* det0 = network->addConvolutionNd(*bottleneck_csp17->getOutput(0), 3 * (Yolo::CLASS_NUM + 5), DimsHW{ 1, 1 }, weightMap["model.24.m.0.weight"], weightMap["model.24.m.0.bias"]);
auto conv18 = convBlock(network, weightMap, *bottleneck_csp17->getOutput(0), get_width(256, gw), 3, 2, 1, "model.18");
ITensor* inputTensors19[] = { conv18->getOutput(0), conv14->getOutput(0) };
auto cat19 = network->addConcatenation(inputTensors19, 2);
auto bottleneck_csp20 = C3(network, weightMap, *cat19->getOutput(0), get_width(512, gw), get_width(512, gw), get_depth(3, gd), false, 1, 0.5, "model.20");
//yolo layer 1
IConvolutionLayer* det1 = network->addConvolutionNd(*bottleneck_csp20->getOutput(0), 3 * (Yolo::CLASS_NUM + 5), DimsHW{ 1, 1 }, weightMap["model.24.m.1.weight"], weightMap["model.24.m.1.bias"]);
auto conv21 = convBlock(network, weightMap, *bottleneck_csp20->getOutput(0), get_width(512, gw), 3, 2, 1, "model.21");
ITensor* inputTensors22[] = { conv21->getOutput(0), conv10->getOutput(0) };
auto cat22 = network->addConcatenation(inputTensors22, 2);
auto bottleneck_csp23 = C3(network, weightMap, *cat22->getOutput(0), get_width(1024, gw), get_width(1024, gw), get_depth(3, gd), false, 1, 0.5, "model.23");
IConvolutionLayer* det2 = network->addConvolutionNd(*bottleneck_csp23->getOutput(0), 3 * (Yolo::CLASS_NUM + 5), DimsHW{ 1, 1 }, weightMap["model.24.m.2.weight"], weightMap["model.24.m.2.bias"]);
auto yolo = addYoLoLayer(network, weightMap, "model.24", std::vector<IConvolutionLayer*>{det0, det1, det2});
yolo->getOutput(0)->setName(OUTPUT_BLOB_NAME);
network->markOutput(*yolo->getOutput(0));
// Build engine
builder->setMaxBatchSize(maxBatchSize);
config->setMaxWorkspaceSize(16 * (1 << 20)); // 16MB
#if defined(USE_FP16)
config->setFlag(BuilderFlag::kFP16);
#elif defined(USE_INT8)
std::cout << "Your platform support int8: " << (builder->platformHasFastInt8() ? "true" : "false") << std::endl;
assert(builder->platformHasFastInt8());
config->setFlag(BuilderFlag::kINT8);
Int8EntropyCalibrator2* calibrator = new Int8EntropyCalibrator2(1, INPUT_W, INPUT_H, "./coco_calib/", "int8calib.table", INPUT_BLOB_NAME);
config->setInt8Calibrator(calibrator);
#endif
std::cout << "Building engine, please wait for a while..." << std::endl;
ICudaEngine* engine = builder->buildEngineWithConfig(*network, *config);
std::cout << "Build engine successfully!" << std::endl;
// Don't need the network any more
network->destroy();
// Release host memory
for (auto& mem : weightMap)
{
free((void*)(mem.second.values));
}
return engine;
}
ICudaEngine* build_engine_p6(unsigned int maxBatchSize, IBuilder* builder, IBuilderConfig* config, DataType dt, float& gd, float& gw, std::string& wts_name) {
INetworkDefinition* network = builder->createNetworkV2(0U);
// Create input tensor of shape {3, INPUT_H, INPUT_W} with name INPUT_BLOB_NAME
ITensor* data = network->addInput(INPUT_BLOB_NAME, dt, Dims3{ 3, INPUT_H, INPUT_W });
assert(data);
std::map<std::string, Weights> weightMap = loadWeights(wts_name);
/* ------ yolov5 backbone------ */
auto focus0 = focus(network, weightMap, *data, 3, get_width(64, gw), 3, "model.0");
auto conv1 = convBlock(network, weightMap, *focus0->getOutput(0), get_width(128, gw), 3, 2, 1, "model.1");
auto c3_2 = C3(network, weightMap, *conv1->getOutput(0), get_width(128, gw), get_width(128, gw), get_depth(3, gd), true, 1, 0.5, "model.2");
auto conv3 = convBlock(network, weightMap, *c3_2->getOutput(0), get_width(256, gw), 3, 2, 1, "model.3");
auto c3_4 = C3(network, weightMap, *conv3->getOutput(0), get_width(256, gw), get_width(256, gw), get_depth(9, gd), true, 1, 0.5, "model.4");
auto conv5 = convBlock(network, weightMap, *c3_4->getOutput(0), get_width(512, gw), 3, 2, 1, "model.5");
auto c3_6 = C3(network, weightMap, *conv5->getOutput(0), get_width(512, gw), get_width(512, gw), get_depth(9, gd), true, 1, 0.5, "model.6");
auto conv7 = convBlock(network, weightMap, *c3_6->getOutput(0), get_width(768, gw), 3, 2, 1, "model.7");
auto c3_8 = C3(network, weightMap, *conv7->getOutput(0), get_width(768, gw), get_width(768, gw), get_depth(3, gd), true, 1, 0.5, "model.8");
auto conv9 = convBlock(network, weightMap, *c3_8->getOutput(0), get_width(1024, gw), 3, 2, 1, "model.9");
auto spp10 = SPP(network, weightMap, *conv9->getOutput(0), get_width(1024, gw), get_width(1024, gw), 3, 5, 7, "model.10");
auto c3_11 = C3(network, weightMap, *spp10->getOutput(0), get_width(1024, gw), get_width(1024, gw), get_depth(3, gd), false, 1, 0.5, "model.11");
/* ------ yolov5 head ------ */
auto conv12 = convBlock(network, weightMap, *c3_11->getOutput(0), get_width(768, gw), 1, 1, 1, "model.12");
auto upsample13 = network->addResize(*conv12->getOutput(0));
assert(upsample13);
upsample13->setResizeMode(ResizeMode::kNEAREST);
upsample13->setOutputDimensions(c3_8->getOutput(0)->getDimensions());
ITensor* inputTensors14[] = { upsample13->getOutput(0), c3_8->getOutput(0) };
auto cat14 = network->addConcatenation(inputTensors14, 2);
auto c3_15 = C3(network, weightMap, *cat14->getOutput(0), get_width(1536, gw), get_width(768, gw), get_depth(3, gd), false, 1, 0.5, "model.15");
auto conv16 = convBlock(network, weightMap, *c3_15->getOutput(0), get_width(512, gw), 1, 1, 1, "model.16");
auto upsample17 = network->addResize(*conv16->getOutput(0));
assert(upsample17);
upsample17->setResizeMode(ResizeMode::kNEAREST);
upsample17->setOutputDimensions(c3_6->getOutput(0)->getDimensions());
ITensor* inputTensors18[] = { upsample17->getOutput(0), c3_6->getOutput(0) };
auto cat18 = network->addConcatenation(inputTensors18, 2);
auto c3_19 = C3(network, weightMap, *cat18->getOutput(0), get_width(1024, gw), get_width(512, gw), get_depth(3, gd), false, 1, 0.5, "model.19");
auto conv20 = convBlock(network, weightMap, *c3_19->getOutput(0), get_width(256, gw), 1, 1, 1, "model.20");
auto upsample21 = network->addResize(*conv20->getOutput(0));
assert(upsample21);
upsample21->setResizeMode(ResizeMode::kNEAREST);
upsample21->setOutputDimensions(c3_4->getOutput(0)->getDimensions());
ITensor* inputTensors21[] = { upsample21->getOutput(0), c3_4->getOutput(0) };
auto cat22 = network->addConcatenation(inputTensors21, 2);
auto c3_23 = C3(network, weightMap, *cat22->getOutput(0), get_width(512, gw), get_width(256, gw), get_depth(3, gd), false, 1, 0.5, "model.23");
auto conv24 = convBlock(network, weightMap, *c3_23->getOutput(0), get_width(256, gw), 3, 2, 1, "model.24");
ITensor* inputTensors25[] = { conv24->getOutput(0), conv20->getOutput(0) };
auto cat25 = network->addConcatenation(inputTensors25, 2);
auto c3_26 = C3(network, weightMap, *cat25->getOutput(0), get_width(1024, gw), get_width(512, gw), get_depth(3, gd), false, 1, 0.5, "model.26");
auto conv27 = convBlock(network, weightMap, *c3_26->getOutput(0), get_width(512, gw), 3, 2, 1, "model.27");
ITensor* inputTensors28[] = { conv27->getOutput(0), conv16->getOutput(0) };
auto cat28 = network->addConcatenation(inputTensors28, 2);
auto c3_29 = C3(network, weightMap, *cat28->getOutput(0), get_width(1536, gw), get_width(768, gw), get_depth(3, gd), false, 1, 0.5, "model.29");
auto conv30 = convBlock(network, weightMap, *c3_29->getOutput(0), get_width(768, gw), 3, 2, 1, "model.30");
ITensor* inputTensors31[] = { conv30->getOutput(0), conv12->getOutput(0) };
auto cat31 = network->addConcatenation(inputTensors31, 2);
auto c3_32 = C3(network, weightMap, *cat31->getOutput(0), get_width(2048, gw), get_width(1024, gw), get_depth(3, gd), false, 1, 0.5, "model.32");
/* ------ detect ------ */
IConvolutionLayer* det0 = network->addConvolutionNd(*c3_23->getOutput(0), 3 * (Yolo::CLASS_NUM + 5), DimsHW{ 1, 1 }, weightMap["model.33.m.0.weight"], weightMap["model.33.m.0.bias"]);
IConvolutionLayer* det1 = network->addConvolutionNd(*c3_26->getOutput(0), 3 * (Yolo::CLASS_NUM + 5), DimsHW{ 1, 1 }, weightMap["model.33.m.1.weight"], weightMap["model.33.m.1.bias"]);
IConvolutionLayer* det2 = network->addConvolutionNd(*c3_29->getOutput(0), 3 * (Yolo::CLASS_NUM + 5), DimsHW{ 1, 1 }, weightMap["model.33.m.2.weight"], weightMap["model.33.m.2.bias"]);
IConvolutionLayer* det3 = network->addConvolutionNd(*c3_32->getOutput(0), 3 * (Yolo::CLASS_NUM + 5), DimsHW{ 1, 1 }, weightMap["model.33.m.3.weight"], weightMap["model.33.m.3.bias"]);
auto yolo = addYoLoLayer(network, weightMap, "model.33", std::vector<IConvolutionLayer*>{det0, det1, det2, det3});
yolo->getOutput(0)->setName(OUTPUT_BLOB_NAME);
network->markOutput(*yolo->getOutput(0));
// Build engine
builder->setMaxBatchSize(maxBatchSize);
config->setMaxWorkspaceSize(16 * (1 << 20)); // 16MB
#if defined(USE_FP16)
config->setFlag(BuilderFlag::kFP16);
#elif defined(USE_INT8)
std::cout << "Your platform support int8: " << (builder->platformHasFastInt8() ? "true" : "false") << std::endl;
assert(builder->platformHasFastInt8());
config->setFlag(BuilderFlag::kINT8);
Int8EntropyCalibrator2* calibrator = new Int8EntropyCalibrator2(1, INPUT_W, INPUT_H, "./coco_calib/", "int8calib.table", INPUT_BLOB_NAME);
config->setInt8Calibrator(calibrator);
#endif
std::cout << "Building engine, please wait for a while..." << std::endl;
ICudaEngine* engine = builder->buildEngineWithConfig(*network, *config);
std::cout << "Build engine successfully!" << std::endl;
// Don't need the network any more
network->destroy();
// Release host memory
for (auto& mem : weightMap)
{
free((void*)(mem.second.values));
}
return engine;
}
void APIToModel(unsigned int maxBatchSize, IHostMemory** modelStream, float& gd, float& gw, std::string& wts_name) {
// Create builder
IBuilder* builder = createInferBuilder(gLogger);
IBuilderConfig* config = builder->createBuilderConfig();
// Create model to populate the network, then set the outputs and create an engine
ICudaEngine* engine = build_engine(maxBatchSize, builder, config, DataType::kFLOAT, gd, gw, wts_name);
assert(engine != nullptr);
// Serialize the engine
(*modelStream) = engine->serialize();
// Close everything down
engine->destroy();
builder->destroy();
config->destroy();
}
void doInference(IExecutionContext& context, cudaStream_t& stream, void** buffers, float* input, float* output, int batchSize) {
// DMA input batch data to device, infer on the batch asynchronously, and DMA output back to host
CUDA_CHECK(cudaMemcpyAsync(buffers[0], input, batchSize * 3 * INPUT_H * INPUT_W * sizeof(float), cudaMemcpyHostToDevice, stream));
context.enqueue(batchSize, buffers, stream, nullptr);
CUDA_CHECK(cudaMemcpyAsync(output, buffers[1], batchSize * OUTPUT_SIZE * sizeof(float), cudaMemcpyDeviceToHost, stream));
cudaStreamSynchronize(stream);
}
bool parse_args(int argc, char** argv, std::string& engine) {
if (argc < 3) return false;
if (std::string(argv[1]) == "-v" && argc == 3) {
engine = std::string(argv[2]);
}
else {
return false;
}
return true;
}
int main(int argc, char** argv) {
cudaSetDevice(DEVICE);
//std::string wts_name = "";
std::string engine_name = "";
//float gd = 0.0f, gw = 0.0f;
//std::string img_dir;
if (!parse_args(argc, argv, engine_name)) {
std::cerr << "arguments not right!" << std::endl;
std::cerr << "./yolov5 -v [.engine] // run inference with camera" << std::endl;
return -1;
}
std::ifstream file(engine_name, std::ios::binary);
if (!file.good()) {
std::cerr << " read " << engine_name << " error! " << std::endl;
return -1;
}
char* trtModelStream{ nullptr };
size_t size = 0;
file.seekg(0, file.end);
size = file.tellg();
file.seekg(0, file.beg);
trtModelStream = new char[size];
assert(trtModelStream);
file.read(trtModelStream, size);
file.close();
// prepare input data ---------------------------
static float data[BATCH_SIZE * 3 * INPUT_H * INPUT_W];
//for (int i = 0; i < 3 * INPUT_H * INPUT_W; i++)
// data[i] = 1.0;
static float prob[BATCH_SIZE * OUTPUT_SIZE];
IRuntime* runtime = createInferRuntime(gLogger);
assert(runtime != nullptr);
ICudaEngine* engine = runtime->deserializeCudaEngine(trtModelStream, size);
assert(engine != nullptr);
IExecutionContext* context = engine->createExecutionContext();
assert(context != nullptr);
delete[] trtModelStream;
assert(engine->getNbBindings() == 2);
void* buffers[2];
// In order to bind the buffers, we need to know the names of the input and output tensors.
// Note that indices are guaranteed to be less than IEngine::getNbBindings()
const int inputIndex = engine->getBindingIndex(INPUT_BLOB_NAME);
const int outputIndex = engine->getBindingIndex(OUTPUT_BLOB_NAME);
assert(inputIndex == 0);
assert(outputIndex == 1);
// Create GPU buffers on device
CUDA_CHECK(cudaMalloc(&buffers[inputIndex], BATCH_SIZE * 3 * INPUT_H * INPUT_W * sizeof(float)));
CUDA_CHECK(cudaMalloc(&buffers[outputIndex], BATCH_SIZE * OUTPUT_SIZE * sizeof(float)));
// Create stream
cudaStream_t stream;
CUDA_CHECK(cudaStreamCreate(&stream));
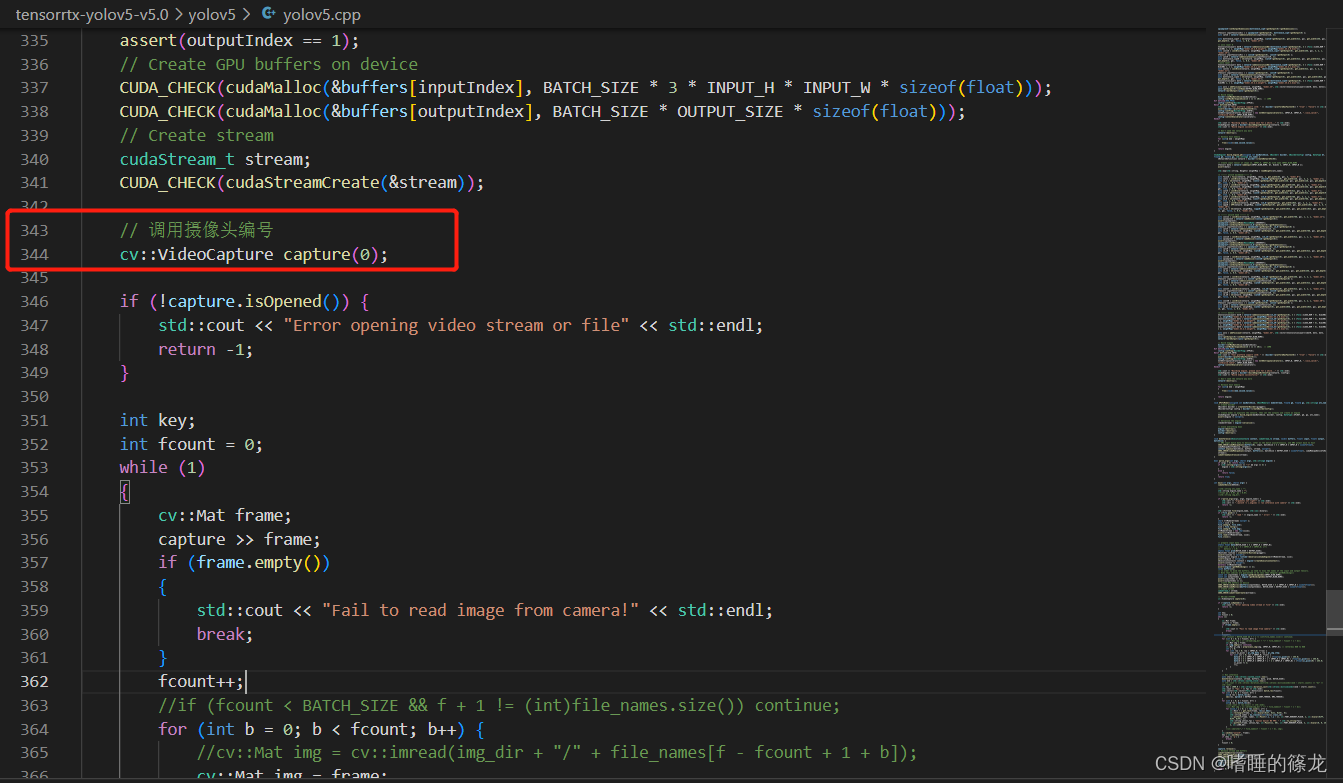
// ��������ͷ���
cv::VideoCapture capture(0);
//cv::VideoCapture capture("../overpass.mp4");
//int fourcc = cv::VideoWriter::fourcc('M','J','P','G');
//capture.set(cv::CAP_PROP_FOURCC, fourcc);
if (!capture.isOpened()) {
std::cout << "Error opening video stream or file" << std::endl;
return -1;
}
int key;
int fcount = 0;
while (1)
{
cv::Mat frame;
capture >> frame;
if (frame.empty())
{
std::cout << "Fail to read image from camera!" << std::endl;
break;
}
fcount++;
//if (fcount < BATCH_SIZE && f + 1 != (int)file_names.size()) continue;
for (int b = 0; b < fcount; b++) {
//cv::Mat img = cv::imread(img_dir + "/" + file_names[f - fcount + 1 + b]);
cv::Mat img = frame;
if (img.empty()) continue;
cv::Mat pr_img = preprocess_img(img, INPUT_W, INPUT_H); // letterbox BGR to RGB
int i = 0;
for (int row = 0; row < INPUT_H; ++row) {
uchar* uc_pixel = pr_img.data + row * pr_img.step;
for (int col = 0; col < INPUT_W; ++col) {
data[b * 3 * INPUT_H * INPUT_W + i] = (float)uc_pixel[2] / 255.0;
data[b * 3 * INPUT_H * INPUT_W + i + INPUT_H * INPUT_W] = (float)uc_pixel[1] / 255.0;
data[b * 3 * INPUT_H * INPUT_W + i + 2 * INPUT_H * INPUT_W] = (float)uc_pixel[0] / 255.0;
uc_pixel += 3;
++i;
}
}
}
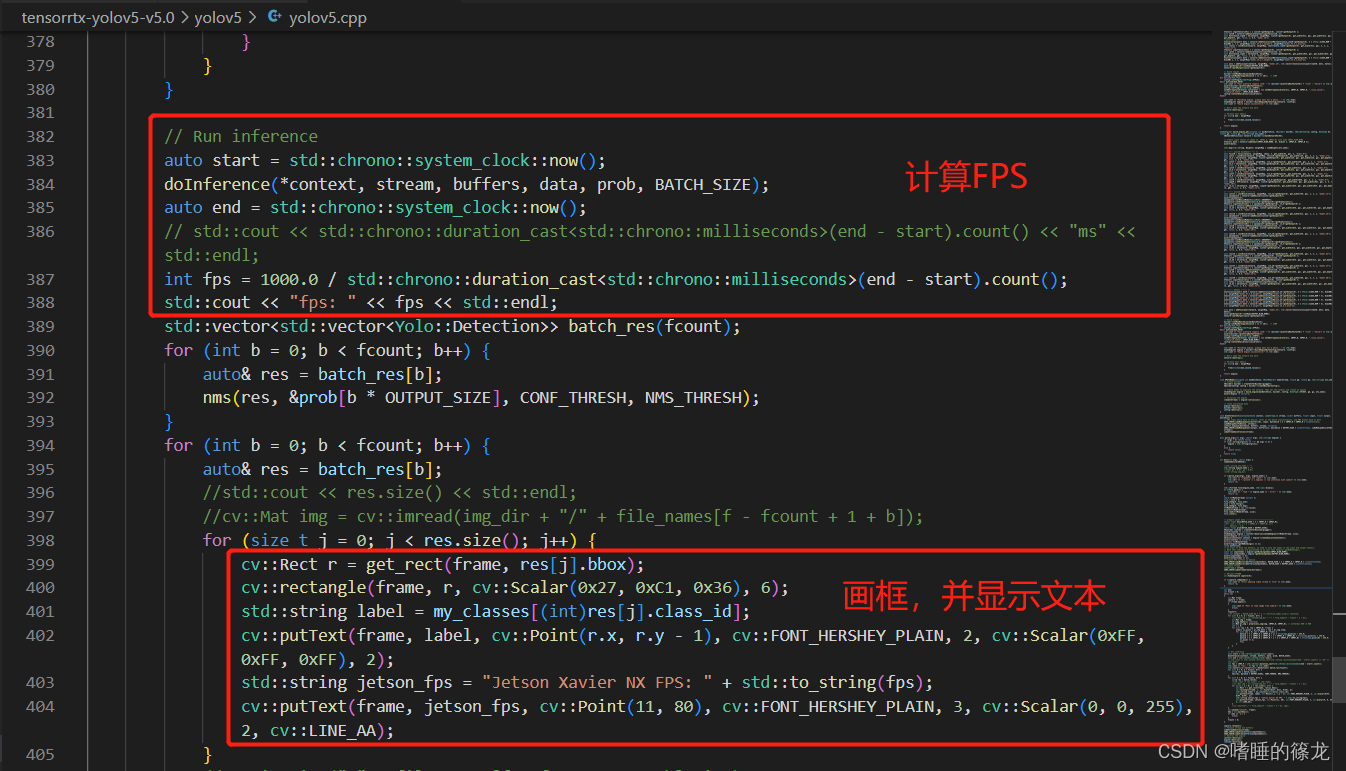
// Run inference
auto start = std::chrono::system_clock::now();
doInference(*context, stream, buffers, data, prob, BATCH_SIZE);
auto end = std::chrono::system_clock::now();
// std::cout << std::chrono::duration_cast<std::chrono::milliseconds>(end - start).count() << "ms" << std::endl;
int fps = 1000.0 / std::chrono::duration_cast<std::chrono::milliseconds>(end - start).count();
std::cout << "fps: " << fps << std::endl;
std::vector<std::vector<Yolo::Detection>> batch_res(fcount);
for (int b = 0; b < fcount; b++) {
auto& res = batch_res[b];
nms(res, &prob[b * OUTPUT_SIZE], CONF_THRESH, NMS_THRESH);
}
for (int b = 0; b < fcount; b++) {
auto& res = batch_res[b];
//std::cout << res.size() << std::endl;
//cv::Mat img = cv::imread(img_dir + "/" + file_names[f - fcount + 1 + b]);
for (size_t j = 0; j < res.size(); j++) {
cv::Rect r = get_rect(frame, res[j].bbox);
cv::rectangle(frame, r, cv::Scalar(0x27, 0xC1, 0x36), 6);
std::string label = my_classes[(int)res[j].class_id];
cv::putText(frame, label, cv::Point(r.x, r.y - 1), cv::FONT_HERSHEY_PLAIN, 2, cv::Scalar(0xFF, 0xFF, 0xFF), 2);
std::string jetson_fps = "Jetson Xavier NX FPS: " + std::to_string(fps);
cv::putText(frame, jetson_fps, cv::Point(11, 80), cv::FONT_HERSHEY_PLAIN, 3, cv::Scalar(0, 0, 255), 2, cv::LINE_AA);
}
//cv::imwrite("_" + file_names[f - fcount + 1 + b], img);
}
cv::imshow("yolov5", frame);
key = cv::waitKey(1);
if (key == 'q') {
break;
}
fcount = 0;
}
capture.release();
// Release stream and buffers
cudaStreamDestroy(stream);
CUDA_CHECK(cudaFree(buffers[inputIndex]));
CUDA_CHECK(cudaFree(buffers[outputIndex]));
// Destroy the engine
context->destroy();
engine->destroy();
runtime->destroy();
return 0;
}
ע������:
- �����ݼ��������
- �ĵ�������ͷ���
- ��ѡ:������ͷ�����Ϣ
֮���ٴν��б���,Ȼ��ִ�в��Դ���:
(yolo) nx@ubuntu:~/tensorrtx-yolov5-v5.0/yolov5/build$ make
(yolo) nx@ubuntu:~/tensorrtx-yolov5-v5.0/yolov5/build$ sudo ./yolov5 -v yolov5s.engine
�������:

(PS:�������ĺܸ��˺ò���!!!)
?
DeepStream����
��װ
1����װǰע��汾��Ӧ,Jetpack��DeepStream��Ӧ���±�:
| Jeppack | DeepStream |
|---|---|
| 4.6 | 6.0 |
| 4.5.1 | 5.1 |
| 4.4.1 | 5.0 |
���İ�װ��Jetpack�汾Ϊ4.6,��˰�װ��Ӧ��DeepStream-6.0
2����װ�������
ִ������������װ��Ҫ��������:
sudo apt install \
libssl1.0.0 \
libgstreamer1.0-0 \
gstreamer1.0-tools \
gstreamer1.0-plugins-good \
gstreamer1.0-plugins-bad \
gstreamer1.0-plugins-ugly \
gstreamer1.0-libav \
libgstrtspserver-1.0-0 \
libjansson4=2.11-1
3����װDeepStream SDK
�ڵ�1���Ѿ����� DeepStream 6.0 Jetson tar package deepstream_sdk_v6.0.0_jetson.tbz2, �� NX����,��������������������ȡ����װDeepStream SDK:
sudo tar -xvf deepstream_sdk_v6.0.0_jetson.tbz2 -C / cd /opt/nvidia/deepstream/deepstream-6.0
sudo ./install.sh
sudo ldconfig
Demo����
��װ��ɽ���ٷ������ļ���
cd /opt/nvidia/deepstream/deepstream-6.0/samples/configs/deepstream-app/
#����һ��
deepstream-app -c source8_1080p_dec_infer-resnet_tracker_tiled_display_fp16_nano.txt
������̴��ٶȽ���,���ĵȴ�,�������:
���ٲ���YOLOv5(Coming soon)
CSI-2����ͷʵʱ���(Coming soon)
?
Reference
Jetson�����塱��NVIDIA�Ķ�λ��ʲô?�Ա�����������Ƕ��ʽƽ̨,Jetson��ʲô����?
Jetson Xavier NX ˢ��+�����廪Դ��������
Jetson����ʵս��¼(��):Jetson Xavier NX�汾�����Լ���¼ϵͳ
Jetson����ʵս��¼(��):Jetson Xavier NX���忪��(Ubuntu18.04ϵͳ)
YOLOV5������������ Jetson Xavier NX �汾(������ϸ)
Jetson nano�ϲ����Լ���Yolov5ģ��(TensorRT����)
Jetson nano + yolov5 + TensorRT����+����usb����ͷ