图像处理-002图像的几何变换
图像存在诸如放大、缩小、平移、旋转等变换形式,放大、缩小变换通过resize函数实现的,而平移、旋转通过cv.warpAffine 和cv.warpPerspective实现的,通过cv.warpAffine 和cv.warpPerspective函数图像可以做任意类型的变换,两者的区别是cv.warpAffine 使用的变换矩阵是 2 × 3 2\times3 2×3维的, cv.warpPerspective使用 3 × 3 3\times3 3×3维的变换矩阵。
Scale(图像放/缩)
Scale即为调整图像的大小,通过cv.resize() 函数实现。实际中,既可以通过指定缩放后的大小,也可以指定缩放因子实现。同时可以选择不同的插值方式,常用的插值方式有:
- INTER_NEAREST: 最近邻插值, 该方法保证图像边缘的锐度(锐度是衡量图像质量的最重要的因素之一,它反应了图像细节数量的多少。锐度是由不同色调或颜色区域之间的边界定义的),可能会造成图像的模糊;
- INTER_LINEAR: 线性插值, 与INTER_NEAREST不同的是,它在二维上进行插值,并预测用于计算像素颜色的函数, 该算法能有效地处理放大或放大图像时的视觉失真;
- INTER_CUBIC: 立方插值(4x4像素邻域的双三次插值), 该方法是三次插值技术的扩展,用于二维规则网格图案;
- INTER_AREA:象素关系重采样, 使用像素面积关系技术进行重采样。放大图像时,INTER_AREA和INTER_NEAREST的工作原理相同,当图像缩小时候,该方法可以避免波纹出现;
- INTER_LANCZOS4: 8x8像素邻域的Lanczos插值, 使用傅立叶级数和切比雪夫多项式,适用于具有大量小尺寸细节的图像。
实现代码: (C++)
/**
 * 图像放大
 * @param img
 */
void GeometricTransformation::image_zoom_out(const Mat &img) {
  logger_info("======image_zoom_out===========");
  Mat zoomIn, zoomOut;
  //最近邻插值
  resize(img, zoomOut, Size(img.cols * 2, img.rows * 2), 0, 0, INTER_NEAREST);
  imshow("Resize nearest zoomOut", zoomOut);

  // 线性插值
  resize(img, zoomOut, Size(img.cols * 2, img.rows * 2), 0, 0, INTER_LINEAR);
  imshow("Resize linear zoomOut", zoomOut);

  //双立方插值
  resize(img, zoomOut, Size(img.cols * 2, img.rows * 2), 0, 0, INTER_CUBIC);
  imshow("Resize cubic zoomOut", zoomOut);

  //8*8邻域的Lanczos插值
  resize(img, zoomOut, Size(img.cols * 2, img.rows * 2), 0, 0, INTER_LANCZOS4);
  imshow("Resize cubic zoomOut", zoomOut);

}

/**
 * 图像缩小
 * @param img
 */
void GeometricTransformation::image_zoom_in(const Mat &img) {
  logger_info("======image_zoom_in===========");
  Mat zoomIn, zoomOut;
  //最近邻插值
  resize(img, zoomIn, Size(img.cols / 2, img.rows / 2), 0, 0, INTER_NEAREST);
  imshow("Resize nearest zoomIn", zoomIn);

  // 线性插值
  resize(img, zoomIn, Size(img.cols / 2, img.rows / 2), 0, 0, INTER_LINEAR);
  imshow("Resize linear zoomIn", zoomIn);

  //双立方插值
  resize(img, zoomIn, Size(img.cols / 2, img.rows / 2), 0, 0, INTER_CUBIC);
  imshow("Resize cubic zoomIn", zoomIn);

  //8*8邻域的Lanczos插值
  resize(img, zoomIn, Size(img.cols / 2, img.rows / 2), 0, 0, INTER_LANCZOS4);
  imshow("Resize cubic zoomIn", zoomIn);

}
实现代码: (Python)
# resize image size 放大
def scale_zoom_out(origin_image):
    logger.log.info("zoom out")
    # x轴变为原来2  y轴变为原来2倍 立方插值
    zoom_out_image = cv.resize(origin_image, None, fx=2, fy=2, interpolation=cv.INTER_CUBIC)
    cv.imshow("zoom out", zoom_out_image)

    height, width = origin_image.shape[:2]
    zoom_out_image_2 = cv.resize(origin_image, (2 * width, 2 * height), interpolation=cv.INTER_CUBIC)

    cv.imshow("zoom out2", zoom_out_image_2)


# resize image size 缩小
def scale_zoom_in(origin_image):
    logger.log.info("zoom in")
    # x轴变为原来1/2  y轴变为原来1/2 线性插值
    zoom_in_image = cv.resize(origin_image, None, fx=0.5, fy=0.5, interpolation=cv.INTER_LINEAR)
    cv.imshow("zoom in", zoom_in_image)

    height, width = origin_image.shape[:2]
    # 缩小时, 宽、高必须为整数
    zoom_in_image_2 = cv.resize(origin_image, (int(0.5 * width), int(0.5 * height)), interpolation=cv.INTER_LINEAR)

    cv.imshow("zoom in 2", zoom_in_image_2)
图像平移
图像平移即为转移图像的显示位置,即(x,y)->(x+tx, y+ty)
平移是物体位置的移动。设(tx,ty)为图像沿X,Y轴移动的位移,则创建如下的变换矩阵M为:
M = [ 1 0 t x 0 1 t y ] M= \begin{bmatrix} 1 & 0 & tx \\ 0 & 1 & ty \end{bmatrix} M=[10?01?txty?]
实现代码:C++
使用cv.Mat构建变换矩阵
void GeometricTransformation::image_translation_right_bottom(const Mat &origin_image) {
  logger_info("======image_translation_right_bottom===========");
  logger_info("origin_image type: %d", origin_image.type());
  //平移矩阵
  float warp_values[] = {1.0, 0.0, 100, 0.0, 1.0, 50};
  Mat trans_matrix = Mat(2, 3, CV_32F, warp_values);
  Mat dst;
//  x轴为列的方向 Y轴为行的方向
//  warpAffine(origin_image, dst, trans_matrix, Size_<int>(origin_image.cols, origin_image.rows));
  warpAffine(origin_image, dst, trans_matrix, origin_image.size());

  imshow("right bottom", dst);

}

void GeometricTransformation::image_translation_left_top(const Mat &origin_image) {
  logger_info("======image_translation_left_top===========");
  //平移矩阵
  float warp_values[] = {1.0, 0.0, -100, 0.0, 1.0, -50};
  Mat trans_matrix = Mat(2, 3, CV_32F, warp_values);
  Mat dst;
  //  warpAffine(origin_image, dst, trans_matrix, Size_<int>(origin_image.cols, origin_image.rows));
  warpAffine(origin_image, dst, trans_matrix, origin_image.size());

  imshow("left top", dst);
}

void GeometricTransformation::image_translation_right_top(const Mat &origin_image) {
  logger_info("======image_translation_right_top===========");
  //平移矩阵
  float warp_values[] = {1.0, 0.0, 100, 0.0, 1.0, -50};
  Mat trans_matrix = Mat(2, 3, CV_32F, warp_values);
  Mat dst;
  //  warpAffine(origin_image, dst, trans_matrix, Size_<int>(origin_image.cols, origin_image.rows));
  warpAffine(origin_image, dst, trans_matrix, origin_image.size());

  imshow("right top", dst);
}

void GeometricTransformation::image_translation_left_bottom(const Mat &origin_image) {
  logger_info("======image_translation_left_bottom===========");
  logger_info("======image_translation_left_bottom=====cols=%d==rows=%d====", origin_image.cols, origin_image.rows);
  logger_info("======image_translation_left_bottom=====height=%d===width=%d=", origin_image.size().height,
              origin_image.size().width);
  //平移矩阵
  float warp_values[] = {1.0, 0.0, -100, 0.0, 1.0, 50};
  Mat trans_matrix = Mat(2, 3, CV_32F, warp_values);
  Mat dst;
  //  warpAffine(origin_image, dst, trans_matrix, Size_<int>(origin_image.cols, origin_image.rows));
  warpAffine(origin_image, dst, trans_matrix, origin_image.size());

  imshow("left bottom", dst);
}
实现代码:python
python中使用np.float32构建变换矩阵
# 平移  右下
def translation_right_bottom(origin_image):
    logger.log.info(origin_image.shape)
    rows, cols, channels = origin_image.shape
    # 以屏幕左上角为坐标原点右下平移(100, 50)
    M = np.float32([[1, 0, 100], [0, 1, 50]])
    dst = cv.warpAffine(origin_image, M, (cols, rows))
    cv.imshow('right bottom ', dst)


# 平移  左上
def translation_left_top(origin_image):
    logger.log.info(origin_image.shape)
    rows, cols, channels = origin_image.shape
    # 以屏幕左上角为坐标原点左上平移(100, 50)
    M = np.float32([[1, 0, -100], [0, 1, -50]])
    dst = cv.warpAffine(origin_image, M, (cols, rows))
    cv.imshow('left top ', dst)


# 平移  右上
def translation_right_top(origin_image):
    logger.log.info(origin_image.shape)
    rows, cols, channels = origin_image.shape
    # 以屏幕左上角为坐标原点左上平移(100, 50)
    M = np.float32([[1, 0, 100], [0, 1, -50]])
    dst = cv.warpAffine(origin_image, M, (cols, rows))
    cv.imshow('right top ', dst)


# 平移  左下
def translation_left_bottom(origin_image):
    logger.log.info(origin_image.shape)
    rows, cols, channels = origin_image.shape
    # 以屏幕左上角为坐标原点左上平移(100, 50)
    M = np.float32([[1, 0, -100], [0, 1, 50]])
    dst = cv.warpAffine(origin_image, M, (cols, rows))
    cv.imshow('left bottom ', dst)
Rotation(图像旋转)
图像逆时针旋转 θ \theta θ角度时使用的变换矩阵为 M = [ c o s θ ? s i n θ s i n θ c o s θ ] M=\begin{bmatrix} cos\theta & -sin\theta \\ sin\theta & cos\theta \end{bmatrix} M=[cosθsinθ??sinθcosθ?],该变换矩阵是基于图像的坐标原点为旋转中心点进行变换的,为便于图像在任意位置旋转同时更好的适应屏幕,opencv提供了另一种以任意点为旋转中心点且可进行缩放的变换矩阵,
M = [ α ? β ( 1 ? α ) ? c e n t e r . x ? β ? c e n t e r . y ? β α β ? c e n t e r . x + ( 1 ? α ) ? c e n t e r . y ] , 其中, α = s c a l e ? c o s θ , β = s c a l e ? s i n θ s c a l e 为缩放因子 M=\begin{bmatrix} \alpha & -\beta & (1-\alpha)\cdot center.x - \beta \cdot center.y \\ -\beta & \alpha & \beta\cdot center.x + (1-\alpha)\cdot center.y \end{bmatrix}, \\其中,\alpha = scale \cdot cos \theta, \beta= scale\cdot sin\theta scale为缩放因子 M=[α?β??βα?(1?α)?center.x?β?center.yβ?center.x+(1?α)?center.y?],其中,α=scale?cosθ,β=scale?sinθscale为缩放因子
opencv使用cv.getRotationMatrix2D函数来获取旋转矩阵。
实现代码: C++
/**
 * 逆时针旋转30度
 * @param img
 */
void GeometricTransformation::translation_anti_clockwise_30(const Mat &img) {
  logger_info("======translation_anti_clockwise_30===========");
  int width = img.cols;
  int height = img.rows;
  Mat translation_matrix = getRotationMatrix2D(Point2f(width / 2, height / 2), 30, 1);
  Mat dst;
  warpAffine(img, dst, translation_matrix, Size_<int>(width, height));
  imshow("anti_clockwise 30", dst);
}

/**
 * 逆时针旋转30度 并缩小为原图像一半
 * @param img
 */
void GeometricTransformation::translation_anti_clockwise_30_scale_half(const Mat &img) {
  logger_info("======translation_anti_clockwise_30_scale_half===========");
  int width = img.cols;
  int height = img.rows;
  Mat translation_matrix = getRotationMatrix2D(Point2f(width / 2, height / 2), 30, 0.5);
  Mat dst;
  warpAffine(img, dst, translation_matrix, Size_<int>(width, height));
  imshow("anti_clockwise 30 half", dst);
}

/**
 * 顺时针旋转30度 并缩小为原图像一半
 * @param img
 */
void GeometricTransformation::translation_clockwise_30(const Mat &img) {
  logger_info("======translation_clockwise_30===========");
  int width = img.cols;
  int height = img.rows;
  Mat translation_matrix = getRotationMatrix2D(Point2f(width / 2, height / 2), -30, 1);
  Mat dst;
  warpAffine(img, dst, translation_matrix, Size_<int>(width, height));
  imshow("clockwise 30", dst);
}

/**
 * 顺时针旋转30度 并缩小为原图像一半
 * @param img
 */
void GeometricTransformation::translation_clockwise_30_scale_half(const Mat &img) {
  logger_info("======translation_clockwise_30_scale_half===========");
  int width = img.cols;
  int height = img.rows;
  Mat translation_matrix = getRotationMatrix2D(Point2f(width / 2, height / 2), -30, 0.5);
  Mat dst;
  warpAffine(img, dst, translation_matrix, Size_<int>(width, height));
  imshow("clockwise 30 half", dst);
}
实现代码: python
# 逆时针旋转30度
def translation_anti_clockwise_30(origin_img):
    # 获取图像的行、列
    rows, cols, channels = origin_img.shape
    # cols-1 and rows-1 are the coordinate limits.
    rotation_matrix = cv.getRotationMatrix2D(((cols - 1) / 2.0, (rows - 1) / 2.0), 30, 1)
    dst = cv.warpAffine(origin_img, rotation_matrix, (cols, rows))
    cv.imshow("anti_clockwise_30", dst)


# 逆时针旋转30度 缩放一半
def translation_anti_clockwise_30_scale_half(origin_img):
    # 获取图像的行、列
    rows, cols, channels = origin_img.shape
    # cols-1 and rows-1 are the coordinate limits.
    rotation_matrix = cv.getRotationMatrix2D(((cols - 1) / 2.0, (rows - 1) / 2.0), 30, 0.5)
    dst = cv.warpAffine(origin_img, rotation_matrix, (cols, rows))
    cv.imshow("anti_clockwise_30 half", dst)


# 顺时针旋转30度
def translation_clockwise_30(origin_img):
    # 获取图像的行、列
    rows, cols, channels = origin_img.shape
    # cols-1 and rows-1 are the coordinate limits.
    rotation_matrix = cv.getRotationMatrix2D(((cols - 1) / 2.0, (rows - 1) / 2.0), -30, 1)
    dst = cv.warpAffine(origin_img, rotation_matrix, (cols, rows))
    cv.imshow("clockwise_30", dst)


# 顺时针旋转30度 缩放一半
def translation_clockwise_30_scale_half(origin_img):
    # 获取图像的行、列
    rows, cols, channels = origin_img.shape
    # cols-1 and rows-1 are the coordinate limits.
    rotation_matrix = cv.getRotationMatrix2D(((cols - 1) / 2.0, (rows - 1) / 2.0), -30, 0.5)
    dst = cv.warpAffine(origin_img, rotation_matrix, (cols, rows))
    cv.imshow("clockwise_30 half", dst)
Affine Transformation(仿射变换)
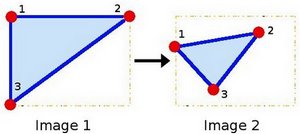
在几何学中,两个向量空间间的仿射变换由线性变换(一个矩阵)和平移(一个向量)组成。即一种由矩阵乘法(线性变换)和矢量加法(平移)的形式组合的变换。仿射变换是空间直角坐标系的变换,从一个二维坐标变换到另一个二维坐标,可用来表示rotation(线性变换),translation(向量加法), scale(线性变换),实际上仿射变换反映的是图像间的位置关系;
即: x → A x + b x \rarr Ax+b x→Ax+b,在有限维情况下,每个仿射变换由矩阵A和向量b给出。图形放射变换后具有如下性质:
- 点间的共线关系, 变换后一条线的点继续共线;
- 沿直线间的比率不变,变换后,对于不同的共线点p1,p2,p3,比值|p2-p1|/|p3-p2|保持不变;
通俗地讲,变换后图像的平行性、平直性保持不变。

通常使用 2 × 3 2\times3 2×3维矩阵来表示affine变换矩阵,
A = [ a 00 a 01 a 10 a 11 ] 2 × 2 B = [ b 00 b 10 ] 2 × 1 M = [ A B ] = [ a 00 a 01 b 00 a 10 a 11 b 10 ] 2 × 3 A = \begin{bmatrix} a_{00} & a_{01} \\ a_{10} & a_{11} \end{bmatrix}_{2\times2} B=\begin{bmatrix} b_{00} \\ b_{10}\end{bmatrix}_{2\times1} \\ M = \begin{bmatrix} A & B \end{bmatrix} = \begin{bmatrix} a_{00} & a_{01} & b_{00}\\ a_{10} & a_{11} &b_{10} \end{bmatrix}_{2\times3} A=[a00?a10??a01?a11??]2×2?B=[b00?b10??]2×1?M=[A?B?]=[a00?a10??a01?a11??b00?b10??]2×3?
使用A, B对二维向量 X = [ x y ] X=\begin{bmatrix} x \\ y\end{bmatrix} X=[xy?]做affine变换时,下面的公式可以达到同样的效果
T = A ? X + B o r T = M ? [ x y 1 ] T 即: T = [ a 00 x + a 01 y + b 00 a 10 x + a 11 y + b 10 ] T = A \cdot X + B \quad or \quad T = M \cdot \begin{bmatrix} x & y &1 \end{bmatrix}^T \\ 即: T= \begin{bmatrix} a{00}x + a_{01}y + b_{00} \\ a_{10}x + a_{11}y + b_{10} \end{bmatrix} T=A?X+BorT=M?[x?y?1?]T即:T=[a00x+a01?y+b00?a10?x+a11?y+b10??]
M是仿射变换 2 × 3 2\times3 2×3矩阵,A是 2 × 2 2\times2 2×2矩阵,表示坐标轴的旋转和缩放,B是 2 × 1 2\times1 2×1矩阵,是坐标轴平移矩阵。
为计算仿射变换矩阵,需先找出原图像中的三个点及其在目标图像中对应的三个点,然后使用 cv.getAffineTransform创建一个 2 × 3 2\times3 2×3维的矩阵,并将该矩阵传递给cv.warpAffine.
实现代码: C++
/**
 * 仿射变换
 * @param img
 */
void GeometricTransformation::image_affine_translation(const Mat &img) {
  logger_info("======image_affine_translation=================");
  //获取源图像 三个点
  Point2f srcTri[3];
  srcTri[0] = Point2f(0.f, 0.f);
  srcTri[1] = Point2f(img.cols - 1.f, 0.f);
  srcTri[2] = Point2f(0.f, img.rows - 1.f);
  //目标图像三个点
  Point2f dstTri[3];
  dstTri[0] = Point2f(0.f, img.rows * 0.33f);
  dstTri[1] = Point2f(img.cols * 0.85f, img.rows * 0.25f);
  dstTri[2] = Point2f(img.cols * 0.15f, img.rows * 0.7f);

//  affine变换矩阵
  Mat affine_matrix = getAffineTransform(srcTri, dstTri);

  Mat target_img;
  warpAffine(img, target_img, affine_matrix, Size_<int>(img.cols, img.rows));
  imshow("affine translation", target_img);
}
实现代码: python
# 仿射变换
def affine_translation(origin_img):
    rows, cols, channels = origin_img.shape
    # 源图像中的三个点(50, 50) (200, 50) (50, 200)
    # origin_img_positions = np.float32([[50, 50], [200, 50], [50, 200]])
    origin_img_positions = np.float32([[0, 0], [cols - 1, 0], [0, rows - 1]])
    # 目标图像中的三个点(50, 50) (200, 50) (50, 200)
    # target_img_positions = np.float32([[0, 100], [200, 50], [100, 250]])
    target_img_positions = np.float32([[0, rows * 0.33], [cols * 0.85, rows * 0.25], [cols * 0.15, rows * 0.7]])

    affine_matrix = cv.getAffineTransform(origin_img_positions, target_img_positions)
    target_img = cv.warpAffine(origin_img, affine_matrix, (cols, rows))

    cv.imshow("affine image", target_img)

    plt.subplot(121)
    # plt.imshow(origin_img)
    # OpenCV中描述图像的多维数组三通道依序为BGR,
    # 而matplotlib中的imshow函数依RGB的顺序显示图像,
    # 所以颜色上显示混乱、有图像失真毛病
    # 所以显示时需要转化
    plt.imshow(cv.cvtColor(origin_img, cv.COLOR_BGR2RGB))
    plt.title('origin image')

    plt.subplot(122)
    # plt.imshow(target_img)
    plt.imshow(cv.cvtColor(target_img, cv.COLOR_BGR2RGB))
    plt.title('affine image')

    plt.show()
Perspective translation(透视变换)
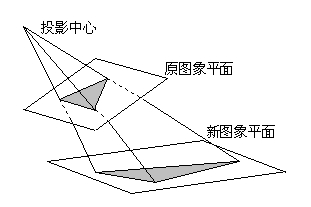
透视变换(Perspective Transformation)是将图片投影到一个新的视平面(Viewing Plane),也称作投影映射(Projective Mapping)。通过透视变换改变图像的观察视角可以更好的从图像中获取所需的信息。透视转换处理的是三维世界到2D图像的转换。其原理与照相机工件原理类似。

通用的变换公式为:
[ x ‘ y ′ z ′ ] = [ a 00 a 01 b 01 a 10 a 11 b 11 c 00 c 01 1 ] [ x y z ] \begin{bmatrix} x^{‘} \\ y^{'} \\ z^{'} \end{bmatrix} = \begin{bmatrix} a_{00} & a_{01} & b_{01} \\ a_{10} & a_{11} & b_{11} \\ c_{00} & c_{01} & 1 \end{bmatrix} \begin{bmatrix} x \\ y \\ z \end{bmatrix} ? ??x‘y′z′?? ??=? ??a00?a10?c00??a01?a11?c01??b01?b11?1?? ??? ??xyz?? ??
其中,变换矩阵 M = [ a 00 a 01 b 01 a 10 a 11 b 11 c 00 c 01 1 ] M = \begin{bmatrix} a_{00} & a_{01} & b_{01} \\ a_{10} & a_{11} & b_{11} \\ c_{00} & c_{01} & 1 \end{bmatrix} M=? ??a00?a10?c00??a01?a11?c01??b01?b11?1?? ?? , (x, y)为转换前的图像中的某点,(x’,y’)为(x,y)在转换后图像的对应点。变换矩阵M可以分为四部分A, B, C, D,即 M = [ A B C 1 ] M =\begin{bmatrix} A & B \\ C & 1 \end{bmatrix} M=[AC?B1?] 其中 A = [ a 00 a 01 a 10 a 11 ] A = \begin{bmatrix} a_{00} & a_{01} \\ a_{10} & a_{11} \end{bmatrix} A=[a00?a10??a01?a11??], B = [ b 01 b 11 ] B = \begin{bmatrix} b_{01} \\ b_{11} \end{bmatrix} B=[b01?b11??], C = [ c 00 c 01 ] C = \begin{bmatrix} c_{00} & c_{01} \end{bmatrix} C=[c00??c01??], D = [ 1 ] D = \begin{bmatrix} 1 \end{bmatrix} D=[1?]. A用于线性变换,如:缩放,旋转,B用于平移变换,C用于透视,相对对于affine变换矩阵,perspective变换矩阵C, D 部分为0.因此affine变换视为一种特殊的perspective变换。
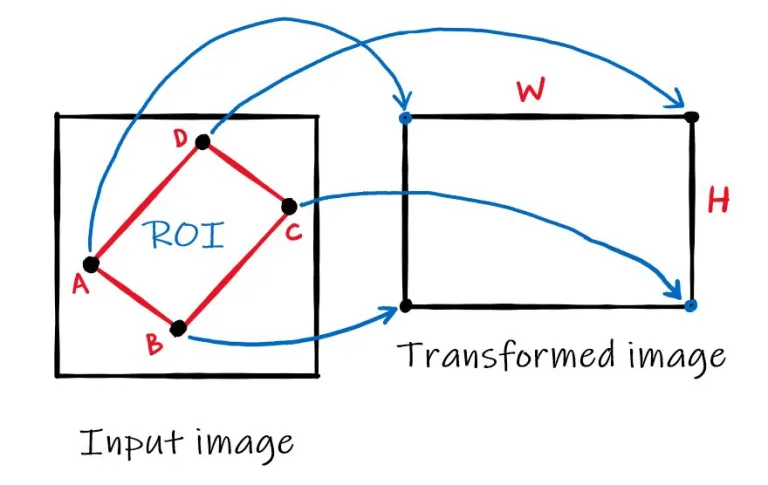
从变换矩阵M中可知,其有A,B,C,D组成,为找到M需从源图像中找出4个点位置及4个点在目标图像中对应的位置。在这4个点中,其中3个点不能在一条直线上。在OpenCV中通过cv.getPerspectiveTransform获得M,然后使用cv.warpPerspective完成变换。

实现代码: C++
/**
 * 透视转换
 * @param img
 */
void GeometricTransformation::image_perspective_translation(const Mat &img) {
  logger_info("======image_perspective_translation=================");
  //获取源图像 四个点
  Point2f srcTri[4];
//  srcTri[0] = Point2f(56.f, 65.f);
//  srcTri[1] = Point2f(368.f, 32.f);
//  srcTri[2] = Point2f(28.f, 387.f);
//  srcTri[3] = Point2f(389.f, 390.f);
  srcTri[0] = Point2f(img.cols / 1.70, img.rows / 4.20);
  srcTri[1] = Point2f(img.cols / 1.15, img.rows / 3.32);
  srcTri[2] = Point2f(img.cols / 1.33, img.rows / 1.10);
  srcTri[3] = Point2f(img.cols / 1.93, img.rows / 1.36);

//  中继点
  Point2f mid[3];
  mid[0] = (srcTri[0] + srcTri[1]) / 2;
  mid[1] = (srcTri[1] + srcTri[2]) / 2;
  mid[2] = (srcTri[2] + srcTri[3]) / 2;
  mid[3] = (srcTri[3] + srcTri[0]) / 2;

  //目标图像四个点
  Point2f dstTri[3];
//  dstTri[0] = Point2f(0.f, 0.f);
//  dstTri[1] = Point2f(300.f, 0.f);
//  dstTri[2] = Point2f(0.f, 300.f);
//  dstTri[3] = Point2f(300.f, 300.f);

  dstTri[0] = Point2f(0.f, 0.f);
  dstTri[1] = Point2f(norm(mid[1] - mid[3]), 0.f);
  dstTri[2] = Point2f(norm(mid[1] - mid[3]), norm(mid[0] - mid[2]));
  dstTri[3] = Point2f(0.f, norm(mid[0] - mid[2]));

  //  affine变换矩阵
  Mat perspective_matrix = getPerspectiveTransform(srcTri, dstTri);

  Mat target_img;
  //  对加源图像进行仿射变换操作
  warpPerspective(img, target_img, perspective_matrix, Size_<int>(img.cols, img.rows));
  imshow("perspective translation", target_img);
}
实现代码: python
# 透视变换
def perspective_translation(origin_img):
    rows, cols, channels = origin_img.shape
    # 源图像中的四个点(56, 65) (368, 52) (28, 387) (389, 390)
    # origin_img_positions = np.float32([[50, 50], [200, 50], [50, 200]])
    # origin_img_positions = np.float32([[56, 65], [368, 52], [28, 387], [389, 390]])
    origin_img_positions = np.float32(
        [[cols / 1.70, rows / 4.2],
         [cols / 1.15, rows / 3.32],
         [cols / 1.33, rows / 1.1],
         [cols / 1.93, rows / 1.36]])

    mid_positions = np.float32([(origin_img_positions[0] + origin_img_positions[1]) / 2,
                                (origin_img_positions[1] + origin_img_positions[2]) / 2,
                                (origin_img_positions[2] + origin_img_positions[3]) / 2,
                                (origin_img_positions[3] + origin_img_positions[0]) / 2])

    # 目标图像中的四个点(0, 0) (300, 0) (0, 300),(300,300)
    # target_img_positions = np.float32([[0, 100], [200, 50], [100, 250]])
    # target_img_positions = np.float32([[0, 0], [300, 0], [0, 300], [300, 300]])
    target_img_positions = np.float32([[0, 0],
                                       [cv.norm(mid_positions[1] - mid_positions[3]), 0],
                                       [cv.norm(mid_positions[1] - mid_positions[3]),
                                        cv.norm(mid_positions[0] - mid_positions[2])],
                                       [0, cv.norm(mid_positions[0] - mid_positions[2])]])

    perspective_matrix = cv.getPerspectiveTransform(origin_img_positions, target_img_positions)
    target_img = cv.warpPerspective(origin_img, perspective_matrix, (cols, rows))

    cv.imshow("perspective image", target_img)

    plt.subplot(121)
    # plt.imshow(origin_img)
    # OpenCV中描述图像的多维数组三通道依序为BGR,
    # 而matplotlib中的imshow函数依RGB的顺序显示图像,
    # 所以颜色上显示混乱、有图像失真毛病
    # 所以显示时需要转化
    plt.imshow(cv.cvtColor(origin_img, cv.COLOR_BGR2RGB))
    plt.title('origin image')

    plt.subplot(122)
    # plt.imshow(target_img)
    plt.imshow(cv.cvtColor(target_img, cv.COLOR_BGR2RGB))
    plt.title('perspective image')

    plt.show()
参考文献:
- https://docs.opencv.org/4.6.0/d4/d61/tutorial_warp_affine.html
- https://docs.opencv.org/4.6.0/da/d6e/tutorial_py_geometric_transformations.html
- https://iq.opengenus.org/different-interpolation-methods-in-opencv/
- https://www.cs.cornell.edu/courses/cs4620/2015fa/lectures/12perspectiveWeb.pdf
- https://theailearner.com/tag/perspective-transformation-opencv/