目录
『机器学习』分享机器学习课程学习笔记,逐步讲述从简单的线性回归、逻辑回归到 ? 决策树算法 ? 朴素贝叶斯算法 ? 支持向量机算法 ? 随机森林算法 ? 人工神经网络算法 等算法的内容。
研学说明
因为本人大四本学期近期事务繁多,这篇博文匆忙赶出来,这次交作业比起之前相比有点不求甚解了,我觉得是有错误的理解的(狗头保命),欢迎大家评论区指正!!!
资源下载
拿来即用,所见即所得。
项目仓库:https://gitee.com/miao-zehao/machine-learning/tree/master

环境配置可能的报错与解决方法
温馨提示,本次实验的环境配置有点难搞!有比较多的报错,如果不太想经历这些,可以直接使用Anaconda傻瓜式安装
方法1:手动部署
报错1: 库的版本过高,需要换成低版本的
TypeError: Descriptors cannot not be created directly.
If this call came from a _pb2.py file, your generated code is out of date and must be regenerated with protoc >= 3.19.0.
If you cannot immediately regenerate your protos, some other possible workarounds are:
 1. Downgrade the protobuf package to 3.20.x or lower.
 2. Set PROTOCOL_BUFFERS_PYTHON_IMPLEMENTATION=python (but this will use pure-Python parsing and will be much slower).

More information: https://developers.google.com/protocol-buffers/docs/news/2022-05-06#python-updates

报错2:需要安装指定的库
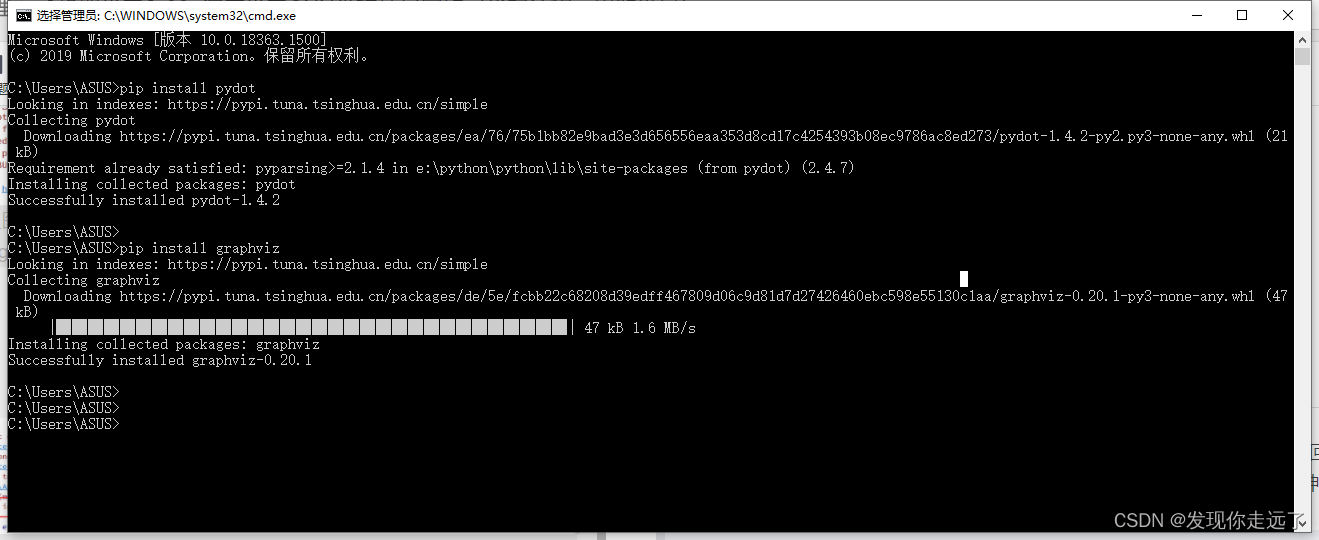
pydot可以直接pip install完成安装,但是graphviz还需要额外下载并设置环境变量。
ImportError: You must install pydot (`pip install pydot`) and install graphviz (see instructions at https://graphviz.gitlab.io/download/) for plot_model to work.

pip install pydot
pip install graphviz
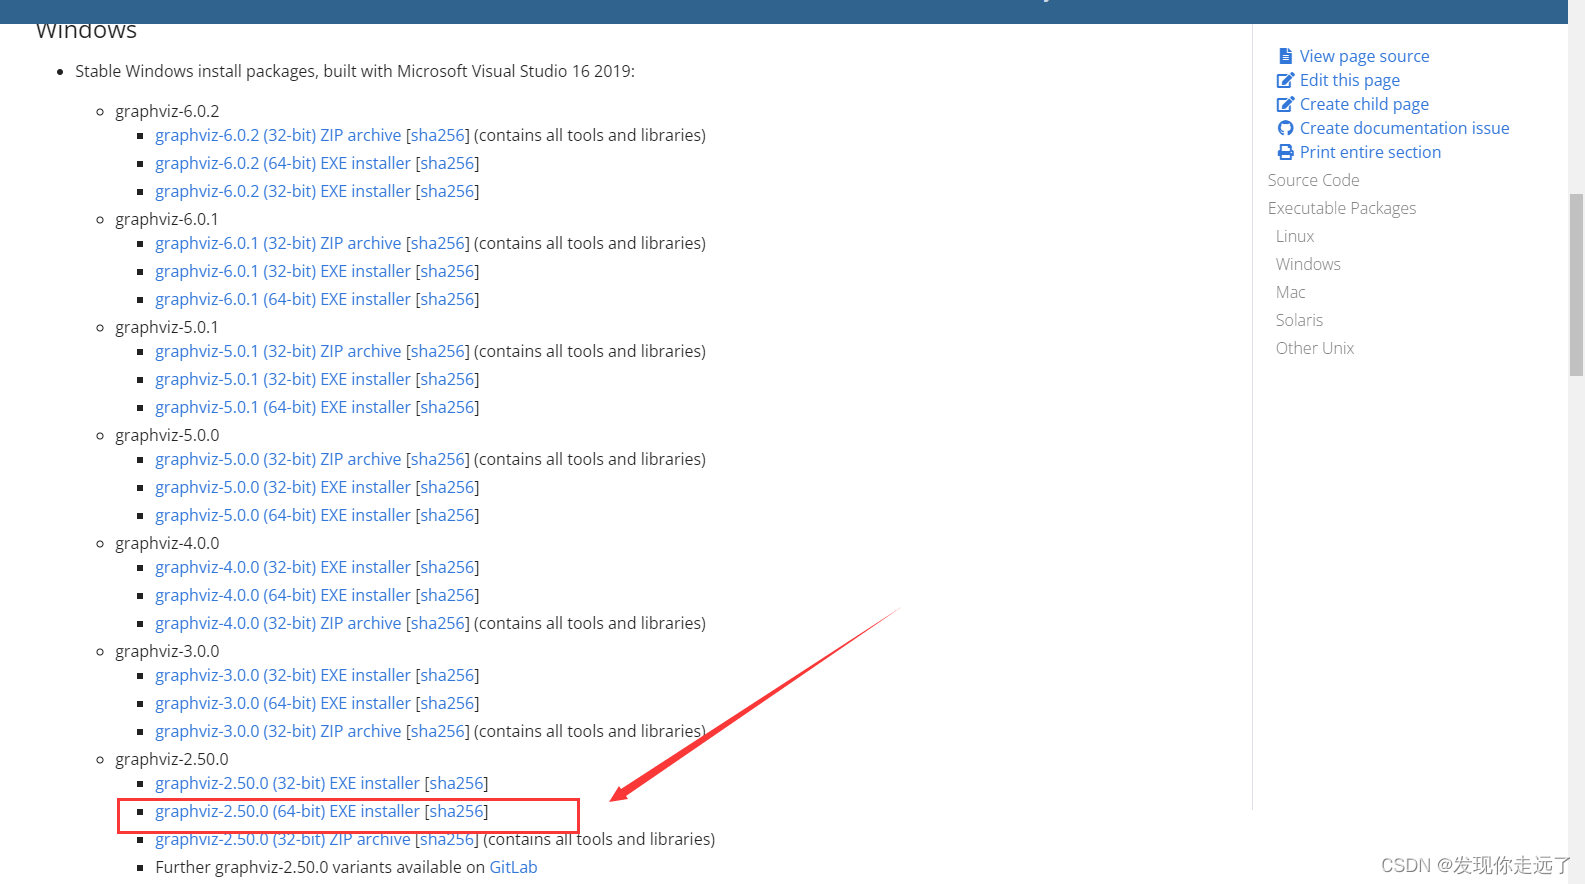
graphviz下载地址
https://graphviz.gitlab.io/download/
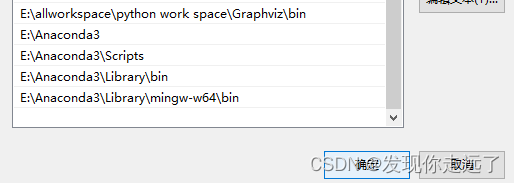
注意这边要勾选添加环境变量

确保环境变量

步骤3 重启电脑使得系统环境变量的修改生效
我不知道为啥・・・・我电脑一定要重启才会生效,如果你的电脑你确信没有这个情况,那么可以忽略这个重启电脑而是重启idea编辑器即可。
步骤4 引用包名的修改
报错的引用
from tensorflow.keras.models import Sequential, Model
修改成下面的导包,加上一个.python
from tensorflow.python.keras.models import Sequential, Model
方法2:Anaconda部署
确保你的Anaconda安装正确
检查你的环境变量
部署命令
conda install graphviz
conda install pydotplus
0. 初始情况
import numpy as np
from tensorflow.python.keras.models import Sequential, Model
from tensorflow.python.keras.layers import Dense, Flatten, Conv1D, MaxPooling1D, Input, concatenate
from keras.utils import plot_model
import os
os.environ['TF_CPP_MIN_LOG_LEVEL'] = '2' # 忽略掉不影响运行的报错
# 这个报错原因主要是 TensorFlow与crud的版本不一致,也可以换版本解决
# I tensorflow/core/platform/cpu_feature_guard.cc:193] This TensorFlow binary is optimized with oneAPI Deep Neural Network Library (oneDNN) to use the following CPU instructions in performance-critical operations: AVX AVX2
# To enable them in other operations, rebuild TensorFlow with the appropriate compiler flags.
def split_sequences2(first_seq, secend_seq, sw_width, n_features):
'''
该函数将序列数据分割成样本
'''
input_seq1 = np.array(first_seq).reshape(len(first_seq), 1)
input_seq2 = np.array(secend_seq).reshape(len(secend_seq), 1)
out_seq = np.array([first_seq[i] + secend_seq[i] for i in range(len(first_seq))])
out_seq = out_seq.reshape(len(out_seq), 1)
dataset = np.hstack((input_seq1, input_seq2, out_seq))
print('dataset:\n', dataset)
X, y = [], []
for i in range(len(dataset)):
# 切片索引从0开始,区间为前闭后开,所以不用减去1
end_element_index = i + sw_width
# 同样的道理,这里考虑最后一个样本正好取到最后一行的数据,那么索引不能减1,如果减去1的话最后一个样本就取不到了。
if end_element_index > len(dataset):
break
# 该语句实现步长为1的滑动窗口截取数据功能;
# 以下切片中,:-1 表示取除最后一列的其他列数据;-1表示取最后一列的数据
seq_x, seq_y = dataset[i:end_element_index, :-1], dataset[end_element_index - 1, -1]
X.append(seq_x)
y.append(seq_y)
process_X, process_y = np.array(X), np.array(y)
# [:,:,0]表示三维数组前两个维度的数据全取,第三个维度取第一个数据,可以想象成一摞饼干,取了一块。
# 本例中 process_X的shape为(7,3,2),所以下式就很好理解了,
X1 = process_X[:, :, 0].reshape(process_X.shape[0], process_X.shape[1], n_features)
X2 = process_X[:, :, 1].reshape(process_X.shape[0], process_X.shape[1], n_features)
print('train_X:\n{}\ntrain_y:\n{}\n'.format(process_X, process_y))
print('train_X.shape:{},trian_y.shape:{}\n'.format(process_X.shape, process_y.shape))
print('X1.shape:{},X2.shape:{}\n'.format(X1.shape, X2.shape))
return X1, X2, process_y
def oned_cnn_model(images_name,my_filters, my_kernel_size, my_activation, n_steps, n_features, X_1, X_2, y, x1, x2, epoch_num,
verbose_set):
visible1 = Input(shape=(n_steps, n_features))
cnn1 = Conv1D(filters=my_filters, kernel_size=my_kernel_size, activation=my_activation)(visible1)
cnn1 = MaxPooling1D(pool_size=2)(cnn1)
cnn1 = Flatten()(cnn1)
visible2 = Input(shape=(n_steps, n_features))
cnn2 = Conv1D(filters=my_filters, kernel_size=my_kernel_size, activation=my_activation)(visible2)
cnn2 = MaxPooling1D(pool_size=2)(cnn2)
cnn2 = Flatten()(cnn2)
merge = concatenate([cnn1, cnn2])
dense = Dense(50, activation=my_activation)(merge)
output = Dense(1)(dense)
model = Model(inputs=[visible1, visible2], outputs=output)
model.compile(optimizer='adam', loss='mse',
metrics=['accuracy'], loss_weights=None, sample_weight_mode=None, weighted_metrics=None,
target_tensors=None)
print('\n', model.summary())
plot_model(model, to_file=images_name+'.png', show_shapes=True, show_layer_names=True, rankdir='TB',dpi=200)
# epochs 训练轮次
# verbose:信息展示模式,0或1
history = model.fit([X_1, X_2], y, batch_size=32, epochs=epoch_num, verbose=verbose_set)
yhat = model.predict([x1, x2], verbose=0)
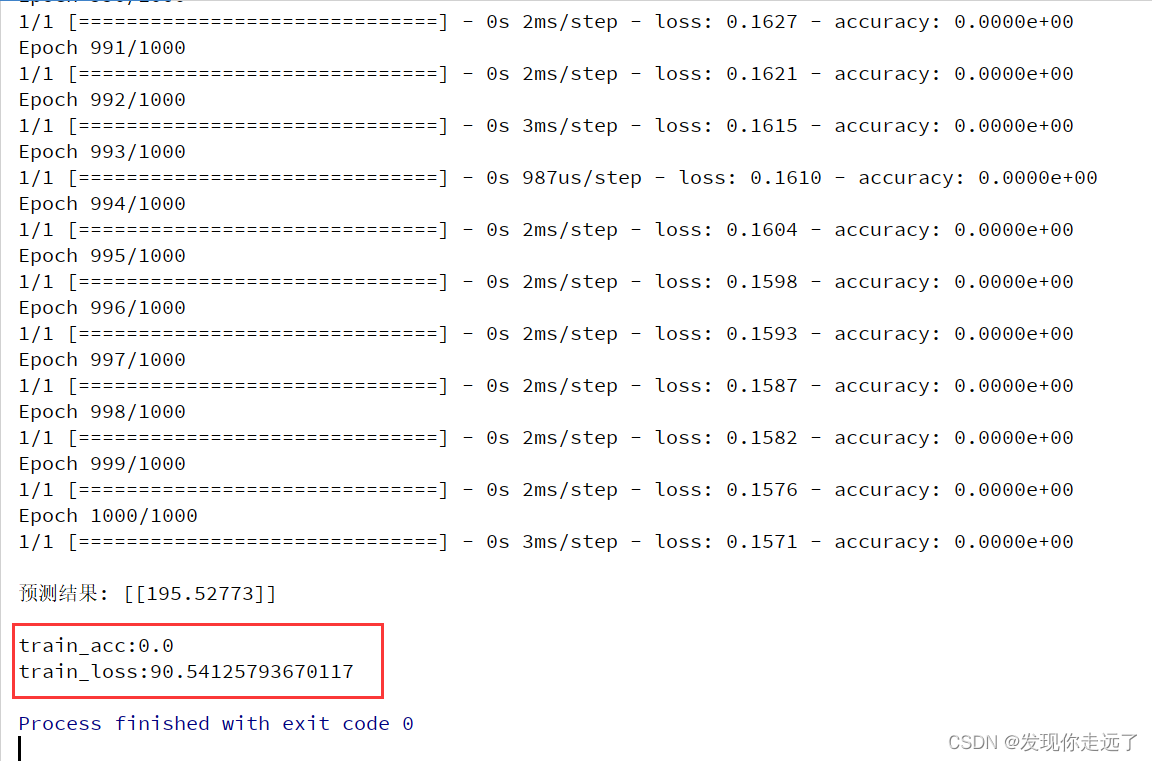
print('\n预测结果:', yhat)
return model, history
if __name__ == '__main__':
train_seq1 = [10, 20, 35, 45, 55, 65, 75, 85, 95]
train_seq2 = [15, 25, 35, 45, 55, 65, 75, 85, 95]
sw_width = 3
n_features = 1
epoch_num = 1000
verbose_set = 1 # 信息展示模式,是否显示训练过程的损失
train_X1, train_X2, train_y = split_sequences2(train_seq1, train_seq2, sw_width, n_features)
# 预测
x_input = np.array([[22, 24], [23, 12], [123, 125]])
x_1 = x_input[:, 0].reshape((1, sw_width, n_features))
x_2 = x_input[:, 1].reshape((1, sw_width, n_features))
images_name="0.初始情况"
my_filters=64
my_kernel_size=2
my_activation='relu'
# filters 卷积核的数目(即输出的维度)
# kernel_size 卷积核大小:单个整数或由2个整数构成的list/tuple,卷积核的宽度和长度。如为单个整数,则表示在各个空间维度的相同长度。
# activation激活函数,elu,selu: 可伸缩的指数线性单元(Scaled Exponential Linear Unit),参考Self-Normalizing Neural Networks,softplus,softsign,
# 可以填写 relu,tanh,sigmoid,hard_sigmoid,linear
model, history = oned_cnn_model(images_name,my_filters, my_kernel_size, my_activation,sw_width, n_features, train_X1, train_X2, train_y, x_1, x_2, epoch_num, verbose_set)
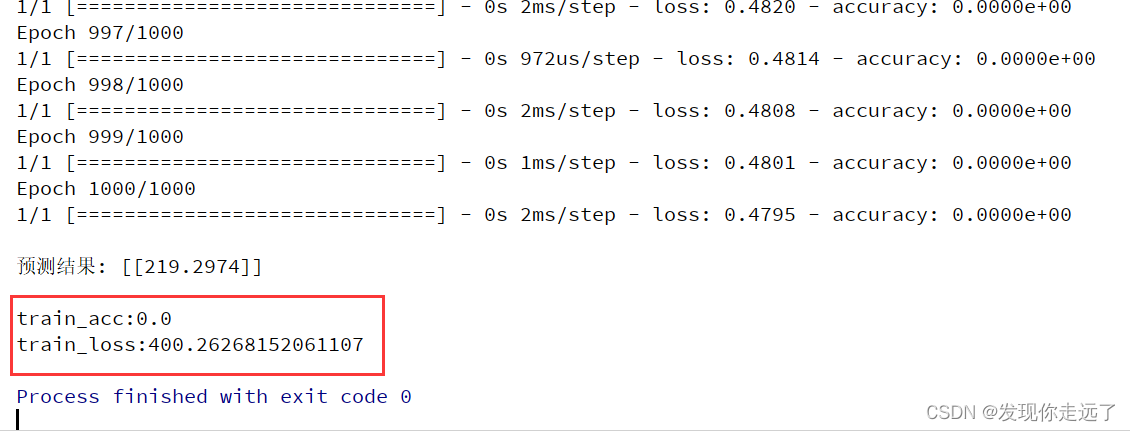
print('\ntrain_acc:%s' % np.mean(history.history['accuracy']), '\ntrain_loss:%s' % np.mean(history.history['loss']))
模型简图

运行效果
1. 更改卷积核的数量
import numpy as np
from tensorflow.python.keras.models import Sequential, Model
from tensorflow.python.keras.layers import Dense, Flatten, Conv1D, MaxPooling1D, Input, concatenate
from keras.utils import plot_model
import os
os.environ['TF_CPP_MIN_LOG_LEVEL'] = '2' # 忽略掉不影响运行的报错
# 这个报错原因主要是 TensorFlow与crud的版本不一致,也可以换版本解决
# I tensorflow/core/platform/cpu_feature_guard.cc:193] This TensorFlow binary is optimized with oneAPI Deep Neural Network Library (oneDNN) to use the following CPU instructions in performance-critical operations: AVX AVX2
# To enable them in other operations, rebuild TensorFlow with the appropriate compiler flags.
def split_sequences2(first_seq, secend_seq, sw_width, n_features):
'''
该函数将序列数据分割成样本
'''
input_seq1 = np.array(first_seq).reshape(len(first_seq), 1)
input_seq2 = np.array(secend_seq).reshape(len(secend_seq), 1)
out_seq = np.array([first_seq[i] + secend_seq[i] for i in range(len(first_seq))])
out_seq = out_seq.reshape(len(out_seq), 1)
dataset = np.hstack((input_seq1, input_seq2, out_seq))
print('dataset:\n', dataset)
X, y = [], []
for i in range(len(dataset)):
# 切片索引从0开始,区间为前闭后开,所以不用减去1
end_element_index = i + sw_width
# 同样的道理,这里考虑最后一个样本正好取到最后一行的数据,那么索引不能减1,如果减去1的话最后一个样本就取不到了。
if end_element_index > len(dataset):
break
# 该语句实现步长为1的滑动窗口截取数据功能;
# 以下切片中,:-1 表示取除最后一列的其他列数据;-1表示取最后一列的数据
seq_x, seq_y = dataset[i:end_element_index, :-1], dataset[end_element_index - 1, -1]
X.append(seq_x)
y.append(seq_y)
process_X, process_y = np.array(X), np.array(y)
# [:,:,0]表示三维数组前两个维度的数据全取,第三个维度取第一个数据,可以想象成一摞饼干,取了一块。
# 本例中 process_X的shape为(7,3,2),所以下式就很好理解了,
X1 = process_X[:, :, 0].reshape(process_X.shape[0], process_X.shape[1], n_features)
X2 = process_X[:, :, 1].reshape(process_X.shape[0], process_X.shape[1], n_features)
print('train_X:\n{}\ntrain_y:\n{}\n'.format(process_X, process_y))
print('train_X.shape:{},trian_y.shape:{}\n'.format(process_X.shape, process_y.shape))
print('X1.shape:{},X2.shape:{}\n'.format(X1.shape, X2.shape))
return X1, X2, process_y
def oned_cnn_model(images_name,my_filters, my_kernel_size, my_activation, n_steps, n_features, X_1, X_2, y, x1, x2, epoch_num,
verbose_set):
visible1 = Input(shape=(n_steps, n_features))
cnn1 = Conv1D(filters=my_filters, kernel_size=my_kernel_size, activation=my_activation)(visible1)
cnn1 = MaxPooling1D(pool_size=2)(cnn1)
cnn1 = Flatten()(cnn1)
visible2 = Input(shape=(n_steps, n_features))
cnn2 = Conv1D(filters=my_filters, kernel_size=my_kernel_size, activation=my_activation)(visible2)
cnn2 = MaxPooling1D(pool_size=2)(cnn2)
cnn2 = Flatten()(cnn2)
merge = concatenate([cnn1, cnn2])
dense = Dense(50, activation=my_activation)(merge)
output = Dense(1)(dense)
model = Model(inputs=[visible1, visible2], outputs=output)
model.compile(optimizer='adam', loss='mse',
metrics=['accuracy'], loss_weights=None, sample_weight_mode=None, weighted_metrics=None,
target_tensors=None)
print('\n', model.summary())
plot_model(model, to_file=images_name+'.png', show_shapes=True, show_layer_names=True, rankdir='TB',dpi=200)
# epochs 训练轮次
# verbose:信息展示模式,0或1
history = model.fit([X_1, X_2], y, batch_size=32, epochs=epoch_num, verbose=verbose_set)
yhat = model.predict([x1, x2], verbose=0)
print('\n预测结果:', yhat)
return model, history
if __name__ == '__main__':
train_seq1 = [10, 20, 35, 45, 55, 65, 75, 85, 95]
train_seq2 = [15, 25, 35, 45, 55, 65, 75, 85, 95]
sw_width = 3
n_features = 1
epoch_num = 1000
verbose_set = 1 # 信息展示模式,是否显示训练过程的损失
train_X1, train_X2, train_y = split_sequences2(train_seq1, train_seq2, sw_width, n_features)
# 预测
x_input = np.array([[22, 24], [23, 12], [123, 125]])
x_1 = x_input[:, 0].reshape((1, sw_width, n_features))
x_2 = x_input[:, 1].reshape((1, sw_width, n_features))
images_name="1.更改卷积核的数量=128"
my_filters=128
my_kernel_size=2
my_activation='relu'
# filters 卷积核的数目(即输出的维度)
# kernel_size 卷积核大小:单个整数或由2个整数构成的list/tuple,卷积核的宽度和长度。如为单个整数,则表示在各个空间维度的相同长度。
# activation激活函数,elu,selu: 可伸缩的指数线性单元(Scaled Exponential Linear Unit),参考Self-Normalizing Neural Networks,softplus,softsign,
# 可以填写 relu,tanh,sigmoid,hard_sigmoid,linear
model, history = oned_cnn_model(images_name,my_filters, my_kernel_size, my_activation,sw_width, n_features, train_X1, train_X2, train_y, x_1, x_2, epoch_num, verbose_set)
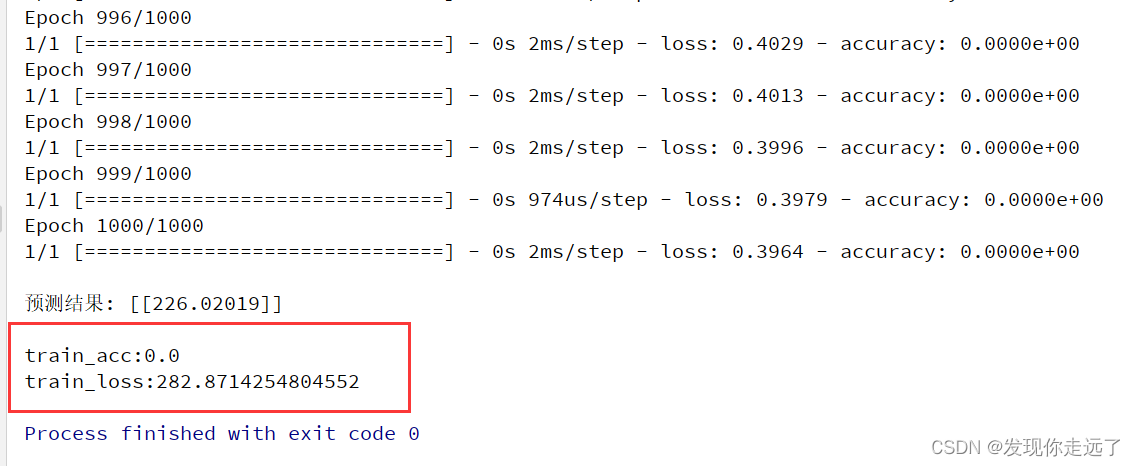
print('\ntrain_acc:%s' % np.mean(history.history['accuracy']), '\ntrain_loss:%s' % np.mean(history.history['loss']))
模型简图
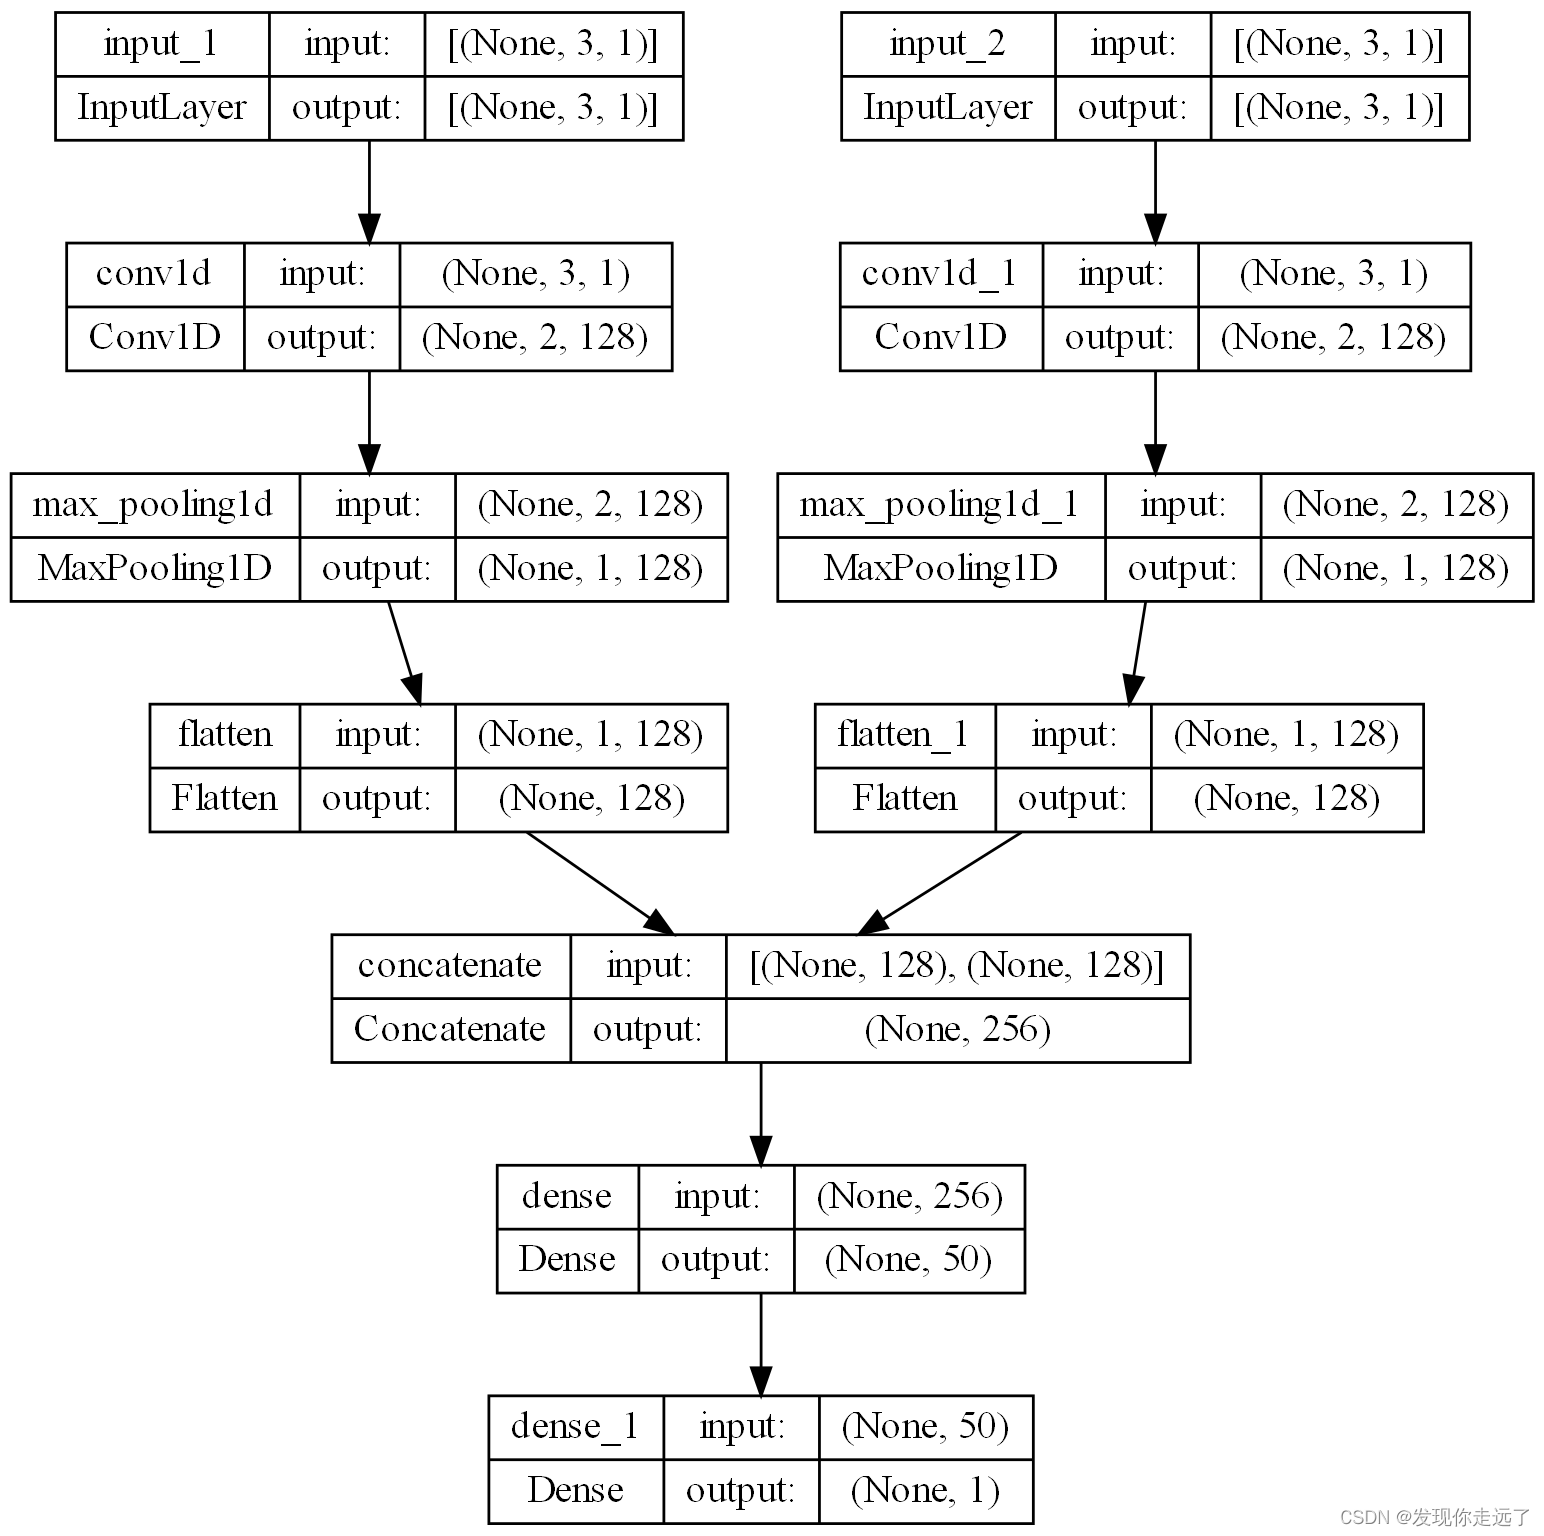
运行效果
2. 更改卷积核的大小
import numpy as np
from tensorflow.python.keras.models import Sequential, Model
from tensorflow.python.keras.layers import Dense, Flatten, Conv1D, MaxPooling1D, Input, concatenate
from keras.utils import plot_model
import os
os.environ['TF_CPP_MIN_LOG_LEVEL'] = '2' # 忽略掉不影响运行的报错
# 这个报错原因主要是 TensorFlow与crud的版本不一致,也可以换版本解决
# I tensorflow/core/platform/cpu_feature_guard.cc:193] This TensorFlow binary is optimized with oneAPI Deep Neural Network Library (oneDNN) to use the following CPU instructions in performance-critical operations: AVX AVX2
# To enable them in other operations, rebuild TensorFlow with the appropriate compiler flags.
def split_sequences2(first_seq, secend_seq, sw_width, n_features):
'''
该函数将序列数据分割成样本
'''
input_seq1 = np.array(first_seq).reshape(len(first_seq), 1)
input_seq2 = np.array(secend_seq).reshape(len(secend_seq), 1)
out_seq = np.array([first_seq[i] + secend_seq[i] for i in range(len(first_seq))])
out_seq = out_seq.reshape(len(out_seq), 1)
dataset = np.hstack((input_seq1, input_seq2, out_seq))
print('dataset:\n', dataset)
X, y = [], []
for i in range(len(dataset)):
# 切片索引从0开始,区间为前闭后开,所以不用减去1
end_element_index = i + sw_width
# 同样的道理,这里考虑最后一个样本正好取到最后一行的数据,那么索引不能减1,如果减去1的话最后一个样本就取不到了。
if end_element_index > len(dataset):
break
# 该语句实现步长为1的滑动窗口截取数据功能;
# 以下切片中,:-1 表示取除最后一列的其他列数据;-1表示取最后一列的数据
seq_x, seq_y = dataset[i:end_element_index, :-1], dataset[end_element_index - 1, -1]
X.append(seq_x)
y.append(seq_y)
process_X, process_y = np.array(X), np.array(y)
# [:,:,0]表示三维数组前两个维度的数据全取,第三个维度取第一个数据,可以想象成一摞饼干,取了一块。
# 本例中 process_X的shape为(7,3,2),所以下式就很好理解了,
X1 = process_X[:, :, 0].reshape(process_X.shape[0], process_X.shape[1], n_features)
X2 = process_X[:, :, 1].reshape(process_X.shape[0], process_X.shape[1], n_features)
print('train_X:\n{}\ntrain_y:\n{}\n'.format(process_X, process_y))
print('train_X.shape:{},trian_y.shape:{}\n'.format(process_X.shape, process_y.shape))
print('X1.shape:{},X2.shape:{}\n'.format(X1.shape, X2.shape))
return X1, X2, process_y
def oned_cnn_model(images_name,my_filters, my_kernel_size, my_activation, n_steps, n_features, X_1, X_2, y, x1, x2, epoch_num,
verbose_set):
visible1 = Input(shape=(n_steps, n_features))
cnn1 = Conv1D(filters=my_filters, kernel_size=my_kernel_size, activation=my_activation)(visible1)
cnn1 = MaxPooling1D(pool_size=2)(cnn1)
cnn1 = Flatten()(cnn1)
visible2 = Input(shape=(n_steps, n_features))
cnn2 = Conv1D(filters=my_filters, kernel_size=my_kernel_size, activation=my_activation)(visible2)
cnn2 = MaxPooling1D(pool_size=2)(cnn2)
cnn2 = Flatten()(cnn2)
merge = concatenate([cnn1, cnn2])
dense = Dense(50, activation=my_activation)(merge)
output = Dense(1)(dense)
model = Model(inputs=[visible1, visible2], outputs=output)
model.compile(optimizer='adam', loss='mse',
metrics=['accuracy'], loss_weights=None, sample_weight_mode=None, weighted_metrics=None,
target_tensors=None)
print('\n', model.summary())
plot_model(model, to_file=images_name+'.png', show_shapes=True, show_layer_names=True, rankdir='TB',dpi=200)
# epochs 训练轮次
# verbose:信息展示模式,0或1
history = model.fit([X_1, X_2], y, batch_size=32, epochs=epoch_num, verbose=verbose_set)
yhat = model.predict([x1, x2], verbose=0)
print('\n预测结果:', yhat)
return model, history
if __name__ == '__main__':
train_seq1 = [10, 20, 35, 45, 55, 65, 75, 85, 95]
train_seq2 = [15, 25, 35, 45, 55, 65, 75, 85, 95]
sw_width = 3
n_features = 1
epoch_num = 1000
verbose_set = 1 # 信息展示模式,是否显示训练过程的损失
train_X1, train_X2, train_y = split_sequences2(train_seq1, train_seq2, sw_width, n_features)
# 预测
x_input = np.array([[22, 24], [23, 12], [123, 125]])
x_1 = x_input[:, 0].reshape((1, sw_width, n_features))
x_2 = x_input[:, 1].reshape((1, sw_width, n_features))
images_name="2.更改卷积核的大小=1"
my_filters=64
my_kernel_size=1# 卷积核的大小=1
my_activation='relu'
# filters 卷积核的数目(即输出的维度)
# kernel_size 卷积核大小:单个整数或由2个整数构成的list/tuple,卷积核的宽度和长度。如为单个整数,则表示在各个空间维度的相同长度。
# activation激活函数,elu,selu: 可伸缩的指数线性单元(Scaled Exponential Linear Unit),参考Self-Normalizing Neural Networks,softplus,softsign,
# 可以填写 relu,tanh,sigmoid,hard_sigmoid,linear
model, history = oned_cnn_model(images_name,my_filters, my_kernel_size, my_activation,sw_width, n_features, train_X1, train_X2, train_y, x_1, x_2, epoch_num, verbose_set)
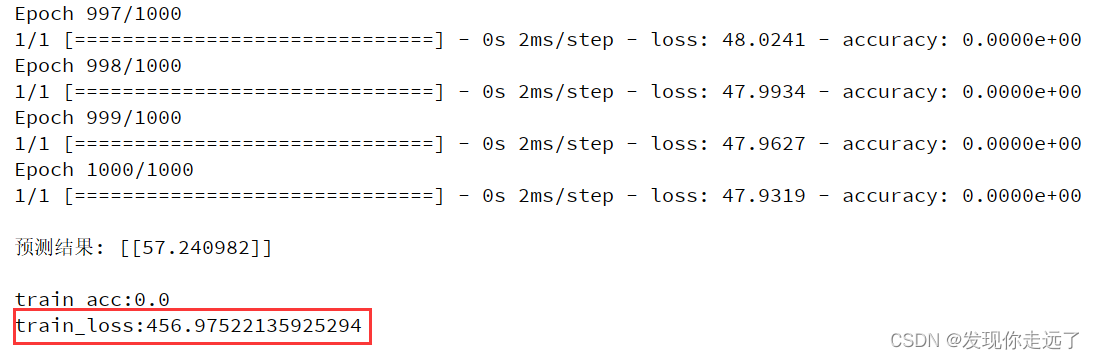
print('\ntrain_acc:%s' % np.mean(history.history['accuracy']), '\ntrain_loss:%s' % np.mean(history.history['loss']))
模型简图
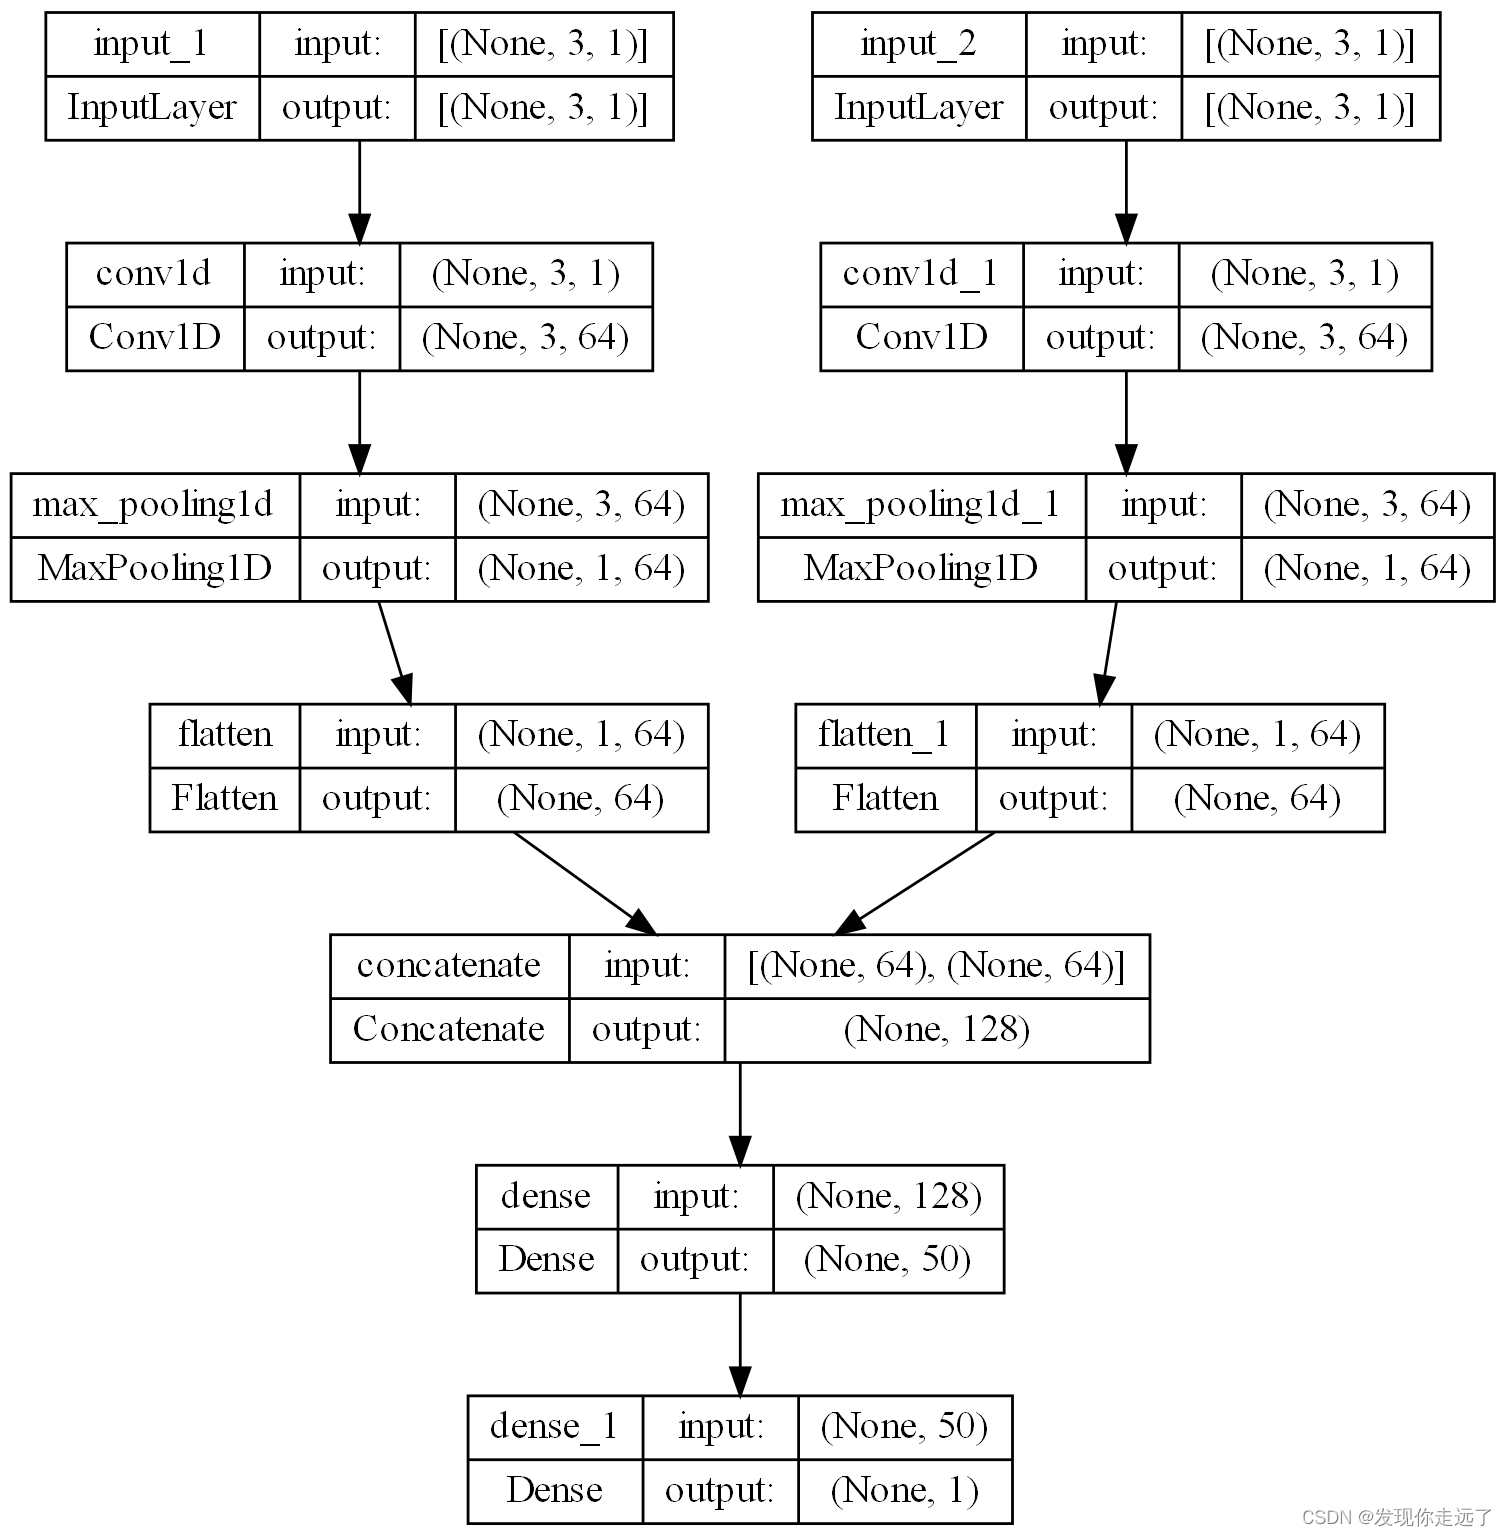
运行效果
3. 尝试更改CNN中的其他参数(这里改变激活函数)
对比参数的设置对模型性能的影响
import numpy as np
from tensorflow.python.keras.models import Sequential, Model
from tensorflow.python.keras.layers import Dense, Flatten, Conv1D, MaxPooling1D, Input, concatenate
from keras.utils import plot_model

import os

os.environ['TF_CPP_MIN_LOG_LEVEL'] = '2'  # 忽略掉不影响运行的报错


# 这个报错原因主要是 TensorFlow与crud的版本不一致,也可以换版本解决
# I tensorflow/core/platform/cpu_feature_guard.cc:193] This TensorFlow binary is optimized with oneAPI Deep Neural Network Library (oneDNN) to use the following CPU instructions in performance-critical operations:  AVX AVX2
# To enable them in other operations, rebuild TensorFlow with the appropriate compiler flags.


def split_sequences2(first_seq, secend_seq, sw_width, n_features):
    '''
    该函数将序列数据分割成样本
    '''
    input_seq1 = np.array(first_seq).reshape(len(first_seq), 1)
    input_seq2 = np.array(secend_seq).reshape(len(secend_seq), 1)
    out_seq = np.array([first_seq[i] + secend_seq[i] for i in range(len(first_seq))])
    out_seq = out_seq.reshape(len(out_seq), 1)

    dataset = np.hstack((input_seq1, input_seq2, out_seq))
    print('dataset:\n', dataset)

    X, y = [], []

    for i in range(len(dataset)):
        # 切片索引从0开始,区间为前闭后开,所以不用减去1
        end_element_index = i + sw_width
        # 同样的道理,这里考虑最后一个样本正好取到最后一行的数据,那么索引不能减1,如果减去1的话最后一个样本就取不到了。
        if end_element_index > len(dataset):
            break

        # 该语句实现步长为1的滑动窗口截取数据功能;
        # 以下切片中,:-1 表示取除最后一列的其他列数据;-1表示取最后一列的数据
        seq_x, seq_y = dataset[i:end_element_index, :-1], dataset[end_element_index - 1, -1]

        X.append(seq_x)
        y.append(seq_y)

        process_X, process_y = np.array(X), np.array(y)

    # [:,:,0]表示三维数组前两个维度的数据全取,第三个维度取第一个数据,可以想象成一摞饼干,取了一块。
    # 本例中 process_X的shape为(7,3,2),所以下式就很好理解了,
    X1 = process_X[:, :, 0].reshape(process_X.shape[0], process_X.shape[1], n_features)
    X2 = process_X[:, :, 1].reshape(process_X.shape[0], process_X.shape[1], n_features)

    print('train_X:\n{}\ntrain_y:\n{}\n'.format(process_X, process_y))
    print('train_X.shape:{},trian_y.shape:{}\n'.format(process_X.shape, process_y.shape))
    print('X1.shape:{},X2.shape:{}\n'.format(X1.shape, X2.shape))

    return X1, X2, process_y


def oned_cnn_model(images_name,my_filters, my_kernel_size, my_activation, n_steps, n_features, X_1, X_2, y, x1, x2, epoch_num,
                   verbose_set):
    visible1 = Input(shape=(n_steps, n_features))

    cnn1 = Conv1D(filters=my_filters, kernel_size=my_kernel_size, activation=my_activation)(visible1)
    cnn1 = MaxPooling1D(pool_size=2)(cnn1)
    cnn1 = Flatten()(cnn1)

    visible2 = Input(shape=(n_steps, n_features))
    cnn2 = Conv1D(filters=my_filters, kernel_size=my_kernel_size, activation=my_activation)(visible2)
    cnn2 = MaxPooling1D(pool_size=2)(cnn2)
    cnn2 = Flatten()(cnn2)

    merge = concatenate([cnn1, cnn2])
    dense = Dense(50, activation=my_activation)(merge)
    output = Dense(1)(dense)

    model = Model(inputs=[visible1, visible2], outputs=output)

    model.compile(optimizer='adam', loss='mse',
                  metrics=['accuracy'], loss_weights=None, sample_weight_mode=None, weighted_metrics=None,
                  target_tensors=None)

    print('\n', model.summary())
    plot_model(model, to_file=images_name+'.png', show_shapes=True, show_layer_names=True, rankdir='TB',dpi=200)

    # epochs 训练轮次
    # verbose:信息展示模式,0或1
    history = model.fit([X_1, X_2], y, batch_size=32, epochs=epoch_num, verbose=verbose_set)

    yhat = model.predict([x1, x2], verbose=0)
    print('\n预测结果:', yhat)

    return model, history


if __name__ == '__main__':
    train_seq1 = [10, 20, 35, 45, 55, 65, 75, 85, 95]
    train_seq2 = [15, 25, 35, 45, 55, 65, 75, 85, 95]
    sw_width = 3
    n_features = 1
    epoch_num = 1000
    verbose_set = 1  # 信息展示模式,是否显示训练过程的损失

    train_X1, train_X2, train_y = split_sequences2(train_seq1, train_seq2, sw_width, n_features)

    # 预测
    x_input = np.array([[22, 24], [23, 12], [123, 125]])
    x_1 = x_input[:, 0].reshape((1, sw_width, n_features))
    x_2 = x_input[:, 1].reshape((1, sw_width, n_features))

    images_name="3.更改激活函数"
    my_filters=64
    my_kernel_size=2
    my_activation='linear'
    # filters 卷积核的数目(即输出的维度)
    # kernel_size 卷积核大小:单个整数或由2个整数构成的list/tuple,卷积核的宽度和长度。如为单个整数,则表示在各个空间维度的相同长度。
    # activation激活函数,elu,selu: 可伸缩的指数线性单元(Scaled Exponential Linear Unit),参考Self-Normalizing Neural Networks,softplus,softsign,
    # 可以填写 relu,tanh,sigmoid,hard_sigmoid,linear

    model, history = oned_cnn_model(images_name,my_filters, my_kernel_size, my_activation,sw_width, n_features, train_X1, train_X2, train_y, x_1, x_2, epoch_num, verbose_set)

    print('\ntrain_acc:%s' % np.mean(history.history['accuracy']), '\ntrain_loss:%s' % np.mean(history.history['loss']))
模型截图

运行效果
总结
大家喜欢的话,给个👍,点个关注!给大家分享更多有趣好玩的python机器学习知识!
版权声明:
发现你走远了@mzh原创作品,转载必须标注原文链接
Copyright 2022 mzh
Crated:2022-9-23
欢迎关注 『机器学习』 系列,持续更新中
欢迎关注 『机器学习』 系列,持续更新中
【机器学习】01. 波士顿房价为例子学习线性回归
【机器学习】02. 使用sklearn库牛顿化、正则化的逻辑回归
【机器学习】03. 支持向量机SVM库进行可视化分类
【机器学习】04. 神经网络模型 MLPClassifier分类算法与MLPRegressor回归算法
【机器学习】05. 聚类分析
【机器学习】07. 决策树模型DecisionTreeClassifier
【机器学习】08. 深度学习CNN卷积神经网络keras库
【更多内容敬请期待】