来源:投稿 作者:王浩
编辑:学姐
这篇文章的核心内容是讲解如何使用FCN实现图像的语义分割。
- 在文章的开始,我们讲了一些FCN的结构和优缺点。
- 然后,讲解了如何读取数据集。
- 接下来,告诉大家如何实现训练。
- 最后,是测试以及结果展示。
希望本文能给大家带来帮助。
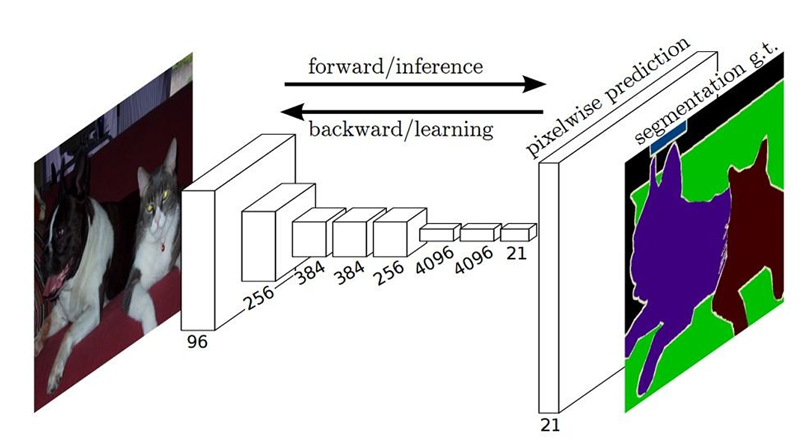
FCN对图像进行像素级的分类,从而解决了语义级别的图像分割(semantic segmentation)问题。与经典的CNN在卷积层之后使用全连接层得到固定长度的特征向量进行分类(全联接层+softmax 输出)不同,FCN可以接受任意尺寸的输入图像,采用反卷积层对最后一个卷积层的feature map进行 上采样, 使它恢复到输入图像相同的尺寸,从而可以对每个像素都产生了一个预测, 同时保留了原始输入 图像中的空间信息, 最后在上采样的特征图上进行逐像素分类。
下图是语义分割所采用的全卷积网络(FCN)的结构示意图:
传统的基于CNN的分割方法缺点?
传统的基于CNN的分割方法:为了对一个像素分类,使用该像素周围的一个图像块作为CNN的输 入,用于训练与预测,这种方法主要有几个缺点:
1)存储开销大,例如,对每个像素使用15 * 15的图像块,然后不断滑动窗口,将图像块输入到 CNN中进行类别判断,因此,需要的存储空间随滑动窗口的次数和大小急剧上升;
2)效率低下,相邻像素块基本上是重复的,针对每个像素块逐个计算卷积,这种计算有很大程度上 的重复;
3)像素块的大小限制了感受区域的大小,通常像素块的大小比整幅图像的大小小很多,只能提取一 些局部特征,从而导致分类性能受到限制。而全卷积网络(FCN)则是从抽象的特征中恢复出每个像素所属的类别。即从图像级别的分类进一步延伸到 像素级别的分类。
FCN改变了什么?
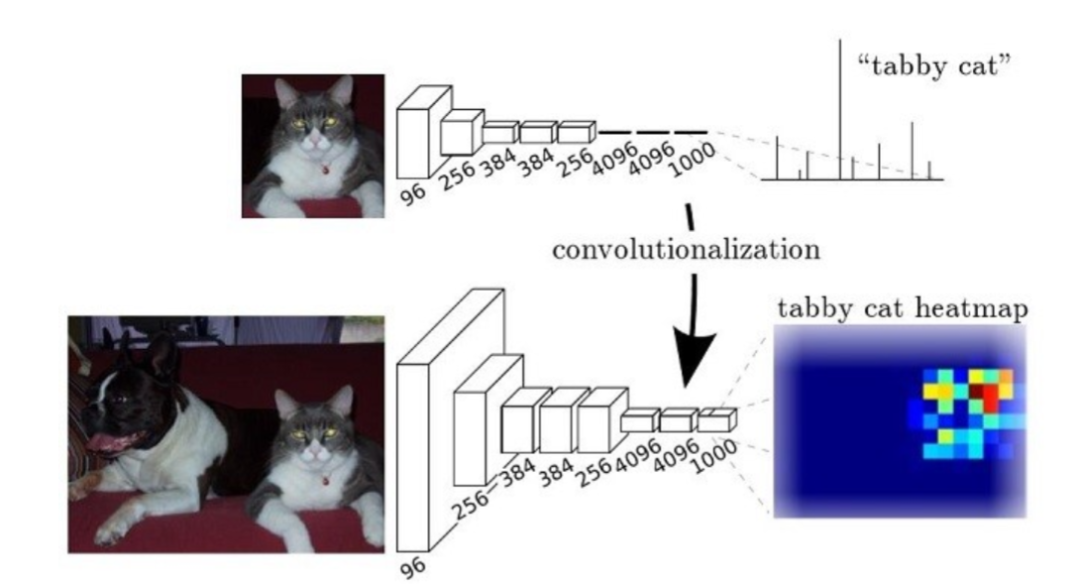
对于一般的分类CNN网络,如VGG和Resnet,都会在网络的最后加入一些全连接层,经过 softmax后就可以获得类别概率信息。但是这个概率信息是1维的,即只能标识整个图片的类别,不能标识每个像素点的类别,所以这种全连接方法不适用于图像分割。
而FCN提出可以把后面几个全连接都换成卷积,这样就可以获得一张2维的feature map,后接 softmax层获得每个像素点的分类信息,从而解决了分割问题,如图4。
FCN缺点
(1)得到的结果还是不够精细。进行8倍上采样虽然比32倍的效果好了很多,但是上采样的结果还 是比较模糊和平滑,对图像中的细节不敏感。
(2)对各个像素进行分类,没有充分考虑像素与像素之间的关系。忽略了在通常的基于像素分类的分割 方法中使用的空间规整(spatial regularization)步骤,缺乏空间一致性。
数据集
本例的数据集采用PASCAL VOC 2012 数据集,它有二十个类别:
- Person:person
- Animal: bird, cat, cow, dog, horse, sheep
- Vehicle:aeroplane, bicycle, boat, bus, car, motorbike, train
- Indoor: bottle, chair, dining table, potted plant, sofa, tv/monitor
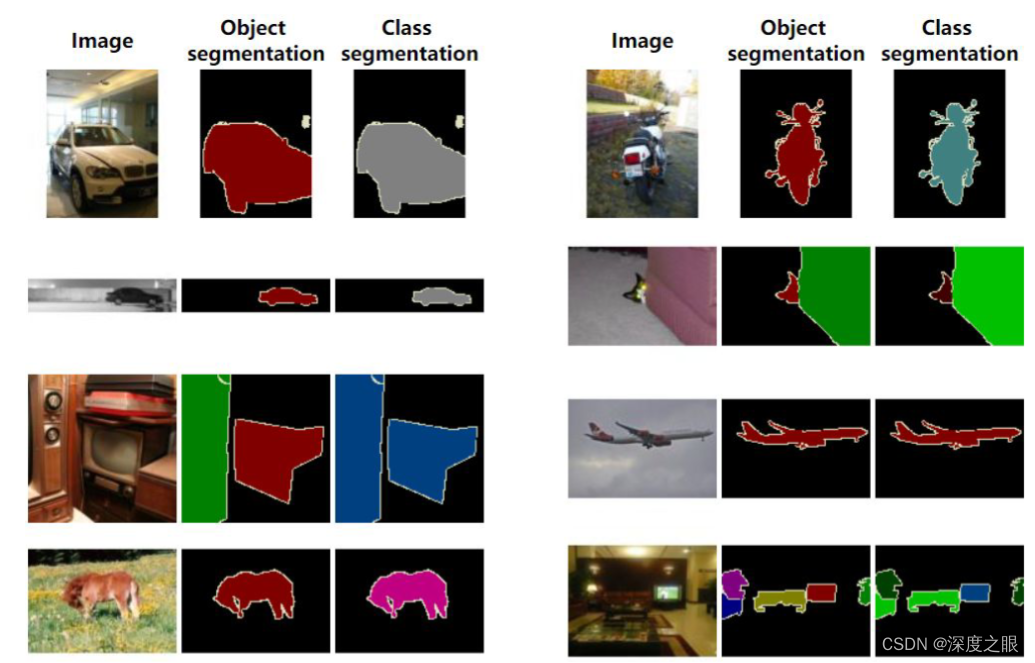
下载地址:The PASCAL Visual Object Classes Challenge 2012 (VOC2012) (ox.ac.uk)。
http://host.robots.ox.ac.uk/pascal/VOC/voc2012/index.html
数据集的结构
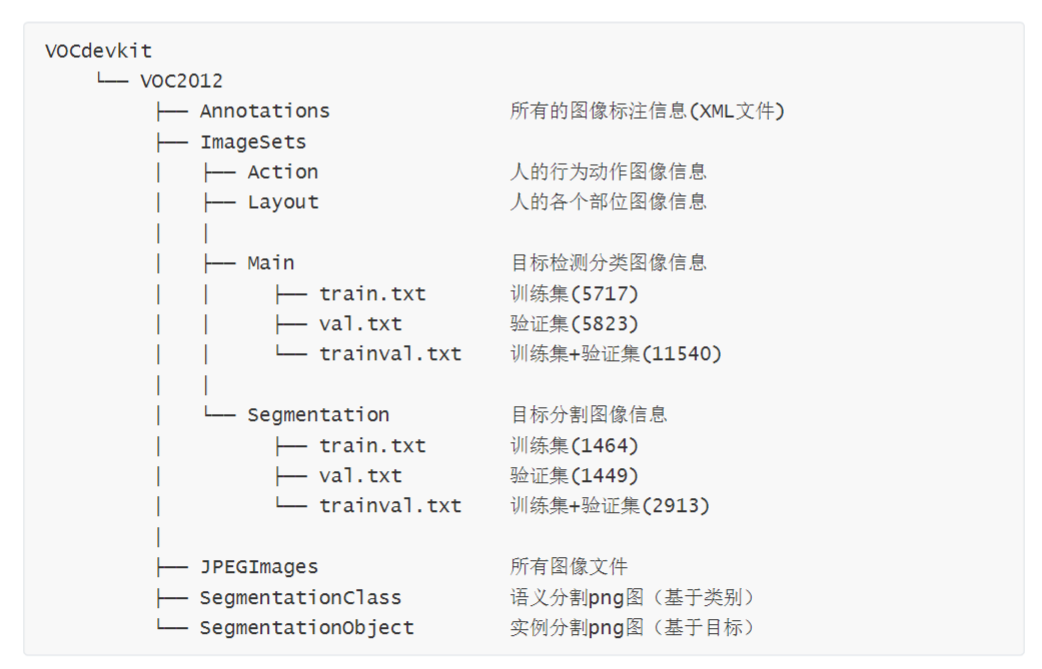
数据集包含物体检测和语义分割,我们只需要语义分割的数据集,所以可以考虑把多余的图片删除,删除的思路:
1、获取所有图片的name。
2、获取所有语义分割mask的name。
3、求二者的差集,然后将差集的name删除。
代码如下:
import?glob
import?os
image_all?=?glob.glob('data/VOCdevkit/VOC2012/JPEGImages/*.jpg')
image_all_name?=?[image_file.replace('\\',?'/').split('/')[-1].split('.')[0]?for
image_file?in?image_all]
image_SegmentationClass?=
glob.glob('data/VOCdevkit/VOC2012/SegmentationClass/*.png')
image_se_name=?[image_file.replace('\\',?'/').split('/')[-1].split('.')[0]?for
image_file?in?image_SegmentationClass]
image_other=list(set(image_all_name)?-?set(image_se_name))
print(image_other)
for?image_name?in?image_other:
os.remove('data/VOCdevkit/VOC2012/JPEGImages/{}.jpg'.format(image_name))
代码链接
本例选用的代码来自:
deep-learning-for-image-processing/pytorch_segmentation/fcn at master · WZMIAOMIAO/deep-learning-for-image-processing (github.com)
https://github.com/WZMIAOMIAO/deep-learning-for-image-processing/tree/master/pytorch_segmentation/fcn
其他的代码也有很多,这篇比较好理解!
其实还有个比较好的图像分割库:
https://github.com/qubvel/segmentation_models.pytorch
这个图像分割集合由俄罗斯的程序员小哥Pavel Yakubovskiy一手打造。在后面的文章,我也会使用这个库演示。
项目结构
├──?src:?模型的backbone以及FCN的搭建
├──?train_utils:?训练、验证以及多GPU训练相关模块?├──?my_dataset.py:?自定义dataset用于读取VOC数据集
├──?train.py:?以fcn_resnet50(这里使用了Dilated/Atrous?Convolution)进行训练
├──?predict.py:?简易的预测脚本,使用训练好的权重进行预测测试
├──?validation.py:?利用训练好的权重验证/测试数据的mIoU等指标,并生成record_mAP.txt文件?└──?pascal_voc_classes.json:?pascal_voc标签文件
由于代码很多不能一一讲解,所以,接下来对重要的代码做剖析。
自定义数据集读取
my_dataset.py自定义数据读取的方法,代码如下:
import?os
import?torch.utils.data?as?data
from?PIL?import?Image
class?VOCSegmentation(data.Dataset):
def?__init__(self,?voc_root,?year="2012",?transforms=None,?txt_name:?str?=
"train.txt"):
super(VOCSegmentation,?self).__init__()
assert?year?in?["2007",?"2012"],?"year?must?be?in?['2007',?'2012']"
root?=?os.path.join(voc_root,?"VOCdevkit",?f"VOC{year}")
root=root.replace('\\','/')
assert?os.path.exists(root),?"path?'{}'?does?not?exist.".format(root)
image_dir?=?os.path.join(root,?'JPEGImages')
mask_dir?=?os.path.join(root,?'SegmentationClass')
txt_path?=?os.path.join(root,?"ImageSets",?"Segmentation",?txt_name)
txt_path=txt_path.replace('\\','/')
assert?os.path.exists(txt_path),?"file?'{}'?does?not
exist.".format(txt_path)
with?open(os.path.join(txt_path),?"r")?as?f:
file_names?=?[x.strip()?for?x?in?f.readlines()?if?len(x.strip())?>
0]
self.images?=?[os.path.join(image_dir,?x?+?".jpg")?for?x?in?file_names]
self.masks?=?[os.path.join(mask_dir,?x?+?".png")?for?x?in?file_names]
assert?(len(self.images)?==?len(self.masks))
self.transforms?=?transforms
导入需要的包。
定义VOC数据集读取类VOCSegmentation。在init方法中,核心是读取image列表和mask列表。
def?__getitem__(self,?index):
img?=?Image.open(self.images[index]).convert('RGB')
target?=?Image.open(self.masks[index])
if?self.transforms?is?not?None:
img,?target?=?self.transforms(img,?target)
return?img,?target
getitem方法是获取单张图片和图片对应的mask,然后对其做数据增强。
def?collate_fn(batch):
images,?targets?=?list(zip(*batch))
batched_imgs?=?cat_list(images,?fill_value=0)
batched_targets?=?cat_list(targets,?fill_value=255)
return?batched_imgs,?batched_targets
collate_fn方法是对一个batch中数据调用cat_list做数据对齐。
在train.py中torch.utils.data.DataLoader调用
train_loader?=?torch.utils.data.DataLoader(train_dataset,
batch_size=batch_size,
num_workers=num_workers,
shuffle=True,
pin_memory=True,
collate_fn=train_dataset.collate_fn)
val_loader?=?torch.utils.data.DataLoader(val_dataset,
batch_size=1,
num_workers=num_workers,
pin_memory=True,
collate_fn=val_dataset.collate_fn)
训练
重要参数
打开train.py,我们先认识一下重要的参数:
def?parse_args():
import?argparse
parser?=?argparse.ArgumentParser(description="pytorch?fcn?training")
#?数据集的根目录(VOCdevkit)所在的文件夹
parser.add_argument("--data-path",?default="data/",?help="VOCdevkit?root")
parser.add_argument("--num-classes",?default=20,?type=int)
parser.add_argument("--aux",?default=True,?type=bool,?help="auxilier?loss")
parser.add_argument("--device",?default="cuda",?help="training?device")
parser.add_argument("-b",?"--batch-size",?default=32,?type=int)
parser.add_argument("--epochs",?default=30,?type=int,?metavar="N",
help="number?of?total?epochs?to?train")
parser.add_argument('--lr',?default=0.0001,?type=float,?help='initial
learning?rate')
parser.add_argument('--momentum',?default=0.9,?type=float,?metavar='M',
help='momentum')
parser.add_argument('--wd',?'--weight-decay',?default=1e-4,?type=float,
metavar='W',?help='weight?decay?(default:?1e-4)',
dest='weight_decay')
parser.add_argument('--print-freq',?default=10,?type=int,?help='print
frequency')
parser.add_argument('--resume',?default='',?help='resume?from?checkpoint')
parser.add_argument('--start-epoch',?default=0,?type=int,?metavar='N',
help='start?epoch')
#?是否使用混合精度训练
parser.add_argument("--amp",?default=False,?type=bool,
help="Use?torch.cuda.amp?for?mixed?precision?training")
args?=?parser.parse_args()
return?args
- data-path:定义数据集的根目录(VOCdevkit)所在的文件夹
- num-classes:检测目标类别数(不包含背景)。
- aux:是否使用aux_classifier。
- device:使用cpu还是gpu训练,默认是cuda。
- batch-size:BatchSize设置。
- epochs:epoch的个数。
- lr:学习率。
- resume:继续训练时候,选择用的模型。
- start-epoch:起始的epoch,针对再次训练时,可以不需要从0开始。
- amp:是否使用torch的自动混合精度训练。
数据增强
增强调用transforms.py中的方法。
训练集的增强如下:
class?SegmentationPresetTrain:
def?__init__(self,?base_size,?crop_size,?hflip_prob=0.5,?mean=(0.485,?0.456,
0.406),?std=(0.229,?0.224,?0.225)):
#?随机Resize的最小尺寸
min_size?=?int(0.5?*?base_size)
#?随机Resize的最大尺寸
max_size?=?int(2.0?*?base_size)
#?随机Resize增强。
trans?=?[T.RandomResize(min_size,?max_size)]
if?hflip_prob?>?0:
#随机水平翻转
trans.append(T.RandomHorizontalFlip(hflip_prob))
trans.extend([
#随机裁剪
T.RandomCrop(crop_size),
T.ToTensor(),
T.Normalize(mean=mean,?std=std),
])
self.transforms?=?T.Compose(trans)
def?__call__(self,?img,?target):
return?self.transforms(img,?target)
训练集增强,包括随机Resize、随机水平翻转、随即裁剪。
验证集增强:
class?SegmentationPresetEval:
def?__init__(self,?base_size,?mean=(0.485,?0.456,?0.406),?std=(0.229,?0.224,
0.225)):
self.transforms?=?T.Compose([
T.RandomResize(base_size,?base_size),
T.ToTensor(),
T.Normalize(mean=mean,?std=std),
])
def?__call__(self,?img,?target):
return?self.transforms(img,?target)
验证集的增强比较简单,只有随机Resize。
Main方法
对Main方法,我做了一些修改,修改的代码如下:
#定义模型,并加载预训练
model?=?fcn_resnet50(pretrained=True)
#?默认classes是21,如果不是21,则要修改类别。
if?num_classes?!=?21:
model.classifier[4]?=?torch.nn.Conv2d(512,?num_classes,?kernel_size=(1,
1),?stride=(1,?1))
model.aux_classifier[4]?=?torch.nn.Conv2d(256,?num_classes,?kernel_size=
(1,?1),?stride=(1,?1))
print(model)
model.to(device)
#?如果有多张显卡,则使用多张显卡
if?torch.cuda.device_count()?>?1:
print("Let's?use",?torch.cuda.device_count(),?"GPUs!")
model?=?torch.nn.DataParallel(model)
模型,我改为pytorch官方的模型了,如果能使用官方的模型尽量使用官方的模型。
默认类别是21,如果不是21,则要修改类别。
检测系统中是否有多张卡,如果有多张卡则使用多张卡不能浪费资源。
如果不想使用所有的卡,而是指定其中的几张卡,可以使用:
os.environ['CUDA_VISIBLE_DEVICES']?=?'0,1'
也可以在DataParallel方法中设定:
model?=?torch.nn.DataParallel(model,device_ids=[0,1])
如果使用了多显卡,再使用模型的参数就需要改为model.module.xxx,例如:
params?=?[p?for?p?in?model.module.aux_classifier.parameters()?if
p.requires_grad]
params_to_optimize.append({"params":?params,?"lr":?args.lr?*?10})
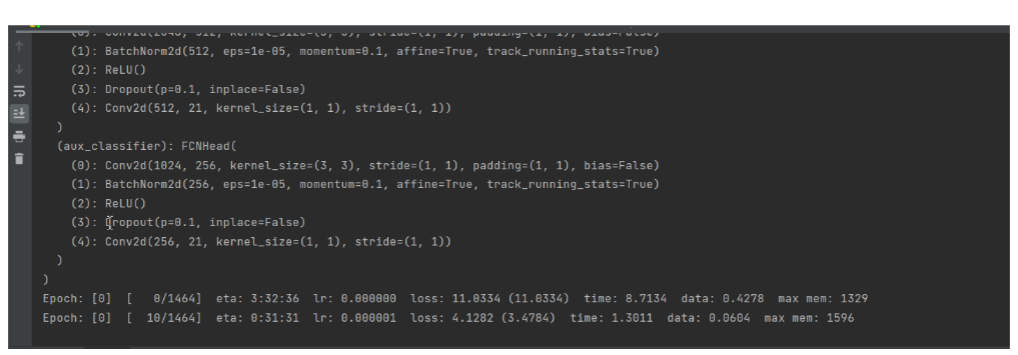
上面的都完成了就可以开始训练了,如下图:
测试
在开始测试之前,我们还要获取到调色板,新建脚本get_palette.py,代码如下:
import?json
import?numpy?as?np
from?PIL?import?Image
#?读取mask标签
target?=?Image.open("./2007_001288.png")
#?获取调色板
palette?=?target.getpalette()
palette?=?np.reshape(palette,?(-1,?3)).tolist()
print(palette)
#?转换成字典子形式
pd?=?dict((i,?color)?for?i,?color?in?enumerate(palette))
json_str?=?json.dumps(pd)
with?open("palette.json",?"w")?as?f:
f.write(json_str)
选取一张mask,然后使用getpalette方法获取,然后将其转为字典的格式保存。
接下来,开始预测部分,新建predict.py,插入以下代码:
import?os
import?time
import?json
import?torch
from?torchvision?import?transforms
import?numpy?as?np
from?PIL?import?Image
from?torchvision.models.segmentation?import?fcn_resnet50
导入程序需要的包文件,然在mian方法中:
def?main():
aux?=?False?#?inference?time?not?need?aux_classifier
classes?=?20
weights_path?=?"./save_weights/model_5.pth"
img_path?=?"./2007_000123.jpg"
palette_path?=?"./palette.json"
assert?os.path.exists(weights_path),?f"weights?{weights_path}?not?found."
assert?os.path.exists(img_path),?f"image?{img_path}?not?found."
assert?os.path.exists(palette_path),?f"palette?{palette_path}?not?found."
with?open(palette_path,?"rb")?as?f:
pallette_dict?=?json.load(f)
pallette?=?[]
for?v?in?pallette_dict.values():
pallette?+=?v
- 定义是否需要aux_classifier,预测不需要aux_classifier,所以设置为False。
- 设置类别为20,不包括背景。
- 定义调色板的路径。
- 读去调色板。
接下来,是加载模型,单显卡训练出来的模型和多显卡训练出来的模型加载有区别,我们先看单显 卡训练出来的模型如何加载。
model?=?fcn_resnet50(num_classes=classes+1)
print(model)
#?单显卡训练出来的模型,加载
#?delete?weights?about?aux_classifier
weights_dict?=?torch.load(weights_path,?map_location='cpu')['model']
for?k?in?list(weights_dict.keys()):
if?"aux_classifier"?in?k:
del?weights_dict[k]
#?load?weights
model.load_state_dict(weights_dict)
model.to(device)
定义模型fcn_resnet50,num_classes设置为类别+1(背景)
加载训练好的模型,并将aux_classifier删除。
然后加载权重。
再看多显卡的模型如何加载
#?create?model
model?=?fcn_resnet50(num_classes=classes+1)
model?=?torch.nn.DataParallel(model)
#?delete?weights?about?aux_classifier
weights_dict?=?torch.load(weights_path,?map_location='cpu')['model']
print(weights_dict)
for?k?in?list(weights_dict.keys()):
if?"aux_classifier"?in?k:
del?weights_dict[k]
#?load?weights
model.load_state_dict(weights_dict)
model=model.module
model.to(device)
定义模型fcn_resnet50,num_classes设置为类别+1(背景),将模型放入DataParallel类中。
加载训练好的模型,并将aux_classifier删除。
加载权重
执行torch.nn.DataParallel(model)时,model被放在了model.module,所以model.module才真 正需要的模型。所以我们在这里将model.module赋值给model。
接下来是图像数据的处理
#?load?image
original_img?=?Image.open(img_path)
#?from?pil?image?to?tensor?and?normalize
data_transform?=?transforms.Compose([transforms.Resize(520),
transforms.ToTensor(),
transforms.Normalize(mean=(0.485,?0.456,
0.406),
std=(0.229,?0.224,
0.225))])
img?=?data_transform(original_img)
#?expand?batch?dimension
img?=?torch.unsqueeze(img,?dim=0)
加载图像
对图像做Resize、标准化、归一化处理。
使用torch.unsqueeze增加一个难度。
完成图像的处理后,就可以开始预测了。
model.eval()?#?进入验证模式
with?torch.no_grad():
#?init?model
img_height,?img_width?=?img.shape[-2:]
init_img?=?torch.zeros((1,?3,?img_height,?img_width),?device=device)
model(init_img)
t_start?=?time_synchronized()
output?=?model(img.to(device))
t_end?=?time_synchronized()
print("inference+NMS?time:?{}".format(t_end?-?t_start))
prediction?=?output['out'].argmax(1).squeeze(0)
prediction?=?prediction.to("cpu").numpy().astype(np.uint8)
np.set_printoptions(threshold=sys.maxsize)
print(prediction.shape)
mask?=?Image.fromarray(prediction)
mask.putpalette(pallette)
mask.save("test_result.png")
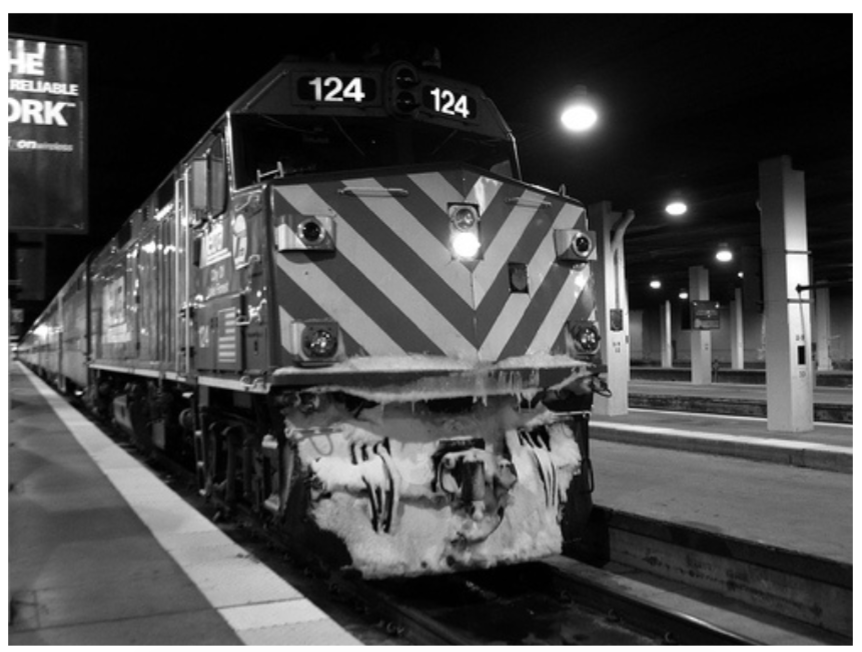
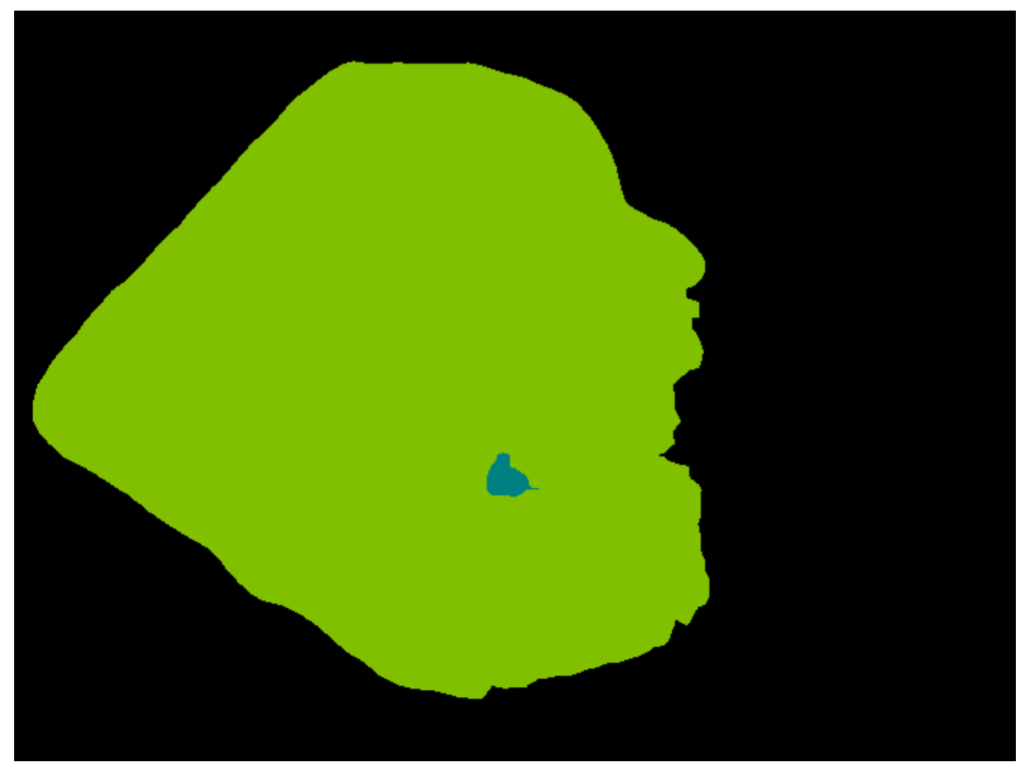
将预测后的结果保存到test_result.png中。查看运行结果:
原图:
结果:
打印出来的数据:
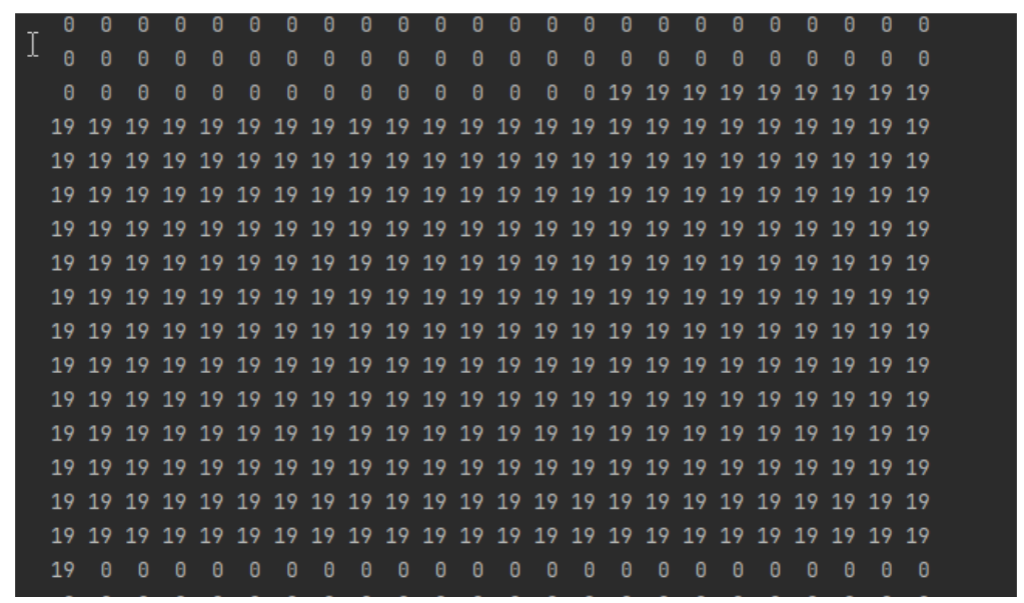
类别列表:
{
"aeroplane":?1,
"bicycle":?2,
"bird":?3,
"boat":?4,
"bottle":?5,
"bus":?6,
"car":?7,
"cat":?8,
"chair":?9,
"cow":?10,
"diningtable":?11,
"dog":?12,
"horse":?13,
"motorbike":?14,
"person":?15,
"pottedplant":?16,
"sheep":?17,
"sofa":?18,
"train":?19,
"tvmonitor":?20
}
从结果来看,已经预测出来图像上的类别是“train”。
语义分割相关论文资料点击卡片👇免费领
后台回复“CVPR”