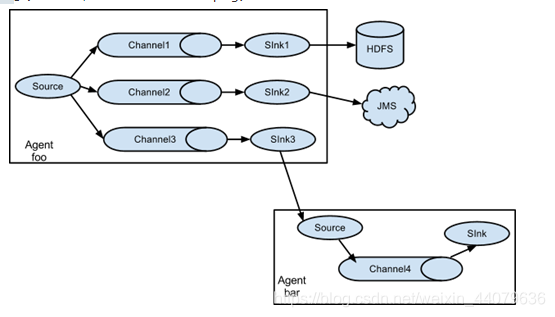
一、Taildir Source多目录断点续传
就是指定一个文件,然后持续监控这个文件的后续写入内容,将新新写进去的内容读取出来
实现:
1.在job目录下新建一个conf文件
touch taildir-file-logger.conf
2.在taildir-file-logger.conf文件中编写一个agent
a1.sources = r1
a1.channels = c1
a1.sinks = k1

a1.sources.r1.type = taildir
a1.sources.r1.filegroups = f1 f2
a1.sources.r1.filegroups.f1 = /opt/datas/flume/ceshi.log
a1.sources.r1.filegroups.f2 = /opt/logs/.*log

a1.channels.c1.type = file

# logger sink将采集的数据输出到控制台(日志文件中),主要用于测试
a1.sinks.k1.type = logger

a1.sources.r1.channels =
3.创建指定的目录和对应的文件
在/opt/datas/flume/目录下创建 ceshi.log文件
在/opt目录下创建logs目录
4.启动agent
bin/flume-ng agent --conf conf -name a1 --conf-file job/taildir-file-logger.conf -Dflume.root.logger=INFO,console
5.在文件中写入内容测试
echo hello world >> ceshi.log
二、一个数据源,输出到多个地点(hdfs和下一个agent)

实现:
1.创建文件夹用来存放读取到的文件
在/opt/flume/job目录下创建group1文件夹
[root@flume0 job]# mkdir group1
在/opt目录下创建 datas/flume文件夹
[root@flume0 job]# mkdir -p /opt/datas/flume
2.在group1目录下,创建exec-memory-avro.conf
[root@flume0 job]# cd group1
[root@flume0 group1]# touch exec-memory-avro.conf


# 添加内容如下
a1.sources = r1
a1.sinks = k1 k2
a1.channels = c1 c2

# 将数据流复制给所有channel(默认)
a1.sources.r1.selector.type = replicating

# tail命令查看输出的日志就是exec采集的内容
a1.sources.r1.type = exec
a1.sources.r1.command = tail -F /opt/a.log
# tail -F a.log  查看文件的最后10行,并且监听该文件产生的新的日志

a1.sinks.k1.type = avro
a1.sinks.k1.hostname = flume0
a1.sinks.k1.port = 4141

a1.sinks.k2.type = avro
a1.sinks.k2.hostname = flume0
a1.sinks.k2.port = 4142

a1.channels.c1.type = memory
a1.channels.c2.type = memory

a1.sources.r1.channels = c1 c2
a1.sinks.k1.channel = c1
a1.sinks.k2.channel = c2
3.在group1目录下,创建avro-memory-hdfs.conf
[root@flume0 group1]# touch avro-memory-hdfs.conf

# 添加如下内容
a2.sources = r1
a2.sinks = k1
a2.channels = c1

a2.sources.r1.type = avro
a2.sources.r1.bind = flume0
a2.sources.r1.port = 4141

a2.channels.c1.type = memory

a2.sinks.k1.type = hdfs
a2.sinks.k1.hdfs.path = hdfs://flume0:9000/flume2/%Y-%m-%d
a2.sinks.k1.hdfs.useLocalTimeStamp = true

a2.sources.r1.channels = c1
a2.sinks.k1.channel = c1
4.在group1目录下,创建avro-memory-file.conf
[root@flume0 group1]# touch avro-memory-file.conf

# 添加如下内容
a3.sources = r1
a3.sinks = k1
a3.channels = c2

a3.sources.r1.type = avro
a3.sources.r1.bind = flume0
a3.sources.r1.port = 4142

a3.channels.c2.type = memory

a3.sinks.k1.type = file_roll
a3.sinks.k1.sink.directory = /opt/datas/flume
a3.sinks.k1.sink.rollInterval = 0

a3.sources.r1.channels = c2
a3.sinks.k1.channel = c2
5.执行配置文件
[root@flume0 apache-flume-1.9.0-bin]# bin/flume-ng agent --conf conf --name a3 --conf-file job/group1/avro-memory-file.conf
[root@flume0 apache-flume-1.9.0-bin]# bin/flume-ng agent --conf conf --name a2 --conf-file job/group1/avro-memory-hdfs.conf
[root@flume0 apache-flume-1.9.0-bin]# bin/flume-ng agent --conf conf --name a1 --conf-file job/group1/exec-memory-avro.conf
6.提交测试数据
[root@flume0 opt]# echo hahaha >> a.log
三、从多个数据中读取数据汇总到一起存在hdfs上

实现
1.在flume/job目录下创建group2文件夹
[root@flume0 job]# mkdir group2
2.在group2目录下,创建demo6-agent1.conf
[root@flume0 group2]# touch agent1.conf

# 内容如下
a1.sources = r1
a1.channels = c1
a1.sinks = k1

a1.sources.r1.type = exec
a1.sources.r1.command = tail -F /opt/app/a.log

a1.channels.c1.type = memory

a1.sinks.k1.type = avro
a1.sinks.k1.hostname = flume0
a1.sinks.k1.port = 6661

a1.sources.r1.channels = c1
a1.sinks.k1.channel = c1
3.在group2目录下,创建agent2.conf
[root@flume0 group2]# touch agent2.conf

# 内容如下
a2.sources = r1
a2.channels = c1
a2.sinks = k1

a2.sources.r1.type = exec
a2.sources.r1.command = tail -F /opt/app/b.log

a2.channels.c1.type = memory

a2.sinks.k1.type = avro
a2.sinks.k1.hostname = flume0
a2.sinks.k1.port = 6661

a2.sources.r1.channels = c1
a2.sinks.k1.channel = c1
4.在group2目录下,创建agent3.conf
[root@flume0 group2]# touch agent3.conf

# 内容如下
a3.sources = r1
a3.channels = c1
a3.sinks = k1

a3.sources.r1.type = avro
a3.sources.r1.bind = flume0
a3.sources.r1.port = 6661

a3.channels.c1.type = memory

a3.sinks.k1.type = logger

a3.sources.r1.channels = c1
a3.sinks.k1.channel = c1
5.执行配置文件
[root@flume0 apache-flume-1.9.0-bin]# bin/flume-ng agent --conf conf --name a3 --conf-file job/group2/agent3.conf -Dflume.root.logger=INFO,console
[root@flume0 apache-flume-1.9.0-bin]# bin/flume-ng agent --conf conf --name a2 --conf-file job/group2/agent2.conf
[root@flume0 apache-flume-1.9.0-bin]# bin/flume-ng agent --conf conf --name a1 --conf-file job/group2/agent1.conf
6.使用echo命令向a.log和b.log追加内容测试
四、使用拦截器
flume通过使用Interceptors(拦截器)实现修改和过滤事件(包含body和header属性的对象)的功能。
event是flume中处理消息的基本单元,由零个或者多个header和正文body组成。Header 是 key/value 形式的,可以用来制造路由决策或携带其他结构化信息(如事件的时间戳或事件来源的服务器主机名)。你可以把它想象成和 HTTP 头一样提供相同的功能——通过该方法来传输正文之外的额外信息。Body是一个字节数组,包含了实际的内容。flume提供的不同source会给其生成的event添加不同的header
1.Timestamp Interceptor拦截器就是可以往event的header中插入关键词为timestamp的时间戳。
[root@flume0 job]# mkdir interceptors
[root@flume0 job]# cd interceptors/
[root@flume0 interceptors]# touch demo1-timestamp.conf

#文件内容如下
a1.sources = r1
a1.channels = c1
a1.sinks = k1

a1.sources.r1.type = netcat
a1.sources.r1.bind = flume0
a1.sources.r1.port = 44444

#timestamp interceptor
a1.sources.r1.interceptors = i1
a1.sources.r1.interceptors.i1.type = timestamp

a1.channels.c1.type = memory

a1.sinks.k1.type = logger

a1.sources.r1.channels = c1
a1.sinks.k1.channel = c1
测试:nc flume0 44444
2. host拦截器该拦截器可以往event的header中插入关键词默认为host的主机名或者ip地址(注意是agent运行的机器的主机名或者ip地址)
[root@flume0 interceptors]# touch demo2-host.conf

#文件内容如下
a1.sources = r1
a1.channels = c1
a1.sinks = k1

a1.sources.r1.type = netcat
a1.sources.r1.bind = flume0
a1.sources.r1.port = 44444

#host interceptor
a1.sources.r1.interceptors = i1
a1.sources.r1.interceptors.i1.type = host

a1.channels.c1.type = memory

a1.sinks.k1.type = logger

a1.sources.r1.channels = c1
a1.sinks.k1.channel = c1
测试:nc flume0 44444
3.Regex Filtering Interceptor拦截器
Regex Filtering Interceptor拦截器用于过滤事件,筛选出与配置的正则表达式相匹配的事件。可以用于包含事件和排除事件。常用于数据清洗,通过正则表达式把数据过滤出来。用于排除错误日志
[root@flume0 interceptors]# touch demo3-regex-filtering.conf

#文件内容如下
a1.sources = r1
a1.channels = c1
a1.sinks = k1

a1.sources.r1.type = netcat
a1.sources.r1.bind = flume0
a1.sources.r1.port = 44444

#host interceptor
a1.sources.r1.interceptors = i1
a1.sources.r1.interceptors.i1.type = regex_filter
#全部是数字的数据
a1.sources.r1.interceptors.i1.regex = ^[0-9]*$
#排除符合正则表达式的数据
a1.sources.r1.interceptors.i1.excludeEvents  = true

a1.channels.c1.type = memory

a1.sinks.k1.type = logger

a1.sources.r1.channels = c1
a1.sinks.k1.channel = c1
多个拦截器同时使用:
a1.sources.r1.interceptors = i1 i2 i3
a1.sources.r1.interceptors.i1.type = timestamp
a1.sources.r1.interceptors.i2.type = host
a1.sources.r1.interceptors.i3.type = regex_filter
a1.sources.r1.interceptors.i3.regex = ^[0-9]*$
4.自定义拦截器
1.在IDEA中创建一个maven项目
2.加入依赖
<dependency>
    <groupId>org.apache.flume</groupId>
    <artifactId>flume-ng-core</artifactId>
    <version>1.9.0</version>
</dependency>
3.自定义拦截器,实现拦截器接口
package com.yu.interceptors;

import org.apache.flume.Context;
import org.apache.flume.Event;
import org.apache.flume.interceptor.Interceptor;

import java.util.List;

public class MyInterceptor implements Interceptor {
    @Override
    public void initialize() {
    }

    @Override
    public Event intercept(Event event) {
        byte[] body = event.getBody();
        if (body[0] >= 'a' && body[0] <= 'z'){
            event.getHeaders().put("type","letter");
        }else if (body[0] >= '0' && body[0] <= '9'){
            event.getHeaders().put("type","number");
        }
        return event;
    }

    @Override
    public List<Event> intercept(List<Event> list) {
        for (Event event : list) {
            intercept(event);
        }
        return list;
    }

    @Override
    public void close() {
    }
    public static class Builder implements Interceptor.Builder{
       @Override
        public Interceptor build() {
            return new MyInterceptor();
        }
        @Override
        public void configure(Context context) {
        }
    }

}
4.打包项目并上传到Linux的flume安装目录的lib文件夹下
5.编写agent,在job目录下的interceptors目录下创建,命名为my.conf
a1.sources = r1
a1.channels = c1 c2
a1.sinks = k1 k2

a1.sources.r1.type = netcat
a1.sources.r1.bind = 0.0.0.0
a1.sources.r1.port = 44444

a1.sources.r1.interceptors = i1
a1.sources.r1.interceptors.i1.type = com.yu.interceptors.MyInterceptor$Builder

a1.sources.r1.selector.type = multiplexing
a1.sources.r1.selector.header = type
a1.sources.r1.selector.mapping.letter = c1
a1.sources.r1.selector.mapping.number = c2
a1.sources.r1.selector.default  = c2

a1.channels.c1.type = memory
a1.channels.c2.type = memory

a1.sinks.k1.type = file_roll
a1.sinks.k1.sink.directory  = /root/t1
a1.sinks.k1.sink.rollInterval = 600

a1.sinks.k2.type = file_roll
a1.sinks.k2.sink.directory = /root/t2
a1.sinks.k1.sink.rollInterval = 600


a1.sources.r1.channels = c1 c2
a1.sinks.k1.channel = c1
a1.sinks.k2.channel = c2
6.在/root目录下创建t1、t2文件夹
7.启动测试
bin/flume-ng agent --conf conf --name a1 --conf-file job/interceptors/my.conf -Dflume.roogger=INFO,console
五、通道选择器
在event进入到Channel之前,可以使用通道选择器 使指定的Event进入到指定的Channel中。Flume内置两种选择器,replicating 和 multiplexing,如果Source配置中没有指定选择器,那么会自动使用replicating (复制)Channel选择器。
1.复制Channel选择器 (replicating )
数据同步给多个Channel
a1.sources = r1
a1.channels = c1 c2
# selector.type 默认值 replicating
a1.sources.r1.selector.type = replicating
#将采集的数据同时发送给c1、c2两个缓冲区
a1.sources.r1.channels = c1 c2
2多路复用Channel选择器 (multiplexing)
数据分流到指定Channel
a1.sources = r1
a1.channels = c1 c2 c3 c4
#多路复用选择器使用的前提是,event对象中包含指定的key-value,可以使用自定义拦截器给event添加key-value
a1.sources.r1.selector.type = multiplexing
a1.sources.r1.selector.header = key
a1.sources.r1.selector.mapping.value1 = c1
a1.sources.r1.selector.mapping.value2 = c2 c3
a1.sources.r1.selector.default = c4
a1.sources.r1.channels = c1 c2 c3 c4