一、下载和安装ES软件
- 官方下载压缩包
# 解压缩
tar -zxvf elasticsearch-7.8.0-linux-x86_64.tar.gz -C /opt/module
# 改名
mv elasticsearch-7.8.0 es-cluster
- 因为ES在使用时候回接收许多用户远程输入的脚本并且执行,为了系统安全,所以不支持root账户直接运行,我们一般创建一个专门的用户去执行ES。在ROOT用户下执行下面命令创建一个叫es的用户。
#新增es用户
useradd es
#为es用户设置密码
passwd es
#赋予es用户ES软件所在位置文件的所有权限
chown -R es:es /opt/module/es-cluster
如果忘记密码或者出现什么问题,可以在ROOT用户下执行删除用户操作
#删除es用户
userdel -r es
- 每台要集群的服务器去修改配置文件
(1)
vim /etc/security/limits.conf
# 在/etc/security/limits.conf文件末尾中增加下面内容
es soft nofile 65536
es hard nofile 65536
(2)
vim /etc/security/limits.d/20-nproc.conf
# 在/etc/security/limits.d/20-nproc.conf文件末尾中增加下面内容
es soft nofile 65536
es hard nofile 65536
* hard nproc 4096
# * 带表 Linux 所有用户名称
(3)
vim /etc/sysctl.conf
# 在/etc/sysctl.conf文件中增加下面内容
vm.max_map_count=655360
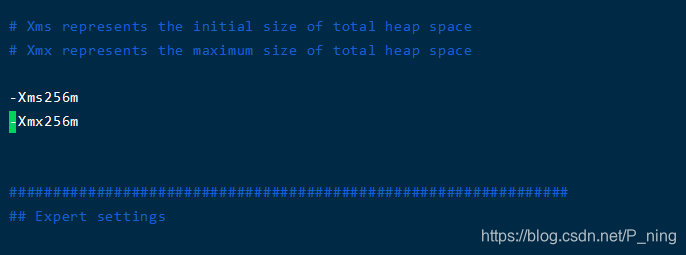
(4)这一步可以省略,有些服务器内存过小,启动一个ES就不够用了,我们可以通过修改你的ES文件夹下的/config/jvm.options约20来行左右的内存大小来节约内存,下图是我就将默认的1g改成256mb,具体看业务定制。

(5)
#重新加载
sysctl -p
二、修改每台服务器中ES的配置文件
 #集群名称
 cluster.name: cluster-es
 #节点名称,每个节点的名称不能重复
 node.name: node-1
 #允许访问ip
 network.host: 0.0.0.0
 #是不是有资格主节点
 node.master: true
 #是否有资格存储数据
 node.data: true
 #提供给外界使用的端口
 http.port: 9200
 #提供公网可使用的ip,否者另一台服务器的没办法通过ip+端口来查找到这台服务器
 network.publish_host: 47.xx.xx.93
 # head 插件需要这打开这两个配置
 http.cors.allow-origin: "*"
 http.cors.enabled: true
 http.max_content_length: 200mb
 #选举主节点,填写节点名字
 cluster.initial_master_nodes: ["node-1"]
 #找主节点或者插件(ip因为个人服务器安全原因做了部分隐藏)
 discovery.seed_hosts: ["47.xx.xx.93:9300"]
 #设定该集群有几个节点连接后才开始正常工作,防止因为网络等原因导致找不到主节点的节点自己成为主节点甚至出现多个集群的现象出现,一般个数为:(所有节点数/2)+1
# gateway.recover_after_nodes: 2
# network.tcp.keep_alive: true
# network.tcp.no_delay: true
# transport.tcp.compress: true
 #集群内同时启动的数据任务个数,默认是 2 个
 #cluster.routing.allocation.cluster_concurrent_rebalance: 16
 #添加或删除节点及负载均衡时并发恢复的线程个数,默认 4 个
 #cluster.routing.allocation.node_concurrent_recoveries: 16
 #初始化数据恢复时,并发恢复线程的个数,默认 4 个
 #cluster.routing.allocation.node_initial_primaries_recoveries: 16
三、启动
每台服务器直接启动即可
cd /opt/module/es-cluster
#启动
bin/elasticsearch
#后台启动
bin/elasticsearch -d