1 准备安装环境
1.1 安装JDK
elasticsearch 7.1.1 配置java8, java11
1.2 更改系统资源配置
-
修改 /etc/sysctl.conf 文件,在文件末尾添加 vm.max_map_count=262144
注意:修改完执行 sysctl -p,从指定的文件加载系统参数,如不指定即从/etc/sysctl.conf中加载
查看结果 sysctl -a|grep vm.max_map_count
-
修改 /etc/security/limits.conf 文件
# 在文件末尾添加下面永久系统调优,修改文件描述符大小(65536)和进程最大数目
# *代表所有服务的用户名,也可设定用户,例如esuser
* soft nofile 65536
* hard nofile 65536
* soft nproc 4096
* hard nproc 4096
2 安装Elasticsearch集群
2.1 准备集群配置
三台机器,均用于保存数据且可被选为master节点
| 机器ip | master节点 | data节点 | 版本 |
|---|---|---|---|
| 172.16.153.3 | 是 | 是 | 7.1.1 |
| 172.16.193.220 | 是 | 是 | 7.1.1 |
| 172.16.193.239 | 是 | 是 | 7.1.1 |
2.1.1 创建esuser用户
# 添加用户组
groupadd esuser
?
# 添加用户
useradd -m -g esuser esuser
?
# 配置密码
passwd esuser
?
# 在最后增加 sudo权限
esuser ALL=(ALL)  NOPASSWD:ALL
2.2 下载 & 安装
# 下载
wget https://artifacts.elastic.co/downloads/elasticsearch/elasticsearch-7.1.1-linux-x86_64.tar.gz
?
# 解压
tar xvf elasticsearch-7.1.1-linux-x86_64.tar.gz
?
# 软链
ln -s elasticsearch-7.1.1 elasticsearch
2.3 配置
2.3.1 配置说明
| 参数 | 说明 |
|---|---|
| cluster.name | 集群名称,相同名称为一个集群 |
| node.name | 节点名称,集群模式下每个节点名称唯一 |
| node.master | 当前节点是否可以被选举为master节点,是:true、否:false |
| node.data | 当前节点是否用于存储数据,是:true、否:false |
| path.data | 索引数据存放的位置 |
| path.logs | 日志文件存放的位置 |
| bootstrap.memory_lock | 需求锁住物理内存,是:true、否:false |
| bootstrap.system_call_filter | SecComp检测,是:true、否:false |
| network.host | 监听地址,用于访问该es |
| network.publish_host | 可设置成内网ip,用于集群内各机器间通信 |
| http.port | es对外提供的http端口,默认 9200 |
| discovery.seed_hosts | es7.x 之后新增的配置,写入候选主节点的设备地址,在开启服务后可以被选为主节点 |
| cluster.initial_master_nodes | es7.x 之后新增的配置,初始化一个新的集群时需要此配置来选举master |
| http.cors.enabled | 是否支持跨域,是:true,在使用head插件时需要此配置 |
| http.cors.allow-origin | "*" 表示支持所有域名 |
2.3.2 详细配置
-
172.16.153.3配置
?
# 7.1.1 配置 ? # 增加如下: cluster.name: my-application ? node.name: node-1 node.master: true node.data: true ? path.data: /data/es/9200/data1,/data/es/9200/data2,/data/es/9200/data3 path.logs: /data/es/9200/logs ? bootstrap.memory_lock: false bootstrap.system_call_filter: false ? network.host: 173.16.153.3 # 有些时候并不需要此配置,但我这里需要.. # network.publish_host: 173.26.153.48 transport.tcp.port: 9300 http.port: 9200 # discovery.seed_hosts: ["173.26.153.48","173.16.153.252","173.16.153.161"] discovery.seed_hosts: ["173.16.153.3:9300","173.16.193.220:9300","173.16.193.239:9300"] cluster.initial_master_nodes: ["173.16.153.3","173.16.193.220","173.16.193.239"] gateway.recover_after_nodes: 2 cluster.routing.allocation.disk.threshold_enabled: false ? ? http.cors.enabled: true http.cors.allow-origin: "*" -
172.16.193.220配置
?
# 7.1.1 配置 ? # 增加如下: cluster.name: my-application ? node.name: node-2 node.master: true node.data: true ? path.data: /data/es/9200/data1,/data/es/9200/data2,/data/es/9200/data3 path.logs: /data/es/9200/logs ? bootstrap.memory_lock: false bootstrap.system_call_filter: false ? network.host: 173.16.193.220 # 有些时候并不需要此配置,但我这里需要.. # network.publish_host: 173.26.153.48 transport.tcp.port: 9300 http.port: 9200 # discovery.seed_hosts: ["173.26.153.48","173.16.153.252","173.16.153.161"] discovery.seed_hosts: ["173.16.153.3:9300","173.16.193.220:9300","173.16.193.239:9300"] cluster.initial_master_nodes: ["173.16.153.3","173.16.193.220","173.16.193.239"] gateway.recover_after_nodes: 2 cluster.routing.allocation.disk.threshold_enabled: false ? ? http.cors.enabled: true http.cors.allow-origin: "*" ? -
172.16.193.239配置
?
# 7.1.1 配置
?
# 增加如下:
cluster.name: my-application
?
node.name: node-3
node.master: true
node.data: true
?
path.data: /data/es/9200/data1,/data/es/9200/data2,/data/es/9200/data3
path.logs: /data/es/9200/logs
?
bootstrap.memory_lock: false
bootstrap.system_call_filter: false
?
network.host: 173.16.193.239
# 有些时候并不需要此配置,但我这里需要..
# network.publish_host: 173.26.153.48
transport.tcp.port: 9300
http.port: 9200
# discovery.seed_hosts: ["173.26.153.48","173.16.153.252","173.16.153.161"]
discovery.seed_hosts: ["173.16.153.3:9300","173.16.193.220:9300","173.16.193.239:9300"]
cluster.initial_master_nodes: ["173.16.153.3","173.16.193.220","173.16.193.239"]
gateway.recover_after_nodes: 2
cluster.routing.allocation.disk.threshold_enabled: false
?
?
http.cors.enabled: true
http.cors.allow-origin: "*"
?
2.3.3 分别修改 jvm.option
-Xms10g
-Xmx10g
2.3.4 添加es安装目录权限
chown -R esuser:esuser /opt/es2.3.5 启动集群
./elasticsearch
?
# 后台运行
./elasticsearch -d
启动成功界面如下:
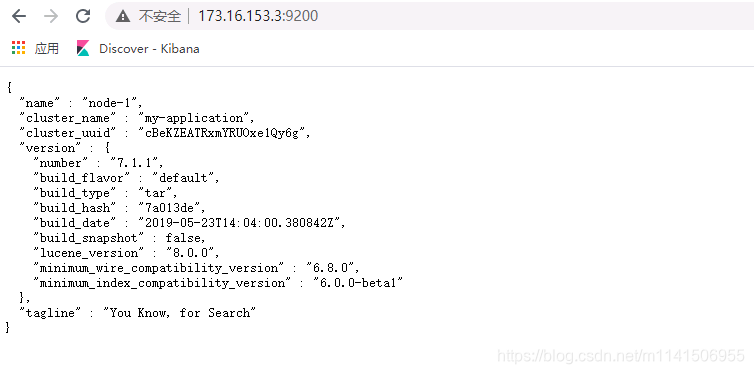
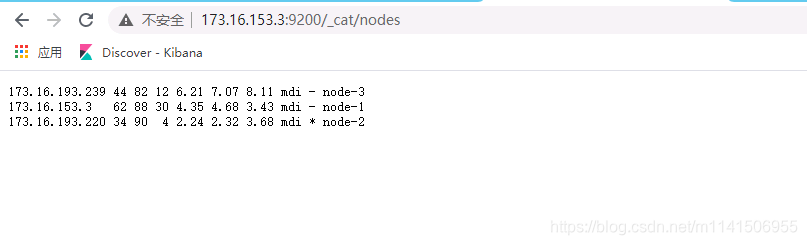
?
?
2.3.6 设置集群认证密码
2.3.6.1 生成证书
在172.16.153.3机器上执行 :
bin/elasticsearch-certutil cert -out config/elastic-certificates.p12 -pass ""注意: 密码后面需要单独设置,这里是集群安全认证,建议密码不设置,成功后生成的证书默认在es的config目录里面 elastic-certificates.p12;分别copy一份到其他节点的config里面(默认目录)
2.3.6.2 在elasticsearch.yml配置添加配置
?
xpack.security.enabled: true
xpack.security.transport.ssl.enabled: true
xpack.security.transport.ssl.verification_mode: certificate
xpack.security.transport.ssl.keystore.path: elastic-certificates.p12
xpack.security.transport.ssl.truststore.path: elastic-certificates.p12
2.3.6.3 重启集群并修改密码
bin/elasticsearch-setup-passwords interactive-
elastic 账号:拥有 superuser 角色,是内置的超级用户。
-
kibana 账号:拥有 kibana_system 角色,用户 kibana 用来连接 elasticsearch 并与之通信。Kibana 服务器以该用户身份提交请求以访问集群监视 API 和 .kibana 索引。不能访问 index。
-
logstash_system 账号:拥有 logstash_system 角色。用户 Logstash 在 Elasticsearch 中存储监控信息时使用。
-
beats_system账号:拥有 beats_system 角色。用户 Beats 在 Elasticsearch 中存储监控信息时使用。
3 安装Kibana
# kibana.yml 配置
?
server.port: 5601
server.host: "173.26.153.48"
elasticsearch.hosts: ["http://173.16.153.3:9200","http://173.16.193.220:9200","http://173.16.193.239:9200"]
elasticsearch.username: "elastic"
elasticsearch.password: "123456"
附件:完整配置
-
172.16.153.3配置
# 7.1.1 配置 ? # 增加如下: cluster.name: my-application ? node.name: node-1 node.master: true node.data: true ? path.data: /data/es/9200/data1,/data/es/9200/data2,/data/es/9200/data3 path.logs: /data/es/9200/logs ? bootstrap.memory_lock: false bootstrap.system_call_filter: false ? network.host: 173.16.153.3 # 有些时候并不需要此配置,但我这里需要.. # network.publish_host: 173.26.153.48 transport.tcp.port: 9300 http.port: 9200 # discovery.seed_hosts: ["173.26.153.48","173.16.153.252","173.16.153.161"] discovery.seed_hosts: ["173.16.153.3:9300","173.16.193.220:9300","173.16.193.239:9300"] cluster.initial_master_nodes: ["173.16.153.3","173.16.193.220","173.16.193.239"] gateway.recover_after_nodes: 2 cluster.routing.allocation.disk.threshold_enabled: false ? ? http.cors.enabled: true http.cors.allow-origin: "*" ? xpack.security.enabled: true xpack.security.transport.ssl.enabled: true xpack.security.transport.ssl.verification_mode: certificate xpack.security.transport.ssl.keystore.path: elastic-certificates.p12 xpack.security.transport.ssl.truststore.path: elastic-certificates.p12 -
172.16.193.220配置
# 7.1.1 配置 ? # 增加如下: cluster.name: my-application ? node.name: node-2 node.master: true node.data: true ? path.data: /data/es/9200/data1,/data/es/9200/data2,/data/es/9200/data3 path.logs: /data/es/9200/logs ? bootstrap.memory_lock: false bootstrap.system_call_filter: false ? network.host: 173.16.193.220 # 有些时候并不需要此配置,但我这里需要.. # network.publish_host: 173.26.153.48 transport.tcp.port: 9300 http.port: 9200 # discovery.seed_hosts: ["173.26.153.48","173.16.153.252","173.16.153.161"] discovery.seed_hosts: ["173.16.153.3:9300","173.16.193.220:9300","173.16.193.239:9300"] cluster.initial_master_nodes: ["173.16.153.3","173.16.193.220","173.16.193.239"] gateway.recover_after_nodes: 2 cluster.routing.allocation.disk.threshold_enabled: false ? ? http.cors.enabled: true http.cors.allow-origin: "*" ? xpack.security.enabled: true xpack.security.transport.ssl.enabled: true xpack.security.transport.ssl.verification_mode: certificate xpack.security.transport.ssl.keystore.path: elastic-certificates.p12 xpack.security.transport.ssl.truststore.path: elastic-certificates.p12 -
172.16.193.239配置
# 7.1.1 配置
?
# 增加如下:
cluster.name: my-application
?
node.name: node-3
node.master: true
node.data: true
?
path.data: /data/es/9200/data1,/data/es/9200/data2,/data/es/9200/data3
path.logs: /data/es/9200/logs
?
bootstrap.memory_lock: false
bootstrap.system_call_filter: false
?
network.host: 173.16.193.239
# 有些时候并不需要此配置,但我这里需要..
# network.publish_host: 173.26.153.48
transport.tcp.port: 9300
http.port: 9200
# discovery.seed_hosts: ["173.26.153.48","173.16.153.252","173.16.153.161"]
discovery.seed_hosts: ["173.16.153.3:9300","173.16.193.220:9300","173.16.193.239:9300"]
cluster.initial_master_nodes: ["173.16.153.3","173.16.193.220","173.16.193.239"]
gateway.recover_after_nodes: 2
cluster.routing.allocation.disk.threshold_enabled: false
?
?
http.cors.enabled: true
http.cors.allow-origin: "*"
?
xpack.security.enabled: true
xpack.security.transport.ssl.enabled: true
xpack.security.transport.ssl.verification_mode: certificate
xpack.security.transport.ssl.keystore.path: elastic-certificates.p12
xpack.security.transport.ssl.truststore.path: elastic-certificates.p12
?