一、环境要求
1.硬件环境
硬件环境包括:系统、硬件、端口号
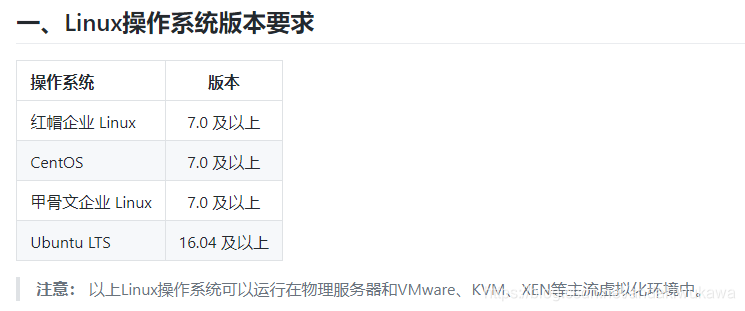
系统要求
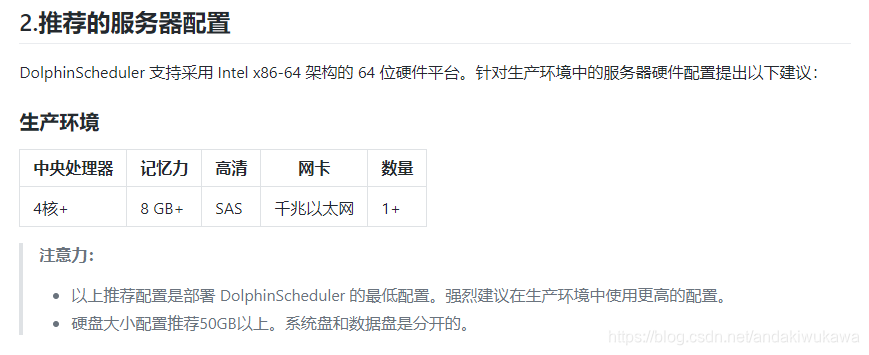
硬件要求,只是推荐配置,没有那么强也可以。
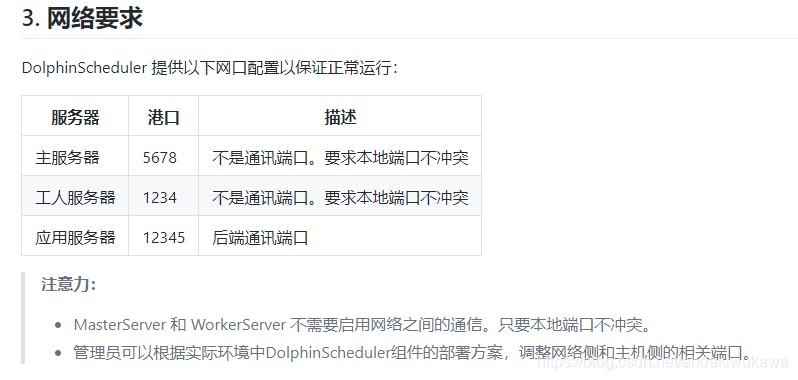
?端口号要求。如果说在部署的过程中,某个节点起不来,查看日志,抛异常说端口号被占用,用ps或者net 查看端口号使用进程是否被占用。
?
2.软件要求
软件环境包括: mysql、jdk、zookeeper、hadoop
CDH5.12.0
jdk1.8
mysql5.7
zookeeper-3.4.5-cdh5.12.0
二、部署过程
1.下载编译好的bin包(也可以下载未编译过的二进制tar.gz包然后编译)?
wget https://www.apache.org/dyn/closer.cgi/incubator/dolphinscheduler/1.3.2/apache-dolphinscheduler-incubating-1.3.2-dolphinscheduler-bin.tar.gz2.创建部署目录??
官方文档默认建立在opt目录下,解压之后mv重命名。
# Create the deployment directory. Do not choose a deployment directory with a high-privilege directory such as / root or / home. mkdir -p /opt/dolphinscheduler;
cd /opt/dolphinscheduler;
# uncompress
tar -zxvf apache-dolphinscheduler-1.3.6-bin.tar.gz -C /opt/dolphinscheduler;
mv apache-dolphinscheduler-1.3.6-bin dolphinscheduler-bin
本次示例安装在不同的目录中:
在三台机器上分别创建这两个文件夹
[root@ruozedata001 ~]# mkdir -p /ruozedata/software?
[root@ruozedata001 ~]# mkdir -p /ruozedata/app
?下载好的bin包不能直接使用,还需要完成一些基础的配置。没有用mv重命名的方法,而是创建了软链接。
[root@ruozedata001 ~]# cd /ruozedata/
[root@ruozedata001 ruozedata]# cd software/
[root@ruozedata001 software]# ll
total 4
drwxr-xr-x 9 root root 4096 Sep 17 21:59 apache-dolphinscheduler-incubating-1.3.2-dolphinscheduler-bin
[root@ruozedata001 software]# ln -s apache-dolphinscheduler-incubating-1.3.2-dolphinscheduler-bin ?dolphinscheduler-bin
[root@ruozedata001 software]# ll
total 8
drwxr-xr-x 9 root root 4096 Sep 17 21:59 apache-dolphinscheduler-incubating-1.3.2-dolphinscheduler-bin
lrwxrwxrwx 1 root root ? 61 Sep 17 22:00 dolphinscheduler-bin -> apache-dolphinscheduler-incubating-1.3.2-dolphinscheduler-bin
[root@ruozedata001 software]#
?3.创建部署用户和主机映射
有点儿类似hadoop的创建用户,和打通映射关系
官方文档给出的方法
在**所有**部署机器上创建部署用户,一定要配置sudo无密码。如果我们计划在 4 台机器上部署 DolphinScheduler:ds1、ds2、ds3 和 ds4,我们首先需要在每台机器上创建一个部署用户。
# To create a user, you need to log in as root and set the deployment user name. Please modify it yourself. The following uses dolphinscheduler as an example. useradd dolphinscheduler;
# Set the user password, please modify it yourself. The following takes dolphinscheduler123 as an example. echo "dolphinscheduler123" | passwd --stdin dolphinscheduler
# Configure sudo passwordless echo 'dolphinscheduler ALL=(ALL) NOPASSWD: NOPASSWD: ALL' >> /etc/sudoers sed -i 's/Defaults requirett/#Defaults requirett/g' /etc/sudoers
本次我们将用户配在hadoop用户上
通过id,hadoop查看我们是否有这个用户。?

如果hadoop用户已经存在,useradd hadoop -g hadoop (这块儿没懂应该是指定组)?
?三台机器一起做用户的配置和免密登陆
# 创建用户需使用root登录,设置部署用户名,请自行修改,后面以hadoop为例
useradd hadoop;# 设置用户密码,请自行修改,后面以dolphinscheduler123为例
echo "ruozedata123" | passwd --stdin hadoop# 配置sudo免密
echo 'hadoop ?ALL=(ALL) ?NOPASSWD: NOPASSWD: ALL' >> /etc/sudoers
sed -i 's/Defaults ? ?requirett/#Defaults ? ?requirett/g' /etc/sudoers注意:
?- 因为是以 sudo -u {linux-user} 切换不同linux用户的方式来实现多租户运行作业,所以部署用户需要有 sudo 权限,而且是免密的。
?- 如果发现/etc/sudoers文件中有"Default requiretty"这行,也请注释掉
?- 如果用到资源上传的话,还需要在`HDFS或者MinIO`上给该部署用户分配读写的权限
?4.配置host映射和ssh打通及修改目录权限
大部分的生产环境应该已经配置过了host映射,查看方法为
对应的三台机器内网ip 和 机器名称

?没有的话可以参照官方文档:
使用第一台机器(主机名是ds1)作为部署机器,在ds1上配置所有要部署的机器的hosts,在ds1上以root身份登录。
vi /etc/hosts
#add ip hostname
192.168.xxx.xxx ds1
192.168.xxx.xxx ds2
192.168.xxx.xxx ds3
192.168.xxx.xxx ds4
将 ds1 上的 /etc/hosts 同步到所有部署机器
for ip in ds2 ds3;
# Please replace ds2 ds3 here with the hostname of machines you want to deploy do sudo scp -r /etc/hosts $ip:/etc/
# Need to enter root password during operation done
SSH 打通:
首先我们在三台机器下切换到用户。三台机器都生成密钥
su - hadoop
ssh-keygen
?到第二台机器下将密钥拷贝到第一台机器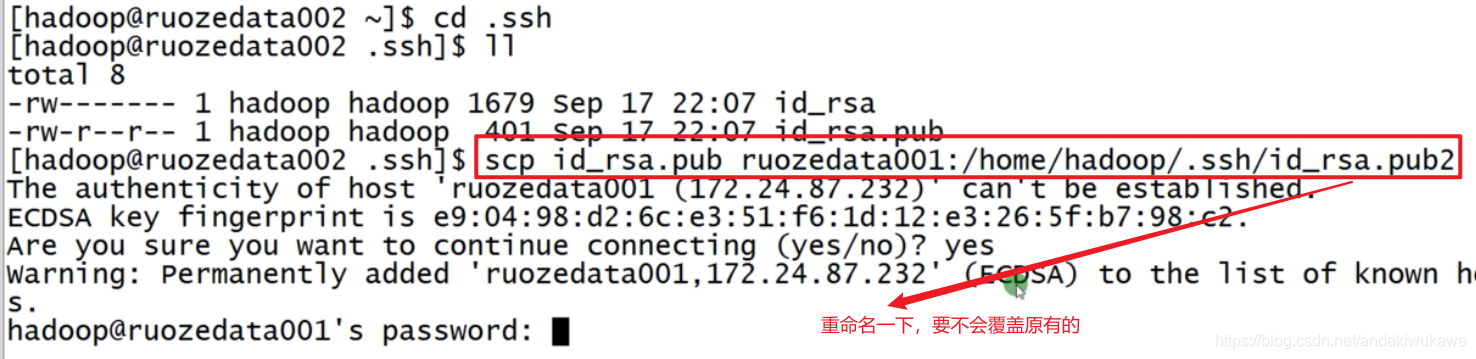
同样第三台也是这样操作
拷贝完成后第一台机器有三台的密钥了?
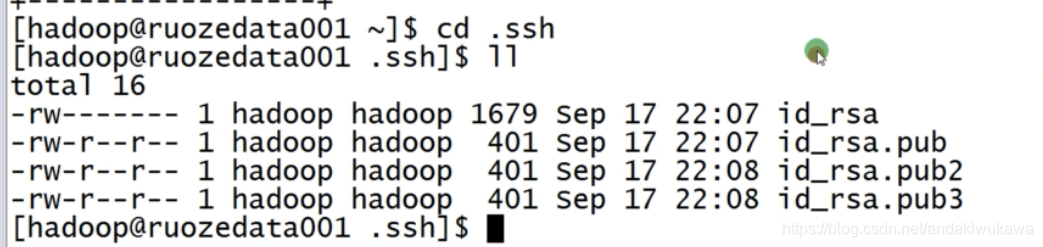
参考hadoop配置文档,赋予权限,将配置好的密钥发送到另外两台机器上。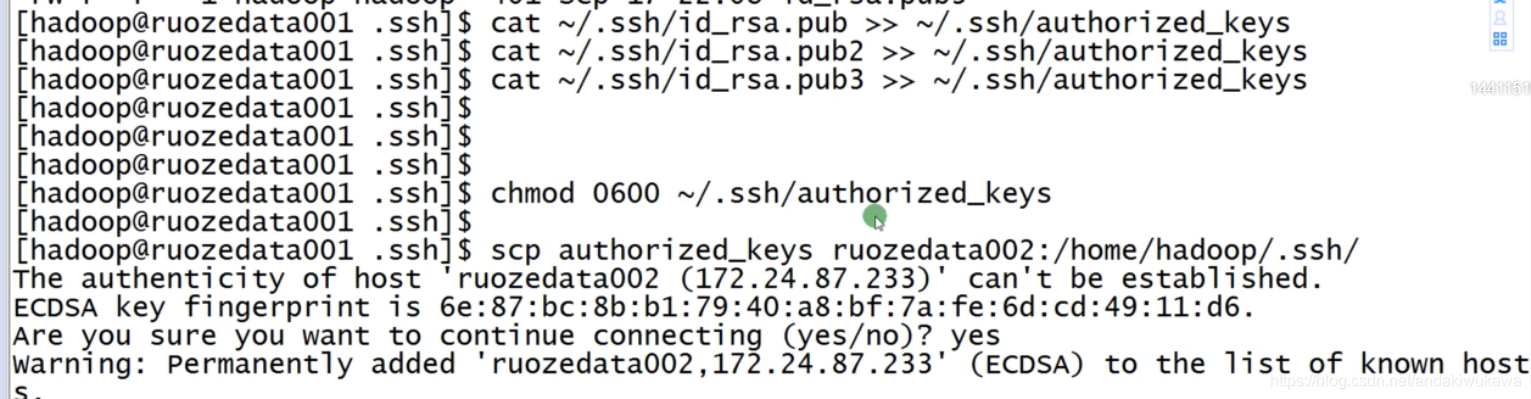
?三台机器配置完成后验证是否配置成功,第一次输入yes,不需要输入密码,配置成功。
三台机器互相信任关系已经打通
ssh ruozedata001 date
ssh ruozedata002 date
ssh ruozedata003 date
?修改目录权限
sudo chown -R hadoop:hadoop /ruozedata
ll /ruozedata
5.数据库初始化
?官方文档:
进入数据库。默认数据库是 PostgreSQL。如果选择MySQL,则需要将mysql-connector-java驱动包添加到DolphinScheduler的lib目录下。
数据库初始化只在node01配置
那么将mysql-connector-java驱动包到DolphinScheduler的lib目录,直接下载这个文件拷贝到这个目录下也可以。
[hadoop@ruozedata001 ~]$ cd
/ruozedata/software/dolphinscheduler-bin/lib
[hadoop@ruozedata001 lib]$?
[hadoop@ruozedata001 lib]$ cp /usr/share/java/mysql-connector-java.jar ?./
拷贝完之后进入到mysql,创建db和用户和赋予权限
mysql -h192.168.xx.xx -P3306 -uroot -p
进入数据库命令行窗口后,执行数据库初始化命令并设置用户和密码。注意:{user} 和 {password} 需要替换为特定的数据库用户名和密码
mysql> CREATE DATABASE dolphinscheduler DEFAULT CHARACTER SET utf8 DEFAULT COLLATE utf8_general_ci;
mysql> GRANT ALL PRIVILEGES ON dolphinscheduler.* TO '{user}'@'%' IDENTIFIED BY '{password}';
mysql> GRANT ALL PRIVILEGES ON dolphinscheduler.* TO '{user}'@'localhost' IDENTIFIED BY '{password}'; mysql> flush privileges;
?我们配置的内容
CREATE DATABASE rzdolphinscheduler DEFAULT CHARACTER SET utf8 DEFAULT COLLATE utf8_general_ci;
GRANT ALL PRIVILEGES ON rzdolphinscheduler.* TO 'hadoop'@'%' IDENTIFIED BY 'ruozedata123';
GRANT ALL PRIVILEGES ON rzdolphinscheduler.* TO 'hadoop'@'localhost' IDENTIFIED BY 'ruozedata123';
flush privileges;
?在conf目录下的datasource.properties中修改如下配置
官方文档:
vi conf/datasource.properties
如果选择Mysql,请注释掉PostgreSQL的相关配置(反之亦然),还需要手动添加[[mysql-connector-java驱动jar](https://downloads.mysql.com/archives/cj/?)] 打包到 lib 目录下,然后正确配置数据库连接信息。
#postgre
#spring.datasource.driver-class-name=org.postgresql.Driver
#spring.datasource.url=jdbc:postgresql://localhost:5432/dolphinscheduler
# mysql
spring.datasource.driver-class-name=com.mysql.jdbc.Driver
spring.datasource.url=jdbc:mysql://xxx:3306/dolphinscheduler?useUnicode=true&characterEncoding=UTF-8&allowMultiQueries=true # Replace the correct IP address
spring.datasource.username=xxx # replace the correct {user} value
spring.datasource.password=xxx # replace the correct {password} value
?我们的配置
vi conf/datasource.properties
spring.datasource.driver-class-name=com.mysql.jdbc.Driver
spring.datasource.url=jdbc:mysql://ruozedata001:3306/rzdolphinscheduler?useUnicode=true&characterEncoding=UTF-8&allowMultiQueries=true
spring.datasource.username=hadoop
spring.datasource.password=ruozedata123
修改保存后,执行脚本目录下的创建表和导入数据脚本
sh script/create-dolphinscheduler.sh?
注意:如果你执行上面的脚本和报告“/斌/ java的:没有这样的文件或目录”的错误,请设置JAVA_HOME和PATH变量在/ etc / profile文件
22:25:31.500 [main] INFO org.apache.dolphinscheduler.dao.upgrade.shell.CreateDolphinScheduler - upgrade DolphinScheduler finished
22:25:31.500 [main] INFO org.apache.dolphinscheduler.dao.upgrade.shell.CreateDolphinScheduler - create DolphinScheduler success
=================================== 完成第一步准备工作
6.修改运行时的参数
修改dolphinscheduler_env.sh'conf/env'目录下文件中的环境变量(以'/opt/soft'下安装的相关软件为例)
按照实际情况填写
官方文档
    export HADOOP_HOME=/opt/soft/hadoop
    export HADOOP_CONF_DIR=/opt/soft/hadoop/etc/hadoop
    #export SPARK_HOME1=/opt/soft/spark1
    export SPARK_HOME2=/opt/soft/spark2
    export PYTHON_HOME=/opt/soft/python
    export JAVA_HOME=/opt/soft/java
    export HIVE_HOME=/opt/soft/hive
    export FLINK_HOME=/opt/soft/flink
    export DATAX_HOME=/opt/soft/datax/bin/datax.py
    export PATH=$HADOOP_HOME/bin:$SPARK_HOME2/bin:$PYTHON_HOME:$JAVA_HOME/bin:$HIVE_HOME/bin:$PATH:$FLINK_HOME/bin:$DATAX_HOME:$PATH

    ```

 `Note: This step is very important. For example, JAVA_HOME and PATH must be configured. Those that are not used can be ignored or commented out.`
?我们的配置,这个配置没有安装python。脚本配置只在node01配置。
[hadoop@ruozedata001 conf]$ cd env/
[hadoop@ruozedata001 env]$ ll
total 4
-rw-rw-r-- 1 hadoop hadoop 1273 Aug 18 14:41 dolphinscheduler_env.sh
[hadoop@ruozedata001 env]$ vi dolphinscheduler_env.sh?
export HADOOP_HOME=/opt/cloudera/parcels/CDH/lib/hadoop
export HADOOP_CONF_DIR=/etc/hadoop/conf
export SPARK_HOME2=/var/lib/hadoop-hdfs/spark-work/spark
export JAVA_HOME=/usr/java/jdk1.8.0_45
export HIVE_HOME=/opt/cloudera/parcels/CDH/lib//hive
export PATH=$HADOOP_HOME/bin:$SPARK_HOME2/bin:$JAVA_HOME/bin:$HIVE_HOME/bin:$PATH我们的jdk要软连接到/usr/bin/java(仍以JAVA_HOME=/opt/soft/java为例)
三台机器都需要执行
sudo ln -s /usr/java/jdk1.8.0_45/bin/java /usr/bin/java==============================完成第二步准备工作?
修改一键部署配置文件 conf/config/install_config.conf中的各参数,特别注意以下参数的配置可以把文件download下来本地修改
以下在node1配置
# choose mysql or postgresql 我们数据库使用的类型,我们用的mysql
dbtype="mysql"
# Database connection address and port 我们的第一台机器
dbhost="ruozedata001:3306"
# database name 我们配置库的名称
dbname="rzdolphinscheduler"
# database username 我们数据库的用户名
username="hadoop"
# database password 我们数据库配置的密码
# NOTICE: if there are special characters, please use the \ to escape, for example, `[` escape to `\[`
password="hadoop123"
#Zookeeper cluster 我们的zookeeper 三台机器
zkQuorum="ruozedata001:2181,ruozedata002:2181,ruozedata003:2181"
# Note: the target installation path for dolphinscheduler, please not config as the same as the current path (pwd) 这里写我们自己安装的位置
installPath="/ruozedata/app/dolphinscheduler"
# deployment user 这里写我们部署的用户我们用的hadoop
# Note: the deployment user needs to have sudo privileges and permissions to operate hdfs. If hdfs is enabled, the root directory needs to be created by itself
deployUser="hadoop"
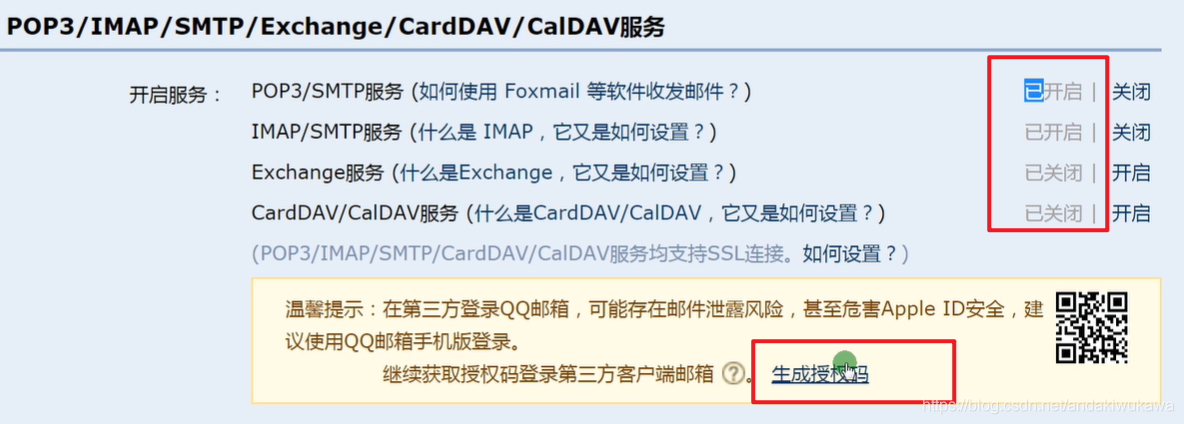
# alert config,take QQ email for example
# mail protocol 如果是公司自己用端口号可以写25,阿里云25端口号是禁用的
mailProtocol="25"
# mail server host 这里写邮件
mailServerHost="smtp.qq.com"
# mail server port
# note: Different protocols and encryption methods correspond to different ports, when SSL/TLS is enabled, make sure the port is correct.
mailServerPort="25"
# mail sender 邮箱的发送者
mailSender="xxx@qq.com"
# mail user 邮箱的用户
mailUser="xxx@qq.com"
# mail sender password 这个地方填写认证码
# note: The mail.passwd is email service authorization code, not the email login password.
mailPassword="xxx"
# Whether TLS mail protocol is supported,true is supported and false is not supported
starttlsEnable="true"
# Whether TLS mail protocol is supported,true is supported and false is not supported。
# note: only one of TLS and SSL can be in the true state. 启用ssl
sslEnable="true"
# note: sslTrust is the same as mailServerHost 这个地方写企业邮箱
sslTrust="smtp.qq.com"
# resource storage type:HDFS,S3,NONE 这个地方写我们资源的存储类型
resourceStorageType="HDFS"
# If resourceStorageType = HDFS, and your Hadoop Cluster NameNode has HA enabled, you need to put core-site.xml and hdfs-site.xml in the installPath/conf directory. In this example, it is placed under /opt/soft/dolphinscheduler/conf, and configure the namenode cluster name; if the NameNode is not HA, modify it to a specific IP or host name.这个地方需要注意一下
# if S3,write S3 address,HA,for example :s3a://dolphinscheduler,
# Note,s3 be sure to create the root directory /dolphinscheduler
defaultFS="hdfs://nameservice1"
# if not use hadoop resourcemanager, please keep default value; if resourcemanager HA enable, please type the HA ips ; if resourcemanager is single, make this value empty 如果你的yarn是HA的话,那这里就配置两个机器,如果是单点的话就注释掉
yarnHaIps="ruozedata001,ruozedata002"
# if resourcemanager HA enable or not use resourcemanager, please skip this value setting; If resourcemanager is single, you only need to replace yarnIp1 to actual resourcemanager hostname. 如果yarn是单点的话在这里配置,HA的话注释掉
#singleYarnIp="yarnIp1"
# resource store on HDFS/S3 path, resource file will store to this hadoop hdfs path, self configuration, please make sure the directory exists on hdfs and have read write permissions。/dolphinscheduler is recommended 我们把我们的资源(shell脚本,jar包)上传到hdfs上传到的目录是哪里
resourceUploadPath="/rzdolphinscheduler"
# who have permissions to create directory under HDFS/S3 root path 我的hdfs在运行的时候是哪个用户
# Note: if kerberos is enabled, please config hdfsRootUser=
hdfsRootUser="hdfs"
# kerberos config 公司如果用kerberos 这里就要配置
# whether kerberos starts, if kerberos starts, following four items need to config, otherwise please ignore
kerberosStartUp="false"
# kdc krb5 config file path
krb5ConfPath="$installPath/conf/krb5.conf"
# keytab username
keytabUserName="hdfs-mycluster@ESZ.COM"
# username keytab path
keytabPath="$installPath/conf/hdfs.headless.keytab"
# api server port 这里是api的端口号
apiServerPort="12345"
# install hosts 安装,我们要安装哪几台机器
# Note: install the scheduled hostname list. If it is pseudo-distributed, just write a pseudo-distributed hostname
ips="ruozedata001,ruozedata002,ruozedata003"
# ssh port, default 22 这里是ssh通信端口号,和生产环境一致
# Note: if ssh port is not default, modify here
sshPort="22"
# run master machine 这里是master老大
# Note: list of hosts hostname for deploying master
masters="ruozedata001,ruozedata002"
# run worker machine 这里是小弟,后面的default是给机器打标签(有的机器性能好,有的机器性能弱)使用上的优先级在这里配置
# note: need to write the worker group name of each worker, the default value is "default"
workers="ruozedata001:default,ruozedata002:default,ruozedata003:default"
# run alert machine 这里是警告,一般部署一个就可以
# note: list of machine hostnames for deploying alert server
alertServer="ruozedata001"
# run api machine 这里是api 一般和master一致
# note: list of machine hostnames for deploying api server
apiServers="ruozedata001,ruozedata002"
其中关于邮件的配置
 ?关于,我的hdfs在运行的时候是哪个用户,hdfsRootUser="hdfs"

# If resourceStorageType = HDFS, and your Hadoop Cluster NameNode has HA enabled, you need to put core-site.xml and hdfs-site.xml in the installPath/conf directory. In this example, it is placed under /opt/soft/dolphinscheduler/conf, and configure the namenode cluster name; if the NameNode is not HA, modify it to a specific IP or host name.这个地方需要注意一下?
- 如果需要上传资源到Hadoop集群,并且Hadoop集群的NameNode配置了HA,则需要开启HDFS资源上传,并且需要复制文件中的core-site.xml和hdfs-site.xml Hadoop 集群到 /opt/dolphinscheduler/conf。非 NameNode HA 跳过下一步。
这里他们说如果我们是HA的话需要,需要把core-site.xml、hdfs-site.xml这两个xml拷贝到conf文件夹下
[hadoop@ruozedata001 conf]$ ln -s /etc/hadoop/conf/core-site.xml core-site.xml
[hadoop@ruozedata001 conf]$ ln -s /etc/hadoop/conf/hdfs-site.xml hdfs-site.xml
[hadoop@ruozedata001 conf]$ 上传install_config.conf时可能遇到的编码问题
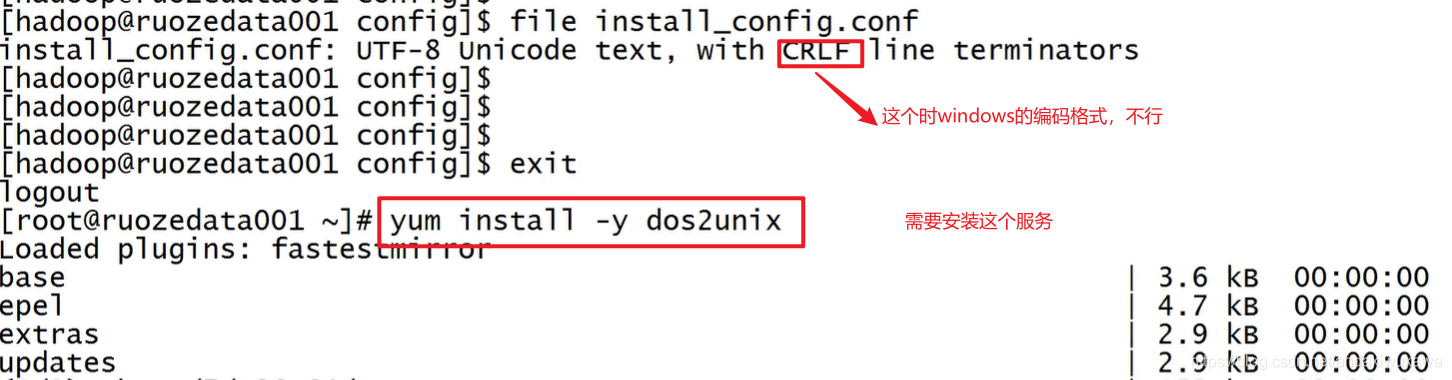
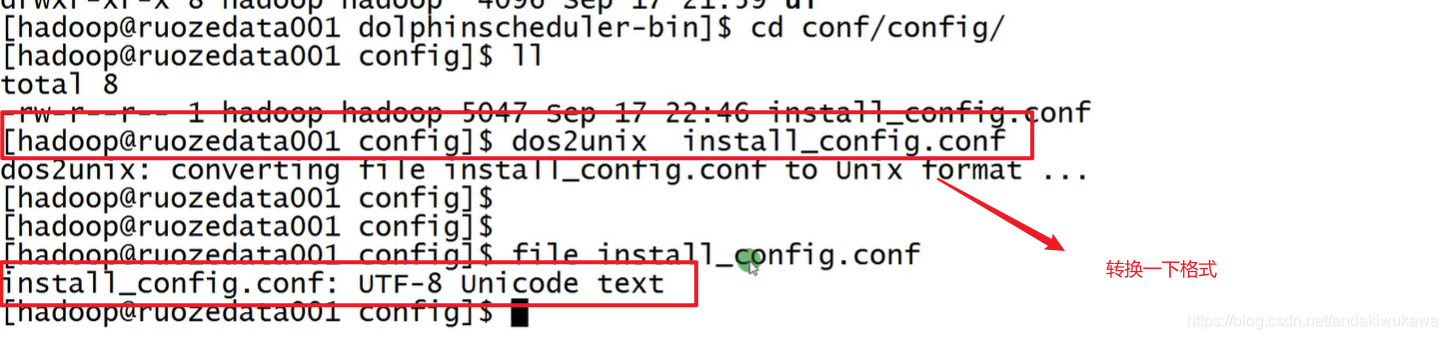
?==============================完成第三步准备工作,准备工作ok
7.一键化部署
切换到部署用户,执行一键部署脚本,我们是用hadoop用户进行部署的

在这个目录下?
sh install.sh查看下每个节点的进程?
[hadoop@ruozedata001 dolphinscheduler-bin]$ jps
29712 Jps
29620 AlertServer
29669 ApiApplicationServer
29574 LoggerServer
29526 WorkerServer
29470 MasterServer
[hadoop@ruozedata001 dolphinscheduler-bin]$

[hadoop@ruozedata002 ~]$ jps
5922 Jps
5511 WorkerServer
5815 ApiApplicationServer
5753 LoggerServer
5465 MasterServer
[hadoop@ruozedata002 ~]$

[hadoop@ruozedata003 ~]$ jps
25236 WorkerServer
25463 Jps
25278 LoggerServer
[hadoop@ruozedata003 ~]$
?检查
1.我们有两台master,第一台课第二台
2.三台机器都有worker
3.每台机器都有logger日志
4.我们的master下都有一个api的server
5.我们第一台机器部署了一个警告的服务

登陆我们的界面
http://ruozedata001:12345/dolphinscheduler?
admin/dolphinscheduler123