JanusGraph入门实操
本篇博客主要记录在centos上安装janusgraph以及在idea中开发图应用的简单示例过程,对于janusgraph和gremlin相关的概念和语法不做介绍。具体可自行查阅相关资料:
前置条件
- 安装jdk1.8
安装hbase

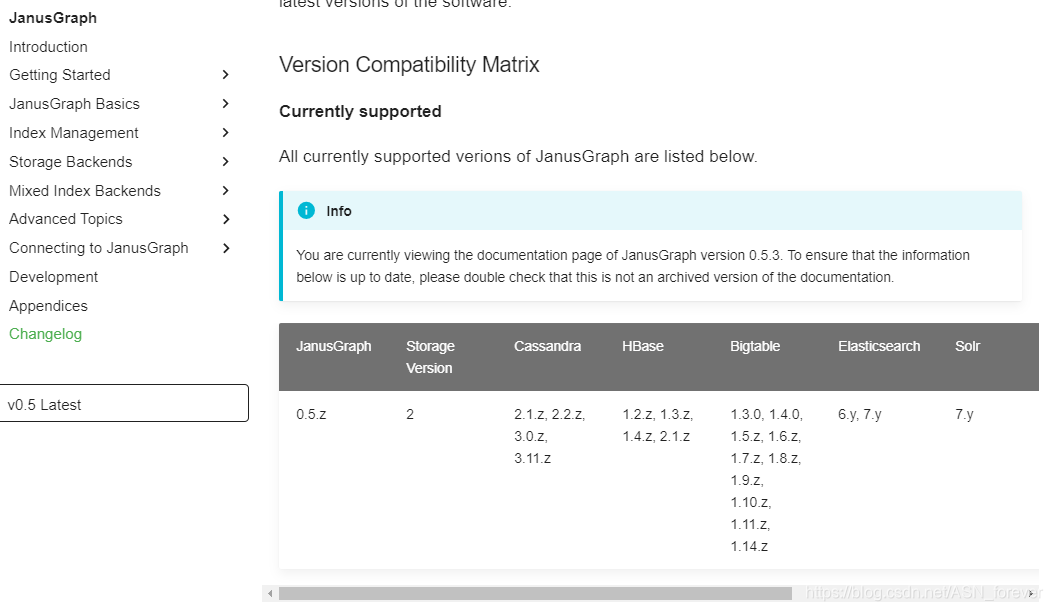
上图表格中是与janusgraph适配的其他组件。这里使用的是hbase2.1.10版本。下载后直接解压运行即可(只为了快速入门janusgraph,这里不需要对hbase做多余的配置):
[root@asn417-01 soft]# cd hbase-2.1.10/
[root@asn417-01 hbase-2.1.10]# ll
总用量 880
drwxr-xr-x.  4 10003 10003   4096 7月  26 03:17 bin
-rw-r--r--.  1 10003 10003 169269 3月  31 2020 CHANGES.md
drwxr-xr-x.  2 10003 10003    208 3月  31 2020 conf
drwxr-xr-x. 11 10003 10003   4096 3月  31 2020 docs
drwxr-xr-x.  7 10003 10003     80 3月  31 2020 hbase-webapps
-rw-r--r--.  1 10003 10003    262 3月  31 2020 LEGAL
drwxr-xr-x.  6 root  root    8192 7月  26 03:14 lib
-rw-r--r--.  1 10003 10003 129382 3月  31 2020 LICENSE.txt
drwxr-xr-x.  2 root  root     151 7月  26 03:43 logs
-rw-r--r--.  1 10003 10003 479625 3月  31 2020 NOTICE.txt
-rw-r--r--.  1 10003 10003   1477 3月  31 2020 README.txt
-rw-r--r--.  1 10003 10003  84456 3月  31 2020 RELEASENOTES.md
[root@asn417-01 hbase-2.1.10]# ./bin/start-hbase.sh
查看hbase web UI
http://xxx:16010/

安装janusgraph
https://github.com/JanusGraph/janusgraph/releases
打开上面的地址选择具体的版本下载janusgraph,这里以janusgraph-full-0.5.3.zip为例。(完整版和非完整版好像没有太大的区别,只是完整版的bin目录下多了一个janusgraph.sh脚本,它自带了Cassandra存储后端和elasticsearch索引后端,且初始化的图比gremlin-server.sh的图复杂一些)
下载解压后目录结构如下:

启动janusgraph服务
配置conf/janusgraph-hbase-test01.properties
复制一份janusgraph-hbase.properties到janusgraph-hbase-test01.properties。然后不用做修改,里面默认的hbase就是本地启动的。
修改gremlin-server.yaml配置
修改conf/gremlin-server/gremlin-server.yaml里的graph,配置为步骤1的路径:

启动janusgraph服务
janusgraph服务其实就是gremlin服务,bin/gremlin-server.sh这个脚本默认就是以gremlin-server.yaml为配置,以org.apache.tinkerpop.gremlin.server.GremlinServer为启动类启动的janusgraph服务。

启动过程中,观察日志,可以发现在hbase中默认创建了名为janusgraph的表,因此启动完成后再次查看hbase web UI,可以看到表信息:

到此为止,以hbase为存储后端的janusgraph服务已经启动成功了,接下来测试客户端与janusgraph服务的交互。交互方式这里主要介绍控制台方式和idea应用方式。
客户端交互
gremlin控制台交互
[root@asn417-01 bin]# ./gremlin.sh

         \,,,/
         (o o)
-----oOOo-(3)-oOOo-----
SLF4J: Class path contains multiple SLF4J bindings.
SLF4J: Found binding in [jar:file:/opt/soft/janusgraph-full-0.5.3/lib/slf4j-log4j12-1.7.12.jar!/org/slf4j/impl/StaticLoggerBinder.class]
SLF4J: Found binding in [jar:file:/opt/soft/janusgraph-full-0.5.3/lib/logback-classic-1.1.3.jar!/org/slf4j/impl/StaticLoggerBinder.class]
SLF4J: See http://www.slf4j.org/codes.html#multiple_bindings for an explanation.
SLF4J: Actual binding is of type [org.slf4j.impl.Log4jLoggerFactory]
plugin activated: tinkerpop.server
plugin activated: tinkerpop.tinkergraph
03:45:00 WARN  org.apache.hadoop.util.NativeCodeLoader  - Unable to load native-hadoop library for your platform... using builtin-java classes where applicable
plugin activated: tinkerpop.hadoop
plugin activated: tinkerpop.spark
plugin activated: tinkerpop.utilities
plugin activated: janusgraph.imports
gremlin> :remote connect tinkerpop.server conf/remote.yaml
==>Configured localhost/127.0.0.1:8182
gremlin> :remote console
==>All scripts will now be sent to Gremlin Server - [localhost/127.0.0.1:8182] - type ':remote console' to return to local mode
gremlin> graph
==>standardjanusgraph[hbase:[127.0.0.1]]
gremlin> g.V().count()
==>0
gremlin> g.addV('person').property('name','p1')
==>v[4264]
gremlin> g.addV('person').property('name','p2')
==>v[4272]
gremlin> g.addE('knows').from(g.V(4264)).to(g.V(4272))
==>e[1lh-3ag-29ed-3ao][4264-knows->4272]
gremlin>
解释:
- console客户端连接步骤3启动的服务:
:remote connect tinkerpop.server conf/remote.yaml - 配置命令远程话:
:remote console - 查看配置的hbase后端是否生效:
graph - 查看当前顶点数:
g.V().count() - 添加一个顶点:
g.addV('person').property('name','p1') - 再添加一个顶点:
g.addV('person').property('name','p2') - 在两个顶点间创建边:
g.addE('knows').from(g.V(4264)).to(g.V(4272))
idea应用交互
程序结构:

pom依赖:
<dependencies>
        <!-- If you require to access to internal JanusGraph component such as ManagementSystem, consider to use the maven package janusgraph-core. -->
        <dependency>
            <groupId>org.janusgraph</groupId>
            <artifactId>janusgraph-core</artifactId>
            <version>0.5.3</version>
        </dependency>
        <!-- If you just want to use Gremlin to communicate with JanusGraph, consider to use the maven package janusgraph-driver -->
        <dependency>
            <groupId>org.janusgraph</groupId>
            <artifactId>janusgraph-driver</artifactId>
            <version>0.5.3</version>
        </dependency>
        <dependency>
            <groupId>org.apache.tinkerpop</groupId>
            <artifactId>gremlin-driver</artifactId>
            <version>3.4.6</version>
        </dependency>
        <!-- janusgraph要使用hbase就需要加上下面两个依赖 -->
        <dependency>
            <groupId>org.janusgraph</groupId>
            <artifactId>janusgraph-hbase</artifactId>
            <version>0.5.0</version>
        </dependency>
        <dependency>
            <groupId>org.apache.hbase</groupId>
            <artifactId>hbase-client</artifactId>
            <version>2.1.10</version>
        </dependency>
    </dependencies>
测试程序:
public class TestHbaseGraph {
    public static void main(String[] args) throws Exception {
        String url = TestHbaseGraph.class.getClassLoader().getResource("janusgraph-hbase-test01.properties").toString();
        System.out.println(url);
        PropertiesConfiguration properties = new PropertiesConfiguration(url);

        JanusGraph graph = JanusGraphFactory.open(properties);

        GraphTraversalSource g = graph.traversal();

        List<Vertex> list = g.V().has("name").toList();
        for (Vertex v : list) {
            System.out.println(v.id());
        }
        g.close();
        graph.close();
    }
}
配置文件(就是前面启动janusgraph服务时配置的内容):
gremlin.graph=org.janusgraph.core.JanusGraphFactory

storage.backend=hbase

storage.hostname=xxx

cache.db-cache = true

cache.db-cache-clean-wait = 20

cache.db-cache-time = 180000

cache.db-cache-size = 0.5
运行程序查看日志如下:
1716 [main] INFO  org.janusgraph.diskstorage.Backend  - Initiated backend operations thread pool of size 12
1774 [main] INFO  org.janusgraph.diskstorage.Backend  - Configuring total store cache size: 1865910588
1823 [main] INFO  org.janusgraph.graphdb.database.IndexSerializer  - Hashing index keys
1890 [main] INFO  org.janusgraph.diskstorage.log.kcvs.KCVSLog  - Loaded unidentified ReadMarker start time 2021-08-04T08:25:36.818Z into org.janusgraph.diskstorage.log.kcvs.KCVSLog$MessagePuller@d0865a3
1990 [main] WARN  org.janusgraph.graphdb.transaction.StandardJanusGraphTx  - Query requires iterating over all vertices [()]. For better performance, use indexes
4264
4272
2108 [main] INFO  org.apache.hadoop.hbase.client.ConnectionImplementation  - Closing master protocol: MasterService
可以看到查询结果就是控制台中插入的两个顶点,说明idea与janusgraph服务成功交互。
补充:本地连接hbase服务是需要配置hosts的,因此需要保证hosts文件中配置了hbase所在机器的映射。