前言:上一篇中示例改进了我们的消息处理,将扇形交换器替换成直连交换器,实现了根据日志等级来接收处理消息。虽然直连交换器改进了程序,但是它仍然有局限性, 不能根据多种标准实现接收处理日志消息。例如我们想按照Error, Warning,Info等日志等级接收消息,同时我们还想根据日志所属系统来处理消息。如果可以实现多种标准进行路由, 程序将会更加的灵活。我们接下来了解主题交换器(Topic Exchange)
RabitMQ安装
如何安装:?https://blog.csdn.net/Beijing_L/article/details/119042261
图例
P(生产者): 生产者属于数据的发送方 ,发送的消息被放入队列里
C(消费者): 消费者属于数据的接收方,发现队列里的消息,将消息从队列中读取出来做业务操作
Queue(队列): RabbitMQ的作用是存储消息,队列的特性是先进先出
主题交换器(Topic Exchange)
之前的示例中使用路由键都是随便定义的, 但消息发送给主题交换器的时候路由键(RoutingKey)不能随便定义,路邮件必须是由点分割的单词列表。可以使用任何单词或者词组,我们通常是用消息的一些特征。就例如 “quick.orange.rabbit” 或者“lazy.orange.elephant”等 。但是RoutingKey最大不能超过255 bytes
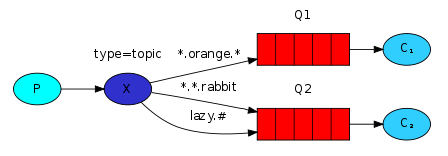
交换器和队列的绑定键(binding Key)也必须是相同的形式, 主体交换器的底层实现原理和直连交换器很类似,使用特定路由键的消息发送到主体交换器中后,如果队列的绑定建和路邮键匹配,则消息将会发送到匹配的队列里。绑定键匹配处理的时候有2个特殊处理,如下图所示
- * 可以表示任何一个单词
- # 可以表示0个或者多个单词

生产者发送消息到主体交换器X, 主题交换器X根据路由键(routing key)和绑定键(binding key)匹配处理,满足匹配原则的就将消息推送到队列里
其中:
- Q1队列: 接收所有带orange颜色的动物相关消息
- Q2队列: 接收所有rabbit的消息以及所有Lazy的动物消息
例如:
- 路由键 quick.orange.rabbit 满足*.orange.* 同时也满足 *.*.rabbit ,所以它会被发送到队列Q1和队列Q2
- 路由键 lazy.orange.elephant 满足*.orange.* 同时也满足layz.# ,所以它会被发送到队列Q1和队列Q2 ,因为#可以表示多个单词
- 路由键 lazy.brown.fox 只满足layz.# , 所以它会被发送到Q2中
想想看, 我们发送消息时以orange或者quick.orange.male.rabbit 当路由键时会发生什么? 两个消息将不会匹配到任何队列造成丢失.但是如果使用lazy.orange.male.rabbit当做路由键的时候,消息会被发送到Q2队列中。虽然路由键是4个单词,但是它可以匹配lazy.# 规则,因为#可以代表多个单词
主题交换器比其他交换器更强大
- 当主题交换器和队列的绑定键为“#” 的时候,队列将会接收到所有的消息,就和不考虑秘钥的扇出交换器(fanout exchange)一样.
- 当主题交换器和队列的绑定键不使用“*”或者“#” 的时候,主题交换器就和直连交换器(direct exchange)一样
参考代码
我们的示例程序中使用主体交换器,例如考虑路由键的配置方式为 <所述系统>.<严重等级> ,代码和先前的代码差不多
消费者
public class ReceiveOtherSysLogs {

    private static final String EXCHANGE_NAME = "topic_logs";

    public static void main(String[] args) throws IOException, TimeoutException {
        ConnectionFactory factory = new ConnectionFactory();
        factory.setHost("127.0.0.1");


        Connection connection = factory.newConnection();
        Channel channel = connection.createChannel();

        channel.exchangeDeclare(EXCHANGE_NAME, "topic");


        //定义一个路由关键字
        String[] bindingKeys = new String[]{"customer.*", "accept.*"};
        String queueName = channel.queueDeclare().getQueue();
        //绑定路由
        for (String bindingKey : bindingKeys) {
            channel.queueBind(queueName, EXCHANGE_NAME, bindingKey);
            System.out.println("exchange:" + EXCHANGE_NAME + ", queue:" + queueName + ", BindRoutingKey:" + bindingKey);
        }
        System.out.println("Waiting for messages");


        DeliverCallback deliverCallback = (consumerTag, delivery) -> {
            String message = new String(delivery.getBody(), "UTF-8");
            System.out.println(" [x] Received '" +
                    delivery.getEnvelope().getRoutingKey() + "':'" + message + "'");
        };
        channel.basicConsume(queueName, true, deliverCallback, consumerTag -> {
        });
    }

}
?ReceiveOtherSysLogs? 用于接收customer和accept系统的消息 ,因为使用的是* 所有消息路由必须是两个单词,多个单词无法匹配
public class ReceiveProductSysLogs {

    private static final String EXCHANGE_NAME = "topic_logs";

    public static void main(String[] args) throws IOException, TimeoutException {
        ConnectionFactory factory = new ConnectionFactory();
        factory.setHost("127.0.0.1");


        Connection connection = factory.newConnection();
        Channel channel = connection.createChannel();

        channel.exchangeDeclare(EXCHANGE_NAME, "topic");
        String queueName = channel.queueDeclare().getQueue();
        //定义一个路由关键字
        String[] bindingKeys = new String[]{"product.#"};


        //绑定路由
        for (String bindingKey : bindingKeys) {
            channel.queueBind(queueName, EXCHANGE_NAME, bindingKey);
            System.out.println("exchange:" + EXCHANGE_NAME + ", queue:" + queueName + ", BindRoutingKey:" + bindingKey);
        }
        System.out.println(" Waiting for messages");

        DeliverCallback deliverCallback = (consumerTag, delivery) -> {
            String message = new String(delivery.getBody(), "UTF-8");
            System.out.println(" [x] Received '" +
                    delivery.getEnvelope().getRoutingKey() + "':'" + message + "'");
        };
        channel.basicConsume(queueName, true, deliverCallback, consumerTag -> {
        });
    }

}
?ReceiveProductSysLogs? 用于接收产品系统的所有消息,因为使用#,所以可以匹配以product开通的KEY
生产者
public class TopicSender {

    private static final String EXCHANGE_NAME = "topic_logs";

    public static void main(String[] args) throws IOException, TimeoutException {
        ConnectionFactory factory = new ConnectionFactory();
        factory.setHost("127.0.0.1");


        Connection connection = factory.newConnection();
        Channel channel = connection.createChannel();

        //声明一个匹配模式的交换机
        channel.exchangeDeclare(EXCHANGE_NAME, "topic");
        //待发送的消息
        String[] routingKeys = new String[]{
                "customer.error",
                "product.info",
                "product.error",
                "product.error.log",
                "accpet.info.log",
        };
        //发送消息
        for (String routingKey : routingKeys) {
            String message = "routingKey=" + routingKey + " log:" + " this is information";
            channel.basicPublish(EXCHANGE_NAME, routingKey, null, message.getBytes());
            System.out.println("TopicSend Sent '" + routingKey + "':'" + message + "'");
        }


        channel.close();
        connection.close();

    }
}
执行结果
| "customer.error" | 满足customer.* |
| "product.info" | 满足product.# |
| ?"product.error" | 满足product.# |
| "product.error.log" | 满足product.#? 其中#可以匹配多个单词 |
| "accpet.info.log", | 不满足accept.*其中*智能匹配一个单词 |
生产者发送消息
TopicSend Sent 'customer.error':'routingKey=customer.error log: this is information'
TopicSend Sent 'product.info':'routingKey=product.info log: this is information'
TopicSend Sent 'product.error':'routingKey=product.error log: this is information'
TopicSend Sent 'product.error.log':'routingKey=product.error.log log: this is information'
TopicSend Sent 'accpet.info.log':'routingKey=accpet.info.log log: this is information'
消费者处理消息
##ReceiveProductSysLogs 处理了所有product相关的消息
exchange:topic_logs, queue:amq.gen-cd03G1A8vIBgzqN7eW-zbg, BindRoutingKey:product.#
 Waiting for messages
 [x] Received 'product.info':'routingKey=product.info log: this is information'
 [x] Received 'product.error':'routingKey=product.error log: this is information'
 [x] Received 'product.error.log':'routingKey=product.error.log log: this is information'
#ReceiveOtherSysLogs 只处理满足条件的消息customer.error
exchange:topic_logs, queue:amq.gen-UJEhQV-JDb1s8fU8lTPFVQ, BindRoutingKey:customer.*
exchange:topic_logs, queue:amq.gen-UJEhQV-JDb1s8fU8lTPFVQ, BindRoutingKey:accept.*
Waiting for messages
[x] Received 'customer.error':'routingKey=customer.error log: this is information'