消息队列协议
网络协议三要素

?
?rabbitMq采用amqp协议

?消息分发策略和机制
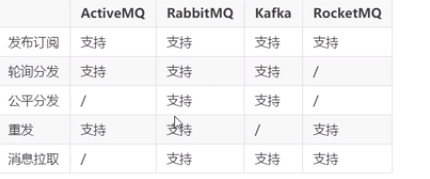
?轮询分发不考略服务器性能,没有时间倾斜性,公平分发类似能者多劳,性能好就多消费
什么是高可用?

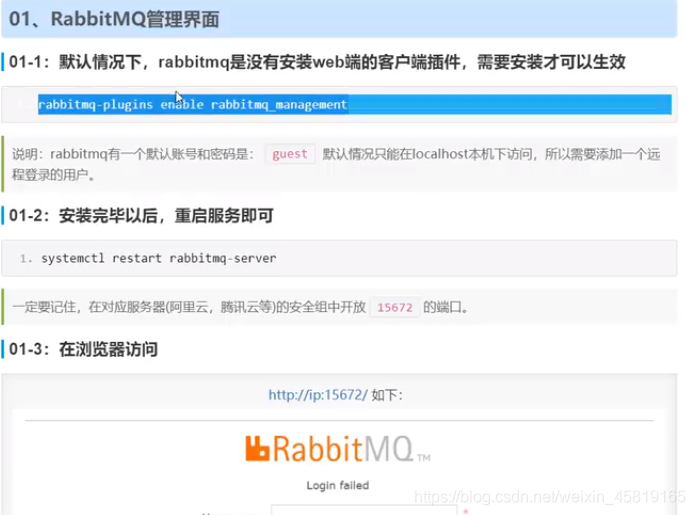
web界面管理和授权
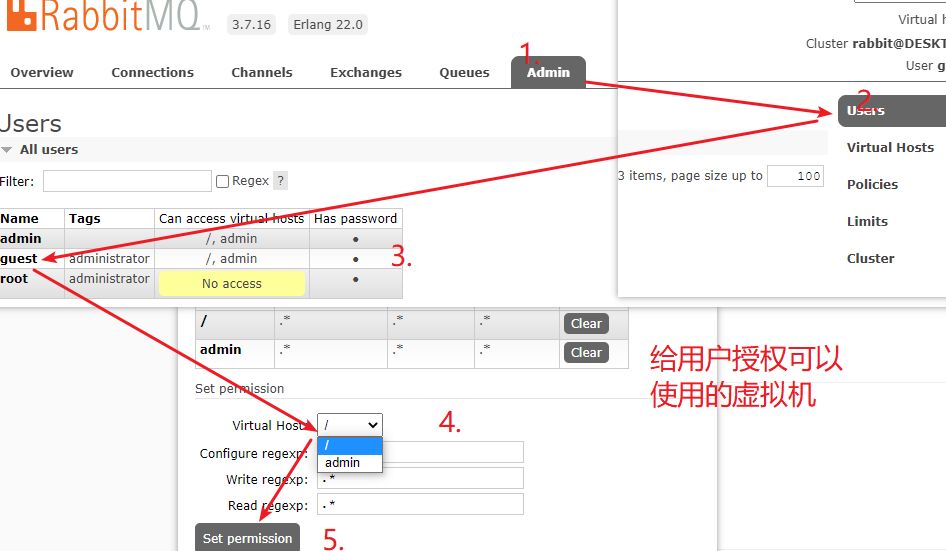
?授权账号和密码

?第三步是为用户赋所有权限,但是如果是admin用户已经是有所有权限的了,可以不执行
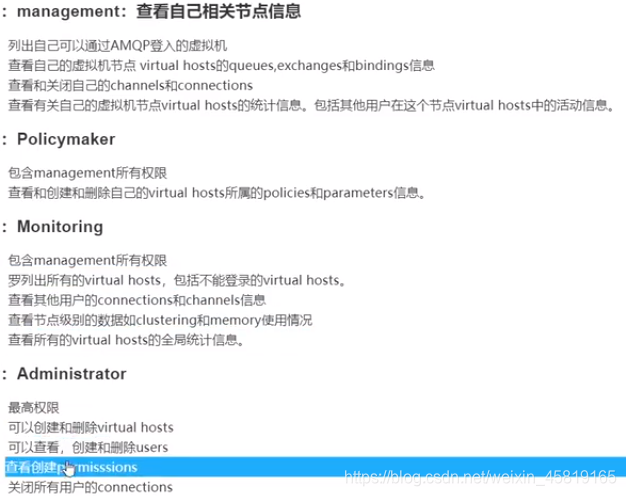
? 角色分类
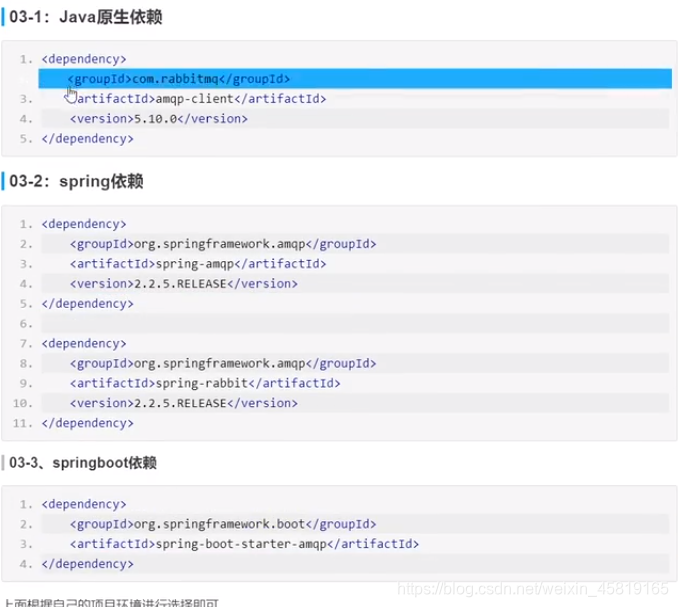
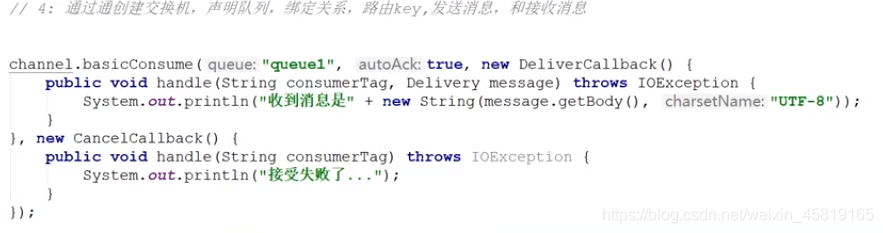
?原生API入门案例
简单模式生产者代码
 ?非持久化会存盘,但是会随着服务的重启而消失
 ?消费者与生产者区别在第四步
?RbbitMq组件图

如果没有指定交换机会创建一个默认的交换机?
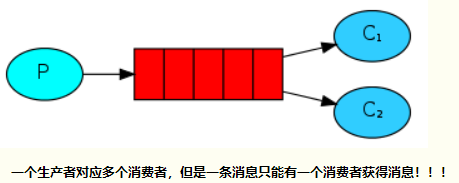
Work Queue消息模型
该消息模型有一个生产者和多个消费者,多个消费者可以同时消费消息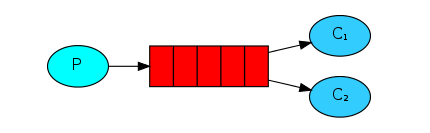
这个消息模型对应着前面说过的轮寻分发 和公平分发 默认是轮训分发(即平均分发消息给消费者不考虑消费者的性能差异 和处理消息的能力),公平分发则采用自动ack机制。
生产者
public class Provider {@Testpublic void test() throws IOException, InterruptedException {Connection connection = RabbitMqUtil.getConnection();Channel channel = connection.createChannel();channel.queueDeclare("work",true,false,false,null);for(int i=0;i<10;i++){channel.basicPublish("","work", MessageProperties.PERSISTENT_TEXT_PLAIN,(i+1+": hello workqueues").getBytes());}RabbitMqUtil.close(channel,connection);}}
消费者一
public class Customer1 {public static void main(String[] args) throws IOException {Connection connection = RabbitMqUtil.getConnection();Channel channel = connection.createChannel();channel.queueDeclare("work",true,false,false,null);channel.basicConsume("work",true,new DefaultConsumer(channel){@Overridepublic void handleDelivery(String consumerTag, Envelope envelope, AMQP.BasicProperties properties, byte[] body) throws IOException {System.out.println("Customer1消费消息:"+new String(body));try {Thread.sleep(2000);} catch (InterruptedException e) {e.printStackTrace();}}});}}
消费者二
public class Customer2 {public static void main(String[] args) throws IOException {Connection connection = RabbitMqUtil.getConnection();Channel channel = connection.createChannel();channel.queueDeclare("work",true,false,false,null);channel.basicConsume("work",true,new DefaultConsumer(channel){@Overridepublic void handleDelivery(String consumerTag, Envelope envelope, AMQP.BasicProperties properties, byte[] body) throws IOException {System.out.println("Customer2消费消息:"+new String(body));}});}}
进行消费
先对两个消费者进行开启,进入异步监听模式,然后让生产者生产10条消息,将消费者一线程休眠2秒,模拟该业务慢的情况
customer1:
customer2: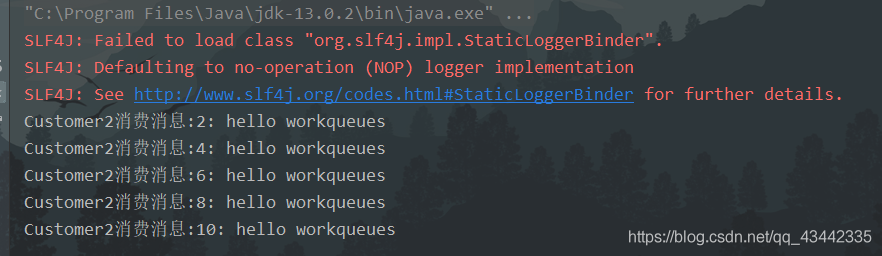
结果是无论是否当某个消费者处理缓慢时,还是一样地平均消费
二、手动ack机制(公平分发)
前面说到Work Queue是将生产者生产的消息一次性平均分配给消费者,当分配完消息后,它的自动确认机制会一次性全部确认,在官方文档中有这么一段解释:
Message acknowledgment
Doing a task can take a few seconds. You may wonder what happens if one of the consumers starts a long task and dies with it only partly done. With our current code once RabbitMQ delivers message to the consumer it immediately marks it for deletion. In this case, if you kill a worker we will lose the message it was just processing. We’ll also lose all the messages that were dispatched to this particular worker but were not yet handled.
But we don’t want to lose any tasks. If a worker dies, we’d like the task to be delivered to another worker.
当生产者生产了10个消息,2个消费者平均分到了5个消息,当消费者一消费完3个消息时不明原因宕机了,剩余的2个消息则会丢失,而我们希望由其他的消费者来对这些剩余的消息消费,要是在业务中出现消息丢失可能会造成很严重的后果,所以官方不推荐使用自动消息确认,下面来测试手动消息确认。
生产者
public class Provider {@Testpublic void test() throws IOException, InterruptedException {Connection connection = RabbitMqUtil.getConnection();Channel channel = connection.createChannel();channel.queueDeclare("work",true,false,false,null);for(int i=0;i<10;i++){channel.basicPublish("","work", MessageProperties.PERSISTENT_TEXT_PLAIN,(i+1+": hello workqueues").getBytes());}RabbitMqUtil.close(channel,connection);}}
消费者一
public class Customer1 {public static void main(String[] args) throws IOException {Connection connection = RabbitMqUtil.getConnection();Channel channel = connection.createChannel();channel.queueDeclare("work",true,false,false,null);//每次只确认一条消息channel.basicQos(1);channel.basicConsume("work",false,new DefaultConsumer(channel){@Overridepublic void handleDelivery(String consumerTag, Envelope envelope, AMQP.BasicProperties properties, byte[] body) throws IOException {System.out.println("Customer1消费消息:"+new String(body));try {Thread.sleep(2000);} catch (InterruptedException e) {e.printStackTrace();}channel.basicAck(envelope.getDeliveryTag(),false);}});}}
消费者一通过线程进行了2秒的休眠,模拟处理业务慢的情况。
消费者二
public class Customer2 {public static void main(String[] args) throws IOException {Connection connection = RabbitMqUtil.getConnection();Channel channel = connection.createChannel();channel.queueDeclare("work",true,false,false,null);channel.basicQos(1);channel.basicConsume("work",false,new DefaultConsumer(channel){@Overridepublic void handleDelivery(String consumerTag, Envelope envelope, AMQP.BasicProperties properties, byte[] body) throws IOException {System.out.println("Customer2消费消息:"+new String(body));channel.basicAck(envelope.getDeliveryTag(),false);}});}}
这里我们通过basicQos()设置了每次只确认一次消息,消息被消费完后通过basicAck()手动确认,第一个参数为消息的标识,用来标识信道中投递的消息,RabbitMQ?推送消息给消费者时,会附带一个?Delivery Tag,以便 消费者可以在消息确认时告诉RabbitMQ到底是哪条消息被确认了,第二个参数为是否多消息确认。当某个消费者宕机了,也不会丢失消息,剩余的则分担到其他的消费者身上,这样的设置可以防止消息的丢失,保证了数据的完整性。
消费者消费
customer1: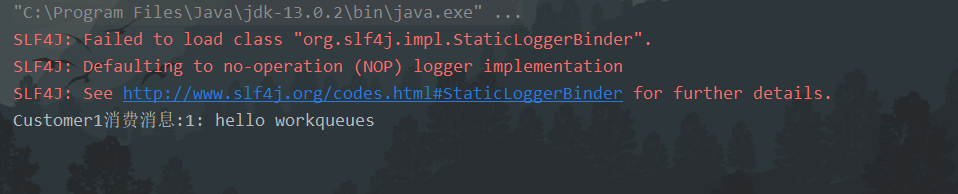
customer2: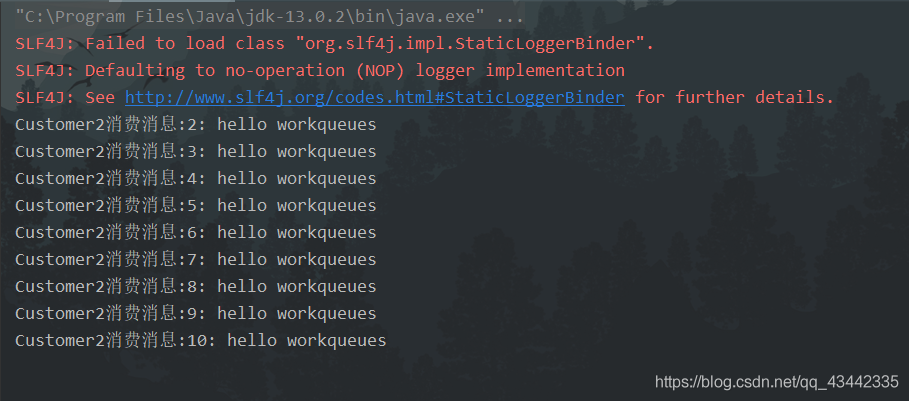
体现了能者多劳,处理效率快的消费者可以处理较多的消息。
SpringBoot集成rabbitMq学习
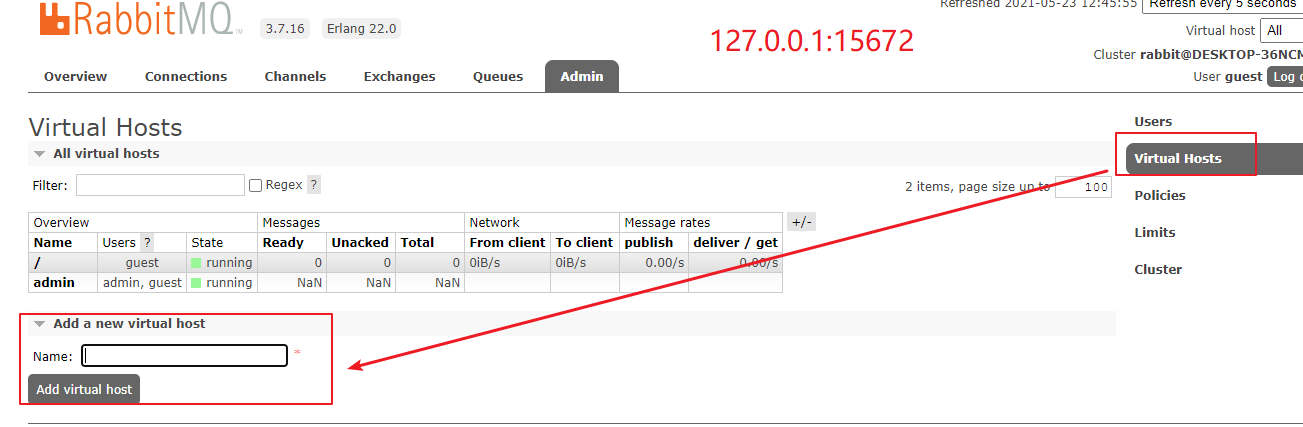
1.创建虚拟主机
Users可以创建用户,Virtual Hosts创建虚拟主机
?
2.给用户授权虚拟机
?
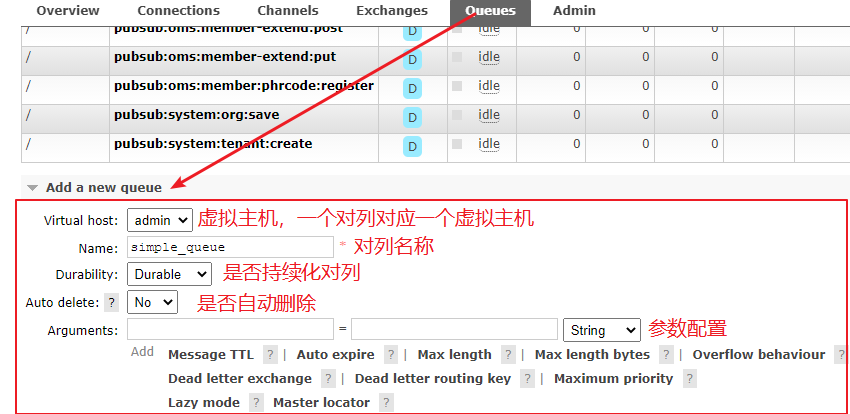
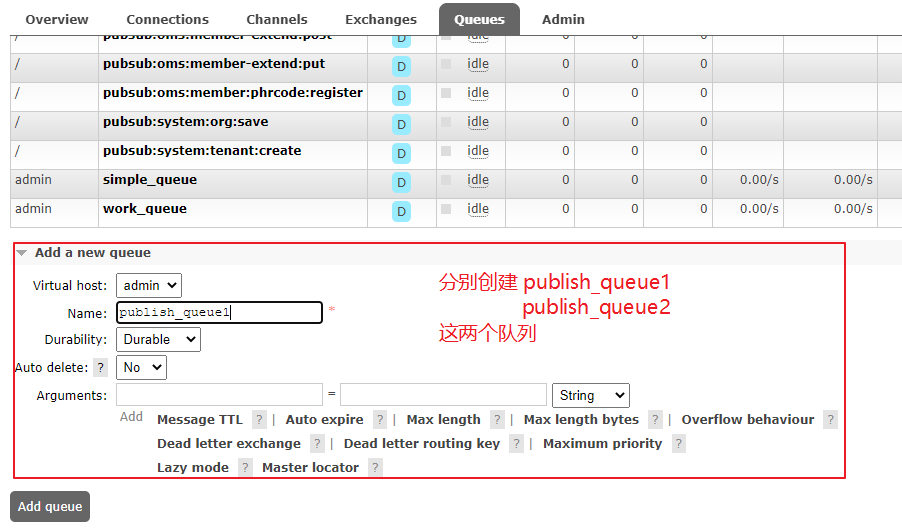
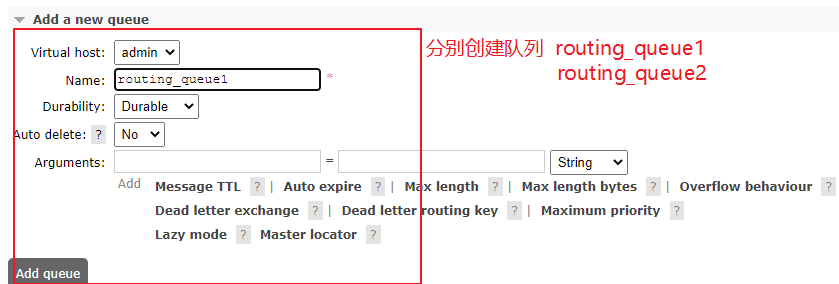
3.创建对列
?
持久化:如果选durable,则队列消息自动持久化到磁盘上,如果选transient,则不会持久化;
自动删除:默认值no,如果yes,则在消息队列没有使用的情况下,队列自行删除。
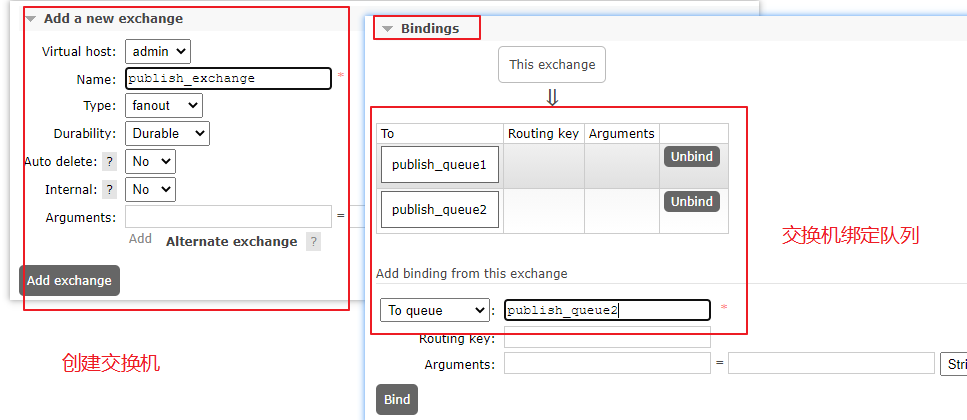
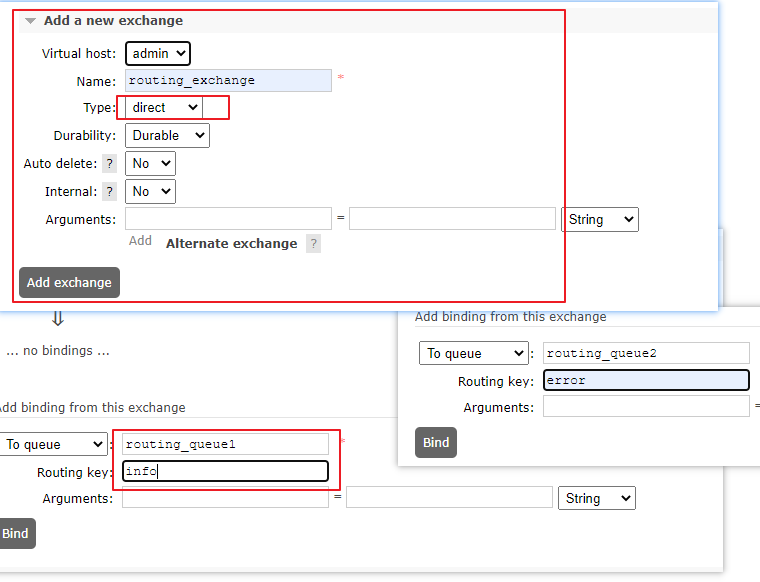
4.创建交换机
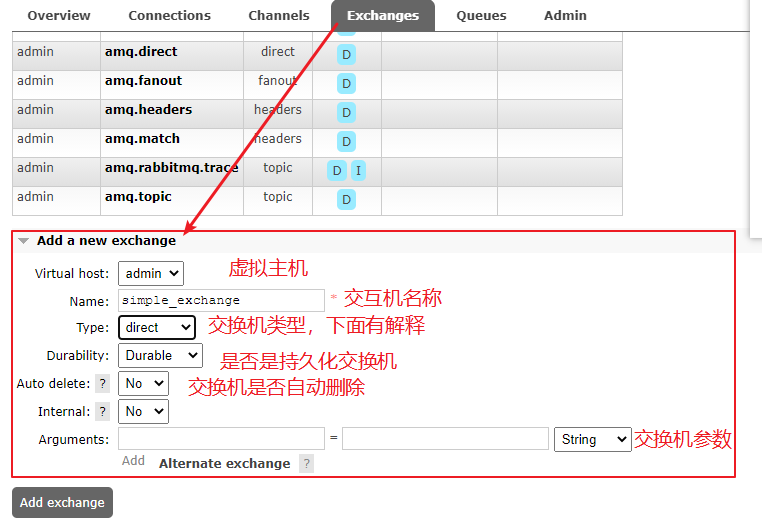
?
自动删除:默认值no,如果是yes,则在将所有队列与交换机取消绑定之后,交换机将自动删除。
交换机类型:
- fanout:广播类型
- direct:路由类型
- topic:通配符类型,基于消息的路由键路由
- headers:通配符类型,基于消息的header路由
内部交换器:默认值no,如果是yes,消息无法直接发送到该交换机,必须通过交换机的转发才能到达
次交换机。本交换机只能与交换机绑定。
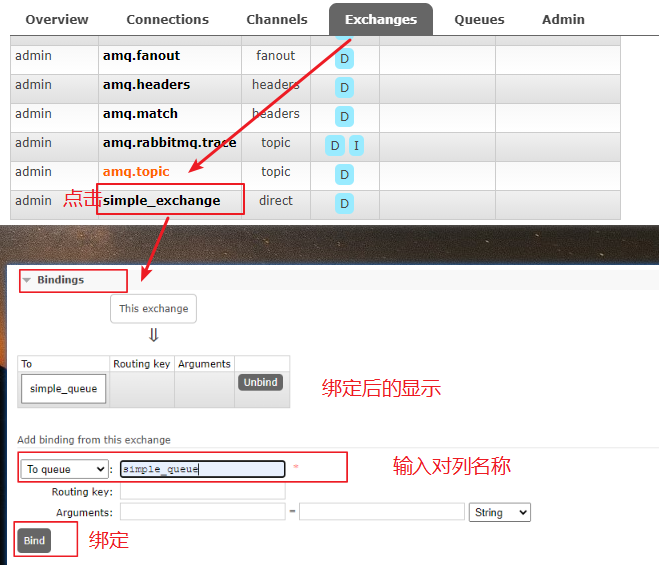
5.交换机和对列绑定
6.创建父工程
rabbitmqparent
? ├── rabbitmq-consumer
? └── rabbitmq-provider
rabbitmq-provider
<parent><groupId>org.springframework.boot</groupId><artifactId>spring-boot-starter-parent</artifactId><version>2.1.18.RELEASE</version><relativePath/> <!-- lookup parent from repository --></parent><dependencies><!-- https://mvnrepository.com/artifact/org.springframework.boot/spring-boot-starter-amqp --><dependency><groupId>org.springframework.boot</groupId><artifactId>spring-boot-starter-amqp</artifactId></dependency><!--rabbit测试依赖--><dependency><groupId>org.springframework.amqp</groupId><artifactId>spring-rabbit-test</artifactId></dependency><!--springBoot测试依赖--><dependency><groupId>org.springframework.boot</groupId><artifactId>spring-boot-starter-test</artifactId><scope>test</scope></dependency></dependencies>
server.port=8081# rabbitMq服务地址spring.rabbitmq.host=127.0.0.1# rabbitMq端口号spring.rabbitmq.port=5672# rabbitMq虚拟主机地址spring.rabbitmq.virtual-host=admin# rabbitMq用户名spring.rabbitmq.username=guest# rabbitMq密码spring.rabbitmq.password=guest
@SpringBootApplicationpublic class ProviderApplication {public static void main(String[] args) {SpringApplication.run(ProviderApplication.class, args);}}
添加web依赖解决

<dependency><groupId>org.springframework.boot</groupId><artifactId>spring-boot-starter-web</artifactId></dependency>
rabbitmq-consumer
pom依赖
<parent><groupId>org.springframework.boot</groupId><artifactId>spring-boot-starter-parent</artifactId><version>2.1.18.RELEASE</version><relativePath/> <!-- lookup parent from repository --></parent><dependencies><!-- https://mvnrepository.com/artifact/org.springframework.boot/spring-boot-starter-amqp --><dependency><groupId>org.springframework.boot</groupId><artifactId>spring-boot-starter-amqp</artifactId></dependency><!--rabbit测试依赖--><dependency><groupId>org.springframework.amqp</groupId><artifactId>spring-rabbit-test</artifactId></dependency><!--springBoot测试依赖--><dependency><groupId>org.springframework.boot</groupId><artifactId>spring-boot-starter-test</artifactId><scope>test</scope></dependency><dependency><groupId>org.springframework.boot</groupId><artifactId>spring-boot-starter-web</artifactId></dependency></dependencies>
application
server.port=8080# rabbitMq服务地址spring.rabbitmq.host=127.0.0.1# rabbitMq端口号spring.rabbitmq.port=5672# rabbitMq虚拟主机地址spring.rabbitmq.virtual-host=admin# rabbitMq用户名spring.rabbitmq.username=guest# rabbitMq密码spring.rabbitmq.password=guest
启动类
@SpringBootApplicationpublic class ConsumerApplication {public static void main(String[] args) {SpringApplication.run(ConsumerApplication.class,args);}}
7.五种工作模式
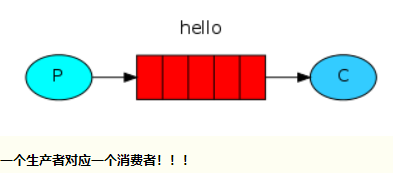
7.1简单模式 Hello World
记得先创建队列
@RunWith(SpringRunner.class)@SpringBootTestpublic class HelloWorld {@Autowiredprivate RabbitTemplate rabbitTemplate;// 编写生产者发送消息到对列@Testpublic void sendHollWorld() {/*** 参数1:对列名称* 参数2:要发送的消息*/rabbitTemplate.convertAndSend("simple_queue", "你好,Hello World");}}
/*** 消息监听器* 消费者,接收消息队列消息监听器* 必须将当前监听器对象注入Spring的容器中* queues = "simple_queue" 队列,要与生产者保持一致*/@Component@RabbitListener(queues = "simple_queue")public class HelloWorldListener {/*** 接受消息,业务处理** @param msg*/@RabbitHandlerpublic void simpleHandler(String msg) {System.out.println("接收到的消息是 : " + msg);}}
7.2工作队列模式 Work queues
记得先创建队列
于简单模式相比,增加了消费者,代码基本一样
provider生产者发生消息
@SpringBootTest@RunWith(SpringRunner.class)public class WorkQueues {@Autowiredprivate RabbitTemplate rabbitTemplate;@Testpublic void sendWork() {/*** 参数1:对列名称* 参数2:要发送的消息*/rabbitTemplate.convertAndSend("work_queue", "我是work模式");}}
/*** 消息监听器* 消费者,接收消息队列消息监听器* 必须将当前监听器对象注入Spring的容器中* queues = "work_queue" 要与发送消息保持一致*/@Component@RabbitListener(queues = "work_queue")public class WorkListener01 {/*** 接受消息,业务处理** @param msg*/@RabbitHandlerpublic void simpleHandler(String msg) {System.out.println("work监听消息01 : " + msg);}}
/*** 消息监听器* 消费者,接收消息队列消息监听器* 必须将当前监听器对象注入Spring的容器中* queues = "work_queue" 要与发送消息保持一致*/@Component@RabbitListener(queues = "work_queue")public class WorkListener02 {/*** 接受消息,业务处理** @param msg*/@RabbitHandlerpublic void simpleHandler(String msg) {System.out.println("work监听消息02 : " + msg);}}
7.3Exchange常见类型
Exchange有常见以下3种类型:
- Fanout:广播 将消息交给所有绑定到交换机的队列, 不处理路由键。只需要简单的将队列绑定到
交换机上。fanout 类型交换机转发消息是最快的。 - Direct:定向 把消息交给符合指定routing key 的队列. 处理路由键。需要将一个队列绑定到交换
机上,要求该消息与一个特定的路由键完全匹配。如果一个队列绑定到该交换机上要求路由键
“dog”,则只有被标记为 “dog” 的消息才被转发,不会转发 dog.puppy,也不会转发 dog.guard,
只会转发dog。
其中,路由模式使用的是 direct 类型的交换机。 - Topic:主题(通配符) 把消息交给符合routing pattern(路由模式)的队列. 将路由键和某模式进
行匹配。此时队列需要绑定要一个模式上。符号 “#” 匹配一个或多个词,符号”“匹配不多不少一个
词。因此“audit.#” 能够匹配到“audit.irs.corporate”,但是“audit.” 只会匹配到 “audit.irs”。
其中,主题模式(通配符模式)使用的是 topic 类型的交换机。
Exchange(交换机)只负责转发消息,不具备存储消息的能力,因此如果没有任何队列与Exchange绑
定,或者没有符合路由规则的队列,那么消息会丢失
7.4Publish/Subscribe发布与订阅模式
简单理解,我发送100条消息,交换机收到100条,他会给队列一100条消息,会给队列二100条消息
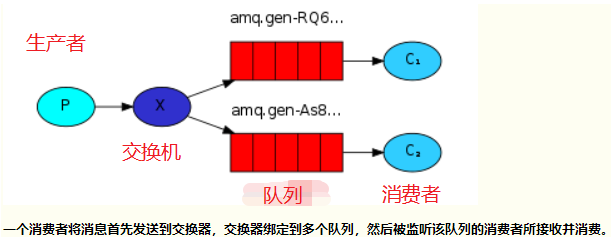
发布订阅模式:
1、每个消费者监听自己的队列。
2、生产者将消息发给broker,由交换机将消息转发到绑定此交换机的每个队列,每个绑定交换机的
队列都将接收到消息
【广播消息:一次性将消息发送给所有消费者,每个消费者收到消息均一致】
provider生产者发生消息
@SpringBootTest@RunWith(SpringRunner.class)public class publishExchange {@Autowiredprivate RabbitTemplate rabbitTemplate;@Testpublic void sendPublish() {/*** 参数一:交换机* 参数二:路由键(空)* 参数三:发送的消息*/rabbitTemplate.convertAndSend("publish_exchange", "", "我是发布订阅模式");}}
consumer消费者接受消息01
@Component@RabbitListener(queues = "publish_queue1")public class PublishListener01 {@RabbitHandlerpublic void simpleHandler(String msg){System.out.println("publish 01: " + msg);}}
consumer消费者接受消息02
@Component@RabbitListener(queues = "publish_queue2")public class PublishListener02 {@RabbitHandlerpublic void simpleHandler(String msg){System.out.println("publish 02: " + msg);}}
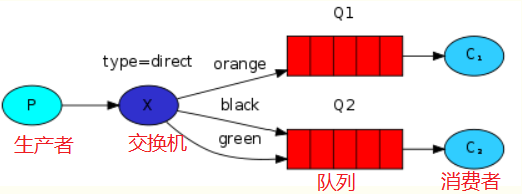
7.5路由模式 Routing
简单理解:发布与订阅模式是将消息分别全部发送到队列,而路由模式是在交换机里配置路由键,生产者可以指定发送到那个路由键里,路由键有和对列一一对应,这样就会进入相应的对列
创建2个队列
创建交换机并绑定队列
provider生产者发生消息
@SpringBootTest@RunWith(SpringRunner.class)public class RoutingExchange {@Autowiredprivate RabbitTemplate rabbitTemplate;@Testpublic void sendRouting() {/*** 参数一:交换机* 参数二:路由键* 参数三:发送的消息*/for (int i = 0; i < 100; i++) {if (i/2==0){rabbitTemplate.convertAndSend("routing_exchange", "info", "我是发布订阅模式"+i+"info");}else {rabbitTemplate.convertAndSend("routing_exchange", "error", "我是发布订阅模式"+i+"error");}}}}
consumer消费者接受消息01
@Component@RabbitListener(queues = "routing_queue1")public class RoutingListener01 {@RabbitHandlerpublic void simpleHandler(String msg){System.out.println("routing_queue1: " + msg);}}
consumer消费者接受消息02
@Component@RabbitListener(queues = "routing_queue2")public class RoutingListener02 {@RabbitHandlerpublic void simpleHandler(String msg){System.out.println("routing_queue2: " + msg);}}
7.6主题模式(Topics通配符模式)
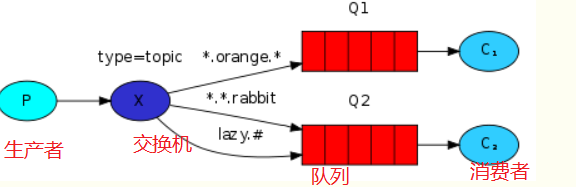
面的路由模式是根据路由key进行完整的匹配(完全相等才发送消息),这里的通配符模式通俗的来讲就是模糊匹配。
符号“#”表示匹配一个或多个词,符号“*”表示匹配一个词。
举例:
item.#: 能够匹配item.insert.abc.bbc 或者item.insert
item.*:只能匹配item.insert
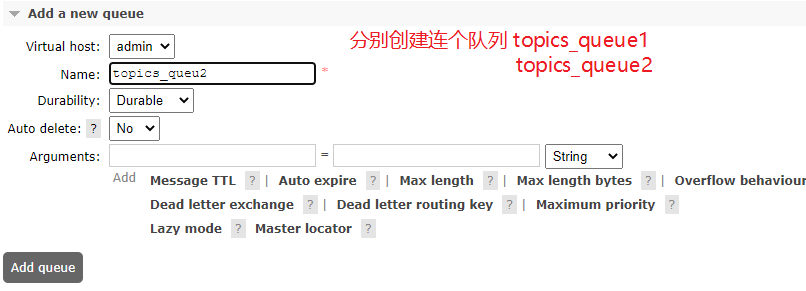
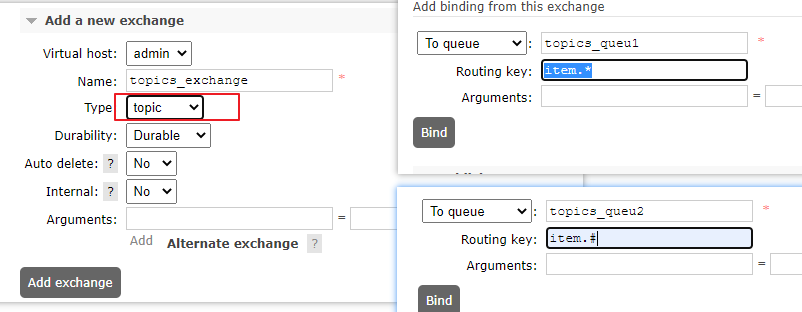
创建2个队列
创建交换机并绑定队列
provider生产者发生消息
@SpringBootTest@RunWith(SpringRunner.class)public class TopicsExchange {@Autowiredprivate RabbitTemplate rabbitTemplate;@Testpublic void sendTopics() {/*** 参数一:交换机* 参数二:路由键* 参数三:发送的消息*/rabbitTemplate.convertAndSend("topics_exchange","item.insert","这条item.#和item.*都会有");rabbitTemplate.convertAndSend("topics_exchange","item.insert.abc","这条item.#有");}}
consumer消费者接受消息01
@Component@RabbitListener(queues = "topics_queu1")public class TopicsListener01 {@RabbitHandlerpublic void simpleHandler(String msg){System.out.println("topics_queue1: " + msg);}}
consumer消费者接受消息02
@Component@RabbitListener(queues = "topics_queu2")public class TopicsListener01 {@RabbitHandlerpublic void simpleHandler(String msg){System.out.println("topics_queue2: " + msg);}}
7.7总结
工作模式:
- 1、简单模式 HelloWorld : 一个生产者、一个消费者,不需要设置交换机(使用默认的交换机)
- 2、工作队列模式 Work Queue: 一个生产者、多个消费者(竞争关系),不需要设置交换机(使用默
认的交换机) - 3、发布订阅模式 Publish/subscribe: 需要设置类型为fanout的交换机,并且交换机和队列进行绑定,
当发送消息到交换机后,交换机会将消息广播发送到绑定的队列 - 4、路由模式 Routing: 需要设置类型为direct的交换机,交换机和队列进行绑定,并且指定routing
key,当发送消息到交换机后,交换机会根据routing key将消息发送到对应的队列 - 5、通配符模式 Topic: 需要设置类型为topic的交换机,交换机和队列进行绑定,并且指定通配符方式
的routing key,当发送消息到交换机后,交换机会根据routing key将消息发送到对应的队列
高级篇
生产者确认模式
在生产者(发送消息放)
# 开启生产者确认模式:(confirm),投递到交换机,不论失败或者成功都回调spring.rabbitmq.publisher-confirms=true# 开启生产者回退模式:(returns),交换机将消息路由到队列,出现异常则回调spring.rabbitmq.publisher-returns=true
import org.springframework.amqp.core.Message;import org.springframework.amqp.rabbit.connection.CorrelationData;import org.springframework.amqp.rabbit.core.RabbitTemplate;import org.springframework.beans.factory.annotation.Autowired;import org.springframework.stereotype.Component;import javax.annotation.PostConstruct;@Componentpublic class MessageConfirmCallback implements RabbitTemplate.ConfirmCallback, RabbitTemplate.ReturnCallback {@Autowiredprivate RabbitTemplate rabbitTemplate;/*** * 创建RabbitTemplate对象之后执行当前方法,为模板对象设置回调确认方法* * 设置消息确认回调方法* * 设置消息回退回调方法**/@PostConstructpublic void initRabbitTemplate() {//设置消息确认回调方法rabbitTemplate.setConfirmCallback(this::confirm);rabbitTemplate.setReturnCallback(this::returnedMessage);}/*** 投递到交换机,不论投递成功还是失败都回调次方法* @param correlationData 投递相关数据* @param ack 是否投递到交换机* @param cause 投递失败原因**/@Overridepublic void confirm(CorrelationData correlationData, boolean ack, String cause) {if (ack) {System.out.println("消息进入交换机成功");} else {System.out.println("消息进入交换机失败, 失败原因:" + cause);}}/*** 当消息投递到交换机,交换机路由到消息队列中出现异常,执行returnedMessaged方法* @param message 投递消息内容* @param replyCode 返回错误状态码* @param replyText 返回错误内容* @param exchange 交换机名称* @param routingKey 路由键**/@Overridepublic void returnedMessage(Message message, int replyCode, String replyText, String exchange, String routingKey) {System.out.println("交换机路由至消息队列出错:>>>>>>>");System.out.println("交换机:" + exchange);System.out.println("路由键:" + routingKey);System.out.println("错误状态码:" + replyCode);System.out.println("错误原因:" + replyText);System.out.println("发送消息内容:" + message.toString());System.out.println("<<<<<<<<");}}
消费者确认签收
消息确认的三种类型:
- 自动确认:acknowledge=”none”
- 手动确认:acknowledge=”manual”
- 根据异常情况确认:acknowledge=”auto”,(这种方式使用麻烦)
application.properties
# 配置开启手动签收# 简单模式的开启手动签收spring.rabbitmq.listener.simple.acknowledge-mode=manual# 路由模式开启手动签收spring.rabbitmq.listener.direct.acknowledge-mode=manual# 是否支持重试spring.rabbitmq.listener.direct.retry.enabled=true
import com.rabbitmq.client.Channel;import org.springframework.amqp.core.Message;import org.springframework.amqp.core.MessageProperties;import org.springframework.amqp.rabbit.annotation.RabbitHandler;import org.springframework.amqp.rabbit.annotation.RabbitListener;import org.springframework.stereotype.Component;@Component@RabbitListener(queues = "routing_queue1")public class RoutingListener01 {@RabbitHandlerpublic void simpleHandler(String msg, Message message, Channel channel) throws IOException {System.out.println("routing_queue1: " + msg);//获取投递标签MessageProperties messageProperties =message.getMessageProperties();long deliveryTag = messageProperties.getDeliveryTag();try {// 模拟异常// if (msg.contains("苹果")) {// throw new RuntimeException("不允许卖苹果手机!!!");//}/*** 手动签收消息* 参数1:消息投递标签* 参数2:是否批量签收:true一次性签收所有,false,只签收当前消息*/channel.basicAck(deliveryTag, false);System.out.println("手动签收完成:{}");} catch (Exception ex) {/*** 手动拒绝签收* 参数1:当前消息的投递标签* 参数2:是否批量签收:true一次性签收所有,false,只签收当前消息* 参数3:是否重回队列,true为重回队列,false为不重回*/channel.basicNack(deliveryTag, false, true);System.out.println("拒绝签收,重回队列:{}" + ex);}}
RabbitMQ延时队列实现定时任务
首先我们得知道什么是消息的TTL
??消息的TTL(TIme To Live),就是消息的存活时间,RabbitMQ可以对队列和消息分别设置TTL。
??对队列设置就是队列没有消费者连着的保留时间,也可以对每一个单独的消息做单独的设置。超过了这个时间,我们认为这个消息就死了,称之为死信
??如果队列和消息都设置TTL,那么会取小的,所以一个消息被路由到不同的队列中,这个消息的死亡时间可能不一样
??接下来再看看什么是死信路由
??死信路由DLX(Dead Letter Exchanges)就是一种普通的exchange,和创建其他的路由没啥两样,只是在某一个设置了Dead Letter Exchange的队列中有消息过期了就会自动触发消息的转发,发送到Dead Letter Exchange中去。如果一个消息满足下面的条件,就会进死信路由
- 一个消息被Consumer拒收了,并且reject方法的参数里requeue是false,也就是说不会被再次放入到队列中
- 消息的TTL到了,消息过期了
- 队列的长度满了,排在前面的消息
??我们既可以控制消息在一段时间后变成死信,也可以控制变成死信的消息被路由到指定的交换机中,结合二者就可以实现延时队列;延时队列的实现方式有两种:设置队列的过期时间和设置消息的过期时间
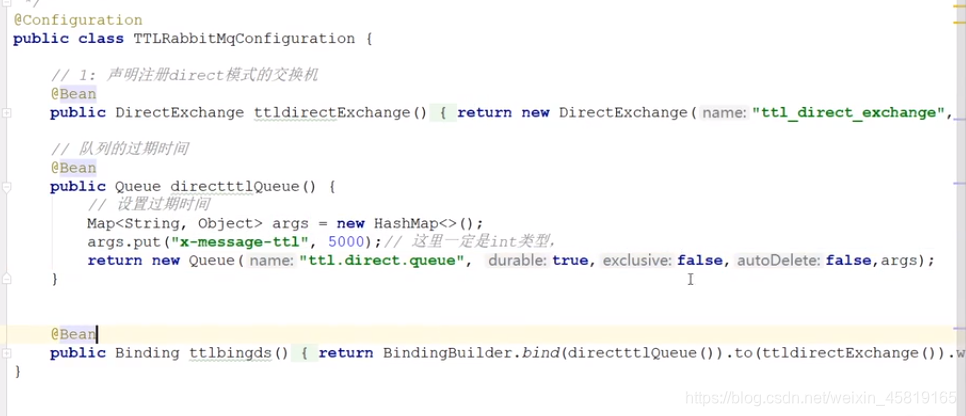
?
?创建生产者发送消息 给消息设置过期时间
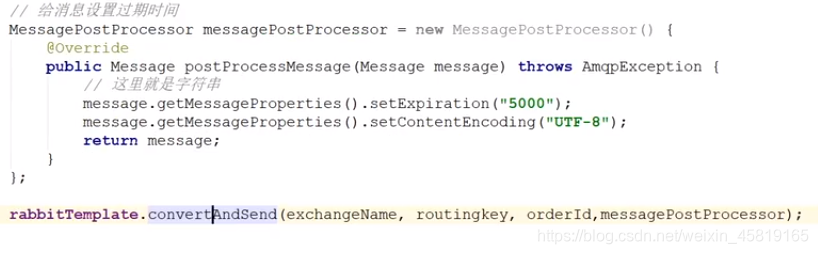
?
?死信队列
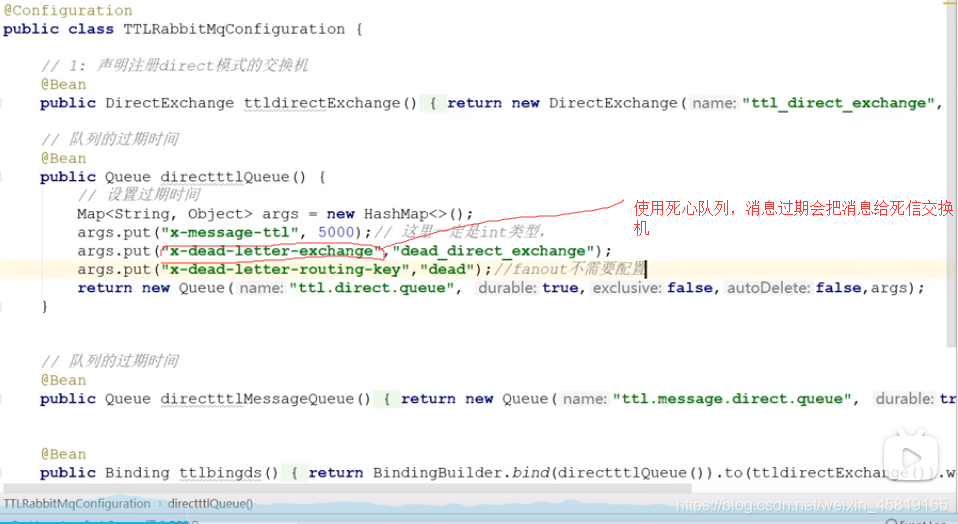
 ?
?
?