实验前夕
systemctl stop firewalld.service //关闭防火墙
systemctl status firewalld.service  //查看防火墙状态
setenforce 0 //  关闭安全系统
一,安装部署
1.环境部署
node1 ; 192.168.189.14 Elasticsearch/Kibana
node2 ; 192.168.189.15 Elasticsearch
apache; 192.168.189.16 httpd / Logstash
客户机 win10
3.更改主机名
hostnamectl set-hostname +主机名
4.配置elasticsearch 环境
node1 nede2 配置
echo '192.168.189.14 node1' >> /etc/hosts
echo '192.168.189.15 node2' >> /etc/hosts     #添加IP和主机名的映射
cat  /etc/hosts   #查看


5.安装elasticsearch软件
node1 node2
cd /opt    #安装目录到opt 下
rpm -ivh elasticsearch-5.5.0.rpm  #使用rpm安装


二,加载系统服务
systemctl daemon-reload
systemctl enable elasticsearch.service
1.更改elasticsearch参数配置
cp /etc/elasticsearch/elasticsearch.yml /etc/elasticsearch/elasticsearch.yml.bak
2.vim /etc/elasticsearch/elasticsearch.yml
#17行;取消注释,修改;集群名字
cluster.name: my-elk-cluster
#23行;取消注释,修改;节点名字(node2修改成node2)
node.name: node1
#33行;取消注释,修改;数据存放路径
path.data: /data/elk_data
#37行;取消注释,修改;日志存放路径
path.logs: /var/log/elasticsearch
#43行;取消注释,修改;不在启动的时候锁定内存
bootstrap.memory_lock: false
#55行;取消注释,修改;提供服务绑定的IP地址,0.0.0.0代表所有地址
network.host: 0.0.0.0
#59行;取消注释;侦听端口为9200(默认)
http.port: 9200
#68行;取消注释,修改;集群发现通过单播实现,指定要发现的节点 node1、node2
discovery.zen.ping.unicast.hosts: ["node1", "node2"]


3.检验配置
grep -v "^#" /etc/elasticsearch/elasticsearch.yml


4.创建数据存放路径并授权
mkdir -p /data/elk_data  #创建数据存放目录
chown elasticsearch:elasticsearch /data/elk_data/  #修改存放数据目录的属主属组
5.启动一下
systemctl start elasticsearch
6.查看一下
netstat -antp | grep 9200


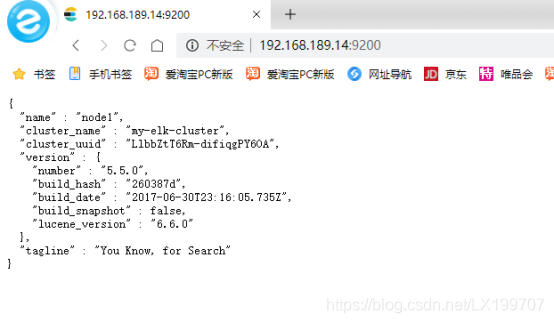
7.查看节点信息
http://192.168.189.14:9200
http://192.168.189.15:9200

8.检验集群健康状态
http://192.168.189.14:9200/_cluster/health?pretty
http://192.168.189.15:9200/_cluster/health?pretty


9.查看集群状态
http://192.168.189.14:9200/_cluster/state?pretty
http://192.168.189.15:9200/_cluster/state?pretty


三,安装elasticsearch-head插件
node1 node 2
1.编译安装node组件依赖包
yum -y install gcc gcc-c++ make
cd /opt    #上传软件包 node-v8.2.1.tar.gz 到/opt
tar xzvf node-v8.2.1.tar.gz  #解压
cd node-v8.2.1/
./configure && make && make install


2.安装安装phantomjs 前端框架
node1 node2
cd /opt     #上传软件包 phantomjs-2.1.1-linux-x86_64.tar.bz2 到/opt目录下
tar jxvf phantomjs-2.1.1-linux-x86_64.tar.bz2 -C /usr/local/src/   #将软件包解压到/usr/local/src/
cd /usr/local/src/phantomjs-2.1.1-linux-x86_64/bin
cp phantomjs /usr/local/bin

3.安装elasticsearch-head 数据可视化工具
node1 node2
cd /opt  #上传软件包 elasticsearch-head.tar.gz 到/opt
tar zxvf elasticsearch-head.tar.gz -C /usr/local/src/
cd /usr/local/src/elasticsearch-head/
npm install  #使用npm编译es-head编码并安装

4.修改主机配置文件
node1 node2
vim /etc/elasticsearch/elasticsearch.yml

#末尾添加以下内容
http.cors.enabled: true      #开启跨域访问支持,默认为 false
http.cors.allow-origin: "*"  #指定跨域访问允许的域名地址为所有

systemctl restart elasticsearch.service  #重新启动一下


5.启动elasticsearch-head
node1 node2
在 elasticsearch-head 目录下启动服务
cd /usr/local/src/elasticsearch-head/
npm run start &
netstat -natp |grep 9100


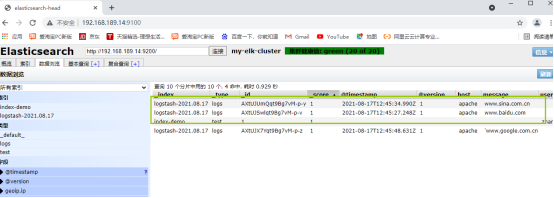
6.使用elasticsearch-head插件查看集群状态
http://192.168.189.14:9100
在Elasticsearch 后面的栏目中输入
http://192.168.189.15:9200

http://192.168.189.15:9100
在Elasticsearch 后面的栏目中输入
http://192.168.189.14:9200


7.创建索引
node1
创建索引为index-demo,类型为test
curl -XPUT 'localhost:9200/index-demo/test/1?pretty&pret

查看数据浏览–会发现在node1上创建的索引为index-demo,类型为test, 相关的信息


8…安装logstash
收集日志输出到elasticsearch中
安装Apahce服务(httpd)
apache
yum -y install httpd
systemctl start httpd
9.安装logstash
apache
cd /opt     #上传logstash-5.5.1.rpm到/opt目录下
rpm -ivh logstash-5.5.1.rpm
systemctl start logstash.service     #开启服务并属组开机自启动
systemctl enable logstash.service
ln -s /usr/share/logstash/bin/logstash /usr/local/bin/   #建立logstash软连接

10.测试logstash命令
apache
logstash -e 'input { stdin{ } } output { stdout { } }'
使用rubydebug显示详细输出,codec为一种编解码器
logstash -e 'input { stdin{} } output { stdout{ codec=>rubydebug} }'
使用logstash将信息写入elasticsearch中,并查看
logstash -e 'input { stdin{} } output { elasticsearch { hosts=> ["192.168.35.40:9200"] } }'	##输入输出对接


11.使用平台收集日志
chmod o+r /var/log/messages		##给其他用户加一个可读权限
vim /etc/logstash/conf.d/system.conf		##配置文件(收集系统日志)
	input {
		file{
	  	  path => "/var/log/messages" #收集数据的路径
		 	  type => "system"         #类型
		    start_position => "beginning"    #从开头收集数据
		    }
		}
	output {
		elasticsearch {
		    hosts => ["192.168.189.14:9200"]    #输出到
		    index => "system-%{+YYYY.MM.dd}"  #索引
   		    }
		}
systemctl restart logstash.service		#重启服务


四,安装kibana
node1
上传kibana-5.5.1-x86_64.rpm到/usr/local/src目录
cd /usr/local/src
rpm -ivh kibana-5.5.1-x86_64.rpm
cd /etc/kibana/
cp kibana.yml kibana.yml.bak
vim kibana.yml
	 2 server.port: 5601		##kibana打开的端口
	 7 server.host: "0.0.0.0“		##kibana侦听的地址
	21 elasticsearch.url: "http://192.168.189.14:9200"		##和elasticsearch建立联系
	30 kibana.index: ".kibana"		##在elasticsearch中添加. kibana索引
systemctl start kibana.service		##启动kibana服务
访问5601端口:http://192.168.189.14:5601/


2.对接apache的日志(访问的、错误)
apache
cd /etc/logstash/conf.d/
vim apache_log.conf
input {
	file{
	    path => "/etc/httpd/logs/access_log"
	    type => "access"
	    start_position => "beginning"
	    }
	file{
	    path => "/etc/httpd/logs/error_log"
	    type => "error"
	    start_position => "beginning"
	    }
	}
output {
	if [type] == "access" {
	elasticsearch {
            hosts => ["192.168.189.14:9200"]
	    index => "apache_access-%{+YYYY.MM.dd}"
   	    }
	}
	if [type] == "error" {
	elasticsearch {
            hosts => ["192.168.189.14:9200"]
	    index => "apache_error-%{+YYYY.MM.dd}"
   	    }
	}
	}

进入kibana进入创建Apache索引appche_acess和apache_error
首页Management–Index Patterns–Create Index Pattern–选择inde name or pattern
验证索引
