一、简介
(一)Hadoop开发存在的问题
1、只能用java语言开发,如果是c语言或其他语言的程序员用Hadoop,存在语言门槛
2、需要对Hadoop底层原理,api比较了解才能做开发
3、开发调试比较麻烦
(二)hive概述
1、Hive是基于Hadoop的一个数据仓库工具。可以将结构化的数据文件映射为一张表,并提供完整的sql查询功能
2、底层是将sql语句转换为MapReduce任务进行运行
3、Hive提供了一系列的工具,可以用来进行数据提取、转化、加载(ETL Extract-Transform-Load ),这是一种可以存储、查询和分析存储在 Hadoop 中的大规模数据的机制
4、本质上是一种大数据离线分析工具
(三)Hive的HQL
1、 HQL - Hive通过类SQL的语法,来进行分布式的计算
2、HQL用起来和SQL非常的类似,Hive在执行的过程中会将HQL转换为MapReduce去执行,所以Hive其实是基于Hadoop的一种分布式计算框架,底层仍然是MapReduce
(四)特点
1、优点:
a. 学习成本低,只要会sql就能用hive
b. 开发效率高,不需要编程,只需要写sql
c. 模型简单,易于理解
d. 针对海量数据的高性能查询和分析
e. HiveQL 灵活的可扩展性(Extendibility)
f. 高扩展性(Scalability)和容错性
g. 与 Hadoop 其他产品完全兼容
2、缺点:
a. 不支持行级别的增删改
b. 不支持完整的在线事务处理
c. 本质上仍然是MR的执行,效率不算高
五、适用场景
1. Hive 构建在基于静态(离线)批处理的Hadoop 之上,Hadoop 通常都有较高的延迟并且在作业提交和调度的时候需要大量的开销。因此,Hive 并不能够在大规模数据集上实现低延迟快速的查询因此,Hive 并不适合那些需要低延迟的应用
Hive 并不提供实时的查询和基于行级的数据更新操作。Hive 的最佳使用场合是大数据集的离线批处理作业,例如,网络日志分析
二、安装
1、上传

2、解压文件并重命名
3、启动hdfs
[root@hadoop01 software]# mv apache-hive-1.2.1-bin hive
[root@hadoop01 software]# start-all.sh
4、启动 hive
[root@hadoop01 software]# cd /home/software/hive/bin/
[root@hadoop01 bin]# sh hive

出现如下启动成功
Logging initialized using configuration in jar:file:/home/software/hive/lib/hive-common-1.2.1.jar!/hive-log4j.properties
hive>
三、基础指令
(一)命令
| 命令 | 作用 | 额外说明 |
|---|---|---|
| show | databases; | 查看都有哪些数据库 |
| create database park; | 创建park数据库 | 创建的数据库,实际是在Hadoop的HDFS文件系统里创建一个目录节点,统一存在:/user/hive/warehouse 目录下 |
| use park; | 进入park数据库 | |
| show tables; | 查看当前数据库下所有表 | |
| create table stu | 创建stu表,以及相关的两个字段 | 1. hive里,表示字符串用的是string,不用char和varchar (id int,name string); 2. 所创建的表,也是HDFS里的一个目录节点 |
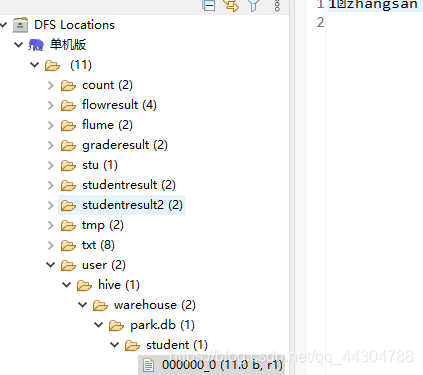
| insert into stu values(1,‘zhang’) | 向stu表插入数据 | 1. HDFS不支持数据的修改和删除,因此已经插入的数据不能够再进行任何的改动 ; 2、 在Hadoop2.0版本后支持了数据追加。实际上,insert into 语句执行的是追加操作; 3、 hive支持查询,行级别的插入。不支持行级别的删除和修改; 4、hive的操作实际是执行一个job任务,调用的是Hadoop的MR; 5、 插入完数据之后,发现HDFS stu目录节点下多了一个文件,文件里存了插入的数据,因此,hive存储的数据,是通过HDFS的文件来存储的。 |
| select * from stu | 查看表数据 | 也可以根据字段来查询,比如select id from stu |
| drop table stu | 删除表 | |
| load data local inpath ‘/home/software/1.txt’ into table stu; | 通过加载文件数据到指定的表里 | 1、 在执行完这个指令之后,发现hdfs stu目录下多了一个1.txt文件。由此可见,hive的工作原理实际上就是在管理hdfs上的文件,把文件里数据抽象成二维表结构,然后提供hql语句供程序员查询文件数据 ; 2、 可以做这样的实验:不通过load 指令,而通过插件向stu目录下再上传一个文件,看下hive是否能将数据管理到stu表里。 |
| create table stu1(id int,name string) row format delimited fields terminated by ’ '; | 创建stu1表,并指定分割符 空格。 | |
| desc stu | 查看 stu表结构 | |
| create table stu2 like stu | 创建一张stu2表,表结构和stu表结构相同 | like只复制表结构,不复制数据 |
| insert overwrite table stu2 select * from stu | 把stu表数据插入到stu2表中 | |
| insert overwrite local directory ‘/home/stu’ row format delimited fields terminated by ’ ’ select * from stu; | 将stu表中查询的数据写到本地的/home/stu目录下 | |
| insert overwrite directory ‘/stu’ row format delimited fields terminated by ’ ’ select * from stu; | 将stu表中查询的数据写到HDFS的stu目录下 | |
| alter table stu rename to stu2 | 为表stu重命名为stu2 | |
| alter table stu add columns (age int); | 为表stu增加一个列字段age,类型为int | |
| exit | 退出hive |
对hive的操作本质上操作的还是hdfs
(二)对上述命令操作的结果(可以直接跳过)
hive> show dataBases;
OK
default
Time taken: 0.75 seconds, Fetched: 1 row(s)
hive> create database student;
OK
Time taken: 0.23 seconds
hive> show dataBases;

hive> use student;
OK
Time taken: 0.019 seconds
hive> show tables;

hive> create table stu (id int,name string);

hive> insert into stu values(1,'list');
hive> select * from stu;
OK
1	list
Time taken: 0.11 seconds, Fetched: 1 row(s)

 在窗口2中
[root@hadoop01 ~]# cd /home/
[root@hadoop01 home]# vim student

3 mayun
4 hafl
5 agkh
6 agkh

在窗口中
hive> load data local inpath '/home/student' into table stu;
Loading data to table student.stu
Table student.stu stats: [numFiles=1, totalSize=29]
OK
Time taken: 0.259 seconds
hive> select * from stu;
OK
NULL	NULL
NULL	NULL
NULL	NULL
NULL	NULL
出现NUll是因为虽说导入了,但分隔符不一致,默认是 /t 而文件中是空格
更改方法
hive> drop table stu;
Moved: 'hdfs://hadoop01:9000/user/hive/warehouse/student.db/stu' to trash at: hdfs://hadoop01:9000/user/root/.Trash/Current
OK
Time taken: 0.176 seconds
hive> show tables;
OK
values__tmp__table__1
Time taken: 0.028 seconds, Fetched: 1 row(s)
hive> create table stu (id int,name string)row format delimited fields terminated by ' ';

hive> load data local inpath '/home/student' into table stu;

hive> select * from stu;
OK
3	mayun
4	hafl
5	agkh
6	agkh
Time taken: 0.052 seconds, Fetched: 4 row(s)
hive> desc stu;
OK
id                  	int
name                	string
Time taken: 0.059 seconds, Fetched: 2 row(s)
hive> create table stu2 like stu;

hive> insert overwrite table stu2 select * from stu;

hive> insert overwrite local directory '/home/stu' row format delimited fields terminated by  ' ' select * from stu;
执行结果在另一窗口2中执行
[root@hadoop01 home]# cat stu
cat: stu: 是一个目录
[root@hadoop01 home]# cd stu
[root@hadoop01 stu]# ll
总用量 4
-rw-r--r--. 1 root root 29 8月  23 08:45 000000_0
[root@hadoop01 stu]# cat 000000_0
3 mayun
4 hafl
5 agkh
6 agkh
[root@hadoop01 stu]#
四、安装MySqL
1、查出系统中关于MySQL的包并删除
–nodeps 忽略依赖强制卸载
[root@hadoop01 ~]# rpm -qa|grep mysql
mysql-libs-5.1.71-1.el6.x86_64
[root@hadoop01 ~]# rpm -e mysql-libs-5.1.71-1.el6.x86_64
error: Failed dependencies:
	libmysqlclient.so.16()(64bit) is needed by (installed) postfix-2:2.6.6-2.2.el6_1.x86_64
	libmysqlclient.so.16(libmysqlclient_16)(64bit) is needed by (installed) postfix-2:2.6.6-2.2.el6_1.x86_64
	mysql-libs is needed by (installed) postfix-2:2.6.6-2.2.el6_1.x86_64
[root@hadoop01 ~]# rpm -e -nodeps mysql-libs-5.1.71-1.el6.x86_64
-nodeps: 未知的选项
[root@hadoop01 ~]# rpm -e --nodeps mysql-libs-5.1.71-1.el6.x86_64
[root@hadoop01 ~]# rpm -qa|grep mysql
2、添加组用户等
[root@hadoop01 ~]# cd /home/software/
[root@hadoop01 software]# groupadd mysql
[root@hadoop01 software]# useradd -r -g mysql mysql
[root@hadoop01 software]# id mysql
uid=496(mysql) gid=500(mysql) 组=500(mysql)
3、先安装服务端、再安装客户端
[root@hadoop01 software]# rpm -ivh MySQL-server-5.6.29-1.linux_glibc2.5.x86_64.rpm
warning: MySQL-server-5.6.29-1.linux_glibc2.5.x86_64.rpm: Header V3 DSA/SHA1 Signature, key ID 5072e1f5: NOKEY
Preparing...                ########################################### [100%]
   1:MySQL-server           ########################################### [100%]
  ......
[root@hadoop01 software]# rpm -ivh MySQL-client-5.6.29-1.linux_glibc2.5.x86_64.rpm
warning: MySQL-client-5.6.29-1.linux_glibc2.5.x86_64.rpm: Header V3 DSA/SHA1 Signature, key ID 5072e1f5: NOKEY
Preparing...                ########################################### [100%]
   1:MySQL-client           ########################################### [100%]
[root@hadoop01 software]#
4、修改配置文件
[root@hadoop01 software]# cd /usr
[root@hadoop01 usr]# vim my.cnf

# For advice on how to change settings please see
# http://dev.mysql.com/doc/refman/5.6/en/server-configuration-defaults.html
[client]
default-character-set=utf8
[mysql]
default-character-set=utf8
[mysqld]
character_set_server=utf8
5、放到开机目录
[root@hadoop01 usr]# cp /usr/share/mysql/mysql.server /etc/init.d/mysqld
6、启动
[root@hadoop01 usr]# cp /usr/share/mysql/mysql.server /etc/init.d/mysqld
[root@hadoop01 usr]# cd /etc/init.d
[root@hadoop01 init.d]# service mysqld start
Starting MySQL.                                            [确定]
[root@hadoop01 init.d]# service mysqld status
MySQL running (6062)                                       [确定]
7、登录MySql
(随机密码在)
[root@hadoop01 init.d]# vim /root/.mysql_secret
复制其中的SdBlnGZt7EoDIvwy(十六位字符)
[root@hadoop01 init.d]# mysqladmin -u root -p password root
Enter password: (复制的东西)
Warning: Using a password on the command line interface can be insecure.
[root@hadoop01 init.d]# mysql -u root -p
Enter password: (root)
Welcome to the MySQL monitor.  Commands end with ; or \g.
Your MySQL connection id is 2
Server version: 5.6.29 MySQL Community Server (GPL)

Copyright (c) 2000, 2016, Oracle and/or its affiliates. All rights reserved.

Oracle is a registered trademark of Oracle Corporation and/or its
affiliates. Other names may be trademarks of their respective
owners.

Type 'help;' or '\h' for help. Type '\c' to clear the current input statement.

mysql>
8、使用
(1)创建数据库hive
mysql> create database hive character set latin1;
Query OK, 1 row affected (0.00 sec)
(2)权限赋予
mysql> grant all privileges on *.* to 'root'@'hadoop01' identified by 'root' with grant option;
Query OK, 0 rows affected (0.00 sec)

mysql> grant all privileges on *.* to 'root'@'%' identified by 'root' with grant option;
Query OK, 0 rows affected (0.00 sec)
(3)刷新生效
mysql> flush privileges;
Query OK, 0 rows affected (0.00 sec)
)退出(
mysql> exit;
Bye
9、配置hive-site.xml
[root@hadoop01 init.d]# cd /home/software/hive/conf/
[root@hadoop01 conf]# cp hive-default.xml.template hive-site.xml
[root@hadoop01 conf]# vim hive-site.xml
把光标移动到configuration的下一行,按下3890dd,若要撤销按u
--><configuration>
<property>
        <name>javax.jdo.option.ConnectionURL</name>
        <value>jdbc:mysql://hadoop01:3306/hive?createDatabaseIfNotExist=true</value>
</property>
<property>
        <name>javax.jdo.option.ConnectionDriverName</name>
        <value>com.mysql.jdbc.Driver</value>
</property>
<property>                                                                              <name>javax.jdo.option.ConnectionUserName</name>                                <value>root</value></property>                                                                     <property>
        <name>javax.jdo.option.ConnectionPassword</name>
        <value>root</value></property>
</configuration>
10、复制文件并启动
[root@hadoop01 software]# cp mysql-connector-java-5.1.38-bin.jar hive/lib
[root@hadoop01 software]# cd /home/software/hive/bin/
[root@hadoop01 bin]# sh hive
Logging initialized using configuration in jar:file:/home/software/hive/lib/hive-common-1.2.1.jar!/hive-log4j.properties
hive>
元数据:数据库与hdfs路径的对应地址
11、一些命令
hive> create database park;
OK
Time taken: 0.763 seconds
hive> use park;
OK
Time taken: 0.039 seconds
hive> create table student(id int,name string);
OK
Time taken: 0.417 seconds
hive> insert into student values(1,'zhangsan');

五、hive
(一)内部表和外部表(企业主外部表用的较多)
(Ⅰ)内部表的概念
先在hive里建一张表,然后向这个表插入数据(用insert可以插入数据,也可以通过加载外部文件方式来插入数据),这样的表称之为hive的内部表
(Ⅱ)外部表的概念
1、HDFS里已经有数据了,然后,通过hive创建一张表来管理这个文件数据。则这样表称之为外部表
2、注意,hive外部表管理的是HDFS里的某一个目录下的文件数据
(Ⅲ)外部表创建命令:
进入hive,执行:create external table stu (id int,name string) row format delimited fields terminated by ’ ’ location ‘/目录路径’
(Ⅳ)内部表和外部标的区别
1、对于内部表,在删除该表的时候,HDFS对应的目录节点会被删除
2、对于外部表,在删除该表的时候,HDFS对应的目录节点不会删除
(Ⅴ)具体使用
(1)
hive> use park;
hive> show tables;
OK
book
student
values__tmp__table__1
Time taken: 0.043 seconds, Fetched: 3 row(s)
hive> drop table student;
Moved: 'hdfs://hadoop01:9000/user/hive/warehouse/park.db/student' to trash at: hdfs://hadoop01:9000/user/root/.Trash/Current
OK
Time taken: 0.386 seconds
hive> create table student(id int,name string) row format delimited fields terminated by ' ';
hive> insert into student values (1,'zhagnsan');

(2)
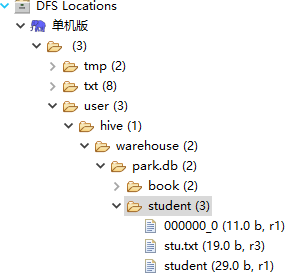
hive> load data local inpath '/home/student' into table student;
Loading data to table park.student
Table park.student stats: [numFiles=2, numRows=0, totalSize=40, rawDataSize=0]
OK
Time taken: 0.183 seconds
hive> select * from student;
OK
1	zhagnsan
3	mayun
4	hafl
5	agkh
6	agkh

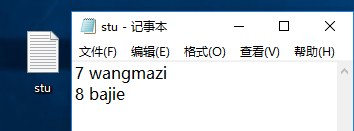
(3)新建stu文件,并写入一些内容。然后将其上传到dfs中


hive> select * from student;
OK
1	zhagnsan
7	wangmazi
8	bajie
3	mayun
4	hafl
5	agkh
6	agkh
(4)新建teacher文件,并写入一些内容。然后将其上传到dfs中(在上传前,先建立文件夹teacher)

(5)根据上一步上传的数据创建外部表
hive> create external table teacher(id int,name string) row format delimited fields terminated by ' ' location '/teacher';
OK
Time taken: 0.11 seconds
hive> select * from teacher;
OK
1	shashibiya
2	aosaibai
Time taken: 0.055 seconds, Fetched: 2 row(s)
hive>
(6)对于内部表,在删除该表的时候,HDFS对应的目录节点会被删除
hive> drop table student;
Moved: 'hdfs://hadoop01:9000/user/hive/warehouse/park.db/student' to trash at: hdfs://hadoop01:9000/user/root/.Trash/Current
OK
Time taken: 0.131 seconds
hive>

(7)对于外部表,在删除该表的时候,HDFS对应的目录节点不会删除
hive> drop table teacher;
OK
Time taken: 0.101 seconds

(二)分区表
(Ⅰ)概述
1、分区表可以通过添加指定的字段来提高Hive的查询效率
2、在数据量较大的情况下,往往会添加分区表来避免全表查询
(Ⅱ)分区表指令
| 指令 | 作用 | 额外说明 |
|---|---|---|
| create | table book (id int, name string) partitioned by (country string) row format delimited fields terminated by ’ '; | 创建book表,以country 作为分区 在创建分区表时,partitioned字段可以不在字段列表中。生成的表中自动就会具有该字段。 |
| load data local inpath ‘/home/cn.txt’ overwrite into table book partition (country=‘cn’); | 将本地文件cn.txt添加到book表中,分区字段为cn 在HDFS下生成category=cn目录 | |
| select * from book where country =‘cn’; | 查看分区为cn的数据 | |
| ALTER TABLE book add PARTITION (country = ‘jp’) location ‘/user/hive/warehouse/park.db/book/country=jp’; | 将指定的目录添加为分区字段 | |
| show partitions book | 查看分区 | |
| msck repair table book; | 修复分区 | |
| alter table book drop partition(country=‘cn’); | 删除分区 | |
| alter table book partition(category=‘french’) rename to partition (category=‘hh’); | 修改分区的名字 |
(Ⅲ)具体使用
hive> create table book (id int, name string) partitioned by (country string) row format delimited fields terminated by ' ';
OK
Time taken: 0.084 seconds
在窗口2中
[root@hadoop01 ~]# cd /home/
[root@hadoop01 home]# vim cnbook
1 hongloumeng
2 shuihuzhuan
3 shanguoyanyi
4 xiyouji

在窗口1中
hive> load data local inpath '/home/cnbook' into table book partition (country='cn');
Loading data to table park.book partition (country=cn)
Partition park.book{country=cn} stats: [numFiles=1, numRows=0, totalSize=53, rawDataSize=0]
OK
Time taken: 1.554 seconds
hive> select * from book;
OK
1	hongloumeng	cn
2	shuihuzhuan	cn
3	shanguoyanyi	cn
4	xiyouji	cn
Time taken: 0.316 seconds, Fetched: 4 row(s)
hive> desc book;
OK
id                  	int
name                	string
country             	string

# Partition Information
# col_name            	data_type           	comment

country             	string
Time taken: 0.091 seconds, Fetched: 8 row(s)
hive>
在eclipse中创建country=en文件夹,并在windows中编写teacher并上传到hdfs上的刚刚创建的文件夹中

在窗口1中
hive> alter table book add partition(country='en') location '/user/hive/warehouse/park.db/book/country=en';
OK
Time taken: 0.076 seconds
hive> select * from book;
OK
1 hongloumeng cn
2 shuihuzhuan cn
3 shanguoyanyi cn
4 xiyouji cn
1 java en
2 hadoop en
3 hbase en
4 hive en
Time taken: 0.082 seconds, Fetched: 8 row(s)
hive>
在eclipse中创建country=jp文件夹,并在windows中编写teacher并上传到hdfs上的刚刚创建的文件夹中

hive> msck repair table book;
OK
Partitions not in metastore:	book:country=jp
Repair: Added partition to metastore book:country=jp
Time taken: 0.415 seconds, Fetched: 2 row(s)
hive> select * from book;
OK
1	hongloumeng	cn
2	shuihuzhuan	cn
3	shanguoyanyi	cn
4	xiyouji	cn
1	java	en
2	hadoop	en
3	hbase	en
4	hive	en
1	zhenzi	jp
2	qianyuqianxun	jp
Time taken: 0.482 seconds, Fetched: 10 row(s)
hive> alter table book drop partition(country='jp');
Moved: 'hdfs://hadoop01:9000/user/hive/warehouse/park.db/book/country=jp' to trash at: hdfs://hadoop01:9000/user/root/.Trash/Current
Dropped the partition country=jp
OK
Time taken: 0.555 seconds
hive> show partitions book;
OK
country=cn
country=en
Time ta
hive> alter table book partition(country='cn') rename to partition(country='china');
OK
Time taken: 0.304 seconds
hive> show partitions book;
OK
country=china
country=en
Time taken: 0.087 seconds, Fetched: 2 row(s)
hive>
(三)分桶表
分桶机制默认不开启
(Ⅰ)概述
1、分桶表是一种更细粒度的数据分配方式
2、一个表既可以分区也可以分桶
3、分桶的主要作用是实现数据的抽样,方便进行数据测试
4、分桶表通过hash分桶算法,将数据分放在不同的桶(hdfs中的文件)中,方便后续获取
5、分桶表机制默认是不开启的,需要手动开启:set hive.enforce.bucketing=true;
6、分桶表不允许以外部文件方式导入数据,只能从另外一张表数据导入
(Ⅱ)分桶表语法
| 指令 | 作用 | 额外说明 |
|---|---|---|
| create table teacher(name string) clustered by (name) into 6 buckets row format delimited fields terminated by ’ '; | 创建teacher表,以name作为分桶机制,分为6个桶 | |
| insert overwrite table teacher select * from tmp; | 将tmp表中的数据添加到teacher表中 | 实际上是产生了6个文件用于存储不分桶的数据 |
| select * from teacher tablesample(bucket 1 out of 3 on name); | 进行抽样 | 抽样格式为:bucket x out of y on XXX:1、x表示抽样的起始桶,例如bucket 1 out of 3表示从第1 个桶开始抽取数据; 2、y决定抽样的比例,要求必须是桶数的因子或者整数倍:a. 如果桶数为6,y为2,则表示抽取6/2=3个桶中的数据; b. 如果桶数为6,y为3,则表示抽取6/3=2个桶中的数据 c. 如果桶数为6,y为12,则表示抽取6/12=0.5个桶中的数据; 3、如果桶数为6,抽样为bucket 1 out of 3 on id表示从第1个桶开始抽样,抽取2个桶的数据,所以抽取的样本为1和4桶中的数据 |
(Ⅲ)具体例子(未完成 见视频下午1)
(1)开启
hive> set hive.enforce.bucketing=true;
(2)
hive> create table teacher(name string) clustered by (name) into 6 buckets row format delimited fields terminated by ' ';
OK
Time taken: 0.122 seconds
hive> create table tmp(name string) clustered by (name) into 6 buckets row format delimited fields terminated by ' ';
OK
Time taken: 0.049 seconds
hive> insert overwrite table teacher select * from tmp
(Ⅳ)一些说明
x out of y
x表示的是凑样的起始桶
y决定抽样的比例6/y=6/3=2个
2 out of 3从第二个桶开始抽取,一共抽取两个桶的数据

常见操作
(一)对数的操作
保留小数位数
hive> select round(4.17);
OK
4.0
Time taken: 0.07 seconds, Fetched: 1 row(s)
hive> select round(4.1742767537,3);
OK
4.174
Time taken: 0.043 seconds, Fetched: 1 row(s)
向下取整
hive> select floor(3.78);
OK
3
Time taken: 0.04 seconds, Fetched: 1 row(s)
向上取证
hive> select ceil(3.1415926);
OK
4
对数
hive> select log10(10);
OK
1.0
Time taken: 0.045 seconds, Fetched: 1 row(s)
开方
hive> select sqrt(9);
OK
3.0
Time taken: 0.05 seconds, Fetched: 1 row(s)
绝对值
hive> select abs(-2);
OK
2
Time taken: 0.039 seconds, Fetched: 1 row(s)
(二)类型转换
hive> select cast('1' as bigint);
OK
1
Time taken: 0.043 seconds, Fetched: 1 row(s)
从1970到现在经过了多少秒
hive> select unix_timestamp('2020-08-20','yyyy-MM-dd');
OK
1597852800
Time taken: 0.049 seconds, Fetched: 1 row(s)
hive> select to_date('2020-08-29 22:34:01');
OK
2020-08-29
Time taken: 0.055 seconds, Fetched: 1 row(s)
返回经过多少天
hive> select datediff('2021-08-23','2021-08-01') ;
OK
22
Time taken: 0.043 seconds, Fetched: 1 row(s)
hive>
(三)函数
if函数、字符串函数、排除空白字符
hive> select if(3>5,true,false);
OK
false
Time taken: 0.086 seconds, Fetched: 1 row(s)
hive> select length('hello');
OK
5
Time taken: 0.042 seconds, Fetched: 1 row(s)
hive> select reverse('hello');
OK
olleh
Time taken: 0.043 seconds, Fetched: 1 row(s)
hive> select substr("nihaoya",3,3);
OK
hao
Time taken: 0.04 seconds, Fetched: 1 row(s)
hive> select trim('    niaho    ');
OK
niaho
Time taken: 0.037 seconds, Fetched: 1 row(s)
hive>
(四)explod
(Ⅰ)概述
1、explode 命令可以将行数据,按指定规则切分出多行
2、用explode做行切分,注意表里只有一列,并且行数据是string类型,因为只有字符类型才能做切分
(Ⅱ)根据word.txt做单词统计(未完成见视频下午1)
1、创建外部表关联hdfs下/word目录
create external table word (word string) location ‘/word’;
2、通过explode 命令将wod列数据按空格进行切分
Select explode (split(word,’ ‘))from word;
3、把切分完的表作为新表进行单词统计
select name,count (name) from (select explode(split(word,’ ')) name from word) as word1 group by name;
(Ⅲ)具体例子
hive> create external word(word string) row format delimited fields terminated by '|' location '/word';
hive> select * from word;
hive> select explode(split(word,' ')) from word;
hive> select name,count(name) from (select explode(split(word,' ')) from word)as word1;
(五)JDBC
(Ⅰ)概述
1、hive实现了jdbc接口,所以可以通过java代码操作
2、hive的jdbc操作在实际应用中用的不多,一般都是在HDFS储存的文件基础上建立外部表来进行查询处理。所以jdbc了解一下即可。
(Ⅱ)实现步骤:
1、在服务器端开启HiveServer服务:sh hive --service hiveserver2 & (以后台线程启动)
[root@hadoop01 ~]# sh hive--service hiveserver2 &
[1] 12239
2、创建本地工程,导入jar包:


导入hive\lib目录下的hive-jdbc-1.2.0-standalone.jar
导入hadoop-2.7.1\share\hadoop\common下的hadoop-common-2.7.1.jar

3、编写jdbc代码执行
package cn.edu.hive;

import java.sql.Connection;
import java.sql.DriverManager;
import java.sql.ResultSet;
import java.sql.SQLException;
import java.sql.Statement;

import org.junit.Test;
public class HIveJdbcTest {
	@Test
	public void testConnect() throws ClassNotFoundException,SQLException{
		//注册驱动
		//注册数据库驱动,用的hive的jdbc,驱动名固定写死
		Class.forName("org.apache.hive.jdbc.HiveDriver");
		//--获取链接
		//如果用的是hive2服务,则写jdbc:hive2,后面跟上hive服务器的ip以及端口号,端口号默认是10000
		Connection conn = DriverManager.getConnection( "jdbc:hive2://192.168.232.129:10000/park","root","root");
		// --创建执行器
		Statement stat = conn.createStatement();//--执行sql
		//--解析结果
		ResultSet rs = stat.executeQuery( "select* from tmp");
		//--解析结果
		while(rs.next()){
			String id = rs.getString( "id");
			String name = rs.getString( "name" ) ;
			System.out.println("id: "+id+ "~"+ "name : "+name);
		}
		//--关流
		stat.close();
		conn.close();
	}
	@Test
	public void testCreate() throws ClassNotFoundException,SQLException{
		//注册驱动
		Class.forName("org.apache.hive.jdbc.HiveDriver");
		//--获取链接
		Connection conn = DriverManager.getConnection( "jdbc:hive2://192.168.232.129:10000/park","root","root");
		// --创建执行器
		Statement stat = conn.createStatement();//--执行sql
		//--解析结果
		//executeUpdate可用于:创建表,向表中插入数据以及删除表
		stat.executeUpdate( "create table stu2 (id int,name string)");
		//--关流
		stat.close();
		conn.close();
	}
	@Test
	public void testInsert() throws ClassNotFoundException,SQLException{
		//注册驱动
		Class.forName("org.apache.hive.jdbc.HiveDriver");
		//--获取链接
		Connection conn = DriverManager.getConnection( "jdbc:hive2://192.168.232.129:10000/park","root","root");
		// --创建执行器
		Statement stat = conn.createStatement();//--执行sql
		//--解析结果
		stat.executeUpdate( "insert into stu2 values(1,'wangwu')");
		//--关流
		stat.close();
		conn.close();
	}
}
4、执行结果验证
hive> show databases;
OK
default
park
Time taken: 0.022 seconds, Fetched: 2 row(s)
hive> use park;
OK
Time taken: 0.017 seconds
hive> show tables;
OK
book
stu2
student
teacher
tmp
Time taken: 0.04 seconds, Fetched: 5 row(s)
hive> select * from stu2;
OK
1	wangwu
Time taken: 0.377 seconds, Fetched: 1 row(s)
hive>
(六)spool
(Ⅰ)概述
1、 sqoop是Apache 提供的工具,用于hdfs和关系型数据库之间数据的导入和导入
2、可以从hdfs导出数据到关系型数据库,也可以从关系型数据库导入数据到hdfs
(Ⅱ)实现步骤:
1、准备sqoop安装包,官网地址:http://sqoop.apache.org
2、配置jdk环境变量和Hadoop的环境变量。因为sqoop在使用是会去找环境变量对应的路径,从而完整工作
3、解压Sqoop的安装包
4、需要将要连接的数据库的驱动包加入sqoop的lib目录下(本例中用的是mysql数据库)
5、利用指令操作sqoop
(Ⅲ)基础指令(未完成 见视频下午3)
| 说明 | 指令示例 |
|---|---|
| 查看mysql所有数据库 | sh sqoop list-databases --connect jdbc:mysql://192.168.48.10:3306/ -username root -password root |
| 查看指定数据库下的所有表 | sh sqoop list-tables --connect jdbc:mysql://hadoop02:3306/hive -username root -password root |
| 关系型数据库 ->hdfs | 实现步骤:1、先在mysql数据库的test数据下建立一张tabx表,并插入测试数据:a. 建表:create table tabx (id int,name varchar(20)); b.插入:insert into tabx (id,name) values (1,‘aaa’),(2,‘bbb’),(3,‘ccc’),(1,‘ddd’),(2,‘eee’),(3,‘fff’); 2、进入到sqoop的bin目录下,执行导入语句:sh sqoop import --connect jdbc:mysql://192.168.48.10:3306/test --username root --password root --table tabx --target-dir ‘/sqoop/tabx’ --fields-terminated-by ’ 竖线 (由于竖线会默认表格的分割符,用汉字代替)’ -m 1; |
| hdfs ->关系型数据库 | 执行:sh sqoop export --connect jdbc:mysql://192.168.48.10:3306/test --username root --password root --export-dir ‘/sqoop’ --table student -m 1 --fields-terminated-by ’ 竖线 '注:sqoop只能导出数据,不能自动建表。所以在导出之前,要现在mysql数据库里建好对应的表 |
| sh sqoop import -help | 查看import的帮助指令 |
(Ⅳ)具体实现
六、遇到的一些问题及解决方法
(一)Namenode没有启动
1、首先单独启动一下namenode
hadoop-deamon.sh start namenode
2、如果还是启动不了,继续下列操作
[root@hadoop01 current]# cd /home/software/hadoop-2.7.1/tmp/dfs/name/current/
[root@hadoop01 current]# cat seen_txid
[root@hadoop01 current]# cat VERSION
[root@hadoop01 current]# cd /home/software/hadoop-2.7.1/tmp/dfs/data/current/
[root@hadoop01 current]# cat VERSION
观察两个VERSION中的cluserId是否一致不一样更改cluserid(将第一个中的复制到第二个中)
3、一样的话,查看内存(namenode启动需要较多内存)
free -m
清一下缓存 并重启
echo 3 > /proc/sys/vm/drop_caches
4、若还是不行看一下日志(最近的)
[root@hadoop01 current]# cd /home/software/hadoop-2.7.1/tmp/dfs/name/current/
5、如果实在不行重新格式化,格式化之前,需删掉tmp
(二)导入junit包未成功


(三)启动后台运行失败
[root@hadoop01 bin]# sh hive--service hiveserver2 &
[1] 12738
[root@hadoop01 bin]# sh: hive--service: 没有那个文件或目录

[1]+  Exit 127                sh hive--service hiveserver2
失败原因:需加上空格。
[root@hadoop01 bin]# sh hive --service hiveserver2 &
[1] 12762
(四)java.sql.SQLException: The query did not generate a result set!
原因,语句写错。对create与insert应使用executeUpdate而非executeQuery。