Flink流处理API

Environment
getExecutionEnvironment
创建一个执行环境,表示当前执行程序的上下文。 如果程序是独立调用的,则此方法返回本地执行环境;如果从命令行客户端调用程序以提交到集群,则此方法返回此集群的执行环境,也就是说,getExecutionEnvironment 会根据查询运行的方式决定返回什么样的运行环境,是最常用的一种创建执行环境的方式。
ExecutionEnvironment env = ExecutionEnvironment.getExecutionEnvironment();


StreamExecutionEnvironment env = StreamExecutionEnvironment.getExecutionEnvironment();
如果没有设置并行度,会以 flink-conf.yaml 中 的配置为准(parallelism.default),默认是 1。
createLocalEnvironment
返回本地执行环境,需要在调用时指定默认的并行度。不配置的话,就是以CPU核心数为并行度。
LocalStreamEnvironment env = StreamExecutionEnvironment.createLocalEnvironment(1);
createRemoteEnvironment
返回集群执行环境,将 Jar 提交到远程服务器。需要在调用时指定 JobManager的 IP 和端口号,并指定要在集群中运行的 Jar 包。
集群的hostname,端口以及jar包的路径。
StreamExecutionEnvironment env = StreamExecutionEnvironment.createRemoteEnvironment("jobmanage-hostname", 6123, "YOURPATH//WordCount.jar");
Source
从集合读取数据
javaBean
// 传感器温度数据类型
public class SensorReading {

    // 属性:id,时间戳,温度值
    private String id;
    private Long timestamp;
    private Double temperature;

    ... 省略getter、setter、构造函数以及toString
}
public static void main(String[] args) throws Exception {

    // 创建执行环境
    StreamExecutionEnvironment env = StreamExecutionEnvironment.getExecutionEnvironment();

    // 设置并行度
    // env.setParallelism(1);

    // 从集合中读取数据
    DataStream<SensorReading> sensorDataStreamSource = env.fromCollection(Arrays.asList(
        new SensorReading("sensor_1", 1547718199L, 35.8),
        new SensorReading("sensor_6", 1547718201L, 15.4),
        new SensorReading("sensor_7", 1547718202L, 6.7),
        new SensorReading("sensor_10", 1547718205L, 38.1)
    ));

    DataStreamSource<Integer> integerDataStreamSource = env.fromElements(1, 2, 3, 4, 5);

    // 打印输出
    sensorDataStreamSource.print("data");
    integerDataStreamSource.print("int");

    // 执行
    env.execute();
}

执行结果如下:
data:6> SensorReading{id='sensor_7', timestamp=1547718202, temperature=6.7}
data:4> SensorReading{id='sensor_1', timestamp=1547718199, temperature=35.8}
data:5> SensorReading{id='sensor_6', timestamp=1547718201, temperature=15.4}
int:2> 1
data:1> SensorReading{id='sensor_10', timestamp=1547718205, temperature=38.1}
int:3> 2
int:4> 3
int:5> 4
int:6> 5
从文件读取数据
数据如下:
sensor_1,1547718199,35.8
sensor_6,1547718201,15.4
sensor_7,1547718202,6.7
sensor_10,1547718205,38.1
public static void main(String[] args) throws Exception {

    // 创建执行环境
    StreamExecutionEnvironment env = StreamExecutionEnvironment.getExecutionEnvironment();

    // 从文件读取数据
    DataStreamSource<String> dataStream = env.readTextFile("/home/lxj/workspace/Flink/src/main/resources/sensor.txt");

    dataStream.print();

    // 执行
    env.execute();
}
以 kafka 消息队列的数据作为来源
引入 kafka 连接器的依赖:
<dependency>
    <groupId>org.apache.flink</groupId>
    <artifactId>flink-connector-kafka-0.11_2.12</artifactId>
    <version>1.10.1</version>
</dependency>
创建sensor topic
kafka-topics.sh --zookeeper hadoop113:2181 --create --topic sensor --replication-factor 2 --partitions 2
启动程序,并启动控制台生产者
[bd@hadoop113 ~]$ kafka-console-producer.sh --broker-list localhost:9092 --topic sensor
>hello word
>hello flink
>test

代码运行结果如下:
1> hello word
2> hello flink
1> test
自定义 Source
除了以上的 source 数据来源,我们还可以自定义 source。需要做的,只是传入一个 SourceFunction 就可以。具体调用如下:
public static void main(String[] args) throws Exception {

    // 创建执行环境
    StreamExecutionEnvironment env = StreamExecutionEnvironment.getExecutionEnvironment();

    DataStreamSource<SensorReading> dataStream = env.addSource(new MySensorSource());

    dataStream.print();

    // 执行
    env.execute();
}

/**
     * 实现自定义的SourceFunction
     */
public static class MySensorSource implements SourceFunction<SensorReading> {

    // 定义一个标识位,用来控制数据的产生
    private boolean running = true;

    @Override
    public void run(SourceContext<SensorReading> sourceContext) throws Exception {

        // 定义一个随机数发生器
        Random random = new Random();

        // 设置10个传感器的初始温度
        HashMap<String, Double> sensorTempMap = new HashMap<String, Double>();
        for (int i = 0; i < 10; i++) {
            sensorTempMap.put("sensor_" + (i + 1), 60 + random.nextGaussian() + 20);
        }

        while (running) {
            for (String sensorId : sensorTempMap.keySet()) {
                // 在当前温度基础上随机波动
                Double newTemp = sensorTempMap.get(sensorId) + random.nextGaussian();
                sensorTempMap.put(sensorId, newTemp);

                sourceContext.collect(new SensorReading(sensorId, System.currentTimeMillis(), newTemp));
            }

            // 控制输出频率
            Thread.sleep(5000);
        }
    }

    @Override
    public void cancel() {

        running = false;
    }
}


执行结果如下:
3> SensorReading{id='sensor_10', timestamp=1630303954757, temperature=80.79470677784754}
4> SensorReading{id='sensor_4', timestamp=1630303954757, temperature=78.38094017324792}
6> SensorReading{id='sensor_2', timestamp=1630303954757, temperature=79.55147458290624}
3> SensorReading{id='sensor_5', timestamp=1630303954758, temperature=79.09612522830896}
2> SensorReading{id='sensor_3', timestamp=1630303954750, temperature=79.74567859094341}
1> SensorReading{id='sensor_7', timestamp=1630303954757, temperature=79.54458893378315}
4> SensorReading{id='sensor_6', timestamp=1630303954758, temperature=79.37135107046713}
2> SensorReading{id='sensor_8', timestamp=1630303954757, temperature=81.77734260326615}
5> SensorReading{id='sensor_1', timestamp=1630303954757, temperature=79.4684393550607}
5> SensorReading{id='sensor_9', timestamp=1630303954758, temperature=80.58053196365552}
Transform-转换算子
map

flatMap
Filter

map、flatMap、filter基本转换算子。
public static void main(String[] args) throws Exception {

    // 创建执行环境
    StreamExecutionEnvironment env = StreamExecutionEnvironment.getExecutionEnvironment();

    // 从文件读取数据
    DataStreamSource<String> inputStream = env.readTextFile("/home/lxj/workspace/Flink/src/main/resources/sensor.txt");

    // map,把String转换成长度输出
    DataStream<Integer> mapStream = inputStream.map(new MapFunction<String, Integer>() {
        @Override
        public Integer map(String value) throws Exception {

            return value.length();
        }
    });
    mapStream.print("map");


    // flatmap,按逗号分字段
    DataStream<String> flatMapStream = inputStream.flatMap(new FlatMapFunction<String, String>() {
        @Override
        public void flatMap(String value, Collector<String> out) throws Exception {

            String[] fields = value.split(",");
            for (String field : fields) {
                out.collect(field);
            }
        }
    });
    flatMapStream.print("flatMap");

    // filter,筛选sensor_1开头的id对应的数据
    DataStream<String> filterStream = inputStream.filter(new FilterFunction<String>() {
        @Override
        public boolean filter(String value) throws Exception {
            return value.startsWith("sensor_1");
        }
    });
    filterStream.print("filter");

    // 执行
    env.execute();
}


// 结果如下:
map:3> 23
flatMap:3> sensor_7
flatMap:3> 1547718202
flatMap:3> 6.7
map:2> 24
flatMap:2> sensor_6
flatMap:2> 1547718201
flatMap:2> 15.4
map:1> 24
flatMap:1> sensor_1
flatMap:1> 1547718199
flatMap:1> 35.8
filter:1> sensor_1,1547718199,35.8
map:5> 25
flatMap:5> sensor_10
flatMap:5> 1547718205
flatMap:5> 38.1
filter:5> sensor_10,1547718205,38.1
KeyBy
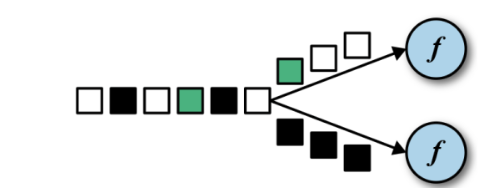
DataStream → KeyedStream:逻辑地将一个流拆分成不相交的分区,每个分区包含具有相同 key 的元素,在内部以 hash 的形式实现的。
滚动聚合算子(Rolling Aggregation)
这些算子可以针对 KeyedStream 的每一个支流做聚合:
sum()
min()
max()
minBy()
maxBy()
public static void main(String[] args) throws Exception {

    // 创建执行环境
    StreamExecutionEnvironment env = StreamExecutionEnvironment.getExecutionEnvironment();

    // 从文件读取数据
    DataStreamSource<String> inputStream = env.readTextFile("/home/lxj/workspace/Flink/src/main/resources/sensor.txt");
    // 数据
    //        sensor_1,1547718199,35.8
    //        sensor_6,1547718201,15.4
    //        sensor_7,1547718202,6.7
    //        sensor_10,1547718205,38.1
    //        sensor_1,1547710000,36.8
    //        sensor_1,1547719999,34.8
    //        sensor_1,1547715555,37.8

    // 转换成对应的javaBean
    //        DataStream<SensorReading> dataStream = inputStream.map(new MapFunction<String, SensorReading>() {
    //            @Override
    //            public SensorReading map(String s) throws Exception {
    //                String[] fields = s.split(",");
    //                return new SensorReading(fields[0], new Long(fields[1]), new Double(fields[2]));
    //            }
    //        });
    DataStream<SensorReading> dataStream = inputStream.map(line -> {
        String[] fields = line.split(",");
        return new SensorReading(fields[0], new Long(fields[1]), new Double(fields[2]));
    });

    // 分组
    // KeyedStream<SensorReading, Tuple> keyedStream = dataStream.keyBy("id");
    KeyedStream<SensorReading, String> keyedStream = dataStream.keyBy(SensorReading::getId);

    // 滚动聚合,取最大的温度值
    //        SingleOutputStreamOperator<SensorReading> maxResultStream = keyedStream.max("temperature");
    //        maxResultStream.print("max");
    // 结果
    //        max:3> SensorReading{id='sensor_10', timestamp=1547718205, temperature=38.1}
    //        max:5> SensorReading{id='sensor_7', timestamp=1547718202, temperature=6.7}
    //        max:4> SensorReading{id='sensor_1', timestamp=1547715555, temperature=37.8}
    //        max:4> SensorReading{id='sensor_1', timestamp=1547715555, temperature=37.8}
    //        max:4> SensorReading{id='sensor_1', timestamp=1547715555, temperature=37.8}
    //        max:4> SensorReading{id='sensor_6', timestamp=1547718201, temperature=15.4}
    //        max:4> SensorReading{id='sensor_1', timestamp=1547715555, temperature=37.8}

    SingleOutputStreamOperator<SensorReading> maxByResultStream = keyedStream.maxBy("temperature");
    maxByResultStream.print("maxBy");
    // 结果
    //        maxBy:5> SensorReading{id='sensor_7', timestamp=1547718202, temperature=6.7}
    //        maxBy:3> SensorReading{id='sensor_10', timestamp=1547718205, temperature=38.1}
    //        maxBy:4> SensorReading{id='sensor_1', timestamp=1547718199, temperature=35.8}
    //        maxBy:4> SensorReading{id='sensor_6', timestamp=1547718201, temperature=15.4}
    //        maxBy:4> SensorReading{id='sensor_1', timestamp=1547710000, temperature=36.8}
    //        maxBy:4> SensorReading{id='sensor_1', timestamp=1547710000, temperature=36.8}
    //        maxBy:4> SensorReading{id='sensor_1', timestamp=1547715555, temperature=37.8}

    // 执行
    env.execute();
}
Reduce
KeyedStream → DataStream:一个分组数据流的聚合操作,合并当前的元素和上次聚合的结果,产生一个新的值,返回的流中包含每一次聚合的结果,而不是只返回最后一次聚合的最终结果。
public static void main(String[] args) throws Exception {

    // 创建执行环境
    StreamExecutionEnvironment env = StreamExecutionEnvironment.getExecutionEnvironment();

    // 从文件读取数据
    DataStreamSource<String> inputStream = env.readTextFile("/home/lxj/workspace/Flink/src/main/resources/sensor.txt");

    DataStream<SensorReading> dataStream = inputStream.map(line -> {
        String[] fields = line.split(",");
        return new SensorReading(fields[0], new Long(fields[1]), new Double(fields[2]));
    });

    // 分组
    KeyedStream<SensorReading, String> keyedStream = dataStream.keyBy(SensorReading::getId);

    // reduce聚合,取最大的温度值,以及最新的时间戳
    keyedStream.reduce((oldData, newData) -> new SensorReading(oldData.getId(),
                                                               newData.getTimestamp(),
                                                               Math.max(oldData.getTemperature(), newData.getTemperature())))
        .print("reduce");
    // 结果
    //        reduce:5> SensorReading{id='sensor_7', timestamp=1547718202, temperature=6.7}
    //        reduce:4> SensorReading{id='sensor_1', timestamp=1547718199, temperature=35.8}
    //        reduce:4> SensorReading{id='sensor_6', timestamp=1547718201, temperature=15.4}
    //        reduce:4> SensorReading{id='sensor_1', timestamp=1547719999, temperature=35.8}
    //        reduce:4> SensorReading{id='sensor_1', timestamp=1547715555, temperature=37.8}
    //        reduce:3> SensorReading{id='sensor_10', timestamp=1547718205, temperature=38.1}
    //        reduce:4> SensorReading{id='sensor_1', timestamp=1547710000, temperature=37.8}

    // 执行
    env.execute();
}
Split 和 Select
Split
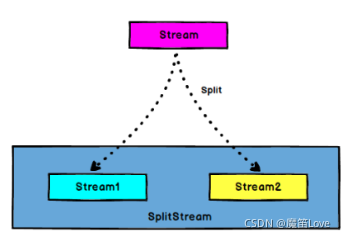
DataStream → SplitStream:根据某些特征把一个 DataStream 拆分成两个或者多个 DataStream。
Select
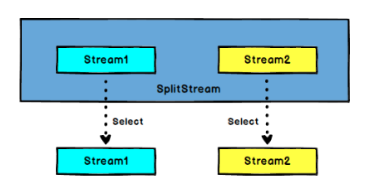
SplitStream→DataStream:从一个 SplitStream 中获取一个或者多个DataStream。
传感器数据按照温度高低(以 30 度为界),拆分成两个流。
public static void main(String[] args) throws Exception {

    // 创建执行环境
    StreamExecutionEnvironment env = StreamExecutionEnvironment.getExecutionEnvironment();

    // 从文件读取数据
    DataStreamSource<String> inputStream = env.readTextFile("/home/lxj/workspace/Flink/src/main/resources/sensor.txt");

    DataStream<SensorReading> dataStream = inputStream.map(line -> {
        String[] fields = line.split(",");
        return new SensorReading(fields[0], new Long(fields[1]), new Double(fields[2]));
    });

    // 分流操作,按照温度值30为界,分为两个流
    SplitStream<SensorReading> splitStream = dataStream.split(value -> value.getTemperature() > 30
                                                              ? Collections.singletonList("high")
                                                              : Collections.singletonList("low"));

    //        splitStream.select("high").print("high");
    //        high:3> SensorReading{id='sensor_1', timestamp=1547710000, temperature=36.8}
    //        high:6> SensorReading{id='sensor_1', timestamp=1547718199, temperature=35.8}
    //        high:2> SensorReading{id='sensor_10', timestamp=1547718205, temperature=38.1}
    //        high:4> SensorReading{id='sensor_1', timestamp=1547719999, temperature=34.8}
    //        high:5> SensorReading{id='sensor_1', timestamp=1547715555, temperature=37.8}

    //        splitStream.select("low").print("low");
    //        low:3> SensorReading{id='sensor_7', timestamp=1547718202, temperature=6.7}
    //        low:2> SensorReading{id='sensor_6', timestamp=1547718201, temperature=15.4}

    splitStream.select("high", "low").print("all");
    //        all:3> SensorReading{id='sensor_1', timestamp=1547718199, temperature=35.8}
    //        all:2> SensorReading{id='sensor_1', timestamp=1547715555, temperature=37.8}
    //        all:3> SensorReading{id='sensor_6', timestamp=1547718201, temperature=15.4}
    //        all:1> SensorReading{id='sensor_1', timestamp=1547719999, temperature=34.8}
    //        all:5> SensorReading{id='sensor_10', timestamp=1547718205, temperature=38.1}
    //        all:6> SensorReading{id='sensor_1', timestamp=1547710000, temperature=36.8}
    //        all:4> SensorReading{id='sensor_7', timestamp=1547718202, temperature=6.7}


    // 执行
    env.execute();
}
Connect 和 CoMap
connect
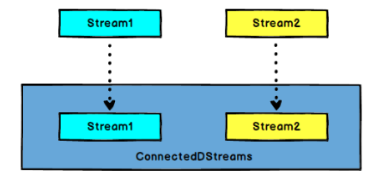
DataStream,DataStream → ConnectedStreams:连接两个保持他们类型的数据流,两个数据流被 Connect 之后,只是被放在了一个同一个流中,内部依然保持各自的数据和形式不发生任何变化,两个流相互独立。数据类型可以不一样。
CoMap,CoFlatMap

ConnectedStreams → DataStream:作用于 ConnectedStreams 上,功能 与 map和 flatMap 一样,对 ConnectedStreams 中的每一 个 Stream 分别进行 map 和 flatMap处理。
public static void main(String[] args) throws Exception {

    // 创建执行环境
    StreamExecutionEnvironment env = StreamExecutionEnvironment.getExecutionEnvironment();

    // 从文件读取数据
    DataStreamSource<String> inputStream = env.readTextFile("/home/lxj/workspace/Flink/src/main/resources/sensor.txt");

    DataStream<SensorReading> dataStream = inputStream.map(line -> {
        String[] fields = line.split(",");
        return new SensorReading(fields[0], new Long(fields[1]), new Double(fields[2]));
    });

    // 分流操作,按照温度值30为界,分为两个流
    SplitStream<SensorReading> splitStream = dataStream.split(value -> value.getTemperature() > 30
                                                              ? Collections.singletonList("high")
                                                              : Collections.singletonList("low"));

    DataStream<SensorReading> highStream = splitStream.select("high");
    DataStream<SensorReading> lowStream = splitStream.select("low");

    // 合流connect,将高温流转换成二元组类型,与低温流连接合并之后,输出状态信息
    SingleOutputStreamOperator<Tuple2<String, Double>> warningStream = highStream.map(new MapFunction<SensorReading, Tuple2<String, Double>>() {
        @Override
        public Tuple2<String, Double> map(SensorReading sensorReading) throws Exception {
            return new Tuple2<>(sensorReading.getId(), sensorReading.getTemperature());
        }
    });

    ConnectedStreams<Tuple2<String, Double>, SensorReading> connectedStreams = warningStream.connect(lowStream);

    SingleOutputStreamOperator<Object> resultStream = connectedStreams.map(new CoMapFunction<Tuple2<String, Double>, SensorReading, Object>() {

        @Override
        public Object map1(Tuple2<String, Double> value) throws Exception {
            return new Tuple3<>(value.f0, value.f1, "high temperature");
        }

        @Override
        public Object map2(SensorReading sensorReading) throws Exception {
            return new Tuple2<>(sensorReading.getId(), "normal");
        }
    });
    resultStream.print("connect");
    //        connect:5> (sensor_10,38.1,high temperature)
    //        connect:1> (sensor_1,34.8,high temperature)
    //        connect:2> (sensor_1,37.8,high temperature)
    //        connect:4> (sensor_7,normal)
    //        connect:3> (sensor_1,35.8,high temperature)
    //        connect:3> (sensor_6,normal)
    //        connect:6> (sensor_1,36.8,high temperature)

    // 执行
    env.execute();
}
Union
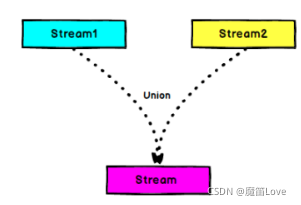
DataStream → DataStream:对两个或者两个以上的 DataStream 进行 union 操作,产生一个包含所有 DataStream 元素的新 DataStream,合并的两条流必须是相同的类型。
public static void main(String[] args) throws Exception {

    // 创建执行环境
    StreamExecutionEnvironment env = StreamExecutionEnvironment.getExecutionEnvironment();

    // 从文件读取数据
    DataStreamSource<String> inputStream = env.readTextFile("/home/lxj/workspace/Flink/src/main/resources/sensor.txt");

    DataStream<SensorReading> dataStream = inputStream.map(line -> {
        String[] fields = line.split(",");
        return new SensorReading(fields[0], new Long(fields[1]), new Double(fields[2]));
    });

    // 分流操作,按照温度值30为界,分为两个流
    SplitStream<SensorReading> splitStream = dataStream.split(value -> value.getTemperature() > 30
                                                              ? Collections.singletonList("high")
                                                              : Collections.singletonList("low"));

    DataStream<SensorReading> highStream = splitStream.select("high");
    DataStream<SensorReading> lowStream = splitStream.select("low");

    // union合并多条流
    highStream.union(lowStream).print("high-union-low");
    //        high-union-low:6> SensorReading{id='sensor_1', timestamp=1547715555, temperature=37.8}
    //        high-union-low:4> SensorReading{id='sensor_1', timestamp=1547710000, temperature=36.8}
    //        high-union-low:2> SensorReading{id='sensor_7', timestamp=1547718202, temperature=6.7}
    //        high-union-low:1> SensorReading{id='sensor_1', timestamp=1547718199, temperature=35.8}
    //        high-union-low:1> SensorReading{id='sensor_6', timestamp=1547718201, temperature=15.4}
    //        high-union-low:3> SensorReading{id='sensor_10', timestamp=1547718205, temperature=38.1}
    //        high-union-low:5> SensorReading{id='sensor_1', timestamp=1547719999, temperature=34.8}


    // 执行
    env.execute();
}
Connect 与 Union 区别:
- Union 之前两个流的类型必须是一样, Connect 可以不一样,在之后的 coMap中再去调整成为一样的。
- Connect 只能操作两个流,Union 可以操作多个。
支持的数据类型
Flink 流应用程序处理的是以数据对象表示的事件流。所以在 Flink 内部,我们需要能够处理这些对象。它们需要被序列化和反序列化,以便通过网络传送它们;或者从状态后端、检查点和保存点读取它们。为了有效地做到这一点,Flink 需要明确知道应用程序所处理的数据类型。Flink 使用类型信息的概念来表示数据类型,并为每个数据类型生成特定的序列化器、反序列化器和比较器。
Flink 还具有一个类型提取系统,该系统分析函数的输入和返回类型,以自动获取类型信息,从而获得序列化器和反序列化器 。但是,在某些情况下,例如 lambda函数或泛型类型,需要显式地提供类型信息,才能使应用程序正常工作或提高其性能。
Flink 支持 Java 和 Scala 中所有常见数据类型。使用最广泛的类型有以下几种。
基础数据类型
Flink 支持所有的 Java 和 Scala 基础数据类型,Int, Double, Long, String, …
DataStream<Integer> numberStream = env.fromElements(1, 2, 3, 4);
numberStream.map(data -> data * 2);
Java 和 Scala 元组(Tuples)
DataStream<Tuple2<String, Integer>> personStream = env.fromElements(
    new Tuple2("Adam", 17),
    new Tuple2("Sarah", 23));
personStream.filter(p -> p.f1 > 18);
Flink的Tuples最大是25元组。用fx来获取x位置的数据。
Scala 样例类(case classes)
case class Person(name: String, age: Int)

val persons: DataStream[Person] = env.fromElements(
    Person("Adam", 17),
    Person("Sarah", 23))
persons.filter(p => p.age > 18)
Java 简单对象(POJOs)
public class Person {
    public String name;
    public int age;
    public Person() {}
    public Person(String name, int age) {
        this.name = name;
        this.age = age;
    }
}
DataStream<Person> persons = env.fromElements(
    new Person("Alex", 42),
    new Person("Wendy", 23));
其它(Arrays, Lists, Maps, Enums, 等等)
Flink 对 Java 和 Scala 中的一些特殊目的的类型也都是支持的,比如 Java 的ArrayList,HashMap,Enum 等等。
实现 UDF 函数——更细粒度的控制流
函数类(Function Classes)
Flink 暴露了所有 udf 函数的接口(实现方式为接口或者抽象类 )。例如MapFunction, FilterFunction, ProcessFunction 等等。
下面例子实现了 FilterFunction 接口:
DataStream<String> flinkTweets = tweets.filter(new FlinkFilter());

public static class FlinkFilter implements FilterFunction<String> {
    @Override
    public boolean filter(String value) throws Exception {
        return value.contains("flink");
    }
}
还可以将函数实现成匿名类
DataStream<String> flinkTweets = tweets.filter(new FilterFunction<String>() {
    @Override
    public boolean filter(String value) throws Exception {
        return value.contains("flink");
    }
});
我们 filter 的字符串"flink"还可以当作参数传进去。
DataStream<String> tweets = env.readTextFile("INPUT_FILE");

DataStream<String> flinkTweets = tweets.filter(new KeyWordFilter("flink"));

public static class KeyWordFilter implements FilterFunction<String> {
    private String keyWord;
    KeyWordFilter(String keyWord) { this.keyWord = keyWord; }
    @Override
    public boolean filter(String value) throws Exception {
        return value.contains(this.keyWord);
    }
}
匿名函数(Lambda Functions)
DataStream<String> tweets = env.readTextFile("INPUT_FILE");

DataStream<String> flinkTweets = tweets.filter(tweet -> tweet.contains("flink"));
富函数(Rich Functions)
“富函数”是 DataStream API 提供的一个函数类的接口,所有 Flink 函数类都有其 Rich 版本。它与常规函数的不同在于,可以获取运行环境的上下文,并拥有一些生命周期方法,所以可以实现更复杂的功能。
RichMapFunction
RichFlatMapFunction
RichFilterFunction
…
Rich Function 有一个生命周期的概念。典型的生命周期方法有 :
open()方法是 rich function 的初始化方法,当一个算子例如 map 或者 filter
被调用之前 open()会被调用。
close()方法是生命周期中的最后一个调用的方法,做一些清理工作。
getRuntimeContext()方法 提供了函数的 RuntimeContext 的一些信息,例如函数执行的并行度,任务的名字,以及 state 状态
public static class MyMapper extends RichMapFunction<SensorReading, Tuple2<String, Integer>> {

    @Override
    public Tuple2<String, Integer> map(SensorReading sensorReading) throws Exception {

        return new Tuple2<>(sensorReading.getId(), getIterationRuntimeContext().getNumberOfParallelSubtasks());
    }

    @Override
    public void open(Configuration parameters) throws Exception {
        // 初始化工作,,一般是定义状态,或者建立数据库连接,或者建立一个和 HDFS 的连接
        super.open(parameters);
    }

    @Override
    public void close() throws Exception {
        // 一般是关闭连接和清空状态操作
        super.close();
    }
}
数据重分区操作
public static void main(String[] args) throws Exception {

    // 创建执行环境
    StreamExecutionEnvironment env = StreamExecutionEnvironment.getExecutionEnvironment();

    // 从文件读取数据
    DataStreamSource<String> inputStream = env.readTextFile("/home/lxj/workspace/Flink/src/main/resources/sensor.txt");

    DataStream<SensorReading> dataStream = inputStream.map(line -> {
        String[] fields = line.split(",");
        return new SensorReading(fields[0], new Long(fields[1]), new Double(fields[2]));
    });
    dataStream.print("init");

    // shuffle
    dataStream.shuffle().print("shuffle");

    // keyBy
    dataStream.keyBy("id").print("keyBy");

    // global
    dataStream.global().print("global");


    // 结果
    //        init:1> SensorReading{id='sensor_1', timestamp=1547719999, temperature=34.8}
    //        init:6> SensorReading{id='sensor_1', timestamp=1547710000, temperature=36.8}
    //        init:3> SensorReading{id='sensor_1', timestamp=1547718199, temperature=35.8}
    //        init:2> SensorReading{id='sensor_1', timestamp=1547715555, temperature=37.8}
    //        shuffle:3> SensorReading{id='sensor_1', timestamp=1547710000, temperature=36.8}
    //        global:1> SensorReading{id='sensor_1', timestamp=1547719999, temperature=34.8}
    //        global:1> SensorReading{id='sensor_1', timestamp=1547710000, temperature=36.8}
    //        keyBy:4> SensorReading{id='sensor_1', timestamp=1547719999, temperature=34.8}
    //        global:1> SensorReading{id='sensor_1', timestamp=1547715555, temperature=37.8}
    //        init:3> SensorReading{id='sensor_6', timestamp=1547718201, temperature=15.4}
    //        keyBy:4> SensorReading{id='sensor_1', timestamp=1547710000, temperature=36.8}
    //        keyBy:4> SensorReading{id='sensor_1', timestamp=1547715555, temperature=37.8}
    //        keyBy:4> SensorReading{id='sensor_1', timestamp=1547718199, temperature=35.8}
    //        keyBy:4> SensorReading{id='sensor_6', timestamp=1547718201, temperature=15.4}
    //        init:5> SensorReading{id='sensor_10', timestamp=1547718205, temperature=38.1}
    //        shuffle:3> SensorReading{id='sensor_1', timestamp=1547719999, temperature=34.8}
    //        global:1> SensorReading{id='sensor_1', timestamp=1547718199, temperature=35.8}
    //        global:1> SensorReading{id='sensor_6', timestamp=1547718201, temperature=15.4}
    //        keyBy:3> SensorReading{id='sensor_10', timestamp=1547718205, temperature=38.1}
    //        global:1> SensorReading{id='sensor_10', timestamp=1547718205, temperature=38.1}
    //        shuffle:3> SensorReading{id='sensor_1', timestamp=1547715555, temperature=37.8}
    //        shuffle:3> SensorReading{id='sensor_1', timestamp=1547718199, temperature=35.8}
    //        shuffle:3> SensorReading{id='sensor_6', timestamp=1547718201, temperature=15.4}
    //        shuffle:3> SensorReading{id='sensor_10', timestamp=1547718205, temperature=38.1}
    //        init:4> SensorReading{id='sensor_7', timestamp=1547718202, temperature=6.7}
    //        global:1> SensorReading{id='sensor_7', timestamp=1547718202, temperature=6.7}
    //        shuffle:3> SensorReading{id='sensor_7', timestamp=1547718202, temperature=6.7}
    //        keyBy:5> SensorReading{id='sensor_7', timestamp=1547718202, temperature=6.7}


    // 执行
    env.execute();
}
Sink
Flink 没有类似于 spark 中 foreach 方法,让用户进行迭代的操作。虽有对外的输出操作都要利用 Sink 完成。最后通过类似如下方式完成整个任务最终输出操作。
stream.addSink(new MySink(xxxx))
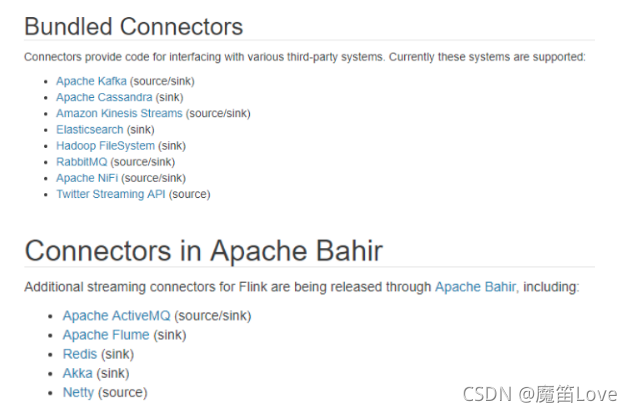
官方提供了一部分的框架的 sink。除此以外,需要用户自定义实现 sink。
Kafka
<dependency>
    <groupId>org.apache.flink</groupId>
    <artifactId>flink-connector-kafka-0.11_2.12</artifactId>
    <version>1.10.1</version>
</dependency>
从文件读取数据,输出到kafka
public static void main(String[] args) throws Exception {

    // 创建执行环境
    StreamExecutionEnvironment env = StreamExecutionEnvironment.getExecutionEnvironment();
    env.setParallelism(1);

    // 从文件读取数据
    DataStreamSource<String> inputStream = env.readTextFile("/home/lxj/workspace/Flink/src/main/resources/sensor.txt");

    DataStream<String> dataStream = inputStream.map(line -> {
        String[] fields = line.split(",");
        return new SensorReading(fields[0], new Long(fields[1]), new Double(fields[2])).toString();
    });

    dataStream.addSink(new FlinkKafkaProducer011<String>("hadoop113:9092", "first", new SimpleStringSchema()));


    // 执行
    env.execute();
}
启动kafka控制台消费者
[bd@hadoop113 flume]$ kafka-console-consumer.sh --bootstrap-server hadoop113:9092 --topic first
SensorReading{id='sensor_1', timestamp=1547718199, temperature=35.8}
SensorReading{id='sensor_6', timestamp=1547718201, temperature=15.4}
SensorReading{id='sensor_7', timestamp=1547718202, temperature=6.7}
SensorReading{id='sensor_10', timestamp=1547718205, temperature=38.1}
SensorReading{id='sensor_1', timestamp=1547710000, temperature=36.8}
SensorReading{id='sensor_1', timestamp=1547719999, temperature=34.8}
SensorReading{id='sensor_1', timestamp=1547715555, temperature=37.8}
从kafka控制台生产者生产数据,控制台消费者消费数据
public static void main(String[] args) throws Exception {

    // 创建执行环境
    StreamExecutionEnvironment env = StreamExecutionEnvironment.getExecutionEnvironment();
    env.setParallelism(1);

    // 从kafka读取数据
    // 创建kafka配置对象
    Properties properties = new Properties();
    properties.setProperty(ProducerConfig.BOOTSTRAP_SERVERS_CONFIG, "hadoop113:9092");
    properties.setProperty(ConsumerConfig.GROUP_ID_CONFIG, "consumer-group");
    properties.setProperty(ProducerConfig.KEY_SERIALIZER_CLASS_CONFIG,
                           "org.apache.kafka.common.serialization.StringDeserializer");
    properties.setProperty(ProducerConfig.VALUE_SERIALIZER_CLASS_CONFIG,
                           "org.apache.kafka.common.serialization.StringDeserializer");
    properties.setProperty(ConsumerConfig.AUTO_OFFSET_RESET_CONFIG, "latest");


    // 从Kafka读取数据
    DataStreamSource<String> sensor = env.addSource(new FlinkKafkaConsumer010<String>("sensor", new SimpleStringSchema(), properties));
    DataStream<String> dataStream = sensor.map(line -> {
        String[] fields = line.split(",");
        return new SensorReading(fields[0], new Long(fields[1]), new Double(fields[2])).toString();
    });

    dataStream.addSink(new FlinkKafkaProducer011<String>("hadoop113:9092", "first", new SimpleStringSchema()));


    // 执行
    env.execute();
}
[bd@hadoop113 ~]$ kafka-console-producer.sh --broker-list localhost:9092 --topic sensor
>sensor_1,1547715555,37.8
>sensor_10,1547718205,38.1

[bd@hadoop113 flume]$ kafka-console-consumer.sh --bootstrap-server hadoop113:9092 --topic first
SensorReading{id='sensor_1', timestamp=1547715555, temperature=37.8}
SensorReading{id='sensor_10', timestamp=1547718205, temperature=38.1}
Redis
<dependency>
    <groupId>org.apache.bahir</groupId>
    <artifactId>flink-connector-redis_2.11</artifactId>
    <version>1.0</version>
</dependency>
定义一个 redis 的 mapper 类,用于定义保存到 redis 时调用的命令
public static class MyRedisMapper implements RedisMapper<SensorReading> {

    // 定义保存数据到redis的命令,存成hash表,hset sensor_temp id temperature
    @Override
    public RedisCommandDescription getCommandDescription() {
        return new RedisCommandDescription(RedisCommand.HSET, "sensor_temp");
    }

    @Override
    public String getKeyFromData(SensorReading sensorReading) {
        return sensorReading.getId();
    }

    @Override
    public String getValueFromData(SensorReading sensorReading) {
        return sensorReading.getTemperature().toString();
    }
}
public static void main(String[] args) throws Exception {

    // 创建执行环境
    StreamExecutionEnvironment env = StreamExecutionEnvironment.getExecutionEnvironment();
    env.setParallelism(1);

    // 从文件读取数据
    DataStreamSource<String> inputStream = env.readTextFile("/home/lxj/workspace/Flink/src/main/resources/sensor.txt");

    DataStream<SensorReading> dataStream = inputStream.map(line -> {
        String[] fields = line.split(",");
        return new SensorReading(fields[0], new Long(fields[1]), new Double(fields[2]));
    });

    // 定义jedis连接配置
    FlinkJedisPoolConfig config = new FlinkJedisPoolConfig.Builder()
        .setHost("10.10.10.38")
        .setPort(6379)
        .build();

    dataStream.addSink(new RedisSink<>(config, new MyRedisMapper()));

    // 结果
    //        127.0.0.1:6379> HGETALL sensor_temp
    //        1) "sensor_1"
    //        2) "37.8"
    //        3) "sensor_6"
    //        4) "15.4"
    //        5) "sensor_7"
    //        6) "6.7"
    //        7) "sensor_10"
    //        8) "38.1"


    // 执行
    env.execute();
}
Elasticsearch
Elasticsearch 是一个实时的分布式存储、搜索、分析的引擎。
关键字:
- 实时
- 分布式
- 搜索
- 分析
我们在日常开发中,数据库也能做到(实时、存储、搜索、分析)。相对于数据库,Elasticsearch的强大之处就是可以模糊查询。那么数据库也能进行模式搜索:
select * from user where name like '%cao%'
就可以把cao相关的内容搜索出来了。但是要明白的是:name like %cao%这类的查询是不走索引的,不走索引意味着:只要数据库的量很大(1亿条),查询肯定会是秒级别的
而且,即便给你从数据库根据模糊匹配查出相应的记录了,那往往会返回大量的数据,往往需要的数据量并没有这么多,可能50条记录就足够了。
还有一个就是:用户输入的内容往往并没有这么的精确,比如从Google输入ElastcSeach(打错字),但是Google还是能估算我想输入的是Elasticsearch。
而Elasticsearch是专门做搜索的,就是为了解决上面所讲的问题而生的,换句话说:
- Elasticsearch对模糊搜索非常擅长(搜索速度很快)
- 从Elasticsearch搜索到的数据可以根据评分过滤掉大部分的,只要返回评分高的给用户就好了(原生就支持排序)
- 没有那么准确的关键字也能搜出相关的结果(能匹配有相关性的记录)
<dependency>
    <groupId>org.apache.flink</groupId>
    <artifactId>flink-connector-elasticsearch6_2.12</artifactId>
    <version>1.10.1</version>
</dependency>
在主函数中调用:
// es 的 httpHosts 配置
ArrayList<HttpHost> httpHosts = new ArrayList<>();

httpHosts.add(new HttpHost("localhost", 9200));

dataStream.addSink( new ElasticsearchSink.Builder<SensorReading>(httpHosts, new MyEsSinkFunction()).build());
ElasitcsearchSinkFunction 的实现:
public static class MyEsSinkFunction implements
    ElasticsearchSinkFunction<SensorReading>{
    @Override
    public void process(SensorReading element, RuntimeContext ctx, RequestIndexer
                        indexer) {
        HashMap<String, String> dataSource = new HashMap<>();
        dataSource.put("id", element.getId());
        dataSource.put("ts", element.getTimestamp().toString());
        dataSource.put("temp", element.getTemperature().toString());
        IndexRequest indexRequest = Requests.indexRequest()
            .index("sensor")
            .type("readingData")
            .source(dataSource);
        indexer.add(indexRequest);
    }
}
JDBC 自定义 sink
<dependency>
    <groupId>mysql</groupId>
    <artifactId>mysql-connector-java</artifactId>
    <version>5.1.44</version>
</dependency>
创建好数据库flinktest和数据表sensor_temp
public static void main(String[] args) throws Exception {

    // 创建执行环境
    StreamExecutionEnvironment env = StreamExecutionEnvironment.getExecutionEnvironment();
    env.setParallelism(1);

    // 从文件读取数据
    DataStreamSource<String> inputStream = env.readTextFile("/home/lxj/workspace/Flink/src/main/resources/sensor.txt");

    DataStream<SensorReading> dataStream = inputStream.map(line -> {
        String[] fields = line.split(",");
        return new SensorReading(fields[0], new Long(fields[1]), new Double(fields[2]));
    });


    dataStream.addSink(new MyJdbcSink());

    // 执行
    env.execute();
}

public static class MyJdbcSink extends RichSinkFunction<SensorReading> {

    Connection connection = null;
    PreparedStatement insertStmt = null;
    PreparedStatement updateStmt = null;

    @Override
    public void open(Configuration parameters) throws Exception {
        connection = DriverManager.getConnection("jdbc:mysql://10.10.10.38:13306/flinktest",
                                                 "root",
                                                 "123456");

        insertStmt = connection.prepareStatement("insert into sensor_temp (id, temp) value (?, ?)");
        updateStmt = connection.prepareStatement("update sensor_temp set temp = ? where id = ?");
    }

    // 每次来一条数据,调用连接执行sql
    @Override
    public void invoke(SensorReading value, Context context) throws Exception {

        // 直接执行更新语句,如果没有成功就执行插入
        updateStmt.setDouble(1, value.getTemperature());
        updateStmt.setString(2, value.getId());
        updateStmt.execute();

        if (updateStmt.getUpdateCount() == 0) {
            insertStmt.setString(1, value.getId());
            insertStmt.setDouble(2, value.getTemperature());
            insertStmt.execute();
        }

    }

    @Override
    public void close() throws Exception {

        connection.close();
        updateStmt.close();
        insertStmt.close();
    }
}
mysql> select * from sensor_temp;
+-----------+------+
| id        | temp |
+-----------+------+
| sensor_1  | 37.8 |
| sensor_10 | 38.1 |
| sensor_6  | 15.4 |
| sensor_7  |  6.7 |
+-----------+------+