文章目录
MyBatis-Plus简介和快速入门
一、简介(来自官网)
MyBatis-Plus,简称MP,是一个MyBatis的增强工具,在MyBatis的基础上只做增强不做修改,为简化开发、提高效率而生。
特性:
- 无侵入:只做增强不做改变,引入它不会对现有工程产生影响,如丝般顺滑
- 损耗小:启动即会自动注入基本 CURD,性能基本无损耗,直接面向对象操作
- 强大的 CRUD 操作:内置通用 Mapper、通用 Service,仅仅通过少量配置即可实现单表- 大部分 CRUD 操作,更有强大的条件构造器,满足各类使用需求
- 支持 Lambda 形式调用:通过 Lambda 表达式,方便的编写各类查询条件,无需再担心字段写错
- 支持主键自动生成:支持多达 4 种主键策略(内含分布式唯一 ID 生成器 - Sequence),可自由配置,完美解决主键问题
- 支持 ActiveRecord 模式:支持 ActiveRecord 形式调用,实体类只需继承 Model 类即可进行强大的 CRUD 操作
- 支持自定义全局通用操作:支持全局通用方法注入( Write once, use anywhere )
- 内置代码生成器:采用代码或者 Maven 插件可快速生成 Mapper 、 Model 、 Service 、 Controller 层代码,支持模板引擎,更有超多自定义配置等您来使用
- 内置分页插件:基于 MyBatis 物理分页,开发者无需关心具体操作,配置好插件之后,写分页等同于普通 List 查询
- 分页插件支持多种数据库:支持 MySQL、MariaDB、Oracle、DB2、H2、HSQL、SQLite、Postgre、SQLServer 等多种数据库
- 内置性能分析插件:可输出 SQL 语句以及其执行时间,建议开发测试时启用该功能,能快速揪出慢查询
- 内置全局拦截插件:提供全表 delete 、 update 操作智能分析阻断,也可自定义拦截规则,预防误操作
二、快速开始
步骤一、新建数据库表,写对应的JavaBean类。
首先我们还是使用我们之前Mybatis建的student表吧。(这里,四个属性的名称前面的s_被我又去掉了)
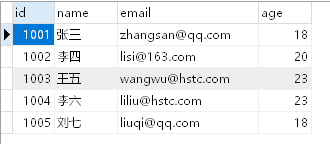
然后为我们的表格创建一个Bean。
package com.example.po;

public class Student {
    private Integer id;
    private String name;
    private String email;
    private Integer age;

    public Student() {
    }

    public Student(Integer id, String name, String email, Integer age) {
        this.id = id;
        this.name = name;
        this.email = email;
        this.age = age;
    }

    public Integer getId() {
        return id;
    }

    public void setId(Integer id) {
        this.id = id;
    }

    public String getName() {
        return name;
    }

    public void setName(String name) {
        this.name = name;
    }

    public String getEmail() {
        return email;
    }

    public void setEmail(String email) {
        this.email = email;
    }

    public Integer getAge() {
        return age;
    }

    public void setAge(Integer age) {
        this.age = age;
    }

    @Override
    public String toString() {
        return "Student{" +
                "id=" + id +
                ", name='" + name + '\'' +
                ", email='" + email + '\'' +
                ", age=" + age +
                '}';
    }
}
步骤二、添加依赖
mybatis和mybatis-plus会自动维护我们的mybatis 以及mybatis-spring相关的依赖
    <dependencies>
        <!--mybatisPlus-->
        <dependency>
            <groupId>com.baomidou</groupId>
            <artifactId>mybatis-plus</artifactId>
            <version>3.4.3</version>
        </dependency>
        <!--junit-->
        <dependency>
            <groupId>junit</groupId>
            <artifactId>junit</artifactId>
            <version>4.13.1</version>
            <scope>test</scope>
        </dependency>
        <!--log4j-->
        <dependency>
            <groupId>log4j</groupId>
            <artifactId>log4j</artifactId>
            <version>1.2.17</version>
        </dependency>
        <!--c3p0-->
        <dependency>
            <groupId>com.mchange</groupId>
            <artifactId>c3p0</artifactId>
            <version>0.9.5.2</version>
        </dependency>
        <!--数据库驱动-->
        <dependency>
            <groupId>mysql</groupId>
            <artifactId>mysql-connector-java</artifactId>
            <version>8.0.26</version>
        </dependency>
        <!--spring-->
        <dependency>
            <groupId>org.springframework</groupId>
            <artifactId>spring-context</artifactId>
            <version>5.3.9</version>
        </dependency>
        <dependency>
            <groupId>org.springframework</groupId>
            <artifactId>spring-orm</artifactId>
            <version>5.3.9</version>
        </dependency>
    </dependencies>
步骤三、写配置文件
mybatis的配置文件:
mybatis-config.xml
<?xml version="1.0" encoding="UTF-8" ?>
<!DOCTYPE configuration
        PUBLIC "-//mybatis.org//DTD Config 3.0//EN"
        "http://mybatis.org/dtd/mybatis-3-config.dtd">

<configuration>

</configuration>
log4j.xml日志
<?xml version="1.0" encoding="UTF-8"?>
<!DOCTYPE log4j:configuration PUBLIC "-//log4j/log4j Configuration//EN" "log4j.dtd">

<log4j:configuration xmlns:log4j="http://jakarta.apache.org/log4j/">

    <!-- 日志输出到控制台 -->
    <appender name="STDOUT" class="org.apache.log4j.ConsoleAppender">
        <!--编码格式-->
        <param name="Encoding" value="UTF-8"/>
        <!-- 日志输出格式 -->
        <layout class="org.apache.log4j.PatternLayout">
            <param name="ConversionPattern" value="[%p][%d{yyyy-MM-dd HH:mm:ss SSS}][%c]-[%m]%n"/>
        </layout>
    </appender>

    <logger name="java.sql">
        <level value ="debug"/>
    </logger>
    <logger name="org.apache.ibatis">
        <level value="info"/>
    </logger>

    <root>
        <level value="debug"/>
        <appender-ref ref="STDOUT"/>
    </root>
</log4j:configuration>
db.properties
jdbc.driver=com.mysql.cj.jdbc.Driver
jdbc.url=jdbc:mysql://localhost/mybatis?useSSL=false&serverTimezone=UTC
jdbc.username=root
jdbc.password=root
applicationContext.xml
<?xml version="1.0" encoding="UTF-8"?>
<beans xmlns="http://www.springframework.org/schema/beans"
       xmlns:xsi="http://www.w3.org/2001/XMLSchema-instance"
       xmlns:context="http://www.springframework.org/schema/context"
       xmlns:tx="http://www.springframework.org/schema/tx"
       xsi:schemaLocation="
       http://www.springframework.org/schema/beans
       http://www.springframework.org/schema/beans/spring-beans.xsd
       http://www.springframework.org/schema/context
       https://www.springframework.org/schema/context/spring-context.xsd
       http://www.springframework.org/schema/tx
       http://www.springframework.org/schema/tx/spring-tx.xsd">

    <!--数据源-->
    <context:property-placeholder location="classpath:db.properties"/>
    <bean id="dataSource" class="com.mchange.v2.c3p0.ComboPooledDataSource">
        <property name="driverClass" value="${jdbc.driver}"/>
        <property name="jdbcUrl" value="${jdbc.url}"/>
        <property name="user" value="${jdbc.username}"/>
        <property name="password" value="${jdbc.password}"/>
    </bean>

    <!--事务管理器-->
    <bean id="dataSourceTransactionManager" class="org.springframework.jdbc.datasource.DataSourceTransactionManager">
        <property name="dataSource" ref="dataSource"/>
    </bean>

    <!--基于注解的事务管理-->
    <tx:annotation-driven transaction-manager="dataSourceTransactionManager"/>

    <!--配置MyBatisPlus的MybatisSqlSessionFactoryBean-->
    <bean id="sqlSessionFactoryBean" class="com.baomidou.mybatisplus.extension.spring.MybatisSqlSessionFactoryBean">
        <!--数据源-->
        <property name="dataSource" ref="dataSource"/>
        <property name="configLocation" value="classpath:mybatis-config.xml"/>
        <!--别名处理-->
        <property name="typeAliasesPackage" value="com.example.po"/>
    </bean>

    <!--配置mybatis扫描mapper接口的路径-->
    <bean class="org.mybatis.spring.mapper.MapperScannerConfigurer">
        <property name="basePackage" value="com.example.dao"/>
    </bean>

</beans>
步骤四、集成MP(Mybatis-Plus,后边都直接简称MP)
MP的集成非常简单,对于Spring,我们仅仅需要把Mybatis自带的MyBatisSqlSessionFactory替换为MP自带的即可。也就是刚才applicationContext.xml文件中的这一段:
如果是Mybatis的话,那么class的值是org.mybatis.spring.SqlSessionFactoryBean

三、通用CRUD
准备完毕,现在我们可以开始进行我们的CRUD了。(开始爽了)
首先,说一下之前我们使用mybatis的做法吧:
步骤:
1、创建dao接口
2、写接口方法
3、创建mapper文件,并为每个接口方法写sql语句
4、在mybatis的主配置文件注册mapper
然后我们再说一下MP的做法:
步骤:
1、创建dao接口,继承BaseMapper<T>接口,<T>传入他对应的实体类。
就没了?!!!没错,就这一部,不需要写我们的xml文件。MP已经帮我们全都写好了。我们直接写测试代码:
3.1 insert(插入操作)
package com.example.text;

import com.example.dao.StudentDao;
import com.example.po.Student;
import org.junit.Test;
import org.springframework.context.ApplicationContext;
import org.springframework.context.support.ClassPathXmlApplicationContext;

public class MyTest {
    private ApplicationContext context = new ClassPathXmlApplicationContext("applicationContext.xml");
    private StudentDao studentDao = context.getBean("studentDao",StudentDao.class);

    //通用插入操作
    @Test
    public void testInsert(){
        //初始化Student
        Student student = new Student(null,"林八","linba@163.com",23);
        int num = studentDao.insert(student);
        System.out.println("成功添加"+num+"条记录");
    }
}
执行后,看我们的数据库(添加成功)
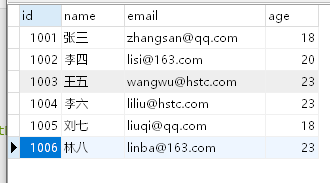
插入后,我们甚至可以直接获取自增的id值如下:
    @Test
    public void testInsert(){
        //初始化Student
        Student student = new Student(null,"张飞","liubei@163.com",30);
        int num = studentDao.insert(student);
        System.out.println("成功添加"+num+"条记录");
        //插入操作执行后,我们可以获取自增的主键值
        int id = student.getId();
        System.out.println("插入的主键值为:"+id);
    }
数据库:

控制台:

3.2 updateById(更新操作)
直接传入一个Student对象即可。(除id值外,其他值都可为空,为空的字段不会出现在sql语句中)
直接写测试方法:
    //通用更新操作
    @Test
    public void testUpdateById(){
        //初始化Student
        Student student = new Student(1004,"关羽","guanyu@qq.com",29);
        int result = studentDao.updateById(student);
        System.out.println("成功修改"+result+"条记录");
    }
数据库:

3.3 查询操作——各种select
- 通过id查询:selectById
    @Test
    public void testSelectById(){
        Student student = studentDao.selectById(1007);
        System.out.println(student);
    }
显示:

- 使用and查询单条记录:selectOne(返回复数记录的话会报错)
    @Test
    public void testSelectOne(){
    	//写个匿名类,设置我们要查询的组合条件的实体类
        Wrapper<Student> stu = new Wrapper<Student>() {
            @Override
            public Student getEntity() {
                return new Student(null,"关羽",null,29);
            }

            @Override
            public MergeSegments getExpression() {
                return null;
            }

            @Override
            public void clear() {

            }

            @Override
            public String getSqlSegment() {
                return null;
            }
        };

        Student student = studentDao.selectOne(stu);
        System.out.println(student);
    }
结果:

- 使用in通过id值查询多条记录(selectBatchIds)
    @Test
    public void testSelectBatchIds(){
        List<Integer> ids = new ArrayList<>();
        ids.add(1001);
        ids.add(1002);
        List<Student> students = studentDao.selectBatchIds(ids);
        for (Student stu:students){
            System.out.println(stu);
        }
    }
显示:

- 传入Map通过and查询若干条数据:selectByMap
    @Test
    public void testSelectByMap(){
        Map<String,Object> map = new HashMap<>();
        //map的键必须跟表中的列名相同
        map.put("s_name","张飞");
        map.put("s_age",28);
        List<Student> students = studentDao.selectByMap(map);
        for (Student stu:students){
            System.out.println(stu);
        }
    }
结果:

3.4 删除操作——各种delete
- 通过id删除记录:deleteById
- 通过多个id删除多条记录:deleteBatchIds
- 通过and组合条件删除记录:deleteByMap
    @Test
    public void testDeleteById(){
        int result = studentDao.deleteById(1001);
        System.out.println("成功删除"+result+"条记录");
    }

    @Test
    public void testDeleteBatchIds(){
        List<Integer> ids = new ArrayList<>();
        ids.add(1002);
        ids.add(1003);
        int result = studentDao.deleteBatchIds(ids);
        System.out.println("成功删除"+result+"条记录");
    }

    @Test
    public void testDeleteByMap(){
        Map<String,Object> map = new HashMap<>();
        map.put("s_id",1005);
        map.put("s_name","刘七");
        int result = studentDao.deleteByMap(map);
        System.out.println("成功删除"+result+"条记录");
    }
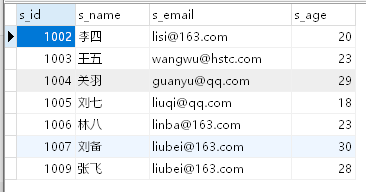
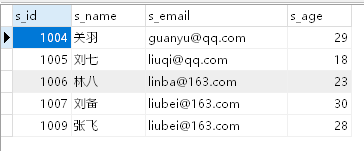
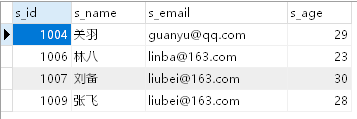
依次执行上面的方法,控制台和数据库显示:



附加1:如果表名或者表中属性的名称与我们实体类的名称不同解决方法
假如现在,我们的表名叫mp_student
属性名分别叫s_id,s_name,s_email,s_age。
那么,我们就要在实体类
1、用@TableName对实体类进行标注
2、用@IdName对主键进行标注
3、用@TableField对非主键进行标注
如下:
package com.example.po;

import com.baomidou.mybatisplus.annotation.IdType;
import com.baomidou.mybatisplus.annotation.TableField;
import com.baomidou.mybatisplus.annotation.TableId;
import com.baomidou.mybatisplus.annotation.TableName;

@TableName(value = "mp_student")
public class Student {
    /*
    *   TableId标注这个是主键
    *   value值告诉MP这个主键在表中的属性名(相同其实也可以省略不写)
    *   type值有以下几个,分别表示:
    *   AUTO	数据库ID自增
    *   NONE	无状态,该类型为未设置主键类型(注解里等于跟随全局,全局里约等于 INPUT)
    *   INPUT	insert前自行set主键值
    *   ASSIGN_ID	分配ID(主键类型为Number(Long和Integer)或String)(since 3.3.0),使用接口IdentifierGenerator的方法nextId(默认实现类为DefaultIdentifierGenerator雪花算法)
    *   ASSIGN_UUID	分配UUID,主键类型为String(since 3.3.0),使用接口IdentifierGenerator的方法nextUUID(默认default方法)
    * */
    @TableId(value = "s_id", type = IdType.AUTO)
    private Integer id;
    @TableField(value = "s_name")
    private String name;
    @TableField(value = "s_email")
    private String email;
    @TableField(value = "s_age")
    private Integer age;

    public Student() {
    }

    public Student(Integer id, String name, String email, Integer age) {
        this.id = id;
        this.name = name;
        this.email = email;
        this.age = age;
    }

    public Integer getId() {
        return id;
    }

    public void setId(Integer id) {
        this.id = id;
    }

    public String getName() {
        return name;
    }

    public void setName(String name) {
        this.name = name;
    }

    public String getEmail() {
        return email;
    }

    public void setEmail(String email) {
        this.email = email;
    }

    public Integer getAge() {
        return age;
    }

    public void setAge(Integer age) {
        this.age = age;
    }

    @Override
    public String toString() {
        return "Student{" +
                "id=" + id +
                ", name='" + name + '\'' +
                ", email='" + email + '\'' +
                ", age=" + age +
                '}';
    }
}
注意:设置主键的type=AUTO的话,必须要数据库中对主键设置自增,并设置自增的起始值才行。设置如下:
选择自己的数据库表,然后点击Design Table

选中主键,然后点击下面的Auto Increment(自增)

点击Option菜单项,设置自增的起始值。

顺便说下,TableName和TableField这两个注释,他们也有自己的其他属性值:
点击查看官方TableName属性值介绍
点击查看官方TableField属性值介绍