二八佳人体似酥,腰间仗剑斩愚夫。虽然不见人头落,暗里教君骨髓枯。
上一章简单介绍了SpringBoot整合Redis_Jedis版(二十),如果没有看过,请观看上一章
一. SpringCache
一.一 SpringCache 的出现
在SpringBoot 整合 Redis 时,无论是使用 Lettuce 还是使用 Jedis 连接池, 在查询单个对象,查询全部对象的时候,都是我们自己手动进行判断缓存的信息。
SpringBoot 使用 Lettuce 连接池时:
 @Override
    public User findById(int id) {
        log.info("先从缓存中查询用户编号为{} 是否存在",id);
        User user=redisUtil.get(KEY_PRE+id);
        if(user!=null){
            log.info(">>>>>>>>>>使用的是缓存中的数据");
            return user;
        }
        log.info(">>>>>>>>>>>从数据库中查询,并放置到缓存中");
        user= userMapper.findById(id);
        redisUtil.set(KEY_PRE+id,user);
        return user;
    }
    @Override
    public List<User> findAll() {
        log.info("先从缓存中查询用户列表是否存在");
        List<User> userList= (List<User>) redisUtil.range(KEY_PRE+"ALL");
        if(!CollectionUtils.isEmpty(userList)){
            log.info(">>>>>>>>>>使用的是缓存中的数据");
            return userList;
        }
        log.info(">>>>>>>>>>>从数据库中查询,并放置到缓存中");
        userList= userMapper.findAll();
        redisUtil.leftPushAll(KEY_PRE+"ALL",userList);
        return userList;
    }
SpringBoot 使用 Jedis 连接池时:
 @Override
    public User findById(int id) {
        log.info("先从缓存中查询用户编号为{} 是否存在",id);
        User user=BeanConvertUtil.stringToBean(redisUtil.get(KEY_PRE+id,redisDB),User.class);
        if(user!=null){
            log.info(">>>>>>>>>>使用的是缓存中的数据");
            return user;
        }
        log.info(">>>>>>>>>>>从数据库中查询,并放置到缓存中");
        user= userMapper.findById(id);
        redisUtil.set(KEY_PRE+id,BeanConvertUtil.beanToString(user),redisDB);
        return user;
    }
    @Override
    public List<User> findAll() {
        log.info("先从缓存中查询用户列表是否存在");
        List<String> userStringList= (List<String>) redisUtil.lrange(KEY_PRE+"ALL",0,-1,redisDB);
        List<User> userList=new ArrayList<>();
        if(!CollectionUtils.isEmpty(userStringList)){
            log.info(">>>>>>>>>>使用的是缓存中的数据");
            for(String userString:userStringList){
                userList.add(BeanConvertUtil.stringToBean(userString,User.class));
            }
            return userList;
        }
        log.info(">>>>>>>>>>>从数据库中查询,并放置到缓存中");
        userList= userMapper.findAll();

        for(User user:userList){
            redisUtil.lpush(redisDB,KEY_PRE+"ALL",BeanConvertUtil.beanToString(user));
        }

        return userList;
    }
可以发现, 两个都需要开发者自己手动处理缓存的信息。
并且,如果缓存的工具不同,处理的方式也不同。
实际上,这些与业务是没有太大的联系的。
我们希望能够有一种方式,能够通过简单的配置+注解,达到以前原生的写法就完美了。
    @Override
    public User findById(int id) {
        return userMapper.findById(id);
    }
    @Override
    public List<User> findAll() {
        return userMapper.findAll();
    }
在这两个方法上,添加某个注解, 能够达到 有缓存走缓存,没有缓存走数据库查询,
然后将查询结果放置在缓存中,下一次查询时走缓存的结果,
并且与缓存的实现方式无关 (无论是 Lettuce 还是 Jedis)
有这么一种技术, 叫做SpringCache
一.二 SpringCache 的简单使用
按照 SpringBoot_Redis 项目,创建 SpringBoot_Cache 项目。
Redis服务器打开,使用的仍然是 database 15 数据库。
采用的是 springboot 2.2.13 版本。
目前数据库表 user 里面有三条记录
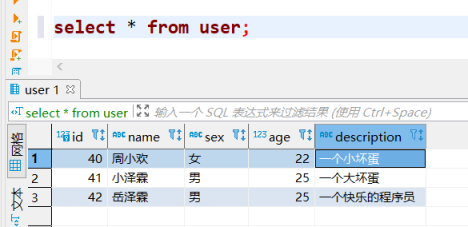
一.二.一 pom.xml 添加依赖
        <!--依赖 data-redis的依赖-->
        <dependency>
            <groupId>org.springframework.boot</groupId>
            <artifactId>spring-boot-starter-data-redis</artifactId>
        </dependency>
        <!--不能忘记这个依赖-->
        <dependency>
            <groupId>org.apache.commons</groupId>
            <artifactId>commons-pool2</artifactId>
        </dependency>
        <dependency>
            <groupId>org.springframework.boot</groupId>
            <artifactId>spring-boot-starter-cache</artifactId>
        </dependency>
        <!--添加cache的依赖信息-->
一.二.二 application.yml 进行配置
与redis整合时一样,没有改变。
# 引入 数据库的相关配置
spring:
  datasource:
    driver-class-name: com.mysql.cj.jdbc.Driver
    url: jdbc:mysql://localhost:3306/springboot?serverTimezone=GMT%2B8&useUnicode=true&characterEncoding=UTF-8&useSSL=false&allowMultiQueries=true
    username: root
    password: abc123
  # 配置Redis的使用
  redis:
    database: 15 # 所使用的数据库  默认是0
    host: 127.0.0.1  #所使用的redis的主机地址
    port: 6379  # 端口号  默认是 6379
    password: zk123 # 密码
    timeout: 5000 # 超时时间  5000毫秒
    # 连接池 lettuce 的配置
    lettuce:
      pool:
        max-active: 100
        min-idle: 10
        max-wait: 100000
#整合mybatis时使用的
mybatis:
  #包别名
  type-aliases-package: top.yueshushu.learn.pojo
  #映射文件路径
  mapper-locations: classpath:mybatis/mapper/**/*.xml
  configuration:
    #日志信息
    log-impl: org.apache.ibatis.logging.stdout.StdOutImpl
一.二.三 启动类上 添加 @EnableCaching 注解
需要在启动类上 添加 @EnableCaching 注解, 开启缓存。
@MapperScan("top.yueshushu.learn.mapper")
@SpringBootApplication
//开启缓存
@EnableCaching
public class RedisApplication {
    public static void main(String[] args) {
        SpringApplication.run(RedisApplication.class,args);
        System.out.println("运行 Redis Cache缓存");
    }
}
一.二.四 不使用缓存时处理
一.二.四.一 查询 findById 实现
    @Override
    public User findById(int id) {
        return userMapper.findById(id);
    }
一.二.四.二 查询测试
  @Test
    public void findByIdTest(){
        User user=userService.findById(40); //id随时更换
        log.info(user);
    }
运行测试方法 findByIdTest()
第一次查询

发现查询了数据库
第二次查询

依然走的是数据库查询.
这是以前的常规的写法。
一.二.五 使用SpringCache 缓存时处理
一.二.五.一 查询 findById 实现
    @Override
    // 指定了参数为 id:  变成了:  value::id 的key值
    @Cacheable(value=KEY_PRE,key = "#id")
    public User findById(int id) {
        return userMapper.findById(id);
    }
在方法上 添加了一个注解 @Cacheable ,补充属性信息
value 表示使用的缓存组, key 表示缓存的值。
一.二.五.二 查询测试
  @Test
    public void findByIdTest(){
        User user=userService.findById(40); //id随时更换
        log.info(user);
    }
运行测试方法 findByIdTest()
第一次查询

发现查询了数据库
第二次查询

发现,并没有查询数据库,走的是缓存里面的数据。
查看 Redis客户端
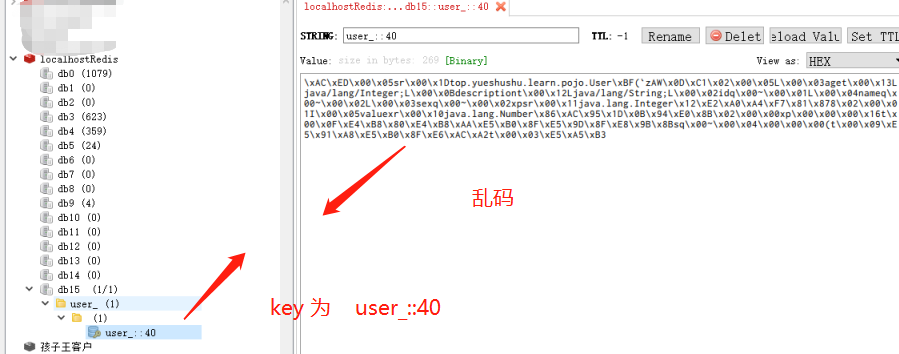
发现存储的数据乱码了.
一.二.六 处理存储信息乱码问题
除了 RedisConfig.java 配置之外 ,再添加一个 CacheConfig.java 的配置信息
package top.yueshushu.learn.config;

import com.fasterxml.jackson.annotation.JsonAutoDetect;
import com.fasterxml.jackson.annotation.PropertyAccessor;
import com.fasterxml.jackson.databind.ObjectMapper;
import lombok.extern.log4j.Log4j2;
import lombok.extern.slf4j.Slf4j;
import org.springframework.cache.CacheManager;
import org.springframework.cache.annotation.CachingConfigurerSupport;
import org.springframework.cache.interceptor.*;
import org.springframework.context.annotation.Bean;
import org.springframework.context.annotation.Configuration;
import org.springframework.data.redis.cache.RedisCacheConfiguration;
import org.springframework.data.redis.cache.RedisCacheManager;
import org.springframework.data.redis.cache.RedisCacheWriter;
import org.springframework.data.redis.connection.RedisConnectionFactory;
import org.springframework.data.redis.serializer.Jackson2JsonRedisSerializer;
import org.springframework.data.redis.serializer.RedisSerializationContext;

import javax.annotation.Resource;
import java.time.Duration;
import java.util.HashMap;
import java.util.Map;

/**
 * @author :zk_yjl
 * @description:Cache的缓存配置信息,可以解决乱码问题
 * @date :2021/09/23 17:09
 */
@Log4j2
@Configuration
public class CacheConfig extends CachingConfigurerSupport {

    @Resource
    private RedisConnectionFactory factory;

    /**
     * 自定义生成redis-key
     *
     * @return
     */
    @Override
    @Bean
    public KeyGenerator keyGenerator() {
        return (o, method, objects) -> {
            StringBuilder sb = new StringBuilder();
            sb.append(o.getClass().getName()).append(".");
            sb.append(method.getName()).append(".");
            for (Object obj : objects) {
                sb.append(obj.toString());
            }
            log.info("keyGenerator=" + sb.toString());
            return sb.toString();
        };
    }

    @Bean
    @Override
    public CacheResolver cacheResolver() {
        return new SimpleCacheResolver(cacheManager());
    }

    @Bean
    @Override
    public CacheErrorHandler errorHandler() {
        // 用于捕获从Cache中进行CRUD时的异常的回调处理器。
        return new SimpleCacheErrorHandler();
    }

    @Bean
    @Override
    public CacheManager cacheManager() {
        return new RedisCacheManager(
                RedisCacheWriter.nonLockingRedisCacheWriter(factory),
                this.getRedisCacheConfigurationWithTtl(30*60), // 默认策略,未配置的 key 会使用这个
                this.getRedisCacheConfigurationMap() // 指定 key 策略
        );
    }

    private Map<String, RedisCacheConfiguration> getRedisCacheConfigurationMap() {
        Map<String, RedisCacheConfiguration> redisCacheConfigurationMap = new HashMap<>();
        //DayCache和SecondsCache进行过期时间配置translates缓存丢弃改为了redis
        redisCacheConfigurationMap.put("translates", this.getRedisCacheConfigurationWithTtl(12*60*60));
        redisCacheConfigurationMap.put("strategies", this.getRedisCacheConfigurationWithTtl(60));
        return redisCacheConfigurationMap;
    }

    private RedisCacheConfiguration getRedisCacheConfigurationWithTtl(Integer seconds) {
        Jackson2JsonRedisSerializer<Object> jackson2JsonRedisSerializer = new Jackson2JsonRedisSerializer<>(Object.class);
        ObjectMapper om = new ObjectMapper();
        om.setVisibility(PropertyAccessor.ALL, JsonAutoDetect.Visibility.ANY);
        om.enableDefaultTyping(ObjectMapper.DefaultTyping.NON_FINAL);
        jackson2JsonRedisSerializer.setObjectMapper(om);

        RedisCacheConfiguration redisCacheConfiguration = RedisCacheConfiguration.defaultCacheConfig();
        redisCacheConfiguration = redisCacheConfiguration.serializeValuesWith(
                RedisSerializationContext
                        .SerializationPair
                        .fromSerializer(jackson2JsonRedisSerializer)
        ).entryTtl(Duration.ofSeconds(seconds));

        return redisCacheConfiguration;
    }

}
重新运行测试 (此时缓存信息并没有清空)

出现了异常.
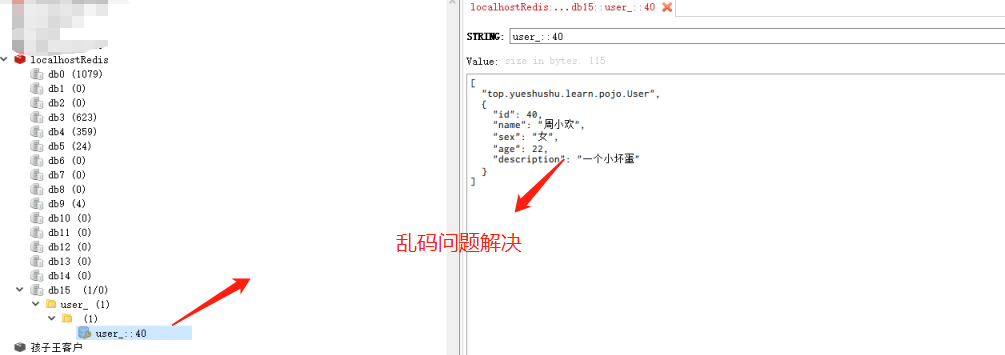
将缓存信息 key 清空后再执行, 运行是成功的,
从数据库里面查询, 将查询结果放置到Redis缓存里面,并且缓存信息正常展示。
二. Spring Cache 的概念
参考文章: https://www.cnblogs.com/morganlin/p/12000223.html (转载很多,不知道原版是哪一个)
二.一 几个重要概念&缓存注解
| 名称 | 解释 |
|---|---|
| Cache | 缓存接口,定义缓存操作。实现有:RedisCache、EhCacheCache、ConcurrentMapCache等 |
| CacheManager | 缓存管理器,管理各种缓存(cache)组件 |
| @Cacheable | 主要针对方法配置,能够根据方法的请求参数对其进行缓存.不保证方法被调用 |
| @CacheEvict | 清空缓存 常用于删除 |
| @CachePut | 保证方法被调用,又希望结果被缓存。 与@Cacheable区别在于是否每次都会调用方法,常用于更新 |
| @EnableCaching | 开启基于注解的缓存 在启动类上进行配置 |
| keyGenerator | 缓存数据时key生成策略 |
| serialize | 缓存数据时value序列化策略 |
| @CacheConfig | 统一配置本类的缓存注解的属性 |
| @Caching | 同一个方法,操作多个缓存时使用 |
二.二 @Cacheable/@CachePut/@CacheEvict 主要的参数
| 名称 | 解释 |
|---|---|
| value | 缓存的名称,在 spring 配置文件中定义,必须指定至少一个 例如: @Cacheable(value=”mycache”) 或者 @Cacheable(value={”cache1”,”cache2”} |
| key | 缓存的 key,可以为空,如果指定要按照 SpEL 表达式编写, 如果不指定,则缺省按照方法的所有参数进行组合 例如: @Cacheable(value=”testcache”,key=”#id”) |
| condition | 缓存的条件,可以为空,使用 SpEL 编写,返回 true 或者 false, 只有为 true 才进行缓存/清除缓存 例如:@Cacheable(value=”testcache”,condition=”#userName.length()>2”) |
| unless | 否定缓存。当条件结果为TRUE时,就不会缓存。 @Cacheable(value=”testcache”,unless=”#userName.length()>2”) |
| allEntries (@CacheEvict ) | 是否清空所有缓存内容,缺省为 false,如果指定为 true, 则方法调用后将立即清空所有缓存 例如: @CachEvict(value=”testcache”,allEntries=true) |
| beforeInvocation (@CacheEvict) | 是否在方法执行前就清空,缺省为 false,如果指定为 true, 则在方法还没有执行的时候就清空缓存,缺省情况下,如果方法 执行抛出异常,则不会清空缓存 例如: @CachEvict(value=”testcache”,beforeInvocation=true) |
二.三 SpEL上下文数据
Spring Cache提供了一些供我们使用的SpEL上下文数据,下表直接摘自Spring官方文档:
| 名称 | 位置 | 描述 | 示例 |
|---|---|---|---|
| methodName | root对象 | 当前被调用的方法名 | #root.methodname |
| method | root对象 | 当前被调用的方法 | #root.method.name |
| target | root对象 | 当前被调用的目标对象实例 | #root.target |
| targetClass | root对象 | 当前被调用的目标对象的类 | #root.targetClass |
| args | root对象 | 当前被调用的方法的参数列表 | #root.args[0] |
| caches | root对象 | 当前方法调用使用的缓存列表 | #root.caches[0].name |
| Argument Name | 执行上下文 | 当前被调用的方法的参数,如findArtisan(Artisan artisan),可以通过#artsian.id获得参数 | #artsian.id |
| result | 执行上下文 | 方法执行后的返回值(仅当方法执行后的判断有效,如 unless cacheEvict的beforeInvocation=false) | #result |
注意:
1.当我们要使用root对象的属性作为key时我们也可以将“#root”省略,因为Spring默认使用的就是root对象的属性。 如
@Cacheable(key = "targetClass + methodName +#p0")
2.使用方法参数时我们可以直接使用“#参数名”或者“#p参数index”。 如:
@Cacheable(value="users", key="#id")
@Cacheable(value="users", key="#p0")
SpEL提供了多种运算符
| 类型 | 运算符 |
|---|---|
| 关系 | <,>,<=,>=,==,!=,lt,gt,le,ge,eq,ne |
| 算术 | +,- ,* ,/,%,^ |
| 逻辑 | &&,||,!,and,or,not,between,instanceof |
| 条件 | ?: (ternary),?: (elvis) |
| 正则表达式 | matches |
| 其他类型 | ?.,?[…],![…],$[…] |
三. SpringCache 的注解用法
通常情况下, 传入的参数为 key, 返回的结果为 value
三.一 @Cacheable
    @Override
    // 指定了参数为 id:  变成了:  value::id 的key值
    @Cacheable(value=KEY_PRE,key = "#id")
    public User findById(int id) {
        return userMapper.findById(id);
    }
进行测试 传入的参数 是 40
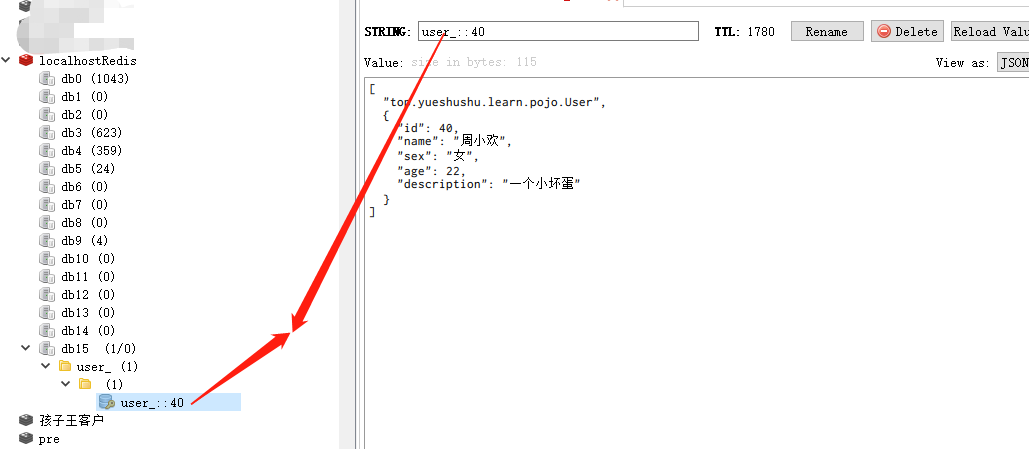
当参数有多个时
 @Cacheable(value = KEY_PRE)
    @Override
    public List<User> findByNameAndSex(String name, String sex) {
        return userMapper.findByNameAndSex(name,sex);
    }
不指定 key 时 (传入参数 name为 周小欢 sex为 女 时), 默认的生成的缓存 key为:
user_::top.yueshushu.learn.service.UserServiceImpl.findByNameAndSex.周小欢女
可以 通过 key 进行指定
 @Cacheable(value = KEY_PRE,key = "#name")
    @Override
    public List<User> findByNameAndSex(String name, String sex) {
        return userMapper.findByNameAndSex(name,sex);
    }
生成 后的 key 为: user_::周小欢
key值 可以进行拼接
@Cacheable(value = KEY_PRE,key = "#name+#sex")
生成后的key 为: user_::周小欢女
也可以使用 #p+参数序号 来指定
@Cacheable(value = KEY_PRE,key = "#p0+#p1")
生成的key 是: user_::周小欢女
也可以使用 SpEL 上下文进行处理
    @Override
    @Cacheable(value = KEY_PRE,key="#root.targetClass+#root.methodName+#id")
    public User findById(int id) {
        return userMapper.findById(id);
    }
传入参数是 40 的话,
生成的 key 是: user_::class top.yueshushu.learn.service.UserServiceImplfindById40
也可以指定 条件 condition 当条件满足时,才使用缓存。
传入 id 为 40, <30为false, 即条件为 false
@Cacheable(value = KEY_PRE,key="#root.targetClass+#root.methodName+#id",
condition ="#id<30" )
重新运行

发生会查询数据库,不走缓存。 即使Redis里面有这个 key
unless 表示条件不满足时,使用缓存
    @Override
    @Cacheable(value = KEY_PRE,key="#root.targetClass+#root.methodName+#id",
    unless ="#id<30" )
    public User findById(int id) {
        return userMapper.findById(id);
    }
三.二 @CachePut 缓存更新
常用于修改缓存里面的内容。
设置 id=40 的用户的缓存, key为: user_::40
    @Override
    @Cacheable(value = KEY_PRE,key="#id" )
    public User findById(int id) {
        return userMapper.findById(id);
    }
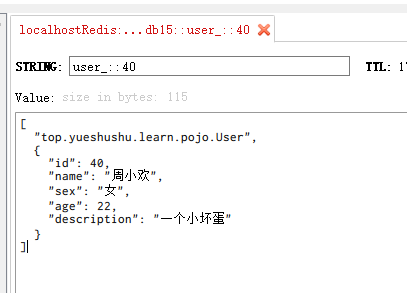
修改用户的信息, 注意, 这个修改方法有返回值 User, 并不是以前的 void
    @Override
    @CachePut(value = KEY_PRE,key = "#user.id")
    public User updateUser(User user) {
        userMapper.updateUser(user);
        //更新全部的缓存信息
        return user;
    }
将返回值 放置到缓存里面。
    @Test
    public void updateTest(){
       User user=userService.findById(40);  //id随时更换
       user.setName("我换新的名字了");
       userService.updateUser(user);
       log.info("修改成功{}",user);
       findByIdTest();;
    }
运行处理

发现缓存里面的内容 也同步进行更新了.
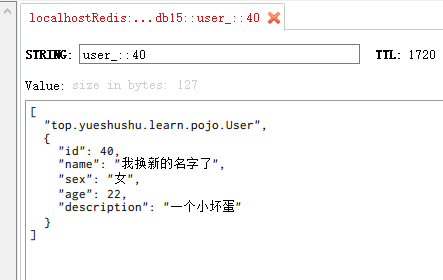
添加方法时
注意, 方法有返回值, 为 User userMapper.addUser() 方法,会自动回显 id.
所以 key值用的是 #result 结果里面的id
   @CachePut(value=KEY_PRE,key = "#result.id")
    @Override
    public User addUser(User user) {
        userMapper.addUser(user);
        return user;

    }
测试方法
    @Test
    public void insertTest(){
        //1. 构建对象
        User user=new User();
        user.setName("岳泽霖");
        user.setAge(26);
        user.setSex("男");
        user.setDescription("一个快乐的程序员");
        //2. 添加方法
        userService.addUser(user);
        log.info("添加成功,{}",user);
    }
查看控制台输出

新添加的 用户 id 为56
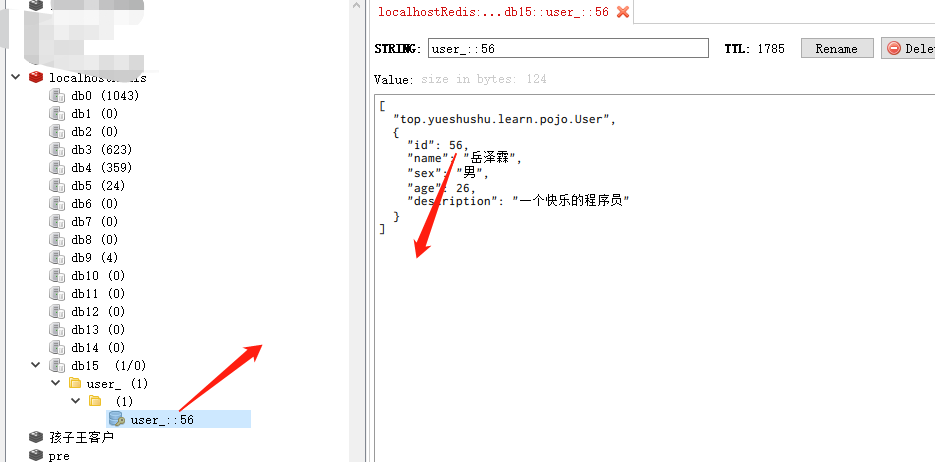
根据 id=56 查询的话, 也是直接从缓存里面获取数据.
三.三 @CacheEvict 清空缓存
根据id 清空缓存 返回值可以是 void
    @Override
    @CacheEvict(value = KEY_PRE,key = "#id")
    public void deleteUser(int id) {
        userMapper.deleteById(id);
    }
清空缓存
   @Test
    public void deleteTest(){
        userService.deleteUser(56); //id随时更换
    }
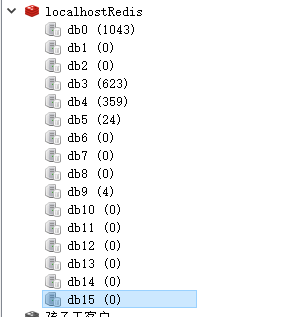
发现数据库里面没有 id=56 的记录了, redis缓存里面也没有 key为 user_:: 56 的记录了。
findById 中 id=40 和 findAll() 生成两个缓存

删除时, 使用 allEntries=true 属性
    @Override
    @CacheEvict(value = KEY_PRE,key = "#id",allEntries = true)
    public void deleteUser(int id) {
        userMapper.deleteById(id);
    }
运行删除 id=56(已经不存在这条记录信息了)

发现, 会清空当前数据库下所有的缓存信息。 所以,这个属性 allEntries 不要乱用。
三.四 @CacheConfig 在类上统一设置
我们发现, 我们设置缓存时, 每一个方法,无论是 findById , 还是 deleteUser, updateUser , 都使用了一个前缀 value=KEY_PRE, 这个值是 user_ 可不可以将这个前缀统一设置呢?
可以使用 @CacheConfig 注解在类上来简化缓存的开发.
@Service
@Log4j2
@CacheConfig(cacheNames ={"user_"})
public class UserServiceImpl implements UserService {
    ...
}
这样在 方法上,就可以省略掉 以前的 value 属性。
    @Override
    @Cacheable(key="#id" )
    public User findById(int id) {
        return userMapper.findById(id);
    }
    @Override
    @Cacheable(key = "#root.targetClass+#root.methodName")
    public List<User> findAll() {
        return userMapper.findAll();
    }
    @Cacheable(key = "#root.targetClass+#root.methodName")
    @Override
    public List<User> findByNameAndSex(String name, String sex) {
        return userMapper.findByNameAndSex(name,sex);
    }

与以前是相同的效果。
可以一个实体类,设置一个相应的前缀信息。
三.五 @Caching 多注解组合
@Target({ElementType.TYPE, ElementType.METHOD})
@Retention(RetentionPolicy.RUNTIME)
@Inherited
@Documented
public @interface Caching {

	Cacheable[] cacheable() default {};

	CachePut[] put() default {};

	CacheEvict[] evict() default {};

}
里面包含了三个常用的注解
    @Caching(
            cacheable = {
                    @Cacheable(key = "#name"),  // 放置缓存到 name
                    @Cacheable(key="#sex")     // 放置缓存到 sex , id的缓存用  put更新
            },
            put = {
                    @CachePut(key="#id")    //同时更新 id缓存
            }
    )
    @Override
    public List<User> findByNameAndSexAndId(String name, String sex, Integer id) {
        return userMapper.findByNameAndSexAndId(name,sex,id);
    }
会同时将查询的信息 放置到 name 属性的缓存, sex属性的缓存里面, 同时更新 id属性的缓存信息。
测试类
    @Test
    public void findNameAndSexAndIdTest(){
        log.info(">>>>>>>>目前数据库中存在的用户信息:");
        List<User> userList=userService.findByNameAndSexAndId("欢欢","女",40);
        userList.forEach(n->log.info(n));
    }
查看缓存的信息
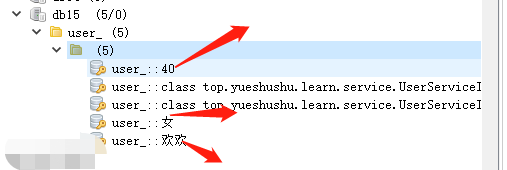
这些就是 Spring Cache 的基本用法.
本章节的代码放置在 github 上:
https://github.com/yuejianli/springboot/tree/develop/SpringBoot_Cache
谢谢您的观看,如果喜欢,请关注我,再次感谢 !!!