前情提要
这篇是大体就是做整合shiro,在登陆的时候加入一些校验和拦截,
顺便把信息设置做出来,上篇篇幅太长就没把info.html写出来,
上篇中有部分使用Element UI ,下拉是select,之前使用Layui,
但是展示有问题,无奈采用Element的el-select,还有新增和修改的详情窗口,也是采用Element ui
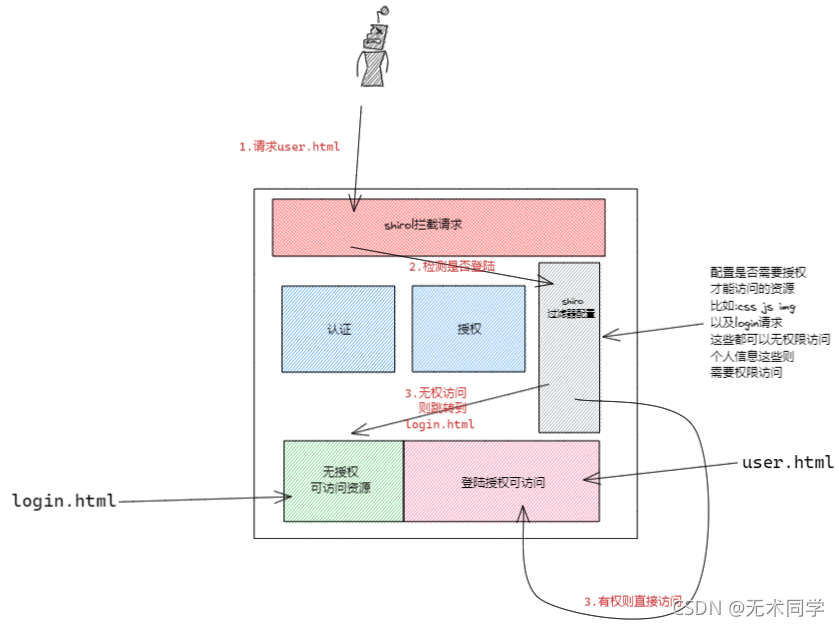
大体流程图
只是大概的描述了一下其中的流程,一些细节没有画出来,如果刚学shiro,
或者没学shiro,可以看一下这篇潮汐先生的一篇适合小白的Shiro教程

正文开始
添加基本资料
templates文件夹下新增info.html文件
<!DOCTYPE html>
<html>
	<head>
		<meta charset="utf-8">
		<link rel="stylesheet" type="text/css" href="css/layui-admin.css"/>
		<link rel="stylesheet" href="https://unpkg.com/layui@2.6.8/dist/css/layui.css">
		<script src="https://unpkg.com/layui@2.6.8/dist/layui.js"></script>
		<link rel="stylesheet" type="text/css" href="css/layui-admin.css"/>
		<script src="http://code.jquery.com/jquery-2.1.1.min.js"></script>
		 <script src="https://cdn.bootcss.com/vue/2.5.16/vue.min.js"></script>
		<link rel="stylesheet" href="https://unpkg.com/element-ui/lib/theme-chalk/index.css">
		<script src="https://unpkg.com/element-ui/lib/index.js"></script>
		<script src="https://unpkg.com/axios@0.21.1/dist/axios.min.js"></script>
	</head>
	<body>
		<div id="app">
			<div class="layui-bg-gray panel"  >
				<div class="layui-card panel-height" >
					<div class="layui-card-header " >
						我的资料
					</div>
					<div class="layui-card-body">
						<div class="layui-form" style="margin-top: 15px;" >
						  <div class="layui-form-item">
						    <label class="layui-form-label">昵称</label>
						    <div class="layui-input-inline">
						      <input type="text" name="title" required  lay-verify="required" placeholder="请输入昵称" v-model="user.niceName" autocomplete="off" class="layui-input">
						    </div>
						  </div>
						    <div class="layui-form-item">
						      <label class="layui-form-label">账号</label>
						      <div class="layui-input-inline">
						        <input type="text" name="title" required  lay-verify="required" placeholder="请输入账号"  v-model="user.username" autocomplete="off" class="layui-input">
						      </div>
						    </div>
						  <div class="layui-form-item">
						    <label class="layui-form-label">密码</label>
						    <div class="layui-input-inline">
						      <input type="password" name="password" required lay-verify="required" placeholder="请输入密码"  v-model="user.password" autocomplete="off" class="layui-input">
						    </div>
						  </div>
							<div class="layui-form-item">
								<label class="layui-form-label">性别 </label>
								<div class="layui-input-inline">
									<el-select  v-model="user.sex"  placeholder="请选择">
										<el-option value="" key="" label="请选择"></el-option>
										<el-option value="0" key="0" label="男"></el-option>
										<el-option value="1" key="1" label="女"></el-option>
									</el-select>
								</div>
							</div>
							<div class="layui-form-item">
								<label class="layui-form-label">头像 </label>
								<div class="layui-input-block">
									<el-upload class="avatar-uploader" show-file-list="false" action="upload/img" :on-success="success">
										<img v-if="user.avatar" :src="user.avatar" class="avatar">
									</el-upload>
								</div>
							</div>
						  <div class="layui-form-item">
						    <div class="layui-input-block">
						       <button type="button" class="layui-btn" @click="saveOrUpdate">修改资料</button>
							   <button type="button" class="layui-btn layui-btn-primary" @click="reload">重新填写</button>
						    </div>
						  </div>
						</div>

					</div>
				</div>
			</div>
		</div>
		<script src="js/info.js"></script>
	</body>
</html>
基本资料js
js文件夹下新建info.js
// 基本资料
var vm = new Vue({
    el:"#app",
    data:{
        user:{
            niceName:null,
            username:null,
            password:null,
            sex:"",
            avatar:""
        }
    },
    mounted(){
        axios({
            url:"sysUser/setting",
            methods: "get"
        }).then(res => {
            vm.user = res.data.data;
            vm.user.sex = vm.user.sex.toString();
        });
    },
    methods:{
        success(res,file){
            vm.user.avatar = res.data;
        },
        reload(){
            vm.user={
                niceName:null,
                username:null,
                password:null,
                sex:"0",
                avatar:""
            }
        },
        //保存或者更新
        saveOrUpdate(){
            axios({
                url:"sysUser/update",
                method: "post",
                headers:{
                    "Content-Type": "application/json"
                },
                data:JSON.stringify(vm.user)
            }).then(res =>{
                console.log(res);
            });
        },
    }
});
添加新接口
上一篇ifame中写了info.html只不过没有添加这个html文件
sysUserController 新增setting接口
id暂时设置为1,整合完之后会直接从shiro中获取用户id的
  @GetMapping("setting")
    public Result setting(){
        UserEntity userEntity = userService.getById(1);
        return Result.success(userEntity);
    }
启动看一下结果,没啥问题,目前登陆的账号昵称和头像都是写死的,之后全都会去做加载的!

开始整合Shiro
pom.xml
<!-- properties中的 -->
<shiro.version>1.5.3</shiro.version>

<dependency>
   <groupId>org.apache.shiro</groupId>
   <artifactId>shiro-spring-boot-starter</artifactId>
   <version>${shiro.version}</version>
</dependency>
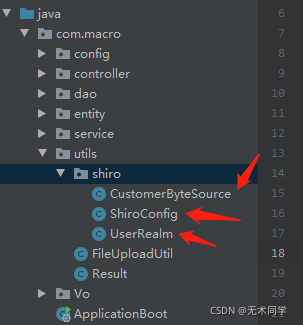
新建文件夹和文件

CustomerByteSource
这个是序列化+盐值salt加密,这是一个坑,坑了我好久,不要用自带的ByteSource.Util.bytes
要不然在后面的整合redis中,从redis获取认证信息会异常,
import org.apache.shiro.codec.Base64;
import org.apache.shiro.codec.CodecSupport;
import org.apache.shiro.codec.Hex;
import org.apache.shiro.util.ByteSource;
import java.io.File;
import java.io.InputStream;
import java.io.Serializable;
import java.util.Arrays;

//自定义salt实现  实现序列化接口

/**
 * 从redis中获取
 */
public class CustomerByteSource implements ByteSource, Serializable {

    private byte[] bytes;
    private String cachedHex;
    private String cachedBase64;

    public CustomerByteSource() {

    }

    public CustomerByteSource(byte[] bytes) {
        this.bytes = bytes;
    }

    public CustomerByteSource(char[] chars) {
        this.bytes = CodecSupport.toBytes(chars);
    }

    public CustomerByteSource(String string) {
        this.bytes = CodecSupport.toBytes(string);
    }

    public CustomerByteSource(ByteSource source) {
        this.bytes = source.getBytes();
    }

    public CustomerByteSource(File file) {
        this.bytes = (new BytesHelper()).getBytes(file);
    }

    public CustomerByteSource(InputStream stream) {
        this.bytes = (new BytesHelper()).getBytes(stream);
    }

    public static boolean isCompatible(Object o) {
        return o instanceof byte[] || o instanceof char[] || o instanceof String || o instanceof ByteSource || o instanceof File || o instanceof InputStream;
    }

    public byte[] getBytes() {
        return this.bytes;
    }

    public boolean isEmpty() {
        return this.bytes == null || this.bytes.length == 0;
    }

    public String toHex() {
        if (this.cachedHex == null) {
            this.cachedHex = Hex.encodeToString(this.getBytes());
        }

        return this.cachedHex;
    }

    public String toBase64() {
        if (this.cachedBase64 == null) {
            this.cachedBase64 = Base64.encodeToString(this.getBytes());
        }

        return this.cachedBase64;
    }

    public String toString() {
        return this.toBase64();
    }

    public int hashCode() {
        return this.bytes != null && this.bytes.length != 0 ? Arrays.hashCode(this.bytes) : 0;
    }

    public boolean equals(Object o) {
        if (o == this) {
            return true;
        } else if (o instanceof ByteSource) {
            ByteSource bs = (ByteSource) o;
            return Arrays.equals(this.getBytes(), bs.getBytes());
        } else {
            return false;
        }
    }

    private static final class BytesHelper extends CodecSupport {
        private BytesHelper() {
        }

        public byte[] getBytes(File file) {
            return this.toBytes(file);
        }

        public byte[] getBytes(InputStream stream) {
            return this.toBytes(stream);
        }
    }
}
UserRealm
后面会写关于这两个的详细信息
import com.macro.entity.UserEntity;
import com.macro.service.UserService;
import org.apache.shiro.authc.*;
import org.apache.shiro.authz.AuthorizationInfo;
import org.apache.shiro.realm.AuthorizingRealm;
import org.apache.shiro.subject.PrincipalCollection;
import org.apache.shiro.util.ByteSource;
import org.springframework.beans.factory.annotation.Autowired;

public class UserRealm extends AuthorizingRealm {

    @Autowired
    private UserService userService;


    /**
     * 授权
     * @param principalCollection
     * @return
     */
    @Override
    protected AuthorizationInfo doGetAuthorizationInfo(PrincipalCollection principalCollection) {
        System.out.println("这里是授权");
        return null;
    }

    /**
     * 认证
     * @param authenticationToken
     * @return
     * @throws AuthenticationException
     */
    @Override
    protected AuthenticationInfo doGetAuthenticationInfo(AuthenticationToken authenticationToken) throws AuthenticationException {
        System.out.println("这里是认证");
        UsernamePasswordToken token = (UsernamePasswordToken) authenticationToken;
        String username = token.getUsername();
        UserEntity user = userService.findByUserName(username);
        if(user == null){
            throw  new UnknownAccountException("账号或者密码错误");
        }
        /**
         * 1.用户名
         * 2.加密后密码
         * 3.随机盐值
         * 4.当前realm名称
         */
        SimpleAuthenticationInfo info = new SimpleAuthenticationInfo(user, user.getPassword(), ByteSource.Util.bytes("1234"), getName());
        return info;
    }
}
ShiroConfig
import org.apache.shiro.authc.credential.HashedCredentialsMatcher;
import org.apache.shiro.realm.Realm;
import org.apache.shiro.spring.web.ShiroFilterFactoryBean;
import org.apache.shiro.web.mgt.DefaultWebSecurityManager;
import org.springframework.context.annotation.Bean;
import org.springframework.context.annotation.Configuration;

import java.util.HashMap;
import java.util.Map;

//Shiro的核心配置类,用来整合shiro框架
@Configuration
public class ShiroConfig {

    /**
     *
     * @param defaultWebSecurityManager
     * @return
     */
    @Bean
    public ShiroFilterFactoryBean getShiroFilterFactoryBean(DefaultWebSecurityManager defaultWebSecurityManager){
        ShiroFilterFactoryBean shiroFilterFactoryBean = new ShiroFilterFactoryBean();

        //给filter设置安全管理器
        shiroFilterFactoryBean.setSecurityManager(defaultWebSecurityManager);

        //配置系统受限资源
        //配置系统公共资源
        Map<String,String> map = new HashMap<>();
        //无需权限访问
        map.put("/statics/**", "anon");
        map.put("/login.html", "anon");
        map.put("/user/login", "anon");
        map.put("/login", "anon");
        map.put("/favicon.ico", "anon");
        map.put("/css/**", "anon");
        map.put("/js/**", "anon");
        map.put("/layui.js", "anon");
        map.put("/common.js", "anon");
        //其余需要权限访问
        map.put("/**", "authc");
        //默认认证界面路径
        shiroFilterFactoryBean.setLoginUrl("/login");
        shiroFilterFactoryBean.setFilterChainDefinitionMap(map);

        return shiroFilterFactoryBean;
    }


    //2.创建安全管理器
    @Bean
    public DefaultWebSecurityManager getDefaultWebSecurityManager(Realm realm){
        DefaultWebSecurityManager defaultWebSecurityManager = new DefaultWebSecurityManager();
        //给安全管理器设置
        defaultWebSecurityManager.setRealm(realm);

        return defaultWebSecurityManager;
    }

    //3.将自定义的Realm 设置为Bean ,注入到2中
    @Bean
    public Realm getRealm(){
        UserRealm realm = new UserRealm();
        // 设置密码匹配器
        HashedCredentialsMatcher credentialsMatcher = new HashedCredentialsMatcher();
        // 设置加密方式
        credentialsMatcher.setHashAlgorithmName("MD5");
         // 设置散列次数
        credentialsMatcher.setHashIterations(1024);
        realm.setCredentialsMatcher(credentialsMatcher);
        return realm;
    }
}
修改LoginController类中的login
    @PostMapping("user/login")
    @ResponseBody
    public Result login(@RequestBody UserEntity user){
//            判断传过来是否为空
        if(user == null || StringUtil.isEmpty(user.getUsername()) || StringUtil.isEmpty(user.getPassword())){
            return Result.error("账号或者密码不能为空");
        }
        try{
            Subject subject = SecurityUtils.getSubject();
            UsernamePasswordToken token = new UsernamePasswordToken(user.getUsername(),user.getPassword());
            subject.login(token);
        }catch (UnknownAccountException e) {
            return Result.error(e.getMessage());
        }catch (IncorrectCredentialsException e) {
            return Result.error("账号或密码不正确");
        }catch (AuthenticationException e) {
            return Result.error("账户验证失败");
        }

        return Result.success();
    }
登陆流程
getShiroFilterFactoryBean过滤器配置中设置了/login anon,这个就是无授权即可访问,
map.put("/**", "authc");访问其他时都需要授权
shiroFilterFactoryBean.setLoginUrl("/login"); 这个是当访问授权,授权且无权限时,则会跳转到login接口,
login接口则会跳转到login.html
login中调用subject.login(token)会走到UserRealm中的认证器 doGetAuthenticationInfo,

UserRealm只是重写了AuthorizingRealm的认证和授权方式,并且
在ShiroConfig中的安全管理器 getDefaultWebSecurityManager,重新注入了Realm
而这个Realm则是自定义的Realm

在shiro文件夹下新建ShiroUtils
import com.macro.entity.UserEntity;
import org.apache.shiro.SecurityUtils;
import org.apache.shiro.crypto.hash.Md5Hash;

/**
 * shiro工具类
 */
public class ShiroUtils {

    /**
     * 获取当前登陆的用户信息
     * @return
     */
    public static UserEntity getUser(){
        UserEntity user = (UserEntity) SecurityUtils.getSubject().getPrincipal();
        return user;
    }

    /**
     * 获取当前登陆的用户id
     * @return
     */
    public static Integer getUserId(){
        UserEntity user = getUser();
        return user.getId();
    }

    /**
     * 盐值加密+hash次数
     * @param password
     * @return
     */
    public static String getMdPassWord(String password){
        Md5Hash md = new Md5Hash(password,"1234",1024);
        return md.toHex();
    }

    public static void main(String[] args) {
        System.out.println(getMdPassWord("123456"));
    }
}
记得重新去生成一个密码,要不然登陆不上去的
改造sysUserController
只有两个方法需要改造,add和update以及setting,用户信息直接从Subject中获取的,不知道的这是啥的可以看看文章最上面推荐的一篇文章
    @PostMapping("add")
    public Result add(@RequestBody UserEntity user){
        //新加,密码加密
        user.setPassword(ShiroUtils.getMdPassWord(user.getPassword()));
        boolean save = userService.save(user);
        if(save){
            return Result.success();
        }
        return Result.error("添加失败");
    }

	@PostMapping("update")
    public Result update(@RequestBody UserEntity user){
     	//新加,密码加密
        user.setPassword(ShiroUtils.getMdPassWord(user.getPassword()));
        boolean type = userService.updateById(user);
        return type ? Result.success() : Result.error("更新失败");
    }
   @GetMapping("setting")
    public Result setting(){
        //新改动,直接通过ShiroUtils.getUserId()获取用户id
        UserEntity userEntity = userService.getById(ShiroUtils.getUserId());
        return Result.success(userEntity);
    }
启动测试一下,密码错误提示和个人信息,都是正常的

修改登陆后展示的用户头像与名称
在index.html引入axios.js前面忘了引入了
<script src="https://unpkg.com/axios@0.21.1/dist/axios.min.js"></script>
修改index.html中名字和图片
<a style="color:black"><img :src="avatar" class="layui-nav-img">{{niceName}}</a>
只修改了这一小块

修改index.html中js部分
var vm =  new Vue({
        el: '#rapp',
        data: {
            main:"./main.html",
            val:"",
            niceName:"",
            avatar:""
        },
        mounted(){
            this.info();
        },
        methods:{
            info() {
                axios({
                    url: "sysUser/setting",
                    methods: "get"
                }).then(res => {
                    vm.niceName = res.data.data.niceName;
                    vm.avatar = res.data.data.avatar;
                });
            },
            logout(){
                window.location = "/logout"
            }
        },
        update:function(){
            console.log("###");
        }
    });
这几块都是他添加部分

效果如下,没啥问题:

源码
在公众号内发送后台即可获取源码和数据库
