一,准备工作
1.创建配置中心
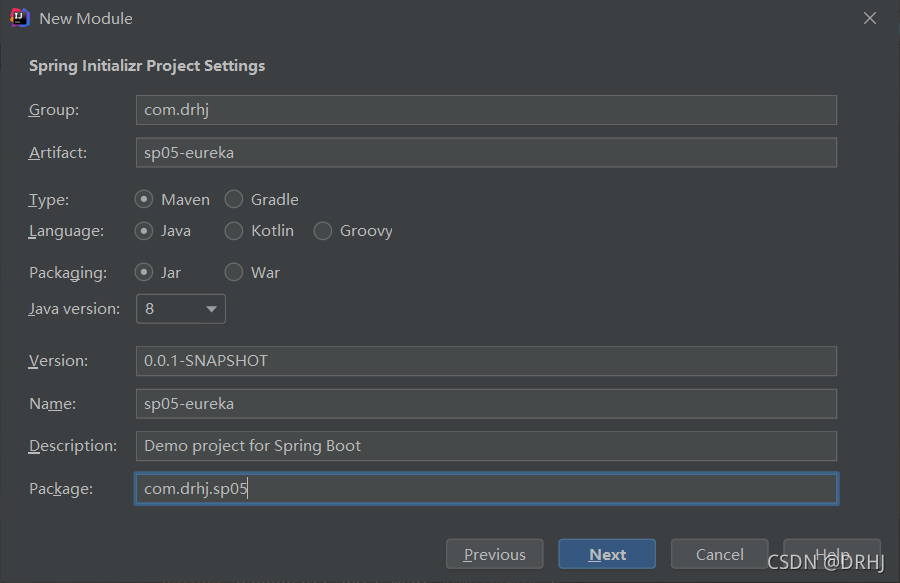
创建spring boot的moudle

选择Eureka Server

修改pom.xml文件
<?xml version="1.0" encoding="UTF-8"?>
<project xmlns="http://maven.apache.org/POM/4.0.0" xmlns:xsi="http://www.w3.org/2001/XMLSchema-instance"
         xsi:schemaLocation="http://maven.apache.org/POM/4.0.0 https://maven.apache.org/xsd/maven-4.0.0.xsd">
    <parent>
        <artifactId>springcloud1</artifactId>
        <groupId>com.drhj</groupId>
        <version>0.0.1-SNAPSHOT</version>
    </parent>
    <modelVersion>4.0.0</modelVersion>

    <groupId>com.drhj</groupId>
    <artifactId>sp05-eureka</artifactId>
    <version>0.0.1-SNAPSHOT</version>
    <name>sp05-eureka</name>
    <description>Demo project for Spring Boot</description>
    <properties>
        <java.version>1.8</java.version>
    </properties>
    <dependencies>
        <dependency>
            <groupId>org.springframework.cloud</groupId>
            <artifactId>spring-cloud-starter-netflix-eureka-server</artifactId>
        </dependency>

        <dependency>
            <groupId>org.springframework.boot</groupId>
            <artifactId>spring-boot-starter-test</artifactId>
            <scope>test</scope>
        </dependency>
    </dependencies>

    <build>
        <plugins>
            <plugin>
                <groupId>org.springframework.boot</groupId>
                <artifactId>spring-boot-maven-plugin</artifactId>
            </plugin>
        </plugins>
    </build>

</project>
application.yml配置
因为目前只是针对单台服务器,不向自己注册,不从自己拉取。所以关闭自我保护模式
spring:
  application:
    name: eureka-server
server:
  port: 2001
#关闭自我保护模式
#主机名
#针对单台服务器,不向自己注册,不从自己拉取
eureka:
  server:
    enable-self-preservation: false
  instance:
    hostname: eureka1
  client:
    register-with-eureka: false
    fetch-registry: false
- eureka 集群服务器之间,通过 hostname 来区分
- eureka.server.enable-self-preservation
eureka 的自我保护状态:心跳失败的比例,在15分钟内是否超过85%,如果出现了超过的情况,Eureka Server会将当前的实例注册信息保护起来,同时提示一个警告,一旦进入保护模式,Eureka Server将会尝试保护其服务注册表中的信息,不再删除服务注册表中的数据。也就是不会注销任何微服务 - eureka.client.register-with-eureka=false
不向自身注册 - eureka.client.fetch-registry=false
不从自身拉取注册信息 - eureka.instance.lease-expiration-duration-in-seconds
最后一次心跳后,间隔多久认定微服务不可用,默认90
添加@EnableEurekaServer
在启动类中添加
package com.drhj.sp05;

import org.springframework.boot.SpringApplication;
import org.springframework.boot.autoconfigure.SpringBootApplication;
import org.springframework.cloud.netflix.eureka.server.EnableEurekaServer;

@EnableEurekaServer
@SpringBootApplication
public class Sp05EurekaApplication {

    public static void main(String[] args) {
        SpringApplication.run(Sp05EurekaApplication.class, args);
    }

}
启动测试
localhost:2001

目前暂无服务注册
修改hosts文件,添加 eureka 域名映射
如果想通过特殊域名访问,比如eureka,可修改hosts文件,
位置:C:\Windows\System32\drivers\etc\hosts
注意以管理员身份打开,用记事本打开就好。
添加映射

启动测试

补充
eureka四条运行机制
1.客户端启动时,会反复连接注册中心尝试注册,直到注册成功
2.客户端每30s发送一次心跳数据,服务器连续3次收不到一个服务的心跳,会删除它的注册信息
3.客户端每30s拉取一次注册表,刷新本地注册表缓存
4.自我保护模式
15分钟内,85%服务器出现心跳异常
由于网络中断,15分钟内,85%服务器出现心跳异常,自动进入保护模式
自我保护模式下所有的注册信息都不删除
网络恢复后,自动退出保护模式
开发调试期间,可以关闭保护模式,避免影响调试
2.注册服务
在pom.xml添加依赖
分别在itemservice userservice orderservice的pom.xml添加eureka客户端依赖
<dependency>
      <groupId>org.springframework.cloud</groupId>
      <artifactId>spring-cloud-starter-netflix-eureka-client</artifactId>
</dependency>
在application.yml添加设置
分别在itemservice userservice orderservice的application.yml添加设置,指定访问地址
eureka:
  client:
    service-url:
      # 可以从云服务商购买不同地点的eureka服务器
      # 自己的服务器只能写defaultZone
      defaultZone: http://eureka1:2001/eureka
3.注册测试
1)启动三个服务
2)启动注册中心
3)访问 eureka1:2001

在service服务项上报错

在注册中心报错

以上两种属于正常现象,因为我们没有配置集群,所以默认启动8761端口,而这端口如果被占用就会报错,但不影响我们测试。
二,eureka和服务提供者高可用

所谓高可用就是一个服务用多个端口打开(多个服务),然后当调用该服务时,会在这些服务中选择。
1.设置服务提供者高可用
这里先设置item-service商品服务高可用
设置两个服务器,分别指定端口 8001,8002


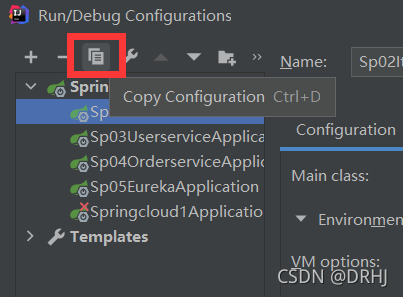
然后复制上一份


分别启动这两个服务,查看注册中心

出现两个服务
2.eureka高可用
添加两个服务器的 profile 配置文件
application-eureka1.yml
eureka:
  instance:
    hostname: eureka1
  client:
    register-with-eureka: true  #profile的配置会覆盖公用配置
    fetch-registry: true        #profile的配置会覆盖公用配置
    service-url:
      defaultZone: http://eureka2:2002/eureka  #eureka1启动时向eureka2注册
application-eureka2.yml
eureka:
  instance:
    hostname: eureka2
  client:
    register-with-eureka: true  #profile的配置会覆盖公用配置
    fetch-registry: true        #profile的配置会覆盖公用配置
    service-url:
      defaultZone: http://eureka1:2001/eureka  #eureka2启动时向eureka1注册
配置启动参数 --spring.profiles.active 和 --server.port
设置eureka1启动参数
–spring.profiles.active=eureka1 --server.port=2001

设置eureka2启动参数
–spring.profiles.active=eureka2 --server.port=2002
复制上一份

分别启动,查看


三,Feign远程调用
Feign集成Ribbon,默认实现了负载均衡和重试
1.业务需求
在订单业务(order service)中可以调用商品服务(item service)和用户服务(user service)
2.Feign依赖
在pom.xml文件中添加如下依赖
<dependency>
    <groupId>org.springframework.cloud</groupId>
    <artifactId>spring-cloud-starter-openfeign</artifactId>
</dependency>
3.编写itemservice的Feign接口
package com.drhj.sp04.feign;

import cn.drhj.sp01.pojo.Item;
import cn.drhj.web.util.JsonResult;
import org.springframework.cloud.openfeign.FeignClient;
import org.springframework.web.bind.annotation.GetMapping;
import org.springframework.web.bind.annotation.PathVariable;
import org.springframework.web.bind.annotation.PostMapping;
import org.springframework.web.bind.annotation.RequestBody;

import java.util.List;

/*
配置三条:
 - 调用哪个服务
 - 哪个路劲
 - 向路径提交什么参数
 */
@FeignClient(name = "item-service")
public interface ItemClient {
    @GetMapping("/{orderId}")
    JsonResult<List<Item>> getItems(@PathVariable String orderId);
    @PostMapping("/decreaseNumber")
    JsonResult<?> decreaseNumber(@RequestBody List<Item> items);
}
4.编写userservice的Feign接口
package com.drhj.sp04.feign;

import cn.drhj.sp01.pojo.User;
import cn.drhj.web.util.JsonResult;
import org.springframework.cloud.openfeign.FeignClient;
import org.springframework.web.bind.annotation.GetMapping;
import org.springframework.web.bind.annotation.PathVariable;
import org.springframework.web.bind.annotation.RequestParam;

@FeignClient(name = "user-service")
public interface UserClient {
    @GetMapping("/{userId}")
    JsonResult<User> getUser(@PathVariable("userId") Integer id);
    @GetMapping("/{userId}/score")    // 8/score?score=1000
    JsonResult<?> addScore(@PathVariable Integer userId,@RequestParam("score") Integer score);

}
5.修改OrderServiceImpl
添加对远程调用的使用
package com.drhj.sp04.service;

import cn.drhj.sp01.pojo.Item;
import cn.drhj.sp01.pojo.Order;
import cn.drhj.sp01.pojo.User;
import cn.drhj.sp01.service.OrderService;
import cn.drhj.web.util.JsonResult;
import com.drhj.sp04.feign.ItemClient;
import com.drhj.sp04.feign.UserClient;
import lombok.extern.slf4j.Slf4j;
import org.springframework.beans.factory.annotation.Autowired;
import org.springframework.stereotype.Service;

import java.util.List;

@Slf4j
@Service
public class OrderServiceImpl implements OrderService {
    @Autowired
    private ItemClient itemClient;
    @Autowired
    private UserClient userClient;
    //根据订单id获取订单
    @Override
    public Order getOrder(String orderId) {
        log.info("获取订单,orderId = " + orderId);
        Order order = new Order();
        order.setId(orderId);
        //远程调用用户,获取用户信息
        JsonResult<List<Item>> items = itemClient.getItems(orderId);
        //远程调用商品,获取商品列表
//        order.setItems();
        JsonResult<User> user = userClient.getUser(8);
        order.setUser(user.getData());
        order.setItems(items.getData());
        return order;
    }
    //添加订单
    @Override
    public void addOrder(Order order) {
        log.info("添加订单: " + order);
        //远程调用商品,减少库存
        itemClient.decreaseNumber(order.getItems());
        //远程调用用户,增加积分
        userClient.addScore(order.getUser().getId(),1000);
    }
}
6.启动类添加注解

7.测试
使用该网址多刷新几次

使用该网址多刷新几次,看itemservice两个服务的后台讯息
8001端口:

8002端口:

由此可见实现了负载均衡
四,Ribbon的重试
1.介绍
重试是指当请求访问服务器失败时,再次向服务器发送请求,如果一个服务器重试失败可以更换服务器
2.机制
远程调用失败,可以自动发起重试调用
- 异常
- 服务器宕机
- 后台服务阻塞超时
3.参数
- MaxAutoRetries - 单台服务器的重试次数 默认0
- MaxAutoRetriesNextServer - 更换服务器次数 默认1
- ReadTimeout - 等待响应的超时时间 默认1000
- OkToRetryOnAllOperations - 是否对所有类型请求都重试,默认只是GET请求重试
- ConnectTimeOut - 与后台服务器建立连接的等待超时时间,默认1000
4.测试
1)在order service中的application.yml添加配置,在order service中设置是因为通过order service的请求向 item service发送请求
ribbon:
  MaxAutoRetries: 1
  MaxAutoRetriesNextServer: 2
设置单台服务器重试次数为1次,如果重试一次后还没成功,则更换服务器且更换服务器的次数为2次
2)在itemservice中的controller中添加随机阻塞代码,人为阻塞
package com.drhj.sp02.controller;

import cn.drhj.sp01.pojo.Item;
import cn.drhj.sp01.service.ItemService;
import cn.drhj.web.util.JsonResult;
import lombok.extern.slf4j.Slf4j;
import org.springframework.beans.factory.annotation.Autowired;
import org.springframework.web.bind.annotation.*;

import java.util.List;
import java.util.Random;

@RestController
@Slf4j
public class ItemController {
    @Autowired
    private ItemService itemService;
    //根据订单id获取订单商品列表
    @GetMapping("/{orderId}")
    public JsonResult<List<Item>> getItems(@PathVariable String orderId) throws InterruptedException {
        List<Item> items = itemService.getItems(orderId);
        //随机阻塞,90%概率执行阻塞代码
        if (Math.random() < 0.9) {
            //暂停 [0.5000) ms
            int t = new Random().nextInt(5000);
            System.out.println("暂停:" + t);
            Thread.sleep(t);
        }
        return JsonResult.ok().data(items);
    }
    //减少库存
    //@RequestBody 完整接收请求协议体数据
    @PostMapping("/decreaseNumber")
    public JsonResult<?> decreaseNumber(@RequestBody List<Item> items) {
        itemService.decreaseNumber(items);
        return JsonResult.ok().msg("减少库存成功");
    }
    @GetMapping("/favicon.ico")
    public void ico() {
    }
}
3)重启 item的两个服务和order服务
继续访问 http://localhost:8201/1
查看item后台
8001端口

8002端口

发生了重试
注意这是多次刷新的结果,可能不够直观,但可以看出,确实发生了重试。