1、防火墙开放端口
# 需要开放给外网的 主机-端口
ipa ? ? ? ? ? ? ?xxx.xxx.xxx.xxx 18080
ClouderaManager ?xxx.xxx.xxx.xxx 7180,7182,7183
Master1 ? ? ? ? ?xxx.xxx.xxx.xxx 16010,9870,8889,8888,25010,8088,19888
Master2 ? ? ? ? ?xxx.xxx.xxx.xxx 16010,9870,8889,8888,25020,8088,18088
Client1 ? ? ? ? ?xxx.xxx.xxx.xxx 18443
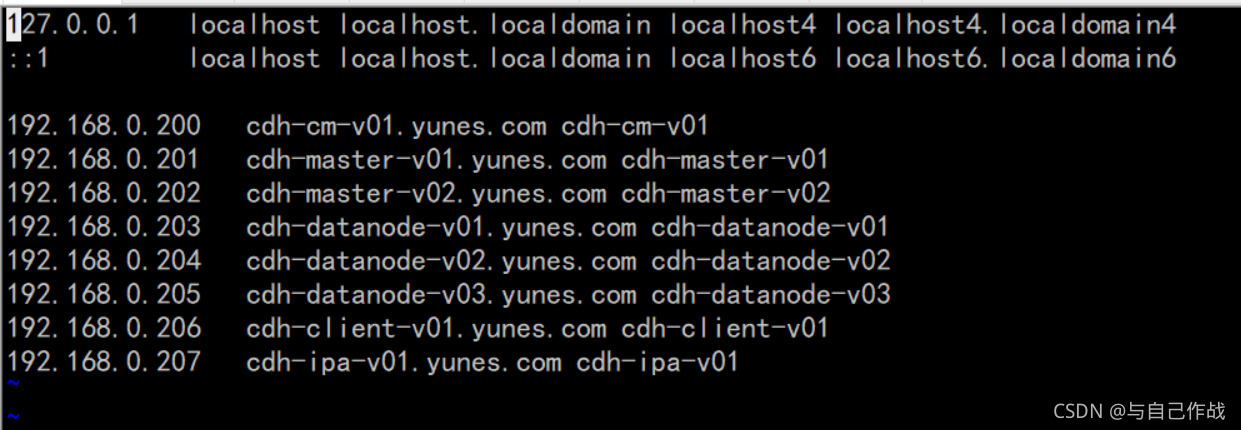
2、添加主机信息到/etc/hosts
内网IP配置(外网配置相同):
192.168.0.200?? ?cdh-cm-v01.yunes.com cdh-cm-v01
192.168.0.201?? ?cdh-master-v01.yunes.com cdh-master-v01
192.168.0.202?? ?cdh-master-v02.yunes.com cdh-master-v02
192.168.0.203?? ?cdh-datanode-v01.yunes.com cdh-datanode-v01
192.168.0.204?? ?cdh-datanode-v02.yunes.com cdh-datanode-v02
192.168.0.205?? ?cdh-datanode-v03.yunes.com cdh-datanode-v03
192.168.0.206?? ?cdh-client-v01.yunes.com cdh-client-v01
192.168.0.207?? ?cdh-ipa-v01.yunes.com cdh-ipa-v01

?
3、install?pip
yum -y install epel-release
yum -y install python-pip
pip --version ?# 查看pip版本
pip install --upgrade pip(Python pip install --upgrade pip报错多种解决方法)
4、selinux配置
vi /etc/sysconfig/selinux
SELINUX=disabled
5、limits配置
vi /etc/security/limits.conf
*?? ?-?? ?nofile?? ?409600
*?? ?-?? ?nproc?? ?262144
root?? ?-?? ?nofile?? ?409600
root?? ?-?? ?nproc?? ?262144
6、关闭防火墙
systemctl stop firewalld;
systemctl disable firewalld;
systemctl status firewalld;
7、 禁用ipv6
vi /etc/sysctl.conf
net.ipv6.conf.all.disable_ipv6 =1
net.ipv6.conf.default.disable_ipv6 =1
net.ipv6.conf.lo.disable_ipv6 = 0
8、修改sshd访问端口号
vi?/etc/ssh/sshd_config

9、生成秘钥
ssh-keygen -t rsa
配置root用户无密码访问(在cdh-cm-v01 服务器上执行)
ssh-copy-id -p36565 -i ?~/.ssh/id_rsa.pub root@cdh-cm-v01
ssh-copy-id -p36565 -i ?~/.ssh/id_rsa.pub root@cdh-master-v01
ssh-copy-id -p36565 -i ?~/.ssh/id_rsa.pub root@cdh-master-v02
ssh-copy-id -p36565 -i ?~/.ssh/id_rsa.pub root@cdh-client-v01
ssh-copy-id -p36565 -i ?~/.ssh/id_rsa.pub root@cdh-datanode-v01
ssh-copy-id -p36565 -i ?~/.ssh/id_rsa.pub root@cdh-datanode-v02
ssh-copy-id -p36565 -i ?~/.ssh/id_rsa.pub root@cdh-datanode-v03

10、配置同步脚本
mkdir ~/scripts;
cd ~/scripts/;
# 1). vi ssh_to_all_node.sh
#!/bin/bash
ssh_port=36565
domain_name="yunes.com"
if [ $# -eq 1 ]
then
? cmd=$1
elif [ $# -eq 2 ]
then
? cmd=$1
? grep_host=$2
else
? echo "Must at least One parameter: 1. sshCommand; 2. grepHost"
? exit 1
fi
local_host=$(hostname -f)
echo $local_host
echo "---------------------------------------------------------"
echo "Begin run command: [ ${cmd} ] to AllCusterNode, Please waitting..."
echo ""
if [ $# -eq 1 ]
then
? for target_host in `cat /etc/hosts |grep "${domain_name}"|grep -v 'ipa'|grep -v 'grep'|awk '{print $2}'`
? do
? ? if [ "${target_host}" != "${local_host}" ]; then
? ? ? echo "Run Command: ?ssh root@${target_host} ${cmd}"
? ? ? sleep 1
? ? ? ssh -p${ssh_port} root@${target_host} "${cmd}"
? ? fi
? done
fi
if [ $# -eq 2 ]
then
? for target_host in `cat /etc/hosts |grep "${domain_name}"|grep -v 'ipa'|grep -v 'grep'|grep "${grep_host}"|awk '{print $2}'`
? do
? ? if [ "${target_host}" != "${local_host}" ]; then
? ? ? echo "Run Command: ?ssh root@${target_host} ${cmd}"
? ? ? sleep 1
? ? ? ssh -p${ssh_port} root@${target_host} "${cmd}"
? ? fi
? done
fi
# 2). vi sync_to_all_node.sh
#!/bin/bash
ssh_port=36565
domain_name="yunes.com"
if [ $# -eq 2 ]
then
? source_file=$1
? target_dir=$2
elif [ $# -eq 3 ]
then
? source_file=$1
? target_dir=$2
? grep_host=$3
else
? echo "Must at least Two parameter: 1. source file, 2. TargetDir, 3.grepForHostName"
? exit 1
fi
echo $source_file
echo $target_dir
local_host=$(hostname -f)
echo $local_host
echo "---------------------------------------------------------"
echo "Begin sync file from ${local_host}:${source_file} to AllCusterNode, Please waitting..."
echo ""
if [ $# -eq 2 ]
then
? for target_host in `cat /etc/hosts |grep "${domain_name}"|grep -v 'ipa'|grep -v 'grep'|awk '{print $2}'`
? do
? ? if [ "${target_host}" != "${local_host}" ]; then
? ? ? echo "Sync file from ${source_file} to ${target_host}:${target_dir}"
? ? ? sleep 1
? ? ? scp -P${ssh_port} -r ${source_file} root@${target_host}:${target_dir}/
? ? fi
? done
fi
if [ $# -eq 3 ]
then
? for target_host in `cat /etc/hosts |grep "${domain_name}"|grep -v 'ipa'|grep -v 'grep'|grep "${grep_host}"|awk '{print $2}'`
? do
? ? if [ "${target_host}" != "${local_host}" ]; then
? ? ? echo "Sync file from ${source_file} to ${target_host}:${target_dir}"
? ? ? sleep 1
? ? ? scp -P${ssh_port} -r ${source_file} root@${target_host}:${target_dir}/
? ? fi
? done
fi
11、同步修改的配置文件
cd ~/scripts/;
sh ./sync_to_all_node.sh /etc/hosts /etc/; # 先执行这一步,将提示,输入 "yes"
sh ./sync_to_all_node.sh /etc/sysctl.conf /etc/;
sh ./sync_to_all_node.sh /etc/security/limits.conf /etc/security/
#有多块磁盘?
sh ./ssh_to_all_node.sh 'sysctl -p;echo "/dev/vdb1 ?/DATA/disk1 ?ext4 defaults,noatime,nodiratime 0 0" >> /etc/fstab; mkdir -p /DATA/disk1; mount -a;';
sh ./ssh_to_all_node.sh "df -h |grep DATA"; # 核对磁盘挂载是否成功
#一块磁盘?
sh ./ssh_to_all_node.sh 'sysctl -p; mkdir -p /DATA/disk1';
sh ./ssh_to_all_node.sh "rm -rf /DATA/disk1/dfs;" # 删除以前安装过的 hdfs 数据目录,如果是首次执行,请忽略
12、安装httpd
yum -y install httpd createrepo
vi /etc/httpd/conf/httpd.conf
AddType application/x-gzip .gz .tgz .parcel
systemctl enable httpd
systemctl restart httpd
systemctl status httpd
13、安装时间ntp
13.1、yum -y install ntp;
cd ~/scripts/;
sh ./ssh_to_all_node.sh "yum -y install ntp;";
cp /etc/ntp.conf /etc/ntp.conf.bak
13.2、去掉原来的 server条目,添加如下 server 行
可以添加阿里云为时间同步节点:
server ntp1.aliyun.com
 ?
?
vi /etc/ntp.conf?
server cdh-cm-v01.yunes.com
vi /etc/sysconfig/ntpd
SYNC_HWCLOCK=yes
13.3、同步到其他服务器
cd ~/scripts/;
sh ./sync_to_all_node.sh /etc/ntp.conf /etc/;
13.4、本机 (cdh-cm-v01)配置文件还原:
cp /etc/ntp.conf.bak /etc/ntp.conf
13.4、启动 ntpd服务
systemctl restart ntpd;systemctl enable ntpd;systemctl status ntpd;
cd ~/scripts/;
sh ./ssh_to_all_node.sh "systemctl restart ntpd;systemctl enable ntpd;systemctl status ntpd;"