SANIC 中文用户指南
SANIC API文档

Sanic是Python3.7+Web服务器和Web框架,旨在提高性能。它允许使用Python3.5中添加async/await 语法,使代码有效的避免阻塞从而达到提升响应速度的目的。
Sanic提供一种简单且快速,集创建和启动于一体的方法,来实现一个易于修改和拓展的HTTP服务。
- 安装
pip install sanic
- 应用
#server.py
from sanic import Sanic
from sanic.response import text

app = Sanic('MyHelloWorldApp')

@app.get('/')
async def hello_world(request):
    return text('Hello, world.')
- 运行
sanic server.app
入门
Sanic应用(Sanic Application)
-
实例(Instance)
Sanic()是最基础的组成部分,在server.py的文件中将其实例化,文件名不是必须的,但是推荐使用server.py作为名称来实例化Sanic对象。# /path/to/server.py from sanic import Sanic app = Sanic('MyHelloWorldApp') -
应用上下文(Application context)
大多数应用程序都需要跨代码库的不同部分共享/重用数据或对象。最常见的例子是数据库连接。v21.3版本中引入了应用级的上下文对象,且使用方法与请求上下文一致,有效的避免了命名冲突可能导致的潜在问题。# Correct way to attach objects to the application app = Sanic('MyApp') app.ctx.db = Database() -
App注册表(App)
当实例化一个Sanic对象之后,可以随时通过Sanic注册表来获取该对象。如果获取的对象不存在,通过添加force_create参数主动创建一个同名的Sanic对象并返回,如果不设置该参数,默认情况下会抛出SanicException异常。如果只有一个Sanic实例被注册了,不传人任何参数将返回该实例。# /path/to/server.py from sanic import Sanic app = Sanic('my_awesome_server') app = Sanic.get_app('my_awesome_server') app = Sanic.get_app('non-existing', force_create=True,) Sanic('My only app') app = Sanic.get_app() -
配置(Configuration)
Sanic将配置保存在Sanic对象的config属性中。可以使用属性操作或字典操作的方式来修改配置。app = Sanic('myapp') app.config.DB_NAME = 'appdb' app.config.['DB_USER'] = 'appuser' db.settings = { 'DB_HOST' : 'localhost', 'DB_NAME' : 'appdb', 'DB_USER' : 'appuser' } app.config.update(db_settings) -
自定义(Customization)
Sanic应用在实例化时可以根据个人需求以多种方式进行定制。-
自定义配置(Custom configuration)
自定义配置就是将自己的配置对象直接传递到Sanic实例中。如果使用了自定义配置对象类,建议将自定义类继承Sanic的Config类,以保持与父类行为一致。可以调用父类方法来添加属性。from sanic.config import Config class MyConfig(Config): FOO = 'bar' app = Sanic(..., config=MyConfig())from sanic import Sanic, text from sanic.config import Config class TomlConfig(Config): def __init__(self, *args, path:str, **kwargs): super().__init__(*args, **kwargs) with open(path, 'r') as f: self.apply(toml.load(f)) def apply(self, config): self.update(self._to_uppercase(config)) def _to_uppercase(self, obj:Dict[str, Any])->Dict[str, Any]: retval:Dict[str, Any] = {} for key, value in obj.items(): upper_key = key.upper() if isinstance(value, list): retval[upper_key] = [self._to_uppercase(item) for item in value] elif isinstance(value, dict): retval[upper_key] = self._to_uppercase(value) else: retval[upper_key] = value return retval toml_config = TomlConfig(path='/path/to/config.toml') app = Sanic(toml_config.APP_NAME, config=toml_config) -
自定义上下文(Custom context)
默认情况下,应用程序上下文是一个SimpleNamespace实例,它允许在上面设置任何想要的属性。当然,也可以使用其他对象来代替。 -
自定义请求(Custom requests)
import time from sanic import Request, Sanic, text class NanoSecondRequest(Request): @classmethod def generate_id(*_): return time.time_ns() app = Sanic(..., request_class=NanoSecondRequest) @app.get('/') async def handler(request): return text(str(request.id)) -
自定义错误响应函数(Custom error handler)
from sanic.handlers import ErrorHandler
class CustomErrorHandler(ErrorHandler):
    def default(self, request, exception):
        '''
        handles errors that have no error handlers assigned
        '''
        # You custom error handling logic...
        return super().default(request, exception)
app = Sanic(..., error_handler = CustomErrorHandler())
-
响应函数(Handlers)
在Sanic中,响应函数可以是任何一个可调用程序,它至少是一个request实例作为参数,并返回一个HTTPResponse实例或一个执行其他操作的协同程序作为响应。
它既可以是一个普通函数,也可以是一个异步的函数。它的工作是响应指定端点的访问,并执行一些指定的操作,是承载业务逻辑代码的地方。
def i_am_a_handler(request):
    return HTTPResponse()
async def i_am_ALSO_a_handler(request):
    return HTTPResponse()
from sanic.response import text
@app.get('/foo')
async def foo_handler(request):
    return text('I said foo!')
带完整注释的响应函数
from sanic.response import HTTPResponse, text
from sanic.request import Request

@app.get('/typed')
async def typed_handler(request:Request)->HTTPResponse:
    return text('Done.')
请求(Request)
-
请求体(Body)
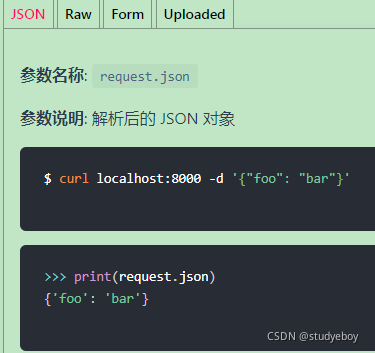
-
上下文(Context)
-
请求上下文(Request context)
request.ctx对象是存储请求相关信息的地方。通常用来存储服务端通过某些验证后需要临时存储的身份认证信息以及专有变量等内容。最典型的用法就是将从数据库获取的用户对象存储在request.ctx中,所有该中间件之后的其他中间件以及请求期间的处理程序都可以对此进行访问。@app.middleware('request') async def run_before_handler(request): request.ctx.user = await fetch_user_by_token(request.token) @app.get('/hi') async def hi_my_name_is(request): return text('Hi, my name is {}'.format(request.ctx.user.name)) -
连接上下文(Connection context)
通常情况下,应用程序需要向同一个客户端提供多个并发(或连续)的请求。这种情况通常发生在需要查询多个端点来获取数据的渐进式网络应用程序中。在HTTP协议要求通过keep alive请求来减少频繁连接所造成的时间浪费。当多个请求共享一个连接时,Sanic将提供一个上下文对象来允许这些请求共享状态。@app.on_request async def increment_foo(request): if not hasattr(request.conn_info.ctx, 'foo'): rquest.conn_info.ctx.foo = 0 request.conn_info.ctx.foo += 1 @app.get('/') async def count_foo(request): return text(f'request.conn_info.ctx.foo={request.conn_info.ctx.foo}')
-
-
路由参数(Parameter)
从路径提取的路由参数将作为参数传递到处理程序中。@app.route('/tag/<tag>') async def tag_handler(request, tag): return text('Tag - {}'.format(tag)) -
请求参数(Arguments)
在request中,可以通过两种属性来访问请求参数:request.argsrequest.query_args

响应(Response)
所有的响应函数都必须返回一个response对象,中间件可以自由选择是否返回response对象。
-
响应方式(Methods)
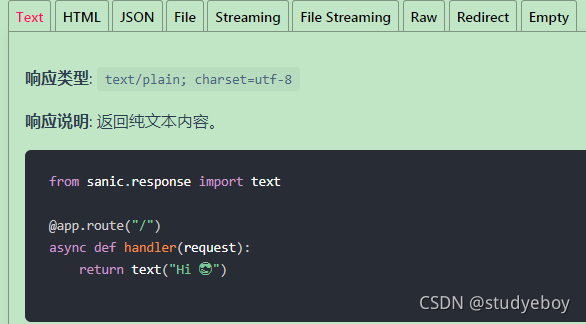
Sanic内置了9中常用的返回类型,可以通过方式中的任意一种快速生成返回对象。
-
默认状态码(Default Status)
响应的默认HTTP状态码是200,如果需要改状态码,可以通过下面的方式进行修改。
@app.post('/')
async def create_new(request):
    new_thing = await do_create(request)
    return json({'created': True, 'id': new_thing.thing_id}, status=201)
路由(Routing)
-
添加路由(Adding a route)
-
app.add_route()方式直接将响应函数进行挂载async def handler(request): return text('OK') app.add_route(handler, '/test') -
绑定监听HTTP
GET请求方式,通过修改methods参数,达到使用一个响应函数响应HTTP的多种请求app.add_route( handler, '/test', methods=['POST', 'PUT'], ) -
使用装饰器进行路由绑定
@app.route('/test', methods=['POST', 'PUT'])
async def handler(request):
    return text('OK')
-
-
HTTP方法(HTTP methods)
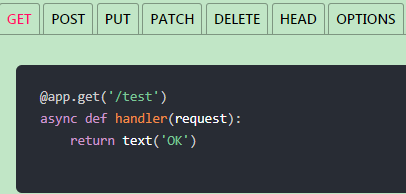
每一个标准的HTTP请求方式都对应封装了一个简单易用的装饰器:
-
路由参数(Path parameters)
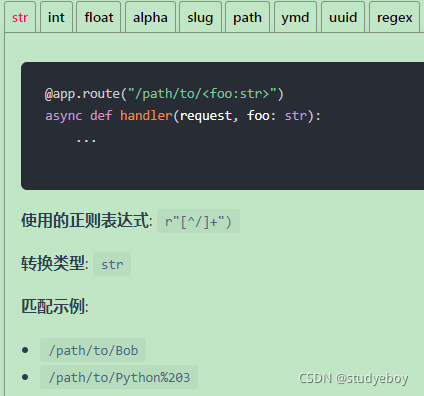
Sanic允许模式匹配,并从URL中提取值。然后将这些参数作为关键字参数传递到响应函数中。@app.get('/tag/<tag>') async def tag_handler(request, tag): return text('Tag - {}'.format(tag))也可以为路由参数指定类型,它将在匹配时进行强制类型转换。
@app.get('/foo/<foo_id:uuid>') async def uuid_handler(request, foo_id:UUID): return text('UUID - {}'.format(foo_id))-
匹配类型(Supported types)
-
正则匹配(Regex Matching)

-
-
动态访问(Generating a URL)
Sanic提供了一种记忆处理程序方法名生成url的方法:app.url_for(),只需要函数名称即可实现响应函数之间的处理权力的移交。

可以传递任意数量的关键字参数,任何非路由参数的部分都会被视作为查询字符串的一部分。
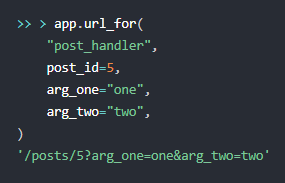
同样支持一个键名传递多个值。
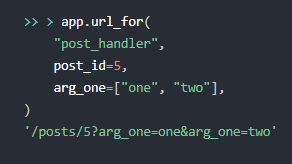
- 特殊关键字参数(Special keyword arguments)
- 自定义路由名称(Customizing a route name)
-
Websocket
Websocket的工作方式和HTTP是类似的。它也具备有一个独立的装饰器。
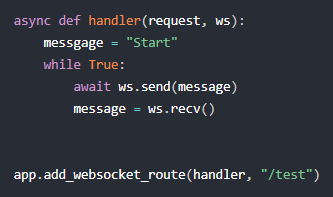
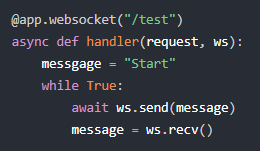
-
严格匹配分隔符(Strict slashes)
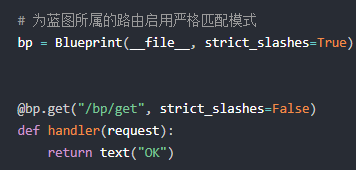
sanic可以按需开启或关闭路由的严格匹配模式,开启后路由将会严格按照/作为分隔来进行路由匹配,可以在以下几种方法中进行匹配,遵循的优先级:- 路由(Route)
- 蓝图(Blueprint)
- 蓝图组(BlueprintGroup)
- 应用(Application)


-
静态文件(Static files)
为了确保Sanic可以正确代理静态文件,使用app.static()方法进行路由分配。第一个参数是静态文件所需要匹配的路由,第二个参数是渲染文件所在的文件(夹)路径。

监听器(Listeners)
在Sanic应用程序的生命周期中6个切入点,在这些关键节点上设置监听器可以完成一些注入操作。有两个切入点旨在主进程中出发(即只在sanic server.app中触发一次)。
main_process_startmain_process_stop
有四个切入点可以在服务器启动或者关闭前执行一些初始化或资源回收相关代码。before_server_startafter_server_startbefore_server_stopafter_server_stop
工作流程的生命周期如下:

-
启动监听器(Attaching a listener)
将函数设置为侦听器的过程类似于生命路由。
两个注入的参数是当前正在运行Sanic()的实例和当前正在运行的循环。

可以通过装饰器的方式来将函数添加为监听器。

进一步缩短该装饰器的调用代码。

-
执行顺序(Order of execution)
监听器按启动期间声明的顺序正向执行,并在拆解期间按照注册顺序反向执行。

-
ASGI模式(ASGI Mode)
中间件(Middleware)
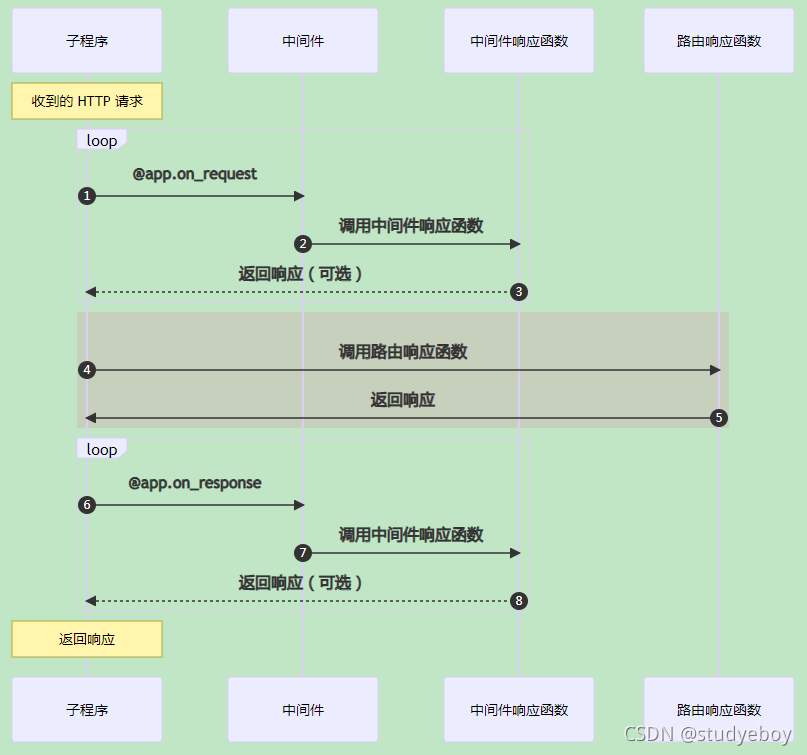
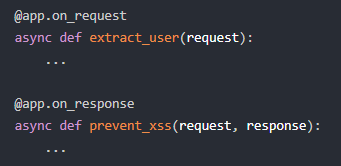
监听器允许将功能挂载到工作进程的生命周期,而中间件允许将功能挂载到HTTP流的生命周期。可以在执行响应函数之前或者响应函数之后执行中间件。
-
启用(Attaching middleware)


-
变更(Modification)
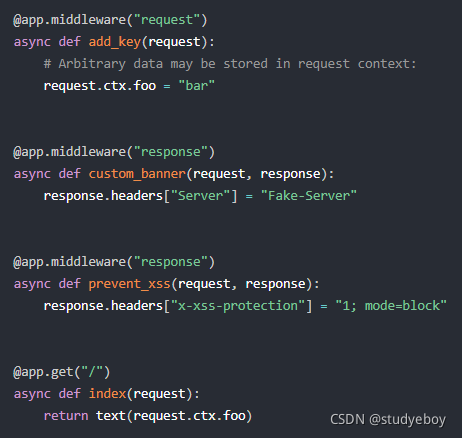
如果中间件不涉及返回响应操作,可以使用中间件来修改请求参数或者响应参数。执行顺序:- 请求中间件:add_key
- 响应函数:index
- 响应中间件:prevent_xss
- 响应中间件:custom_banner
-
提前响应(Responding early)
如果中间件返回了一个HTTPResponse对象,那么请求将会终止,此对象将会作为最终响应进行返回。如果此操作发生在响应函数之前,那么响应函数将不会被调用。除此之外,此操作同样不会调用该中间件之后的其他中间件。
执行中间件按照声明的顺序执行。响应中间件按照声明顺序的逆序执行。
标头(Headers)
请求头和响应头仅在对应的Request对象和HTTPResponse对象中起作用。他们使用multidict包进行构建,允许一个键名具有多个对应值。
- 请求头(Request Headers)
- 响应头(Response Headers)
Cookies
-
读取(Reading)

-
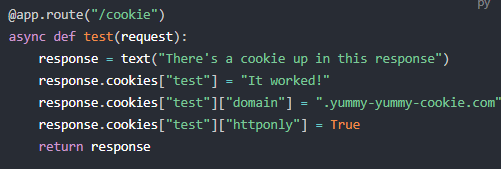
写入(Writing)
-
删除(Deleting)

后台任务(Background tasks)
-
创建任务(Creating Tasks)

-
在app.run之前添加任务(Adding tasks before app.run)

进阶
基于类的视图(Class Based Views)
-
定义视图(Defining a view)

-
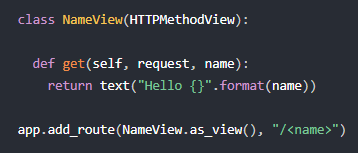
路由参数(PATH parameters)
-
装饰器(Decorators)


-
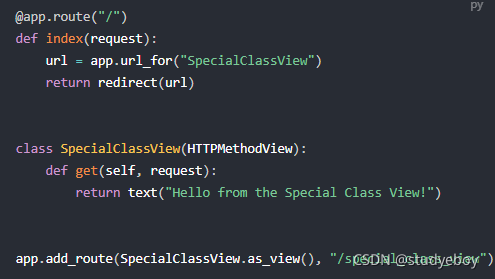
URL生成(Generating a URL)
-
合成视图(Composition view)
作为HTTPMethodView的替代方法,可以使用CompositionView将处理程序函数移至视图类之外。

代理设置(Proxy configuration)
Sanic 可以通过配置来从代理请求的请求头部信息获取客户端的真实的 IP 地址,这个地址会被保存到 request.remote_addr 属性中。如果请求头中包含 URL 的完整信息,那同样也可以获取得到。
反向代理后的服务必须要设置如下一项或多项配置:

-
转发头(Forwarded header)
如果想使用 转发(Forwarded) 头,您应该将app.config.FORWARDED_SECRET秘钥值设置为受信的反向代理服务器已知的秘钥值。这个秘钥会被用于鉴定反向代理服务是否安全。
Sanic 会忽略任何不携带这个秘钥的信息,并且如果不设置秘钥值,就不会去解析请求头。 -
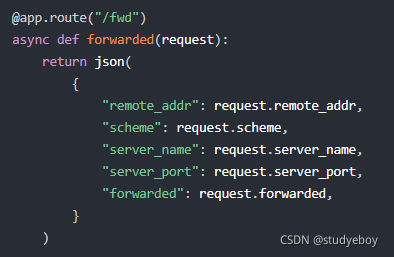
实例(Examples)
request:
-
没有设置
FORWARDED_SECRET,以x-header中的信息为准。
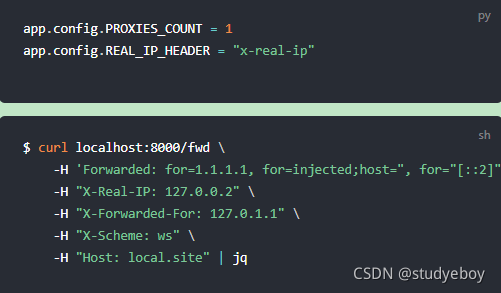
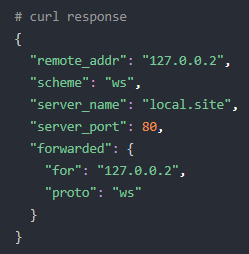
-
配置
FORWARDED_SECRET后

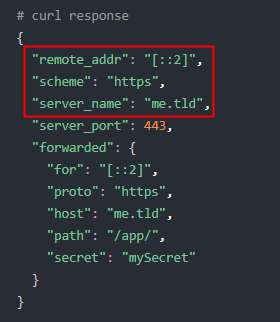
-
转发头(Forwarded header)为空时,使用X-headers

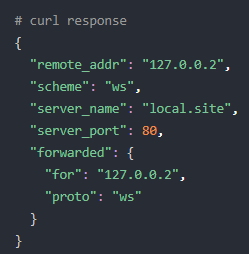
-
没有请求头但是不包含任何匹配的信息

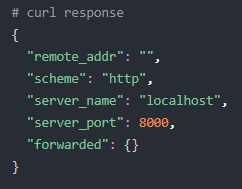
-
有转发头(Forwarded header),没有对的上的秘钥,使用X-headers中的值

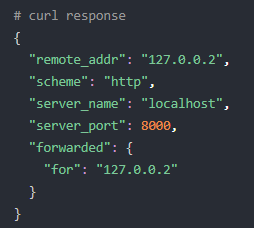
-
不同的格式但也满足条件的情况

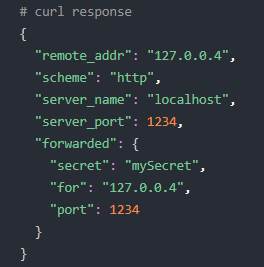
-
测试包含转译字符的

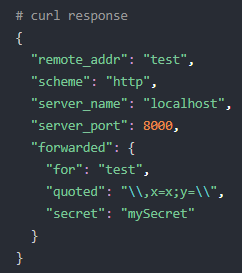
-
如果出现破坏了格式的信息,情况1:

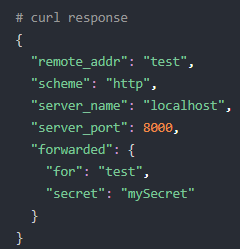
-
如果出现破坏了格式的信息,情况2:

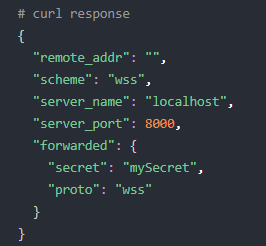
-
出现意外值不会丢失其他有效信息:

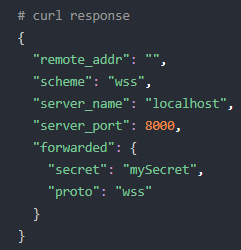
-
反转译:

-
可以使用 “by” 字段携带密钥:

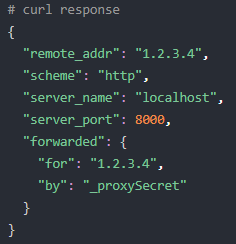
-
流式传输(Streaming)
-
请求流(Request streaming)
Sanic 允许您以串流的形式接收并响应由客户端发送来的数据。
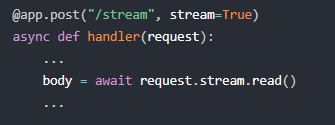
当在一个路由上启用了流式传输,您就可以使用await request.stream.read()方法来获取请求数据流。
当请求中所有的数据都传输完毕后,该方法会返回 None 值。

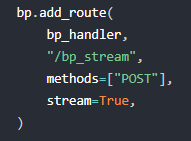
在使用装饰器注册路由时也可以传入关键字参数来启动流式传输…
调用 add_route 方法是传入该参数。
-
响应流(Response streaming)
Sanic 中的StreamingHTTPResponse对象允许您将响应的内容串流给客户端。也可以使用sanic.response.stream这个方法。
这个方法接受一个协程函数作为回调,同时,该回调必须接受一个参数,该参数是一个可以控制向客户端传输数据的对象。

-
文件流(File streaming)
Sanic 提供了sanic.response.file_stream函数来处理发送大文件的场景。该函数会返回一个StreamingHTTPResponse对象,并且默认使用分块传输编码;因此 Sanic 不会为该响应添加Content-Length响应头。

Websockets
Sanic提供了操作一个易操作的websockets封装。
- HTTP:HTTP协议,通信只能由客户端发起。服务器返回查询结果。HTTP协议做不到服务器主动向客户端推送信息。这种单向请求,如果服务器有连续的状态变化,客户端要获知只能使用轮询,每隔一段时间就发出一个询问,了解服务器有没有新的信息。轮询的效率低,非常浪费资源,因为必须不停连接,或则HTTP连接始终打开。
- Websocket:Websocket协议在2008年诞生,2011年成为国际标准。所有浏览器都已经支持了。它最大的特点是,服务器可以主动向客户端推送信息,客户端也可以主动向服务器发送信息,是真正的双向平等对话,属于服务器推送技术的一种。
-
定义路由(Routing)
async def feed(request, ws): pass app.add_websocket_route(feed, '/feed') @app.websocket('/feed') async def feed(request, ws): pass -
定义响应函数(Handler)
一个Websocket的响应函数将会被打开并维持一个通讯循环。然后,可以调用传入函数的第二个参数对象的send()和recv()方法来处理业务。@app.websocket('/feed') async def feed(request, ws): while True: data = 'hello!' print('Sending: ' + data) await ws.send(data) data = await ws.recv() print('Receved: ' + data) -
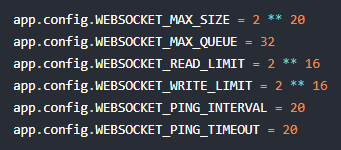
配置(Configuration)
版本管理(Versioning)
在URL中前添加版本信息是接口开发中的一种惯例。这样做可以在迭代API功能时,保证旧版本API的兼容性。添加版本信息就是在URL上添加这样的/v{version}前缀。wersion可以是int,float 或str类型。下列值都为有效值:
- 1,2,3
- 1.1, 2.25, 3.0
- “1”,“v1”,“v1.1”
可以为路由、蓝图、蓝图组添加版本前缀:
-
为路由添加版本前缀(Per route)
在定义路由时直接传入版本号。#/v1/text @app.route('/text', version=1) def handle_request(request): return response.text('Hello world! Version 1') #/v2/text @app.route('/text', version=2) def handle_request(request): return response.text('Hello world! Version 2') -
为蓝图添加版本前缀(Per Blueprint )
在创建蓝图的时候传入版本号,这样蓝图下的所有路由都会拥有该版本号的前缀。bp = Blueprint('test', url_prefix='/foo', version=1) #/v1/foo/html @bp.route('html') def handle_request(request): return response.html('<p>Hello world!</p>') -
为蓝图组添加版本前缀(Per Blueprint Group)
在蓝图组中指定版本信息来简化蓝图版本的管理。如果蓝图组内的蓝图在创建时没有指定其他的版本,则将继承蓝图组所指定的版本信息。当使用蓝图组来管理管本时,版本的前缀信息会按照以下顺序被自动添加在路由上。- 路由上的配置
- 蓝图上的配置
- 蓝图组的配置
一旦发现在定义路由时指定了版本信息,Sanic将会忽略蓝图和蓝图组中的版本信息。
from sanic.blueprints import Blueprint from sanic.response import json bp1 = Blueprint( name='blueprint-1', url_prefix='/bp1', version=1.25, ) bp2 = Blueprint( name='blueprint-2', url_prefix='/bp2', ) group = Blueprint.group( [bp1, bp2], url_prefix='/bp-group', version='v2', ) #GET /v1.25/bp-group/bp1/endpoint-1 @bp1.get('endpoint-1') async def handle_endpoint_1_bp1(request): return json({'Source': 'blueprint-1/endpoint-1'}) #GET /v2/bp-group/bp2/endpoint-2 @bp2.get('/endpoint-1') async def handle_endpoint_1_bp2(request): return json({'Source': 'blueprint-2/endpoint-1'}) #GET /v1/bp-group/bp2/endpoint-2 @bp2.get('/endpoint-2', version=1) async def handle_endpoint_2_bp2(request): return json({'Source': 'blurepoint-2/endpoint-2'}) -
版本前缀(Version prefix)
路由的version参数总是会再在生成的URL路径最前面添加版本信息。为了在版本信息之前还能够增加其他路径信息,在接受version参数的函数中,可以传递version_prefix参数。version_prefix可以这么使用:- 使用
app.route和bp.route装饰器(以及所有其他装饰器)时 - 创建
Blueprint对象时 - 调用
Blueprint.group函数时 - 创建
BlueprintGroup对象时 - 使用
app.blueprint注册蓝图
如果在多个地方都有定义该参数了。根据上述列表顺序(从上至下),更加具体的定义将覆盖比之宽泛的定义。
# /v1/my/path app.route('/my/path', version=1, version_prefix='/api/v') #/v1/my/path app = Sanic(__name__) v2ip = Blueprint('v2ip', url_prefix='/ip', version=2) api = Blueprint.group(v2ip, version_prefix='/api/version') #/api/version2/ip @v2ip.get('/') async def handler(request): return text(request.ip) app.blueprint(api) - 使用
信号(Signals)
该功能还处于BETA阶段。
最佳实践
蓝图(Blueprints)
-
概述(Overview)
蓝图是应用中可以作为子路由的对象。蓝图定义了同样的添加路由的方式,可以将一系列路由注册到蓝图上而不是直接注册到应用上,然后再以可插拔的方式将蓝图注册到应用程序。蓝图对于大型应用特别有用,在大型应用中,可以将应用代码根据不同的业务分解成多个蓝图。 -
创建和注册蓝图(Creating and registering)
首先,创建一个蓝图,蓝图对象有和Sanic对象十分相似的方法,也提供了相同额装饰器来注册路由。# ./my_blueprint.py from sanic.response import json from sanic import Blueprint bp = Blueprint('my_blueprint') @app.route('/') async def bp_root(request): return json({'my' : 'blueprint'})然后将蓝图注册到Sanic应用上。
from sanic import Sanic
from my_blueprint import bp
app = Sanic(__name__)
app.blueprint(bp)
蓝图也提供了
websocket()装饰器和add_websocket_route方法来实现Websocket通讯。 -
蓝图组(Blueprint groups)
蓝图也可以以列表或者元组的形式进行注册,在这种情况下,注册时会递归的遍历当前序列,在序列中或者在子序列中的所有蓝图对象都会被注册到应用上。Blueprint.group方法允许模拟一个后端目录结构来简化上述问题。
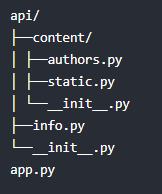
第一个蓝图(First blueprint)# api/content/authors.py from sanic import Blueprint authors = Blueprint('conten_authors', url_prefix='/authors')第二个蓝图(Second blueprint)
# api/conten/static.py
from sanic import Blueprint
static = Blueprint('content_static', url_prefix='/static')
蓝图组(Blueprint group)
# api/content/__init__.py
from static import Blueprint
from .static import static
from .authors import authors
content = Blueprint.group(static, authors, url_prefix='/content')
第三个蓝图(Third blueprint)
# api/info.py
from sanic import Blueprint
info = Blueprint('info', url_prefix='/info')
另一个蓝图组(Another blueprint group)
# api/__init__.py
from sanic import Blueprint
from .content import content
from .info import info
api = Blueprint.group(content, info, url_prefix='/api')
主应用(Main server)
所有的蓝图都会被注册。
#app.py from sanic import Sanic from .apli import api app = Sanic(__name__) app.blueprint(api) -
中间件(Middleware)
蓝图可以有自己的中间件,这些中间件只会影响到注册到该蓝图上的路由。@bp.middleware async def print_on_request(request): print('I am a spy') @bp.middleware('request') async def halt_request(request): return text('I halted the request') @bp.middleware('response') async def halt_response(request, response): return text('I halted the response')使用蓝图组能够将中间件应用给同组中的所有蓝图。
bp1 = Blueprint('bp1', url_prefix='/bp1') bp2 = Blueprint('bp2', url_prefix='/bp2') @bp1.middleware('response') async def bp1_only_middleware(request): print('applied on Blueprint: bp1 Only') @bp1.route('/') async def bp1_route(request): return text('bp1') @bp2.route('/<param>') async def bp2_route(request, param): return text(param) group = Blueprint.group(bp1, bp2) @group.middleware('request') async def group_middleware(request): print('common middleware applied for both bp1 and bp2') # Register Blueprint group under the app app.blueprint(group) -
异常(Exceptions)
定义蓝图特定的响应函数。@bp.exceptioin(NotFound) def ignore_404s(request, exception): return text('Yep, I totally found the page:{}'.format(request.url)) -
静态文件(Static files)
蓝图可以单独指定需要代理的静态文件。bp = Blueprint('bp', url_prefix='/bp') bp.static('/web/path', '/folder/to/serve') bp.static('/web/path', '/folder/to/serve', name='uploads')然后用
url_for()函数来获取。>> > print(app.url_for("static", name="bp.uploads", filename="file.txt")) '/bp/web/path/file.txt' -
监听器(Listeners)
蓝图也可以实现监听器。@bp.listener('before_server_start') async def before_server_start(app, loop): ... @bp.listener('after_server_stop') async def after_server_stop(app, loop): ... -
版本管理(Versioning)
蓝图可以使用版本管理来管理不同版本API。auth1 = Blueprint('auth', url_prefix='/auth', version=1) auth2 = Blueprint('auth', url_prefix='/auth', version=2)当将蓝图注册到APP上时,
/v1/auth和/v2/auth路由将指向两个不同的蓝图,允许为每个API版本创建子路由。from auth_blueprints import auth1, auth2 app = Sanic(__name__) app.blueprint(auth1) app.blueprint(auth2)将多个蓝图放在一个蓝图组下然后同时为他们添加上版本信息。
auth = Blueprint('auth', url_prefix='/auth') metrics = Blueprint('metrics', url_prefix='/metrics') group = Blueprint.group([autho, metrics], version='v1') -
组合(Composable)
一个蓝图对象可以被多个蓝图组注册,且蓝图组之间可以进行嵌套注册。这样就消除了蓝图之间组合的限制。app = Sanic(__name__) blueprint_1 = Blueprint('blueprint_1', url_prefix='/bp1') blueprint_2 = Blueprint('blueprint_2', url_prefix='/bp2') group = Blueprint.group( blueprint_1, blueprint_2, version=1, version_prefix='/api/v', url_prefix='/grouped', strict_slashes=True, ) primary = Blueprint.group(group, url_prefix='/primary') @blueprint_1.route('/') def blueprint_1_default_route(request): return text('BP1_OK') @blueprint_2.route('/') def blueprint_2_default_route(request): return text('BP2_OK') app.blueprint(group) app.blueprint(primary) app.blueprint(blueprint_1) -
URL生成(Generating a URL)
当使用url_for()来生成URL时,端点的名称将以以下格式来组织。<blueprint_name>.<handler_name>
异常处理(Exceptions)
-
使用Sanic预置异常(Using Sanic exceptions)
有时只需要告诉Sanic终止执行响应函数,并返回一个状态码,抛出SanicException异常之后,Sanic将自动完成剩下的工作。可以选择传递一个参数status_code。默认情况下,不传递该参数,SanicException将会返回一个HTTP 500内部服务错误的响应。from sanic.exceptions import SanicException @app.route('/youshallnotpass') async def no_no(request): raise SanicException('Something went wrong.', status_code=501)应该自己实现的更常见的异常包括:
InvalidUsage(400)Unauthorized(401)Forbidden(403)NotFound(404)ServerError(500)
from sanic import exceptions @app.route('/login') async def login(request): user = await some_login_func(request) if not user: raise exceptions.NotFound( f'Could not find user with username={request.json.username}') ... -
处理(Handling)
Sanic通过呈现错误页面来自动处理异常,因此在许多情况下,不需要自己处理它们。但是,如果希望在引发异常时更多的控制该做什么,可以自己实现一个处理程序。
Sanic提供了一个装饰器,不仅适用于Sanic标准异常,还适用于应用程序可能抛出的任何异常。
添加处理程序最简单的方法是使用@app.exception()并向其传递一个或多个异常。from sanic.exceptions import NotFound @app.exception(NotFound, SomeCustomException) async def ignore_404s(request, exceptioin): return text('Yep, I totally found the page:{}'.format(request.url))也可以通过捕获
Exception来创建一个异常捕获处理程序。@app.exception(Exception) async def catch_anything(request, exception): ...使用
app.error_handler.add()来添加异常处理程序。async def server_error_handler(request, exception): return text('Oops, sever error', status=500) app.error_handler.add(Exception, server_error_handler) -
自定义异常处理(Custom error handling)
某些情况下,可能希望在默认设置的基础上增加更多的错误处理功能。在这种情况下,可以将Sanic的默认错误处理程序子类化。from sanic.handlers import ErrorHandler class CustomErrorHandler(ErrorHandler): def default(self.request, exceptioin): '''handles errors that have no error handlers assigned''' # You custom error handling logic... return super().default(request, exception) app.error_handler = CustomErrorHandler() -
异常格式(Fallback handler)
Sanic自带了三种异常格式:- HTML(default)
- Text
- JSON
根据应用程序是否处于调试模式,这些异常内容将呈现不同级别的细节。
装饰器(Decorators)
为了更好的创建一个web API,编码时遵循“一次且仅一次”的原则很有必要,使用装饰器是遵循这个原则的最好方式之一,可以将特定的逻辑进行封装,灵活的在各种响应函数上复用。
假设想去检查某个用户是否对特定的路由有访问的权限。可以创建一个装饰器来装饰一个响应函数,检查发送请求的客户端是否有权限来访问该资源,并返回正确的响应。
from functools import wraps
from sanic.response import json
def authorized():
    def decorator(f):
        @wraps(f)
        async def decorated_function(request, *args, **kwargs):
            #run some method that checks the request
            # for the client's authorization status
            is_authorized = await check_request_for_authorization_status(request)
            if is_authorized:
                #the user is authorized.
                #run the handler method and return the response
                response = await f(request, *args, **kwargs)
                return response
            else:
                # the user is not authorized.
                return json({'status':'not_authorized'}, 403)
        return decorated_function
    return decorator
app.route('/')
@authorized()
async def test(request):
    return json({'status':'authorized'})
日志(Logging)
Sanic允许根据请求进行不同类型的记录(访问日志、错误日志)。
-
快速开始(Quick Start)
from sanic import Sanic
from sanic.log import logger
from sanic.response import text
app = Sanic('logging_example')
@app.route('/')
async def test(request):
    logger.info('Here is your log')
    return text('Hello World!')
if __name__ == '___main__':
    app.run(debug=True, access_log=True)
服务器运行后,看到一下日志信息

尝试像服务器发送请求后,输出如下的日志信息。

-
自定义日志(Changing Sanic loggers)
使用自己的日志配置,需要使用logging.config.dictConfig,或者在初始化Sanic app时传递log_config即可。
app = Sanic('logging_example', log_config=LOGGING_CONFIG)
if __name__ == '__main__':
    app.run(access_log=False)
在Python中处理日志是一个比较轻松的操作,但是如果需要处理大量的请求,那么性能就可能会成为一个瓶颈。添加访问日志的耗时将会增加,这将会增大系统开销。
使用Nginx记录访问日志是一个减轻系统开销的好办法,将Sanic部署在Nginx代理之后,并禁用Sanic的access_log,性能会显著提升。
为了在生产环境下获得最佳性能,建议在禁用debug和access_log的情况下运行Sanic:app.run(debug=False, access_log=False)。
- 配置(Configuration)
Sanic的默认认知配置为:sanic.log.LOGGING_CONFIG_DEFAULTS。
Sanic使用了三个日志器,如果想创建并使用自己的日志配置,则需要自定义该配置。
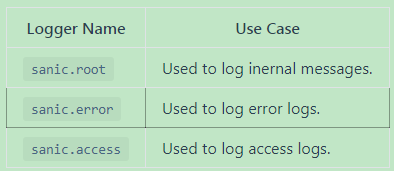
除了Python提供的默认参数(asctime,levelname, message)之外,Sanic还未日志器提供了附加参数:

默认的访问日志格式为:

测试(Testing)
https://github.com/sanic-org/sanic-testing
运行和部署
配置(Configuration)
基础(Basics)
Sanic会将配置保存在应用程序对象的Config属性中,它是一个可以通过字典的形式或者属性的形式进行操作的对象。
app = Sanic('myapp')
app.config.DB_NAME = 'appdb'
app.config['DV_USER'] = 'appuser'
可以使用update()方法来更新配置。
db_settings = {
    'DB_HOST':'localhost',
    'DB_NAME':'appdb',
    'DB_USER':'appuser'
    }
app.config.updata(db_settings)
Sanic中,标准做法是使用大写字母来命名配置名称,如果将大写名称和小写名称混合使用,可能会导致某些配置无法正常读取,遇到无法解释的状况。
配置加载(Loading)
-
环境变量(Enviroment variables)
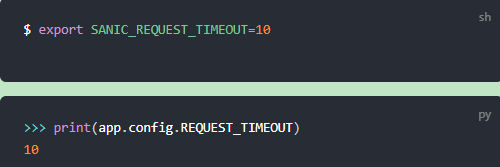
任何使用SANIC_作为前缀的环境变量都会诶加载并应用于Sanic配置。例如:在环境变量中设置SANIC_REQUEST_TIMEOUT环境变量后,将会被应用程序自动加载,并传递到REQUEST_TIMEOUT配置变量中。
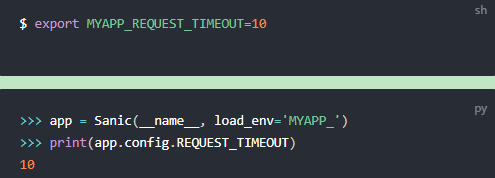
自动选择启动时应用程序要读取的变量前缀。
同样,也可以完全禁用环境变量的加载。

-
使用通用方法加载(Using Sanic.update_config)
Sanic中有一种通用的方法用于加载配置:app.update_config。可以通过向他提供文件路径、字典、类或者几乎任何其他种类的对象的路径来更新配置。-
通过文件加载(From a file)
假设有一个名为my_config.py的文件,内容如下:

可以通过将文件路径传递给app.update_config进行配置加载。

同样接受bash风格的环境变量。

-
通过字典加载(From a dict)

-
通过类加载(From a class or object)

-
内置配置(Builtin values)


超时(Timeouts)
-
请求超时(REQUEST_TIMEOUT)
请求时间用于衡量从建立 TCP 连接到整个 HTTP 请求接收完成所花费的时间。如果请求时间超过了设定的 REQUEST_TIMEOUT ,Sanic 会将其视为客户端错误并将 HTTP 408 作为响应发送给客户端。如果您的客户端需要频繁传递大量的数据, 请您将此参数调至更高或减少传输数据。 -
响应超时(RESPONSE_TIMEOUT)
响应时间用于衡量从整个 HTTP 请求接收完成到 Sanic 将响应完整发送至客户端所花费的时间。如果响应时间超过了设定的 RESONSE_TIMEOUT ,Sanic 会将其视为服务端错误并将 HTTP 503 作为响应发送给客户端。如果您的应用程序需要消耗大量的时间来进行响应,请尝试将此参数调至更高或优化响应效率。 -
长连接超时(KEEPALIVE_TIMEOUT)
Keep-Alive中文叫做长连接,它是 HTTP1.1 中引入的 HTTP 功能。当发送 HTTP 请求时,客户端(通常是浏览器)可以通过设置Keep-Alive标头来指示 http 服务器(Sanic)在发送响应之后不关闭 TCP 连接。这将允许客户端重用现有的 TCP 连接来发送后续的 HTTP 请求,以提高客户端和服务端之间的通讯效率。
TCP连接打开的时长本质上由服务器自身决定,在 Sanic 中,使用KEEP_ALIVE_TIMEOUT作为该值。默认情况下它设置为 5 秒。这与 Apache 的默认值相同。该值足够客户端发送一个新的请求。如非必要请勿更改此项。如需更改,请勿超过 75 秒,除非您确认客户端支持TCP连接保持足够久。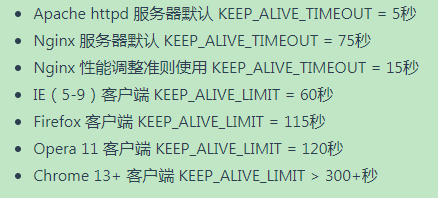
代理配置(Proxy configuration)
参照进阶->代理设置(Proxy cofiguration)
开发历程(Development)
集成到Sanic中的Web服务器不只是一个开发服务器。只要没有处于调试模式,就可以投入生成。
-
调试模式(Debug mode)
-
通过设置调试模式,Sanic会输出更为详细的输出内容,并激活自动重载功能。但是Sanic的调试模式会降低服务器的性能,因此建议只在开发环境中启用它。
from sanic import Sanic from sanic.response import json app = Sanic(__name__) @app.route('/') async def hello_world(request): return json({'hello':'world'}) if __name__ == '__main__': app.run(host='0.0.0.0', port=1234, debug=True) -
自动重载(Automatic Reloader)
auto_reload参数将开启或关闭自动重载功能。app.run(auto_reload=True)
运行Sanic(Running Sanic)
Sanic自带了一个Web服务器。在大多数情况下,推荐使用该服务器来部署Sanic应用。除此之外,还可以使用支持ASGI应用的服务器来部署Sanic,或者使用Gunicorn。
Sanic服务器(Sanic Server)
当定义了sanic.Sanic实例后,可以调用其run方法,该方法支持以下几个关键字参数。

#server.py
app = Sanic('My App')
app.run(host='0.0.0.0', port=1337, access_log=False)
python server.py
-
子进程(Workers)
-
默认情况下,Sanic在主进程中只占用一个CPU核心进行服务器的监听。若要增加并发,需要在运行参数中指定workers的数量即可。
app.run(host='0.0.0.0', port=1337, workers=4)Sanic会自动管理多个进程,并在它们之间进行负载均衡。一般将子进程数量设置和机器的CPU核心数量一样。
-
基于Linux的操作系统上,查看CPU核心数量的方法:
nproc -
使用PythonlAI获取该值方法
import multiprocessing
workers = multiprocessing.cpu_count()
app.run(..., workers=workers)
-
-
通过命令行运行(Runing via command)
-
Sanic命令行运行界面(Sanic CLI)
Sanic提供一个简单的命令行界面,来通过命令行启动。例如,在server.py文件中初始化了一个Sanic应用,可以使用命令行运行程序:sanic server.app --host=0.0.0.0 --port=1337 --workers=4 -
作为模块运行(As a module)
Sanic也可以被当做模块直接调用。python -m sanic server.app --host=0.0.0.0 --port=1337 --workers=4
-
ASGI
Sanic兼容ASGI,可以使用ASGI服务器来运行Sanic。现有的三大主流的ASGI服务器:Daphne、Uvicorn和Hypercorn。
daphe myapp:app
uvicorn myapp:app
hyperorn myapp:app
使用ASGI时需注意:
- 当使用 Sanic 服务器,websocket 功能将使用
websockets包来实现。在 ASGI 模式中,将不会使用该第三方包,因为 ASGI 服务器将会管理 websocket 链接。 - ASGI 生命周期协议 (opens new window)中规定 ASGI 只支持两种服务器事件:启动和关闭。而 Sanic 则有四个事件:启动前、启动后、关闭前和关闭后。因此,在ASGI模式下,启动和关闭事件将连续运行,并不是根据服务器进程的实际状态来运行(因为此时是由 ASGI 服务器控制状态)。因此,最好使用
after_server_start和before_server_stop。
Gunicorn
Gunicorn(Green Unicorn)是基于UNIX操作系统的WSGI HTTP服务器。它是从Ruby的Unicorn项目中移植而来,采用的是pre-fork worker模型。
为了使用 Gunicorn 来运行 Sanic 应用程序,您需要使用 Sanic 提供的 sanic.worker.GunicornWorker 类作为 Gunicorn worker-class 参数。

当通过 gunicorn 运行Sanic时,将失去 async/await 带来的诸多性能优势。Gunicorn 提供了很多配置选项,但它不是让 Sanic 全速运行的最佳坏境。
性能方面的考虑(Performance considerations)
当部署在生产环境时,确保 debug 模式处于关闭状态。
如果选择关闭了 access_log ,Sanic 将会全速运行。
如果的确需要请求访问日志,又想获得更好的性能,可以考虑使用 Nginx 作为代理,让 Nginx 来处理访问日志。这种方式要比用 Python 处理快得多得多。
Nginx部署(Nginx Deployment)
-
介绍(Introduction)
尽管 Sanic 可以直接运行在 Internet 中,但是使用代理服务器可能会更好。 例如在 Sanic 服务器之前添加 Nginx 代理服务器。这将有助于在同一台机器上同时提供多个不同的服务。 这样做还可以简单快捷的提供静态文件。包括 SSL 和 HTTP2 等协议也可以在此类代理上轻松实现。
将 Sanic 应用部署在本地,监听 127.0.0.1, 然后使用 Nginx 代理 /var/www 下的静态文件, 最后使用 Nginx 绑定域名 example.com 向公网提供服务。 -
代理Sanic(Proxied Sanic app)
被代理的应用应该设置FORWARDED_SECRET(受信任代理的密钥)用于识别真实的客户端 IP 以及其他信息。 这可以有效的防止网络中发送的伪造标头来隐藏其 IP 地址的请求。 您可以设置任意随机字符串,同时,您需要在 Nginx 中进行相同的配置。from sanic import Sanic from sanic.response import text app = Sanic('proxied_example') app.config.FORWARDED_SECRET = 'YOUR SECRET' @app.get('/') def index(request): #此处将会显示公网IP return text( f"{request.remote_addr} connected to {request.url_for('idex')}\n" f"Forwarded: {request.forwarded}\n" ) if __name__ == '__main__': app.run(host='127.0.0.0', port=8000, workers=8, access_log=False) -
Nginx配置(Nginx configuration)
在单独的upstream模块中配置keepalive来启动长连接,而不是在server中配置proxy_pass,这样可以极大的提高性能。在下面的例子中,upstream命名为server_name及域名,该名称将通过Host标头传递给 Sanic,可以按需要修改该名称,也可以提供多个服务器以达到负载均衡和故障转移。
将两次出现的example.com更改为域名,然后将YOUR SECRET替换为应用中配置的FORWAEDED_SECRET。upstream example.com{ keepalive 100; server 127.0.0.1:8000' } server{ server_name example.com; listen 443 ssl http2 default_server; listen [::];443 ssl http2 default_server; #Serve static files if found, otherwise proxy to Sanic locatioin / { root /var/www; try_files $uri @sanic; } location @sanic{ proxy_pass http://$server_name; # Allow fast streaming HTTP/1.1 pipes (keep-alive, unbuffered) proxy_http_version 1.1; proxy_request_buffering off; proxy_buffering off; #proxy forwarding (password configured in app.config.FORWARDED_SECRET) proxy_set_header forwarded "$proxy_forwarded;secret=\"YOUR SECRET\""; #Allow websockets and keep-alive (avoid connection: close) proxy_set_header connection "upgrade"; proxy_set_header upgrade $http_upgrade; } }为避免 Cookie 可见性问题和搜索引擎上的地址不一致的问题, 您可以使用以下方法将所有的访问都重定向到真实的域名上。 以确保始终为 HTTPS 访问:
# Redirect all HTTP to HTTPS with no-WWW
server {
  listen 80 default_server;
  listen [::]:80 default_server;
  server_name ~^(?:www\.)?(.*)$;
  return 301 https://$1$request_uri;
}
# Redirect WWW to no-WWW
server {
  listen 443 ssl http2;
  listen [::]:443 ssl http2;
  server_name ~^www\.(.*)$;
  return 301 $scheme://$1$request_uri;
}
上面的配置部分可以放在
/etc/nginx/sites-available/default中或其他网站配置中(如果您创建了新的配置,请务必将它们链接到sites-enabled中)。
请确保在主配置中配置了您的 SSL 证书,或者向每个 server 模块添加ssl_certificate和ssl_certificate_key配置来进行 SSL 监听。
除此之外,复制并粘贴以下内容到nginx/conf.d/forwarded.conf中:# RFC 7239 Forwarded header for Nginx proxy_pass # Add within your server or location block: # proxy_set_header forwarded "$proxy_forwarded;secret=\"YOUR SECRET\""; # Configure your upstream web server to identify this proxy by that password # because otherwise anyone on the Internet could spoof these headers and fake # their real IP address and other information to your service. # Provide the full proxy chain in $proxy_forwarded map $proxy_add_forwarded $proxy_forwarded { default "$proxy_add_forwarded;by=\"_$hostname\";proto=$scheme;host=\"$http_host\";path=\"$request_uri\""; } # The following mappings are based on # https://www.nginx.com/resources/wiki/start/topics/examples/forwarded/ map $remote_addr $proxy_forwarded_elem { # IPv4 addresses can be sent as-is ~^[0-9.]+$ "for=$remote_addr"; # IPv6 addresses need to be bracketed and quoted ~^[0-9A-Fa-f:.]+$ "for=\"[$remote_addr]\""; # Unix domain socket names cannot be represented in RFC 7239 syntax default "for=unknown"; } map $http_forwarded $proxy_add_forwarded { # If the incoming Forwarded header is syntactically valid, append to it "~^(,[ \\t]*)*([!#$%&'*+.^_`|~0-9A-Za-z-]+=([!#$%&'*+.^_`|~0-9A-Za-z-]+|\"([\\t \\x21\\x23-\\x5B\\x5D-\\x7E\\x80-\\xFF]|\\\\[\\t \\x21-\\x7E\\x80-\\xFF])*\"))?(;([!#$%&'*+.^_`|~0-9A-Za-z-]+=([!#$%&'*+.^_`|~0-9A-Za-z-]+|\"([\\t \\x21\\x23-\\x5B\\x5D-\\x7E\\x80-\\xFF]|\\\\[\\t \\x21-\\x7E\\x80-\\xFF])*\"))?)*([ \\t]*,([ \\t]*([!#$%&'*+.^_`|~0-9A-Za-z-]+=([!#$%&'*+.^_`|~0-9A-Za-z-]+|\"([\\t \\x21\\x23-\\x5B\\x5D-\\x7E\\x80-\\xFF]|\\\\[\\t \\x21-\\x7E\\x80-\\xFF])*\"))?(;([!#$%&'*+.^_`|~0-9A-Za-z-]+=([!#$%&'*+.^_`|~0-9A-Za-z-]+|\"([\\t \\x21\\x23-\\x5B\\x5D-\\x7E\\x80-\\xFF]|\\\\[\\t \\x21-\\x7E\\x80-\\xFF])*\"))?)*)?)*$" "$http_forwarded, $proxy_forwarded_elem"; # Otherwise, replace it default "$proxy_forwarded_elem"; }如果 Nginx 中不使用
conf.d和sites-available,以上配置也可以放在nginx.conf的http中。
保存修改之后,重新启动 Nginx 服务:sudo nginx -s reload现在,可以在
https://example.com/上访问您的应用了。 任何的 404 以及类似的错误都将交由 Sanic 进行处理。 静态文件存储在指定的目录下,将由 Nginx 提供访问。 -
SSL证书(SSL certificates)
如果尚未在服务器上配置有效证书,可以安装certbot和python3-certbot-nginx以使用免费的 SSL/TLS 证书,然后运行:certbot --nginx -d example.com -d www.example.com -
作为服务运行(Running as a service)
针对基于systemd的 Linux 发行版。 创建一个文件:/etc/systemd/system/sanicexample.service并写入以下内容:[Unit] Description=Sanic Example [Service] User=nobody WorkingDirectory=/srv/sanicexample ExecStart=/usr/bin/env python3 sanicexample.py Restart=always [Install] WantedBy=multi-user.target之后重新加载服务文件,启动服务并允许开机启动:
sudo systemctl daemon-reload
sudo systemctl start sanicexample
sudo systemctl enable sanicexample
参考资料
WebSocket 教程
