文章目录
1、CAP 定理
1.1 概念
CAP 定理指的是在一个分布式系统中,Consistency(一致性)、 Availability(可用性)、Partition tolerance(分区容错性),三者不可兼得。
- 一致性(C) 分布式系统中多个主机之间是否能够保持数据一致的特性。即,当系统数据发生更新操作后,各个主机中的数据仍然处于一致的状态。
- 可用性(A) 系统提供的服务必须一直处于可用的状态,即对于用户的每一个请求,系统总是可以在有限的时间内对用户做出响应。
- 分区容错性(P) 分布式系统在遇到任何网络分区故障时,仍能够保证对外提供满足一致性和可用性的服务
。
1.2 定理
CAP 定理的内容是:对于分布式系统,网络环境相对是不可控的,出现网络分区是不可避免的,因此系统必须具备分区容错性。但系统不能同时保证一致性与可用性。即要么 CP,要么 AP。
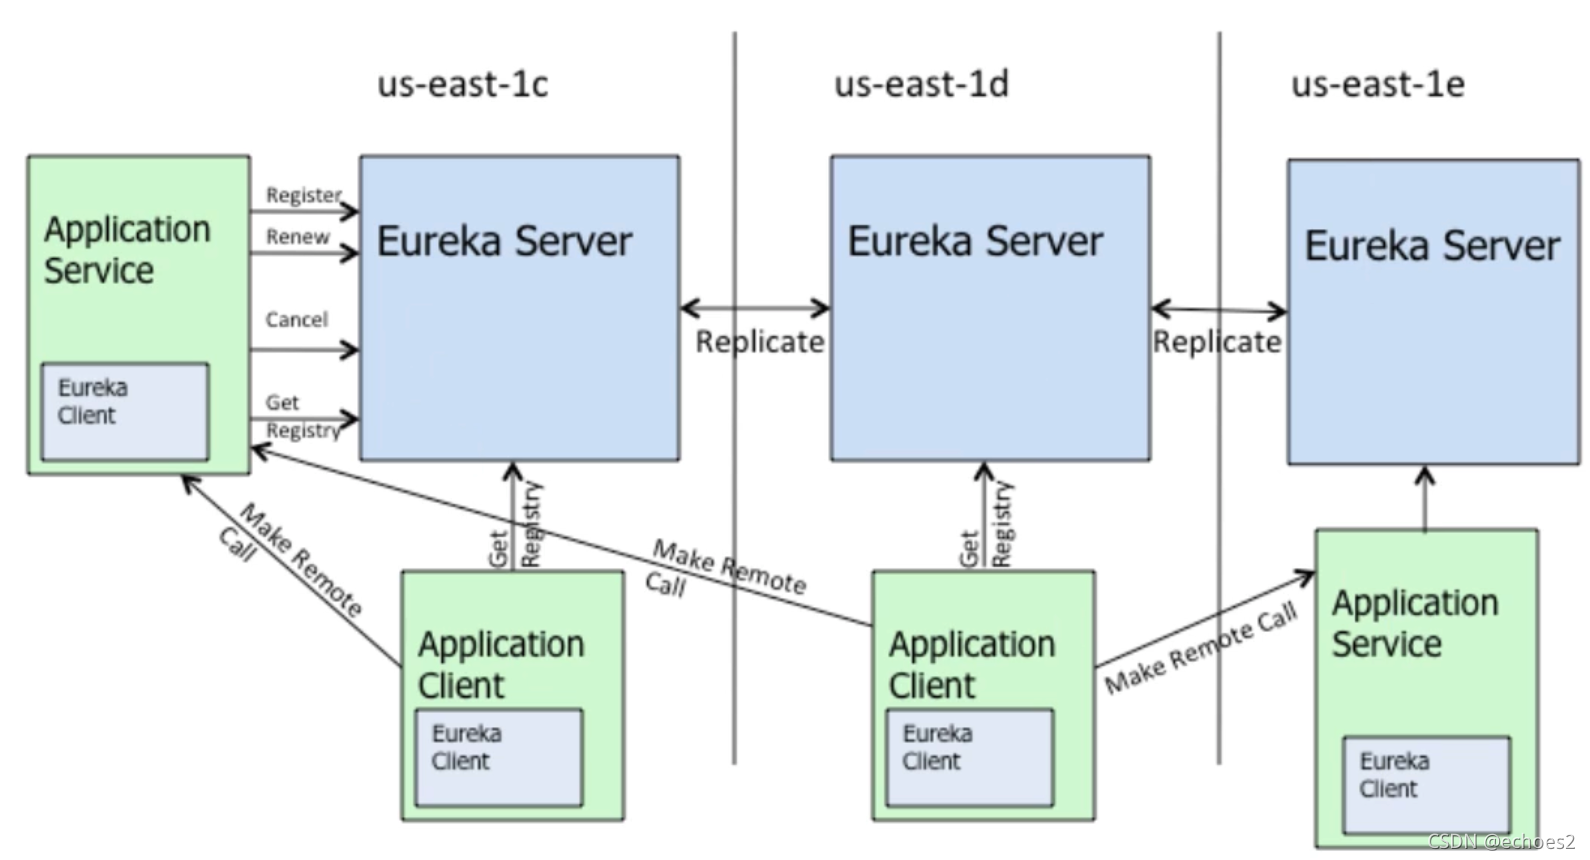
2、EUREKA架构图

3、创建 Eureka 服务中心 00-eurekaserver-8000
3.1、总步骤
- 添加 Eureka Server 依赖
- 在配置文件中配置 Eureka Serve
- 在启动类上添加@EnableEurekaServer 注解,启动 Eureka Server 功能
3.1.1导入依赖
若你使用的是 JDK6、7、8,那么这些依赖无需导入。而 JDK9 及其以上版本需要导入。
<dependency>
        <groupId>javax.xml.bind</groupId>
        <artifactId>jaxb-api</artifactId>
        <version>2.2.11</version>
    </dependency>
    <dependency>
        <groupId>com.sun.xml.bind</groupId>
        <artifactId>jaxb-core</artifactId>
        <version>2.2.11</version>
    </dependency>
    <dependency>
        <groupId>com.sun.xml.bind</groupId>
        <artifactId>jaxb-impl</artifactId>
        <version>2.2.11</version>
    </dependency>
    <dependency>
        <groupId>javax.activation</groupId>
        <artifactId>activation</artifactId>
        <version>1.1.1</version>
</dependency>
3.1.2 修改 application.yml 文件
server:
  port: 8000
eureka:
  instance:
    hostname: localhost
  client:
    register-with-eureka: false #指定当前主机是否需要想Eureka Server注册自己
    fetch-registry: false #指定当前主机是否需要想Eureka Server下载注册表
    service-url:
      #当前Eureka Server 对外暴露的服务地址
      #defaultZone: http://${eureka.instance.hostname}:${server.port}/eureka
      defaultZone: http://localhost:8000/eureka
  server:
#    设置自我保护机制的阈值,默认0.85
    renewal-percent-threshold: 0.75
#    关闭自我保护机制,默认ture
    enable-self-preservation: true
#    server剔除不可用服务时间,单位:ms
    eviction-interval-timer-in-ms: 4000
在短时间内若 EurekaServer 丢失较多微服务,即 EurekaServer 收到的心跳数量小于阈值,为了保证系统的可用性(AP),给那些由于网络抖动而被认为宕机的客户端“重新复活”的机会,Eureka 会自动进入自我保护模式:服务列表只可读取、写入,不可执行删除操作。当EurekaServer 收到的心跳数量恢复到阈值以上时,其会自动退出Self Preservation 模式
3.1.3 启动类上添加@EnableEurekaServer 注解

3.2 启动,测试
GUI 上的属性值
- Renews threshold:Eureka Server 期望每分钟收到客户端的续约总数。 count * 0.85 / 15
- Renews (last min):Eureka Server 实际在最后一分钟收到客户端的续约数量。
- 说明:若 Renews (last min) < Renews threshold ,就会启动自我保护

4、创建提供者工程 02-provider-8081
4.1、总步骤
- 添加 Eureka Client 依赖
- 在配置文件中指定要注册的 Eureka Server 地址,指定自己微服务名称
4.1.1导入依赖
<properties>
    <java.version>1.8</java.version>
    <spring-cloud.version>2020.0.3</spring-cloud.version>
</properties>
 <!--eureka 客户端依赖-->
    <dependency>
        <groupId>org.springframework.cloud</groupId>
        <artifactId>spring-cloud-starter-netflix-eureka-client</artifactId>
    </dependency>
</dependencies>
<!--spring cloud依赖-->
<dependencyManagement>
    <dependencies>
        <dependency>
            <groupId>org.springframework.cloud</groupId>
            <artifactId>spring-cloud-dependencies</artifactId>
            <version>${spring-cloud.version}</version>
            <type>pom</type>
            <scope>import</scope>
        </dependency>
    </dependencies>
</dependencyManagement>
4.1.2 修改 application.yml 文件
Spring:
  #指定微服务名称
  application:
    name: abcmsc-provider-depart

eureka:
  client:
    service-url:
      #指定当前client所要连接的 Eureka server
      defaultZone: http://localhost:8000/eureka


#region与zone -》1:n
#zone与ureka -》1:n
#复杂配置
eureka:
  client:
#    指定区域名称
    region: tyh
#    指定区域中所包含的地带zone
    availability-zones:
      tyh: tyh01,tyh02
#      指定各个地带zone中所包含的Eureka server地址
    service-url:
      tyh01: http://localhost:8000/eureka
      tyh02: http://localhost:8000/eureka
#      指定要连接的注册中心所在区域
    fetch-remote-regions-registry: tyh
5、创建消费者工程 02-consumer-8080
5.1、总步骤
- 添加 Eureka Client 依赖
- 在配置文件中指定要注册的 Eureka Server 地址,指定自己微服务名称
- 在 JavaConfig 类中为 RestTemplate 添加@LoadBalance 注解,实例负载均衡
- 修改处理器,将“主机名:端口” -> “提供者微服务名称”
5.1.1导入依赖
<properties>
    <java.version>1.8</java.version>
    <spring-cloud.version>2020.0.3</spring-cloud.version>
</properties>
<!--actuator 依赖-->
<dependency>
    <groupId>org.springframework.boot</groupId>
    <artifactId>spring-boot-starter-actuator</artifactId>
</dependency>
 <!--eureka 客户端依赖-->
    <dependency>
        <groupId>org.springframework.cloud</groupId>
        <artifactId>spring-cloud-starter-netflix-eureka-client</artifactId>
    </dependency>

<!--spring cloud依赖-->
<dependencyManagement>
    <dependencies>
        <dependency>
            <groupId>org.springframework.cloud</groupId>
            <artifactId>spring-cloud-dependencies</artifactId>
            <version>${spring-cloud.version}</version>
            <type>pom</type>
            <scope>import</scope>
        </dependency>
    </dependencies>
</dependencyManagement>
5.1.2 修改 application.yml 文件
Spring:
  #指定微服务名称
  application:
    name: abcmsc-consumer-depart
eureka:
  client:
    service-url:
      #指定当前client所要连接的 Eureka server
      defaultZone: http://localhost:8000/eureka
5.1.3 RestTemplate 添加@LoadBalance 注解,实例负载均衡

5.1.4修改处理器,将“主机名:端口” -> “提供者微服务名称”

6、服务发现Discovery


7、服务下线(通过 actuator 监控实现 )
- 服务下架:将注册到 Eureka Server 中的 Eureka Client 从 Server 的注册表中移除,这样其
实 Client 就无法发现该 Client 了。 - 服务下线:Client并没有从Eureka Server的注册表中移除(其它Client仍可发现该服务),
而是通过修改服务的状态来到达其它 Client
7.1服务下架
1,修改yml配置
#开启所有监控终端
management:
  endpoints:
    web:
      exposure:
        include: "*"
#  开启shutdown监控终端
  endpoint:
    shutdown:
      enabled: true
2,测试

7.2 服务平滑上下线
(通过修改服务的状态为 UP 或 DOWN 来设置提供者是否可用,而无需重启应用。这种方式通常称为服务的平滑上下线。)
1,修改yml配置
#开启所有监控终端
management:
  endpoints:
    web:
      exposure:
        include: "*"
2运行测试(“DOWN”下线,“UP”上线)


8、搭建Eureka Server集群
8.1 设置域名
修改 hosts文件,sudo vi /etc/hosts
127.0.0.1 eureka8100.com
127.0.0.1 eureka8200.com
127.0.0.1 eureka8300.com

8.2 创建00-eurekaserver-(8100~8300)
1.复制00-eurekaserver8000
2.修改pom

3.修改配置文件application.yml

复制配置
#region与zone -》1:n
#zone与ureka -》1:n
#复杂配置
eureka:
  client:
     register-with-eureka: true
    fetch-registry: true
#    指定区域名称
    region: tyh
#    指定区域中所包含的地带zone
    availability-zones:
      tyh: tyh01,tyh02
#      指定各个地带zone中所包含的Eureka server地址
    service-url:
      tyh01: http://localhost:8000/eureka
      tyh02: http://localhost:8000/eureka
#      指定要连接的注册中心所在区域
    fetch-remote-regions-registry: tyh
    server:
        waitTimeInMsWhenSyncEmpty: 0
        enableSelfPreservation: false