探花交友
文章目录
- ***探花交友***
- 探花详细实现
- 1.项目介绍
- 2.环境搭建
- 3.aliyun短信验证码
- 4 登录
- 3完善用户信息
- 4个人资料管理
- 5统一处理
- 6通用设置
- 7MongoDB
- 8圈子功能
- 9即时通信
- 10附近的人
- 11小视频方案
- 总结
一 dubbo前置课
1 . dubbo是什么
dubbo是服务调用,可以代替feign
controller调用service
2. dubbo架构
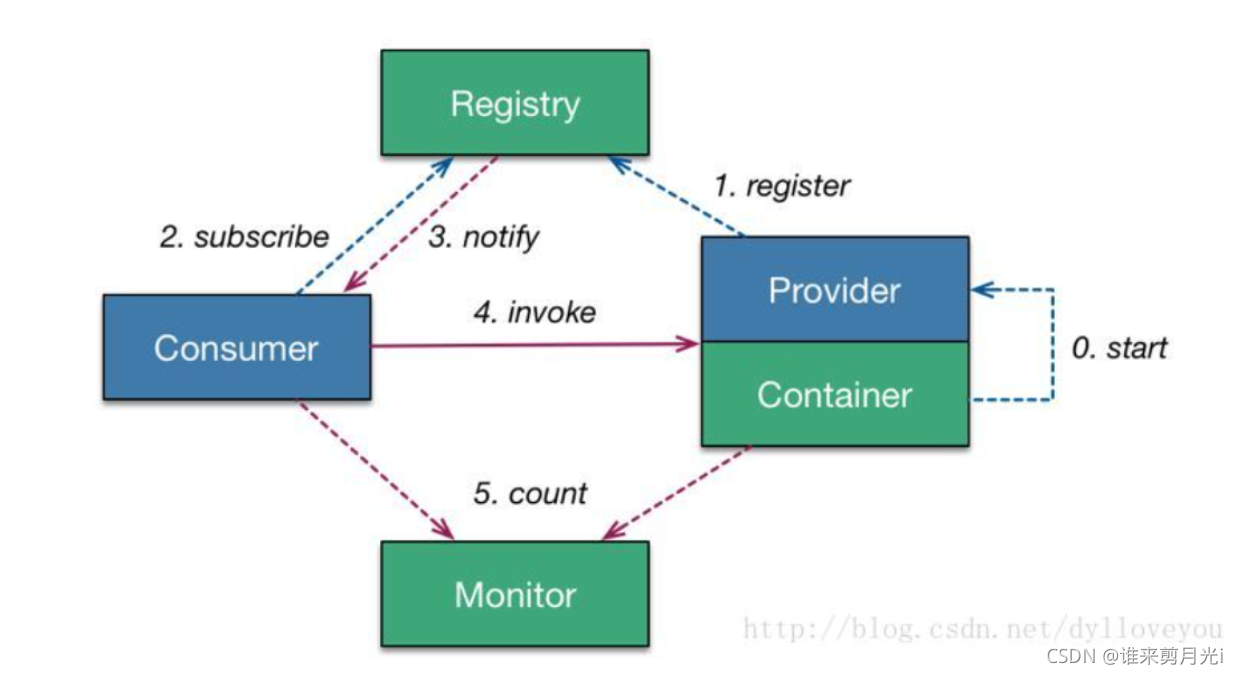

3. dubbo基本使用
3.1 服务提供者
1. 导依赖
 <!--dubbo的起步依赖-->
    <dependency>
        <groupId>org.apache.dubbo</groupId>
        <artifactId>dubbo-spring-boot-starter</artifactId>
        <version>2.7.8</version>
    </dependency>

    <dependency>
        <groupId>org.apache.dubbo</groupId>
        <artifactId>dubbo-registry-nacos</artifactId>
        <version>2.7.8</version>
    </dependency>
2. 写yml
server:
  port: 18081
spring:
  datasource:
    url: jdbc:mysql://localhost:3306/dubbo-demo?useSSL=false
    username: root
    password: root
    driver-class-name: com.mysql.jdbc.Driver
  application:
    name: user-provider
logging:
  level:
    cn.itcast: debug
  pattern:
    dateformat: HH:mm:ss:SSS
dubbo:
  protocol:
    name: dubbo
    port: 20881
  registry:
    address: nacos://127.0.0.1:8848
  scan:
    base-packages: cn.itcast.user.service
3.改注解
在service实现类的@servcie注解改为@DubboService注解
把这个service不在交割spring管理,而是交给dubbo管理
@DubboService
public class UserServiceImpl implements UserService
3.2 服务消费者
1.导依赖
<!--dubbo的起步依赖-->
    <dependency>
        <groupId>org.apache.dubbo</groupId>
        <artifactId>dubbo-spring-boot-starter</artifactId>
        <version>2.7.8</version>
    </dependency>

    <dependency>
        <groupId>org.apache.dubbo</groupId>
        <artifactId>dubbo-registry-nacos</artifactId>
        <version>2.7.8</version>
    </dependency>
2.写yml
提供者不需要
dubbo:
  protocol:
    name: dubbo
    port: 20881
server:
  port: 18080
spring:
  application:
    name: user-consumer
logging:
  level:
    cn.itcast: debug
  pattern:
    dateformat: HH:mm:ss:SSS
dubbo:
  registry:
    address: nacos://127.0.0.1:8848
3.改注解
@Autowired改为@DubboReference

@DubboReference
    private UserService userService;
dubbo不能请求发对象,如果想法对象必须实现序列化
public class User implements Serializable {}
3.3启动检查
dubbo:
  registry:
    address: nacos://127.0.0.1:8848
  consumer:
    check: false
3.4超时与重试
dubbo:
  consumer:
    timeout: 3000
    retries: 0
3.5多版本
3.6负载均衡

4. springCloud 整合Dubbo
探花详细实现
1.项目介绍
1.技术选型
前端:
- flutter + android + 环信SDK + redux + shared_preferences + connectivity + iconfont + webview + sqflite
后端:
- Spring Boot + SpringMVC + Mybatis + MybatisPlus + Dubbo
- Elasticsearch geo 实现地理位置查询
- MongoDB 实现海量数据的存储
- Redis 数据的缓存
- Spark + MLlib 实现智能推荐
- 第三方服务 环信即时通讯
- 第三方服务 阿里云 OSS 、 短信服务
- 第三方服务 虹软开放平台 / 阿里云
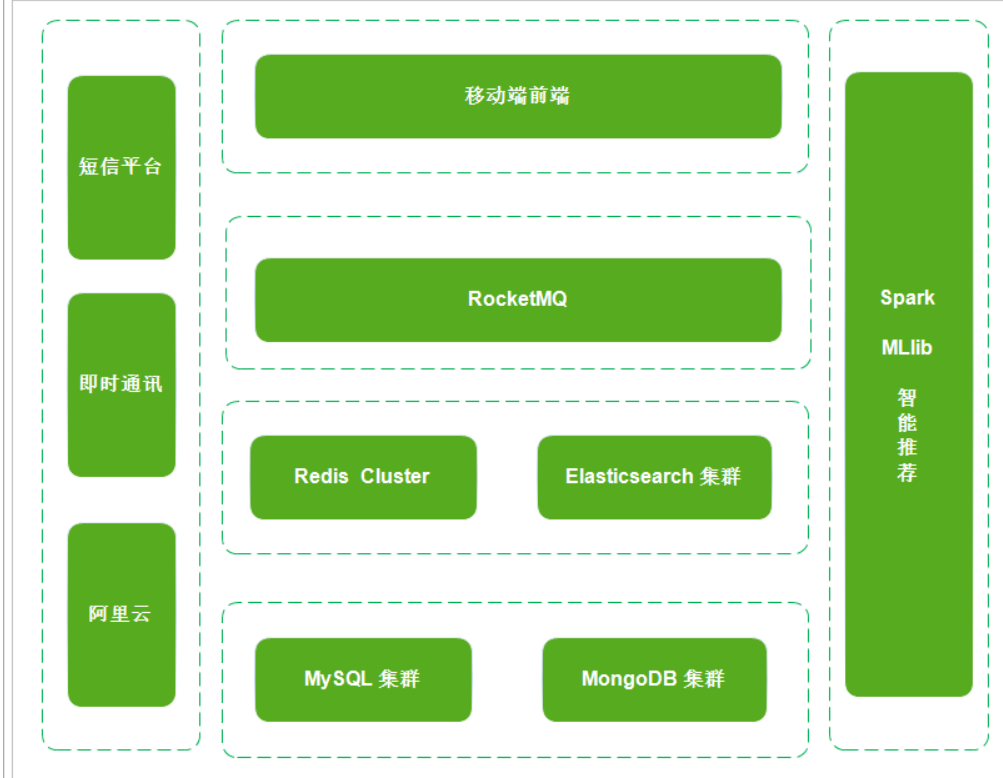
2.技术解决方案
- 使用Elasticsearch geo实现附近的人的解决方案
- 使用Spark + Mllib实现智能推荐的解决方案
- 使用MongoDB进行海量数据的存储的解决方案
- 使用采用分布式文件系统存储小视频数据的解决方案
- 使用百度人脸识别的解决方案
- 使用阿里云进行短信验证码发送的解决方案
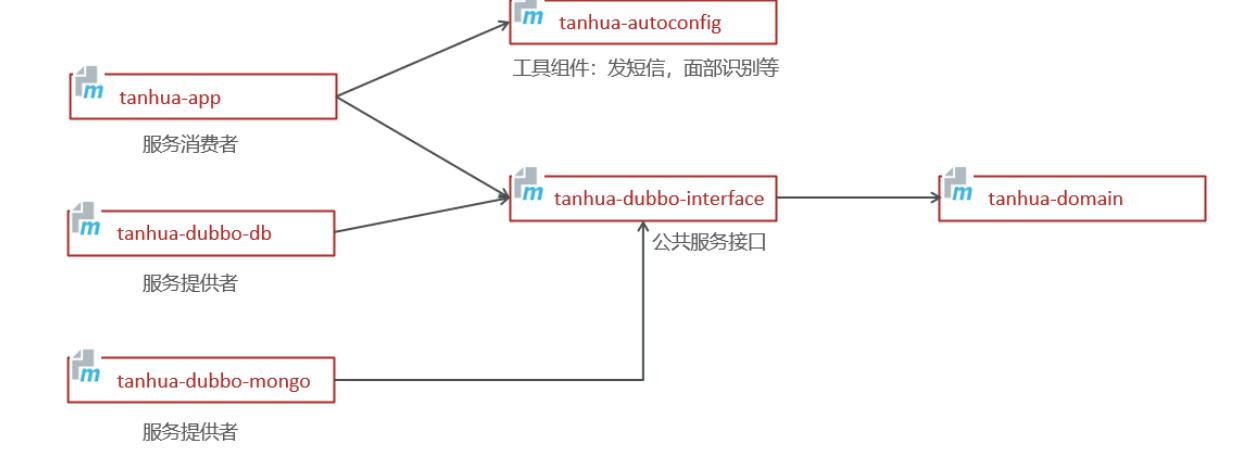
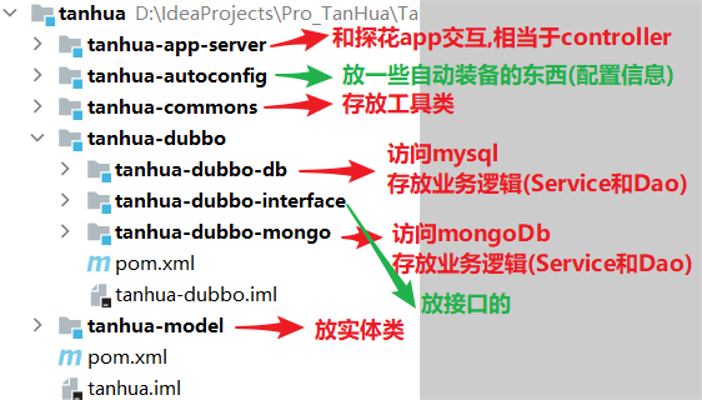
2.环境搭建
3.aliyun短信验证码
1.示例代码
在官网自动生模板
https://next.api.aliyun.com/api/Dysmsapi
 public static com.aliyun.dysmsapi20170525.Client createClient(String accessKeyId, String accessKeySecret) throws Exception {
        Config config = new Config()
                // 您的AccessKey ID
                .setAccessKeyId(accessKeyId)
                // 您的AccessKey Secret
                .setAccessKeySecret(accessKeySecret);
        // 访问的域名
        config.endpoint = "dysmsapi.aliyuncs.com";
        return new com.aliyun.dysmsapi20170525.Client(config);
    }

    public static void main(String[] args_) throws Exception {
        java.util.List<String> args = java.util.Arrays.asList(args_);
        com.aliyun.dysmsapi20170525.Client client = Sample.createClient("accessKeyId", "accessKeySecret");
        SendSmsRequest sendSmsRequest = new SendSmsRequest()
                .setPhoneNumbers("16639176831")
                .setSignName("探花交友")
                .setTemplateCode("SMS_204756728")
                .setTemplateParam("{\"code\":\"1234\"}");
        // 复制代码运行请自行打印 API 的返回值
        client.sendSms(sendSmsRequest);
    }
增强后的代码
    public static void main(String[] args_) throws Exception {
        String accessKeyId="LTAI5tFzUPSsSokQDv8buGZz";
        String accessKeySecret="aHcA1ptL54sy9k4dE6VpX7DWIqJIjn";
         Config config = new Config()
                // 您的AccessKey ID
                .setAccessKeyId(accessKeyId)
                // 您的AccessKey Secret
                .setAccessKeySecret(accessKeySecret);
        // 访问的域名
        config.endpoint = "dysmsapi.aliyuncs.com";
         com.aliyun.dysmsapi20170525.Client client= new com.aliyun.dysmsapi20170525.Client(config);
        SendSmsRequest sendSmsRequest = new SendSmsRequest()
                .setPhoneNumbers("16639176831")
                .setSignName("探花交友")
                .setTemplateCode("SMS_204756728")
                .setTemplateParam("{\"code\":\"1234\"}");
        // 复制代码运行请自行打印 API 的返回值
       SendSmsResponse response = client.sendSms(sendSmsRequest);
        SendSmsResponseBody body = response.getBody();
    }
2.封装短信服务组件
1.把短信服务写成工具类,让SpringBoot自动装配我们的工具类
企业开发中,往往将常见工具类封装抽取,以简洁便利的方式供其他工程模块使用。而SpringBoot的自动装配机制可以方便的实现组件抽取。SpringBoot执行流程如下
- 扫描依赖模块中META-INF/spring.factories
- 执行装配类中方法
- 对象存入容器中
- 核心工程注入对象,调用方法使用收到
2步骤
1. 写 短信组件工具类提供方法
由于我们不能把短信服务中的参数写死,我们要把他抽取出来写到配置文件中,给出相应的配置类,利用有参构造写入类中,将其中的参数利用配置类写入方法中

package com.tanhua.autoconfig.template;

import com.aliyun.dysmsapi20170525.models
import com.aliyun.dysmsapi20170525.models.SendSmsResponse;
import com.aliyun.dysmsapi20170525.models.SendSmsResponseBody;
import com.aliyun.teaopenapi.models.Config;
import com.tanhua.autoconfig.properties.SmsProperties;

public class SmsTemplate {

    private SmsProperties properties;

    public SmsTemplate(SmsProperties properties) {
        this.properties = properties;
    }
    public void sendSms(String mobile,String code) {

        try {
            //配置阿里云
            Config config = new Config()
                    // 您的AccessKey ID
                    .setAccessKeyId(properties.getAccessKey())
                    // 您的AccessKey Secret
                    .setAccessKeySecret(properties.getSecret());
            // 访问的域名
            config.endpoint = "dysmsapi.aliyuncs.com";

            com.aliyun.dysmsapi20170525.Client client =  new com.aliyun.dysmsapi20170525.Client(config);

            SendSmsRequest sendSmsRequest = new SendSmsRequest()
                    .setPhoneNumbers(mobile)
                    .setSignName(properties.getSignName())
                    .setTemplateCode(properties.getTemplateCode())
                    .setTemplateParam("{\"code\":\""+code+"\"}");
            // 复制代码运行请自行打印 API 的返回值
            SendSmsResponse response = client.sendSms(sendSmsRequest);

            SendSmsResponseBody body = response.getBody();

            System.out.println(body.getMessage());

        }catch (Exception e) {
            e.printStackTrace();
        }

    }

}
2.写yml
#tanhua-app-server工程加入短信配置

tanhua:
  sms:
    signName: 探花交友
    templateCode: SMS_204756728
    accessKey: LTAI5tFzUPSsSokQDv8buGZz
    secret: aHcA1ptL54sy9k4dE6VpX7DWIqJIjn
3.写配置类
package com.tanhua.autoconfig.properties;

import lombok.Data;
import org.springframework.boot.context.properties.ConfigurationProperties;

@Data
@ConfigurationProperties(prefix = "tanhua.sms")
public class SmsProperties {
    private String signName;
    private String templateCode;
    private String accessKey;
    private String secret;

}
4写自动装配类和自动装配配置
根据自动装配原则,在tanhua-autoconfig工程创建 /META-INF/spring.factories文件
org.springframework.boot.autoconfigure.EnableAutoConfiguration=\
com.tanhua.autoconfig.TanhuaAutoConfiguration
在com.tanhua.autoconfig中我们写一个类作为自动装配类如下
package com.tanhua.autoconfig;


import com.tanhua.autoconfig.properties.*;
import com.tanhua.autoconfig.template.*;
import org.springframework.boot.autoconfigure.condition.ConditionalOnProperty;
import org.springframework.boot.context.properties.EnableConfigurationProperties;
import org.springframework.context.annotation.Bean;

@EnableConfigurationProperties({
        SmsProperties.class
})
public class TanhuaAutoConfiguration {

    @Bean
    public SmsTemplate smsTemplate(SmsProperties properties) {
        return new SmsTemplate(properties);
    }
}
@EnableConfigurationProperties作用:
使我们配置类上的**@ConfigurationProperties(prefix = “tanhua.sms”)**生效
5在tanhua-app-server中单元测试测试
@RunWith(SpringRunner.class)
@SpringBootTest(classes = AppServerApplication.class)
public class SmsTemplateTest {

    //注入
    @Autowired
    private SmsTemplate smsTemplate;

    //测试
    @Test
    public void testSendSms() {
        smsTemplate.sendSms("18618412321","4567");
    }
}
在tanhua-autoconfig中我们并没有手动创建SmsTemplate的对象也没有在其中加入@component注解为什么tanhua-app-server可以直接注入,spring容器中为什么会有这个对象:
为什么需要spring.factories文件,
因为我们整个项目里面的入口文件只会扫描整个项目里面下的@Compont @Configuration等注解
但是如果我们是引用了其他jar包,而其他jar包只有@Bean或者@Compont等注解,是不会扫描到的

核心工程会找到每一个依赖模块的下的 /META-INF/spring.factories
根据spring.factories的EnableAutoConfiguration执行其中的类
而在这个类中往往会有@Bean,会将这个对象创建到spring容器中
我们就可以在核心模块中直注入使用
4 登录
1.登录验证码
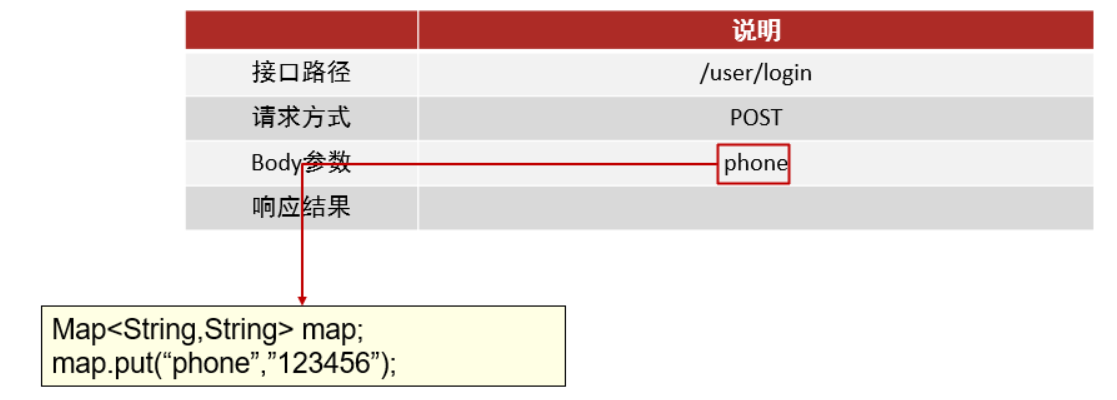
可以参考api文档
http://192.168.136.160:3000/project/19/interface/api/94
1.流程分析
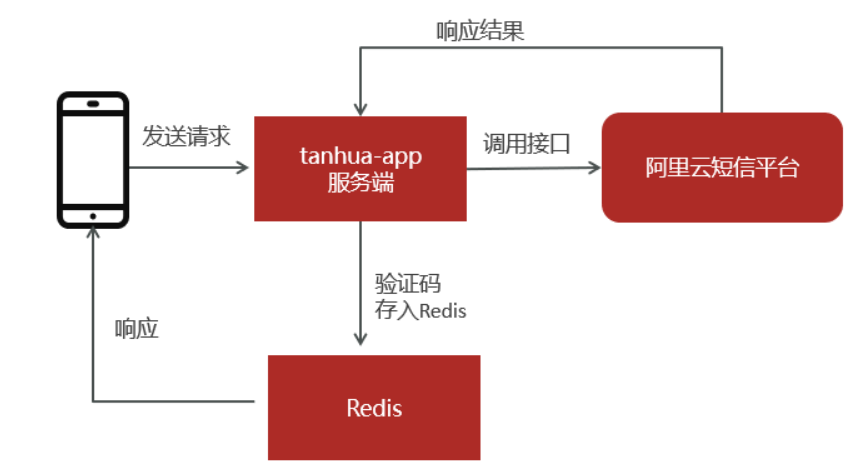
客户端发送请求
服务端调用第三方组件发送验证码
验证码发送成功,存入redis
响应客户端,客户端跳转到输入验证码页面
2 .代码实现
1、搭建SpringBoot运行环境(引导类,配置文件)
2、定义业务层方法,根据手机号码发送短信
3、编写Controller接受请求参数
4、数据响应
tanhua-app-server
application.yml
#服务端口
server:
  port: 18080
spring:
  application:
    name: tanhua-app-server
  redis:  #redis配置
    port: 6379
    host: 192.168.136.160
  cloud:  #nacos配置
    nacos:
      discovery:
        server-addr: 192.168.136.160:8848
dubbo:    #dubbo配置
  registry:
    address: spring-cloud://localhost
  consumer:
    check: false
tanhua:
  sms:
    signName: 探花交友
    templateCode: SMS_204756728
    accessKey: LTAI5tFzUPSsSokQDv8buGZz
    secret: aHcA1ptL54sy9k4dE6VpX7DWIqJIjn
UserService

注入 SmsTemplate和RedisTemplate<String,String>
写方法调用短信服务,然后把验证码存入redis中并设置5分钟有效
package com.tanhua.server.service;

import com.tanhua.autoconfig.template.SmsTemplate;
import org.apache.commons.lang.RandomStringUtils;
import org.springframework.beans.factory.annotation.Autowired;
import org.springframework.data.redis.core.RedisTemplate;
import org.springframework.stereotype.Service;

import java.time.Duration;

@Service
public class UserService {

    @Autowired
    private SmsTemplate smsTemplate;

    @Autowired
    private RedisTemplate<String,String> redisTemplate;

    public void sendMsg(String phone){
        //1、随机生成6位数字
        String code = RandomStringUtils.randomNumeric(6);
        //2、调用template对象,发送手机短信
        //smsTemplate.send(phone,code);
        //3、将验证码存入到redis
       // redisTemplate.opsForValue().set("CHECK_CODE_"+phone,code, Duration.ofMillis(5));
        redisTemplate.opsForValue().set("CHECK_CODE_"+phone,code, Duration.ofMinutes(5));
    }
}
LoginController
根据文档路径/user/login用restful风格P写出访问方法并用ResponseEntity作为返回参数
package com.tanhua.server.controller;

import com.tanhua.server.service.UserService;
import org.springframework.beans.factory.annotation.Autowired;
import org.springframework.http.ResponseEntity;
import org.springframework.web.bind.annotation.PostMapping;
import org.springframework.web.bind.annotation.RequestBody;
import org.springframework.web.bind.annotation.RequestMapping;
import org.springframework.web.bind.annotation.RestController;

import java.util.Map;

@RestController
@RequestMapping("/user")
public class LoginController {

    @Autowired
    private UserService userService;

    @PostMapping("/login")
    public ResponseEntity login(@RequestBody Map map){
        String phone = (String) map.get("phone");
        userService.sendMsg(phone);
        //return ResponseEntity.status(500).body("出错了");
        return ResponseEntity.ok(null);
    }
}
3 PostMan访问测试
post请求http:localhost:18080/user/login
并在请求中添加json数据
2. 用户登录
1.jwt介绍
JSON Web token简称JWT, 是用于对应用程序上的用户进行身份验证的标记。也就是说, 使用 JWTS 的应用程序不再需要保存有关其用户的 cookie 或其他session数据。此特性便于可伸缩性, 同时保证应用程序的安全
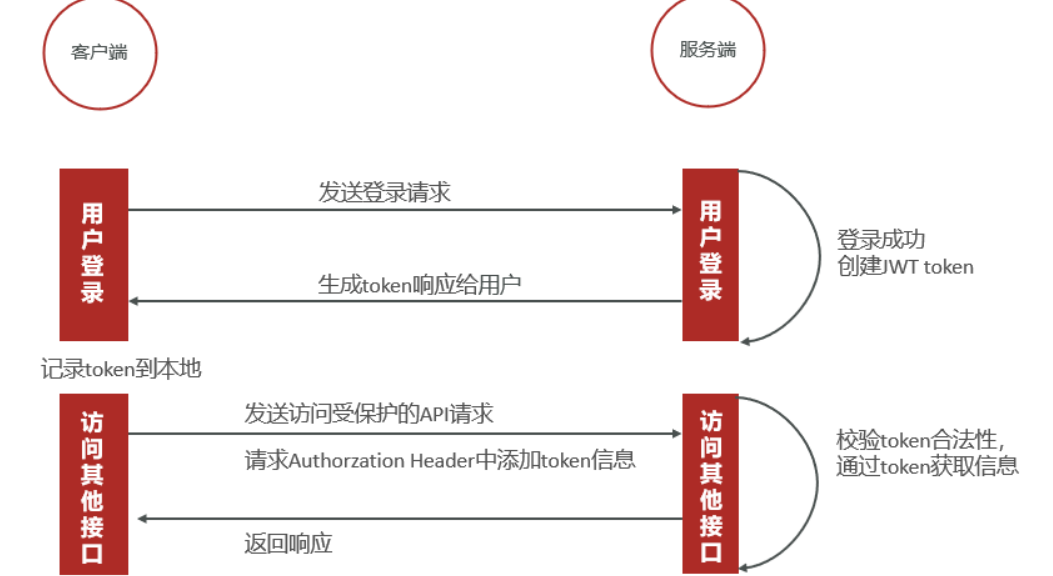
2. 案例
导依赖
<dependency>
    <groupId>io.jsonwebtoken</groupId>
    <artifactId>jjwt</artifactId>
    <version>0.9.1</version>
</dependency>
生成token
public void testCreateToken() {
        //生成token
        //1、准备数据
        Map map = new HashMap();
        map.put("id",1);
        map.put("mobile","13800138000");
        //2、使用JWT的工具类生成token
        long now = System.currentTimeMillis();
        String token = Jwts.builder()
                .signWith(SignatureAlgorithm.HS512, "itcast") //指定加密算法
                .setClaims(map) //写入数据
                .setExpiration(new Date(now + 30000)) //失效时间
                .compact();
        System.out.println(token);
    }
解析token
 /**
     * SignatureException : token不合法
     * ExpiredJwtException:token已过期
     */
    @Test
    public void testParseToken() {
        String token = "eyJhbGciOiJIUzUxMiJ9.eyJtb2JpbGUiOiIxMzgwMDEzODAwMCIsImlkIjoxLCJleHAiOjE2MTgzOTcxOTV9.2lQiovogL5tJa0px4NC-DW7zwHFqZuwhnL0HPAZunieGphqnMPduMZ5TtH_mxDrgfiskyAP63d8wzfwAj-MIVw";
        try {
            Claims claims = Jwts.parser()
                    .setSigningKey("itcast")
                    .parseClaimsJws(token)
                    .getBody();
            Object id = claims.get("id");
            Object mobile = claims.get("mobile");
            System.out.println(id + "--" + mobile);
        }catch (ExpiredJwtException e) {
            System.out.println("token已过期");
        }catch (SignatureException e) {
            System.out.println("token不合法");
        }

    }
3 完成用户登录

接口文档

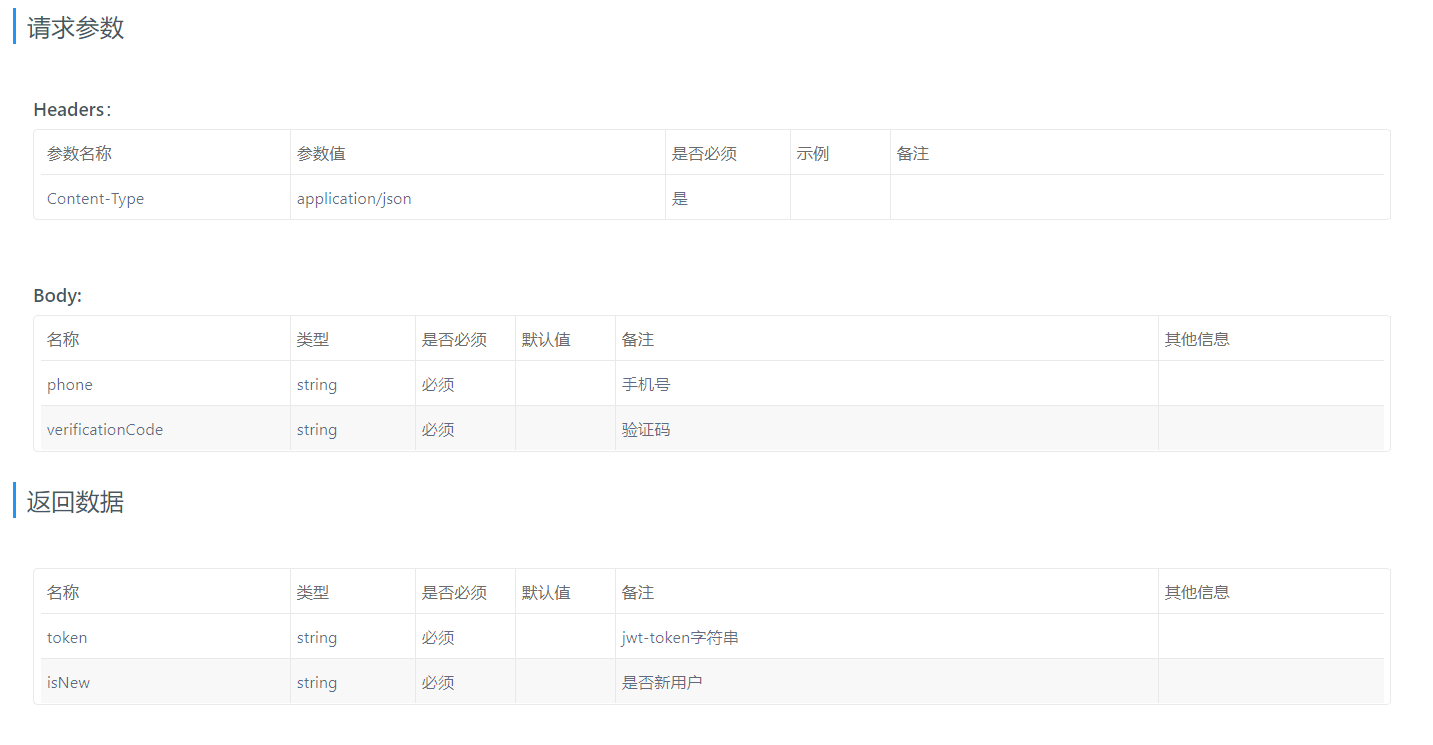
思路:
   当输入手机号时获取验证码 ,通过aliyun短信服务会收到验证码短信,切验证码会存到redis中
   然后用户输入验证码,请求发送到java服务器端进行验证码校验
   验证码校验通过会校验手机号请求数据库判断号码是否存在,如果存在这是老用户,不存在则会创建新用户进行注册
   通过JwtUtils传入Map集合(集合中存入id和mobile)生成token
   新用户isNew为true 老用户为false
   用map集合接收token和isNew然后用responseEntity返回结果
实现代码
LoginController
   @PostMapping("/loginVerification")
    public ResponseEntity loginVerification (@RequestBody Map map){
        //1 获取参数
        String phone = (String) map.get("phone");
        String code = (String) map.get("verificationCode");
        //2 调用service方法
        Map resMap = userService.loginVerification(phone, code);
        //3 返回
        return ResponseEntity.ok(resMap);
    }
UserService
@DubboReference  //调用Dubbo服务
    private UserApi userApi;
public Map loginVerification(String phone,String code){
        //1 从redis中获取验证码
        String redisCode = redisTemplate.opsForValue().get("CHECK_CODE_" + phone);
        //2 校验验证码(验证码是否存在,是否和输入的验证码一致)
        if (StringUtils.isEmpty(redisCode)||!redisCode.equals(code)){
            throw new RuntimeException("验证码无效");
        }
        //3 删除redis中的验证码
        redisTemplate.delete("CHECK_CODE_" + phone);
        //4 通过手机号查询用户
        User user = userApi.findByMobile(phone);
        //5 如果用户不存在这创建用户保存到数据库中
        boolean isNew =false;
        if (user==null){
            user=new User();
            user.setMobile(phone);
            user.setPassword(DigestUtils.md5Hex("123456"));
            user.setCreated(new Date());
            user.setUpdated(new Date());
            long userId=userApi.save(user);
            user.setId(userId);
            isNew=true;
        }
        //6通过Jwt生成token
        Map map=new HashMap();
        map.put("id",user.getId());
        map.put("mobile",phone);
        String token = JwtUtils.getToken(map);
        //7 返回
        Map retMap =new HashMap();
        retMap.put("token",token);
        retMap.put("isNew",isNew);
        return retMap;
    }
UserMapper
public interface UserMapper extends BaseMapper<User> {
}
UserApi
public interface UserApi {

    public User findByMobile(String mobile);

    long save(User user);
}
UserApiImpl
@DubboService //注入Dubbo服务
public class UserApiImpl implements UserApi{

    @Autowired
    private UserMapper userMapper;

//通过手机号查询用户
    @Override
    public User findByMobile(String mobile) {
        QueryWrapper<User> qw =new QueryWrapper<>();
        qw.eq("mobile",mobile);
        return userMapper.selectOne(qw);
    }

//添加用户并返回用户id
    @Override
    public long save(User user) {
        userMapper.insert(user);
        return user.getId();
    }
}
JwtUtils
public class JwtUtils {

    // TOKEN的有效期1小时(S)
    private static final int TOKEN_TIME_OUT = 1 * 3600;

    // 加密KEY
    private static final String TOKEN_SECRET = "itcast";


    // 生成Token
    public static String getToken(Map params){
        long currentTime = System.currentTimeMillis();
        return Jwts.builder()
                .signWith(SignatureAlgorithm.HS512, TOKEN_SECRET) //加密方式
                .setExpiration(new Date(currentTime + TOKEN_TIME_OUT * 1000)) //过期时间戳
                .addClaims(params)
                .compact();
    }


    /**
     * 获取Token中的claims信息
     */
    public static Claims getClaims(String token) {
        return Jwts.parser()
                .setSigningKey(TOKEN_SECRET)
                .parseClaimsJws(token).getBody();
    }


    /**
     * 是否有效 true-有效,false-失效
     */
    public static boolean verifyToken(String token) {

        if(StringUtils.isEmpty(token)) {
            return false;
        }

        try {
            Claims claims = Jwts.parser()
                    .setSigningKey("itcast")
                    .parseClaimsJws(token)
                    .getBody();
        }catch (Exception e) {
            return false;
        }
      return true;
    }
}
User
@Data
@AllArgsConstructor  //满参构造方法
@NoArgsConstructor   //无参构造方法
public class User extends BasePojo{
    private Long id;
    private String mobile;
    private String password;
    private Date created;
    private Date updated;
}
tanhua-dubbo-db要提供数据服务,写启动类和yml配置
server:
  port: 18081
spring:
  datasource:
    driver-class-name: com.mysql.jdbc.Driver
    url: jdbc:mysql:///tanhua
    username: root
    password: root
  application:
    name: tanhua-dubbo-db
  cloud:
    nacos:
      discovery:
        server-addr: 192.168.136.160:8848
dubbo:
  protocol:
    name: dubbo
    port: 20881
  registry:
    address: spring-cloud://localhost
  scan:
    base-packages: com.tanhua.dubbo.api

mybatis-plus:
  global-config:
    db-config:
      table-prefix: tb_ #
      id-type: auto #主键自增
4代码优化
抽取BasePojo
由于每个实体类都有created和updated属性
为了简化实体类中created和updated字段,抽取BasePojo让实体类继承即可
@Data
public abstract class BasePojo implements Serializable {

    @TableField(fill = FieldFill.INSERT) //自动填充
    private Date created;
    @TableField(fill = FieldFill.INSERT_UPDATE)
    private Date updated;

}
在字段上添加 @TableField(fill = FieldFill.INSERT) 和 @TableField(fill = FieldFill.INSERT_UPDATE)可以利用MybatisPlus自动填充
package com.tanhua.dubbo.server.handler;

import com.baomidou.mybatisplus.core.handlers.MetaObjectHandler;
import org.apache.ibatis.reflection.MetaObject;
import org.springframework.stereotype.Component;

import java.util.Date;

@Component
public class MyMetaObjectHandler implements MetaObjectHandler {

    @Override
    public void insertFill(MetaObject metaObject) {
        Object created = getFieldValByName("created", metaObject);
        if (null == created) {
            //字段为空,可以进行填充
            setFieldValByName("created", new Date(), metaObject);
        }

        Object updated = getFieldValByName("updated", metaObject);
        if (null == updated) {
            //字段为空,可以进行填充
            setFieldValByName("updated", new Date(), metaObject);
        }
    }

    @Override
    public void updateFill(MetaObject metaObject) {
        //更新数据时,直接更新字段
        setFieldValByName("updated", new Date(), metaObject);
    }
}
3完善用户信息
1.文件存储OSS
(第三方服务和我们短信服务类似,利用SpringBoot自动装配,参考短信服务)
第三方的一般都有文档,我们直接拿来用就好,注意SpringBoot的自动装配原理
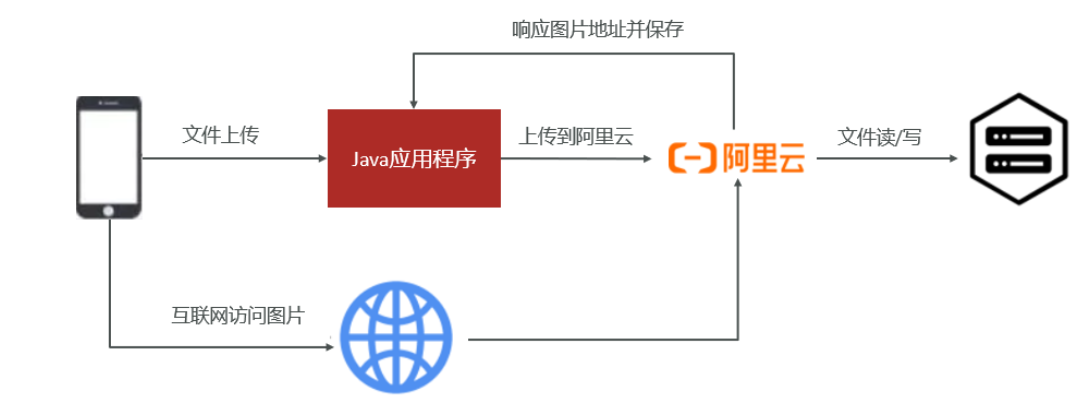
对象存储服务(Object Storage Service,OSS)是一种海量、安全、低成本、高可靠的云存储服务,适合存放任意类型的文件。容量和处理能力弹性扩展,多种存储类型供选择,全面优化存储成本。
地址:https://www.aliyun.com/product/oss
代码
OssProperties
package com.tanhua.autoconfig.properties;

import lombok.Data;
import org.springframework.boot.context.properties.ConfigurationProperties;

@Data
@ConfigurationProperties(prefix = "tanhua.oss")
public class OssProperties {

    private String accessKey;
    private String secret;
    private String bucketName;
    private String url; //域名
    private String endpoint;
}
OssTemplate
package com.tanhua.autoconfig.template;

import com.aliyun.oss.OSS;
import com.aliyun.oss.OSSClientBuilder;
import com.tanhua.autoconfig.properties.OssProperties;

import java.io.ByteArrayInputStream;
import java.io.InputStream;
import java.text.SimpleDateFormat;
import java.util.Date;
import java.util.UUID;


public class OssTemplate {
    private OssProperties ossProperties;

    public OssTemplate(OssProperties ossProperties) {
        this.ossProperties = ossProperties;
    }
    /**
     * 文件上传
     *   1:文件名称
     *   2:输入流
     */

    public String upload(String filename , InputStream is){

        //拼写路径
        filename=new SimpleDateFormat("yyyy/MM/dd").format(new Date())
                +"/"
                + UUID.randomUUID().toString()+filename.substring(filename.lastIndexOf("."));
        // yourEndpoint填写Bucket所在地域对应的Endpoint。以华东1(杭州)为例,Endpoint填写为https://oss-cn-hangzhou.aliyuncs.com。
        String endpoint = ossProperties.getEndpoint();
// 阿里云主账号AccessKey拥有所有API的访问权限,风险很高。强烈建议您创建并使用RAM账号进行API访问或日常运维,请登录 https://ram.console.aliyun.com 创建RAM账号。
        String accessKeyId = ossProperties.getAccessKey();
        String accessKeySecret = ossProperties.getSecret();

// 创建OSSClient实例。
        OSS ossClient = new OSSClientBuilder().build(endpoint, accessKeyId,accessKeySecret);


// 依次填写Bucket名称(例如examplebucket)和Object完整路径(例如exampledir/exampleobject.txt)。Object完整路径中不能包含Bucket名称。
        ossClient.putObject(ossProperties.getBucketName(), filename, is);

// 关闭OSSClient。
        ossClient.shutdown();
        String url=ossProperties.getUrl()+filename;
        return url;
    }

}
TanhuaAutoConfiguration
@EnableConfigurationProperties({
        SmsProperties.class,
        OssProperties.class,
        AipFaceProperties.class
})
public class TanhuaAutoConfiguration {
    @Bean
    public SmsTemplate smsTemplate(SmsProperties smsProperties){
        return new SmsTemplate(smsProperties);
    }

    @Bean
    public OssTemplate ossTemplate(OssProperties ossProperties){
        return new OssTemplate(ossProperties);
    }

    @Bean
    public AipFaceTemplate aipFaceTemplate(){
        return new AipFaceTemplate();
    }
}
tanhua:
  oss:
    accessKey: LTAI5tFRR5M1zWjrTUwXqns1
    secret: P8NuT00kV6YJzqX231Fp6MiBmeyH8v
    endpoint: oss-cn-hangzhou.aliyuncs.com
    bucketName: tanhuajiaoyou-0001
    url: https://tanhuajiaoyou-0001.oss-cn-hangzhou.aliyuncs.com/
2百度人脸识别
通过人脸识别判断图片是否有人脸
代码
AipFaceProperties
**注意:**ipFace是人脸识别的Java客户端,为使用人脸识别的开发人员提供了一系列的交互方法。
用户可以参考如下代码新建一个AipFace,初始化完成后建议单例使用,避免重复获取access_token
解决方案:通过@bean让spring管理实现单例
package com.tanhua.autoconfig.properties;

import com.baidu.aip.face.AipFace;
import lombok.Data;
import org.springframework.boot.context.properties.ConfigurationProperties;
import org.springframework.context.annotation.Bean;

@Data
@ConfigurationProperties(prefix = "tanhua.aip")
public class AipFaceProperties {
    private String appId;
    private String apiKey;
    private String secretKey;

   /* AipFace是人脸识别的Java客户端,为使用人脸识别的开发人员提供了一系列的交互方法。
    用户可以参考如下代码新建一个AipFace,初始化完成后建议单例使用,避免重复获取access_token*/
    @Bean
    public AipFace aipFace() {
        AipFace client = new AipFace(appId, apiKey, secretKey);
        client.setConnectionTimeoutInMillis(2000);
        client.setSocketTimeoutInMillis(60000);
        return client;
    }
}
AipFaceTemplate
package com.tanhua.autoconfig.template;

import com.baidu.aip.face.AipFace;
import com.tanhua.autoconfig.properties.AipFaceProperties;
import org.json.JSONObject;
import org.springframework.beans.factory.annotation.Autowired;

import java.util.HashMap;

public class AipFaceTemplate {

    @Autowired
    private AipFace client;

    /**
     * 检测图片中是否包含人脸
     *  true:包含
     *  false:不包含
     */
    public boolean detect(String imageUrl){
        HashMap<String, String> options = new HashMap<String, String>();
        options.put("face_field", "age");
        options.put("max_face_num", "2");
        options.put("face_type", "LIVE");
        options.put("liveness_control", "LOW");

        // 调用接口
        String imageType = "URL";

        // 人脸检测
        JSONObject res = client.detect(imageUrl, imageType, options);
        System.out.println(res.toString(2));
        Integer error_code = (Integer) res.get("error_code");
        return error_code==0;
    }
}
TanhuaAutoConfiguration
@EnableConfigurationProperties({
        SmsProperties.class,
        OssProperties.class,
        AipFaceProperties.class
})
public class TanhuaAutoConfiguration {
    @Bean
    public SmsTemplate smsTemplate(SmsProperties smsProperties){
        return new SmsTemplate(smsProperties);
    }

    @Bean
    public OssTemplate ossTemplate(OssProperties ossProperties){
        return new OssTemplate(ossProperties);
    }

    @Bean
    public AipFaceTemplate aipFaceTemplate(){
        return new AipFaceTemplate();
    }
}
tanhua:
  aip:
    appId: 25145502
    apiKey: 7qLsKqWZjnrpRR7oe3uxbemZ
    secretKey: 6XGL25wNV1Y0xU8P46GVCn5Fp3dih1CO
3保存用户信息
接口文档
接口路径:POST /user/loginReginfo

数据库表分析:
- 用户表和用户信息表是一对一的关系,两者采用主键关联的形式配置
- 主键关联:用户表主键和用户资料表主键要保持一致(如:用户表id=1,此用户的资料表id=1)
简单流程
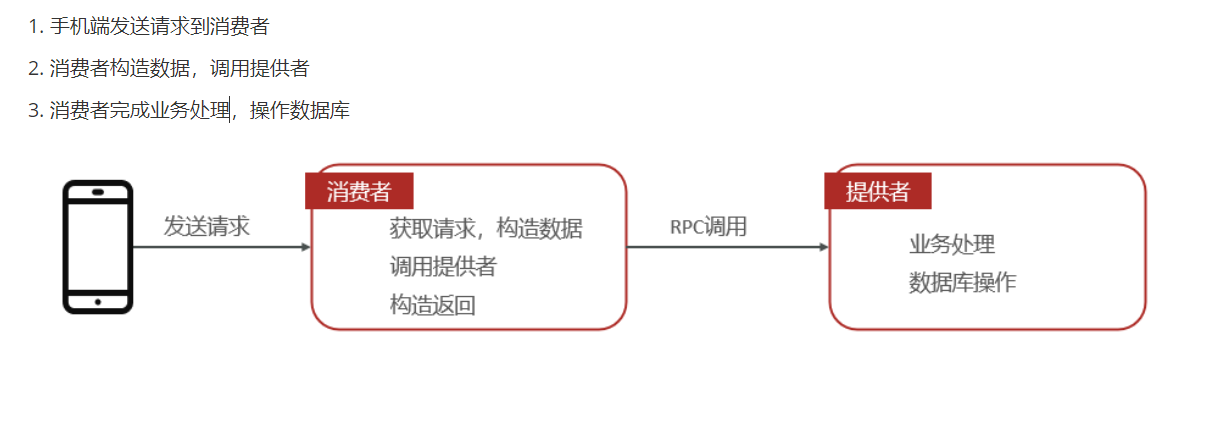
代码实现
UserInfo
@Data
@NoArgsConstructor
@AllArgsConstructor
public class UserInfo extends BasePojo {

    /**
     * 由于userinfo表和user表之间是一对一关系
     *   userInfo的id来源于user表的id

     type= IdType.INPUT 表示 新增时程序员必须给定,否则报错

     */
    @TableId(type= IdType.INPUT)
    private Long id; //用户id
    private String nickname; //昵称
    private String avatar; //用户头像
    private String birthday; //生日
    private String gender; //性别
    private Integer age; //年龄
    private String city; //城市
    private String income; //收入
    private String education; //学历
    private String profession; //行业
    private Integer marriage; //婚姻状态
    private String tags; //用户标签:多个用逗号分隔
    private String coverPic; // 封面图片


    //用户状态,1为正常,2为冻结
    @TableField(exist = false)
    private String userStatus = "1";
}
LoginController
    @Autowired
    private UserInfoService userInfoService;


 /**
     * 保存用户信息
     *   UserInfo
     *   请求头中携带token
     *  POST  /user/loginReginfo
     */

@PostMapping("/loginReginfo")
    public ResponseEntity loginReginfo(@RequestBody UserInfo userInfo,
                                       @RequestHeader("Authorization") String token){
        //1,校验token
        if (!JwtUtils.verifyToken(token)){
            return ResponseEntity.status(401).body(null);
        }

        //2、向userinfo中设置用户id
           //获取id
        Claims claims = JwtUtils.getClaims(token);
//        long id = (int) claims.get("id");
//        userInfo.setId(id);

        Integer id = (Integer) claims.get("id");
        userInfo.setId(Long.valueOf(id));

        //3、调用service
        userInfoService.save(userInfo);
        return ResponseEntity.ok(null);
    }
UserInfoService
package com.tanhua.server.service;


@Service
public class UserInfoService {

    @DubboReference
    private UserInfoApi userInfoApi;


    public void save(UserInfo userInfo) {
        userInfoApi.save(userInfo);
    }
}
UserInfoApi
package com.tanhua.dubbo.api;

import com.baomidou.mybatisplus.core.mapper.BaseMapper;
import com.tanhua.model.domain.UserInfo;

public interface UserInfoApi {

    public void save(UserInfo userInfo);

    public void update(UserInfo userInfo);
}
UserInfoApiImpl
package com.tanhua.dubbo.api;

import com.tanhua.dubbo.mappers.UserInfoMapper;
import com.tanhua.model.domain.UserInfo;
import org.apache.dubbo.config.annotation.DubboService;
import org.springframework.beans.factory.annotation.Autowired;

@DubboService
public class UserInfoApiImpl implements UserInfoApi{

    @Autowired
    private UserInfoMapper userInfoMapper;
    @Override
    public void save(UserInfo userInfo) {
        userInfoMapper.insert(userInfo);
    }

    @Override
    public void update(UserInfo userInfo) {
        userInfoMapper.updateById(userInfo);
    }
}
UserInfoMapper
package com.tanhua.dubbo.mappers;

import com.baomidou.mybatisplus.core.mapper.BaseMapper;
import com.tanhua.model.domain.UserInfo;

public interface UserInfoMapper extends BaseMapper<UserInfo> {
}
4上传用户头像
接口文档
接口路径: POST /user/loginReginfo/head
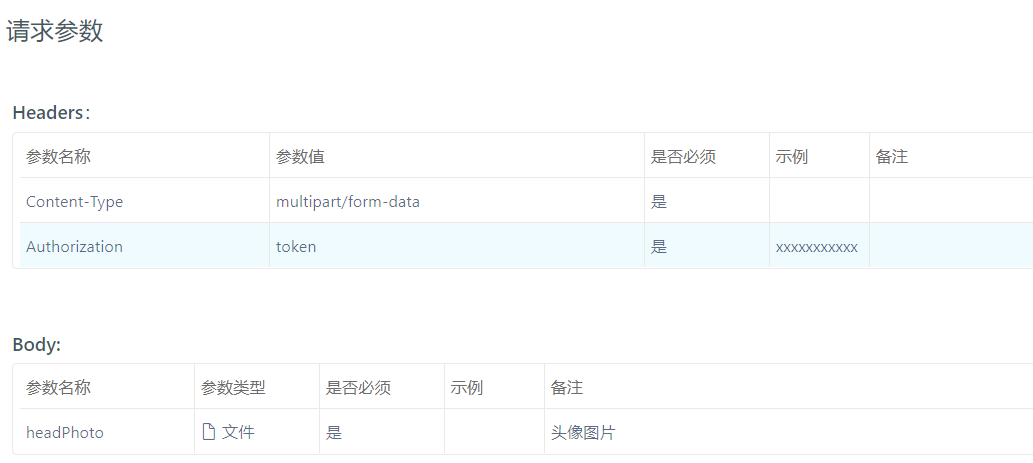
执行流程
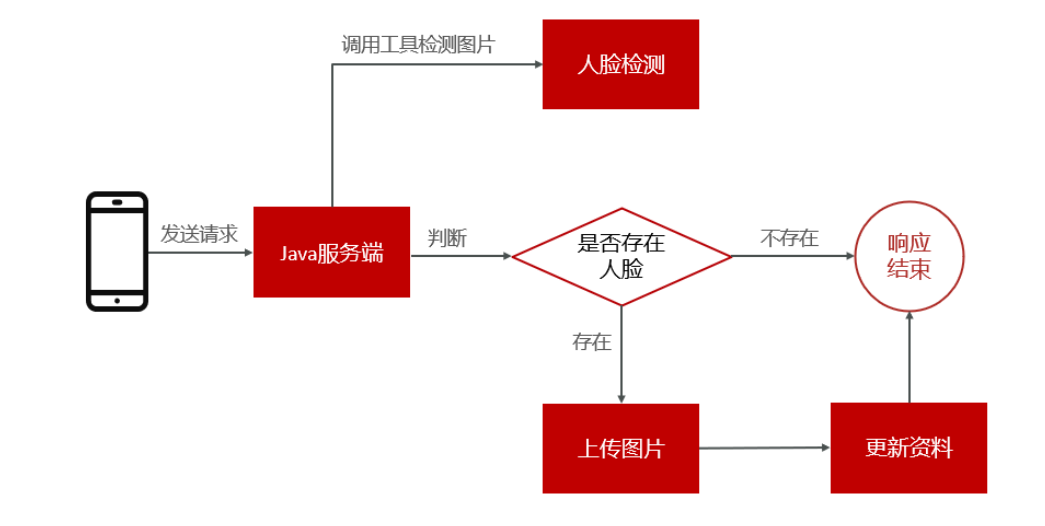
补充
上传文件三要素
- 请求方式必须为post(get请求有大小限制)
- 表单的enctype属性必须为multipart/form-data
- 标签类型必须为file
在Spring中已经帮我i们封装好了,我们直接用即可
MultipartFile headPhoto
名字要和请求的文件参数一样
通过MultipartFile对象我们调方法可直接获取流对象和文件名字
tring filename = headPhoto.getOriginalFilename();
InputStream inputStream = headPhoto.getInputStream();
代码实现
LoginController
/**
 *   上传用户头像
 *   UserInfo
 *   请求头中携带token
 *  POST  /user/loginReginfo/head
 */
@PostMapping("/loginReginfo/head")
public ResponseEntity updateHead(MultipartFile headPhoto,
                                 @RequestHeader("Authorization") String token) throws IOException {

    //校验token
    boolean verifyToken = JwtUtils.verifyToken(token);
    if (!verifyToken){
        return ResponseEntity.status(401).body(null);
    }

    //获得id(更新图片用)
    Claims claims = JwtUtils.getClaims(token);
    Integer id = (Integer) claims.get("id");
    //调用Service
    userInfoService.updateHead(headPhoto,Long.valueOf(id));
    return ResponseEntity.ok(null);
}
UserInfoService
package com.tanhua.server.service;


@Service
public class UserInfoService {

    @DubboReference
    private UserInfoApi userInfoApi;

    @Autowired
    private OssTemplate ossTemplatel;

    @Autowired
    private AipFaceTemplate aipFaceTemplate;

    public void updateHead(MultipartFile headPhoto, Long id) throws IOException {
        //1将图片上传到OOS
        String name = headPhoto.getName();
        System.out.println(name);
        String filename = headPhoto.getOriginalFilename();
        System.out.println(filename);
        InputStream inputStream = headPhoto.getInputStream();
        String imageUrl = ossTemplatel.upload(filename, inputStream);
        //判断照片是否存在人脸
        boolean detect = aipFaceTemplate.detect(imageUrl);
        if (!detect){
            //不存在抛异常
            throw new RuntimeException();
        }else {
            //存在更新图片url
            UserInfo userInfo=new UserInfo();
            userInfo.setId(id);
            userInfo.setAvatar(imageUrl);
            userInfoApi.update(userInfo);
        }
    }


}
UserInfoApi
package com.tanhua.dubbo.api;

import com.baomidou.mybatisplus.core.mapper.BaseMapper;
import com.tanhua.model.domain.UserInfo;

public interface UserInfoApi {

    public void save(UserInfo userInfo);

    public void update(UserInfo userInfo);
}
UserInfoApiImpl
package com.tanhua.dubbo.api;

import com.tanhua.dubbo.mappers.UserInfoMapper;
import com.tanhua.model.domain.UserInfo;
import org.apache.dubbo.config.annotation.DubboService;
import org.springframework.beans.factory.annotation.Autowired;

@DubboService
public class UserInfoApiImpl implements UserInfoApi{

    @Autowired
    private UserInfoMapper userInfoMapper;
    @Override
    public void save(UserInfo userInfo) {
        userInfoMapper.insert(userInfo);
    }

    @Override
    public void update(UserInfo userInfo) {
        userInfoMapper.updateById(userInfo);
    }
}
4个人资料管理
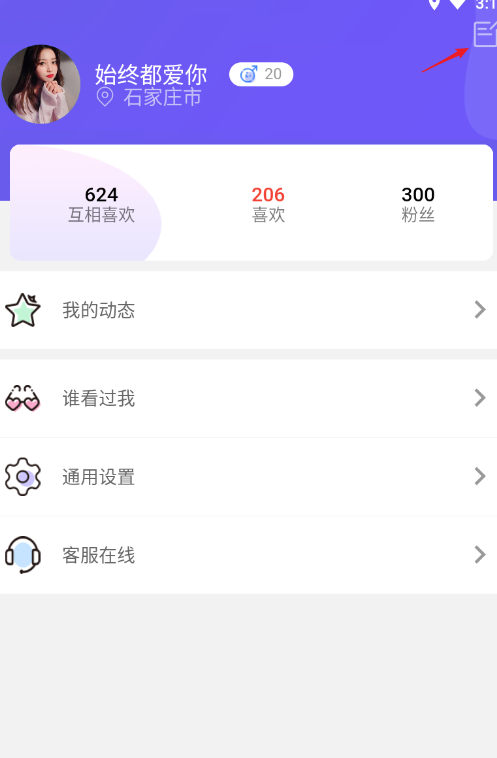
1查询用户资料
由于前端需要的返回数据和我们的数据库的数据不一样(类型,字段数等)
这时候我们就需要用到了我们在后台常用的解决方案 vo和dto
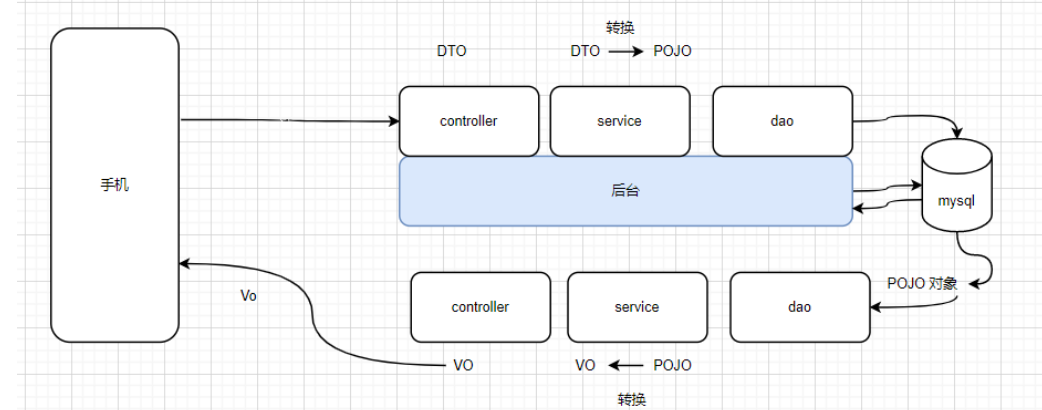
我们可以看api文档

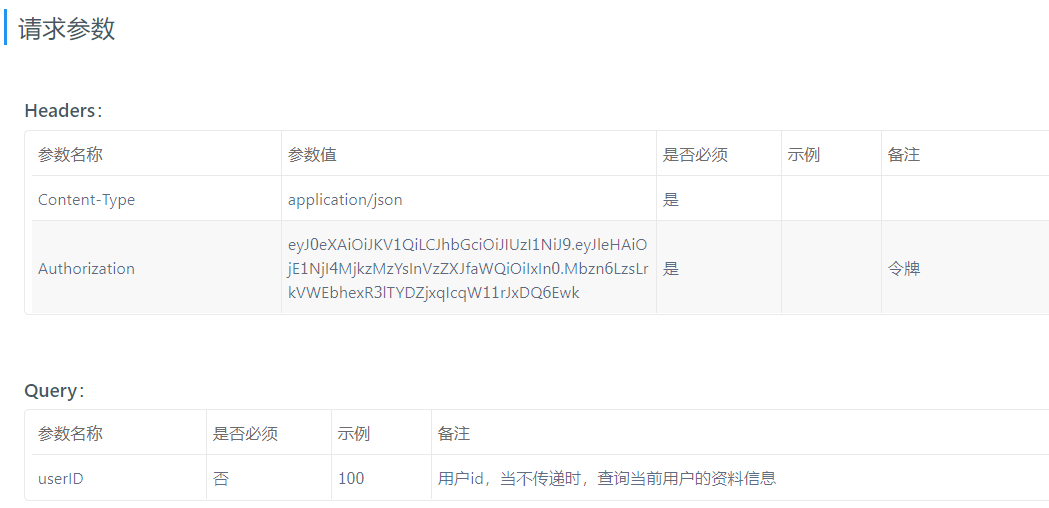

age前端需要的是string而我们的数据库是int
如果我们直接返回UserInfo对象前端页面不能解析,我们用户数据就会看到一片空白
所以我么要在定义一个Vo对象,将查询到的UserInfo信息转成Vo对象
代码如下
UserInfoVo
package com.tanhua.model.vo;


@Data
@NoArgsConstructor
@AllArgsConstructor
public class UserInfoVo implements Serializable {

    private Long id; //用户id
    private String nickname; //昵称
    private String avatar; //用户头像
    private String birthday; //生日
    private String gender; //性别
    private String age; //年龄
    private String city; //城市
    private String income; //收入
    private String education; //学历
    private String profession; //行业
    private Integer marriage; //婚姻状态
}
UsersController
@RestController
@RequestMapping("/users")
public class UsersController {

    @Autowired
    private UserInfoService userInfoService;

    @GetMapping
    public ResponseEntity findById(Long userId){
        //校验token
       boolean verifyToken = JwtUtils.verifyToken(token);
      if (!verifyToken){
          return ResponseEntity.status(401).body(null);
      }
        //获得token的id
       Claims claims = JwtUtils.getClaims(token);
        Integer id = (Integer) claims.get("id");
        //判断userId是否为null
        if(userId==null){
            userId=UserHolder.getUserId();
        }
        //查询用户并返回
        UserInfoVo userInfoVo=userInfoService.findById(userId);
        return ResponseEntity.ok(userInfoVo);
    }
UserInfoService
这里我们可以看到我们将查询的数据UserInfo转换为UserInfoVo
package com.tanhua.server.service;


@Service
public class UserInfoService {

    @DubboReference
    private UserInfoApi userInfoApi;


    public UserInfoVo findById(Long userId) {
        UserInfoVo vo=new UserInfoVo();
        UserInfo userInfo = userInfoApi.findById(userId);
        BeanUtils.copyProperties(userInfo,vo);
        if (userInfo.getAge()!=null){
            vo.setAge(userInfo.getAge().toString());
        }
        return vo;
    }

}
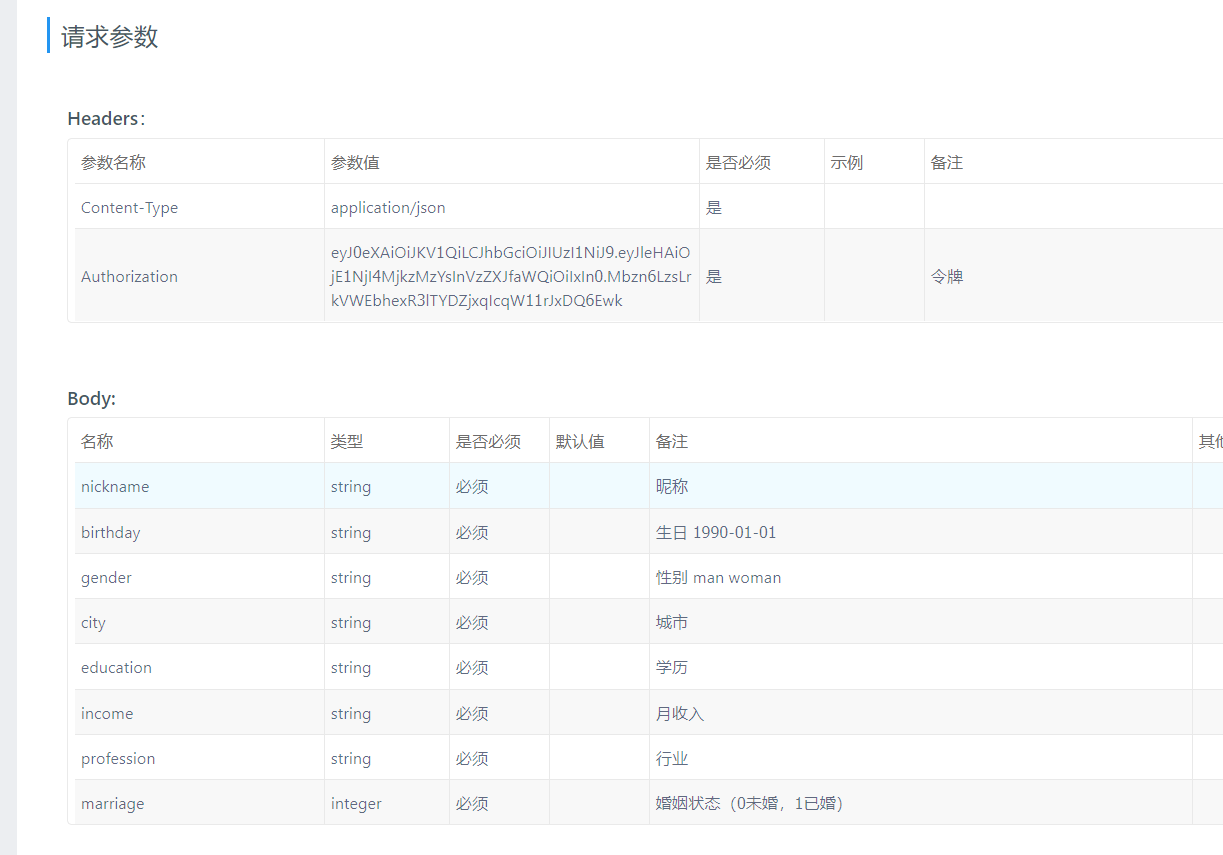
2更新用户资料
api文档
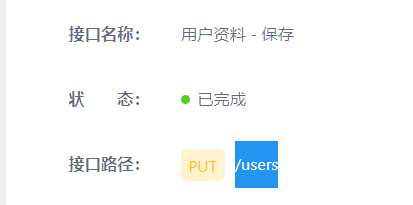
代码实现
UsersController
 @PutMapping
    public ResponseEntity updateUserInfo(@RequestBody UserInfo userInfo){
        //校验token
        boolean verifyToken = JwtUtils.verifyToken(token);
      if (!verifyToken){
       }
        //解析token
    Integer id = (Integer) claims.get("id");

        userInfo.setId(UserHolder.getUserId());
        //返回
        userInfoService.update(userInfo);
        return ResponseEntity.ok(null);
    }
UserInfoService
 public void update(UserInfo userInfo) {
        userInfoApi.update(userInfo);
    }
}
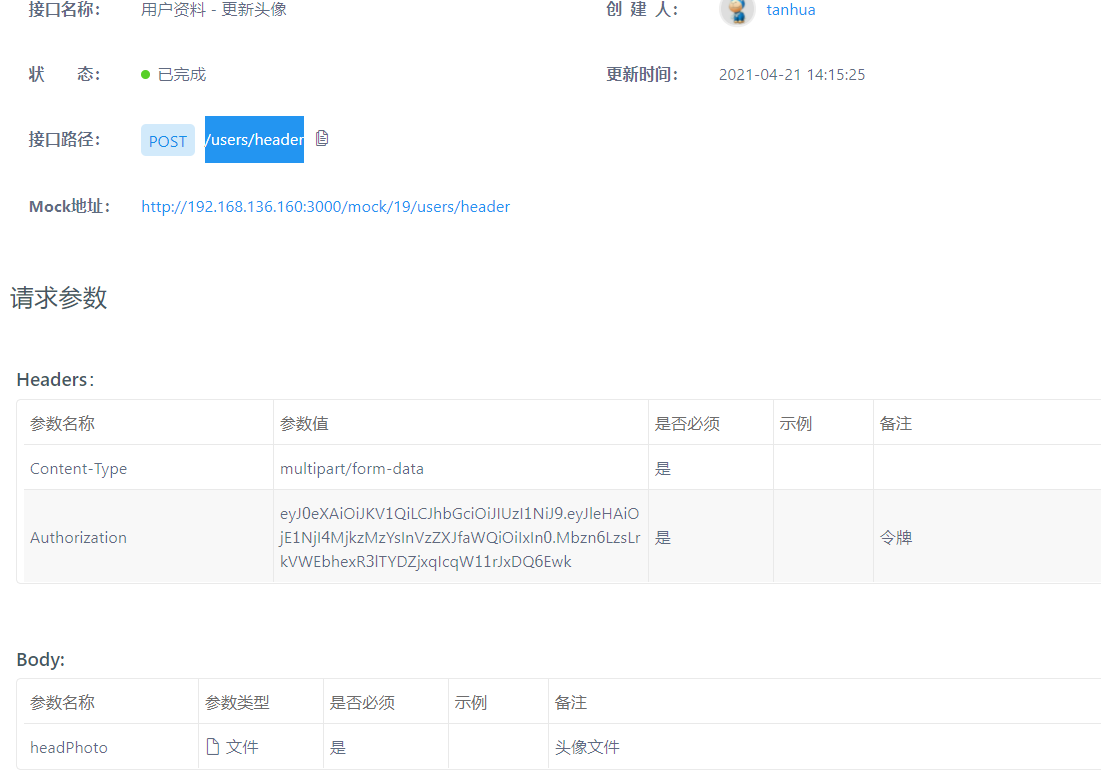
3更新头像
api文档
代码
UsersController
/**
     * 更新用户头像
     *  post  /users/header
     * */
    @PostMapping("/header")
    public ResponseEntity updateHead(MultipartFile headPhoto) throws IOException {
        User user = UserHolder.get();
        userInfoService.updateHead(headPhoto,user.getId());
        return ResponseEntity.ok(null);
    }
UserInfoService
  public void updateHead(MultipartFile headPhoto, Long id) throws IOException {
        //1将图片上传到OOS
        String filename = headPhoto.getOriginalFilename();
        System.out.println(filename);
        InputStream inputStream = headPhoto.getInputStream();
        String imageUrl = ossTemplatel.upload(filename, inputStream);
        //判断照片是否存在人脸
        boolean detect = aipFaceTemplate.detect(imageUrl);
        if (!detect){
            //不存在抛异常
            throw new BusinessException(ErrorResult.faceError());
        }else {
            //存在更新图片url
            UserInfo userInfo=new UserInfo();
            userInfo.setId(id);
            userInfo.setAvatar(imageUrl);
            userInfoApi.update(userInfo);
        }
    }
5统一处理
1统一身份鉴权
由于每次都要校验token而且每次都要解析token不妨我们用拦截器简化开发
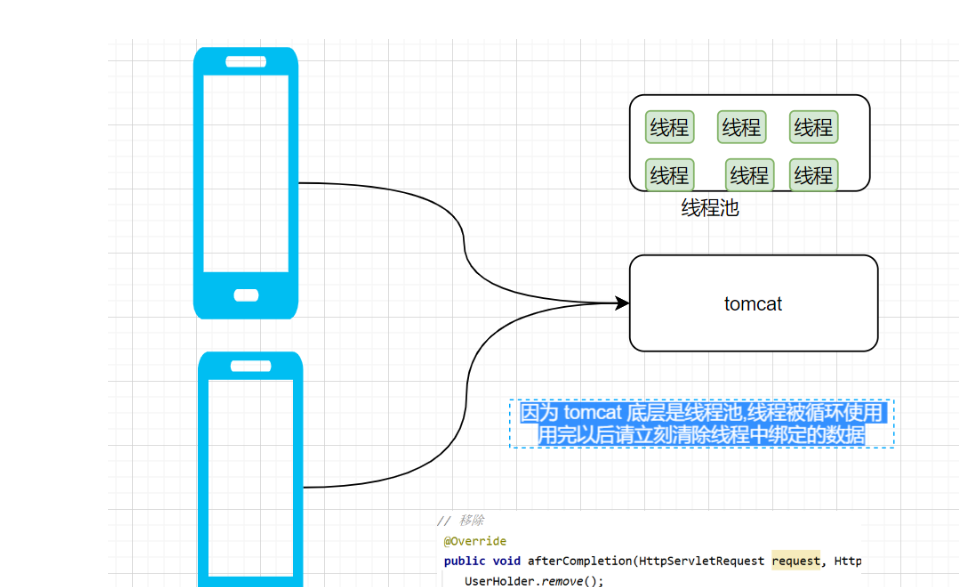
由于我们每次解析token都要传递参数然后解析,我们可以把它在拦截器中解析然后存储在Threadlcoal中
ThreadLcoal底层是一个Map集合key是每一个线程我们只用定义value即可ThreadLocal tl = new ThreadLocal<>();
ThreadLcoal不会出现线程安全,每一个线程都不一样都有各自的value
UserHolder
package com.tanhua.server.interceptor;

import com.tanhua.model.domain.User;

public class UserHolder {
    private static ThreadLocal<User> tl = new ThreadLocal<>();

    //将用户对象,存入Threadlocal
    public static void set(User user) {
        tl.set(user);
    }
    //获取对象
    public static User get(){
        return tl.get();
    }

    //获取userId

    public static Long getUserId(){
        return tl.get().getId();
    }
    //获取手机号码

    public static String getMobile(){
        return tl.get().getMobile();
    }

    //删除ThreadLocal
    public void remove(){
        tl.remove();
    }


}
TokenInterceptor
定义拦截器
package com.tanhua.server.interceptor;


public class TokenInterceptor implements HandlerInterceptor{
    @Override
    public boolean preHandle(HttpServletRequest request, HttpServletResponse response, Object handler) throws Exception {
        //判断token
        String token = request.getHeader("Authorization");
        boolean verifyToken = JwtUtils.verifyToken(token);
        if (!verifyToken){
            response.setStatus(401);
            return false;
        }

        Claims claims = JwtUtils.getClaims(token);
        Integer id = (Integer) claims.get("id");
        String mobile = (String) claims.get("mobile");
        User user=new User();
        user.setId(Long.valueOf(id));
        user.setMobile(mobile);
        UserHolder.set(user);
        return true;
    }

    @Override
    public void afterCompletion(HttpServletRequest request, HttpServletResponse response, Object handler, Exception ex) throws Exception {
        UserHolder.remove();
    }
}
WebConfig
将定义的拦截器注册并设置拦截和不拦截的路径
package com.tanhua.server.interceptor;

@Configuration
public class WebConfig implements WebMvcConfigurer {
    @Override
    public void addInterceptors(InterceptorRegistry registry) {
        registry.addInterceptor(new TokenInterceptor())
                .addPathPatterns("/**")
                .excludePathPatterns(new String[]{"/user/login","/user/loginVerification"});
    }
}
Interceptor 和 Filter 的区别
拦截器 Interceptor
   作用: 能够对 所有的请求进行拦截
   拦截器 属于Springmvc 的东西,可以使用@Autowired 注入所需要的对象
         和spring 整合更加的方便
过滤器 Filter
   作用: 能够对 所有的请求进行拦截
为什么要删除ThreadLcoal中的user
2统一异常处理
前端要求
  如果有异常,应该返回  1) 错误代码 2) 错误文本描述
  {
     errCode:"00001"
     errMessage: "系统错误"
  }
为了满足要求, jdk 自带的异常无法 处理,需要自定义异常

所以我们自己定义个 ErrorResult 对象 和 一个

BusinessException
ErrorResult
package com.tanhua.model.vo;

import lombok.AllArgsConstructor;
import lombok.Builder;
import lombok.Data;
import lombok.NoArgsConstructor;

@Data
@NoArgsConstructor
@AllArgsConstructor
@Builder
public class ErrorResult {

    private String errCode = "999999";
    private String errMessage;

    public static ErrorResult error() {
        return ErrorResult.builder().errCode("999999").errMessage("系统异常稍后再试").build();
    }

    public static ErrorResult fail() {
        return ErrorResult.builder().errCode("000001").errMessage("发送验证码失败").build();
    }

    public static ErrorResult loginError() {
        return ErrorResult.builder().errCode("000002").errMessage("验证码失效").build();
    }

    public static ErrorResult faceError() {
        return ErrorResult.builder().errCode("000003").errMessage("图片非人像,请重新上传!").build();
    }

    public static ErrorResult mobileError() {
        return ErrorResult.builder().errCode("000004").errMessage("手机号码已注册").build();
    }

    public static ErrorResult contentError() {
        return ErrorResult.builder().errCode("000005").errMessage("动态内容为空").build();
    }

    public static ErrorResult likeError() {
        return ErrorResult.builder().errCode("000006").errMessage("用户已点赞").build();
    }

    public static ErrorResult disLikeError() {
        return ErrorResult.builder().errCode("000007").errMessage("用户未点赞").build();
    }

    public static ErrorResult loveError() {
        return ErrorResult.builder().errCode("000008").errMessage("用户已喜欢").build();
    }

    public static ErrorResult disloveError() {
        return ErrorResult.builder().errCode("000009").errMessage("用户未喜欢").build();
    }
}
定义自定义异常类
BusinessException
package com.tanhua.server.exception;

import com.tanhua.model.vo.ErrorResult;
import lombok.Data;

@Data
public class BusinessException extends RuntimeException {

    private ErrorResult errorResult;

    public BusinessException(ErrorResult errorResult) {
        super(errorResult.getErrMessage());//将errorResult的信息传递给父类
        this.errorResult = errorResult;
    }
}
统一异常管理配置
ExceptionAdvice
package com.tanhua.server.exception;

import com.tanhua.model.vo.ErrorResult;
import org.springframework.http.HttpStatus;
import org.springframework.http.ResponseEntity;
import org.springframework.web.bind.annotation.ControllerAdvice;
import org.springframework.web.bind.annotation.ExceptionHandler;

@ControllerAdvice
public class ExceptionAdvice {

    @ExceptionHandler(BusinessException.class)
    public ResponseEntity businessException(BusinessException e){
        e.printStackTrace();
        ErrorResult errorResult = e.getErrorResult();
        return ResponseEntity.status(HttpStatus.INTERNAL_SERVER_ERROR).body(errorResult);
    }

    @ExceptionHandler(Exception.class)
    public ResponseEntity exception(Exception e){
        e.printStackTrace();
        return ResponseEntity.status(HttpStatus.INTERNAL_SERVER_ERROR).body(ErrorResult.error());
    }
}
6通用设置
1SpringMVC
注解回顾
@RequestHeader("xxxx")

@PathVariable("xx")
从请求路径中获取数据

@RequestParam("xxx")
请求参数中获取数据

@RequestBody

接受前端发送的请求参数并封装为对象
    要求: 1.请求参数必须是json 格式
ResponseEntity
ResponseEntity: 是springmvc 内置对象
1) 可以更加方便的响应数据+状态码
// 失败
return ResponseEntity.status(401).body(null);
// 成功
ResponseEntity.ok(userInfo);
Spring+dubbo 注解的使用
@DubboService : 一个类上用这个注解表示这个对象可以被远程调用
@Service  : 一个类上用这个注解表示 这个对象只能 自己使用,其他电脑不能远程调用
----------------------
@DubboReference :  远程调用,其他电脑上(tomcat)的类
@Autowired  : 使用本地tomcat上有的对象
2通用设置查询
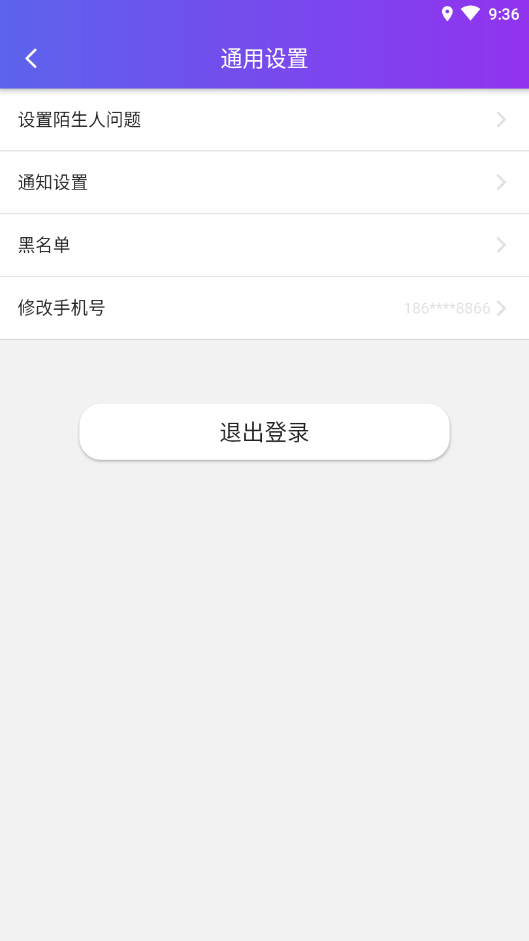
api文档
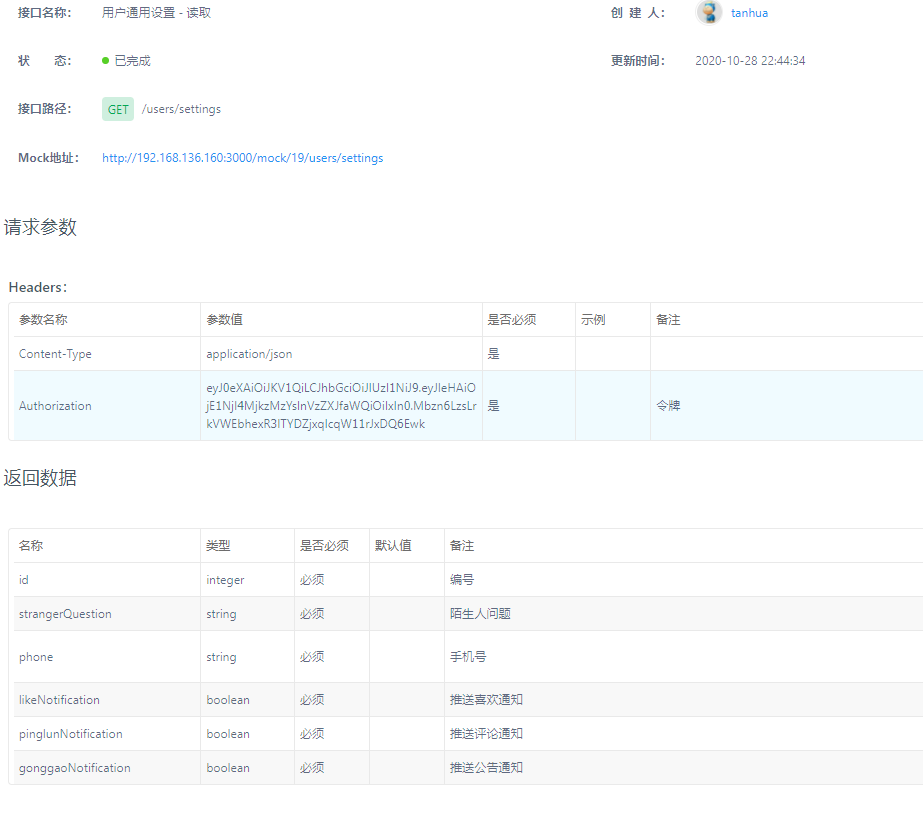
可以看到返回数据用到了id phone 陌生人问题 通知 涉及到了 token 还有settings和quesstion两张表
所以我们需要自定义vo对象 将数据库查询到的还有id 和phone封装进去
实体类
Settings
package com.tanhua.model.domain;

@Data
@NoArgsConstructor
@AllArgsConstructor
public class Settings extends BasePojo {

    private Long id;
    private Long userId;
    private Boolean likeNotification;
    private Boolean pinglunNotification;
    private Boolean gonggaoNotification;

}
Question
package com.tanhua.model.domain;


@Data
@NoArgsConstructor
@AllArgsConstructor
public class Question extends BasePojo {

    private Long id;
    private Long userId;
    //问题内容
    private String txt;

}
SettingsVo
package com.tanhua.model.vo;


@Data
@NoArgsConstructor
@AllArgsConstructor
public class SettingsVo implements Serializable {

    private Long id;
    private String phone;
    private String strangerQuestion = "";
    private Boolean likeNotification = true;
    private Boolean pinglunNotification = true;
    private Boolean gonggaoNotification = true;

}
mapper类
SettingsMapper
public interface SettingsMapper extends BaseMapper<Settings> {
}
QuestionMapper
public interface QuestionMapper extends BaseMapper<Question> {
}
api接口
SettingsApi
package com.tanhua.dubbo.api;

import com.tanhua.model.domain.Settings;

public interface SettingsApi {
    public Settings findById(Long id);

}
QuestionApi
package com.tanhua.dubbo.api;

import com.tanhua.model.domain.Question;

public interface QuestionApi {
    public Question findById(Long id);

}
api实现类
什么时后可以用SelectById什么时候用selectOne
SettingsApiImpl
package com.tanhua.dubbo.api;


@DubboService
public class SettingsApiImpl implements SettingsApi{

    @Autowired
    private SettingsMapper settingsMapper;

    @Override
    public Settings findById(Long id) {
        QueryWrapper<Settings> qw=new QueryWrapper<>();
        qw.eq("user_id",id);
        return settingsMapper.selectOne(qw);
    }

}
QuestionApiImpl
package com.tanhua.dubbo.api;


@DubboService
public class QuestionApiImpl implements QuestionApi{

    @Autowired
    private QuestionMapper questionMapper;

    @Override
    public Question findById(Long id){
        QueryWrapper<Question> qw =new QueryWrapper<>();
        qw.eq("user_id",id);
        return questionMapper.selectOne(qw);
    }
}
SettingController
@RestController
@RequestMapping("/users")
public class SettingController {

    @Autowired
    private SettingService settingService;

    /**
     *通用设置读取
     * 访问路径GET  /users/settings
     */

    @GetMapping("/settings")
    public ResponseEntity setting(){
        SettingsVo vo=settingService.setting();
        return ResponseEntity.ok(vo);
    }
StrringService
package com.tanhua.server.service;

@Service
public class SettingService {

    @DubboReference
    private QuestionApi questionApi;

    @DubboReference
    private SettingsApi settingsApi;

    public SettingsVo setting() {
        SettingsVo vo = new SettingsVo();
        Long userId = UserHolder.getUserId();
        String mobile = UserHolder.getMobile();
        vo.setId(userId);
        vo.setPhone(mobile);

        Question question = questionApi.findById(userId);
        String txt = question == null ? "你喜欢java吗?" : question.getTxt();
        vo.setStrangerQuestion(txt);

        Settings settings = settingsApi.findById(userId);
        if (settings != null) {
            vo.setGonggaoNotification(settings.getGonggaoNotification());
            vo.setPinglunNotification(settings.getPinglunNotification());
            vo.setLikeNotification(settings.getLikeNotification());
        }
        return vo;
    }
}
3设置陌生人问题
api文档
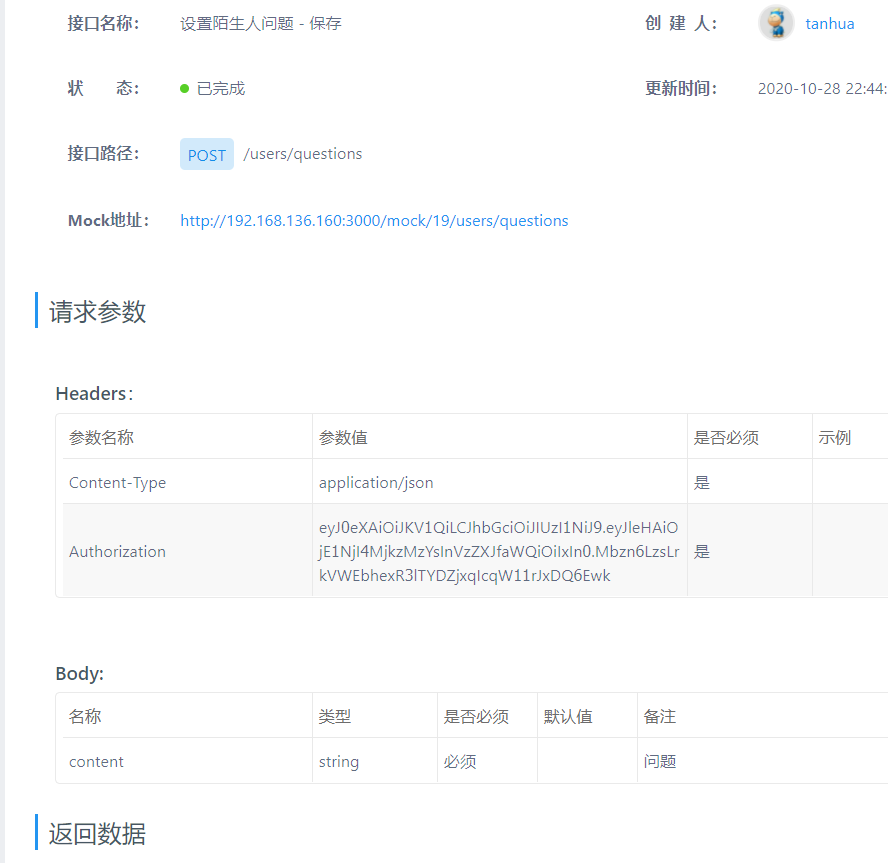
思路:
查询Quesstion,如果存在这保存,不存在则添加
实现
SettingController
 /**
     * 设置陌生人问题
     * POST  /users/questions
     * */

    @PostMapping("/questions")
    public ResponseEntity questions(@RequestBody Map map){
        String content = (String) map.get("content");
        settingService.questions(content);
        return ResponseEntity.ok(null);
    }
SettingService
  public void questions(String content) {
        Long userId = UserHolder.getUserId();
        Question question = questionApi.findById(userId);
        if (question==null){
            question=new Question();
            question.setUserId(userId);
            question.setTxt(content);
            questionApi.save(question);
        }else {
            question.setTxt(content);
            questionApi.update(question);
        }
    }
QuestionApi
public interface QuestionApi {
    public Question findById(Long id);

    void save(Question question);

    void update(Question question);
}
QuestionApiImpl
    @Override
    public void save(Question question) {
        questionMapper.insert(question);
    }

    @Override
    public void update(Question question) {
        questionMapper.updateById(question);
    }
}
4通知设置
api文档
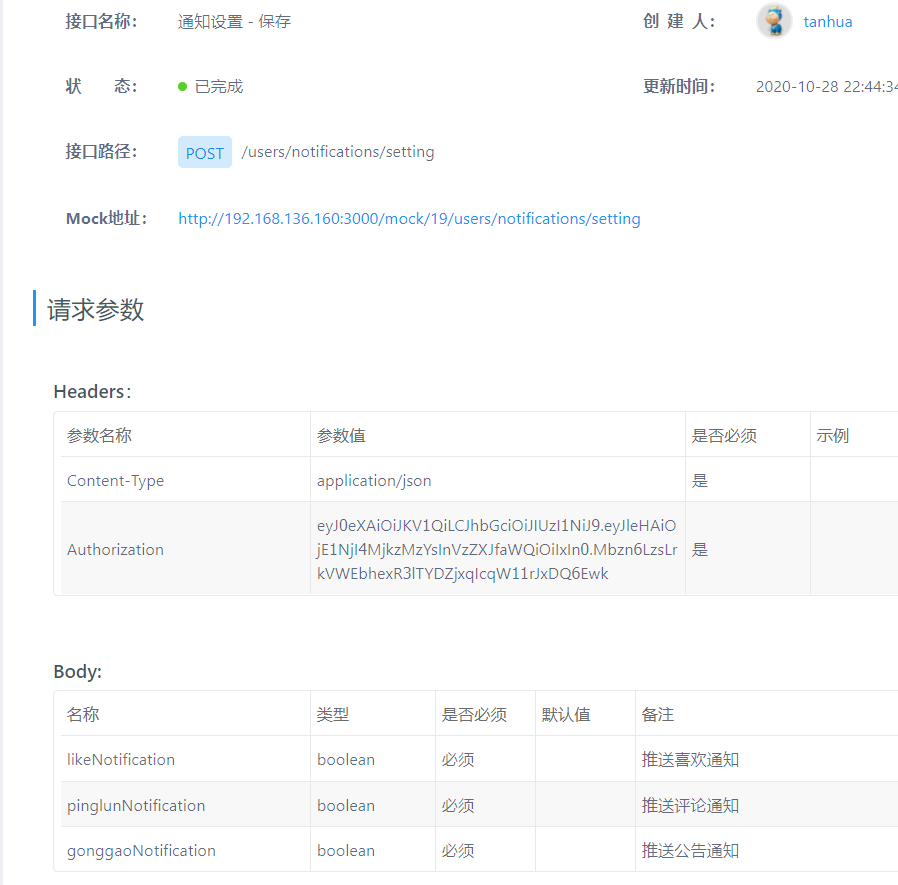
思路:
查询settings,如果存在这保存,不存在则添加
SettingController
/**
 * 通知设置
 * POST  /users/notifications/setting
 * */

@PostMapping("/notifications/setting")
public ResponseEntity notifications(@RequestBody Map map){
    settingService.notifications(map);
    return ResponseEntity.ok(null);
}
SettingService
public void notifications(Map map) {
    Long userId = UserHolder.getUserId();
    Boolean likeNotification = (Boolean) map.get("likeNotification");
    Boolean pinglunNotification = (Boolean) map.get("pinglunNotification");
    Boolean gonggaoNotification = (Boolean) map.get("gonggaoNotification");

    Settings settings = settingsApi.findById(userId);
    if (settings==null){
        settings=new Settings();
        settings.setUserId(userId);

        settings.setPinglunNotification(pinglunNotification);
        settings.setLikeNotification(likeNotification);
        settings.setGonggaoNotification(gonggaoNotification);
        settingsApi.save(settings);
    }else {
        settings.setPinglunNotification(pinglunNotification);
        settings.setLikeNotification(likeNotification);
        settings.setGonggaoNotification(gonggaoNotification);
        settingsApi.update(settings);
    }
}
SettingsApi
package com.tanhua.dubbo.api;

import com.tanhua.model.domain.Settings;

public interface SettingsApi {
    public Settings findById(Long id);

    void save(Settings settings);

    void update(Settings settings);
}
SettingsApiImpl
    @Override
    public void save(Settings settings) {
        settingsMapper.insert(settings);
    }

    @Override
    public void update(Settings settings) {
        settingsMapper.updateById(settings);
    }

}
5黑名单查询
api文档
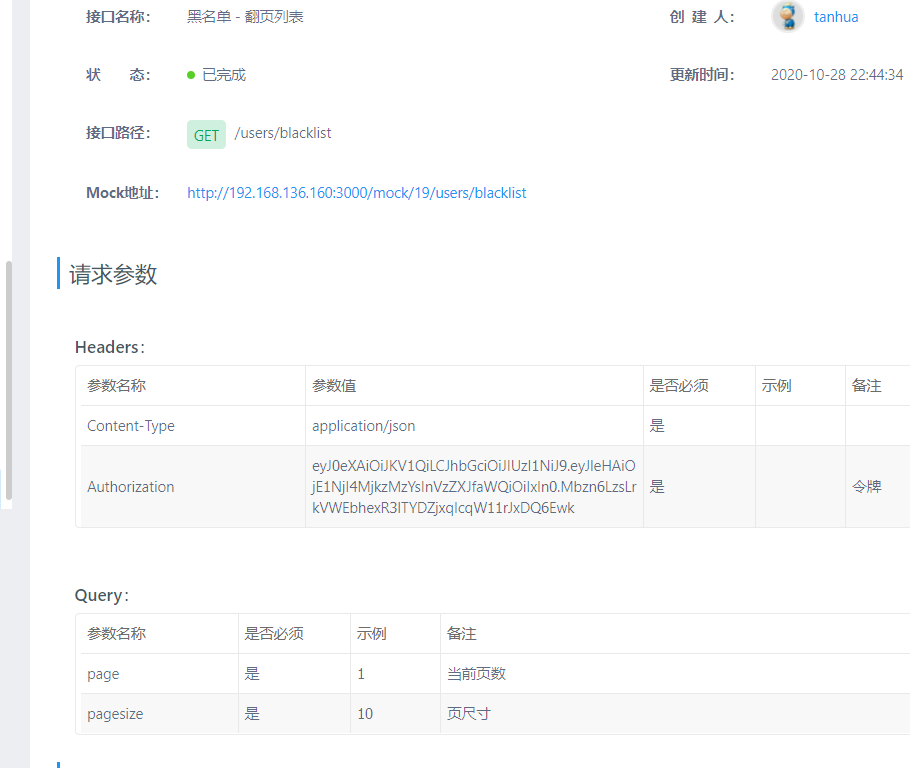
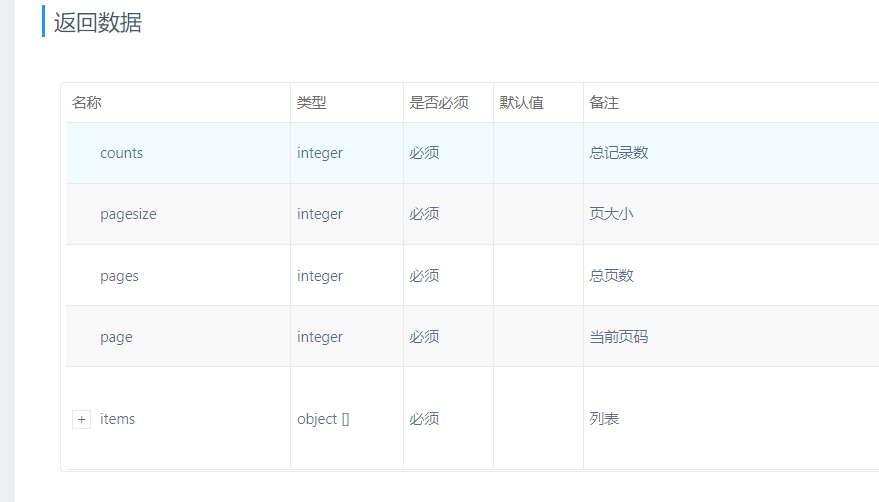
MybatisPlus分页查询
@Select("SELECT b.* FROM tb_black_list as a LEFT JOIN tb_user_info as b ON a.black_user_id=b.id WHERE       a.user_id=#{userId}")
IPage<UserInfo> findBlackList(@Param("pages") Page pages,@Param("userId") Long userId);
1.要有Page参数
2.返回值是IPage (要定义泛型)
3.Ipage对象中把分页结果都封装好了
思路
api文档我们可以看到 返回结果不仅有列表还有别的,所以我们要封装成Vo对象
PageResult
package com.tanhua.model.vo;

import lombok.AllArgsConstructor;
import lombok.Data;
import lombok.NoArgsConstructor;

import java.io.Serializable;
import java.util.Collections;
import java.util.List;

@Data
@AllArgsConstructor
@NoArgsConstructor
public class PageResult implements Serializable {

    private Integer counts = 0;//总记录数
    private Integer pagesize;//页大小
    private Integer pages = 0;//总页数
    private Integer page;//当前页码
    private List<?> items = Collections.emptyList(); //列表

    public PageResult(Integer page,Integer pagesize,
                      int counts,List list) {
        this.page = page;
        this.pagesize = pagesize;
        this.items = list;
        this.counts = counts;
        this.pages = counts % pagesize == 0 ? counts / pagesize : counts / pagesize + 1;
    }

}
SettingController
/**
 * 黑名单 - 翻页列表
 * GET /users/blacklist
 * */

@GetMapping("/blacklist")
public ResponseEntity blacklist(@RequestParam(defaultValue = "1") Integer page,
                                @RequestParam(defaultValue = "10",value = "pagesize")Integer pagesize){
    PageResult pageResult =settingService.blacklist(page,pagesize);
    return ResponseEntity.ok(pageResult);
}
SettingService
//黑名单
public PageResult blacklist(Integer page, Integer pagesize) {
    //1、获取当前用户的id
    Long userId = UserHolder.getUserId();
    //2、调用API查询用户的黑名单分页列表  Ipage对象
    IPage<UserInfo> iPage=blackListApi.findByUserId(userId,page,pagesize);
    //3、对象转化,将查询的Ipage对象的内容封装到PageResult中
    PageResult pageResult=new PageResult(page,pagesize, (int) iPage.getTotal(),iPage.getRecords());
    //4、返回
    return pageResult;
}
BlackListApi
package com.tanhua.dubbo.api;

import com.baomidou.mybatisplus.core.metadata.IPage;
import com.tanhua.model.domain.BlackList;
import com.tanhua.model.domain.UserInfo;

public interface BlackListApi {


    IPage<UserInfo> findByUserId(Long userId, Integer page, Integer pagesize);


}
BlackListApiImpl
@DubboService
public class BlackListApiImpl implements BlackListApi{

    @Autowired
    private BlackListMapper blackListMapper;

    @Autowired
    private UserInfoMapper userInfoMapper;


    //分页查询
    @Override
    public IPage<UserInfo> findByUserId(Long userId, Integer page, Integer pagesize) {
        Page pages=new Page(page,pagesize);
        return userInfoMapper.findBlackList(pages,userId);
    }
UserInfoMapper
public interface UserInfoMapper extends BaseMapper<UserInfo> {


    @Select("SELECT b.* FROM tb_black_list as a LEFT JOIN tb_user_info as b ON a.black_user_id=b.id WHERE a.user_id=#{userId}")
    IPage<UserInfo> findBlackList(@Param("pages") Page pages,@Param("userId") Long userId);
}
6黑名单移除
api文档
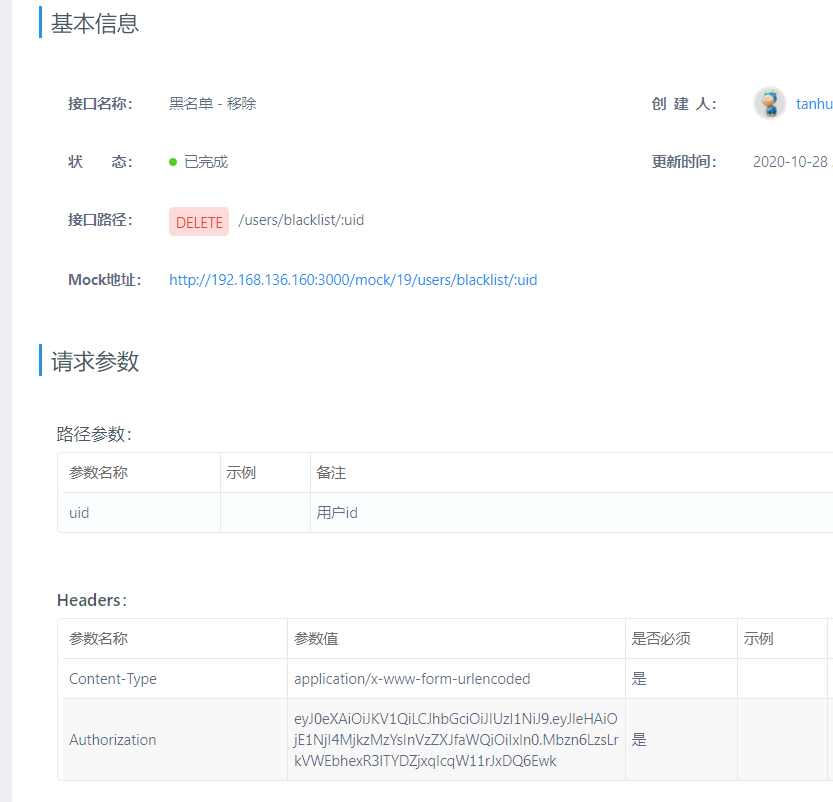
SettingController
/**
 * 黑名单 - 移除
 * DELETE /users/blacklist/:uid
 * */

@DeleteMapping("/blacklist/{uid}")
public ResponseEntity deleteBlackList(@PathVariable("uid") Long blackUserId){
    settingService.deleteBlackList(blackUserId);
    return ResponseEntity.ok(null);

}
SettingService
//移除黑名单
public void deleteBlackList(Long blackUserId) {
    Long userId = UserHolder.getUserId();
    blackListApi.delete(userId,blackUserId);
}
7MongoDB
1MongoDB简介
对于社交类软件的功能,我们需要对它的功能特点做分析:
- 数据量会随着用户数增大而增大
- 读多写少
- 价值较低
- 非好友看不到其动态内容
- 地理位置的查询
- ……
针对以上特点,我们来分析一下:
- mysql:关系型数据库(效率低)
- redis:redis缓存(微博,效率高,数据格式不丰富)
- 对于数据量大而言,显然不能够使用关系型数据库进行存储,我们需要通过MongoDB进行存储
- 对于读多写少的应用,需要减少读取的成本
- 比如说,一条SQL语句,单张表查询一定比多张表查询要快
MongoDB:是一个高效的非关系型数据库(不支持表关系:只能操作单表)
2MongoDB的特点
MongoDB 最大的特点是他支持的查询语言非常强大,其语法有点类似于面向对象的查询语言,几乎可以实现类似关系数据库单表查询的绝大部分功能,而且还支持对数据建立索引。它是一个面向集合的,模式自由的文档型数据库。具体特点总结如下:
-
面向集合存储,易于存储对象类型的数据
-
模式自由
-
支持动态查询
-
支持完全索引,包含内部对象
-
支持复制和故障恢复
-
使用高效的二进制数据存储,包括大型对象(如视频等)
-
自动处理碎片,以支持云计算层次的扩展性
-
支持 Python,PHP,Ruby,Java,C,C#,Javascript,Perl及C++语言的驱动程 序, 社区中也提供了对Erlang及.NET 等平台的驱动程序
-
文件存储格式为 BSON(一种 JSON 的扩展)
1.表不存在会自动创建(使用的数据库不存在也会自动创建)
2.插入的数据会自动生成一个 主键列 _id
3.同一个表数据, 不同的数据可以有不同的列(灵活)
3探花交友
- mongodb:存储业务数据(圈子,推荐的数据,小视频数据,点赞,评论等)
- redis:承担的角色是缓存层(提升查询效率)
- mysql:存储和核心业务数据,账户
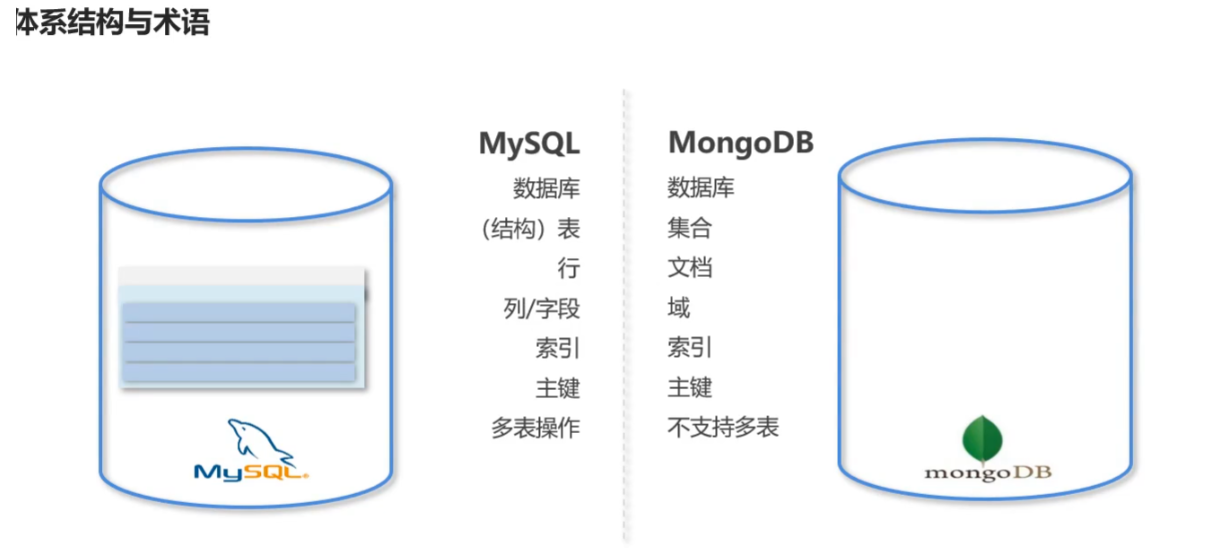
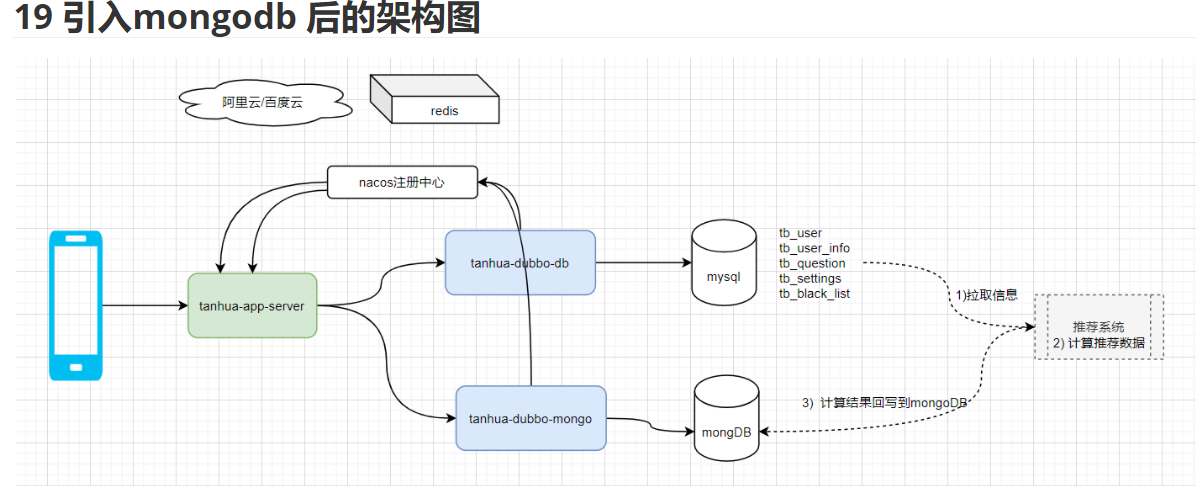
4基本命令
增加
db.user.insert({id:1,username:'zhangsan',age:20})
删除
> db.user.remove({age:22},true)

#删除所有数据
> db.user.remove({})
修改
#更新数据, 更新age 字段,数据不存在,不新增,字段不存在增加age 字段
> db.user.update({id:1},{$set:{age:22}})

#注意:如果这样写,会删除掉其他的字段
> db.user.update({id:1},{age:25})

#更新不存在的字段,会新增字段
> db.user.update({id:2},{$set:{sex:1}}) #更新数据

#更新不存在的数据,默认不会新增数据
> db.user.update({id:3},{$set:{sex:1}})

#如果设置第一个参数为true,就是新增数据
> db.user.update({id:3},{$set:{sex:1}},true)
查询
db.user.find()  #查询全部数据
db.user.find({},{id:1,username:1})  #只查询id与username字段
db.user.find().count()  #查询数据条数
db.user.find({id:1}) #查询id为1的数据
db.user.find({age:{$lte:21}}) #查询小于等于21的数据
db.user.find({$or:[{id:1},{id:2}]}) #查询id=1 or id=2

#分页查询:Skip()跳过几条,limit()查询条数
db.user.find().limit(2).skip(1)  #跳过1条数据,查询2条数据
db.user.find().sort({id:-1}) #按照id倒序排序,-1为倒序,1为正序
5SpringData-Mongo
配置
第一步,导入依赖:
<parent>
    <groupId>org.springframework.boot</groupId>
    <artifactId>spring-boot-starter-parent</artifactId>
    <version>2.3.9.RELEASE</version>
</parent>
<dependencies>
    <dependency>
            <groupId>org.projectlombok</groupId>
            <artifactId>lombok</artifactId>
    </dependency>
    <dependency>
         <groupId>org.springframework.boot</groupId>
         <artifactId>spring-boot-starter-data-mongodb</artifactId>
    </dependency>
    <dependency>
        <groupId>org.springframework.boot</groupId>
        <artifactId>spring-boot-starter-test</artifactId>
        <scope>test</scope>
    </dependency>
</dependencies>
第二步,编写application.yml配置文件
spring:
  data:
    mongodb:
      uri: mongodb://192.168.136.160:27017/test
第三步,编写启动类
package com.tanhua.mongo;

import org.springframework.boot.SpringApplication;
import org.springframework.boot.autoconfigure.SpringBootApplication;

@SpringBootApplication
public class MongoApplication {

    public static void main(String[] args) {
        SpringApplication.run(MongoApplication.class, args);
    }
}
完成基本操作
第一步,编写实体类
package com.tanhua.mongo.domain;

import lombok.AllArgsConstructor;
import lombok.Data;
import lombok.NoArgsConstructor;
import org.bson.types.ObjectId;
import org.springframework.data.mongodb.core.mapping.Document;

@Data
@AllArgsConstructor
@NoArgsConstructor
@Document(value="person")
public class Person {

    private ObjectId id;
    private String name;
    private int age;
    private String address;

}
第二步,通过MongoTemplate完成CRUD操作
package cn.itcast.mongo.test;


import com.tanhua.mongo.MongoApplication;
import com.tanhua.mongo.domain.Person;
import org.bson.types.ObjectId;
import org.junit.Test;
import org.junit.runner.RunWith;
import org.springframework.beans.factory.annotation.Autowired;
import org.springframework.boot.test.context.SpringBootTest;
import org.springframework.data.domain.Sort;
import org.springframework.data.mongodb.core.MongoTemplate;
import org.springframework.data.mongodb.core.query.Criteria;
import org.springframework.data.mongodb.core.query.Query;
import org.springframework.data.mongodb.core.query.Update;
import org.springframework.test.context.junit4.SpringRunner;

import java.util.List;

@RunWith(SpringRunner.class)
@SpringBootTest(classes = MongoApplication.class)
public class MongoTest {


    /**
     *    1、注入MongoTemplate对象
     *    2、调用对象方法完成数据的CRUD
     */
    @Autowired
    private MongoTemplate mongoTemplate;


    //保存
    @Test
    public void testSave() {
        Person person = new Person();
        person.setName("张三");
        person.setAge(18);
        person.setAddress("北京金燕龙");
        mongoTemplate.save(person);
    }

    //保存
    @Test
    public void testSave2() {
        for (int i = 0; i < 10; i++) {
            Person person = new Person();
            person.setId(ObjectId.get()); //ObjectId.get():获取一个唯一主键字符串
            person.setName("张三"+i);
            person.setAddress("金燕龙"+i);
            person.setAge(18+i);
            mongoTemplate.save(person);
        }
    }

    /**
     * 查询所有
     */
    @Test
    public void testFindAll() {
        List<Person> list = mongoTemplate.findAll(Person.class);
        for (Person person : list) {
            System.out.println(person);
        }
    }

    /**
     * 条件查询
     */
    @Test
    public void testFind() {
        //1、创建Criteria对象,并设置查询条件
        Criteria criteria = Criteria.where("myname").is("张三")
                .and("age").is(18)
                ;//is 相当于sql语句中的=
        //2、根据Criteria创建Query
        Query query = new Query(criteria);
        //3、查询
        List<Person> list = mongoTemplate.find(query, Person.class);//Query对象,实体类对象字节码
        for (Person person : list) {
            System.out.println(person);
        }
    }

    /**
     * 分页查询
     */
    @Test
    public void testPage() {
        int page = 1;
        int size = 2;
        //1、创建Criteria对象,并设置查询条件
        Criteria criteria = Criteria.where("age").lt(50); //is 相当于sql语句中的=
        //2、根据Criteria创建Query
        Query queryLimit = new Query(criteria)
                .skip((page -1) * size) //从第几条开始查询
                .limit(size) //每页查询条数
                .with(Sort.by(Sort.Order.desc("age")));
        //3、查询
        List<Person> list = mongoTemplate.find(queryLimit, Person.class);
        for (Person person : list) {
            System.out.println(person);
        }
    }


    /**
     * 更新
     */
    @Test
    public void testUpdate() {
        //1、构建Query对象
        Query query = Query.query(Criteria.where("id").is("61275c3980f68e67ab4fdf25"));
        //2、设置需要更新的数据内容
        Update update = new Update();
        update.set("age", 10);
        update.set("myname", "lisi");
        //3、调用方法
        mongoTemplate.updateFirst(query, update, Person.class);
    }

    //删除
    @Test
    public void testDelete() {
        //1、构建Query对象
        Query query = Query.query(Criteria.where("id").is("5fe404c26a787e3b50d8d5ad"));
        mongoTemplate.remove(query, Person.class);
    }
}
6今日佳人(练习MongoDB)
(用MongDB实现海量数据存储)
api文档
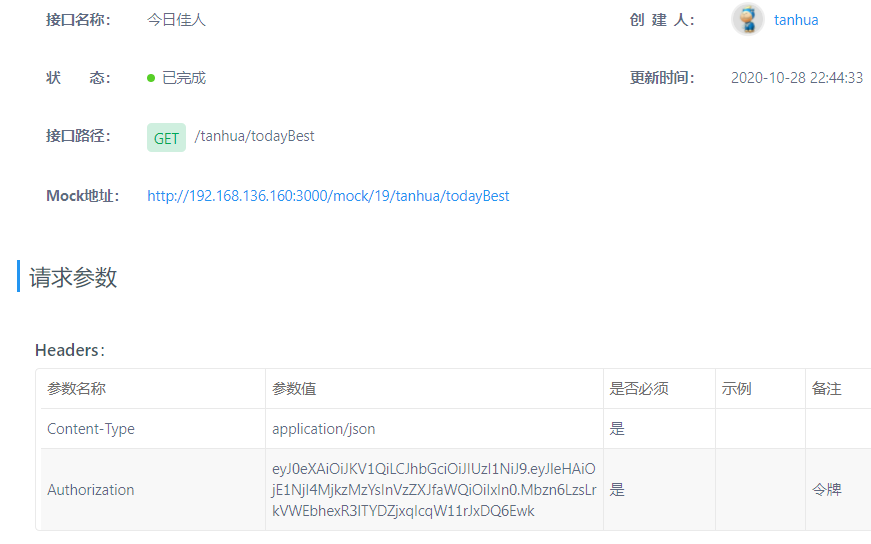
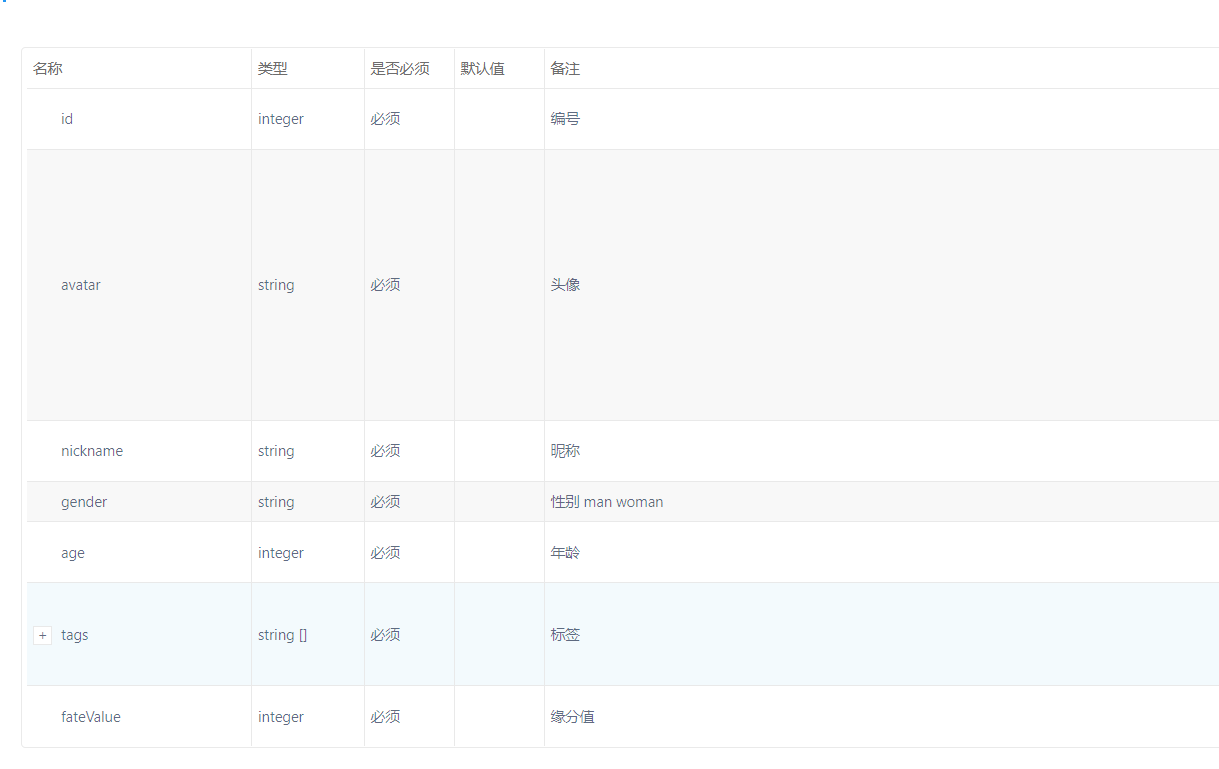
解析:
会发现这里不仅用到了MongDB中的RecommendUser的数据还用到了MySQL的UserInfo数据
我们要定义Vo对象来封装两张表查询的数据并返回
TodayBest(vo对象)
package com.tanhua.model.vo;


import com.tanhua.model.domain.UserInfo;
import com.tanhua.model.mongo.RecommendUser;
import lombok.AllArgsConstructor;
import lombok.Data;
import lombok.NoArgsConstructor;
import org.springframework.beans.BeanUtils;

/**
 * 今日佳人
 */
@Data
@NoArgsConstructor
@AllArgsConstructor
public class TodayBest {

    private Long id; //用户id
    private String avatar;
    private String nickname;
    private String gender; //性别 man woman
    private Integer age;
    private String[] tags;
    private Long fateValue; //缘分值

    /**
     * 在vo对象中,补充一个工具方法,封装转化过程
     */
    public static TodayBest init(UserInfo userInfo, RecommendUser recommendUser) {
        TodayBest vo = new TodayBest();
        BeanUtils.copyProperties(userInfo,vo);
        if(userInfo.getTags() != null) {
            vo.setTags(userInfo.getTags().split(","));
        }
        vo.setFateValue(recommendUser.getScore().longValue());
        return vo;
    }
}
RecommendUser(mongo今日佳人实体类)
package com.tanhua.model.mongo;

import lombok.AllArgsConstructor;
import lombok.Data;
import lombok.NoArgsConstructor;
import org.bson.types.ObjectId;
import org.springframework.data.mongodb.core.mapping.Document;

@AllArgsConstructor
@NoArgsConstructor
@Data
@Document(collection = "recommend_user")
public class RecommendUser implements java.io.Serializable {
    private ObjectId id; //主键id
    private Long userId; //推荐的用户id
    private Long toUserId; //用户id
    private Double score =0d; //推荐得分
    private String date; //日期
}
TanhuaService
package com.tanhua.server.controller;

import com.tanhua.model.vo.TodayBest;
import com.tanhua.server.service.TanhuaService;
import org.springframework.beans.factory.annotation.Autowired;
import org.springframework.http.ResponseEntity;
import org.springframework.web.bind.annotation.GetMapping;
import org.springframework.web.bind.annotation.RequestMapping;
import org.springframework.web.bind.annotation.RestController;

@RestController
@RequestMapping("/tanhua")
public class TanhuaController {

    @Autowired
    private TanhuaService tanhuaService;

    /**
     * 今日佳人
     * GET /tanhua/todayBest
     * */

    @GetMapping("todayBest")
    public ResponseEntity todayBest(){
       TodayBest todayBest= tanhuaService.todayBest();
       return ResponseEntity.ok(todayBest);
    }
}
TanhuaService
package com.tanhua.server.service;

import com.tanhua.dubbo.api.RecommendApi;
import com.tanhua.dubbo.api.UserInfoApi;
import com.tanhua.model.domain.UserInfo;
import com.tanhua.model.mongo.RecommendUser;
import com.tanhua.model.vo.TodayBest;
import com.tanhua.server.interceptor.UserHolder;
import org.apache.dubbo.config.annotation.DubboReference;
import org.springframework.stereotype.Service;

@Service
public class TanhuaService {

    @DubboReference
    private RecommendApi recommendApi;

    @DubboReference
    private UserInfoApi userInfoApi;

    public TodayBest todayBest() {
        Long userId = UserHolder.getUserId();
        RecommendUser recommendUser = recommendApi.queryWithMaxScore(userId);
        if (recommendUser==null){
            recommendUser=new RecommendUser();
            recommendUser.setUserId(1l);
            recommendUser.setScore(99d);
        }
        UserInfo userInfo = userInfoApi.findById(recommendUser.getUserId());
        TodayBest vo = TodayBest.init(userInfo, recommendUser);
        return vo;
    }
}
RecommendApi
package com.tanhua.dubbo.api;

import com.tanhua.model.mongo.RecommendUser;

public interface RecommendApi {
    RecommendUser queryWithMaxScore(Long toUserId);
}
RecommendApiImpl
package com.tanhua.mongo.api;

import com.tanhua.dubbo.api.RecommendApi;
import com.tanhua.model.mongo.RecommendUser;
import org.apache.dubbo.config.annotation.DubboService;
import org.springframework.beans.factory.annotation.Autowired;
import org.springframework.data.domain.Sort;
import org.springframework.data.mongodb.core.MongoTemplate;
import org.springframework.data.mongodb.core.query.Criteria;
import org.springframework.data.mongodb.core.query.Query;

@DubboService
public class RecommendApiImpl implements RecommendApi {

    @Autowired
    private MongoTemplate mongoTemplate;

    @Override
    public RecommendUser queryWithMaxScore(Long toUserId) {
        Criteria criteria =Criteria.where("toUserId").is(toUserId);
        Query query=Query.query(criteria)
                .with(Sort.by(Sort.Order.desc("score")))
                .skip(0)
                .limit(1);
        RecommendUser recommendUser = mongoTemplate.findOne(query, RecommendUser.class);
        return recommendUser;
    }
}
特别注意
在项目中,添加了mongo的依赖的话,springboot就会自动去连接本地的mongo,由于他连接不上会导致出错。
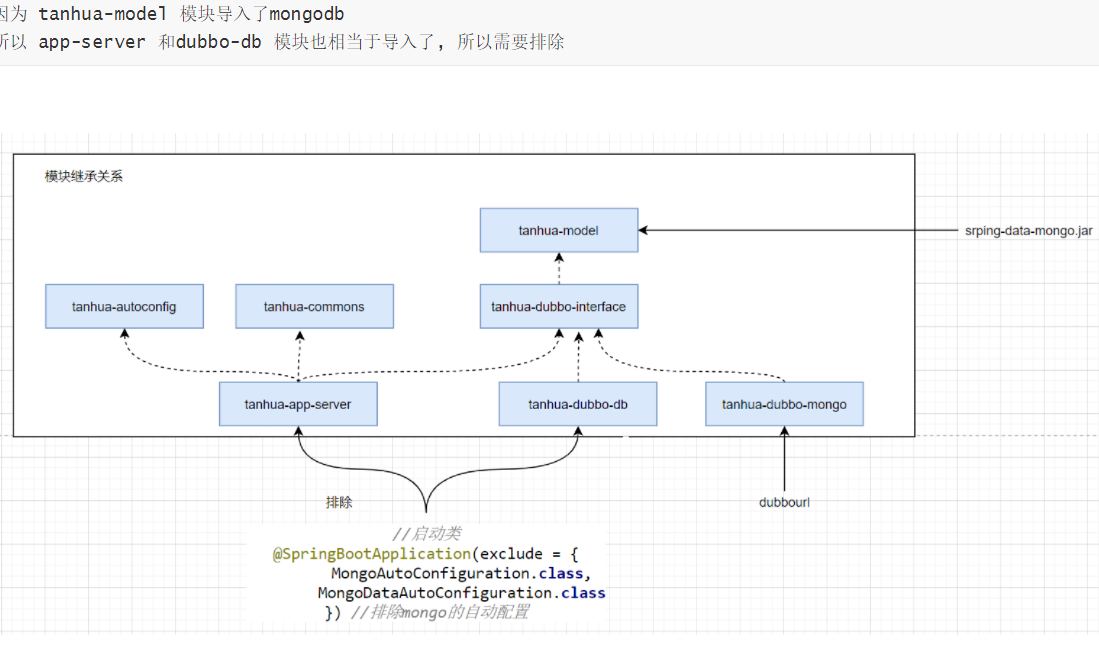
我们要在tanhua-app-server和tanhua-dubbo-db的启动类排除mongo的自动配置
@SpringBootApplication(exclude = {
        MongoAutoConfiguration.class,
        MongoDataAutoConfiguration.class
})
@MapperScan("com.tanhua.dubbo.mappers")
public class DubboDBApplication {
@SpringBootApplication(exclude = {
        MongoAutoConfiguration.class,
        MongoDataAutoConfiguration.class
})
public class AppServerApplicattion {
7推荐(交友)列表
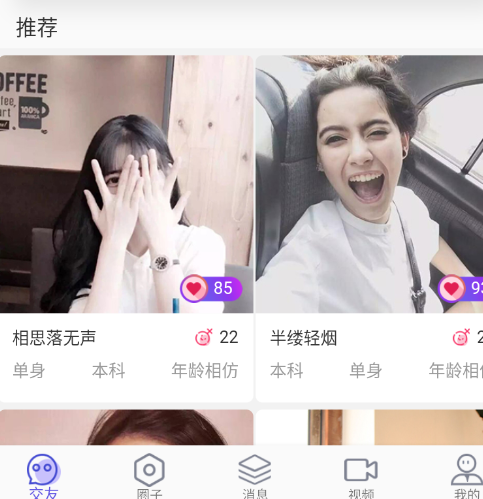
api文档
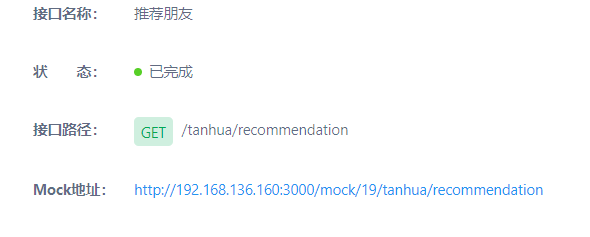
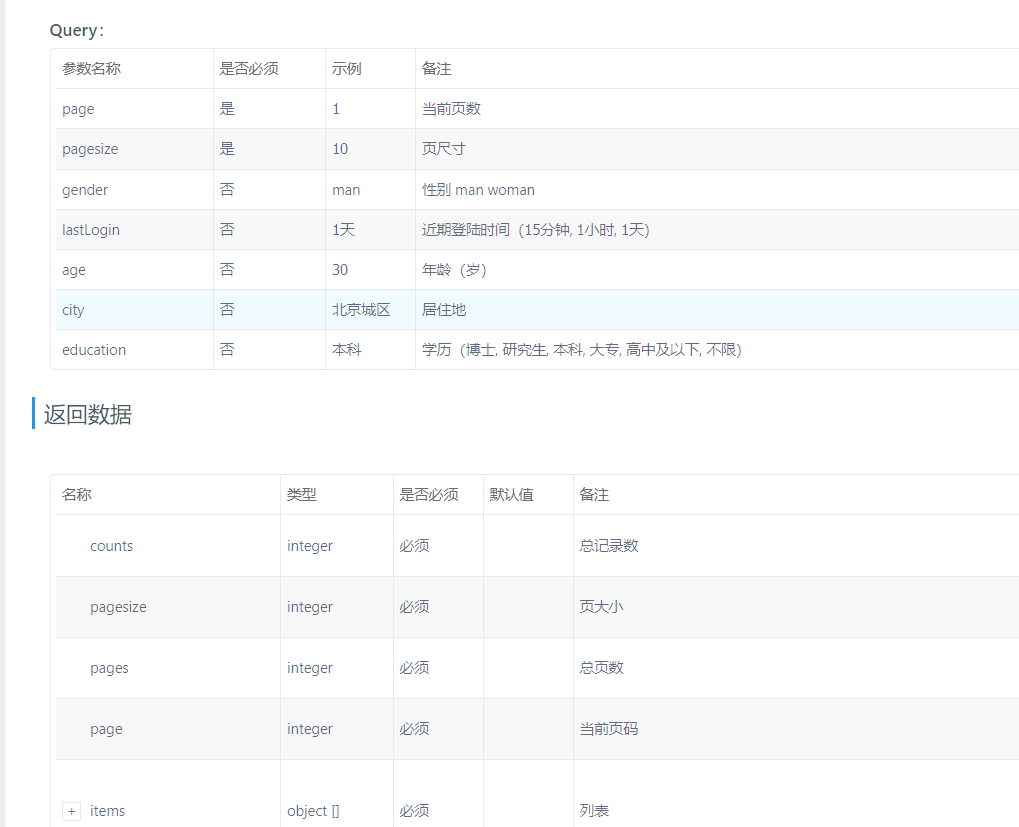
分析
可以在api文档看到
传递的参数是Query 且参数有点多 我们可以封装成Dto对象传递到我们的后台
返回数据是分页数据,我们依然用PageResult接收
在items中不仅有用户Info数据还有推荐Recomment的缘分值等和今日佳人的TodayBest的vo对象一样
我们就可以直接用来封装数据
代码
TanhuaController
/**
 * 推荐列表
 * GET /tanhua/recommendation
 *参数: Query RecommendUserDto
 * 返回PageResult
 * */
@GetMapping("/recommendation")
public ResponseEntity recommendation(RecommendUserDto dto){
    PageResult pageResult= tanhuaService.recommendation(dto);
    return ResponseEntity.ok(pageResult);
}
TanhuaService
   //    //查询分页推荐好友列表
//    public PageResult recommendation(RecommendUserDto dto) {
//        Long userId = UserHolder.getUserId();
//        PageResult pageResult=recommendApi.queryRecommendUserList(dto.getPage(),dto.getPagesize(),userId);
//        List<RecommendUser> items = (List<RecommendUser>) pageResult.getItems();
//        if (items==null){
//            return pageResult;
//        }
//        List<TodayBest> list=new ArrayList<>();
//        for (RecommendUser item : items) {
//            Long recommendUserId = item.getUserId();
//            UserInfo userInfo = userInfoApi.findById(recommendUserId);
//            if (userInfo!=null){
//                if (!StringUtils.isEmpty(dto.getGender())&&!userInfo.getGender().equals(dto.getGender())){
//                    continue;
//                }
//                if (dto.getAge()!=null&&dto.getAge()<userInfo.getAge()){
//                    continue;
//                }
//                    TodayBest vo = TodayBest.init(userInfo, item);
//                list.add(vo);
//            }
//
//        }
//        pageResult.setItems(list);
//        return pageResult;
//    }
//查询分页推荐好友列表
    public PageResult recommendation(RecommendUserDto dto) {
        Long userId = UserHolder.getUserId();
        PageResult pageResult = recommendApi.queryRecommendUserList(dto.getPage(), dto.getPagesize(), userId);
        List<RecommendUser> items = (List<RecommendUser>) pageResult.getItems();
        if (items == null) {
            return pageResult;
        }
        List<Long> ids = CollUtil.getFieldValues(items, "userId", long.class);
        UserInfo userInfo = new UserInfo();
        if (dto.getGender() != null) {
            userInfo.setGender(dto.getGender());
        }
        if (dto.getAge() != null) {
            userInfo.setAge(dto.getAge());
        }
        Map<Long, UserInfo> map = userInfoApi.findByIds(ids, userInfo);
        List<TodayBest> list = new ArrayList<>();
        for (RecommendUser item : items) {
            UserInfo info = map.get(item.getUserId());
            if (info != null) {
                TodayBest vo = TodayBest.init(info, item);
                list.add(vo);
            }
        }
        pageResult.setItems(list);
        return pageResult;
    }
分析service
在代码中注释的是没有优化的代码,可以看到在查询UserIfo信息时候我们一条一条查询很浪费资源,效率很低
for (RecommendUser item : items) {
         Long recommendUserId = item.getUserId();
          UserInfo userInfo = userInfoApi.findById(recommendUserId);
          .....

优化: 我们直接查询全部在进行循环封装 这样我们就访问一次MongDB
这里我们用到了hutu工具包
 List<Long> ids = CollUtil.getFieldValues(items, "userId", long.class);
 获取/要查询的id的集合

  Map<Long, UserInfo> map = userInfoApi.findByIds(ids, userInfo);
  根据集合查询并返回一个Map集合 里头有每一个id 对应的UserInFo
  然后循环封装Vo对象
RecommendApi
public interface RecommendApi {
    RecommendUser queryWithMaxScore(Long toUserId);

    PageResult queryRecommendUserList(Integer page, Integer pagesize, Long toUserId);
}
RecommendApiImpl
   @Override
    public PageResult queryRecommendUserList(Integer page, Integer pagesize, Long toUserId) {
        Criteria criteria=Criteria.where("toUserId").is(toUserId);
        Query query=Query.query(criteria);
        Long count = mongoTemplate.count(query, RecommendUser.class);
        query.with(Sort.by(Sort.Order.desc("score")))
                .skip((page-1)*pagesize)
                .limit(pagesize);
        List<RecommendUser> recommendUsers = mongoTemplate.find(query, RecommendUser.class);
        return new PageResult(page,pagesize,count,recommendUsers);
    }
}
UserInfoApiImpl
@Override
public Map<Long, UserInfo> findByIds(List<Long> ids, UserInfo info) {
    QueryWrapper<UserInfo> qw=new QueryWrapper<>();
    qw.in("id",ids);
    if(info!=null){
        if (info.getGender()!=null) {
            qw.eq("gender", info.getGender());
        }
        if (info.getAge()!=null){
            qw.lt("age",info.getAge());
        }
    }
    List<UserInfo> list = userInfoMapper.selectList(qw);
    Map<Long, UserInfo> map = CollUtil.fieldValueMap(list, "id");
    return map;
}
我们要知道的开发思想
传递参数封装对象实现业务返回结果
8MongoDB集群
副本集群
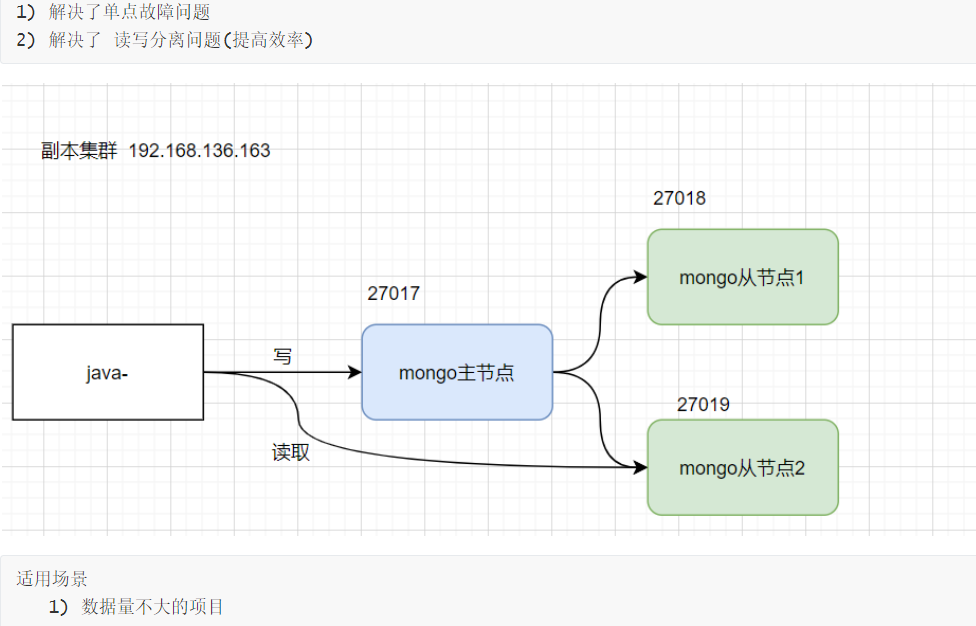
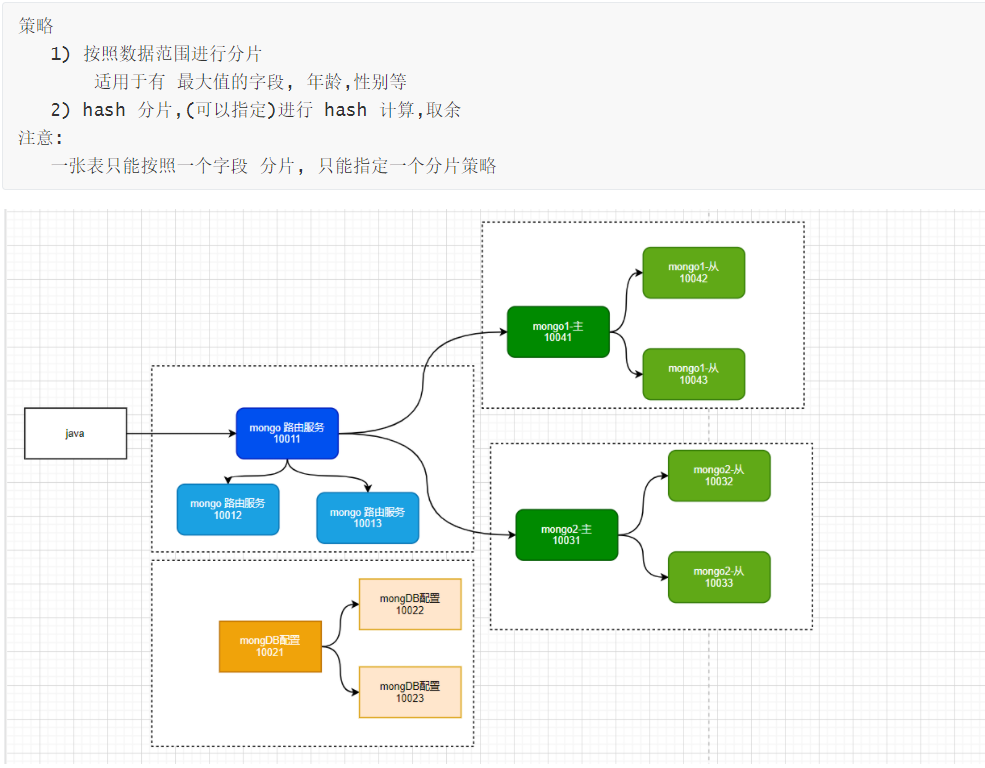
分片集群
8圈子功能
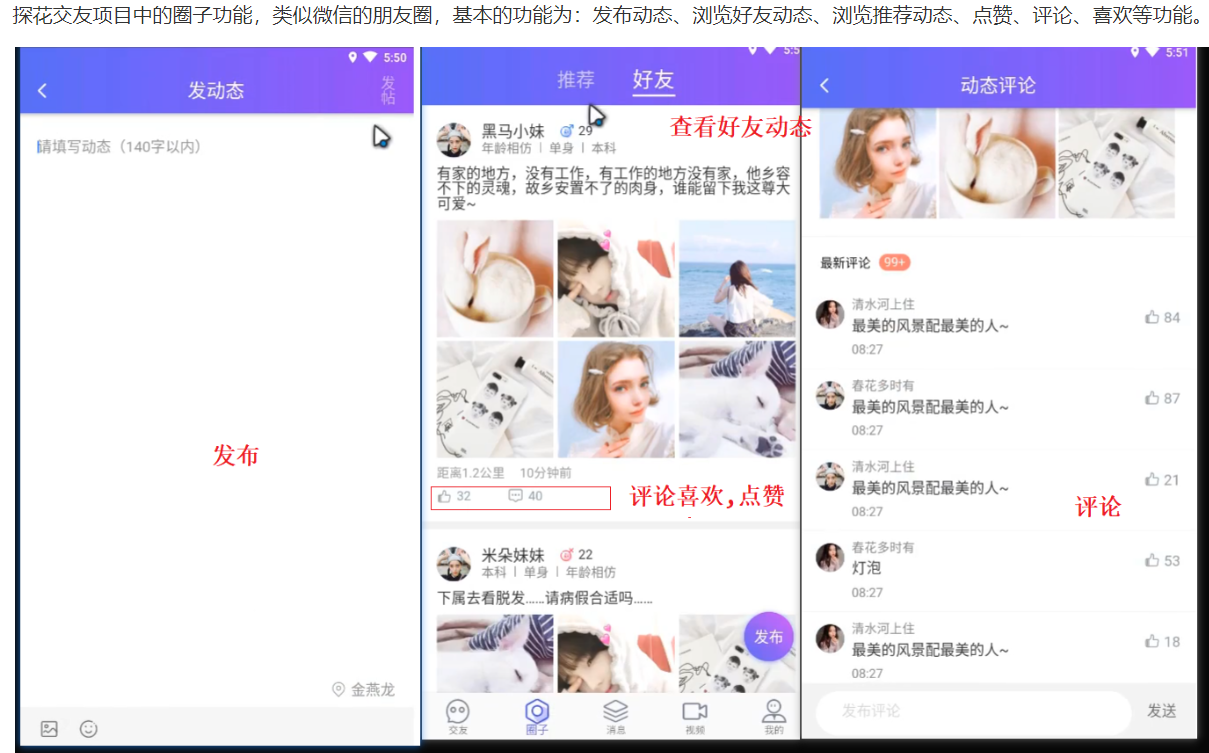
1表解构设计
圈子功能分为三张表
好友表  **好友关系表:记录好友的双向关系(双向)**
动态表 **发布表:动态总记录表(记录每个人发送的动态详情)**
好友动态时间线表 **好友时间线表:记录当前好友发布的动态数据**
2发布圈子动态
分析实现步骤
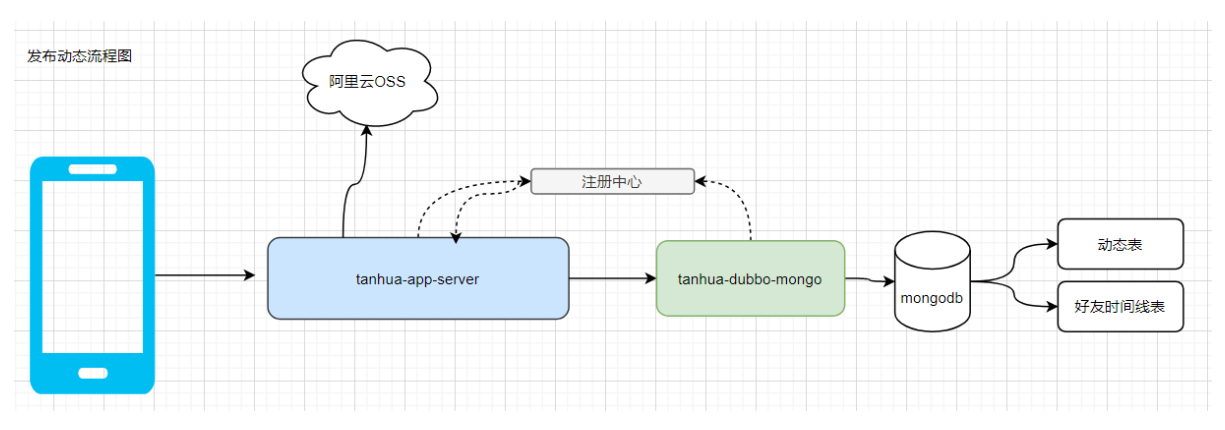
我们在发布动态的时候要从前台接受数据  用户发布动态描述 和动态的图片视频等(数组,可以为多个)
我们要将图片上传到aliyun Oss上 返回图片路径
将路径封装到Monement对象中
根据用户userId查询好友的friendId
然后根据friendId添加动态时间线表的数据
由于可能好友过多响应较慢让用户体验不好可以使用异步请求开一个线程慢慢的添加好友动态时间线数据
异步请求补充
这里我们用到了异步请求,而spring恰好给我们提供了一个简单实现步骤
- 创建一个类,再类上添加@component注解 使其交给spring管理
- 写一个异步方法,实现异步添加在方法上添加@Async注解
- 最后要记得在启动类上加上@EnableAsync注解开启异步
代码
MovementsController
@RestController
@RequestMapping("/movements")
public class MovementsController {

    @Autowired
    private MovementsService movementsService;

    /**
     * 发布动态
     * POST /movements
     */
    @PostMapping
    public ResponseEntity movements(Movement movement,
                                    MultipartFile[] imageContent) throws IOException {

        movementsService.movements(movement, imageContent);
        return ResponseEntity.ok(null);
    }
MovementsService
@Service
public class MovementsService {

    @Autowired
    private OssTemplate ossTemplate;

    @DubboReference
    private MovementApi movementApi;

    @DubboReference
    private UserInfoApi userInfoApi;

    @Autowired
    private RedisTemplate<String, String> redisTemplate;

    //发布动态
    public void movements(Movement movement, MultipartFile[] imageContent) throws IOException {
        //1、判断发布动态的内容是否存在
        if (StringUtils.isEmpty(movement.getTextContent())) {
            throw new BusinessException(ErrorResult.contentError());
        }
        //2、获取当前登录的用户id
        Long userId = UserHolder.getUserId();
        //3、将文件内容上传到阿里云OSS,获取请求地址
        List<String> urls = new ArrayList<>();
        for (MultipartFile multipartFile : imageContent) {
            String upload = ossTemplate.upload(multipartFile.getOriginalFilename(), multipartFile.getInputStream());
            urls.add(upload);
        }
        //4、将数据封装到Movement对象
        movement.setMedias(urls);
        movement.setUserId(userId);
        //5、调用API完成发布动态
        movementApi.save(movement);
    }
MovementApiImpl
@DubboService
public class MovementApiImpl implements MovementApi {

    @Autowired
    private MongoTemplate mongoTemplate;

    @Autowired
    private IdWorker idWorker;

    @Autowired
    private TimeLineService timeLineService;


    @Override
    public void save(Movement movement) {
        //设置pid,设置使时间
        movement.setPid(idWorker.getNextId("movement"));
        movement.setCreated(System.currentTimeMillis());
        mongoTemplate.save(movement);
        //设置时间线表
//        Criteria criteria=Criteria.where("userId").is(movement.getUserId());
//        Query qw=Query.query(criteria);
//        List<Friend> list = mongoTemplate.find(qw, Friend.class);
//        for (Friend friend : list) {
//            MovementTimeLine timeLine=new MovementTimeLine();
//            timeLine.setFriendId(friend.getFriendId());
//            timeLine.setMovementId(movement.getId());
//            timeLine.setCreated(System.currentTimeMillis());
//            timeLine.setUserId(friend.getUserId());
//            mongoTemplate.save(timeLine);
//        }
        timeLineService.saveTimeLine(movement.getUserId(),movement.getId());

    }
TimeLineService(异步类)
package com.tanhua.mongo.utils;


@Component
public class TimeLineService {

    @Autowired
    private MongoTemplate mongoTemplate;

    @Async
    public void saveTimeLine(Long userId, ObjectId movementId) {
        Criteria criteria = Criteria.where("userId").is(userId);
        Query qw = Query.query(criteria);
        List<Friend> list = mongoTemplate.find(qw, Friend.class);
        for (Friend friend : list) {
            MovementTimeLine timeLine = new MovementTimeLine();
            timeLine.setFriendId(friend.getFriendId());
            timeLine.setMovementId(movementId);
            timeLine.setCreated(System.currentTimeMillis());
            timeLine.setUserId(friend.getUserId());
            mongoTemplate.save(timeLine);
        }
    }
}
IdWorker(生成唯一的pid类)
package com.tanhua.mongo.utils;


@Component
public class IdWorker {

    @Autowired
    private MongoTemplate mongoTemplate;

    public Long getNextId(String collName) {
        Query query = new Query(Criteria.where("collName").is(collName));

        Update update = new Update();
        update.inc("seqId", 1);

        FindAndModifyOptions options = new FindAndModifyOptions();
        options.upsert(true);
        options.returnNew(true);

        Sequence sequence = mongoTemplate.findAndModify(query, update, options, Sequence.class);
        return sequence.getSeqId();
    }
}
mongo主键自增
第一步:创建实体类
package com.tanhua.domain.mongo;

import lombok.AllArgsConstructor;
import lombok.Data;
import lombok.NoArgsConstructor;
import org.bson.types.ObjectId;
import org.springframework.data.annotation.Id;
import org.springframework.data.mongodb.core.mapping.Document;
import org.springframework.data.mongodb.core.mapping.Field;

@Document(collection = "sequence")
@Data
@AllArgsConstructor
@NoArgsConstructor
public class Sequence {

    private ObjectId id;

    private long seqId; //自增序列

    private String collName;  //集合名称
}
第二步:编写service
package com.tanhua.dubbo.utils;

import com.tanhua.domain.mongo.Sequence;
import org.springframework.beans.factory.annotation.Autowired;
import org.springframework.data.mongodb.core.FindAndModifyOptions;
import org.springframework.data.mongodb.core.MongoTemplate;
import org.springframework.data.mongodb.core.query.Criteria;
import org.springframework.data.mongodb.core.query.Query;
import org.springframework.data.mongodb.core.query.Update;
import org.springframework.stereotype.Component;

@Component
public class IdWorker {

    @Autowired
    private MongoTemplate mongoTemplate;

    public Long getNextId(String collName) {
        Query query = new Query(Criteria.where("collName").is(collName));

        Update update = new Update();
        update.inc("seqId", 1);

        FindAndModifyOptions options = new FindAndModifyOptions();
        options.upsert(true);
        options.returnNew(true);

        Sequence sequence = mongoTemplate.findAndModify(query, update, options, Sequence.class);
        return sequence.getSeqId();
    }
}
Movement
Movement:发布信息表(总记录表数据)
package com.tanhua.domain.mongo;

import lombok.AllArgsConstructor;
import lombok.Data;
import lombok.NoArgsConstructor;
import org.bson.types.ObjectId;
import org.springframework.data.mongodb.core.mapping.Document;

import java.util.List;

//动态详情表
@Data
@NoArgsConstructor
@AllArgsConstructor
@Document(collection = "movement")
public class Movement implements java.io.Serializable {


    private ObjectId id; //主键id
    private Long pid; //Long类型,用于推荐系统的模型(自动增长)
    private Long created; //发布时间
    private Long userId;
    private String textContent; //文字
    private List<String> medias; //媒体数据,图片或小视频 url
    private String longitude; //经度
    private String latitude; //纬度
    private String locationName; //位置名称
    private Integer state = 0;//状态 0:未审(默认),1:通过,2:驳回
}
MovementTimeLine
MovementTimeLine:好友时间线表,用于存储好友发布(或推荐)的数据,每一个用户一张表进行存储
package com.tanhua.domain.mongo;

import lombok.AllArgsConstructor;
import lombok.Data;
import lombok.NoArgsConstructor;
import org.bson.types.ObjectId;
import org.springframework.data.mongodb.core.mapping.Document;

/**
 * 好友时间线表,用于存储好友发布的数据
 */
@Data
@NoArgsConstructor
@AllArgsConstructor
@Document(collection = "movement_timeLine")
public class MovementTimeLine implements java.io.Serializable {

    private static final long serialVersionUID = 9096178416317502524L;
    private ObjectId id;
    private ObjectId movementId;//动态id
    private Long userId;   //发布动态用户id
    private Long friendId; // 可见好友id
    private Long created; //发布的时间
}
Friend
Friend 好友关系表
package com.tanhua.domain.mongo;

import lombok.AllArgsConstructor;
import lombok.Data;
import lombok.NoArgsConstructor;
import org.bson.types.ObjectId;
import org.springframework.data.mongodb.core.mapping.Document;

/**
 * 好友表:好友关系表
 */
@Data
@NoArgsConstructor
@AllArgsConstructor
@Document(collection = "friend")
public class Friend implements java.io.Serializable{

    private static final long serialVersionUID = 6003135946820874230L;
    private ObjectId id;
    private Long userId; //用户id
    private Long friendId; //好友id
    private Long created; //时间

}
3查询个人动态
api文档

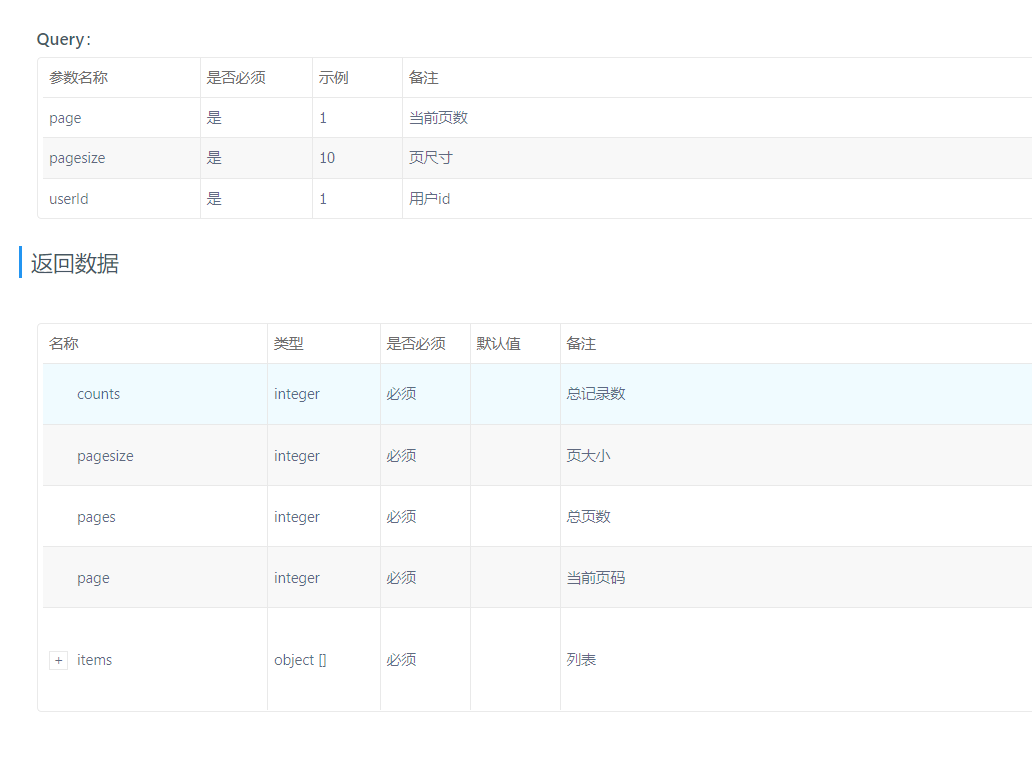
返回的是PageResult items中我们用MovementVo来封装
代码
vo对象
MovementsVo
package com.tanhua.model.vo;

@Data
@NoArgsConstructor
@AllArgsConstructor
public class MovementsVo  implements Serializable {

    private String id; //动态id

    private Long userId; //用户id
    private String avatar; //头像
    private String nickname; //昵称
    private String gender; //性别 man woman
    private Integer age; //年龄
    private String[] tags; //标签


    private String textContent; //文字动态
    private String[] imageContent; //图片动态
    private String distance; //距离
    private String createDate; //发布时间 如: 10分钟前
    private Integer likeCount; //点赞数
    private Integer commentCount; //评论数
    private Integer loveCount; //喜欢数


    private Integer hasLiked; //是否点赞(1是,0否)
    private Integer hasLoved; //是否喜欢(1是,0否)


    public static MovementsVo init(UserInfo userInfo, Movement item) {
        MovementsVo vo = new MovementsVo();
        //设置动态数据
        BeanUtils.copyProperties(item, vo);
        vo.setId(item.getId().toHexString());
        //设置用户数据
        BeanUtils.copyProperties(userInfo, vo);
        if(!StringUtils.isEmpty(userInfo.getTags())) {
            vo.setTags(userInfo.getTags().split(","));
        }
        //图片列表
        vo.setImageContent(item.getMedias().toArray(new String[]{}));
        //距离
        vo.setDistance("500米");
        Date date = new Date(item.getCreated());
        vo.setCreateDate(new SimpleDateFormat("yyyy-MM-dd hh:mm:ss").format(date));
        //设置是否点赞(后续处理)
        vo.setHasLoved(0);
        vo.setHasLiked(0);
        //点赞,喜欢,评论数量
        vo.setLikeCount(0);
        vo.setLoveCount(0);
        vo.setCommentCount(0);
        return vo;
    }
}
MovementController
/**
 * 查询个人动态
 * GET  /movements/all
 */
@GetMapping("all")
public ResponseEntity findByUserId(@RequestParam(defaultValue = "1") Integer page,
                                   @RequestParam(defaultValue = "10") Integer pagesize,
                                   Long userId) {
    PageResult pageResult = movementsService.findByUserId(userId, page, pagesize);
    return ResponseEntity.ok(pageResult);
}
MovementsService
//查询个人动态
public PageResult findByUserId(Long userId, Integer page, Integer pagesize) {
    PageResult pageResult = movementApi.findByUserId(userId, page, pagesize);
    List<Movement> items = (List<Movement>) pageResult.getItems();
    if (items == null) {
        return pageResult;
    }
    UserInfo userInfo = userInfoApi.findById(userId);
    List<MovementsVo> list = new ArrayList<>();
    for (Movement item : items) {
        MovementsVo vo = MovementsVo.init(userInfo, item);
        list.add(vo);
    }
    pageResult.setItems(list);
    return pageResult;
}
MovementApiImpl
@Override
//查询个人动态
public PageResult findByUserId(Long userId, Integer page, Integer pagesize) {
    Criteria criteria=Criteria.where("userId").is(userId);
    Query query=new Query(criteria)
            .skip((page-1)*pagesize)
            .limit(pagesize)
            .with(Sort.by(Sort.Order.desc("created")));
    List<Movement> movements = mongoTemplate.find(query, Movement.class);
    return new PageResult(page,pagesize,0l,movements);
}
4查询好友动态

api文档
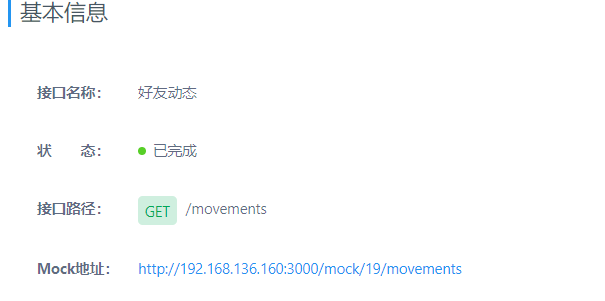
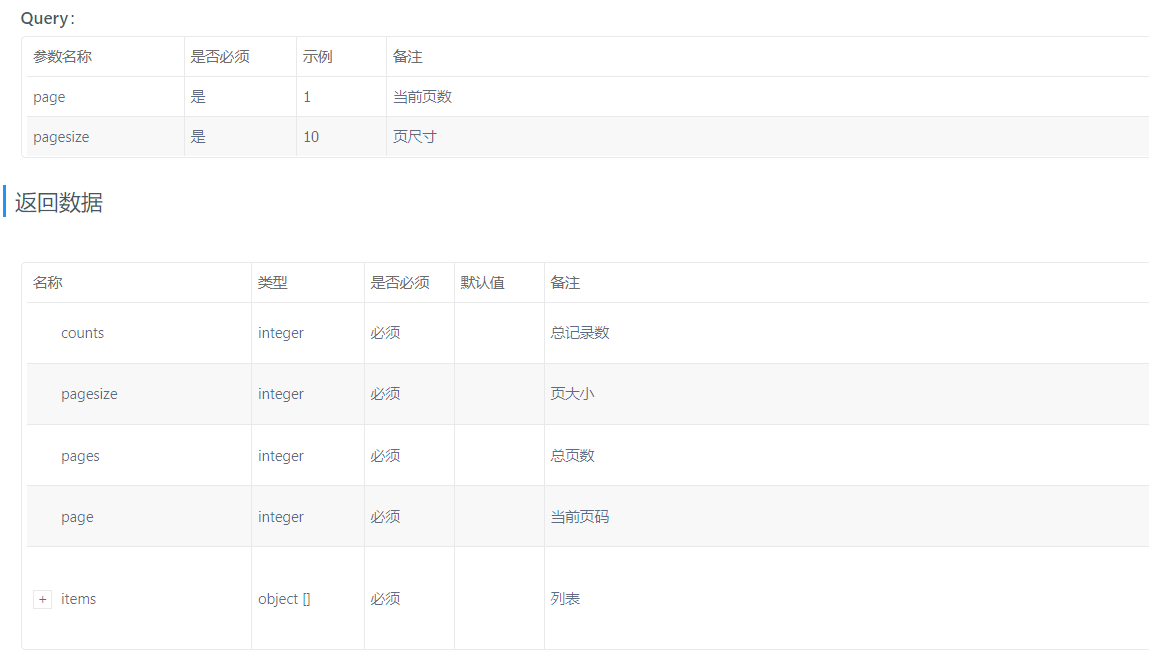
分析
查询好友动态时,我们可以根据好友动态时间线表查询
因为好友发表动态时都会在时间表存储数据,把好友信息,和发布的动态id存储
我们就可以根据自己的userID对应friendId查询出好友动态id
再根据动态id查询好友动态,封装数据返回

代码
MovementsController
/**
 * 查询好友动态
 * GET  /movements
 */
@GetMapping
public ResponseEntity findFriendMovement(@RequestParam(defaultValue = "1") Integer page,
                                         @RequestParam(defaultValue = "10") Integer pagesize) {
    PageResult pageResult = movementsService.findFriendMovement(page, pagesize);
    return ResponseEntity.ok(pageResult);
}
MovementsService
public PageResult findFriendMovement(Integer page, Integer pagesize) {
    Long userId = UserHolder.getUserId();
    List<Movement> movementList = movementApi.findByFriendId(userId, page, pagesize);
    return getPageResult(page, pagesize, movementList);
}
MovementApiImpl
// 根据时间线查询好友动态
 @Override
 public List<Movement> findByFriendId(Long userId, Integer page, Integer pagesize) {
     Query query=Query.query(Criteria.where("friendId").is(userId))
             .skip((page-1)*pagesize)
             .limit(pagesize)
             .with(Sort.by(Sort.Order.desc("created")));
     List<MovementTimeLine> timeLineList = mongoTemplate.find(query, MovementTimeLine.class);
     List<ObjectId> movementIds = CollUtil.getFieldValues(timeLineList, "movementId", ObjectId.class);
     Query qw =Query.query(Criteria.where("id").in(movementIds));
     List<Movement> movementList = mongoTemplate.find(qw, Movement.class);
     return movementList;
 }
5查询推荐动态

api文档
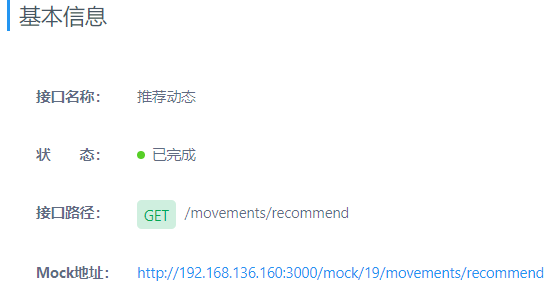
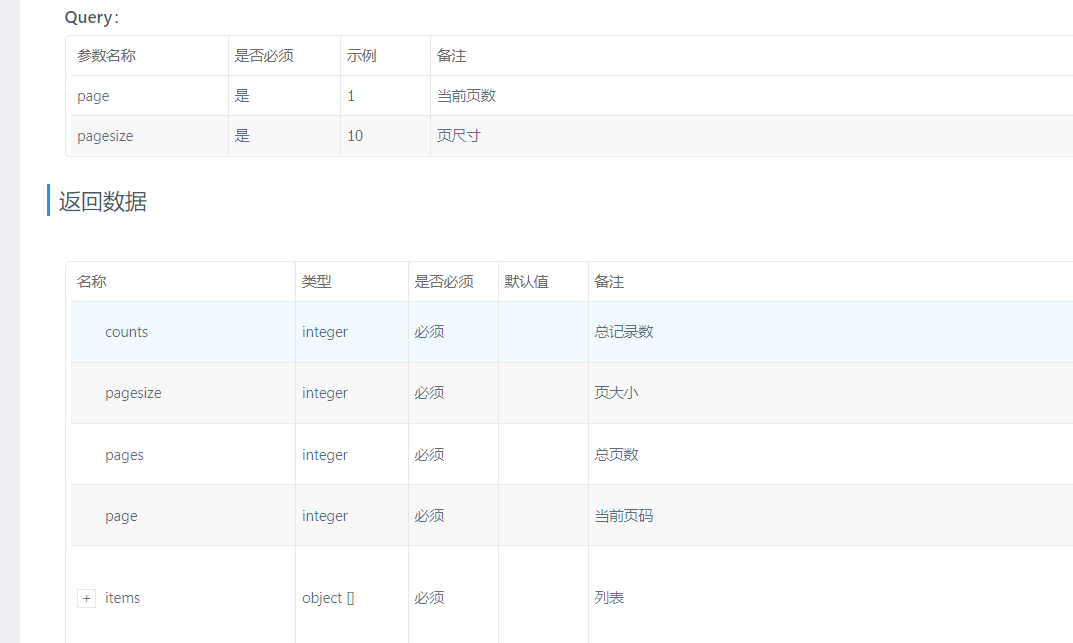
分析
查询推荐动态时.我们要先在redis中查询推荐动态的pid
如果redis有数据我们就要解析数据("16,17,18,19,20,21,10015,10020,10040,10064,10092,10093,10099,10067")
利用stream流把数据分成一段段的列表
如果redis中没有数据就在数据库构造十条(随机构造)
构造十条数据时我们要用到TypedAggregation对象
代码
MovementsController
/**
 * 推荐动态
 * GET  /movements/recommend
 */
@GetMapping("/recommend")
public ResponseEntity findRecommendMovement(@RequestParam(defaultValue = "1") Integer page,
                                            @RequestParam(defaultValue = "10") Integer pagesize) {
    PageResult pageResult = movementsService.findRecommendMovement(page, pagesize);
    return ResponseEntity.ok(pageResult);
}
MovementsService
public PageResult findRecommendMovement(Integer page, Integer pagesize) {
    //从redis中获取数据
    //String redisKey="MOVEMENTS_RECOMMEND_"+UserHolder.getUserId();
    String redisKey = Constants.MOVEMENTS_RECOMMEND + UserHolder.getUserId();
    String redisValue = redisTemplate.opsForValue().get(redisKey);
    //判断数据是否存在
    List<Movement> list = Collections.EMPTY_LIST;//构建空集合
    if (StringUtils.isEmpty(redisValue)) {
        //如果不存在调用api构造十条数据
        list = movementApi.randomMonements(pagesize);
    } else {
        //如果存在处理pid数据
        String[] pids = redisValue.split(",");
        if ((page - 1) * pagesize < pids.length) {
            List<Long> collect = Arrays.stream(pids)
                    .skip((page - 1) * pagesize)
                    .limit(pagesize)
                    .map(e -> Long.valueOf(e))
                    .collect(Collectors.toList());
            list = movementApi.findMovementByPid(collect);
        }
    }
    //调用公共方法构造返回值
    return getPageResult(page, pagesize, list);
}
private PageResult getPageResult(Integer page, Integer pagesize, List<Movement> movementList) {
    if (CollUtil.isEmpty(movementList)) {
        return new PageResult();
    }
    //获取好友id
    //根据好友id查询好友info数据获得头像信息等
    List<Long> userIds = CollUtil.getFieldValues(movementList, "userId", Long.class);
    Map<Long, UserInfo> map = userInfoApi.findByIds(userIds, null);
    List<MovementsVo> list = new ArrayList<>();
    for (Movement movement : movementList) {
        UserInfo userInfo = map.get(movement.getUserId());
        if (userInfo != null) {
            MovementsVo vo = MovementsVo.init(userInfo, movement);
            //查询点赞状态
            String rediskey = Constants.MOVEMENTS_INTERACT_KEY + movement.getId();
            String redisHashkey = Constants.MOVEMENT_LIKE_HASHKEY + UserHolder.getUserId();
            Boolean hasKey = redisTemplate.opsForHash().hasKey(rediskey, redisHashkey);
            if (hasKey) {
                vo.setHasLiked(1);
            }
            list.add(vo);
        }
    }

    return new PageResult(page, pagesize, 0l, list);
}
MovementApiImpl
@Override
public List<Movement> randomMonements(Integer pagesize) {
    //创建通缉对象
    TypedAggregation aggregation= Aggregation.newAggregation(Movement.class,Aggregation.sample(pagesize));
    //调用mongoTemepalte统计
    AggregationResults<Movement> results = mongoTemplate.aggregate(aggregation, Movement.class);
    return results.getMappedResults();
}
@Override
public List<Movement> findMovementByPid(List<Long> collect) {
    Criteria criteria=Criteria.where("pid").in(collect);
    Query query=Query.query(criteria);
    List<Movement> list = mongoTemplate.find(query, Movement.class);
    return list;
}
6查询单条动态

api文档
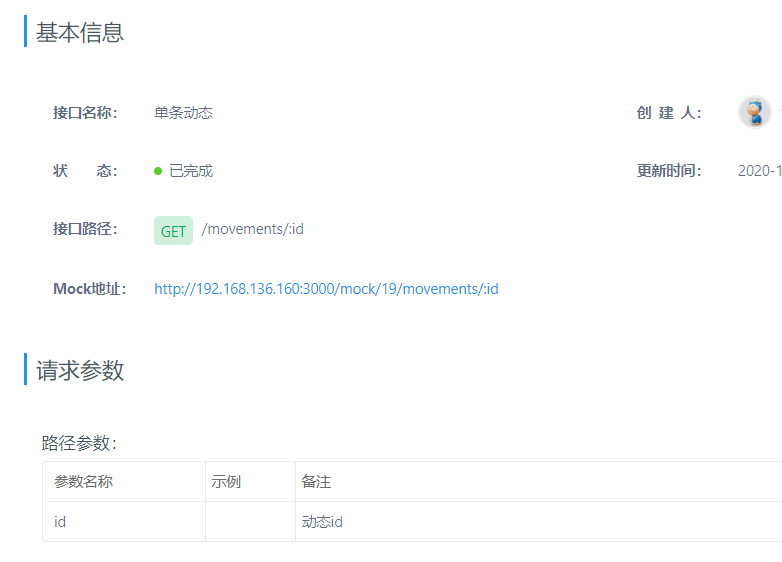
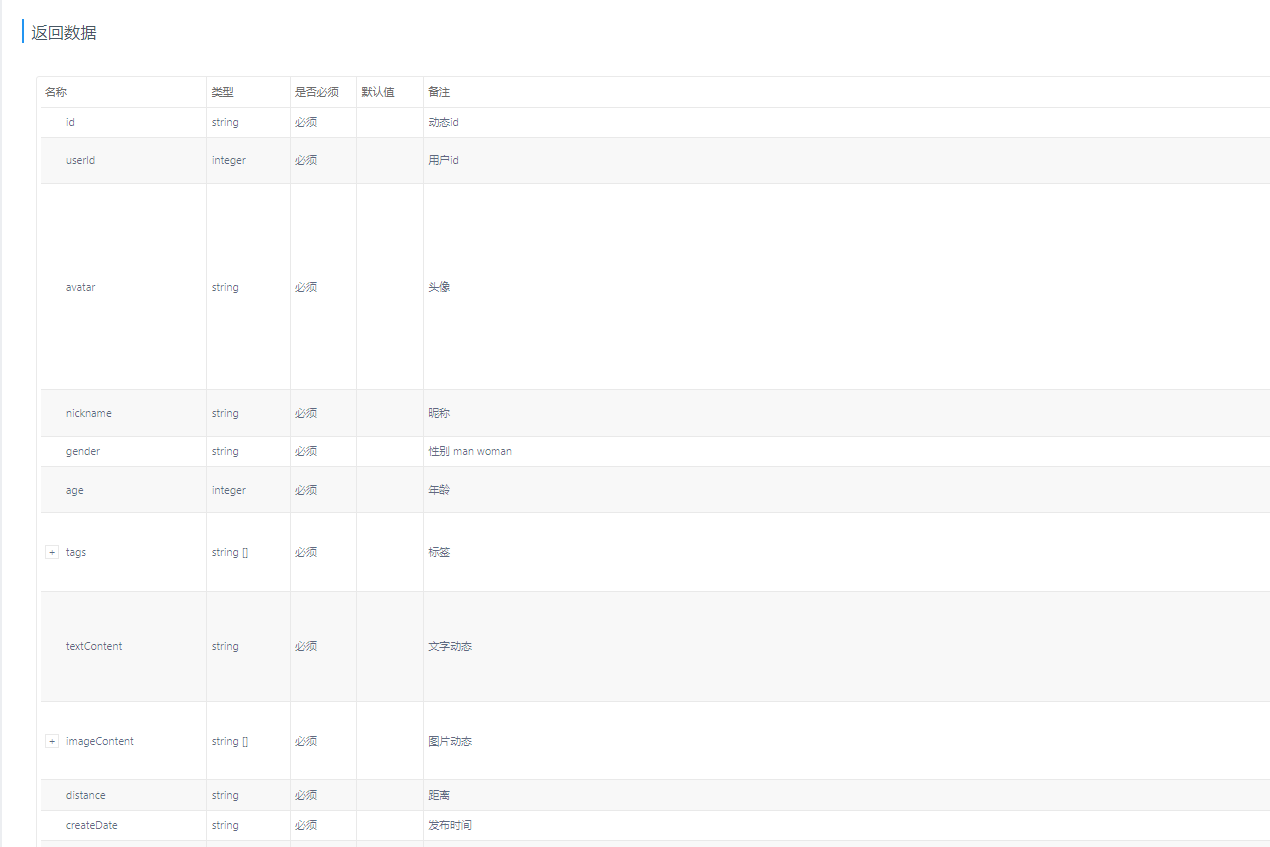
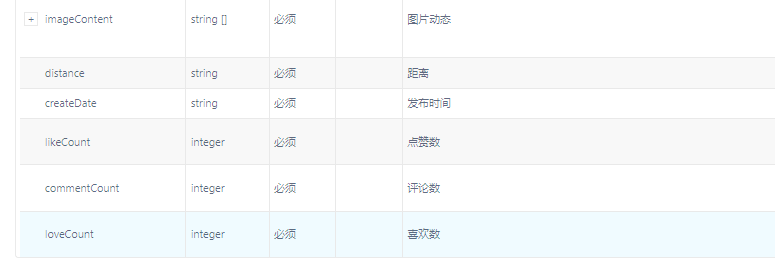
代码
MovementsVo
package com.tanhua.model.vo;


@Data
@NoArgsConstructor
@AllArgsConstructor
public class MovementsVo  implements Serializable {

    private String id; //动态id

    private Long userId; //用户id
    private String avatar; //头像
    private String nickname; //昵称
    private String gender; //性别 man woman
    private Integer age; //年龄
    private String[] tags; //标签


    private String textContent; //文字动态
    private String[] imageContent; //图片动态
    private String distance; //距离
    private String createDate; //发布时间 如: 10分钟前
    private Integer likeCount; //点赞数
    private Integer commentCount; //评论数
    private Integer loveCount; //喜欢数


    private Integer hasLiked; //是否点赞(1是,0否)
    private Integer hasLoved; //是否喜欢(1是,0否)


    public static MovementsVo init(UserInfo userInfo, Movement item) {
        MovementsVo vo = new MovementsVo();
        //设置动态数据
        BeanUtils.copyProperties(item, vo);
        vo.setId(item.getId().toHexString());
        //设置用户数据
        BeanUtils.copyProperties(userInfo, vo);
        if(!StringUtils.isEmpty(userInfo.getTags())) {
            vo.setTags(userInfo.getTags().split(","));
        }
        //图片列表
        vo.setImageContent(item.getMedias().toArray(new String[]{}));
        //距离
        vo.setDistance("500米");
        Date date = new Date(item.getCreated());
        vo.setCreateDate(new SimpleDateFormat("yyyy-MM-dd hh:mm:ss").format(date));
        //设置是否点赞(后续处理)
        vo.setHasLoved(0);
        vo.setHasLiked(0);

        return vo;
    }
}
MovementsController
/**
 * 查询单挑动态
 * GET  /movements/:id
 */

@GetMapping("/{id}")
public ResponseEntity findOneMovement(@PathVariable("id") String movementId) {
    MovementsVo vo = movementsService.findByMovementId(movementId);
    return ResponseEntity.ok(vo);
}
movementsService
public MovementsVo findByMovementId(String movementId) {
    Movement movement = movementApi.findByMovementId(movementId);
    if (movement == null) {
        return null;
    } else {
        UserInfo userInfo = userInfoApi.findById(movement.getUserId());
        MovementsVo vo = MovementsVo.init(userInfo, movement);
        return vo;
    }
}
MovementApiImpl
@Override
public Movement findByMovementId(String movementId) {
    Criteria criteria=Criteria.where("id").is(movementId);
    Query query=new Query(criteria);
    Movement movement = mongoTemplate.findOne(query, Movement.class);
    return movement;
}
7发布评论
api文档
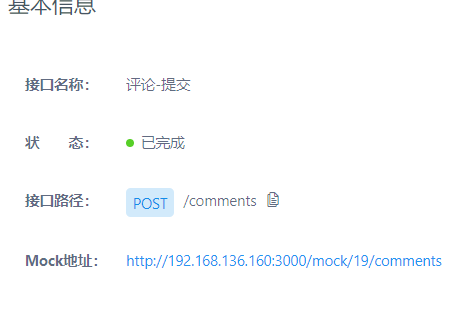

分析
我们可以分析一下comment(评论)表
    private ObjectId publishId;    //发布id
    private Integer commentType;   //评论类型,1-点赞,2-评论,3-喜欢
    private String content;        //评论内容
    private Long userId;           //评论人
    private Long publishUserId;    //被评论人ID
    private Long created; 		   //发表时间
    private Integer likeCount = 0; //当前评论的点赞数


有动态id 评论类型 评论内容 评论人  被评论人ID
所以我们保存评论可以根据动态id 评论类型 评论内容 评论人  被评论人ID来保存

CommentController
/**
 * 发布评论
 * POST /comments
 * */
@PostMapping
public ResponseEntity saveComment(@RequestBody Map map){
    String movementId = (String) map.get("movementId");
    String comment = (String) map.get("comment");
    commentService.saveComment(movementId,comment);
    return ResponseEntity.ok(null);
}
commentService
public void saveComment(String movementId, String comment) {
    Long userId = UserHolder.getUserId();
    Comment com =new Comment();
    com.setUserId(userId);
    com.setPublishId(new ObjectId(movementId));
    com.setContent(comment);
    com.setCommentType(CommentType.COMMENT.getType());
    com.setCreated(System.currentTimeMillis());
    Integer count=commentApi.savaComment(com);
}
CommentApiImpl
保存comment数据后我们要在动态表保存点赞数 / 评论数 / 喜欢数 而且要获取对应的数目
这里我们根据传递过来的类型判断在相对应的字段加一
然后利用mongoTemplate.findAndModify方法返回保存Movement 人后返回movement
t在获取其点赞数 / 评论数 / 喜欢数 而且要获取对应的数目
@Override
public Integer savaComment(Comment com) {
    Movement movement = mongoTemplate.findById(com.getPublishId(), Movement.class);
    if (movement!=null){
        com.setPublishUserId(movement.getUserId());
    }
    mongoTemplate.save(com);
    Criteria criteria = Criteria.where("id").is(com.getPublishId());
    Query query=Query.query(criteria);
    Update update=new Update();
    if (com.getCommentType()== CommentType.LIKE.getType()){
        update.inc("likeCount",1);
    }else if (com.getCommentType()== CommentType.COMMENT.getType()){
        update.inc("commentCount",1);
    } else {
        update.inc("loveCount",1);
    }
    FindAndModifyOptions options=new FindAndModifyOptions();
    options.returnNew(true);
    Movement modify = mongoTemplate.findAndModify(query, update, options, Movement.class);
    return modify.statisCount(com.getCommentType());
}
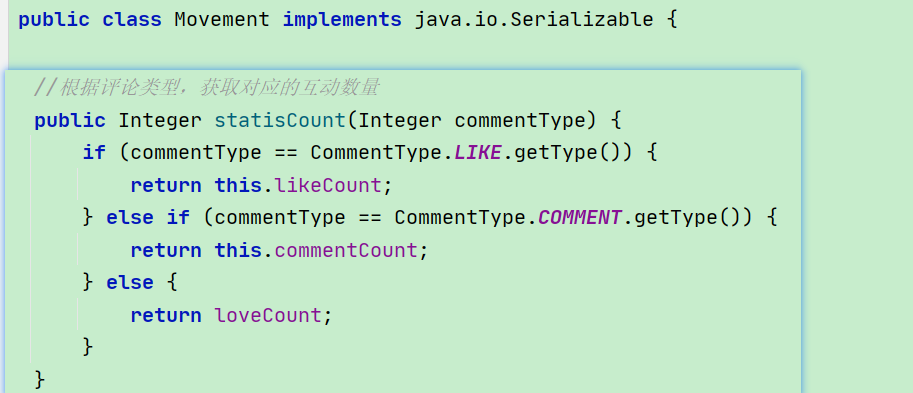
8查看评论列表
api文档
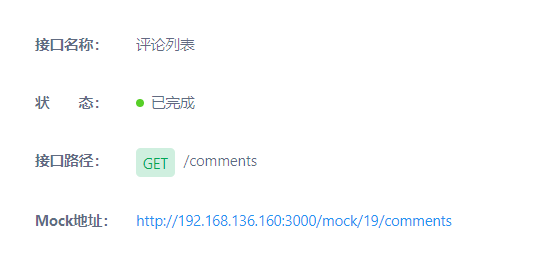
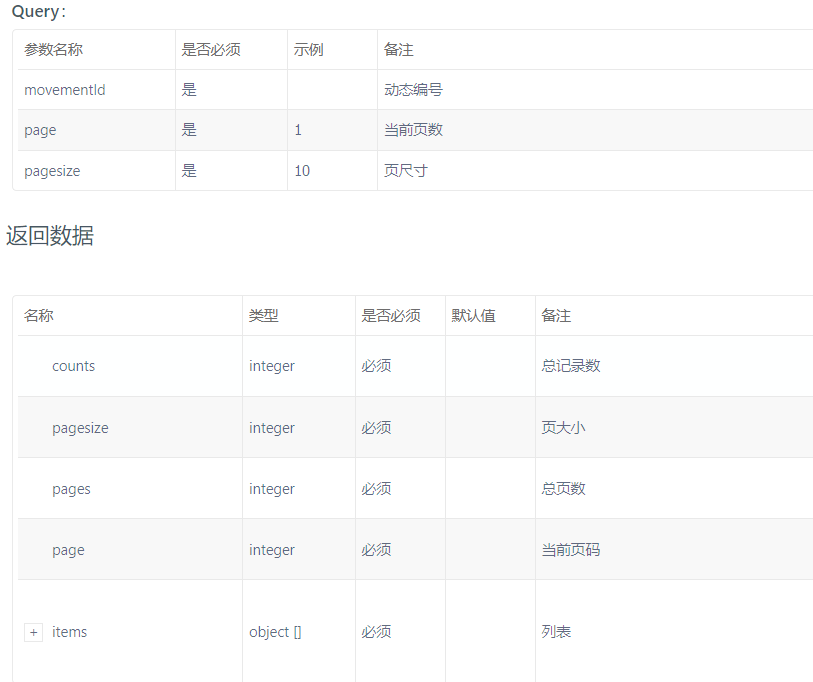
代码
CommentController
/**
 * 评论列表
 *GET/comments
 * */
@GetMapping
public ResponseEntity commentList(String movementId,
                                  @RequestParam(defaultValue = "1") Integer page,
                                  @RequestParam(defaultValue = "10") Integer pagesize){
    PageResult pageResult=commentService.commentList(movementId,page,pagesize);
    return ResponseEntity.ok(pageResult);
}
commentService
public PageResult commentList(String movementId, Integer page, Integer pagesize) {
    List<Comment> commentList=commentApi.commentList(movementId,CommentType.COMMENT,page,pagesize);
    if (CollUtil.isEmpty(commentList)){
        return new PageResult();
    }
    List<Long> ids = CollUtil.getFieldValues(commentList, "userId", Long.class);
    Map<Long, UserInfo> map = userInfoApi.findByIds(ids, null);
    List<CommentVo> vos=new ArrayList<>();
    for (Comment comment : commentList) {
        Long userId = comment.getUserId();
        UserInfo userInfo = map.get(userId);
        if (userInfo!=null){
            CommentVo vo = CommentVo.init(userInfo, comment);
            vos.add(vo);
        }
    }
    return new PageResult(page,pagesize,0l,vos);

}
commentApiImpl
@Override
public List<Comment> commentList(String movementId,CommentType commentType, Integer page, Integer pagesize) {
    Criteria criteria=Criteria.where("publishId").is(new ObjectId(movementId))
            .and("commentType").is(commentType.getType());
    Query query = Query.query(criteria)
            .skip((page - 1) * pagesize)
            .limit(pagesize)
            .with(Sort.by(Sort.Order.desc("created")));
    return mongoTemplate.find(query,Comment.class);
}
9动态点赞和取消点赞
api文档
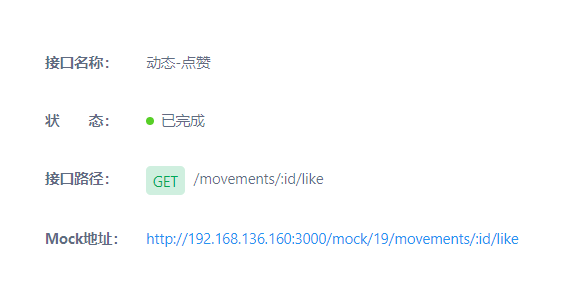
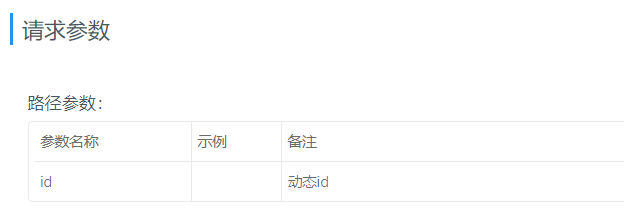

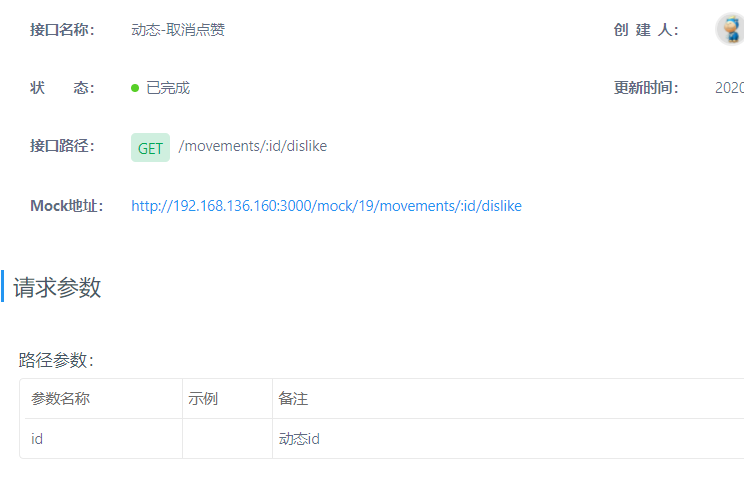

分析
我们可以把动态点赞存到comment表中
commentType 1 点赞 2 是评论 3 是 喜欢
保存的时候我们可以公用发布评论的保存数据库方法
而动态取消点赞就是删除comment的点赞数据 然后Movement对应数目减一
因为查询动态的时候不仅要显示点赞的数目喜欢的数目 而且要显示当前我们登录的用户是否已经点赞或者已经喜欢了此时在查询数据表可能效率会很低,我们可以利用redis来提高效率,如果用户点赞九八数据写道redis中我们查询redis即可取消点赞就把redis的数据删除
存redis时我们可以用hash结构详细看代码实现

代码
MovementsController
/**
 * 动态点赞
 * GET  /movements/:id/like
 */
@GetMapping("/{id}/like")
public ResponseEntity like(@PathVariable("id") String movementId) {
    Integer likeCount = movementsService.likeMovement(movementId);
    return ResponseEntity.ok(likeCount);
}

/**
 * 动态点赞取消
 * GET  /movements/:id/dislike
 */
@GetMapping("/{id}/dislike")
public ResponseEntity dislike(@PathVariable("id") String movementId) {
    Integer likeCount = movementsService.dislikeMovement(movementId);
    return ResponseEntity.ok(likeCount);
}
movementsService
//点赞
public Integer likeMovement(String movementId) {
    //查询用户是否点赞
    Boolean hasComment = commentApi.hasComment(movementId, CommentType.LIKE, UserHolder.getUserId());
    //2、如果已经点赞,抛出异常
    if (hasComment) {
        throw new BusinessException(ErrorResult.likeError());
    }
    //mq写日志
    mqMessageService.sendLogMessage(UserHolder.getUserId(),"0203","movement",movementId);
    Comment comment = new Comment();
    comment.setPublishId(new ObjectId(movementId));
    comment.setCommentType(CommentType.LIKE.getType());
    comment.setUserId(UserHolder.getUserId());
    comment.setCreated(System.currentTimeMillis());
    //3、调用API保存数据到Mongodb
    Integer likeCount = commentApi.savaComment(comment);
    //4、拼接redis的key,将用户的点赞状态存入redis
    String rediskey = Constants.MOVEMENTS_INTERACT_KEY + movementId;
    String redisHashkey = Constants.MOVEMENT_LIKE_HASHKEY + comment.getUserId();
    redisTemplate.opsForHash().put(rediskey, redisHashkey, "1");
    return likeCount;
}

//取消点赞
public Integer dislikeMovement(String movementId) {
    //查询用户是否点赞
    Boolean hasComment = commentApi.hasComment(movementId, CommentType.LIKE, UserHolder.getUserId());
    //2、如果mei点赞,抛出异常
    if (!hasComment) {
        throw new BusinessException(ErrorResult.disLikeError());
    }
    //mq写日志
    mqMessageService.sendLogMessage(UserHolder.getUserId(),"0206","movement",movementId);
    Comment comment = new Comment();
    comment.setUserId(UserHolder.getUserId());
    comment.setPublishId(new ObjectId(movementId));
    comment.setCommentType(CommentType.LIKE.getType());
    Integer likeCount = commentApi.delete(comment);

    String rediskey = Constants.MOVEMENTS_INTERACT_KEY + movementId;
    String redisHashkey = Constants.MOVEMENT_LIKE_HASHKEY + comment.getUserId();
    redisTemplate.opsForHash().delete(rediskey, redisHashkey);
    return likeCount;
}
commentApi
@Override
public Integer savaComment(Comment com) {
    Movement movement = mongoTemplate.findById(com.getPublishId(), Movement.class);
    if (movement!=null){
        com.setPublishUserId(movement.getUserId());
    }
    mongoTemplate.save(com);
    Criteria criteria = Criteria.where("id").is(com.getPublishId());
    Query query=Query.query(criteria);
    Update update=new Update();
    if (com.getCommentType()== CommentType.LIKE.getType()){
        update.inc("likeCount",1);
    }else if (com.getCommentType()== CommentType.COMMENT.getType()){
        update.inc("commentCount",1);
    } else {
        update.inc("loveCount",1);
    }
    FindAndModifyOptions options=new FindAndModifyOptions();
    options.returnNew(true);
    Movement modify = mongoTemplate.findAndModify(query, update, options, Movement.class);
    return modify.statisCount(com.getCommentType());
}

//查询是否点赞
@Override
public Boolean hasComment(String movementId,CommentType commentType,Long userId) {
    Query query = Query.query(Criteria.where("publishId").is(new ObjectId(movementId))
            .and("commentType").is(commentType.getType())
            .and("userId").is(userId));
    return mongoTemplate.exists(query,Comment.class);
}

@Override
public Integer delete(Comment comment) {
    Criteria criteria=Criteria.where("publishId").is(comment.getPublishId())
            .and("commentType").is(comment.getCommentType())
            .and("userId").is(comment.getUserId());
    Query query = Query.query(criteria);
    mongoTemplate.remove(query,Comment.class);
    Query movementQuery=Query.query(Criteria.where("id").is(comment.getPublishId()));
    Update update=new Update();
    if (comment.getCommentType()==CommentType.LIKE.getType()){
        update.inc("likeCount",-1);
    } else if (comment.getCommentType()==CommentType.COMMENT.getType()) {
        update.inc("commentCount",-1);
    }else {
        update.inc("loveCount",-1);
    }
    FindAndModifyOptions options=new FindAndModifyOptions();
    options.returnNew(true);
    Movement modify = mongoTemplate.findAndModify(movementQuery, update, options, Movement.class);
    return modify.statisCount(comment.getCommentType());
}
10喜欢和取消喜欢
api文档
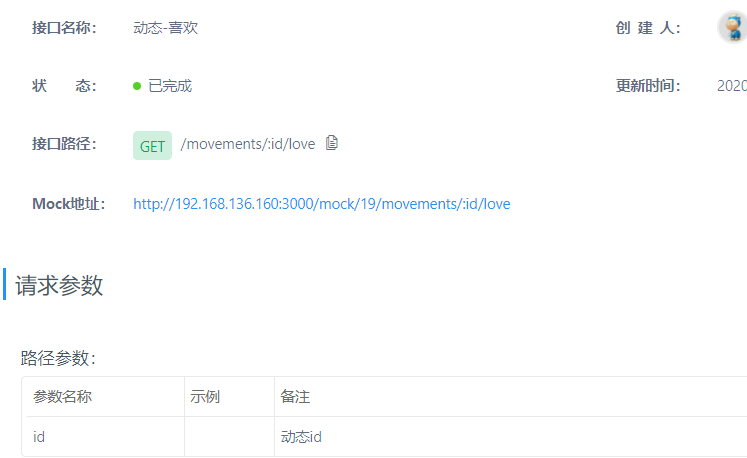

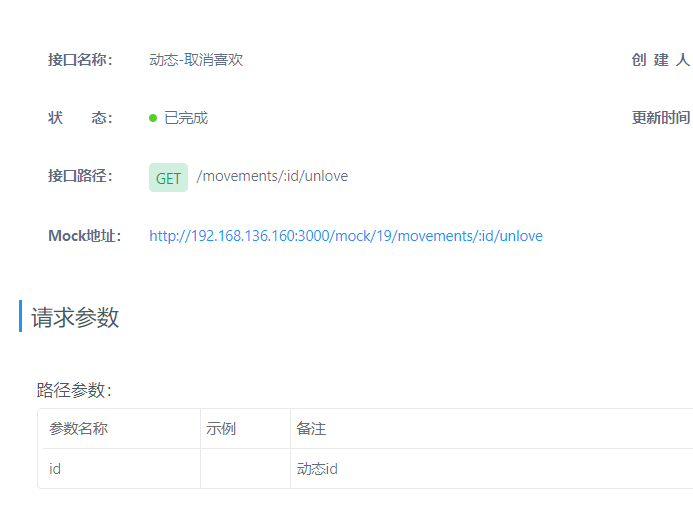

代码(和点赞操作相似)
MovementsControlle
/**
 * 动态喜欢
 * GET  /movements/:id/love
 */
@GetMapping("/{id}/love")
public ResponseEntity love(@PathVariable("id") String movementId) {
    Integer likeCount = movementsService.loveMovement(movementId);
    return ResponseEntity.ok(likeCount);
}

/**
 * 动态喜欢取消
 * GET  /movements/:id/unlove
 */
@GetMapping("/{id}/unlove")
public ResponseEntity unlove(@PathVariable("id") String movementId) {
    Integer likeCount = movementsService.unloveMovement(movementId);
    return ResponseEntity.ok(likeCount);
}
movementsService
public Integer loveMovement(String movementId) {
    //查询用户是否喜欢
    Boolean hasComment = commentApi.hasComment(movementId, CommentType.LOVE, UserHolder.getUserId());
    if (hasComment) {
        throw new BusinessException(ErrorResult.loveError());
    }
    //mq写日志
    mqMessageService.sendLogMessage(UserHolder.getUserId(),"0204","movement",movementId);
    Comment comment = new Comment();
    comment.setPublishId(new ObjectId(movementId));
    comment.setCommentType(CommentType.LOVE.getType());
    comment.setCreated(System.currentTimeMillis());
    comment.setUserId(UserHolder.getUserId());
    Integer loveCount = commentApi.savaComment(comment);

    String rediskey = Constants.MOVEMENTS_INTERACT_KEY + movementId;
    String redisHashkey = Constants.MOVEMENT_LOVE_HASHKEY + comment.getUserId();
    redisTemplate.opsForHash().put(rediskey, redisHashkey, "1");
    return loveCount;
}

public Integer unloveMovement(String movementId) {
    Boolean hasComment = commentApi.hasComment(movementId, CommentType.LOVE, UserHolder.getUserId());
    if (!hasComment) {
        throw new BusinessException(ErrorResult.disloveError());
    }
    //mq写日志
    mqMessageService.sendLogMessage(UserHolder.getUserId(),"0207","movement",movementId);
    Comment comment = new Comment();
    comment.setPublishId(new ObjectId(movementId));
    comment.setUserId(UserHolder.getUserId());
    comment.setCommentType(CommentType.LOVE.getType());
    Integer loveCount = commentApi.delete(comment);

    String rediskey = Constants.MOVEMENTS_INTERACT_KEY + movementId;
    String redisHashkey = Constants.MOVEMENT_LOVE_HASHKEY + comment.getUserId();
    redisTemplate.opsForHash().delete(rediskey, redisHashkey);

    return loveCount;
}
9即时通信
1 环信云通信
介绍
官网:https://www.easemob.com/ 稳定健壮,消息必达,亿级并发的即时通讯云
环信平台为黑马学员开设的专用注册地址:https://datayi.cn/w/woVL50vR
[外链图片转存失败,源站可能有防盗链机制,建议将图片保存下来直接上传(img-hJCKgFxR-1637940029289)(D:/黑马学习资料/探花交友/06-即时通信/讲义/md/assets/1570763722654.png)]
平台架构:
[外链图片转存失败,源站可能有防盗链机制,建议将图片保存下来直接上传(img-SgNUg3AS-1637940029290)(D:/黑马学习资料/探花交友/06-即时通信/讲义/md/assets/8720181010182444.png)]
集成:
环信和用户体系的集成主要发生在2个地方,服务器端集成和客户端集成。
[外链图片转存失败,源站可能有防盗链机制,建议将图片保存下来直接上传(img-RXwmkbi5-1637940029290)(D:/黑马学习资料/探花交友/06-即时通信/讲义/md/assets/1570776683692.png)]
需要使用环信平台,那么必须要进行注册,登录之后即可创建应用。环信100以内的用户免费使用,100以上就要注册企业版了。
企业版价格:
[外链图片转存失败,源站可能有防盗链机制,建议将图片保存下来直接上传(img-Vh41xFky-1637940029291)(D:/黑马学习资料/探花交友/06-即时通信/讲义/md/assets/1570778131775.png)]
创建应用:
[外链图片转存失败,源站可能有防盗链机制,建议将图片保存下来直接上传(img-sBARTpN6-1637940029291)(D:/黑马学习资料/探花交友/06-即时通信/讲义/md/assets/1570778173832.png)]
创建完成:
[外链图片转存失败,源站可能有防盗链机制,建议将图片保存下来直接上传(img-wBJaJQOD-1637940029291)(D:/黑马学习资料/探花交友/06-即时通信/讲义/md/assets/1570778297121.png)]
抽取环信组件
抽取第三方组件和之前oss等第三方一样我们一般利用springboot自动装配原理 具体实现如下
HuanXinTemplate
package com.tanhua.autoconfig.template;

import cn.hutool.core.collection.CollUtil;
import com.easemob.im.server.EMProperties;
import com.easemob.im.server.EMService;
import com.easemob.im.server.model.EMTextMessage;
import com.tanhua.autoconfig.properties.HuanXinProperties;
import lombok.extern.slf4j.Slf4j;

import java.util.Set;

@Slf4j
public class HuanXinTemplate {

    private EMService service;

    public HuanXinTemplate(HuanXinProperties properties) {
        EMProperties emProperties = EMProperties.builder()
                .setAppkey(properties.getAppkey())
                .setClientId(properties.getClientId())
                .setClientSecret(properties.getClientSecret())
                .build();
        service = new EMService(emProperties);
    }

    //创建环信用户
    public Boolean createUser(String username,String password) {
        try {
            //创建环信用户
            service.user().create(username.toLowerCase(), password)
                    .block();
            return true;
        }catch (Exception e) {
            e.printStackTrace();
            log.error("创建环信用户失败~");
        }
        return false;
    }

    //添加联系人
    public Boolean addContact(String username1,String username2) {
        try {
            //创建环信用户
            service.contact().add(username1,username2)
                    .block();
            return true;
        }catch (Exception e) {
            log.error("添加联系人失败~");
        }
        return false;
    }

    //删除联系人
    public Boolean deleteContact(String username1,String username2) {
        try {
            //创建环信用户
            service.contact().remove(username1,username2)
                    .block();
            return true;
        }catch (Exception e) {
            log.error("删除联系人失败~");
        }
        return false;
    }

    //发送消息
    public Boolean sendMsg(String username,String content) {
        try {
            //接收人用户列表
            Set<String> set = CollUtil.newHashSet(username);
            //文本消息
            EMTextMessage message = new EMTextMessage().text(content);
            //发送消息  from:admin是管理员发送
            service.message().send("admin","users",
                    set,message,null).block();
            return true;
        }catch (Exception e) {
            log.error("删除联系人失败~");
        }
        return false;
    }
}
HuanXinProperties
package com.tanhua.autoconfig.properties;

import lombok.Data;
import org.springframework.boot.context.properties.ConfigurationProperties;
import org.springframework.context.annotation.Configuration;

@Configuration
@ConfigurationProperties(prefix = "tanhua.huanxin")
@Data
public class HuanXinProperties {

    private String appkey;
    private String clientId;
    private String clientSecret;

}
启动类
import com.tanhua.autoconfig.properties.AipFaceProperties;
import com.tanhua.autoconfig.properties.HuanXinProperties;
import com.tanhua.autoconfig.properties.OssProperties;
import com.tanhua.autoconfig.properties.SmsProperties;
import com.tanhua.autoconfig.template.AipFaceTemplate;
import com.tanhua.autoconfig.template.HuanXinTemplate;
import com.tanhua.autoconfig.template.OssTemplate;
import com.tanhua.autoconfig.template.SmsTemplate;
import org.springframework.boot.context.properties.EnableConfigurationProperties;
import org.springframework.context.annotation.Bean;


@EnableConfigurationProperties({
        SmsProperties.class,
        OssProperties.class,
        AipFaceProperties.class,
        HuanXinProperties.class
})
public class TanhuaAutoConfiguration {
    @Bean
    public SmsTemplate smsTemplate(SmsProperties smsProperties){
        return new SmsTemplate(smsProperties);
    }

    @Bean
    public OssTemplate ossTemplate(OssProperties ossProperties){
        return new OssTemplate(ossProperties);
    }

    @Bean
    public AipFaceTemplate aipFaceTemplate(){
        return new AipFaceTemplate();
    }
    @Bean
    public HuanXinTemplate huanXinTemplate(HuanXinProperties huanXinProperties){
        return new HuanXinTemplate(huanXinProperties);
    }
}
tanhua-app-server工程的application.yml文件加入配置如下
tanhua:
  huanxin:
    appkey: 1120211117099296#tanhua
    clientId: YXA69YhDFfWKT0awcGTUFO-3kw
    clientSecret: YXA6YqUlnk4hkMf4aZwRKGhAwMP0Fog
2将用户注册到环信
我们在登录时,如果为新用户,这需要创建,这时我们相应的在环信创建用户
账号为Hx_用户id  密码123456
LoginController
loginVerification方法
//5、如果用户不存在,创建用户保存到数据库中
    if(user == null) {
        user = new User();
        user.setMobile(phone);
        user.setPassword(DigestUtils.md5Hex("123456"));
        Long userId = userApi.save(user);
        user.setId(userId);
        isNew = true;

        //注册环信用户
        String hxUser = "hx"+user.getId();
        Boolean create = huanXinTemplate.createUser(hxUser, Constants.INIT_PASSWORD);
        if(create) {
            user.setHxUser(hxUser);
            user.setHxPassword(Constants.INIT_PASSWORD);
            userApi.update(user);
        }
    }
3查询环信用户信息
api文档
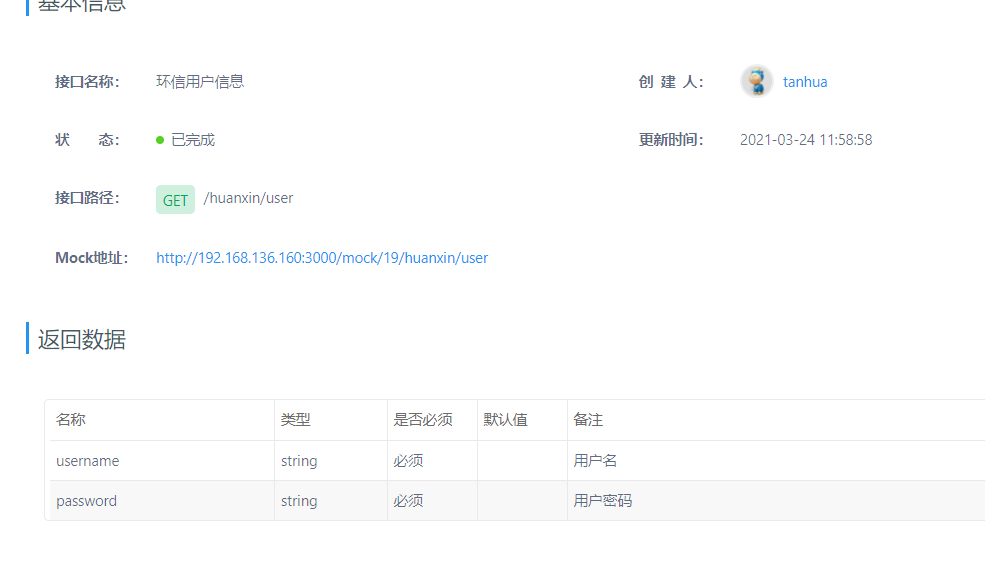
代码
HuanxinController
package com.tanhua.server.controller;

import com.tanhua.model.vo.HuanXinUserVo;
import com.tanhua.server.service.HuanxinService;
import org.springframework.beans.factory.annotation.Autowired;
import org.springframework.http.ResponseEntity;
import org.springframework.web.bind.annotation.GetMapping;
import org.springframework.web.bind.annotation.RequestMapping;
import org.springframework.web.bind.annotation.RestController;

@RestController
@RequestMapping("huanxin")
public class HuanxinController {

    @Autowired
    private HuanxinService huanxinService;

    /**
     * 环信用户信息
     * GET /huanxin/user
     * */
    @GetMapping("/user")
    public ResponseEntity user(){
        HuanXinUserVo vo=huanxinService.findHuanXinUser();
        return ResponseEntity.ok(vo);
    }
}
HuanxinService
package com.tanhua.server.service;

import com.tanhua.dubbo.api.UserApi;
import com.tanhua.model.domain.User;
import com.tanhua.model.vo.HuanXinUserVo;
import com.tanhua.server.interceptor.UserHolder;
import org.apache.dubbo.config.annotation.DubboReference;
import org.springframework.stereotype.Service;

@Service
public class HuanxinService {

    @DubboReference
    private UserApi userApi;

    public HuanXinUserVo findHuanXinUser() {
        Long userId = UserHolder.getUserId();
        User user=userApi.findById(userId);
        if (user==null){
            return null;
        }
        return new HuanXinUserVo(user.getHxUser(),user.getHxPassword());
    }
}
userApi
@Override
public User findById(Long userId) {
    User user = userMapper.selectById(userId);
    return user;
}
4环信用户ID查询用户信息
在好友聊天时,完全基于环信服务器实现。为了更好的页面效果,需要展示出用户的基本信息,这是需要通过环信用户id查询用户。
MessagesController
@RestController
@RequestMapping("/messages")
public class MessagesController {

    @Autowired
    private MessagesService messagesService;

    @GetMapping("/userinfo")
    public ResponseEntity userinfo(String huanxinId) {
       UserInfoVo vo = messagesService.findUserInfoByHuanxin(huanxinId);
        return ResponseEntity.ok(vo);
    }
}
MessagesService
@Service
public class MessagesService {

    @DubboReference
    private UserApi userApi;

    @DubboReference
    private UserInfoApi userInfoApi;

    @DubboReference
    private FriendApi friendApi;

    @Autowired
    private HuanXinTemplate huanXinTemplate;

    /**
     * 根据环信id查询用户详情
     */
    public UserInfoVo findUserInfoByHuanxin(String huanxinId) {
        //1、根据环信id查询用户
        User user = userApi.findByHuanxin(huanxinId);
        //2、根据用户id查询用户详情
        UserInfo userInfo = userInfoApi.findById(user.getId());
        UserInfoVo vo = new UserInfoVo();
        BeanUtils.copyProperties(userInfo,vo); //copy同名同类型的属性
        if(userInfo.getAge() != null) {
            vo.setAge(userInfo.getAge().toString());
        }
        return vo;
    }
}
5查看佳人信息
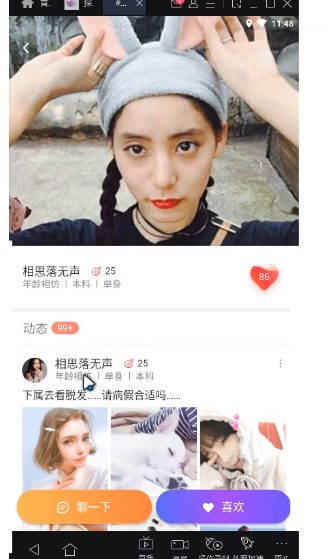
api文档
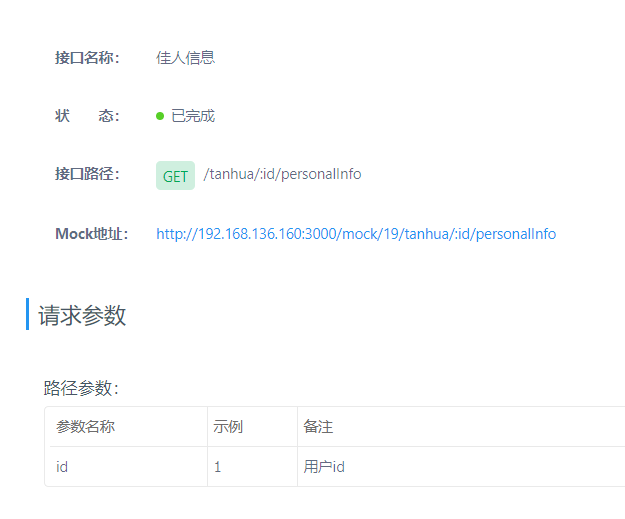
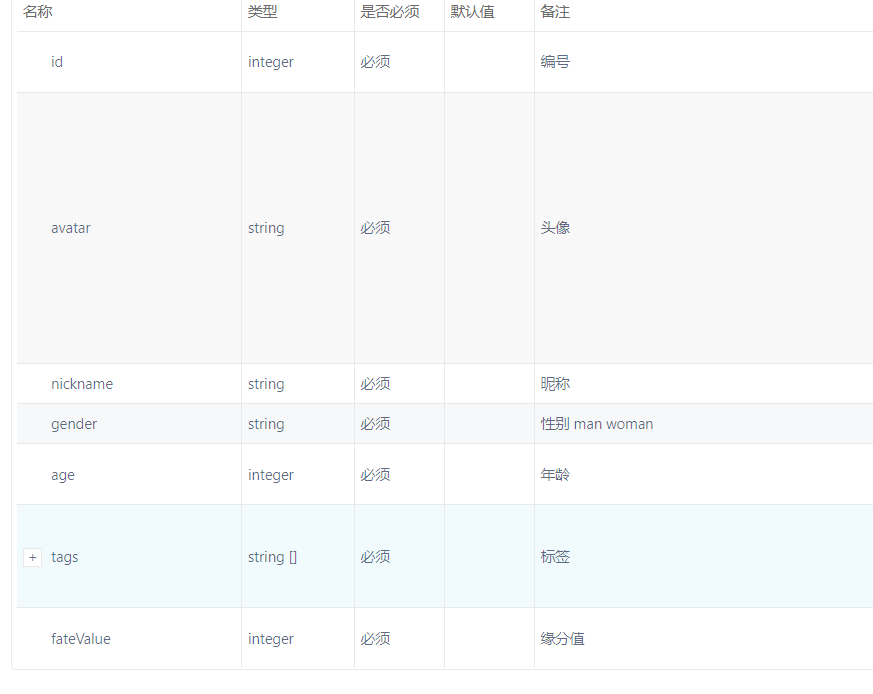
分析
根据返回值可以看到前端想要的数据黑我们今日佳人返回的一样,用TodayBest对象即可
代码
TanhuaController
/**
 * 佳人信息
 * GET /tanhua/:id/personalInfo
 */
@GetMapping("/{id}/personalInfo")
public ResponseEntity personalInfo(@PathVariable("id") Long userId) {
    TodayBest vo = tanhuaService.personalInfo(userId);
    return ResponseEntity.ok(vo);
}
tanhuaService
//查看佳人信息
public TodayBest personalInfo(Long userId) {
    UserInfo info = userInfoApi.findById(userId);
    RecommendUser recommendUser = recommendApi.queryfindByUserId(userId, UserHolder.getUserId());
    TodayBest best = TodayBest.init(info, recommendUser);

    return best;
}
6查看陌生人问题
api文档
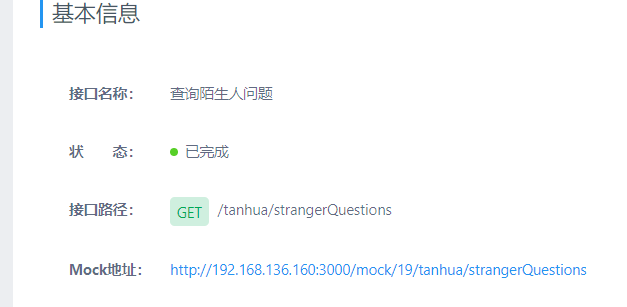
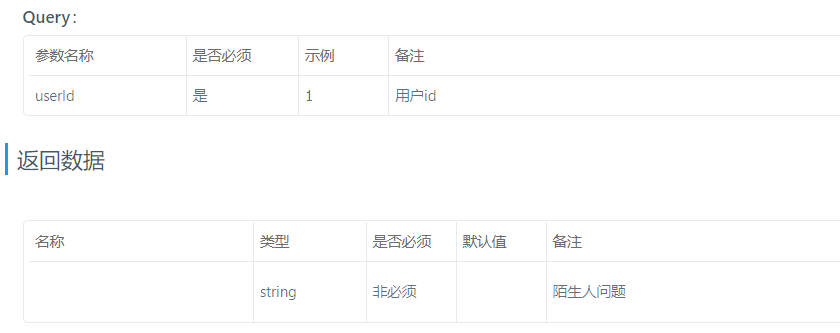
分析
根据提供的参数userId 去数据库查询question表的问题数据
如果问题不存在则设置一个默认问题
代码
TanhuaController
 /**
     * 查看陌生人问题
     * GET /tanhua/strangerQuestions
     */
    @GetMapping("/strangerQuestions")
    public ResponseEntity strangerQuestions(Long userId) {
        String question = tanhuaService.strangerQuestions(userId);
        return ResponseEntity.ok(question);
    }
tanhuaService
//查看陌生人问题
public String strangerQuestions(Long userId) {
    Question question = questionApi.findById(userId);
    String txt = question == null ? "你喜欢java吗?" : question.getTxt();
    return txt;
}
QuestionApiImpl
@DubboService
public class QuestionApiImpl implements QuestionApi{

    @Autowired
    private QuestionMapper questionMapper;

    @Override
    public Question findById(Long id){
        QueryWrapper<Question> qw =new QueryWrapper<>();
        qw.eq("user_id",id);
        return questionMapper.selectOne(qw);
    }
7回复陌生人问题
api文档
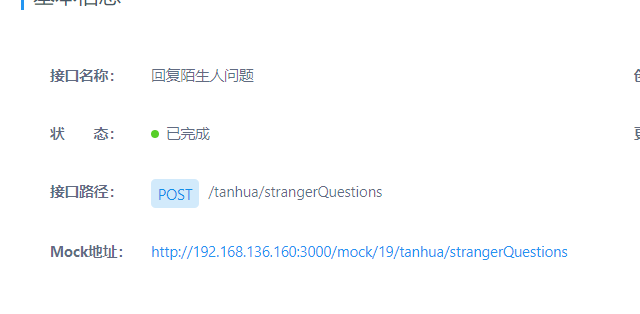

分析
用户看到喜欢的人回复问题后,会给陌生人发送一个好友请求,而陌生人会收到回复的问题,可以选择性的添加好友或拒绝
而发送好友请求信息我们用环信的管理员发送
如果想显示前端的效果必须按照固定格式发送

{
    "userId":106,
    "huanXinId":"hx106",
    "nickname":"黑马小妹",
    "strangerQuestion":"你喜欢去看蔚蓝的大海还是去爬巍峨的高山?",
    "reply":"我喜欢秋天的落叶,夏天的泉水,冬天的雪地,只要有你一切皆可~"
                                                      }
      根据userId 把参数查询出来 封装到map中再转为json即可
代码
TanhuaController
/**
 * 回复陌生人问题
 * POST /tanhua/strangerQuestions
 */
@PostMapping("strangerQuestions")
public ResponseEntity strangerQuestions(@RequestBody Map map) {
    Integer userId = (Integer) map.get("userId");
    String reply = (String) map.get("reply");
    tanhuaService.replyQuestions(Long.valueOf(userId), reply);
    return ResponseEntity.ok(null);
}
tanhuaService
//回复陌生人问题
public void replyQuestions(Long userId, String reply) {
    String hxUser = Constants.HX_USER_PREFIX + UserHolder.getUserId();
    UserInfo info = userInfoApi.findById(UserHolder.getUserId());
    String nickname = info.getNickname();
    String questions = strangerQuestions(userId);
    Map map = new HashMap();
    map.put("userId", UserHolder.getUserId());
    map.put("huanXinId", hxUser);
    map.put("nickname", nickname);
    map.put("strangerQuestion", questions);
    map.put("reply", reply);
    String jsonString = JSON.toJSONString(map);
    Boolean aBoolean = huanXinTemplate.sendMsg(Constants.HX_USER_PREFIX + userId, jsonString);
    if (!aBoolean) {
        throw new BusinessException(null);
    }
}
huanXinTemplate
//发送消息
public Boolean sendMsg(String username,String content) {
    try {
        //接收人用户列表
        Set<String> set = CollUtil.newHashSet(username);
        //文本消息
        EMTextMessage message = new EMTextMessage().text(content);
        //发送消息  from:admin是管理员发送
        service.message().send("admin","users",
                set,message,null).block();
        return true;
    }catch (Exception e) {
        log.error("删除联系人失败~");
    }
    return false;
}
8添加好友
api文档
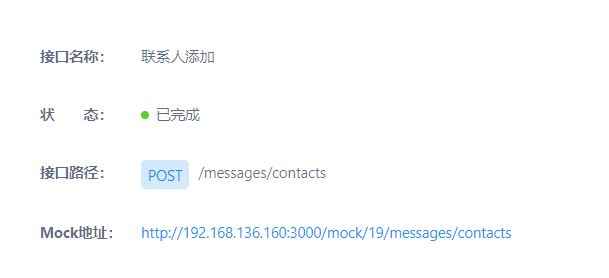

分析
当有人回复我们的问题我们就可以选择接受好友或者忽略
我们选择接受时我们就要进行添加好友
1 要在好友表中添加好友信息 互相为好友,所以要添加两条
2 要在环信服务器将两人添加好友 (调用环信api即可)
代码
MessagesController
/***
 * 联系人添加
 * POST /messages/contacts
 */
@PostMapping("/contacts")
public ResponseEntity contacts(@RequestBody Map map){
    Integer userId = (Integer) map.get("userId");
    messagesService.contacts(Long.valueOf(userId));
    return ResponseEntity.ok(null);
}
messagesService
//联系人添加
public void contacts(Long userId) {
    //1、将好友关系注册到环信
    String hxuser1 = Constants.HX_USER_PREFIX + UserHolder.getUserId();
    String hxuser2 = Constants.HX_USER_PREFIX + userId;
    Boolean aBoolean = huanXinTemplate.addContact(hxuser1, hxuser2);
    if (!aBoolean) {
        throw new BusinessException(ErrorResult.error());
    }
    //2、如果注册成功,记录好友关系到mongodb
    friendApi.save(userId, UserHolder.getUserId());

}
huanXinTemplate
//添加联系人
public Boolean addContact(String username1,String username2) {
    try {
        //创建环信用户
        service.contact().add(username1,username2)
                .block();
        return true;
    }catch (Exception e) {
        log.error("添加联系人失败~");
    }
    return false;
}
friendApi
@Override
public void save(Long userId, Long friendId) {
    Query query1 = Query.query(Criteria.where("userId").is(userId).and("friendId").is(friendId));
    if (!mongoTemplate.exists(query1,Friend.class)){
        Friend friend=new Friend();
        friend.setUserId(userId);
        friend.setFriendId(friendId);
        friend.setCreated(System.currentTimeMillis());
        mongoTemplate.save(friend);
    }
    Query query2 = Query.query(Criteria.where("userId").is(friendId).and("friendId").is(userId));
    if (!mongoTemplate.exists(query2,Friend.class)){
        Friend friend=new Friend();
        friend.setUserId(friendId);
        friend.setFriendId(userId);
        friend.setCreated(System.currentTimeMillis());
        mongoTemplate.save(friend);
    }
}
9用户列表
api文档

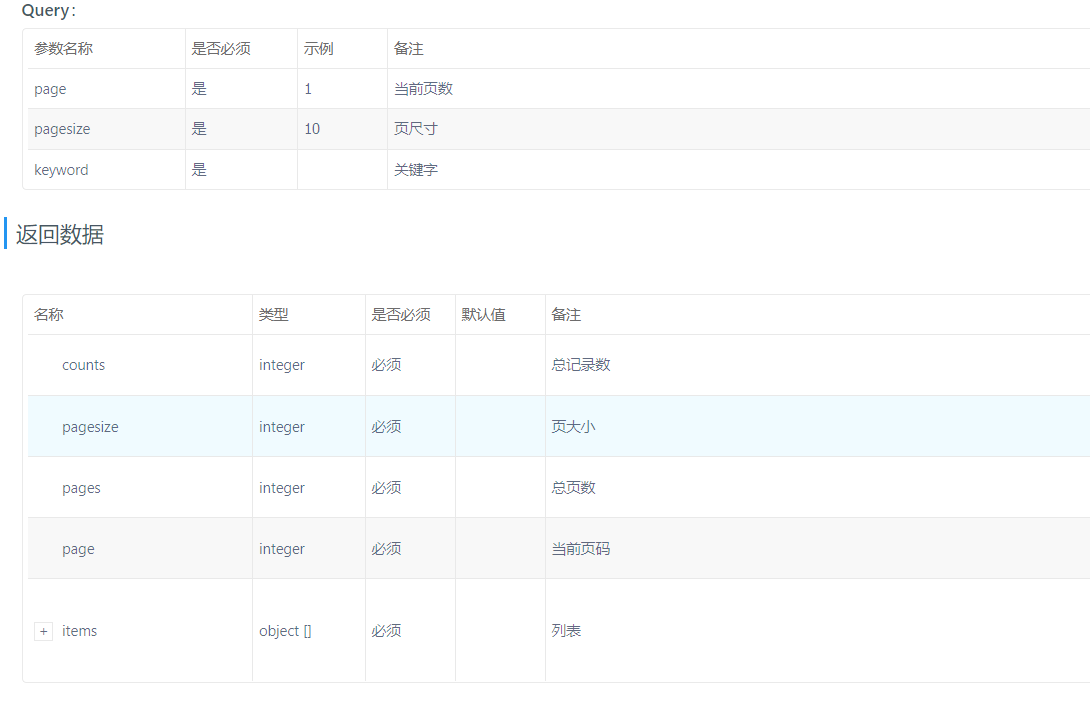
分析
根据好友表查看好友即可,参数有个keword 这个使用来进行模糊查询用的
代码
vo
@Data
@NoArgsConstructor
@AllArgsConstructor
public class ContactVo implements Serializable {

    private Long id;
    private String userId;
    private String avatar;
    private String nickname;
    private String gender;
    private Integer age;
    private String city;

    public static ContactVo init(UserInfo userInfo) {
        ContactVo vo = new ContactVo();
        if(userInfo != null) {
           BeanUtils.copyProperties(userInfo,vo);
           vo.setUserId("hx"+userInfo.getId().toString());
        }
        return vo;
    }
}
MessagesController
/***
 * 联系人列表
 * GET /messages/contacts
 */
@GetMapping("/contacts")
public ResponseEntity contacts(@RequestParam(defaultValue = "1") Integer page,
                               @RequestParam(defaultValue = "10") Integer pagesize,
                               String keyword){
    PageResult pageResult=messagesService.contactsList(page,pagesize,keyword);
    return ResponseEntity.ok(pageResult);
}
messagesService
//联系人列表
public PageResult contactsList(Integer page, Integer pagesize, String keyword) {
Long userId = UserHolder.getUserId();
List<Friend> friends = friendApi.findUserId(page, pagesize, userId);
if (CollUtil.isEmpty(friends)){
return new PageResult();
}
List<Long> friendIds = CollUtil.getFieldValues(friends, "friendId", Long.class);
UserInfo info=new UserInfo();
info.setNickname(keyword);
Map<Long, UserInfo> map = userInfoApi.findByIds(friendIds, info);
List<ContactVo> vos=new ArrayList<>();
for (Friend friend : friends) {
Long friendId = friend.getFriendId();
UserInfo userInfo = map.get(friendId);
if (userInfo!=null){
ContactVo vo = ContactVo.init(userInfo);
vos.add(vo);
}
}
return new PageResult(page,pagesize,0l,vos);
}
userInfoApi
@Override
public Map<Long, UserInfo> findByIds(List<Long> ids, UserInfo info) {
QueryWrapper<UserInfo> qw=new QueryWrapper<>();
qw.in("id",ids);
if(info!=null){
if (info.getGender()!=null) {
qw.eq("gender", info.getGender());
}
if (info.getAge()!=null){
qw.lt("age",info.getAge());
}
if (info.getNickname()!=null){
qw.like("nickname",info.getNickname());
}
}
List<UserInfo> list = userInfoMapper.selectList(qw);
Map<Long, UserInfo> map = CollUtil.fieldValueMap(list, "id");
return map;
}
10附近的人
1探花左滑右滑
api文档
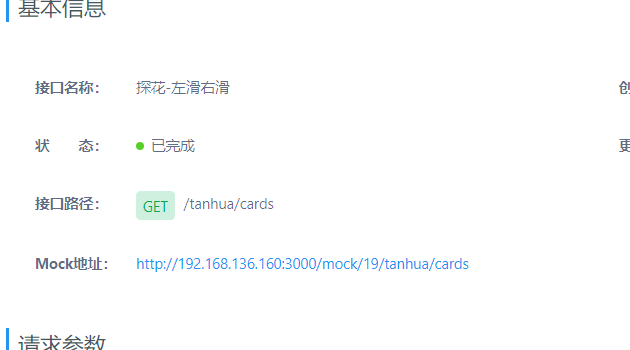
分析
探花功能在前端显示的时左滑右滑切换列表
我们要让这个列表随机显示佳人,而且喜欢过的和不喜欢的不再显示
代码
TanhuaController
/**
* 探花-左滑右滑列表
* GEt /tanhua/cards
*/
@GetMapping("/cards")
public ResponseEntity cards() {
List<TodayBest> bests = tanhuaService.cardsList();
return ResponseEntity.ok(bests);
}
tanhuaService
@Value("${tanhua.default.recommend.users}")
private String recommendUser;
//探花-左滑右滑列表
public List<TodayBest> cardsList() {
//随机查询推荐列表排除喜欢和不喜欢
List<RecommendUser> users = recommendApi.queryCardsList(UserHolder.getUserId(), 10);
//判断list是否存在
if (CollUtil.isEmpty(users)) {
users = new ArrayList<>();
String[] userIds = recommendUser.split(",");
for (String userId : userIds) {
RecommendUser recommendUser = new RecommendUser();
recommendUser.setUserId(Long.valueOf(userId));
recommendUser.setToUserId(UserHolder.getUserId());
recommendUser.setScore(RandomUtil.randomDouble(60, 90));
users.add(recommendUser);
}
}
//封装Vo返回
List<Long> userIds = CollUtil.getFieldValues(users, "userId", Long.class);
Map<Long, UserInfo> map = userInfoApi.findByIds(userIds, null);
List<TodayBest> vos = new ArrayList<>();
for (RecommendUser user : users) {
UserInfo userInfo = map.get(user.getUserId());
if (userInfo != null) {
TodayBest vo = TodayBest.init(userInfo, user);
vos.add(vo);
}
}
return vos;
}
recommendApi
先查询用户喜欢与不喜欢的人 再根据这些人的id排除
调用统计函数TypedAggregation 进行随即查询 Criteria 排除这些人的id and("userId").nin(ids);
传递条件
TypedAggregation<RecommendUser> aggregation=TypedAggregation.newAggregation(
RecommendUser.class,
Aggregation.match(criteria),
Aggregation.sample(i)
);
随机查询
@Override
public List<RecommendUser> queryCardsList(Long userId, int i) {
Query query = Query.query(Criteria.where("userId").is(userId));
List<UserLike> userLikes = mongoTemplate.find(query, UserLike.class);
List<Long> ids = CollUtil.getFieldValues(userLikes, "likeUserId", Long.class);
//构造条件随机查询 i 条
Criteria criteria = Criteria.where("toUserId").is(userId).and("userId").nin(ids);
TypedAggregation<RecommendUser> aggregation=TypedAggregation.newAggregation(
RecommendUser.class,
Aggregation.match(criteria),
Aggregation.sample(i)
);
AggregationResults<RecommendUser> results = mongoTemplate.aggregate(aggregation, RecommendUser.class);
return results.getMappedResults();
}
}
2探花喜欢
api文档
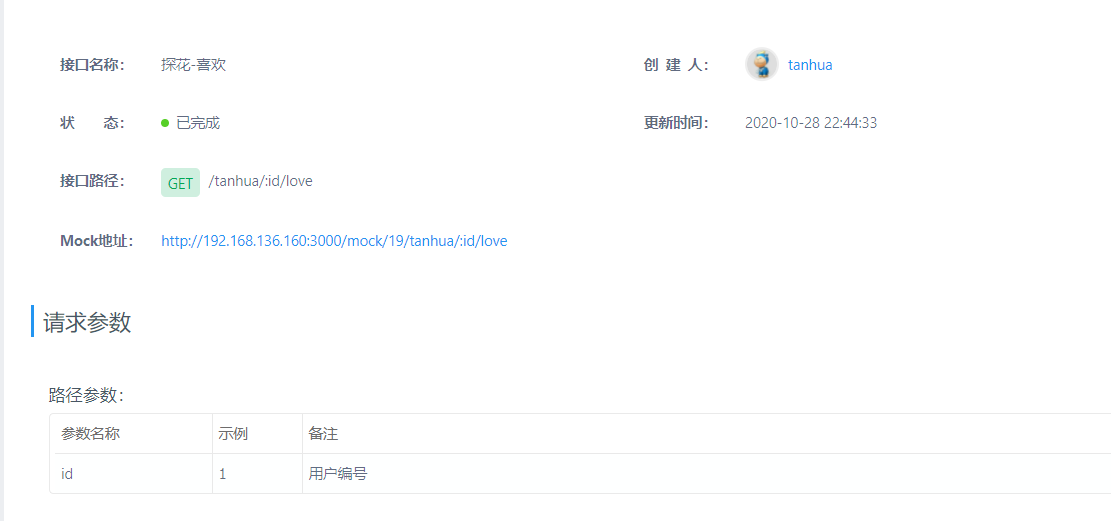
分析
如果喜欢用户 则要把喜欢的用户信息存在LikeUser表中 方便我们下次推荐探花用户时排除
如果两个人相互喜欢要相互添加好友 这时候我们就要进行数据的查询 判段是否相互喜欢
如果查询数据库会有一定的效率问题 我们就可一把数据存到redis中用set结构
一个人有喜欢的key 和不喜欢的key
喜欢这个用户以前可能不喜欢所以我们要像喜欢key的添加这个人id不喜欢的删除
人后进行判断对方是否也喜欢我 如果true 则要添加好友
代码
TanhuaController
/**
* 探花喜欢
* GET /tanhua/:id/love
*/
@GetMapping("/{id}/love")
public ResponseEntity tanhuaLove(@PathVariable("id") Long likeUserId) {
tanhuaService.tanhuaLove(likeUserId);
return ResponseEntity.ok(null);
}
tanhuaService
//探花喜欢
public void tanhuaLove(Long likeUserId) {
//保存数据到MongoDB
Boolean save = likeUserApi.savelove(UserHolder.getUserId(), likeUserId, true);
if (!save) {
throw new BusinessException(ErrorResult.error());
}
//将数据写到reids
String loveKey = Constants.USER_LIKE_KEY + UserHolder.getUserId();
String disloveKey = Constants.USER_NOT_LIKE_KEY + UserHolder.getUserId();
redisTemplate.opsForSet().add(loveKey, likeUserId.toString());
redisTemplate.opsForSet().remove(disloveKey, likeUserId.toString());
//判断是否相互喜欢
if (islike(likeUserId, UserHolder.getUserId())) {
messagesService.contacts(likeUserId);
}
}
判断userId喜不喜欢likeUserId
public Boolean islike(Long userId, Long likeUserId) {
String loveKey = Constants.USER_LIKE_KEY + userId;
Boolean member = redisTemplate.opsForSet().isMember(loveKey, likeUserId.toString());
return member;
}
likeUserApi
保存用户信息时首先查询当前用户和喜欢的id有没有数据 如果有数据则更新没有则添加
@Override
public Boolean savelove(Long userId, Long likeUserId, boolean isLike) {
try {
Criteria criteria = Criteria.where("userId").is(userId).and("likeUserId").is(likeUserId);
Query query = Query.query(criteria);
boolean exists = mongoTemplate.exists(query, UserLike.class);
if (exists){
Update update=new Update();
update.set("isLike",isLike);
update.set("updated",System.currentTimeMillis());
mongoTemplate.updateFirst(query,update,UserLike.class);
}else {
UserLike userLike=new UserLike();
userLike.setUserId(userId);
userLike.setLikeUserId(likeUserId);
userLike.setIsLike(isLike);
userLike.setCreated(System.currentTimeMillis());
userLike.setUpdated(System.currentTimeMillis());
mongoTemplate.save(userLike);
}
return true;
} catch (Exception e) {
e.printStackTrace();
return false;
}
}
3探花不喜欢
api文档
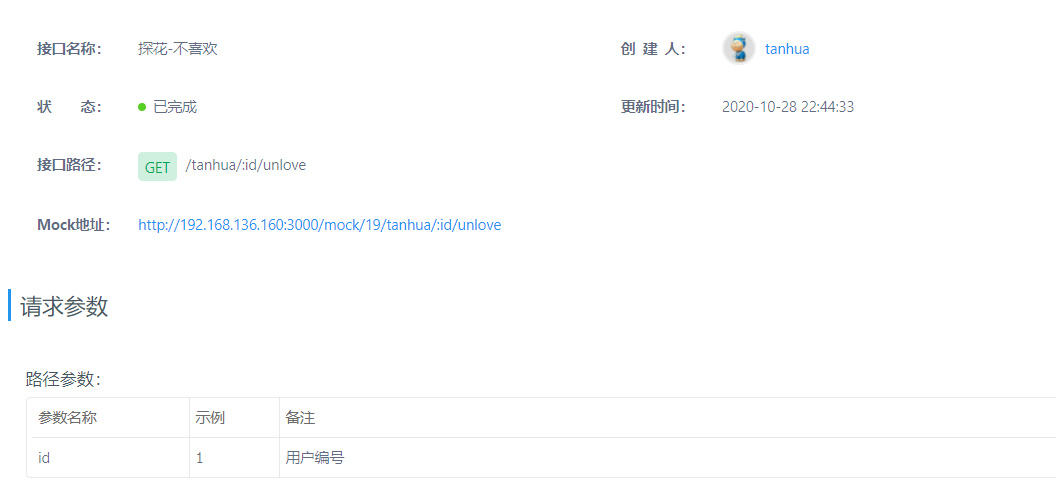
分析
和喜欢类似
在redis中想不喜欢的key添加这个id 喜欢的删除
注意:如果之前两个人相互喜欢二现在有一个人不喜欢了则要删除好友
所以在操作redis之前要先对我们两个人互相判断一下是否都为喜欢,如果都喜欢在操作完redis后要删除好友
TanhuaController
/**
* 探花不喜欢
* GET /tanhua/:id/unlove
*/
@GetMapping("/{id}/unlove")
public ResponseEntity tanhuadisLove(@PathVariable("id") Long dislikeUserId) {
tanhuaService.tanhuadisLove(dislikeUserId);
return ResponseEntity.ok(null);
}
tanhuaService
//探花不喜欢
public void tanhuadisLove(Long dislikeUserId) {
Boolean save = likeUserApi.savelove(UserHolder.getUserId(), dislikeUserId, false);
if (!save) {
throw new BusinessException(ErrorResult.error());
}
//将数据写到reids
Boolean islike = islike(UserHolder.getUserId(), dislikeUserId);
String loveKey = Constants.USER_LIKE_KEY + UserHolder.getUserId();
String disloveKey = Constants.USER_NOT_LIKE_KEY + UserHolder.getUserId();
redisTemplate.opsForSet().add(disloveKey, dislikeUserId.toString());
redisTemplate.opsForSet().remove(loveKey, dislikeUserId.toString());
//判断是否相互喜欢
if (islike(dislikeUserId, UserHolder.getUserId()) && islike) {
//解除好友
messagesService.deletecontacts(dislikeUserId);
}
}
4MongoDB地理位置介绍(GEO)
MongoDB 支持对地理空间数据的查询操作。
地理位置查询,必须创建索引才可以能查询,目前有两种索引。
2d :
使用2d index 能够将数据作为二维平面上的点存储起来,在MongoDB 2.4以前使用2。
2dsphere:
2dsphere索引支持查询在一个类地球的球面上进行几何计算,以GeoJSON对象或者普通坐标对的方式存储数据。
MongoDB内部支持多种GeoJson对象类型:
Point
最基础的坐标点,指定纬度和经度坐标,首先列出经度,然后列出 纬度:
- 有效的经度值介于
-180和之间180,两者都包括在内。 - 有效的纬度值介于
-90和之间90,两者都包括在内。
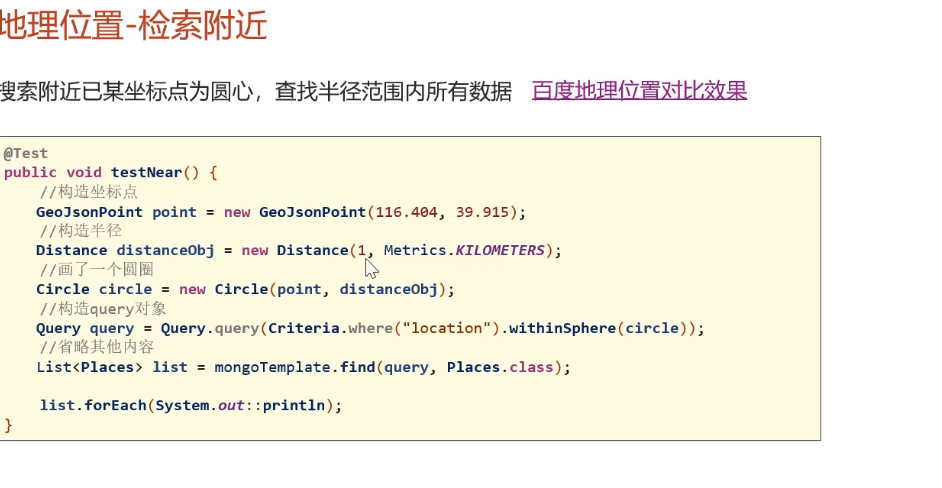
查询附近
查询当前坐标附近的目标
@Test
public void testNear() {
//构造坐标点
GeoJsonPoint point = new GeoJsonPoint(116.404, 39.915);
//构造半径
Distance distanceObj = new Distance(1, Metrics.KILOMETERS);
//画了一个圆圈
Circle circle = new Circle(point, distanceObj);
//构造query对象
Query query = Query.query(Criteria.where("location").withinSphere(circle));
//省略其他内容
List<Places> list = mongoTemplate.find(query, Places.class);
list.forEach(System.out::println);
}
查询并获取距离
我们假设需要以当前坐标为原点,查询附近指定范围内的餐厅,并直接显示距离
//查询附近且获取间距
@Test
public void testNear1() {
//1、构造中心点(圆点)
GeoJsonPoint point = new GeoJsonPoint(116.404, 39.915);
//2、构建NearQuery对象
NearQuery query = NearQuery.near(point, Metrics.KILOMETERS).maxDistance(1, Metrics.KILOMETERS);
//3、调用mongoTemplate的geoNear方法查询
GeoResults<Places> results = mongoTemplate.geoNear(query, Places.class);
//4、解析GeoResult对象,获取距离和数据
for (GeoResult<Places> result : results) {
Places places = result.getContent();
double value = result.getDistance().getValue();
System.out.println(places+"---距离:"+value + "km");
}
}
地理位置一般都是通过一个点Point 这个点MongoDB的GeoJsonPoint可以构造出来 里面的就是经纬度
通过点来查询周围的人以及距离
5上报地理位置
api文档
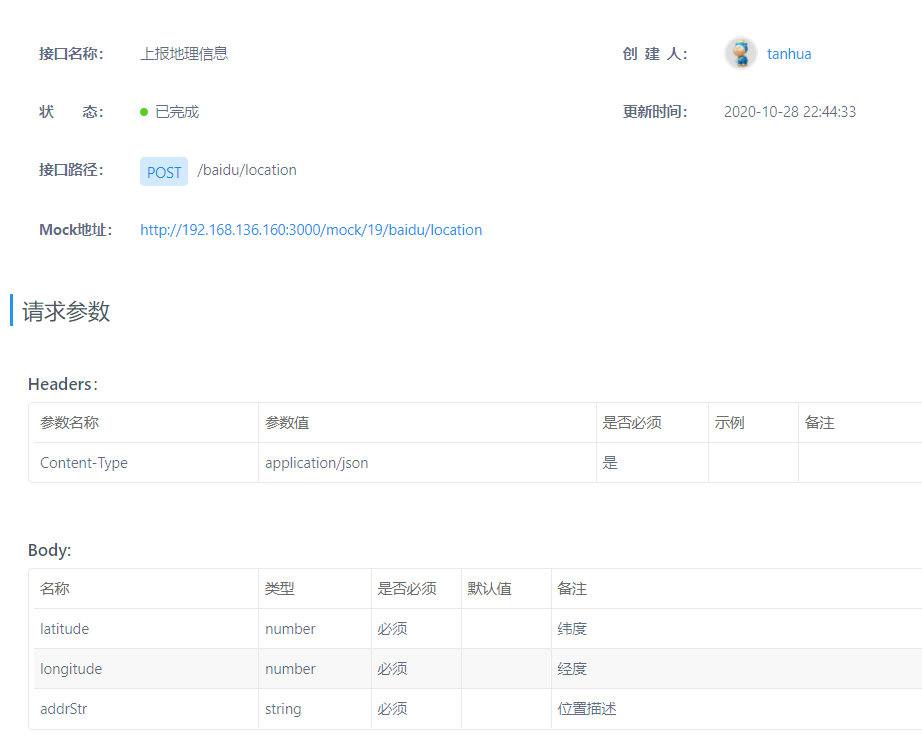
分析
如下图
数据库除了基本信息之外还有一个location字段 这个字段存了一个Point记录了经纬度
我们上报地理位置的时候要把接收前端的经纬度存到GeoJsonPoint 对象中 然后保存到数据库
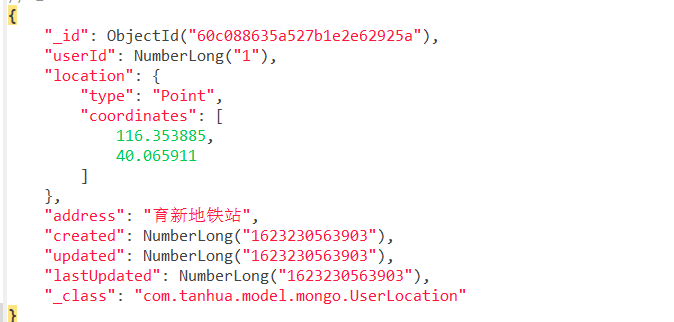
代码
UserLocation
package com.tanhua.model.mongo;
@Data
@NoArgsConstructor
@AllArgsConstructor
@Document(collection = "user_location")
@CompoundIndex(name = "location_index", def = "{'location': '2dsphere'}")
public class UserLocation implements java.io.Serializable{
private static final long serialVersionUID = 4508868382007529970L;
@Id
private ObjectId id;
@Indexed
private Long userId; //用户id
private GeoJsonPoint location; //x:经度 y:纬度
private String address; //位置描述
private Long created; //创建时间
private Long updated; //更新时间
private Long lastUpdated; //上次更新时间
}
BaiduController
package com.tanhua.server.controller;
@RestController
@RequestMapping("/baidu")
public class BaiduController {
@Autowired
private BaiduService baiduService;
/**
* 上报地理信息
* POST /baidu/location
* */
@PostMapping("/location")
public ResponseEntity location(@RequestBody Map map){
Double latitude = Double.valueOf(map.get("latitude").toString());
Double longitude = Double.valueOf(map.get("longitude").toString());
String addrStr = map.get("addrStr").toString();
baiduService.location(longitude,latitude,addrStr);
return ResponseEntity.ok(null);
}
}
BaiduService
package com.tanhua.server.service;
@Service
public class BaiduService {
@DubboReference
private UserLocationApi userLocationApi;
public void location(Double longitude, Double latitude, String addrStr) {
Boolean flag=userLocationApi.updateLocation(UserHolder.getUserId(),longitude,latitude,addrStr);
if (!flag){
throw new BusinessException(ErrorResult.error());
}
}
}
userLocationApi
@Override
public Boolean updateLocation(Long userId, Double longitude, Double latitude, String addrStr) {
try {
//判断是否存在,存在更新,不存在保存
Query query = Query.query(Criteria.where("userId").is(userId));
UserLocation userLocation = mongoTemplate.findOne(query, UserLocation.class);
if (userLocation!=null){
Update update=new Update();
GeoJsonPoint point=new GeoJsonPoint(longitude,latitude);
update.set("location",point);
update.set("address",addrStr);
update.set("lastUpdated",userLocation.getUpdated());
update.set("updated",System.currentTimeMillis());
mongoTemplate.updateFirst(query,update,UserLocation.class);
}else {
userLocation=new UserLocation();
GeoJsonPoint point=new GeoJsonPoint(longitude,latitude);
userLocation.setUserId(userId);
userLocation.setLocation(point);
userLocation.setAddress(addrStr);
userLocation.setCreated(System.currentTimeMillis());
userLocation.setUpdated(System.currentTimeMillis());
userLocation.setLastUpdated(System.currentTimeMillis());
mongoTemplate.save(userLocation);
}
return true;
} catch (Exception e) {
e.printStackTrace();
return false;
}
}
6 搜附近
api文档
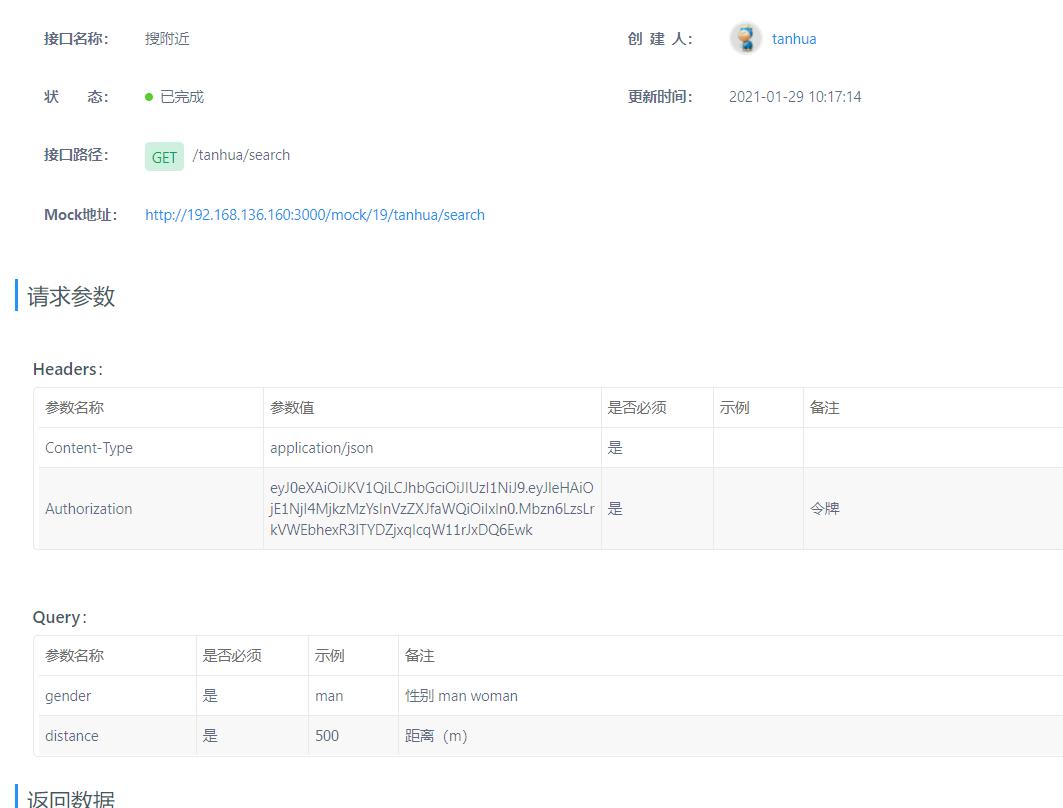
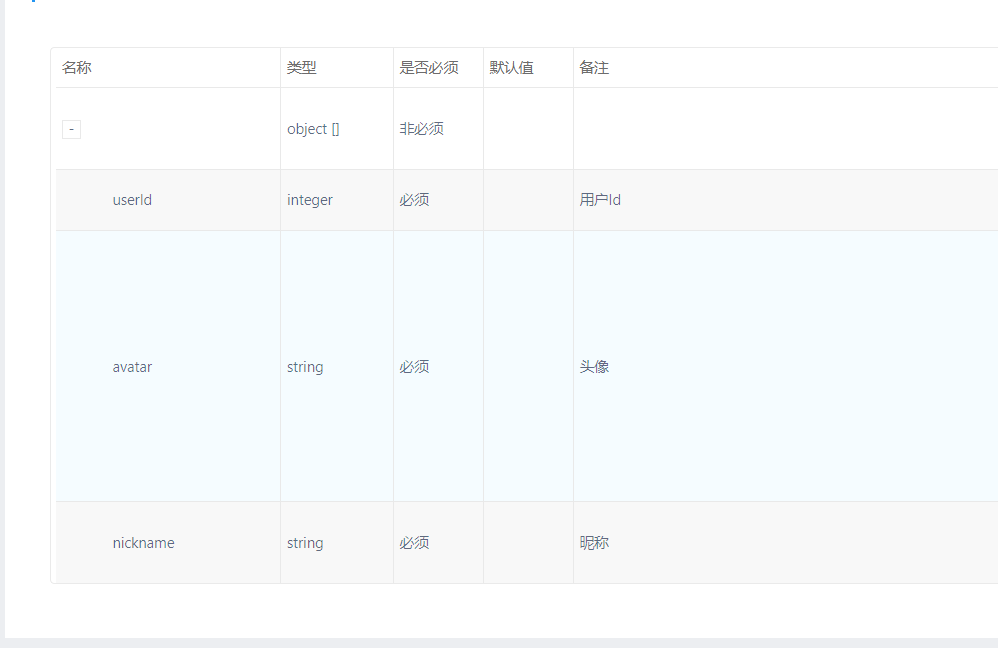
分析
根据当前用户的坐标查询传递来的距离参数范围的人
然后根据这些人的id查询UserInfo信息 根据性别筛选
经筛选后的人封装到vo 再将vo添加到vos返回集合
代码
NearUserVo
package com.tanhua.model.vo;
import com.tanhua.model.domain.UserInfo;
import lombok.AllArgsConstructor;
import lombok.Data;
import lombok.NoArgsConstructor;
//附近的人vo对象
@Data
@NoArgsConstructor
@AllArgsConstructor
public class NearUserVo {
private Long userId;
private String avatar;
private String nickname;
public static NearUserVo init(UserInfo userInfo) {
NearUserVo vo = new NearUserVo();
vo.setUserId(userInfo.getId());
vo.setAvatar(userInfo.getAvatar());
vo.setNickname(userInfo.getNickname());
return vo;
}
}
TanhuaController
/**
* 搜附近
* GET /tanhua/search
*/
@GetMapping("/search")
public ResponseEntity search(String gender,
@RequestParam(defaultValue = "2000") String distance) {
List<NearUserVo> list = tanhuaService.queryNearUser(gender, distance);
return ResponseEntity.ok(list);
}
tanhuaService
//搜附近
public List<NearUserVo> queryNearUser(String gender, String distance) {
List<Long> ids = userLocationApi.queryNearUser(UserHolder.getUserId(), Double.valueOf(distance));
if (CollUtil.isEmpty(ids)){
return new ArrayList<>();
}
UserInfo info=new UserInfo();
info.setGender(gender);
Map<Long, UserInfo> map = userInfoApi.findByIds(ids, info);
List<NearUserVo> vos=new ArrayList<>();
for (Long userId : ids) {
UserInfo userInfo = map.get(userId);
if (userInfo!=null){
NearUserVo vo = NearUserVo.init(userInfo);
vos.add(vo);
}
}
return vos;
}
}
UserLocationApiImpl
查询附近固定格式
//搜附近
@Override
public List<Long> queryNearUser(Long userId, Double value) {
//1、根据用户id,查询用户的位置信息
Query query = Query.query(Criteria.where("userId").is(userId));
UserLocation location = mongoTemplate.findOne(query, UserLocation.class);
if (location==null){
return null;
}
//2、已当前用户位置绘制原点
GeoJsonPoint point=location.getLocation();
//3、绘制半径
Distance distance=new Distance(value/1000, Metrics.KILOMETERS);
//4、绘制圆形
Circle circle=new Circle(point,distance);
//5、查询
Query locationQuery = Query.query(Criteria.where("location").withinSphere(circle));
List<UserLocation> list = mongoTemplate.find(locationQuery, UserLocation.class);
return CollUtil.getFieldValues(list,"userId",Long.class);
}
7 保存访客
当有人查看主页时就是这个人访问了你
就要把访问的信息添加到数据表
我们修改家人信息代码档查看佳人 则添加 userId 访问了佳人Id
如果存在我们更新,只保存一条数据到表中
TanhuaService
//查看佳人信息
public TodayBest personalInfo(Long userId) {
UserInfo info = userInfoApi.findById(userId);
RecommendUser recommendUser = recommendApi.queryfindByUserId(userId, UserHolder.getUserId());
TodayBest best = TodayBest.init(info, recommendUser);
Visitors visitors=new Visitors();
visitors.setDate(System.currentTimeMillis());
visitors.setVisitDate(new SimpleDateFormat("yyyyMMdd").format(new Date()));
visitors.setScore(recommendUser.getScore());
visitors.setUserId(userId);
visitors.setVisitorUserId(UserHolder.getUserId());
visitors.setFrom("首页");
visitorsApi.save(visitors);
return best;
}
visitorsApi
//保存
@Override
public void save(Visitors visitors) {
Criteria criteria = Criteria.where("userId").is(visitors.getUserId())
.and("visitorUserId").is(visitors.getVisitorUserId());
Query query = Query.query(criteria);
if (mongoTemplate.exists(query,Visitors.class)){
Update update=new Update();
update.set("date",visitors.getDate());
update.set("visiDate",visitors.getVisitDate());
mongoTemplate.updateFirst(query,update,Visitors.class);
}else {
mongoTemplate.save(visitors);
}
}
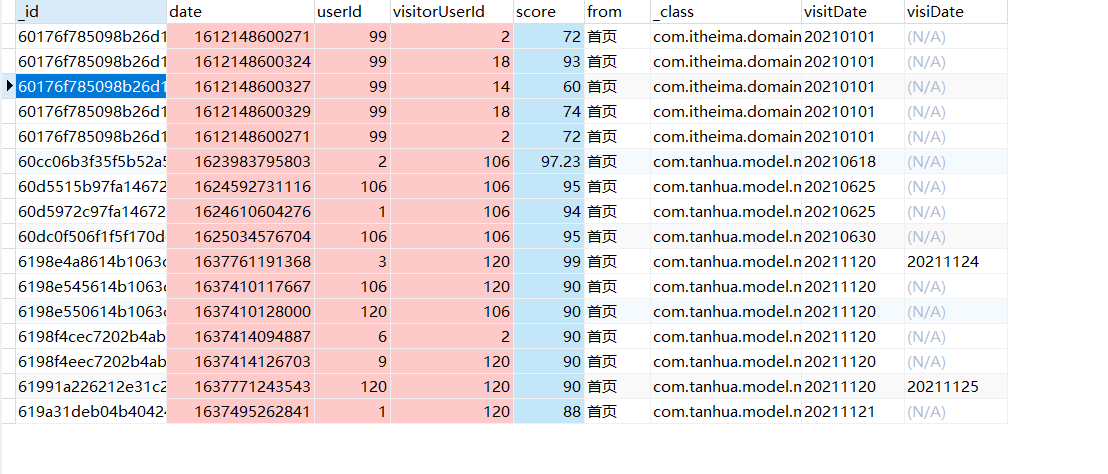
8谁看过我
api文档
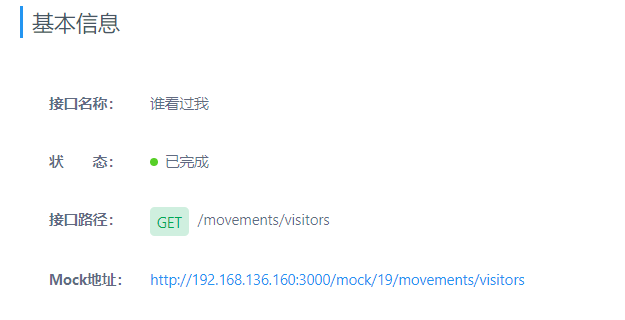
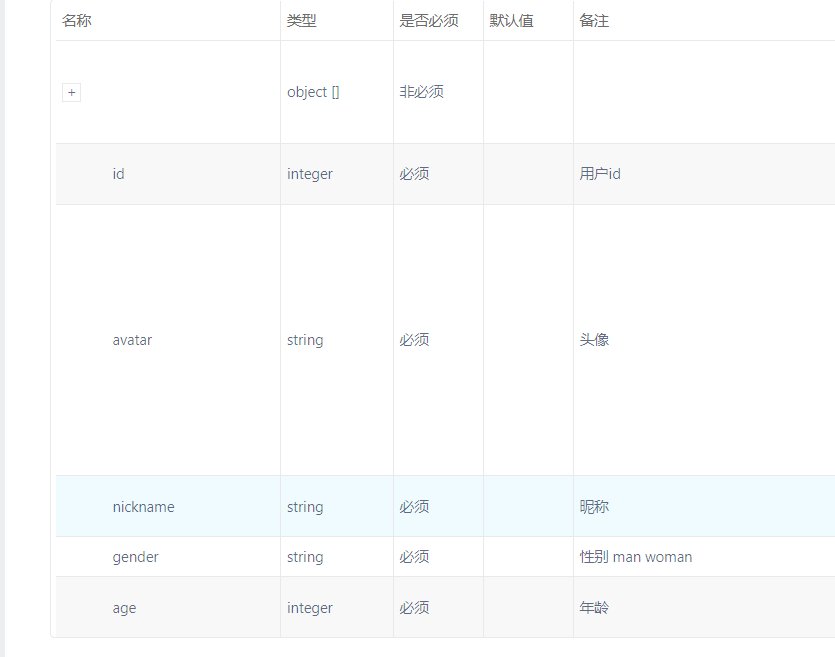
分析
我们查看访客列表时候先在redis中查询我们最近一次查看访客列表的时间
我们只 显示我 访问的访客列表后的 的访问我的访客
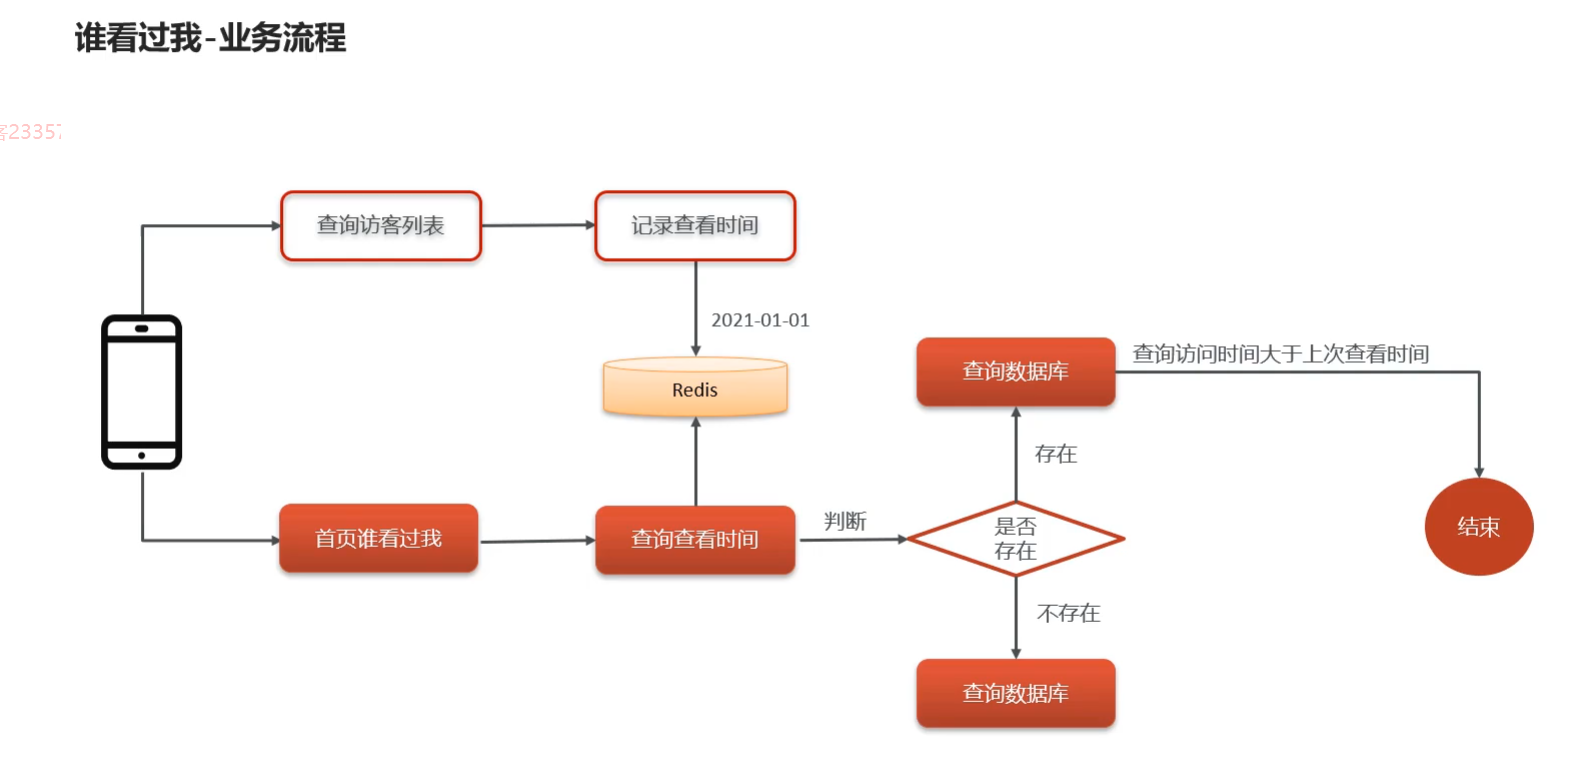
代码
MovementsController
/**
* 谁看过我
* GET /movements/visitors
*/
@GetMapping("/visitors")
public ResponseEntity visitors() {
List<VisitorsVo> list = movementsService.visitors();
return ResponseEntity.ok(list);
}
movementsService
//谁看过我
public List<VisitorsVo> visitors() {
String key = Constants.VISITORS;
String hashKey = UserHolder.getMobile().toString();
String value = (String) redisTemplate.opsForHash().get(key, hashKey);
Long date = StringUtils.isEmpty(value) ? null : Long.valueOf(value);
List<Visitors> visitorsList = visitorsApi.visitors(UserHolder.getUserId(), date);
if (CollUtil.isEmpty(visitorsList)){
return new ArrayList<>();
}
List<Long> ids = CollUtil.getFieldValues(visitorsList, "visitorUserId", Long.class);
Map<Long, UserInfo> map = userInfoApi.findByIds(ids, null);
List<VisitorsVo> vos=new ArrayList<>();
for (Visitors visitors : visitorsList) {
if (visitors.getVisitorUserId()==UserHolder.getUserId()){
continue;
}
UserInfo userInfo = map.get(visitors.getVisitorUserId());
if (userInfo!=null){
VisitorsVo vo = VisitorsVo.init(userInfo, visitors);
vos.add(vo);
}
}
return vos;
}
visitorsApi
//谁看过我
@Override
public List<Visitors> visitors(Long userId, Long date) {
Criteria criteria = Criteria.where("userId").is(userId);
if (date!=null){
criteria.and("date").lt(date);
}
Query query = Query.query(criteria);
return mongoTemplate.find(query,Visitors.class);
}
11小视频方案
1FastDFS介绍
视频存储
- 阿里云OSS(视频简单,贵!!!)
- 自建存储系统
对于小视频的功能的开发,核心点就是:存储 + 推荐 + 加载速度 。
- 对于存储而言,小视频的存储量以及容量都是非常巨大的
- 所以我们选择自己搭建分布式存储系统 FastDFS进行存储
- 对于推荐算法,我们将采用多种权重的计算方式进行计算
- 对于加载速度,除了提升服务器带宽外可以通过CDN的方式进行加速,当然了这需要额外购买CDN服务
FastDFS是什么?
FastDFS是分布式文件系统。使用 FastDFS很容易搭建一套高性能的文件服务器集群提供文件上传、下载等服务。
@Autowired
private FastFileStorageClient client;
@Autowired
private FdfsWebServer webServer;
我们通过FastFileStorageClient 来完成上传
FdfsWebServer 来获取地址
测试
package com.itheima.test;
import com.github.tobato.fastdfs.domain.conn.FdfsWebServer;
import com.github.tobato.fastdfs.domain.fdfs.StorePath;
import com.github.tobato.fastdfs.service.FastFileStorageClient;
import com.tanhua.server.AppServerApplication;
import org.junit.Test;
import org.junit.runner.RunWith;
import org.springframework.beans.factory.annotation.Autowired;
import org.springframework.boot.test.context.SpringBootTest;
import org.springframework.test.context.junit4.SpringRunner;
import java.io.File;
import java.io.FileInputStream;
import java.io.FileNotFoundException;
@RunWith(SpringRunner.class)
@SpringBootTest(classes = AppServerApplication.class)
public class FastDFSTest {
/**
* 测试FastDFS的文件上传
*/
//用于文件上传或者下载
@Autowired
private FastFileStorageClient client;
@Autowired
private FdfsWebServer webServer;
@Test
public void testUpload() throws FileNotFoundException {
//1、指定文件
File file = new File("D:\\1.jpg");
//2、文件上传
StorePath path = client.uploadFile(new FileInputStream(file), file.length(), "jpg", null);
//3、拼接请求路径
String fullPath = path.getFullPath();
System.out.println(fullPath); //a/b/abc.jpg;
String url = webServer.getWebServerUrl() + fullPath;
System.out.println(url);
}
}
- 在线的存储服务器:阿里云OSS
- 自己搭建分布式的存储服务器:fastdfs
2发布小视频
api文档
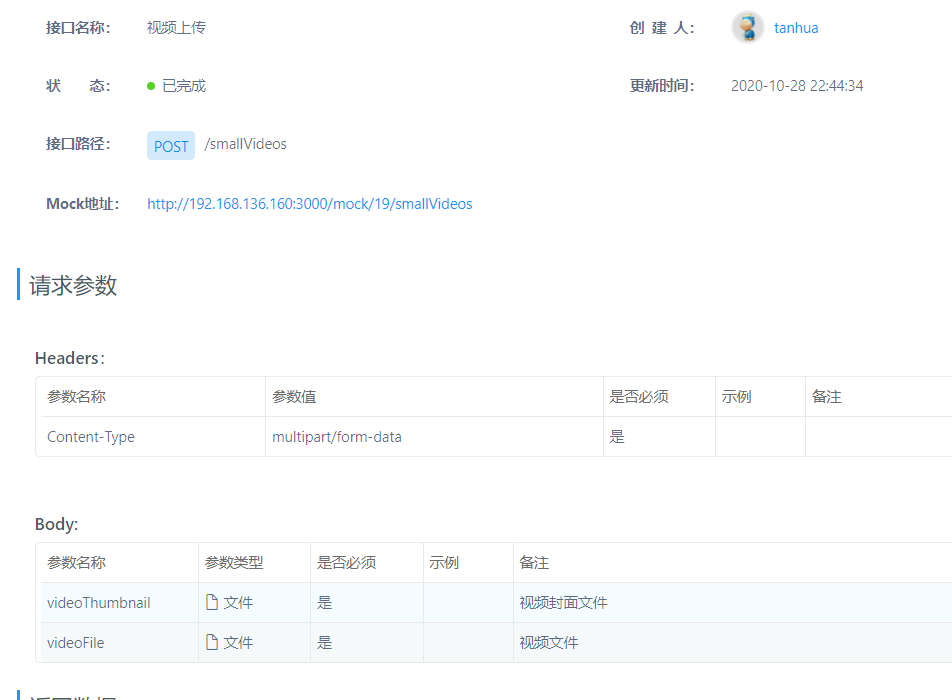
分析
前端传递了啷个文件
一个是视频封面 我们存在OSS中
一个是视频 我们存在FastDFS中
oss我们已经很熟悉了 我们详细介绍FastDFS
我们上传视频要注入FdfsWebServer 对象 然后利用此对象上传
StorePath path = client.uploadFile(new FileInputStream(file), file.length(), "jpg", null);
四个参数 一个流 一个文件长度 一个后缀名 一个我们不用管为null
然后拼接路径
代码
SmallVideosController
@RestController
@RequestMapping("/smallVideos")
public class SmallVideosController {
@Autowired
private SmallVideosService smallVideosService;
/**
* 视频上传
* POST /smallVideos
*/
@PostMapping
public ResponseEntity smallVideos(MultipartFile videoThumbnail,
MultipartFile videoFile) throws IOException {
smallVideosService.savaSmallVideos(videoThumbnail, videoFile);
return ResponseEntity.ok(null);
}
smallVideosService
//小视频上传
public void savaSmallVideos(MultipartFile videoThumbnail, MultipartFile videoFile) throws IOException {
String picUrl = ossTemplate.upload(videoThumbnail.getOriginalFilename(), videoThumbnail.getInputStream());
String filename = videoFile.getOriginalFilename();
String lastName = filename.substring(filename.lastIndexOf(".") + 1);
StorePath path = client.uploadFile(videoFile.getInputStream(),
videoFile.getSize(), lastName, null);
String videoUrl = webServer.getWebServerUrl() + path.getFullPath();
Video video = new Video();
video.setUserId(UserHolder.getUserId());
video.setPicUrl(picUrl);
video.setVideoUrl(videoUrl);
video.setText("缓缓飘落的枫叶像思念");
video.setCreated(System.currentTimeMillis());
String id = videoApi.save(video);
if (StringUtils.isEmpty(id)) {
throw new BusinessException(ErrorResult.error());
}
//mq写日志
mqMessageService.sendLogMessage(UserHolder.getUserId(),"0301","movement",null);
}
videoApi
@Override
public String save(Video video) {
video.setVid(idWorker.getNextId("video"));
Video save = mongoTemplate.save(video);
return save.getId().toHexString();
}
3查询视频列表
api文档
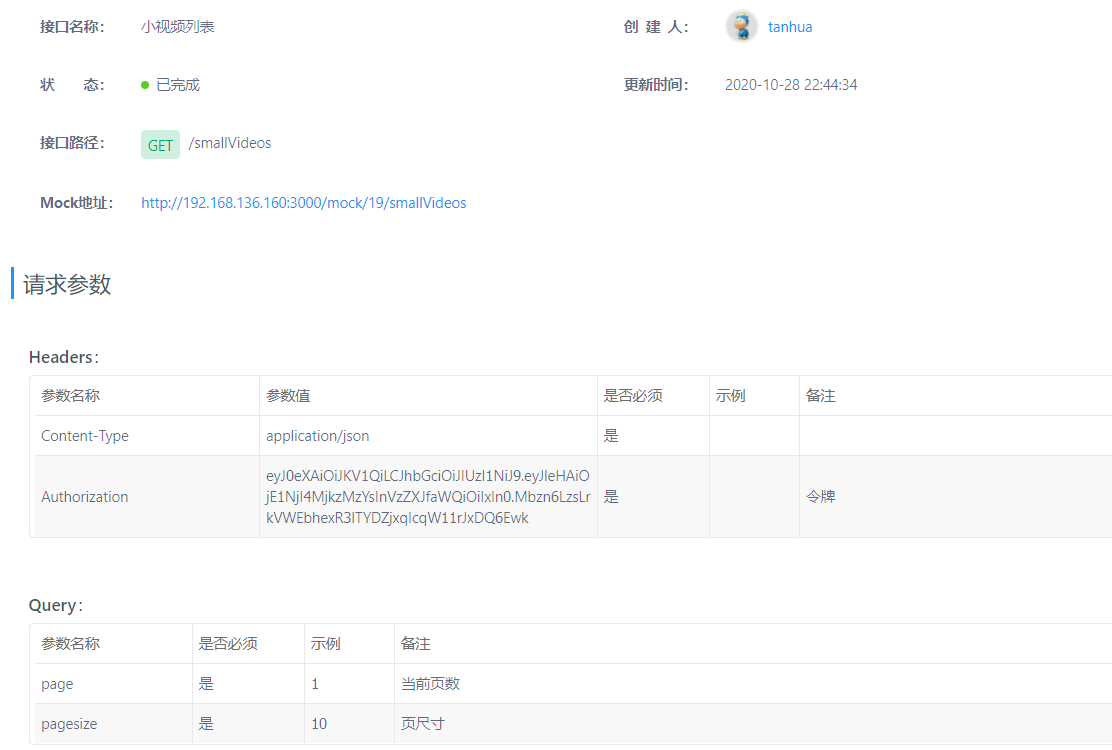
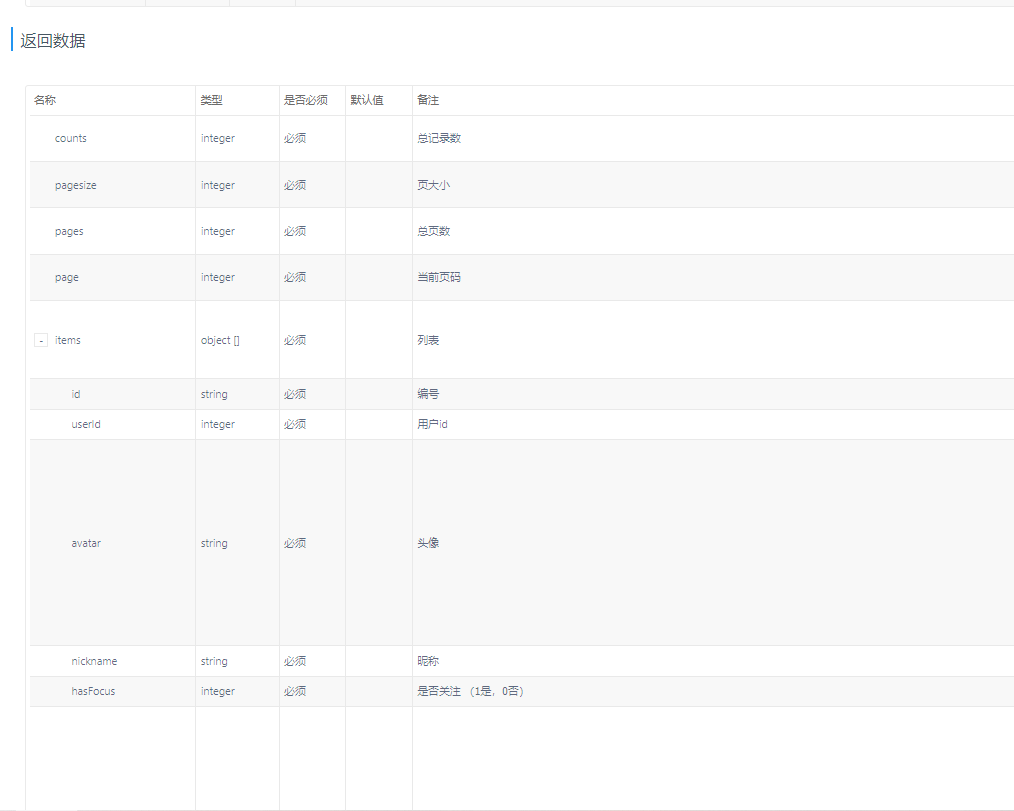
分析
和查询动态类似
我们现在redis查询推荐动态的vid 然后展示
当redis为null或者redis分页数据不存在则去查询mongdb
代码
SmallVideosController
/**
* 视频列表
* GET /smallVideos
*/
@GetMapping
private ResponseEntity smallVideosList(@RequestParam(defaultValue = "1") Integer page,
@RequestParam(defaultValue = "10") Integer pagesize) {
PageResult pageResult = smallVideosService.smallVideosList(page, pagesize);
return ResponseEntity.ok(pageResult);
}
smallVideosService
//视频列表
public PageResult smallVideosList(Integer page, Integer pagesize) {
//定义全局变量
List<Video> list=new ArrayList<>();
int i=0;
//查询redis推荐
String redisKey = Constants.VIDEOS_RECOMMEND + UserHolder.getUserId();
String value = redisTemplate.opsForValue().get(redisKey);
//判断value是否存在
if (!StringUtils.isEmpty(value)) {
//存在跟就redis查询
String[] split = value.split(",");
//跳过的条数小于总长说明redis还有数据
if ((page - 1) * pagesize < split.length) {
List<Long> vids = Arrays.stream(split)
.skip((page - 1) * pagesize)
.limit(pagesize)
.map(e -> Long.valueOf(e))
.collect(Collectors.toList());
list = videoApi.queryVidList(vids);
}
//i: redis中有几页数据
i = PageUtil.totalPage(split.length, pagesize);
}
//判断集合是否为空,为空这代表redis中没有数据了,需要我们从mongoDB查询
if (list.isEmpty()){
list=videoApi.queryList((page-i),pagesize);
//mongoDB中也没数据返回空对象
if (CollUtil.isEmpty(list)){
return new PageResult();
}
}
//构造返回数据
List<Long> ids = CollUtil.getFieldValues(list, "userId", Long.class);
Map<Long, UserInfo> map = userInfoApi.findByIds(ids, null);
List<VideoVo> vos=new ArrayList<>();
for (Video video : list) {
UserInfo info = map.get(video.getUserId());
if (info!=null){
VideoVo vo = VideoVo.init(info, video);
vos.add(vo);
}
}
return new PageResult(page,pagesize,0l,vos);
}
videoApi
@Override
public List<Video> queryVidList(List<Long> vids) {
Query query = Query.query(Criteria.where("vid").in(vids));
query.with(Sort.by(Sort.Order.desc("created")));
return mongoTemplate.find(query,Video.class);
}
@Override
public List<Video> queryList(int page, Integer pagesize) {
Query query = Query.query(new Criteria());
query.skip((page-1)*pagesize).limit(pagesize).with(Sort.by(Sort.Order.desc("created")));
return mongoTemplate.find(query,Video.class);
}
4通用缓存SpringCache
-
使用Spring缓存抽象时我们需要关注以下两点;
1、确定方法需要被缓存以及他们的缓存策略
2、从缓存中读取之前缓存存储的数据
内部使用AOP的形式,对redis操作进行简化
| 名称 | 解释 |
|---|---|
| @Cacheable | 主要针对方法配置,能够根据方法的请求参数对其进行缓存 |
| @CacheEvict | 清空缓存 |
@Cacheable : 先查询缓存, 缓存中如果不存在才执行方法,把返回值放入缓存 (适用于查询)
@CachePut : 执行方法,把返回值放入缓存(适用于更新)
@CacheEvict : 清空缓存
@Caching : 利用该注解可以配置多个 @CachePut,@CacheEvict,@Cacheable
value 是存储到 redis 中的key 的前半部分
key 是存储到 redis 中的key 的后半部分
:: 分割 (redis 的名称空间)
key 的语法
写法1 : "# +变量名称" : 可以动态的获取 参数值当做 redis 中 key 的一部分
写法2 : "#id +'_'+#id" ,即引号中 可以使用+ 号拼接字符串 ,user::1_1
写法3: T(类全限定名称).静态方法名称
例如 key="T(java.lang.System).currentTimeMillis()"
其他写法
"#result" 指的是返回值
"#methodName" 指的是方法名称
改造小视频代码
1 我们要在启动类开启缓存
@EnableCaching
@SpringBootApplication(exclude = {
MongoAutoConfiguration.class,
MongoDataAutoConfiguration.class
})
@EnableCaching
public class AppServerApplicattion {
public static void main(String[] args) {
SpringApplication.run(AppServerApplicattion.class,args);
}
}
2 我们在查看视频方法上加上注解让此方法查询加入缓存
@Cacheable(value = “videos”, key = “T(com.tanhua.server.interceptor.UserHolder).getUserId()+’’+#page+’’+#pagesize”)
/视频列表
@Cacheable(value = "videos", key = "T(com.tanhua.server.interceptor.UserHolder).getUserId()+'_'+#page+'_'+#pagesize")
public PageResult smallVideosList(Integer page, Integer pagesize) {
//定义全局变量
List<Video> list=new ArrayList<>();
int i=0;
//查询redis推荐
String redisKey = Constants.VIDEOS_RECOMMEND + UserHolder.getUserId();
String value = redisTemplate.opsForValue().get(redisKey);
//判断value是否存在
if (!StringUtils.isEmpty(value)) {
//存在跟就redis查询
String[] split = value.split(",");
//跳过的条数小于总长说明redis还有数据
if ((page - 1) * pagesize < split.length) {
List<Long> vids = Arrays.stream(split)
.skip((page - 1) * pagesize)
.limit(pagesize)
.map(e -> Long.valueOf(e))
.collect(Collectors.toList());
list = videoApi.queryVidList(vids);
}
//i: redis中有几页数据
i = PageUtil.totalPage(split.length, pagesize);
}
//判断集合是否为空,为空这代表redis中没有数据了,需要我们从mongoDB查询
if (list.isEmpty()){
list=videoApi.queryList((page-i),pagesize);
//mongoDB中也没数据返回空对象
if (CollUtil.isEmpty(list)){
return new PageResult();
}
}
//构造返回数据
List<Long> ids = CollUtil.getFieldValues(list, "userId", Long.class);
Map<Long, UserInfo> map = userInfoApi.findByIds(ids, null);
List<VideoVo> vos=new ArrayList<>();
for (Video video : list) {
UserInfo info = map.get(video.getUserId());
if (info!=null){
VideoVo vo = VideoVo.init(info, video);
vos.add(vo);
}
}
return new PageResult(page,pagesize,0l,vos);
}
设置缓存失效时间
package com.tanhua.server.config;
import com.google.common.collect.ImmutableMap;
import org.springframework.boot.autoconfigure.cache.RedisCacheManagerBuilderCustomizer;
import org.springframework.context.annotation.Bean;
import org.springframework.context.annotation.Configuration;
import org.springframework.data.redis.cache.RedisCacheConfiguration;
import java.time.Duration;
import java.util.Map;
@Configuration
public class RedisCacheConfig {
//设置失效时间
private static final Map<String, Duration> cacheMap;
static {
cacheMap = ImmutableMap.<String, Duration>builder().put("videos", Duration.ofSeconds(30L)).build();
}
//配置RedisCacheManagerBuilderCustomizer对象
@Bean
public RedisCacheManagerBuilderCustomizer redisCacheManagerBuilderCustomizer() {
return (builder) -> {
//根据不同的cachename设置不同的失效时间
for (Map.Entry<String, Duration> entry : cacheMap.entrySet()) {
builder.withCacheConfiguration(entry.getKey(),
RedisCacheConfiguration.defaultCacheConfig().entryTtl(entry.getValue()));
}
};
}
}
总结
1请求参数详解
一 请求参数为Query简单类型
1 如果只有一个 我们直接接受即可 参数名要和传递的参数名字一致 如果非要不一致的可以在参数前添加@RequestParam("userId")
public ResponseEntity aaa(@RequestParam("userId") Long userId)
2 如果有多个
1) 我们用多个参数接收,每个参数前加上@RequestParam注解 这个注解还可以设置默认值 @RequestParam(defaultValue = "2000")
public ResponseEntity aaa(@RequestParam("userId") Long userId ,@RequestParam("name")String name)
2) 可以用Map集合接收用 Map接收需要加上@RequestParam(required = false)
public ResponseEntity aaa(@RequestParam(required = false) Map map)
3) 可以用实体类接收 但实体类的参数类型和参数名要和传递的参数一致 SpringBoot会帮我们自动填充到实体中@ModelAttribute可以不写
public ResponseEntity aaa(User user)
public ResponseEntity aaa(@ModelAttribute User user)
4) @RequestParam注解还可以设置默认值 @RequestParam(defaultValue = "2000")
二 请求参数为Body
前端传递过来的为json,我们可以用Map 接收
spring默认会把数据写到Map中 我们在从map中获取即可
public ResponseEntity aaa(@RequsetBody Map map)
三 请求参数在路径中
@GetMapping("/{id}/love")
public ResponseEntity tanhuaLove(@PathVariable("id") Long likeUserId)
我们就如上接收即可 用@PathVariable("id") 如果参数和路径的相同 则可以省略注解的参数