数据库(三)
一、事务
1、例子引入
例子:
现在有这么个情况:

有两个人需要转账,一方转给另一方,按照之前的操作是,甲的账户扣500,乙的账户再加500。问题是如果甲发起了转账操作,钱扣了,这个时候数据库宕机了,再启动数据库,就会发现甲的钱扣了,但是这钱并没有到乙这边来。
所以一个解决方案就是,这两个sql语句为一组,同时执行,要么大家都成功,要么大家都失败。这种执行方式j就是通过事务来管理。
2、事务的概念:

3、事务执行的指令

4、事务实现
素材:

通过事务实现转账功能:
#查询状态
SELECT @@autocommit
#设置为手动提交
SET autocommit=0;
#开启事务
START TRANSACTION;
#实现转账
UPDATE account SET amoney=500 WHERE aname ="华子";
#出错了;fffff
UPDATE account SET amoney=2500 WHERE aname ="刘健";
#回滚
ROLLBACK;
#提交事务
COMMIT;
注意:数据库默认自动提交,我们需要自己设置手动提交;想要使用事务,需要先开启事务;接着就是写 sql 语句;然后有个回滚功能,在提交事务之前,无论执行了多少操作,都可以通过回滚功能返回到未执行操作之前的状态;当操作确定无误后,使用提交事务功能,确认最终状态。切记,提交事务之后就不能再回滚。
5、事务执行的原理

6、事务的特点(ACID)

二、视图
1、视图的概念

2、视图的作用

说人话就是:
1、查询出来的表,是一个虚拟表,即便这个虚拟表被更改了,也不会动到数据库里面的那份原表,是对数据库里面的表的一种保护。
2、有些数据经常会被查看,比如首页的数据,或者搜索出来的第一页的数据,如果经常加载这些数据,会加大数据库的负担,可以通过视图加载这些数据形成一个虚拟表,这样每次查看只会看到这张虚拟表,而不用每次都搜索数据库的数据,减少了数据库的负担。
3、创建视图的语法
1.语法:
	create view 视图的名称 as 查询语句

2.例子:
	CREATE VIEW v_s AS SELECT ename,eage FROM emp
4、查询视图
1.语法:
	select * from 视图名称

2.例子:
	SELECT * FROM v_s
5、修改视图
1.语法:
	alter view 视图名称 as 查询语句

2.例子:
	ALTER VIEW v_s AS SELECT ename FROM emp
6、删除视图
1.语法:
	drop view 视图的名称

2.例子
	DROP VIEW v_s
三、DCL(对用户以及权限的操作)
1、查询用户
查询数据库的用户,需要先切入到某数据库中,然后再输入查询语句:


2、创建用户
1.语法:
	create user '用户名'@'主机名' IDENTIFIED by '密码'

2.例子:创建一个huazi用户
	CREATE USER 'huazi'@'localhost' IDENTIFIED BY '123'
3、删除用户
1.语法:
	 drop user '用户名'@'主机名'

2.例子:
	 DROP USER 'huazi'@'localhost'
4、修改用户密码
1.语法:
	UPDATE USER SET PASSWORD =PASSWORD('新密码') WHERE USER="用户名"

2.例子:
	UPDATE USER SET PASSWORD =PASSWORD('abc') WHERE USER="liujian"

3.说明:
	msyql中的密码使用的是 md5 加密。
5、查询权限
1.语法:
	show grants for '用户名'@'主机名'

2.例子:
	SHOW GRANTS FOR 'root'@'%'
6、设置权限
1.语法:
	GRANT 权限的类型 on 库名.表名 to ‘用户名’@ '主机名'

2.例子:
	GRANT SELECT DELETE UPDATE INSERT ON *.* TO 'hua'@'localhost'
		# 权限的类型可以通过 ALL 代表全部权限
7、撤销权限
1.语法:
	revoke 权限的类型 on 库名.表名 from ‘用户名’@ '主机名'
2.说明:
	需要重启服务之后才能生效
四、JDBC
1、JDBC的引入
之前都是通过客户端连接数据库:

在实际的开发中,更多的是通过代码来操作数据库
2、jdbc概念以及导入和基础搭建
a、jdbc是什么?

b、jdbc连接的原理

c、驱动包
如果要使用 jdbc ,首先要准备跟数据库版本相匹配的驱动包。
d、基础搭建

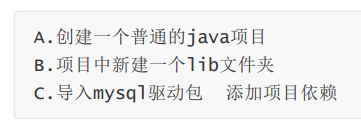
创建 lib 文件夹:

粘贴驱动包进来:

然后右键,添加项目依赖:

就完成了基础的搭建
3、jdbc操作数据库
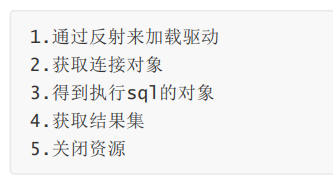
a、操作步骤

b、开始代码输入


接着就是通过字符串保存 sql 语句,然后执行这个 sql 语句(这里的是增 / 删 / 改):

会返回一个 int 值,如果修改成功则是返回 1,否则返回 0。
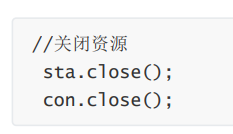
最后自然是关闭资源:

那么完整代码:
public static void main(String[] args) {
        try {
            // 通过反射加载驱动类
            Class.forName("com.mysql.jdbc.Driver");

            // 获取链接对象:url地址,数据库用户名和密码
            Connection con = DriverManager.getConnection("jdbc:mysql://localhost:3306/test?characterEncoding=utf-8", "root", "root");

            // 得到 sql 执行的对象
            Statement sta = con.createStatement();

            // 存放 sql 语句
            String sql = "insert into account values(6,'测试',2222) ";

            // 执行 sql 语句,并获得结果集
            int num = sta.executeUpdate(sql);

            System.out.println(num);    //  输出这个结果集内容

            // 关闭资源
            sta.close();
            con.close();
        } catch (ClassNotFoundException e) {
            e.printStackTrace();
        } catch (SQLException e) {
            e.printStackTrace();
        }
    }
4、jdbc 的 API 介绍

5、方法的介绍

6、ResultSet 结果集

注意:上面方法中 ,getString 并不是唯一,还有其他很多方法,比如,getDouble 方法等等,这个方法主要是取数据库中的列名(字段名)。
next()方法的使用类似于迭代器的next()
使用方式:

上图中,一般都不这么取,一般是根据列名来取:

7、小案例——登录功能的实现
public static void main(String[] args) throws SQLException {
        Scanner sc = new Scanner(System.in);
        System.out.println("请输入用户名");
        String username = sc.next();
        System.out.println("请输入密码");
        int pwd = sc.nextInt();
        System.out.println(checkLogin(username, pwd));
    }

    public static boolean checkLogin(String username,int pwd) throws SQLException {
        Connection con = null;
        Statement sta = null;
        ResultSet rs = null;
        try {
            Class.forName("com.mysql.jdbc.Driver");
//        获取链接对象:url地址,数据库用户名和密码
            con = DriverManager.getConnection("jdbc:mysql://localhost:3306/test?characterEncoding=utf-8", "root", "root");
            sta = con.createStatement();

            // 这里的字符串拼接要注意,数据库中的对应字段都有单引号 ' ,所以这块拼接会复杂一点。
            String sql = "select * from admin where username='"+username+"'"+"and pwd='"+pwd+"'";
            System.out.println(sql);
            rs = sta.executeQuery(sql);     //  向数据库发送查询指令,并接收返回的结果

            if (rs.next()){     //  迭代。如果查找到了数据,则能执行 next 语句,意味着用户名跟密码都输入正确
                return true;
            }
            return false;       //  没找到数据,返回失败

        } catch (ClassNotFoundException e) {
            e.printStackTrace();
        } catch (SQLException e) {
            e.printStackTrace();
        }
        finally {       //  关闭资源
            if (rs!=null){
                rs.close();
            }
            if (sta!=null){
                sta.close();
            }
            if (con!=null){
                con.close();
            }
        }
        return false;
    }
8、PreparedStatement
a、登录功能中的 sql 代码缺陷——sql语句注入问题
在上面得登录功能代码中,sql 语句有问题,可以看到这个执行语句最终会判断是否返回 true。如果外部某人通过某手段,向这个sql语句中再加入一些语句,比如 or 1=1,因为 or 语句有一个为真则为真,且 1=1,这个语句恒为真,这时候就会出现重大问题:

b、防止 sql 注入

c、PreparedStatement 特点和方法

PreparedStatement 不会直接扔进数据库,而是先检查语句是否正确,没问题才放到数据库,这种方式效率更高。

d、PreparedStatement 的使用
原先代码中接收用户输入的方式是这样:

通过 PreparedStatement 对象的使用,则不用这种方法;而是需要填数据的地方先通过占位符代替这个位置,然后判断是否合理合法,如果合理合法,则继续执行,再通过 setXXX方法去填充这个值,然后自后再提交语句。
e、通过 PreparedStatement 优化登录功能
所以通过这种方式修改的登录代码为:
public static void main(String[] args) throws SQLException {
        Scanner sc = new Scanner(System.in);
        System.out.println("请输入用户名");
        String username = sc.next();
        System.out.println("请输入密码");
        int pwd = sc.nextInt();
        System.out.println(checkLogin(username, pwd));
    }

    public static boolean checkLogin(String username,int pwd) throws SQLException {
        Connection con = null;
        Statement sta = null;
        ResultSet rs = null;
        try {
            Class.forName("com.mysql.jdbc.Driver");
//        获取链接对象:url地址,数据库用户名和密码
            con = DriverManager.getConnection("jdbc:mysql://localhost:3306/test?characterEncoding=utf-8", "root", "root");
//            sta = con.createStatement();

            // 这里的字符串拼接要注意,数据库中的对应字段都有单引号 ' ,所以这块拼接会复杂一点。
//            String sql = "select * from admin where username='"+username+"'"+"and pwd='"+pwd+"'";
//            rs = sta.executeQuery(sql);     //  向数据库发送查询指令,并接收返回的结果

            String sql = "select * from admin where username=? and pwd=? ";     //  占位符:?
            PreparedStatement ps = con.prepareStatement(sql);   //  判断该sql语句是否有问题,然后返回相应的对象

            ps.setString(1,username);   //  把数据放到第一个占位符
            ps.setInt(2,pwd);   //  把数据放到第二个占位符

            System.out.println(sql);      // 看看 sql 语句

            rs = ps.executeQuery();     //  向数据库发送查询指令,并接收返回的结果

            if (rs.next()){     //  迭代。如果查找到了数据,则能执行 next 语句,意味着用户名跟密码都输入正确
                return true;
            }
            return false;       //  没找到数据,返回失败

        } catch (ClassNotFoundException e) {
            e.printStackTrace();
        } catch (SQLException e) {
            e.printStackTrace();
        }
        finally {       //  关闭资源
            if (rs!=null){
                rs.close();
            }
            if (sta!=null){
                sta.close();
            }
            if (con!=null){
                con.close();
            }
        }
        return false;
    }
9、工具类的封装(练习)
可以发现,上面的代码太多重复了,每次需要用的时候都一大串代码。可以把他们封装起来,只需要输入 sql 语句,再输入相应的数据,即可完成想要的功能。
工具类:
public class BaseDao {
    // 把常用的不变的设置为 静态常量
    public static final String url = "jdbc:mysql:///test";      //  链接本机
    public static final String driver = "com.mysql.jdbc.Driver";    //  驱动路径
    public static final String username = "root";       //  数据库用户名
    public static final String password = "root";       //  数据库密码


    public static Connection getCon(){		//	链接数据库
        Connection con = null;
        try {
            Class.forName(driver);  //  加载驱动

            con = DriverManager.getConnection(url,username,password);   //链接数据库

            return con;     //  返回链接的对象
        } catch (ClassNotFoundException e) {
            e.printStackTrace();
        } catch (SQLException e) {
            e.printStackTrace();
        }
        return null;
    }

    public static int update(String sql,Object obj[]){      //  增删改功能。executeUpdate方法会返回 int 类型数值,这里返回这个数值判断是否成功
        int num = 0;
        Connection con = null;
        PreparedStatement ps = null;
        try {
            con = getCon();     //  取得链接对象
            ps = con.prepareStatement(sql);     //  用 prepareStatement 校验 sql 语句
            if (obj != null && obj.length>0){   //  数组非空验证
                for (int i = 0; i < obj.length; i++) {
                    ps.setObject(i+1,obj[i]);   //  将对应的数据一一跟占位符对应。因为下标从 1 开始,所以这里要 +1。
                }
            }
            num = ps.executeUpdate();   //  执行 sql 语句,并获得结果集
        } catch (SQLException e) {
            e.printStackTrace();
        }finally {
            closeAll(con,ps,null);
        }
        return num;     //  返回结果集
    }

    public static ResultSet getResultSet(String sql,Object obj[]){      //  查询功能。返回 ResultSet 结果集
        Connection con = null;
        PreparedStatement ps = null;
        ResultSet rs = null;
        try {
            con = getCon();             //  取得链接对象
            ps = con.prepareStatement(sql);      //  用 prepareStatement 校验 sql 语句
            if (obj != null && obj.length>0){
                for (int i = 0; i < obj.length; i++) {
                    ps.setObject(i+1,obj[i]);
                }
            }
            rs = ps.executeQuery();
        } catch (SQLException e) {
            e.printStackTrace();
        }
        return rs;
    }

    public static void closeAll(Connection con,PreparedStatement ps,ResultSet rs){  //  关闭资源
        try {
            if (con != null){
                con.close();
            }
            if (ps != null){
                con.close();
            }
            if (con != null){
                rs.close();
            }
        } catch (SQLException e) {
            e.printStackTrace();
        }
    }
}
测试类:
public static void main(String[] args) throws SQLException {
        //  增加数据
//        String sql = "insert into admin(username,pwd)values(?,?)";
//        Object obj[] ={"admin",1234};
//        int num = BaseDao.update(sql,obj);
//        System.out.println(num);

        //  查询数据
        String sql = "select * from admin where username=?";
        Object obj[] ={"admin"};
        ResultSet rs = BaseDao.getResultSet(sql,obj);
        while (rs.next()){
            System.out.println(rs.getString("username"));
        }
    }