1 引言
鲲鹏云大数据技术课程中有一次实验叫《鲲鹏Bigdata pro 之日志分析综合实验》,给出了详细的操作步骤文档,基本上覆盖了主要的操作流程。但是,如果完全按照其操作流程,基于同学们的现有基础,有极大的可能,同学们还是做不出来。因为该实验要成功完成,还涉及到了许多教程中没提及的操作细节。除非同学的悟性、编程能力水平很高,否则困难重重。
之所以现在我才告诉大家完整的注意细节,是因为:1)想让同学们自己探索,遇到问题锻炼自己解决问题的能力;2)最近,自己也确实非常忙。那些等着老师做实验操作视频的同学,是不可取的。还是要自己积极主动地去经历许多实验方面的挫折,自己才成长的快。如果等着老师发布完美的实验视频,那么就失去了自己主动克服困难的机会,无法让自己成长的更快。
废话少说,言归正传。
2 该实验注意事项
我只谈论按照给出的实验教程做实验,可能遇到的问题,以及教程中没有涉及到的点。实验的前提为:在华为云上已经部署好了Hadoop大数据集群。
2.1 自己安装maven后,如果在IDEA中没设置成自己安装的maven,会造成错误
该错误的表现如图:

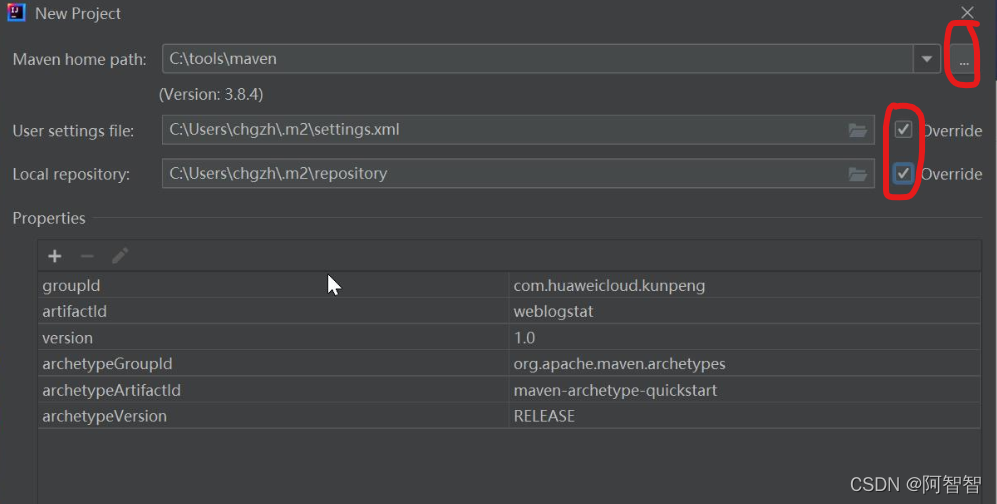
解决方案:在IntelliJ IDEA中新建maven项目一定要设置成你预先安装的maven版本,千万不要默认使用IntelliJ IDEA自带的maven版本。具体做法是,在IntelliJ IDEA中创建maven项目设置你预先安装的maven:

上图,单击“…”设置成你预先安装的maven home路径;同时勾选两个复选框。
2.2 maven的文件夹结构
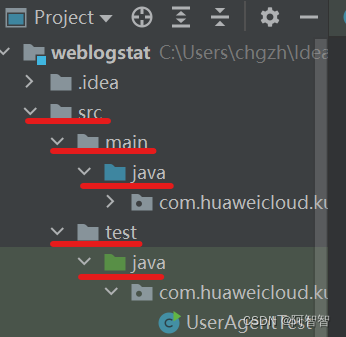
在IntelliJ IDEA中创建了maven项目,有个勾选“Create from archetype”,这个archetype实际上就是一个模板,提供了快速创建项目的机制,里面有一些文件夹结构的规定。这些在实验教程里没有写明。我们创建的项目的目录结构为:

创建上述目录结构,很简单,只需要我们在项目上右击,添加directory即可,里面有相应的模板。我们要在该目录结构上创建相应的Java Package,以及写相应的Java代码。
2.3 从pdf格式的实验教程中拷贝web.log内容时,不做修改,直接在Hadoop集群中作为输入使用,会出现错误
该错误表现如下:

从以上错误中,我们很容易看出:Java的正则表达式匹配结果为空,造成后面的MapReduce任务无法执行。知道原因后,很容易给出解决方案,即将web.log中多余的换行删除即可。为方便大家做实验,下面提供完整的、正确的web.log内容:
183.162.52.7 - - [10/Nov/2016:00:01:02 +0800] "POST /api3/getadv HTTP/1.1" 200 813 "www.huaweicloud.com" "-" cid=0×tamp=1478707261865&uid=2871142&marking=androidbanner&secrect=a6e8e14701ffe9f6063934780d9e2e6d&token=f51e97d1cb1a9caac669ea8acc162b96 "huaweicloud/5.0.0 (Android 5.1.1; Xiaomi Redmi 3 Build/LMY47V),Network 2G/3G" "-" 10.100.134.244:80 200 0.027 0.027
10.100.0.1 - - [10/Nov/2016:00:01:02 +0800] "HEAD / HTTP/1.1" 301 0 "117.121.101.40" "-" - "curl/7.19.7 (x86_64-redhat-linux-gnu) libcurl/7.19.7 NSS/3.16.2.3 Basic ECC zlib/1.2.3 libidn/1.18 libssh2/1.4.2" "-" - - - 0.000
117.35.88.11 - - [10/Nov/2016:00:01:02 +0800] "GET /article/ajaxcourserecommends?id=124 HTTP/1.1" 200 2345 "www.huaweicloud.com" "http://www.huaweicloud.com/code/1852" - "Mozilla/5.0 (Windows NT 6.1; WOW64) AppleWebKit/537.36 (KHTML, like Gecko) Chrome/54.0.2840.71 Safari/537.36" "-" 10.100.136.65:80 200 0.616 0.616
182.106.215.93 - - [10/Nov/2016:00:01:02 +0800] "POST /socket.io/1/ HTTP/1.1" 200 94 "chat.huaweicloud.com" "-" - "android-websockets-2.0" "-" 10.100.15.239:80 200 0.004 0.004
10.100.0.1 - - [10/Nov/2016:00:01:02 +0800] "HEAD / HTTP/1.1" 301 0 "117.121.101.40" "-" - "curl/7.19.7 (x86_64-redhat-linux-gnu) libcurl/7.19.7 NSS/3.16.2.3 Basic ECC zlib/1.2.3 libidn/1.18 libssh2/1.4.2" "-" - - - 0.000
183.162.52.7 - - [10/Nov/2016:00:01:02 +0800] "POST /api3/userdynamic HTTP/1.1" 200 19501 "www.huaweicloud.com" "-" cid=0×tamp=1478707261847&uid=2871142&touid=2871142&page=1&secrect=a6e8e14701ffe9f6063934780d9e2e6d&token=3837a5bf27ea718fe18bda6c53fbbc14 "huaweicloud/5.0.0 (Android 5.1.1; Xiaomi Redmi 3 Build/LMY47V),Network 2G/3G" "-" 10.100.136.65:80 200 0.195 0.195
10.100.0.1 - - [10/Nov/2016:00:01:02 +0800] "HEAD / HTTP/1.1" 301 0 "117.121.101.40" "-" - "curl/7.19.7 (x86_64-redhat-linux-gnu) libcurl/7.19.7 NSS/3.16.2.3 Basic ECC zlib/1.2.3 libidn/1.18 libssh2/1.4.2" "-" - - - 0.000
114.248.161.26 - - [10/Nov/2016:00:01:02 +0800] "POST /api3/getcourseintro HTTP/1.1" 200 2510 "www.huaweicloud.com" "-" cid=283&secrect=86b720f312c2b25da3b20e59e7c89780×tamp=1478707261951&token=4c144b3f4314178b9527d1e91ecc0fac&uid=3372975 "huaweicloud/5.0.2 (iPhone; iOS 8.4.1; Scale/2.00)" "-" 10.100.136.65:80 200 0.007 0.008
120.52.94.105 - - [10/Nov/2016:00:01:02 +0800] "POST /api3/getmediainfo_ver2 HTTP/1.1" 200 633 "www.huaweicloud.com" "-" cid=608&secrect=e25994750eb2bbc7ade1a36708b999a5×tamp=1478707261945&token=9bbdba949aec02735e59e0868b538e19&uid=4203162 "huaweicloud/5.0.2 (iPhone; iOS 10.0.1; Scale/3.00)" "-" 10.100.136.65:80 200 0.049 0.049
注意:上面共9行。
为了方便大家做实验,避免从pdf文档中拷贝之苦,我将Java代码也给出,其中UserAgentTest.java代码如下:
package com.huaweicloud.kunpeng.project;

import com.kumkee.userAgent.UserAgent;

import com.kumkee.userAgent.UserAgentParser;
/**
 * @Auther: shaonaiyi@163.com
 * @Date: 2020/4/23 10:56
 * @Description: 测试UserAgent 代码类
 */
public class UserAgentTest {
    public static void main(String[] args) {
        String agentSource = "Mozilla/5.0 (Windows NT 6.1; WOW64) AppleWebKit/537.36 (KHTML, like Gecko) Chrome/58.0.3029.81 Safari/537.36";
        UserAgentParser userAgentParser = new UserAgentParser();
        UserAgent agent = userAgentParser.parse(agentSource);
        String browser = agent.getBrowser();
        String engine = agent.getEngine();
        String engineVersion = agent.getEngineVersion();
        String os = agent.getOs();
        String platform = agent.getPlatform();
        boolean isMobile = agent.isMobile();
        String version = agent.getVersion();
        System.out.println("浏览器:" + browser);
        System.out.println("引擎:" + engine);
        System.out.println("引擎版本:" + engineVersion);
        System.out.println("操作系统:" + os);
        System.out.println("平台:" + platform);
        System.out.println("是否为移动设备:" + isMobile);
        System.out.println("版本号:" + version);
    }
}
类ParseUserAgentApp.java的代码如下:
package com.huaweicloud.kunpeng.project;

import com.kumkee.userAgent.UserAgent;
import com.kumkee.userAgent.UserAgentParser;
import org.apache.hadoop.conf.Configuration;
import org.apache.hadoop.fs.FileSystem;
import org.apache.hadoop.fs.Path;
import org.apache.hadoop.io.LongWritable;
import org.apache.hadoop.io.Text;
import org.apache.hadoop.mapreduce.Job;
import org.apache.hadoop.mapreduce.Mapper;
import org.apache.hadoop.mapreduce.Reducer;
import org.apache.hadoop.mapreduce.lib.input.FileInputFormat;
import org.apache.hadoop.mapreduce.lib.output.FileOutputFormat;
import java.io.IOException;
import java.util.regex.Matcher;
import java.util.regex.Pattern;

/**
 * @Auther: shaonaiyi@163.com
 * @Date: 2020/04/23 下午3:54
 * @Description: 使用MapReduce 完成浏览器的访问次数统计
 */

public class ParseUserAgentApp {
    //Map 类实现
    public static class MyMapper extends Mapper<LongWritable, Text, Text, LongWritable> {
        LongWritable one = new LongWritable(1);
        private UserAgentParser userAgentParser;
        @Override
        protected void setup(Context context) throws IOException, InterruptedException {
            userAgentParser = new UserAgentParser();
        }
        @Override
        protected void map(LongWritable key, Text value, Context context) throws IOException, InterruptedException {
            //每条日志信息
            String lines = value.toString();
            String agentSource = lines.substring(getCharacterPosition(lines, "\"", 7) + 1);
            UserAgent agent = userAgentParser.parse(agentSource);
            String brower = agent.getBrowser();

            context.write(new Text(brower), one);
        }
        @Override
        protected void cleanup(Context context) throws IOException, InterruptedException {
            userAgentParser = null;
        }
    }
    //Reduce 类实现
    public static class MyReducer extends Reducer<Text, LongWritable, Text, LongWritable> {
        @Override
        protected void reduce(Text key, Iterable<LongWritable> values, Context context) throws IOException, InterruptedException {
            int sum = 0;
            for (LongWritable value: values){
                sum += value.get();
            }
            context.write(key, new LongWritable(sum));
        }
    }

    /**
     * 获取指定字符串中指定标识的字符串出现的索引位置
     * @param value 指定的字符串
     * @param operator 指定标识
     * @param index 索引位置
     * @return 返回的索引位置
     */
    private static int getCharacterPosition(String value, String  operator, int index){
        Matcher slashMatcher = Pattern.compile(operator).matcher(value);
        int matcherIndex = 0;
        while (slashMatcher.find()) {
            matcherIndex++;

            if (matcherIndex == index) {
                break;
            }
        }
        return slashMatcher.start();
    }

    public static void main(String[] args) throws Exception{
        Configuration configuration = new Configuration();
        // 若输出路径有内容,则先删除
        Path outputPath = new Path(args[1]);
        FileSystem fileSystem = FileSystem.get(configuration);
        if(fileSystem.exists(outputPath)){
            fileSystem.delete(outputPath, true);
            System.out.println("路径存在,但已被删除");
        }
        Job job = Job.getInstance(configuration, "ParseUserAgentApp");
        job.setJarByClass(ParseUserAgentApp.class);

        job.setMapperClass(MyMapper.class);
        job.setMapOutputKeyClass(Text.class);
        job.setMapOutputValueClass(LongWritable.class);

        job.setReducerClass(MyReducer.class);
        job.setOutputKeyClass(Text.class);
        job.setOutputValueClass(LongWritable.class);

        FileInputFormat.setInputPaths(job, new Path(args[0]));
        FileOutputFormat.setOutputPath(job, new Path(args[1]));

        System.exit(job.waitForCompletion(true) ? 0 : 1);
    }
}
2.4 在本地打包好的jar文件上传到结点1服务器
方法也很简单,如下图:

利用上图中的MobaXterm的上传按钮,可将本地打包好的jar文件上传到服务上。
3 结语
上面是本实验的注意事项,希望同学们有所收获。完整视频我会传给大家。