目录
在Systemverilog搭建的验证平台中,需要对各组件进行参数配置,但是配置各组件必须得在各组件实例化之后才能配置参数,例如test中必须得执行env = new();才能配置env.i_agt.drv.pen_num = 10;。再比如接口指针,需要就需要为每个组件设定设定set_interface();方法,非常繁琐。
而UVM提供的config_db机制可在组件实例化前就设定好配置信息,这样就可在tb的initial块中就进行设定了。真正将这些配置信息落实在各component,是在testbench运行过程build_phase中。
1. component的路径索引 uvm_component::get_full_name();
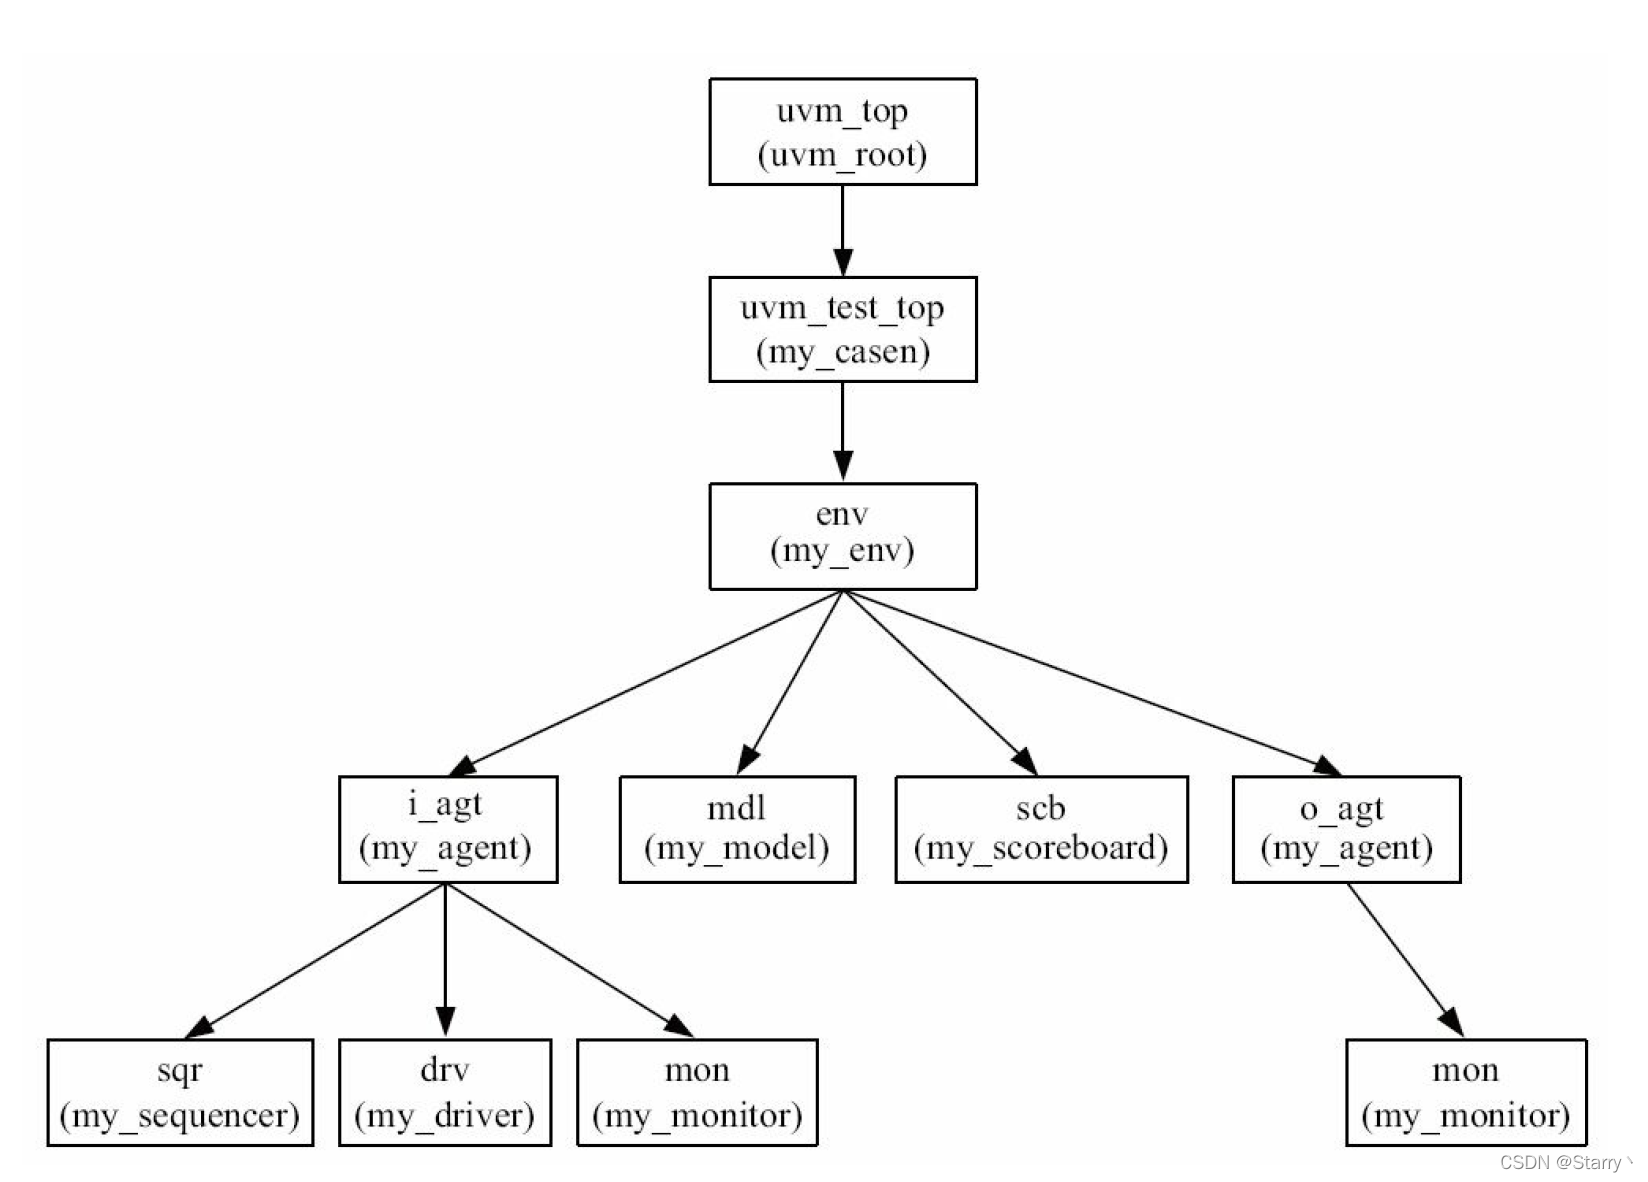
在UVM:类库中提到了UVM树和各component路径索引的概念,此处再强调一下,config_db机制需要写明路径。

component路径索引就是UVM树中从树根到对应component的路径,使用uvm_component类的get_full_name()方法
即
function void my_agent::build_phase(uvm_phase);
	super.build_phase(phase);
	drv = my_driver::type_id::create("drv",this);				//在i_agt的build_phase中这样例化drv
	...
endfunction

function void my_driver::build_phase(uvm_phase);
	super.build_phase(phase);
	uvm_report_info("my_driver",get_full_name(),UVM_LOW);		//消息打印路径索引
endfunction
//打印消息为:"uvm_test_top.env.i_agt.drv"
注意,打印的路径是从uvm_test_top实例开始的,这是因为开发者只需定义my_test,而UVM树根uvm_top实例是自动创建的无需开发者定义。
打印出来的路径中,取的是各component的name,而不是对象名称!
也就是说如果drv = my_driver::type_id::create("driver",this);,那么打印的路径就变成了"uvm_test_top.env.i_agt.driver",但绝不推荐这么做,强烈建议各component的name与对象名保持一致!!
1.1. 获取component索引信息的其他方法
get_full_name()可获取索引路径,还有其他一些方法可获取该component的其他信息。
//...\questasim\verilog_src\uvm-1.2\src\base\uvm_component.svh
function void uvm_component::get_children(ref uvm_component children[$]);
function int uvm_component::get_first_child(ref string name);
function int uvm_component::get_next_child(ref string name);
function uvm_component uvm_component::get_child(string name);
function int uvm_component::get_num_children();
function string uvm_component::get_full_name();
function uvm_component uvm_component::get_parent ();
function int unsigned uvm_component::get_depth();

//...\questasim\verilog_src\uvm-1.2\src\base\uvm_root.svh
extern static function uvm_root uvm_root::get();				//即返回指向实例uvm_top的uvm_root类句柄,注意是static类型
2. uvm_config_db 机制
接下来讲config_db机制,主要用于build_phase阶段各component的配置,例如各种参数、接口指针等等。
相比于Systemverilog(SV)下的testbench中各组件的属性配置,config_db机制有的巨大好处在于:各component实例化之前就可进行配置
例如
class my_env;
	my_agent i_agt;
	my_agent o_agt;
	my_model mdl;
	my_scoreboard scb;
	...
	function void build_phase();
		i_agt.generator.loop = 5;		//my_env向其子组件drv作配置,需要先执行drv = new();
		...
	endfunction
endclass
但UVM中的config机制就可以在run_test();之前就将配置“预定”。
2.1. uvm_config_db::set()与uvm_config_db::get()
用法很简单,先使用uvm_config_db::set()将配置信息写好,相应的component使用uvm_config_db::get()获取配置信息,整个过程类似“寄信”和“收信”
先上函数原型
//...\questasim64_2020.1\verilog_src\uvm-1.2\src\base\uvm_config_db.svh

class uvm_config_db#(type T=int) extends uvm_resource_db#(T);
	...
	  static function bit get(uvm_component cntxt,					//返回类型是bit,表示是否成功get
                          string inst_name,
                          string field_name,
                          inout T value);
     ...
     static function void set(uvm_component cntxt,
                           string inst_name,
                           string field_name,
                           T value);
     static function bit exists(uvm_component cntxt, string inst_name,
    string field_name, bit spell_chk=0);
    ...
endclass
● Type T:要配置的成员类型,默认为int
● uvm_component cntxt :set或get方法的发起者component
● string inst_name:从发起者component到要配置的目标component,在UVM树中的索引路径。
例如
uvm_config_db#(int)::set(uvm_root::get(),"uvm_test_top.env.i_agt.drv","pre_num",100);的set方法,发起者是uvm_top对象,目标是drv
● string field_name:域名称,一种标记,但一般为要配置的成员变量名。
set方法和get方法中的目标component相同、field_name相同时才能正确构成set和get一对。
● T value:set方法中,表示将要为field_name成员设定的值。在get方法中,表示要赋值的成员
见下例
function void my_test::build_phase(uvm_phase phase);
	super.build_phase(phase);
	env = my_env::type_id_create("env",this);
	uvm_config_db#(int)::set(this,"env.i_agt.drv","pre_num",100);
	//以下均是为目标drv的pre_num配置100
	//uvm_config_db#(int)::set(this.env,"i_agt_drv","pre_num",100);
	//uvm_config_db#(int)::set(this.env.i_agt.drv,"","pre_num",100);
	//uvm_config_db#(int)::set(uvm_root::get(),"uvm_test_top.env.i_agt.drv","pre_num",100);
	...
endfunction

function void my_driver::build_phase(uvm_phase phase);
	super.build_phase(phase);
	if(!uvm_config_db#(int)::get(this,"","pre_num",pre_num))
		uvm_report_info("CONFIG","PRE_NUM CONFIG FAILED!",UVM_LOW);
	//注意这一句与下面这句话的区别
	//uvm_config_db#(int)::get(uvm_root::get(),"uvm_test_top.env.i_agt.drv","pre_num",pre_num);
	//uvm_config_db#(int)::get(uvm_test_top,"env.i_agt.drv","pre_num",pre_num);
	...
endfunction
上面代码中,那几个set均是为drv.pre_num进行配置100,但发起者不同
对于那几个get而言,由于get是定义在
my_driver::build_phase(phase);中的,所以如果该UVM树中有好几个my_driver对象,那么每一个my_driver对象在执行build_phase时都会调用一次get代码。
所以在上述情况下,uvm_config_db#(int)::get(this,"","pre_num",pre_num);就表示创建的每一个my_driver对象都要为自己的pre_num成员get一个配置值。
而如果是后面那两句get则表示,只为my_driver类对象drv的pre_num成员get一个配置值。
使用
uvm_component::check_config_usage()检查是否有set的成员未被get
● bit spell_chk:是否检查当前的cntxt、inst_name和field_name是否被set过,1表示开启检查0不开启检查
2.2. 多重uvm_config_db::set:先看发起者,再看时间
意思是如果有多个地方对同一component的同一成员进行了set,那该成员的值最终是多少呢?
UVM设定的原则是先看发起者,发起者层次越高,优先级越高。再看时间,时间越晚,优先级越高
例如下面的例子,求问对象drv的pre_num成员最终被配置为多少?
function void my_driver::build_phase(uvm_phase phase);
	super.build_phase(phase);
	uvm_config_db#(int)::get(this,"","pre_num",pre_num);
	...
endfunction

function void my_test::build_phase(uvm_phase phase);
	super.build_phase(phase);
	uvm_config_db#(int)::set(uvm_root::get(),"uvm_test_top.env.i_agt.drv","pre_num",500);	//发起者为uvm_top
	uvm_config_db#(int)::set(this,"env.i_agt.drv","pre_num",100);							//发起者为uvm_test_top
	uvm_config_db#(int)::set(this.env,"i_agt.drv","pre_num",999);							//发起者为env
	...
endfunction

function void my_env::build_phase(uvm_phase phase);
	super.build_phase(phase);
	uvm_config_db#(int)::set(uvm_root::get(),"uvm_test_top.env.i_agt.drv","pre_num",200);
	...
endfunction
答案是200。
可以看出my_test::build_phase(uvm_phase phase);中有三个set都是给drv.pre_num配置的,但第一个set语句发起者是uvm_root::get()表示树根优先级最高,所以下面的uvm_test_top或env对drv进行配置都无效,尽管他们都是晚配置。
然后在my_env::build_phase(uvm_phase phase);中的set的发起者也是uvm_root::get(),此时层次相同。UVM遵循晚时间的原则,即哪个set执行最晚哪个set有效。根据phase机制,my_env的build_phase执行晚于uvm_test_top的build_phase,所以pre_num最终被配置为200。
2.3. 常见用法
最推荐的写法就是发起者直接定为this
uvm_config_db#(int)::set(this,"env.i_agt.drv","pre_num",100);
uvm_config_db#(int)::get(this,"","pre_num",pre_num);
一般来说,tb中的env都属于不动产,真正对env进行控制和激励产生都是来自uvm_test_top(权限最高),但它要对很多很多具有嵌套关系的组件进行配置,工作量很大,直接配置的化找索引路径可能都要找半天。
考虑上述情况,建议uvm_test_top在build_phase中进行配置。
结构 配置:config成员的获取、解析和配置
即每个组件中都有一个配置该组件的config对象,最低到agent,并且config对象层次与UVM树层次一致。
但依然需要test的build_phase做好全部的config 配置。
下面以一个env下包含多个agent为例
config对象定义如下:
class agent_config extends uvm_object;
    int drv_par1, drv_par2;
	bit is_active;
    `uvm_objenv_cfgt_utils(agent_config)
    function new(string name = "config_obj");
      super.new(name);
    endfunction
  endclass


  class env_config extends uvm_object;
    agent_config agent_cfg[];
	int agent_nums = 1;
    `uvm_objenv_cfgt_utils(env_config)
    function new(string name = "config_obj");
      super.new(name);
    endfunction

	function void create_sub_cfgs();
		agent_cfg = new[agent_nums];
		for(int i = 1;i<= agent_nums;i++) begin
			agent_cfg[i] = agent_config::type_id::create($sformatf("agent_cfg[%0d]",i));
		end
	endfunction

  endclass

  class test_config extends uvm_object;
    env_config env_cfg;
    `uvm_objenv_cfgt_utils(test_config)
    function new(string name = "config_obj");
      super.new(name);
    endfunction

	function void create_sub_cfgs();
		env_cfg = env_config ::type_id::create("env_cfg");
	endfunction

  endclass
而在除了test的各层级中,每层需get 本组件 config、解析config、set 子组件config
但在test的build_phase,要完成所有config实例的创建和配置
除了test层, 不可在各层创建并配置下层的config实例,这是为了遵循“test配置、env容器,尽量不在env内配置”的原则。
所以只能在test层配置,但又要在配置前创建config实例,那只能在test的build_phase实现全部的创建和配置了。各层只是获取、解析和配置。
class driver extends uvm_driver;
	int par1,par2;
	`uvm_component_utils(driver)
	function new(string name, uvm_component parent = null);
      super.new(name, parent);
      `uvm_info("CREATE", $sformatf("unit type [%s] created", name), UVM_LOW)
    endfunction
    function void build_phase(uvm_phase phase);
      super.build_phase(phase);

	  uvm_config_db#(agent_config)::get(this,"","par1",par1);
	  uvm_config_db#(agent_config)::get(this,"","par2",par2);

    endfunction
  endclass

  class agent extends uvm_agent;
    driver drv;
	monitor mon;
	agent_config agent_cfg;						//配置agent的config实例
    `uvm_component_utils(comp2)
    function new(string name = "comp2", uvm_component parent = null);
      super.new(name, parent);
    endfunction
    function void build_phase(uvm_phase phase);
      super.build_phase(phase);
		drv = driver::type_id::create("drv",this);
		mon = monitor::type_id::create("mon",this);
		sqr = sequencer::type_id::create("sqr",this);

	  uvm_config_db#(agent_config)::get(this,"","agent_cfg",agent_cfg);				//获取
	  uvm_config_db#(int)::set(this,"drv","par1",agent_cfg.drv_par1);				//配置
	  uvm_config_db#(int)::set(this,"drv","par2",agent_cfg.drv_par2);
	  is_active = agent_cfg.is_active;												//解析

    endfunction
  endclass
  class env extends uvm_env;
    agent agts[];
	scoreboard scb;
	sequencer sqr;
	env_config env_cfg;					//配置env的config实例
    `uvm_component_utils(env)
    function new(string name = "comp1", uvm_component parent = null);
      super.new(name, parent);
    endfunction

    function void build_phase(uvm_phase phase);
      super.build_phase(phase);
	  uvm_config_db#(env_config)::get(this,"","env_cfg",env_cfg);  				//获取
	  agts = new[env_cfg.agent_nums];											//解析
	  for(int i=1;i<=env_cfg.agent_nums;i++) begin
		agts[i] = agent::type_id:create($sformatf("agts[%0d]",i),this);
		uvm_config_db#(env_config)::set(this,$sformatf("agts[%0d]",i),"agent_cfg",env_cfg.agents_cfg[i]);		//配置
	  end
	  scb = scoreboard::type_id:create("scb",this);
	  sqr = sequencer::type_id:create("sqr",this);
	  uvm_config_db#(env_config)::set(this,"scb","env_cfg",env_cfg);
	  uvm_config_db#(env_config)::set(this,"sqr","env_cfg",env_cfg);
    endfunction

  endclass

  class test extends uvm_test;
    env e;
    test_config test_cfg;					//配置test的config实例
    `uvm_component_utils(uvm_config_test)
    function new(string name = "uvm_config_test", uvm_component parent = null);
      super.new(name, parent);
    endfunction
    function void build_phase(uvm_phase phase);
      super.build_phase(phase);

      e = env::type_id:create("e",this);

	  test_cfg = test_config::type_id:create("test_cfg");				//需要对所有的config进行初始化和配置
	  test_cfg.create_sub_cfgs();
	  test_cfg.env_cfg.agent_nums = 3;
	  test_cfg.env_cfg.create_sub_cfgs();


	  test_cfg.env_cfg.agent_cfg[1].is_active = UVM_ACTIVE;
	  test_cfg.env_cfg.agent_cfg[1].drv_par1 = 100;
	  test_cfg.env_cfg.agent_cfg[1].drv_par2 = 200;

	  test_cfg.env_cfg.agent_cfg[2].is_active = UVM_ACTIVE;
	  test_cfg.env_cfg.agent_cfg[2].drv_par1 = 100;
	  test_cfg.env_cfg.agent_cfg[2].drv_par2 = 200;

	  test_cfg.env_cfg.agent_cfg[3].is_active = UVM_PASSIVE;
	  test_cfg.env_cfg.agent_cfg[3].drv_par1 = 100;
	  test_cfg.env_cfg.agent_cfg[3].drv_par2 = 200;

	  uvm_config_db#(env_config)::set(this,"e","env_cfg",test_cfg.env_cfg);
    endfunction
  endclass
interface 配置:tb的initial块内set
对接口一定要使用config_db机制进行配置。但interface作为连接uvm_test_top与dut的媒介,从复用性考虑,interface一般并不在component的build_phase进行配置,而是在testbench的initial块内且run_test前进行set
例如
`timescale 1ns/1ps

`include "uvm_macros.svh"
import uvm_pkg::*;

class my_driver extends uvm_driver;
	virtual intf vif;													//接口指针
	int pre_num = 10;
	...
	function void build_phase(uvm_phase phase);
		super.build_phase(phase);
		uvm_config_db#(int)::get(this,"","pre_num",pre_num);
		uvm_config_db#(virtual intf)::get(this,"","vif",vif);
		...
	endfunction
endclass
class my_test extends uvm_test;
	...
	function void build_phase(uvm_phase phase);
		super.build_phase(phase);
		uvm_config_db#(int)::set(this,"env.i_agt.drv","pre_num",100);
		env = my_env::type_id::create("env",this);
		...
	endfunction
endclass

interface intf;												//接口定义
	...
endinterface


module tb;
	...
	intf i_intf();											//dut与i_agt通信的intf例化
	intf o_intf();											//dut与o_agt通信的intf例化
	...
	initial begin
		uvm_config_db#(virtual intf)::set(uvm_root::get(),"uvm_test_top.env.i_agt.drv","vif",i_intf);
		uvm_config_db#(virtual intf)::set(uvm_root::get(),"uvm_test_top.env.o_agt.mon","vif",o_intf);
		run_test("my_test");
	end
endmodule
3. 原理:“键键值”型关联数组
有一个全局的uvm_resource_pool类对象uvm_resources,可看作“键 - 键 - 值”型关联数组,通过双键来取值。
set方法本质上是在uvm_resources中创建一个键键值,第一个键是索引路径(由发起者cntxt.get_full_name()和inst_name组成)、第二个键是field_name,第三个值就是value
get方法本质上就是通过键键,从uvm_resources中获取值
exists就是已知键键,查看uvm_resources中是否有相应的值
这也就解释了为什么config_db机制能在component实例化之前就能进行配置。先将而配置信息存储至uvm_resources,等实例化之后需要时,在取出来。
同时该原理也表明,只要键键一致就一定能配置成功,例如下面代码uvm_config_db#(int)::set(uvm_test_top.env,"i_agt.drv.efgh","abcd",120);和uvm_config_db#(int)::get(drv,"efgh","abcd",pre_num);也能实现为drv.pre_num配置120
但建议写成真实UVM树索引路径和待配置成员,同时别忘了发起者cntxt决定了该set/get语句的权威