-
Cluster模式搭建
|IP |端口 |
|-------------|---------|
|192.168.10.68|7001,7002|
|192.168.10.69|7003,7004|
|192.168.10.70|7005,7006| -
安装redis-trib所需的 ruby脚本
root权限下操作
注意:centos7默认的ruby版本太低(2.0),要卸载重装(最低2.2)。另外集群中任意一台安装就行了
rpm -qa| grep ruby
yum install ruby
#添加源
gem sources -a https://gems.ruby-china.com/
#安装gem redis
gem install redis
#如果以上无法安装请去官网手动下载之后安装
https://rubygems.org/pages/download
#创建文件夹
mkdir -p /snt/data/redis/cluster/{redis_7001,redis_7002}
chown -R snt:snt /snt/data/redis/
snt用户操作
192.168.10.68
修改配置文件:
cd /snt/soft/redis/
mkdir cluster
cp redis-4.0.8/redis.conf cluster/redis_7001.conf
cp redis-4.0.8/redis.conf cluster/redis_7002.conf
sed -i 's/bind 127.0.0.1/bind 192.168.10.68/g' /snt/soft/redis/cluster/redis_7001.conf
sed -i 's/port 6379/port 7001/g' /snt/soft/redis/cluster/redis_7001.conf
sed -i 's/daemonize no/daemonize yes/g' /snt/soft/redis/cluster/redis_7001.conf
sed -i 's@pidfile /var/run/redis_6379.pid@pidfile /var/run/redis_7001.pid@g' /snt/soft/redis/cluster/redis_7001.conf
sed -i 's@logfile ""@logfile "/snt/soft/redis/cluster/redis_7001.log"@g' /snt/soft/redis/cluster/redis_7001.conf
sed -i 's@dir ./@dir "/snt/data/redis/cluster/redis_7001"@g' /snt/soft/redis/cluster/redis_7001.conf
sed -i 's/# masterauth <master-password>/masterauth 123456/g' /snt/soft/redis/cluster/redis_7001.conf
sed -i 's/# requirepass foobared/requirepass 123456/g' /snt/soft/redis/cluster/redis_7001.conf
sed -i 's/appendonly no/appendonly yes/g' /snt/soft/redis/cluster/redis_7001.conf
sed -i 's/# cluster-enabled yes/cluster-enabled yes/g' /snt/soft/redis/cluster/redis_7001.conf
sed -i 's/# cluster-config-file nodes-6379.conf/cluster-config-file nodes_7001.conf/g' /snt/soft/redis/cluster/redis_7001.conf
sed -i 's/# cluster-node-timeout 15000/cluster-node-timeout 15000/g' /snt/soft/redis/cluster/redis_7001.conf
配置文件修改参考
# vim /snt/soft/redis/cluster/redis_7001.conf

bind 192.168.10.68
port 7001
daemonize yes
pidfile /var/run/redis_7001.pid
logfile "/snt/soft/redis/luster/redis_7001.log"
dir "/snt/data/redis/cluster/redis_7001"
masterauth 123456
requirepass 123456
appendonly yes
cluster-enabled yes
cluster-config-file nodes_7001.conf
cluster-node-timeout 15000
# vim /snt/soft/redis/cluster/redis_7001.conf

bind 192.168.10.68
port 7002
daemonize yes
pidfile /var/run/redis_7002.pid
logfile "/snt/soft/redis/luster/redis_7002.log"
dir "/snt/data/redis/cluster/redis_7002"
masterauth 123456
requirepass 123456
appendonly yes
cluster-enabled yes
cluster-config-file nodes_7001.conf
cluster-node-timeout 15000
其它两台机器配置与192.168.10.68一致(除端口外,请查看IP与端口对应表),此处省略
- 启动redis
cd /snt/soft/redis/redis-install/bin
./redis-server /snt/soft/redis/cluster/redis_7001.conf
tail /snt/soft/redis/cluster/redis_7001.log

./redis-server /snt/soft/redis/cluster/redis_7002.conf
tail /snt/soft/redis/cluster/redis_7002.log
其它两台机器启动与192.168.30.128一致,此处省略
- 拷贝redis-trib.rb到集群文件夹
root权限
cp /snt/soft/redis/redis-4.0.8/src/redis-trib.rb /snt/soft/redis/cluster
- 创建集群
snt权限
cd /snt/soft/redis/cluster
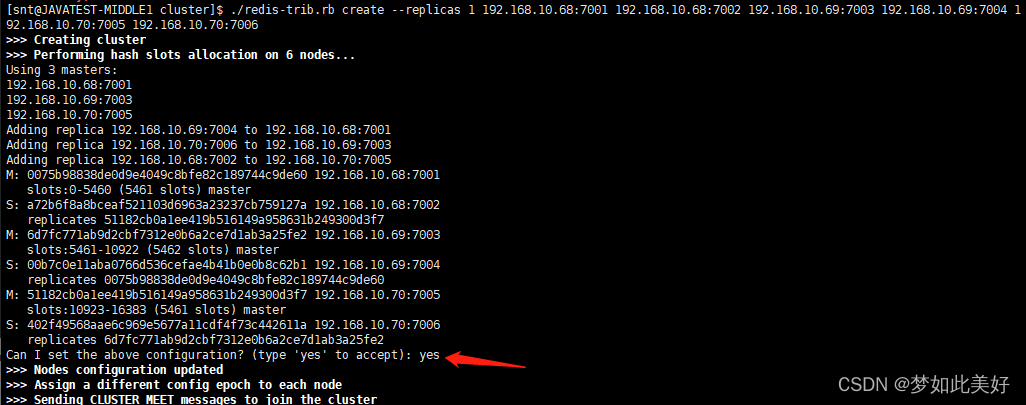
./redis-trib.rb create --replicas 1 192.168.30.128:7001 192.168.30.128:7002 192.168.30.129:7003 192.168.30.129:7004 192.168.30.130:7005 192.168.30.130:7006
如出现以下故障请kill redis 然后注释redis.conf的 requirepass 还有 bind ,另外protected-mode 改为no

输入yes

完成集群创建将出现以下内容

可以看到,自动生成nodes.conf文件:

集群操作
###登录集群:
cd /snt/soft/redis/redis-install/bin
 #-c,使用集群方式登录
./redis-cli -c -h 192.168.10.68 -p 7001 -a 123456
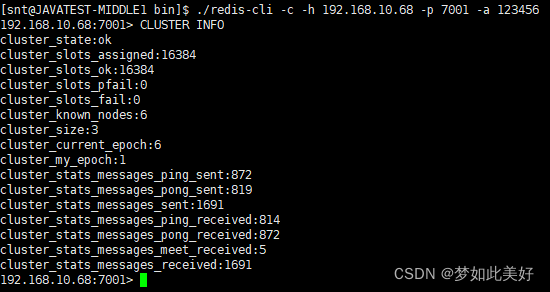
###查看集群信息:
CLUSTER INFO

###列出节点信息:
CLUSTER NODES

###写入数据:

参考文档:
https://blog.csdn.net/miss1181248983/article/details/90056960
gem and ruby:
https://blog.51cto.com/u_14089205/2475887
https://blog.csdn.net/qqxyy99/article/details/78962846