许久不复习数据结构了,对于知识点都有些遗忘了,想着来写一些树的遍历、查找,发现连创建一棵树都快忘记了。不过幸好,还是可以看懂别人的代码,还算是有一些基础的。最终也写出来了。因为觉得这样太过于麻烦了,所以,我就在思考一个问题:如何简化这个过程呢? 所以这篇博客就由此而生了,这里主要会讲述三个方面的知识点:
- 简化树的创建
- 树的几个常见算法
- 树的可视化
演示视频
树的可视化
一、简化树的创建
JSON 是一种轻量级的数据交换格式。它基于ECMAScript的一个子集,采用完全独立于编程语言的文本格式来存储和表示数据。
Tree 是将一组被称为结点 (Node) 的元素按照层次结构的方式组织而成。在这个层次结构最顶端的结点称为根,与根直接相连的结点称为根的子结点。
所以 Tree 就是一种数据的表达方式,那么我们就可以用json来表达它。换言之,JSON和Tree是可以互相转换的。通常我们编写的树相关的程序,那颗树只是短暂存活于内存之中,但是我们现在可以将它保存在硬盘之上,实现持久化保存。这样做的好处在于,练习树相关的算法,不必从头构造一颗树,可以利用现成的json来操作。
关于树和JSON的关系,抛开数据结构的角度来看,树只是我们创建的一个对象而已,所以它是可以转成JSON保存的,对于这一点其实是很容易理解。
这里我们先确定一个树的结构,这里使用 Go 语言定义了一颗 N 叉树。接下来是一些对它的操作,看不懂也没关系,它们不是本文的重点,看不懂这段 Go 代码可以往下看。
定义树的基本结构
注意:我这里的指定的键的名字,它在后面会一直用到的。
// 字典树的节点
type Node struct {
	V        string           `json:"name"`     // 节点存储的值
	Children map[string]*Node `json:"children"` // 节点的孩子
	IsEnd    bool             `json:"is_end"`   // 是否是结束
}

// 字典树
type Trie struct {
	Root *Node `json:"root"` // 字典树的根
}
注意:由于这里使用了 map 来存储,会导致节点本身失去了顺序(后面对树进行操作时,可以看到失去了顺序)。如果你希望保持顺序的话,可以换成切片数组。
实现几个基本操作
// 创建一个新的节点
func NewNode(v string) (node *Node) {
	node = &Node{
		V:        v,
		Children: make(map[string]*Node),
		IsEnd:    false, // 默认值都是false,实际上大部分也都是false
	}
	return
}

// 创建一个新的字典树
func NewTrie() (trie *Trie) {
	trie = &Trie{
		Root: NewNode("/"),
	}
	return
}

// 添加一个元素,对于字典树来说是添加一系列节点
func (trie *Trie) Append(e string) {
	node := trie.Root

	for _, v := range e {
		child, ok := node.Children[string(v)]
		if !ok {
			child = NewNode(string(v))
			node.Children[string(v)] = child
		}
		node = child
	}
	node.IsEnd = true
}
创建一棵树
func main() {
	t := NewTrie()
	t.Append("一尾守鹤")
	t.Append("二尾又旅")
	t.Append("三尾矶抚")
	t.Append("四尾孙悟空")
	t.Append("五尾穆王")
	t.Append("六尾犀犬")
	t.Append("七尾重明")
	t.Append("八尾牛鬼")
	t.Append("九尾九喇嘛")

	data, err := json.Marshal(t.Root)
	if err != nil {
		fmt.Println(err)
	}
	fmt.Println("将内存中的树序列化成JSON:")
	fmt.Println(string(data))
}
所以,我们得到了它!一颗字典树的序列化 JSON 字符串。上面的代码是我学习字典树时参考一个人的实现写的。这里它不是关键,所以只给了部分代码。我们的目标是得到下面这个 JSON,后续进行的一些列操作都会基于它。如果你看到了这里,应该会无比熟悉了吧?如果还有对 JSON 不熟悉的同学,那么可以去熟悉一下,很快就能入门了。
{
"name": "/",
"children": {
"一": {
"name": "一",
"children": {
"尾": {
"name": "尾",
"children": {
"守": {
"name": "守",
"children": {
"鹤": {
"name": "鹤",
"children": {},
"is_end": true
}
},
"is_end": false
}
},
"is_end": false
}
},
"is_end": false
},
"七": {
"name": "七",
"children": {
"尾": {
"name": "尾",
"children": {
"重": {
"name": "重",
"children": {
"明": {
"name": "明",
"children": {},
"is_end": true
}
},
"is_end": false
}
},
"is_end": false
}
},
"is_end": false
},
"三": {
"name": "三",
"children": {
"尾": {
"name": "尾",
"children": {
"矶": {
"name": "矶",
"children": {
"抚": {
"name": "抚",
"children": {},
"is_end": true
}
},
"is_end": false
}
},
"is_end": false
}
},
"is_end": false
},
"九": {
"name": "九",
"children": {
"尾": {
"name": "尾",
"children": {
"九": {
"name": "九",
"children": {
"喇": {
"name": "喇",
"children": {
"嘛": {
"name": "嘛",
"children": {},
"is_end": true
}
},
"is_end": false
}
},
"is_end": false
}
},
"is_end": false
}
},
"is_end": false
},
"二": {
"name": "二",
"children": {
"尾": {
"name": "尾",
"children": {
"又": {
"name": "又",
"children": {
"旅": {
"name": "旅",
"children": {},
"is_end": true
}
},
"is_end": false
}
},
"is_end": false
}
},
"is_end": false
},
"五": {
"name": "五",
"children": {
"尾": {
"name": "尾",
"children": {
"穆": {
"name": "穆",
"children": {
"王": {
"name": "王",
"children": {},
"is_end": true
}
},
"is_end": false
}
},
"is_end": false
}
},
"is_end": false
},
"八": {
"name": "八",
"children": {
"尾": {
"name": "尾",
"children": {
"牛": {
"name": "牛",
"children": {
"鬼": {
"name": "鬼",
"children": {},
"is_end": true
}
},
"is_end": false
}
},
"is_end": false
}
},
"is_end": false
},
"六": {
"name": "六",
"children": {
"尾": {
"name": "尾",
"children": {
"犀": {
"name": "犀",
"children": {
"犬": {
"name": "犬",
"children": {},
"is_end": true
}
},
"is_end": false
}
},
"is_end": false
}
},
"is_end": false
},
"四": {
"name": "四",
"children": {
"尾": {
"name": "尾",
"children": {
"孙": {
"name": "孙",
"children": {
"悟": {
"name": "悟",
"children": {
"空": {
"name": "空",
"children": {},
"is_end": true
}
},
"is_end": false
}
},
"is_end": false
}
},
"is_end": false
}
},
"is_end": false
}
},
"is_end": false
}
所以其实我的简化树的创建,就是创建一颗可以持久存储、跨语言的树!
二、树的几个常见算法
接下来,我们来看几个树的创建操作吧。因为我们的树已经存在了,并且 JSON 这种格式是通用的,所以我们这里使用 Python 来编写接下来的操作。选择 Python 的原因是它非常方便,动态类型的语言,使用起来很快捷。
加载树,并转换为对象
if __name__ == "__main__":
    filepath = os.path.join(os.path.dirname(
        r"C:/Users/Alfred/Desktop/CodeBase/Go/tree/"), "tree.json")
    with open(filepath, "r", encoding="UTF-8") as f:
        tree = json.load(f)
        print(tree)
层序遍历树
层序遍历也就是宽度优先搜索,它的实现是借助队列。
# 层序遍历  tips: 使用队列
def BFS(tree) -> None:
    if not tree:
        return
    queue = []
    queue.append(tree)

    while queue:
        e = queue.pop(0)
        name = e["name"]
        children = e["children"]
        print(name, end=" ")
        if children:
            for child in children.values():
                queue.append(child)

测量树的高度
想法:层序遍历一棵树,每遍历一层,计数器加1。
# 树的高度
def tree_height(tree) -> int:
    if not tree:
        return 0

    queue = []
    queue.append(tree)
    last = tree
    is_last = False
    count = 0  # 计数器

    while len(queue) != 0:
        e = queue.pop(0)  # 取第一个元素
        if e == last:
            is_last = True
            count += 1   # 层序遍历到最后一个元素时,树高加 1

        children = e["children"]
        if children:
            for child in children.values():
                queue.append(child)

            if is_last:
                last = queue[len(queue)-1]
                is_last = False
    return count

测量树的宽度
测量一个树的最大宽度,或者说它有多胖。
想法:分层遍历一棵树,每遍历一层,记录当前层的节点数量,返回最大的个数。
def tree_width(tree) -> int:
    if not tree:
        return 0

    queue = []
    queue.append(tree)
    last = tree
    is_last = False
    max_count = 0    # 计数器
    count = 0

    while len(queue) != 0:
        e = queue.pop(0)
        count += 1
        if e == last:
            is_last = True
            if max_count < count:
                max_count = count
            count = 0

        children: Dict = e["children"]
        if children:
            for child in children.values():
                queue.append(child)

            if is_last:
                last = queue[len(queue) - 1]  # 取队尾元素的值,不是取出最后一个元素
                is_last = False

    return max_count
这里树的宽度显然是9了,因为是九只尾兽。

先序遍历树(递归实现)
# 前序遍历 递归写法
def pre_order(tree) -> None:
    if not tree:
        return
    name = tree["name"]
    children = tree["children"]
    print(name, end=" ")
    for child in children.values():
        pre_order(child)

先序遍历树(迭代实现)
想法:迭代的方式,需要使用到栈。
# 前序遍历 非递归写法  tips: 使用栈
def traverse(tree) -> None:
    if not tree:
        return
    stack = []
    stack.append(tree)  # 添加第一个元素

    while stack:
        e = stack.pop()
        children = e["children"]
        print(e["name"], end=" ")
        for child in children.values():
            stack.append(child)

深度遍历树
想法:深度遍历需要使用到栈。
# 深度遍历
def DFS(tree) -> None:
    if not tree:
        return

    stack = []             # 创建一个栈
    stack.append(tree)     # 初始化栈,相当于将头节点加入

    while len(stack) != 0:
        e = stack.pop()  # 取栈中的元素
        name = e["name"]
        children = e["children"]
        for child in children.values():
            stack.append(child)   # 向栈中添加元素
        print(name, end=" ")

输出树的所有路径
想法:这个有点像是深度遍历,但是需要记录遍历过的节点。这里需要一个全局的队列,来记住路径。这里的写法是递归的,关于非递归的实现,老实说我没看明白(哈哈),所以我就不写了。
# 输出所有的路径  tips: 使用一个队列
# 判断一个路径结束的标志是当节点的孩子为空时,此时一个节点已经结束了。
# 对于字典树来说,还需要考虑到单词包含的问题,这里我添加了is_end这个字段,但是没有使用。
Queue = []


def all_fruits(tree) -> None:
    if not tree:
        return

    children = tree["children"]

    # 如果节点为空
    if not children:
        print(Queue)

    for child in children.values():
        Queue.append(child["name"])
        all_fruits(child)

    if len(Queue) != 0:
        Queue.pop()
    else:
        return

三、树的可视化
最后再来介绍一下树的可视化部分,因为这种单纯的文字讲解,其实是很抽象的。我个人的话,还是比较喜欢图文结合的方式来学习,我本身也是属于视觉学习型的。下面我就来介绍几种可视化树的方法吧,这样大家可以在学习的过程中,亲自看一看树的结构。
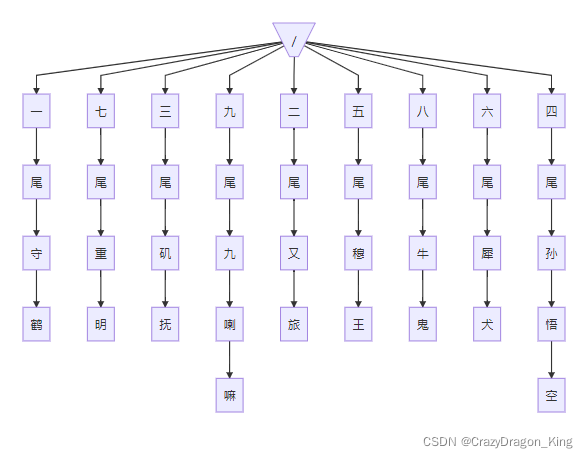
1.markdown 画图
这里的markdown软件,我使用的是 Typora,它本身支持了一个绘图语言,叫做 mermaid。关于这个绘图语言的具体内容,你可以自行去了解,这里不再赘述了。
python代码实现生成 mermaid 绘图语句
# 生成 mermaid 描述
# 层序遍历 tips: 使用队列
def BFS2Mermaid(tree) -> None:
    if not tree:
        return
    queue = []
    queue.append(tree)
    counter = 0 # 结点计数
    count = 0 # 子结点计数

    while Queue:
        e = queue.pop(0)
        name = e["name"]
        children = e["children"]

        if children:
            for child in children.values():
                count += 1
                queue.append(child)
                print("id_%d[%s] --> id_%d[%s]" % (counter, name, count, child["name"]))
        counter += 1
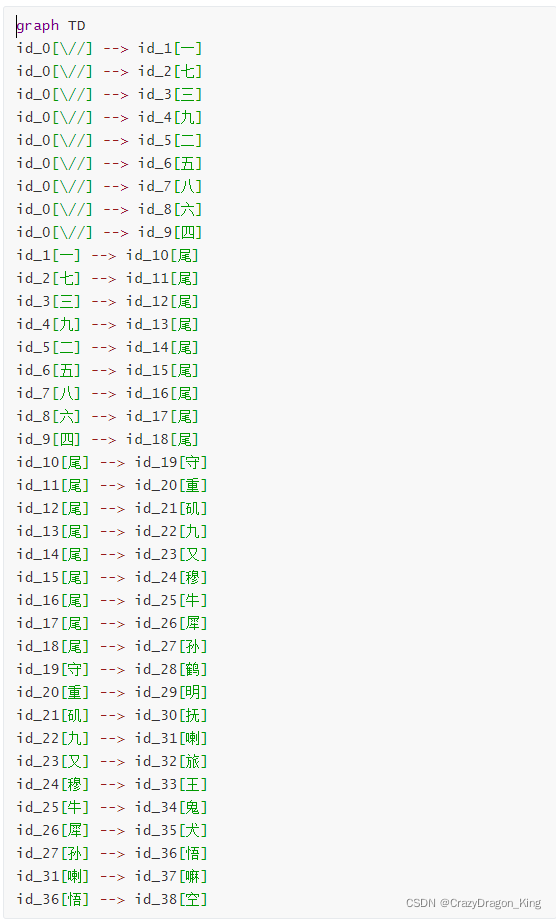
注意:这里我就不贴图了,这样大家可以直接复制这个图了,但是这里需要注意,这个斜杠需要进行转义,不然会报错。
id_0[/] --> id_1[一]
id_0[/] --> id_2[七]
id_0[/] --> id_3[三]
id_0[/] --> id_4[九]
id_0[/] --> id_5[二]
id_0[/] --> id_6[五]
id_0[/] --> id_7[八]
id_0[/] --> id_8[六]
id_0[/] --> id_9[四]
id_1[一] --> id_10[尾]
id_2[七] --> id_11[尾]
id_3[三] --> id_12[尾]
id_4[九] --> id_13[尾]
id_5[二] --> id_14[尾]
id_6[五] --> id_15[尾]
id_7[八] --> id_16[尾]
id_8[六] --> id_17[尾]
id_9[四] --> id_18[尾]
id_10[尾] --> id_19[守]
id_11[尾] --> id_20[重]
id_12[尾] --> id_21[矶]
id_13[尾] --> id_22[九]
id_14[尾] --> id_23[又]
id_15[尾] --> id_24[穆]
id_16[尾] --> id_25[牛]
id_17[尾] --> id_26[犀]
id_18[尾] --> id_27[孙]
id_19[守] --> id_28[鹤]
id_20[重] --> id_29[明]
id_21[矶] --> id_30[抚]
id_22[九] --> id_31[喇]
id_23[又] --> id_32[旅]
id_24[穆] --> id_33[王]
id_25[牛] --> id_34[鬼]
id_26[犀] --> id_35[犬]
id_27[孙] --> id_36[悟]
id_31[喇] --> id_37[嘛]
id_36[悟] --> id_38[空]
注意:需要在开头写上 graph,表示你需要绘制一个图,后面这个 TD,表示图的方向是 Top Down,即上下结构(默认即是上下结构的)。
所以,问题来了,为什么可以用绘制图的方法来绘制一个树呢?因为树是图的一个子集!


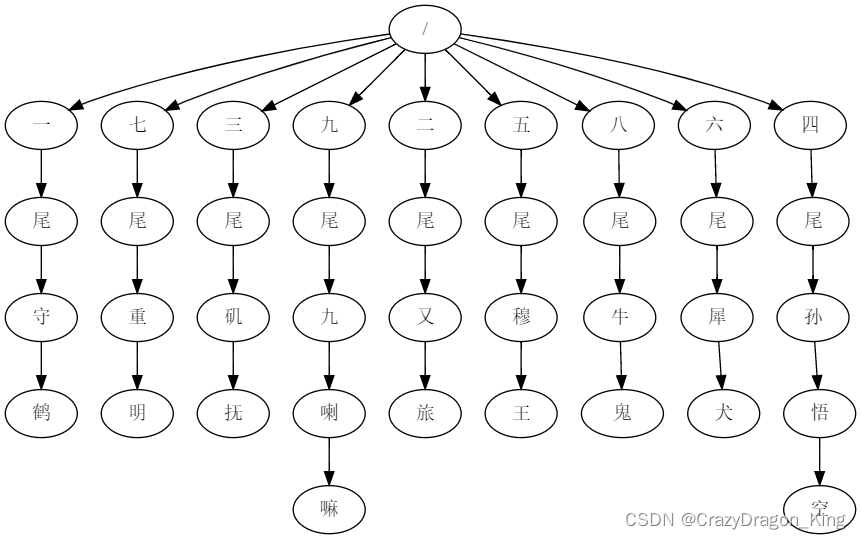
2.dot 绘图
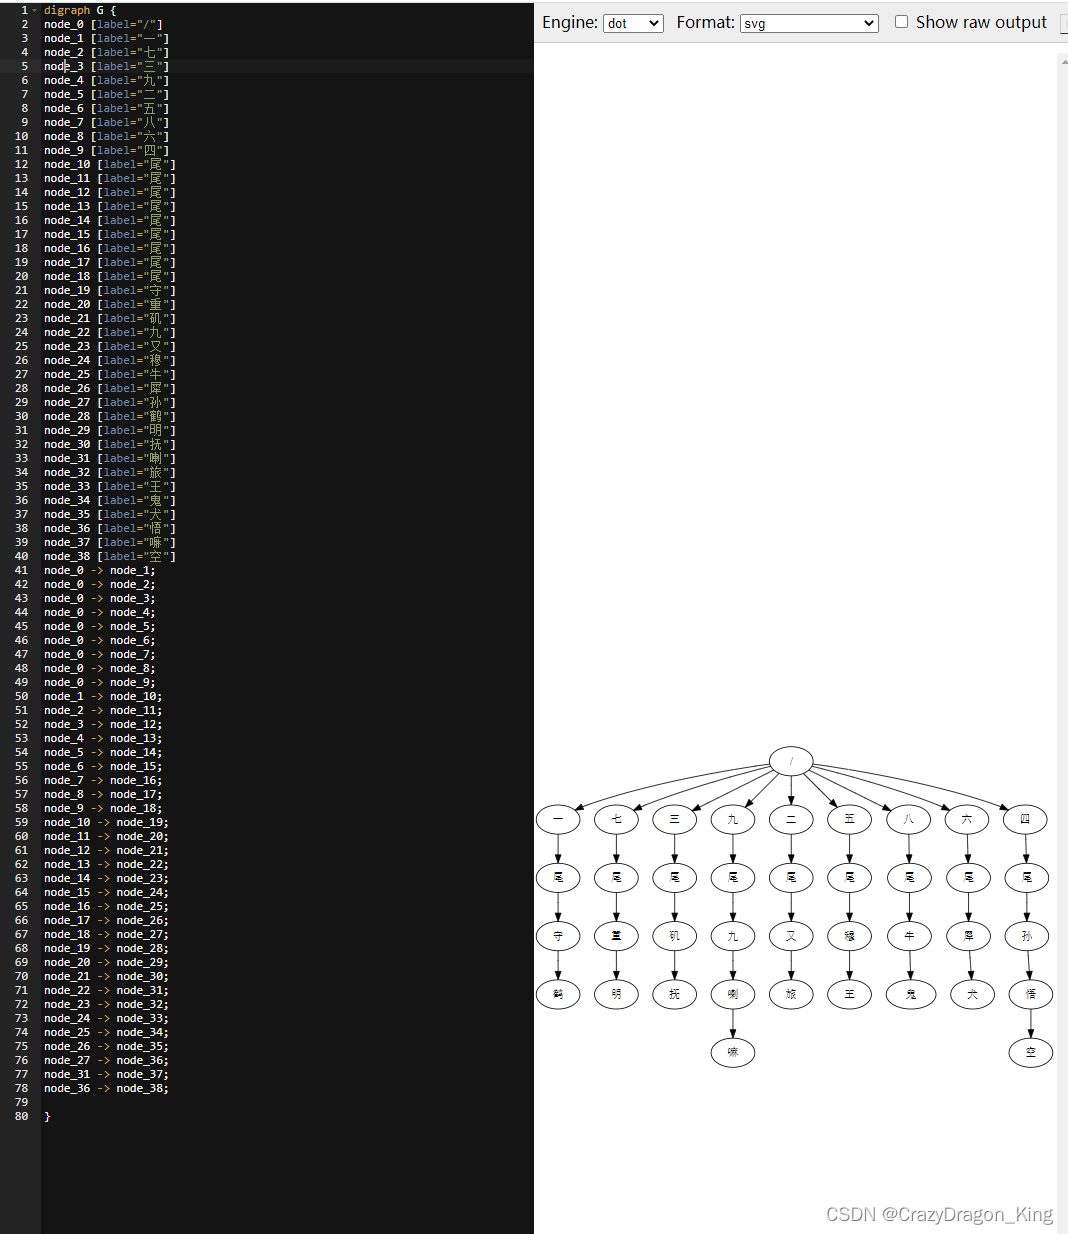
有一种专门的绘图语言,叫做 dot,它是一种功能强大的语言,应该比上面这个 mermaid 还要强大许多。它也是可以用来绘图的,只不过上面这种可能更加方便了,因为markdown的话,基本上大家都会使用。
python代码实现graphviz
# 生成dot描述
# 层序遍历 tips: 使用队列
def BFS2Dot(tree) -> None:
    if not tree:
        return
    queue = []
    queue.append(tree)
    counter = 0 # 节点计数
    count = 0

    labels = [] # 标签描述信息
    nodes = [] # 节点描述信息
    first_node = 'node_%d [label="%s"]' % (counter, tree["name"])
    labels.append(first_node)  # 初始化第一个点

    while queue:
        e = queue.pop(0)
        children = e["children"]

        if children:
            for child in children.values():
                count += 1
                queue.append(child)
                label = 'node_%d [label="%s"]' % (count, child["name"])
                labels.append(label)
                node = "node_%d -> node_%d;" % (counter, count)
                nodes.append(node)
        counter += 1
    print("\n".join(labels))
    print("\n".join((nodes)))
同样,我这里把绘图语句的文本粘贴出来,供大家方便使用,使用的时候,需要在外侧加上一个 digraph G {} 包裹绘图指令。
node_0 [label="/"]
node_1 [label="一"]
node_2 [label="七"]
node_3 [label="三"]
node_4 [label="九"]
node_5 [label="二"]
node_6 [label="五"]
node_7 [label="八"]
node_8 [label="六"]
node_9 [label="四"]
node_10 [label="尾"]
node_11 [label="尾"]
node_12 [label="尾"]
node_13 [label="尾"]
node_14 [label="尾"]
node_15 [label="尾"]
node_16 [label="尾"]
node_17 [label="尾"]
node_18 [label="尾"]
node_19 [label="守"]
node_20 [label="重"]
node_21 [label="矶"]
node_22 [label="九"]
node_23 [label="又"]
node_24 [label="穆"]
node_25 [label="牛"]
node_26 [label="犀"]
node_27 [label="孙"]
node_28 [label="鹤"]
node_29 [label="明"]
node_30 [label="抚"]
node_31 [label="喇"]
node_32 [label="旅"]
node_33 [label="王"]
node_34 [label="鬼"]
node_35 [label="犬"]
node_36 [label="悟"]
node_37 [label="嘛"]
node_38 [label="空"]
node_0 -> node_1;
node_0 -> node_2;
node_0 -> node_3;
node_0 -> node_4;
node_0 -> node_5;
node_0 -> node_6;
node_0 -> node_7;
node_0 -> node_8;
node_0 -> node_9;
node_1 -> node_10;
node_2 -> node_11;
node_3 -> node_12;
node_4 -> node_13;
node_5 -> node_14;
node_6 -> node_15;
node_7 -> node_16;
node_8 -> node_17;
node_9 -> node_18;
node_10 -> node_19;
node_11 -> node_20;
node_12 -> node_21;
node_13 -> node_22;
node_14 -> node_23;
node_15 -> node_24;
node_16 -> node_25;
node_17 -> node_26;
node_18 -> node_27;
node_19 -> node_28;
node_20 -> node_29;
node_21 -> node_30;
node_22 -> node_31;
node_23 -> node_32;
node_24 -> node_33;
node_25 -> node_34;
node_26 -> node_35;
node_27 -> node_36;
node_31 -> node_37;
node_36 -> node_38;
不过,这个软件需要单独安装一下,如果只是想要尝鲜的话,可以使用那种在线的服务。


注意:它的功能远不及这一些,还有很多更高级的特性呢。但是我只是刚接触,然后就是画了一个最普通的图,哈哈。
3.Python 可视化工具
这里提供一个知乎大佬的工具,链接在参考资料目录中。
pip install pytm-cli
使用这个工具,我们需要提供一个 JSON 字符串。所以是不是很方便呀?但是也不是那么简单的,因为我们序列化的 JSON 和它需要的 JSON 结构之间还是存在差别的,所以需要手动转换一下。大概类似于手写一个特别简单的 JSON.stringify 。
这里我提供一种写法提供给大家参考一下:
def transfer_json(obj: Dict[str, Dict]):
    if not obj:
        return {}
    new_obj = []
    for v in obj["children"].values():
        new_obj.append(transfer_json(v))

    return {"name": obj["name"], "children": new_obj}
这个采用递归生成 JSON 字符串的方式,我也想了很久,主要还是对递归理解不够深刻。这种方式实现的挺巧妙的,也参考了一个手写的 JSON.stringify 的例子。
注意:这里返回的是对象,所以想要JSON字符串需要自己再转换一下。
现在我们已经得到了需要的 JSON 结构了,那么我们开始吧!
pytm-cli -i data.json -o demo.html
作者提供了许多不同的展示方式,这里仅演示一种。

Go 版本的实现
这个实现返回的直接是字符串了。
func (trie *Trie) PreTraverse() string {
	node := trie.Root
	return pre(node)
}

func pre(node *Node) string {
	if node == nil {
		return "{}"
	}

	var builder strings.Builder
	arr := ""
	builder.WriteString("[")
	for _, child := range node.Children {
		builder.WriteString(pre(child))
		builder.WriteString(",")
	}

	arr = builder.String()
	// 去除最后的逗号
	if builder.Len() != 1 {
		arr = arr[0 : len(arr)-1]
	}

	return fmt.Sprintf(`{"name": "%s", "children": %s}`, node.V, arr+"]")
}
这里同样也贴出来,这样大家可以先体验一下了。
{
    "name": "/",
    "children": [
        {
            "name": "一",
            "children": [
                {
                    "name": "尾",
                    "children": [
                        {
                            "name": "守",
                            "children": [
                                {
                                    "name": "鹤",
                                    "children": []
                                }
                            ]
                        }
                    ]
                }
            ]
        },
        {
            "name": "七",
            "children": [
                {
                    "name": "尾",
                    "children": [
                        {
                            "name": "重",
                            "children": [
                                {
                                    "name": "明",
                                    "children": []
                                }
                            ]
                        }
                    ]
                }
            ]
        },
        {
            "name": "三",
            "children": [
                {
                    "name": "尾",
                    "children": [
                        {
                            "name": "矶",
                            "children": [
                                {
                                    "name": "抚",
                                    "children": []
                                }
                            ]
                        }
                    ]
                }
            ]
        },
        {
            "name": "九",
            "children": [
                {
                    "name": "尾",
                    "children": [
                        {
                            "name": "九",
                            "children": [
                                {
                                    "name": "喇",
                                    "children": [
                                        {
                                            "name": "嘛",
                                            "children": []
                                        }
                                    ]
                                }
                            ]
                        }
                    ]
                }
            ]
        },
        {
            "name": "二",
            "children": [
                {
                    "name": "尾",
                    "children": [
                        {
                            "name": "又",
                            "children": [
                                {
                                    "name": "旅",
                                    "children": []
                                }
                            ]
                        }
                    ]
                }
            ]
        },
        {
            "name": "五",
            "children": [
                {
                    "name": "尾",
                    "children": [
                        {
                            "name": "穆",
                            "children": [
                                {
                                    "name": "王",
                                    "children": []
                                }
                            ]
                        }
                    ]
                }
            ]
        },
        {
            "name": "八",
            "children": [
                {
                    "name": "尾",
                    "children": [
                        {
                            "name": "牛",
                            "children": [
                                {
                                    "name": "鬼",
                                    "children": []
                                }
                            ]
                        }
                    ]
                }
            ]
        },
        {
            "name": "六",
            "children": [
                {
                    "name": "尾",
                    "children": [
                        {
                            "name": "犀",
                            "children": [
                                {
                                    "name": "犬",
                                    "children": []
                                }
                            ]
                        }
                    ]
                }
            ]
        },
        {
            "name": "四",
            "children": [
                {
                    "name": "尾",
                    "children": [
                        {
                            "name": "孙",
                            "children": [
                                {
                                    "name": "悟",
                                    "children": [
                                        {
                                            "name": "空",
                                            "children": []
                                        }
                                    ]
                                }
                            ]
                        }
                    ]
                }
            ]
        }
    ]
}
4.Echarts 实现
Echats 是百度开源的一个图表库,目前是 apache 下的一个开源项目了,它的功能非常强大,其中就提供了树图的功能,那我不得拿来用一用嘛,哈哈!并且,它的树图是可以互动的,可以展开、收起。

这里面有示例代码,可以复制下来,替换一下使用的 JSON 数据就可以了。这个 JSON 数据使用的也是上面 Python 使用的那个结构。它也支持一下其它字段,感兴趣的话,可以自己自定义一下。
这里我就偷一个懒了,我直接使用 Fiddler 劫持掉它获取 JSON 数据的接口,然后返回我自己的 JSON 数据,这样我连复制代码都不需要了,哈哈。

然后把它展开,截图一下。不过感觉太小了,就是一个普通的点。这个应该是可以配置的,我这里只是提供一个思路,具体怎么去丰富大,就交给大家的想象力了。

我简单的扫了一眼,发现这个配置,改成了20,树图就变大了不少,效果还是不错的。


四、总结
好了,基本上所有的内容就到此为止了。接下来如果有时间的话,我会为可视化的部分录制一个视频,因为我觉得视频的方式可能更好来讲解吧。这个博客也是谋划了很久了 ,不过还是太懒了,今天总算是抽出来时间给它完成了。事情一旦拖延就遥遥无期了。我生待明日,万事成蹉跎。 希望,这篇博客的内容能够帮助到你,反正我是学习到了不少东西了,哈哈。
五、参考资料
如何利用json数据生成树图
Graphviz绘图 - DOT语言 (itopic.org)
如何实现一个JSON.stringify() ,手写JSON.stringify
可视化图形工具—Graphviz和PlantUML - YY分享 (yyearth.com)
DOT Language | Graphviz
【算法】二叉树、N叉树先序、中序、后序、BFS、DFS遍历的递归和迭代实现记录(Java版) - 宋者为王 - 博客园 (cnblogs.com)
小书匠语法说明之mermaid | 小书匠 (xiaoshujiang.com)