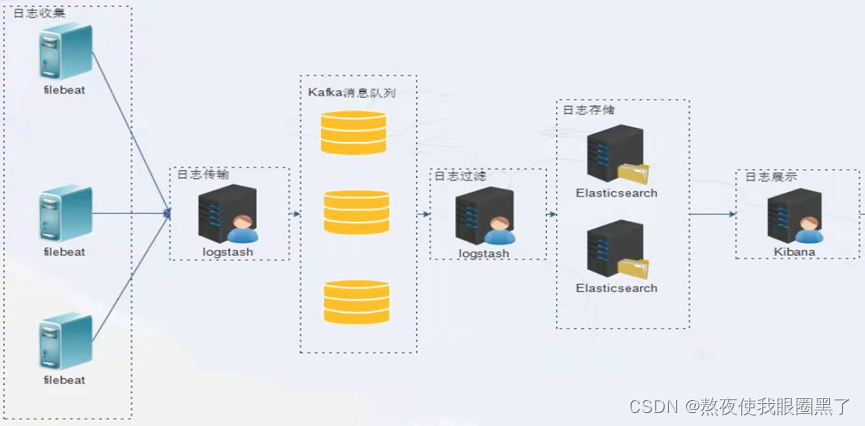
|

本部署方案部署包
Kafka部署,在低于8.0版本时,kafka可以使用
ELK8.0版本
包
logstash-8.0.0-linux-x86_64.tar
kibana-8.0.0-linux-x86_64.tar
filebeat-8.0.0-linux-x86_64.tar
elasticsearch-8.0.0-linux-x86_64.tar
系统配置
systemctl stop firewalld
systemctl disable firewalld
setenforce 0
sed -i "s/^SELINUX=enforcing/SELINUX=disabled/g" /etc/sysconfig/selinux
sed -i "s/^SELINUX=enforcing/SELINUX=disabled/g" /etc/selinux/config
sed -i "s/^SELINUX=permissive/SELINUX=disabled/g" /etc/sysconfig/selinux
sed -i "s/^SELINUX=permissive/SELINUX=disabled/g" /etc/selinux/config
echo "* soft nofile 65536" >> /etc/security/limits.conf
echo "* hard nofile 65536" >> /etc/security/limits.conf
echo "* soft nproc 65536" >> /etc/security/limits.conf
echo "* hard nproc 65536" >> /etc/security/limits.conf
echo "* soft memlock unlimited" >> /etc/security/limits.conf
echo "* hard memlock unlimited" >> /etc/security/limits.conf
echo "vm.max_map_count = 655360" >> /etc/sysctl.conf
sysctl -p
1.安装elasticsearch
8.0版本后,默认增加安全配置,默认启动就行
创建用户
出于安全考虑,elasticsearch默认不允许以root账号运行。
groupadd es
useradd -g es es
echo "123456"|passwd --stdin es
tar -zxvf elasticsearch-8.0.0-linux-x86_64.tar.gz
mv elasticsearch-8.0.0 /usr/local/elasticsearch
cd /usr/local/elasticsearch/config/
cp elasticsearch.yml elasticsearch.yml.bak
vi elasticsearch.yml
cluster.name: "elasticsearch_petition"
node.name: node-01
transport.host: 0.0.0.0
transport.publish_host: 0.0.0.0
transport.bind_host: 0.0.0.0
network.host: 0.0.0.0
http.port: 9200
path.data: /usr/local/elasticsearch/data
path.logs: /usr/local/elasticsearch/logs
http.cors.enabled: true
http.cors.allow-origin: "*"
设置内存,不然起不来
vi /usr/local/elasticsearch/config/jvm.options
-Xms1g
-Xmx1g
mkdir /usr/local/elasticsearch/data
mkdir /usr/local/elasticsearch/logs
chown -R es.es /usr/local/elasticsearch/
启动
su - es
/usr/local/elasticsearch/bin/elasticsearch &
验证
[root@ELK ~]
{
"name" : "node-01",
"cluster_name" : "elasticsearch_petition",
"cluster_uuid" : "bSZ9jKolQxeQI8GagYaWIA",
"version" : {
"number" : "8.0.0",
"build_flavor" : "default",
"build_type" : "tar",
"build_hash" : "1b6a7ece17463df5ff54a3e1302d825889aa1161",
"build_date" : "2022-02-03T16:47:57.507843096Z",
"build_snapshot" : false,
"lucene_version" : "9.0.0",
"minimum_wire_compatibility_version" : "7.17.0",
"minimum_index_compatibility_version" : "7.0.0"
},
"tagline" : "You Know, for Search"
}
2. 安装kibana
tar -zxvf kibana-8.0.0-linux-x86_64.tar.gz
mv kibana-8.0.0 /usr/local/kibana
vi /usr/local/kibana/config/kibana.yml
server.port: 5601
server.host: "0.0.0.0"
i18n.locale: "zh-CN"
chown -R es.es /usr/local/kibana/
su -es
/usr/local/kibana/bin/kibana &
bin/elasticsearch-reset-password -u elastic
bin/elasticsearch-create-enrollment-token -s kibana
执行完,kibana启动会让你输入 kibana的token值
配置完成后会让你登录,请输入elastic和他的密码
设置用户密码时,请在kibana的页面中创建,在设置中就可以设置
Kafka中设置topic
bin/kafka-topics.sh --create --bootstrap-server 192.168.1.41:8092 --replication-factor 3 --partitions 3 --topic system-messages
3.部署logstash(日志过滤) (ip:192.168.1.20)
tar -zxvf logstash-8.0.0-linux-x86_64.tar.gz
mv logstash-8.0.0 /usr/local/logstash
vi /usr/local/logstash/config/kafka-client-jaas.conf
KafkaClient {
org.apache.kafka.common.security.scram.ScramLoginModule required
username="admin"
password="admin";
};
配置文件中的http_ca.crt是从/usr/local/elasticsearch/config/certs
[root@elk certs]
http_ca.crt http.p12 transport.p12
[root@elk certs]
/usr/local/elasticsearch/config/certs
cp http_ca.crt /usr/local/logstash/config
vi /usr/local/logstash/config/logstash-sample.conf
input {
kafka {
bootstrap_servers => "192.168.1.41:8092,192.168.1.42:8092,192.168.1.43:8092"
topics => ["test"]
codec => "json"
security_protocol => "SASL_PLAINTEXT"
sasl_mechanism => "SCRAM-SHA-256"
jaas_path => "/usr/local/logstash/config/kafka-client-jaas.conf"
}
}
output {
elasticsearch {
hosts => ["https://192.168.1.20:9200"]
index => "filebeat-syslog-7-103-%{+YYYY.MM.dd}"
user => "elastic"
password => "123456"
cacert => "/usr/local/logstash/config/http_ca.crt"
}
}
启动
/usr/local/logstash/bin/logstash -f /usr/local/logstash/config/logstash-sample.conf &
4.部署logstash(日志传输)(ip:192.168.1.21)
tar -zxvf logstash-8.0.0-linux-x86_64.tar.gz
mv logstash-8.0.0 /usr/local/logstash
下面的用户名和密码自己创建,自己赋权
vi /usr/local/logstash/config/kafka-client-jaas.conf
KafkaClient {
org.apache.kafka.common.security.scram.ScramLoginModule required
username="admin"
password="admin";
};
vi /usr/local/logstash/config/logstash-sample.conf
input {
beats {
port => 5044
}
stdin{}
}
output {
kafka {
topic_id => "test"
bootstrap_servers => "192.168.1.41:8092,192.168.1.42:8092,192.168.1.43:8092"
codec => "json"
compression_type => "snappy"
batch_size => 5
jaas_path => "/usr/local/logstash/config/kafka-client-jaas.conf"
sasl_mechanism => "SCRAM-SHA-256"
security_protocol => "SASL_PLAINTEXT"
}
}
启动
/usr/local/logstash/bin/logstash -f /usr/local/logstash/config/logstash-sample.conf &
5.安装filebeats(用于在各个服务上面收集日志)
tar -zxvf filebeat-8.0.0-linux-x86_64.tar.gz
mv filebeat-8.0.0-linux-x86_64 /usr/local/filebeat
vi /usr/local/filebeat/filebeat.yml
filebeat.inputs:
- type: log
enabled: true
paths:
- /var/log/messages
tags: ["messages"]
filebeat.config.modules:
path: ${path.config}/modules.d/*.yml
reload.enabled: false
setup.template.settings:
index.number_of_shards: 3
setup.kibana:
output.logstash:
hosts: ["192.168.1.21:5044"]
processors:
- add_host_metadata: ~
- add_cloud_metadata: ~
- drop_fields:
fields: ["beat", "input", "source", "offset", "prospector", "host"]
启动服务
cd /usr/local/filebeat
./filebeat -e -c filebeat.yml &
Metricbeat
系统级监控,更简洁
将 Metricbeat 部署到您的所有 Linux、Windows 和 Mac 主机,并将它连接到 Elasticsearch 就大功告成了:您可以获取系统级的 CPU 使用率、内存、文件系统、磁盘 IO 和网络 IO 统计数据,还可针对系统上的每个进程获得与 top 命令类似的统计数据
Filebeat
轻量型日志采集器
8.其他插件介绍
logstash和filebeat:
都具有日志收集功能,filebeat更轻量,占用资源更少,但logstash 具有filter功能,能过滤分析日志。一般结构都是filebeat采集日志,然后发送到消息队列,redis,kafaka。然后logstash去获取,利用filter功能过滤分析,然后存储到elasticsearch中。
Curator:
是elasticsearch 官方的一个索引管理工具,可以删除、创建、关闭、段合并等等功能。
Cerebro:
是一款es比较好用的开源监控软件,主要是scala写的,修改源码方便。可以通过修改源码屏蔽掉一些像DELETE等危险操作。从而给更多人包括运维人员使用。
Bigdesk:
是elasticsearch的一个集群监控工具,可以通过它来查看es集群的各种状态,如:cpu、内存使用情况,索引数据、搜索情况,http连接数等。
Metricbeat:
是一个轻量级代理,在服务器上安装,以定期从操作系统和服务器上运行的服务收集指标。Metricbeat提供多种内部模块,用于从服务中收集指标,例如 Apache、NGINX、MongoDB、MySQL、PostgreSQL、Prometheus、Redis 等等。
Packetbeat:
抓取网路包数据
自动解析网络包协议,如: ICMP DNS、HTTP、Mysql/PgSQL/MongoDB、Memcache、Thrift、TLS等。
Heartbeat:
是一个轻量级守护程序,可以安装在远程服务器上,定期检查服务状态并确定它们是否可用。与Metricbeat不同,Metricbeat仅确定服务器是启动还是关闭,Heartbeat会确认服务是否可访问。
Marvel:
工具可以帮助使用者监控elasticsearch的运行状态,不过这个插件需要收费,只有开发版是免费,我们学习不影响我们使用。它集成了head以及bigdesk的功能,是官方推荐产品。
Auditbeat:
是一个轻量级代理,可以在审核服务器系统上用户和进程的活动。 例如,可以使用Auditbeat从Linux Audit Framework收集和集中审核事件,还可以使用Auditbeat检测关键文件(如二进制文件和配置文件)的更改,并识别潜在的安全策略违规。
|
