前言:
有人说encache就够了,默认的就好了,为什么要写redis,这里我先说说ehcache和redis区别。
ehcache直接在jvm虚拟机中缓存,速度快,效率高;但是缓存共享麻烦,集群分布式应用不方便。
redis是通过socket访问到缓存服务,效率比ecache低,比数据库要快很多,处理集群和分布式缓存方便,有成熟的方案。
如果是单个应用或者对缓存访问要求很高的应用,用ehcache。
如果是大型系统,存在缓存共享、分布式部署、缓存内容很大的,建议用redis。
引入依赖
 <dependency>
            <groupId>org.springframework.boot</groupId>
            <artifactId>spring-boot-starter-data-redis</artifactId>
 </dependency>
配置redis序列化方式
package com.orm.mybatis.config;

import org.springframework.context.annotation.Bean;
import org.springframework.context.annotation.Configuration;
import org.springframework.data.redis.connection.RedisConnectionFactory;
import org.springframework.data.redis.connection.lettuce.LettuceConnectionFactory;
import org.springframework.data.redis.core.RedisTemplate;
import org.springframework.data.redis.core.StringRedisTemplate;
import org.springframework.data.redis.serializer.GenericJackson2JsonRedisSerializer;
import org.springframework.data.redis.serializer.JdkSerializationRedisSerializer;
import org.springframework.data.redis.serializer.StringRedisSerializer;

@Configuration
public class RedisConfig {

    /**
     * StringRedisTemplate与RedisTemplate区别点
     * 两者的关系是StringRedisTemplate继承RedisTemplate。
     *
     * 两者的数据是不共通的;也就是说StringRedisTemplate只能管理StringRedisTemplate里面的数据,
     * RedisTemplate只能管理RedisTemplate中的数据。
     *
     * 其实他们两者之间的区别主要在于他们使用的序列化类:
     *     RedisTemplate使用的是JdkSerializationRedisSerializer    存入数据会将数据先序列化成字节数组然后在存入Redis数据库。
     *
     *       StringRedisTemplate使用的是StringRedisSerializer
     *
     * 使用时注意事项:
     * 当你的redis数据库里面本来存的是字符串数据或者你要存取的数据就是字符串类型数据的时候,那么你就使用StringRedisTemplate即可。
     * 但是如果你的数据是复杂的对象类型,而取出的时候又不想做任何的数据转换,
     * 直接从Redis里面取出一个对象,那么使用RedisTemplate是更好的选择。
     */

    @Bean      //用GenericJackson2JsonRedisSerializer来序列化
    public RedisTemplate redisTemplate(LettuceConnectionFactory lettuceConnectionFactory){
        //我们为了自己开发方便,一般直接使用<String,Object>
        RedisTemplate<String, Object> redisTemplate = new RedisTemplate<>();

        // 设置键(key)的序列化采用StringRedisSerializer
        StringRedisSerializer stringRedisSerializer=new StringRedisSerializer();
        redisTemplate.setKeySerializer(stringRedisSerializer);
        redisTemplate.setHashKeySerializer(stringRedisSerializer);

        JdkSerializationRedisSerializer jdkSerializationRedisSerializer = new JdkSerializationRedisSerializer();//默认

// 设置值(value)的序列化采用GenericJackson2JsonRedisSerializer
// GenericJackson2JsonRedisSerializer jsonRedisSerializer = new GenericJackson2JsonRedisSerializer();
        redisTemplate.setHashValueSerializer(jdkSerializationRedisSerializer);
        redisTemplate.setValueSerializer(jdkSerializationRedisSerializer);

        //设置连接工厂
        redisTemplate.setConnectionFactory(lettuceConnectionFactory);

        redisTemplate.afterPropertiesSet();

        return redisTemplate;
    }

    @Bean
    public StringRedisTemplate stringRedisTemplate(RedisConnectionFactory factory) {
        StringRedisTemplate stringRedisTemplate = new StringRedisTemplate();
        stringRedisTemplate.setConnectionFactory(factory);
        return stringRedisTemplate;
    }
}
redisTemplate.setKeySerializer(stringRedisSerializer);
redisTemplate.setHashKeySerializer(stringRedisSerializer);
key的序列化方式修改成 StringRedisSerializer。
redisTemplate.setHashValueSerializer(jdkSerializationRedisSerializer);
redisTemplate.setValueSerializer(jdkSerializationRedisSerializer);
value的序列化方式修改成jdkSerializationRedisSerializer
使用JdkSerializationRedisSerializer序列化器,进去的数据为二进制,认证和授权序列化以及反序列化都正常
如果value的序列化使用GenericJackson2JsonRedisSerializer或者StringRedisSerializer 将授权以及认证两者缓存存储到Redis中,但是出现认证(登陆)反序列化丢失数据报错问题,而授权反序列化正常。
配置 RedisCache 缓存
我们自定义的缓存需要实现 Shiro 提供的 Cache<K, V> 接口。
我们来实现一个无参构造和有参构造,并通过 RedisTemplate 实现缓存的 CRUD 操作,存储时采用哈希表。
表名:缓存的名字
键:缓存的用户名
值:缓存的信息
package com.orm.mybatis.cache;
import com.orm.mybatis.utils.ApplicationContextUtil;
import lombok.Data;
import lombok.Getter;
import lombok.Setter;
import lombok.extern.slf4j.Slf4j;
import org.apache.shiro.cache.Cache;
import org.apache.shiro.cache.CacheException;
import org.springframework.context.ApplicationContext;
import org.springframework.context.annotation.Configuration;
import org.springframework.context.annotation.Scope;
import org.springframework.data.redis.core.RedisTemplate;
import org.springframework.data.redis.serializer.StringRedisSerializer;
import org.springframework.stereotype.Component;
import org.springframework.web.context.WebApplicationContext;
import org.springframework.web.context.support.WebApplicationContextUtils;
import javax.annotation.Resource;
import javax.servlet.ServletContext;
import java.util.Collection;
import java.util.Set;

@Slf4j
@Data
@Component
public class RedisCache<K,V> implements Cache<K,V> {

    @Resource
    private RedisTemplate<String,Object> redisTemplate;

    private String cacheName;

    @Override
    public V get(K k) throws CacheException {
        log.info("CacheName"+cacheName+"获取缓存:{key:"+k+"}");
        return (V) redisTemplate.opsForHash().get(cacheName,k.toString());
    }

    @Override
    public V put(K k, V v) throws CacheException {
        log.info("CacheName"+cacheName+"加入缓存:{key:"+k+"  value:"+v+"}");
        redisTemplate.opsForHash().put(cacheName,k.toString(),v);
        return v;
    }

    @Override
    public V remove(K k) throws CacheException {
        V value = (V) redisTemplate.opsForHash().get(cacheName,k.toString());
        redisTemplate.opsForHash().delete(cacheName,k.toString());
        return value;
    }

    @Override
    public void clear() throws CacheException {
        redisTemplate.delete(cacheName);
    }

    @Override
    public int size() {
        return redisTemplate.opsForHash().size(cacheName).intValue();
    }

    @Override
    public Set<K> keys() {
        return (Set<K>)redisTemplate.opsForHash().keys(cacheName);
    }

    @Override
    public Collection<V> values() {
        return (Collection<V>)redisTemplate.opsForHash().values(cacheName);
    }

//封装获取redisTemplate
//    private RedisTemplate redisTemplate(){
//    RedisTemplate redisTemplate = (RedisTemplate) ApplicationContextUtil.getBean("redisTemplate");
//    return redisTemplate;
//    }
}
为什么需要私有String cacheName?这里的配置我们稍后可以看到
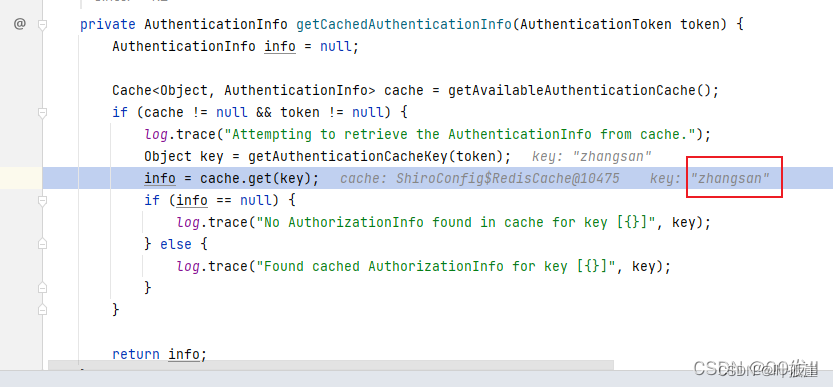
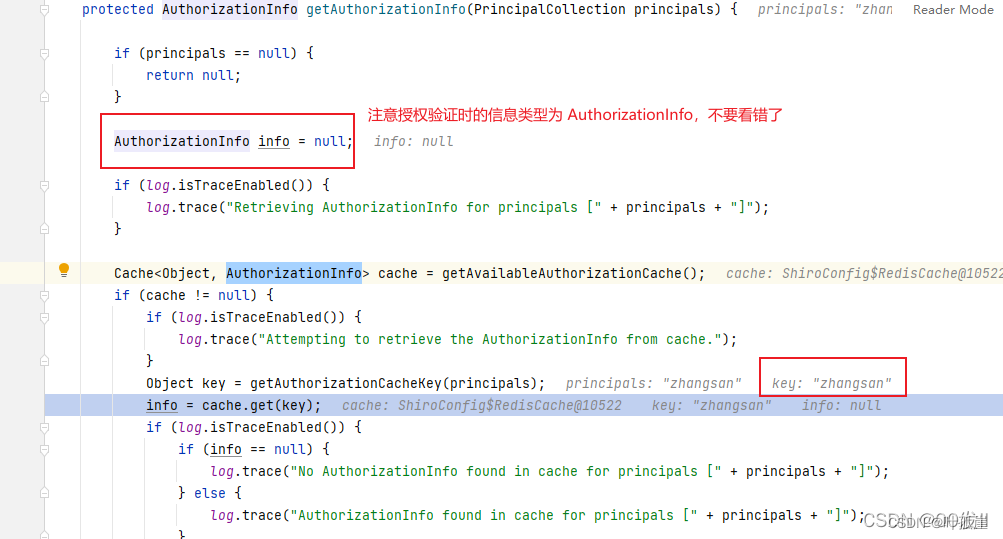
分析情况:在Shiro底层进行调用的过程中,身份验证和授权验证 都会尝试从缓存中取出数据。
因为使用debug进行调试:发现身份验证和授权验证 都会调用自定义Cache的get和put方法,并且两种验证过程传给自定义Cache的get和put方法的参数key是相同的。所以需要添加一个cacheName分别区别身份验证(authentication)和授权验证(authorization)
redisTemplate使用hash (可以看作是 Java的Map<String,Map<String,Object>>结构) 的方式存储,在自定义缓存管理器的getCache方法参数中提供了一个字符串,该字符串在验证和授权时是不一样的
自定义缓存管理器RedisCacheManager
package com.orm.mybatis.cache;

import org.apache.shiro.cache.Cache;
import org.apache.shiro.cache.CacheException;
import org.apache.shiro.cache.CacheManager;
import org.springframework.context.annotation.Configuration;

import javax.annotation.Resource;

@Configuration
public class RedisCacheManager implements CacheManager {

    @Resource
    private RedisCache<Object, Object> redisCache;

    @Override
    public <K, V> Cache<K, V> getCache(String cacheName) throws CacheException {
        System.out.println("缓存名称: "+cacheName);
        redisCache.setCacheName(cacheName);
        return (Cache<K, V>) redisCache;
    }
}
在自定义缓存管理器的getCache方法参数中提供了一个字符串,该字符串在验证和授权时是不一样的,可以把该字符串通过自定义Cache的构造器传递给自定义Cache,之后存储到Redis时将这个字符串作为 map(Map<String,Map<String,Object>>)的key。后来发现重写getCache(String cacheName)并不能自主切换授权和认证。只能通过重写getAuthenticationCacheKey,getAuthorizationCacheKey方法时候,追加对应的redisCache.setCacheName(cacheName);
修改 Shiro 配置类
由于使用了 Resource 自动注入,我们不能再 new 的方式得到对象,需要交予 Spring 容器管理。
package com.orm.mybatis.config;

import com.orm.mybatis.cache.RedisCacheManager;
import com.orm.mybatis.realm.CustomRealm;
import com.orm.mybatis.utils.PasswordHelper;
import lombok.extern.slf4j.Slf4j;
import org.apache.shiro.authc.credential.HashedCredentialsMatcher;

import org.apache.shiro.mgt.DefaultSecurityManager;
import org.apache.shiro.mgt.SecurityManager;
import org.apache.shiro.spring.security.interceptor.AuthorizationAttributeSourceAdvisor;
import org.apache.shiro.spring.web.ShiroFilterFactoryBean;

import org.apache.shiro.web.mgt.DefaultWebSecurityManager;
import org.springframework.aop.framework.autoproxy.DefaultAdvisorAutoProxyCreator;
import org.springframework.boot.autoconfigure.condition.ConditionalOnMissingBean;
import org.springframework.context.annotation.Bean;
import org.springframework.context.annotation.Configuration;

import javax.annotation.Resource;
import java.util.HashMap;
import java.util.Map;

@Slf4j
@Configuration
public class ShiroConfig {

    @Resource
    private RedisCacheManager redisCacheManager;


    //将自己的验证方式加入容器
    //Shiro Realm 继承自AuthorizingRealm的自定义Realm,即指定Shiro验证用户登录的类为自定义的
    @Bean
    public CustomRealm myShiroRealm() {
        HashedCredentialsMatcher hashedCredentialsMatcher = new HashedCredentialsMatcher();
        hashedCredentialsMatcher.setHashAlgorithmName(PasswordHelper.ALGORITHM_NAME);
        hashedCredentialsMatcher.setHashIterations(PasswordHelper.HASH_ITERATIONS);
        CustomRealm customRealm = new CustomRealm();
        //告诉realm,使用credentialsMatcher加密算法类来验证密文
        customRealm.setCredentialsMatcher(hashedCredentialsMatcher);
        customRealm.setCacheManager(redisCacheManager);
        //实现用户认证授权之后,发现,每次刷新页面都会进行多次的数据库操作,为了避免这种现象,减轻数据库的负担,
        //使用缓存,将查询的数据缓存到cache中,避免多次的查询数据,从而提高系统的查询效率。
        //因为开启了debug级别的日志,所以如果控制台没有sql展示说明缓存已开启。
        customRealm.setCachingEnabled(true); //开启全局缓存
        customRealm.setAuthenticationCachingEnabled(true);
        customRealm.setAuthorizationCachingEnabled(true);
        customRealm.setAuthenticationCacheName("authentication_cache");
        customRealm.setAuthorizationCacheName("authorization_cache");
        return customRealm;
    }


}
重写AuthorizingRealm的get**CacheKey
重写getAuthenticationCacheKey(AuthenticationToken token)和getAuthorizationCacheKey(PrincipalCollection principals)
package com.orm.mybatis.realm;
import com.orm.mybatis.cache.RedisCache;
import com.orm.mybatis.config.SerializableByteSource;
import com.orm.mybatis.entity.Permission;
import com.orm.mybatis.entity.Role;
import com.orm.mybatis.entity.User;
import com.orm.mybatis.serviceImpl.LoginServiceImpl;
import org.apache.shiro.authc.*;
import org.apache.shiro.authz.AuthorizationInfo;
import org.apache.shiro.authz.SimpleAuthorizationInfo;
import org.apache.shiro.realm.AuthorizingRealm;
import org.apache.shiro.subject.PrincipalCollection;
import org.apache.shiro.util.ByteSource;
import org.springframework.util.StringUtils;
import javax.annotation.Resource;

public class CustomRealm extends AuthorizingRealm {

    @Resource
    RedisCache redisCache;

    @Resource
    private LoginServiceImpl loginService;


    @Override
    protected Object getAuthenticationCacheKey(AuthenticationToken token) {
        redisCache.setCacheName("authentication_cache");
        System.out.println("触发了authentication_cache");
        return super.getAuthenticationCacheKey(token);
    }

    @Override
    protected Object getAuthorizationCacheKey(PrincipalCollection principals) {
        redisCache.setCacheName("authorization_cache");
        System.out.println("触发了authorization_cache");
        return super.getAuthorizationCacheKey(principals);
    }
}
为什么要重写?
登陆: 登陆时首先会调用 getAuthenticationCacheKey(AuthenticationToken token)
获取key,然后尝试从缓存中获取到AuthenticationInfo
如果未登录第一次缓存中是没有数据的 所以肯定拿不到数据,因为info为null 所以继续调用自定义Realm的doGetAuthenticationInfo方法从数据库中查询到信息并返回,之后使用自定义Cache的put方法将查询到的AuthenticationInfo缓存起来

授权验证,授权验证第一步首先调用getAuthorizationCacheKey(principals)

如果不重写,结果就是:
不论是手动验证还是通过控制器方法上的注解进行验证,他们的第一步总是从缓存中拿到 AuthorizationInfo 从缓存了取一个key=zhansan value类型为AuthenticationInfo的值,然后验证过程想要拿到一个AuthorizationInfo 类型的value,结果却拿到了第一步的AuthenticationInfo 自然就出现类型转换的异常了。
自定义ByteSource实现序列化
Shiro 的SimpleByteSource并不具有序列化功能,我们需要重新写一个ByteSource。
package com.orm.mybatis.config;

import org.apache.shiro.codec.Base64;
import org.apache.shiro.codec.CodecSupport;
import org.apache.shiro.codec.Hex;
import org.apache.shiro.util.ByteSource;
import org.apache.shiro.util.SimpleByteSource;

import java.io.File;
import java.io.InputStream;
import java.io.Serializable;
import java.util.Arrays;

public class SerializableByteSource implements ByteSource, Serializable {

    private static final long serialVersionUID = 8325744266786564709L;

    private final byte[] bytes;
    private String cachedHex;
    private String cachedBase64;

    public SerializableByteSource(byte[] bytes) {
        this.bytes = bytes;
    }

    public SerializableByteSource(char[] chars) {
        this.bytes = CodecSupport.toBytes(chars);
    }

    public SerializableByteSource(String string) {
        this.bytes = CodecSupport.toBytes(string);
    }

    public SerializableByteSource(ByteSource source) {
        this.bytes = source.getBytes();
    }

    public SerializableByteSource(File file) {
        this.bytes = (new SerializableByteSource.BytesHelper()).getBytes(file);
    }

    public SerializableByteSource(InputStream stream) {
        this.bytes = (new SerializableByteSource.BytesHelper()).getBytes(stream);
    }

    public static boolean isCompatible(Object o) {
        return o instanceof byte[] || o instanceof char[] || o instanceof String || o instanceof ByteSource ||
         o instanceof File || o instanceof InputStream;
    }

    public byte[] getBytes() {
        return this.bytes;
    }

    public boolean isEmpty() {
        return this.bytes == null || this.bytes.length == 0;
    }

    public String toHex() {
        if (this.cachedHex == null) {
            this.cachedHex = Hex.encodeToString(this.getBytes());
        }

        return this.cachedHex;
    }

    public String toBase64() {
        if (this.cachedBase64 == null) {
            this.cachedBase64 = Base64.encodeToString(this.getBytes());
        }

        return this.cachedBase64;
    }

    public String toString() {
        return this.toBase64();
    }

    public int hashCode() {
        return this.bytes != null && this.bytes.length != 0 ? Arrays.hashCode(this.bytes) : 0;
    }

    public boolean equals(Object o) {
        if (o == this) {
            return true;
        } else if (o instanceof ByteSource) {
            ByteSource bs = (ByteSource)o;
            return Arrays.equals(this.getBytes(), bs.getBytes());
        } else {
            return false;
        }
    }

    private static final class BytesHelper extends CodecSupport {
        private BytesHelper() {
        }

        public byte[] getBytes(File file) {
            return this.toBytes(file);
        }

        public byte[] getBytes(InputStream stream) {
            return this.toBytes(stream);
        }
    }
}
内容与SimpleByteSource差不多,只不过增加多了一个实现序列化接口implements Serializable。
我还看到有些人这样写也可以的。
//自定义salt实现  实现序列化接口
public class SerializableByteSource extends SimpleByteSource implements Serializable {
    public SerializableByteSource(String string) {
        super(string);
    }
}
Realm 加盐更换成SerializableByteSource
package com.orm.mybatis.realm;

import com.orm.mybatis.cache.RedisCache;
import com.orm.mybatis.config.SerializableByteSource;
import com.orm.mybatis.entity.Permission;
import com.orm.mybatis.entity.Role;
import com.orm.mybatis.entity.User;
import com.orm.mybatis.serviceImpl.LoginServiceImpl;
import org.apache.shiro.authc.*;
import org.apache.shiro.authz.AuthorizationInfo;
import org.apache.shiro.authz.SimpleAuthorizationInfo;
import org.apache.shiro.realm.AuthorizingRealm;
import org.apache.shiro.subject.PrincipalCollection;
import org.apache.shiro.util.ByteSource;
import org.springframework.util.StringUtils;

import javax.annotation.Resource;

public class CustomRealm extends AuthorizingRealm {

    /**
     * @MethodName doGetAuthenticationInfo
     * @Description 认证配置类
     * @Param [authenticationToken]
     * @Return AuthenticationInfo
     * @Author WangShiLin
     * 验证当前登录的Subject
     * LoginController.login()方法中执行Subject.login()时 执行此方法
     */
    @Override
    protected AuthenticationInfo doGetAuthenticationInfo(AuthenticationToken authenticationToken)
     throws AuthenticationException {
        if (!StringUtils.hasText((String) authenticationToken.getPrincipal())) {
            return null;
        }
        System.out.println("authenticationToken.getCredentials()"+new String((char[])authenticationToken.getCredentials()));
        System.out.println((char[])authenticationToken.getCredentials());
        //获取用户信息
        String name = authenticationToken.getPrincipal().toString();
        UsernamePasswordToken token = (UsernamePasswordToken) authenticationToken;
        //authenticationToken是UsernamePasswordToken的子类
        User user = loginService.getUserByName(name);
        if (user == null) {
            //这里返回后会报出对应异常
            return null;
        } else {
            //这里验证authenticationToken和simpleAuthenticationInfo的信息
            //交给AuthenticatingRealm使用CredentialsMatcher进行密码匹配,如果觉得人家的不好可以自定义实现
            return new SimpleAuthenticationInfo(name, user.getPassword(), new SerializableByteSource(user.getSalt()),getName());
        }
    }
}
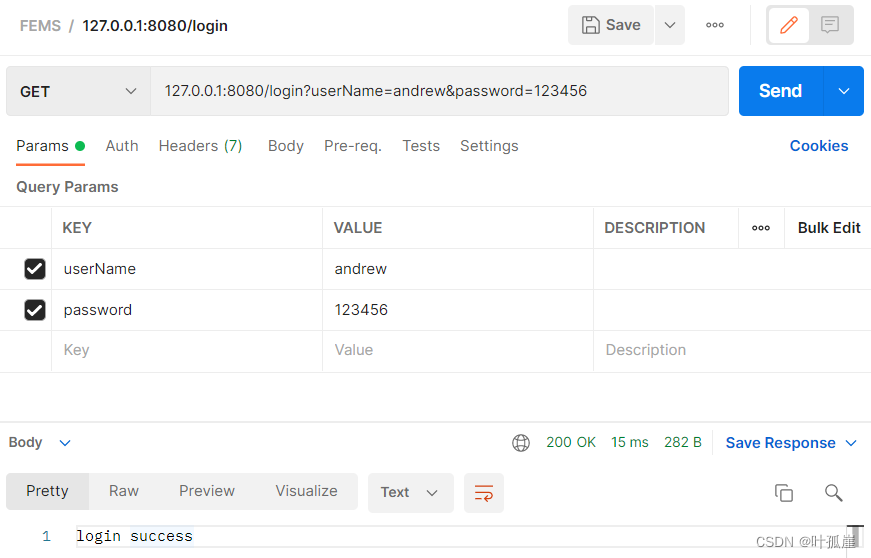
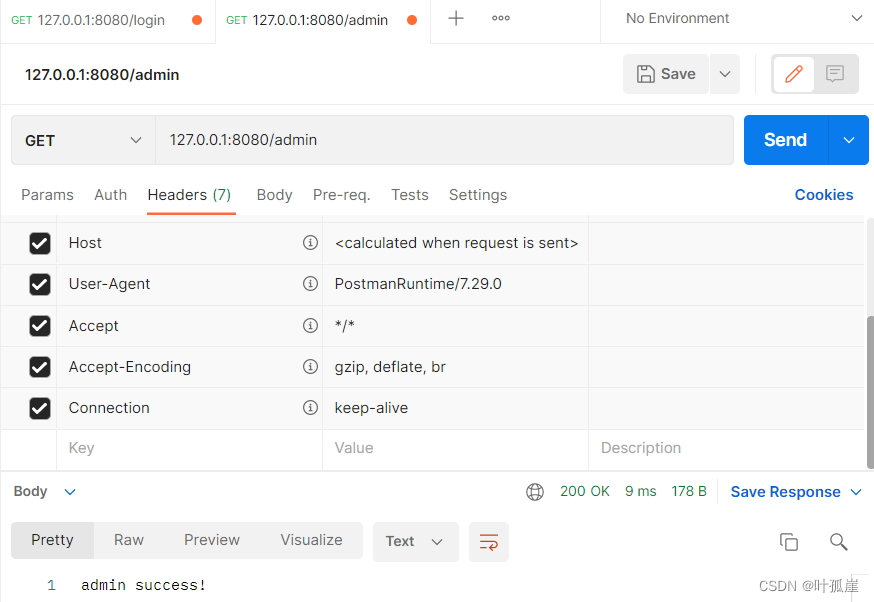
测试
登陆认证

授权

项目地址

