Elasticsearch7.6.1学习
? 在独自一人的上海,居家办公,只有不断学习和工作,严苛自己进步,才能在暗黑时光中找到生命的真谛。茫茫人生像一片无际的汪洋,独帆流行的岁月,我能做的就是热爱自己喜欢的职业,探求学习的乐趣,正如接下来所学的Elasticsearch,当你局限于select的时候,那你看到的世界只有红红绿绿。相反不断的努力,你才能看到天空的繁星,大海的鲛鱼,绿野的骏马,以及宇宙的洪荒。
? 爱你所爱,想你所想。
? ------题记
Typora学习链接学习
https://blog.csdn.net/m0_46502538/article/details/119420273?ops_request_misc=&request_id=&biz_id=102&utm_term=Typora%E7%9A%84%E4%BD%BF%E7%94%A8%E3%80%81&utm_medium=distribute.pc_search_result.none-task-blog-2~all~sobaiduweb~default-1-119420273.142^v9^pc_search_result_control_group,157^v4^control&spm=1018.2226.3001.4187
学习老师:狂神
压缩包git地址:https://gitee.com/yujie.louis/elastic-search
此文代码提交链接
https://gitee.com/The-century-old/elasticsearch/tree/master/luli-es-api
我们讲解什么?
一.简介
sql(模糊查询):select * from use like%狂神说%进行查询,如果是大数据,就十分慢!索引!
elasticsearch:搜索.全文检索
- 聊一个人
- 货比三家
- 安装
- 生态圈
- 分词器ik
- RestFul操作 ES
- CRUD
- SpringBoot集成Elasticsearch(项目集成)
- 爬虫爬取数据!
- 实战,模拟全文检索!
以后你只要,需要用到搜索,就可以用ES!(大数据量的情况下使用)
二.Lucene创始人(Doug Cutting也是Hadoop创始人)
? 1998年4月,Google公司在美国硅谷成立,他是一家搜索引擎起家的公司。
Lucene是用java写成,目标是各种 中小型应用软件加入全文检索功能,因为好用而且开源,所以受程序员喜欢。
三.Elasticsearch概述
Elasticsearch,简称ES,es是一个开源的高扩展的分布式全文搜索引擎,他可以近乎实时的存储,检索数据;本身扩展性很好,可以扩展到上百台服务器,处理pb级别(大数据)的数据。es也是用java开发并使用Lucene作为其核心来实现所有索引和搜索的功能,但是填的目的是通过简单的RESTful API来隐藏Lucene的复杂性,从而让全文搜索更简单。
基于权重
谁在使用Elasticsearch?
维基百科,电商平台,BI系统
四.Elasticsearch和solr的差别
1.Elasticsearch简介
Elasticsearch是一个实时分布式走索和分析引擎,它让你从前所未有的速度处理大数据成为可能。
他用于全文搜索,结构化搜索,分析以及将这三者混合使用。
维基百科使用Elasticsearch提供全文搜索并高亮关键字,以及输入实时搜索(search-sdyou-type)和搜索纠错(did-you-mean)等搜索建议功能。
2.solr简介
Solr是Apache下得一个顶级开源项目,采用java开发,他是基于Lucene的全文搜索服务,Solr提供了比Lucene更为丰富的查询语言,同事实现了可配置,可扩展,并对索引,搜索性能进行了优化
Solr可以独立运行,运行在jetty,Tomcat等这些Servlet容器中,Solr索引的实现很简单,用post方法向Solr服务器发送一个描述field及其内容的xml文档,Solr根据xml文档添加,删除,更新索引。Solr搜索只需要发送Http GET请求,然后对solr返回的xml。json等格式的查询结果进行解析,组织页面布局。
solr的优点包括以下几个方面:
①高级的全文搜索功能;
②专为高通量的网络流量进行的优化;
③基于开放接口(XML和HTTP)的标准;
④综合的HTML管理界面;
⑤可伸缩性-能够有效地复制到另外一个Solr搜索服务器;
⑥使用XML配置达到灵活性和适配性;
⑦可扩展的插件体系。
比较
当单纯的对已有的数据进行搜索的时候,solr更快。也就是说数据已经存放在数据库中。
当实时建立索引,solr会产生io阻塞,查询性能较差,Elasticsearch具有明显的优势。
随着数据量的增加,solr的搜索效率会变得更低,而Elasticsearch没有什么明显的变化。
Elasticsearch VS Solr
1.es基本是开箱即用,非常简单。solr安装略微复杂。
2.Solr利用Zookeeper进行分布式管理,而Elasticsearch自带分布式协调管理功能。
3.solr支持更多格式的数据,比如json,xml,csy,而Elasticsearch仅支持json格式。
4.solr官方提供的功能更多,而Elasticsearch本身更注重于核心功能,高级功能多有第三方插件提供,例如图形界面需要kibana友好支撑。
5.solr查询快,但更新索引时慢(插入删除慢),用于电商查询多的应用
- ES建立索引块(既查询慢),实时性查询快,用于facebook新浪等搜索
- solr是传统搜索应用的有解决方案,但Elasticsearch更适用于新兴的实时搜索应用
6.solr比较成熟,有一个更大,更成熟的用户,开发和贡献者社区,而Elasticsearch相对开发维护较少,更新太快,学习使用成本较高。
五.Elasticsearch安装(后期升级使用为7.6.1)
1.下载
我的下载路径:D:\Elasticsearch
声明:jdk1.8,最低要求
官网
下载地址:https://www.elastic.co/cn/downloads/?elektra=home&storm=hero
https://www.elastic.co/cn/downloads/elasticsearch
Windows下安装
解压即可使用
2.认识目录
bin 启动文件
config 配置文件
	log4j2 日志配置文件
	jvm.options java虚拟机相关的配置
	elasticsearch.yml Elasticsearch的配置文件 默认端口9200端口,存在跨域问题。
jdk 环境
lib 相关jar包
logs 日志
modules 功能模块
plgins 插件 ik分词器
3.启动
bin目录elasticsearch.bat文件
![[外链图片转存失败,源站可能有防盗链机制,建议将图片保存下来直接上传(img-99j6GhGh-1651715841856)(C:\Users\lenovo\AppData\Roaming\Typora\typora-user-images\image-20220502153425026.png)]](https://img-blog.csdnimg.cn/21a37fbd4d314184b82acd82b30a0b82.png)
name: node节点名称
cluster_name: 集群名称(默认的集群名称就是elasticsearch)
version.number: 5.6.0,es版本号
{
  "name" : "陆离",
  "cluster_name" : "elasticsearch",
  "cluster_uuid" : "jw6kBFqZRQWIKp96dzR0kg",
  "version" : {
    "number" : "7.6.1",
    "build_flavor" : "default",
    "build_type" : "zip",
    "build_hash" : "aa751e09be0a5072e8570670309b1f12348f023b",
    "build_date" : "2020-02-29T00:15:25.529771Z",
    "build_snapshot" : false,
    "lucene_version" : "8.4.0",
    "minimum_wire_compatibility_version" : "6.8.0",
    "minimum_index_compatibility_version" : "6.0.0-beta1"
  },
  "tagline" : "You Know, for Search"
}
自成集群,自己生成一个uuid
“tagline” : “You Know, for Search”
标语:你知道的为了搜索
4.安装可视话插件
安装可视话界面es head的创建
1.下载地址
https://github.com/mobz/elasticsearch-head
前提:安装淘宝镜像
cmd 输入 npm install -g cnpm --registry=https://registry.npm.taobao.org
cnpm -v查看版本
2.启动
D:\Elasticsearch\elasticsearch-head-master\elasticsearch-head-master> cnpm install

D:\Elasticsearch\elasticsearch-head-master\elasticsearch-head-master> npm run start
解决跨域问题
![[外链图片转存失败,源站可能有防盗链机制,建议将图片保存下来直接上传(img-Bp5nuGyS-1651715841858)(C:\Users\lenovo\AppData\Roaming\Typora\typora-user-images\image-20220501220520807.png)]](https://img-blog.csdnimg.cn/e8d4626bd5524aed956f5866ac9b7607.png)
控制台会报错
跨域:跨端口,跨网站
访问9100会存在跨域问题
elasticsearch-7.6.1\config\elasticsearch.yml
#配置跨域 开启此功能 允许所有人
http.cors.enabled: true
http.cors.allow-origin: "*"
![[外链图片转存失败,源站可能有防盗链机制,建议将图片保存下来直接上传(img-4Q4zBZfi-1651715841860)(C:\Users\lenovo\AppData\Roaming\Typora\typora-user-images\image-20220501221216706.png)]](https://img-blog.csdnimg.cn/90df781650d04294ba7f5da3f8736d51.png)
3.重启es服务
bin 启动文件
创建索引注意索引存在大写可能会建立不成功
![[外链图片转存失败,源站可能有防盗链机制,建议将图片保存下来直接上传(img-yJqowYQm-1651715841860)(C:\Users\lenovo\AppData\Roaming\Typora\typora-user-images\image-20220501222544776.png)]](https://img-blog.csdnimg.cn/871bf902aa81487ba45896659baeff57.png)
就把索引当作一个数据库。
![[外链图片转存失败,源站可能有防盗链机制,建议将图片保存下来直接上传(img-LXGZQio8-1651715841861)(C:\Users\lenovo\AppData\Roaming\Typora\typora-user-images\image-20220502160144171.png)]](https://img-blog.csdnimg.cn/a0a88ba5331c468abe2e5eddd5a4e9ea.png)
六.Kibana安装(注意下载版本要和Elasticsearch版本一致)
下载地址:https://www.elastic.co/cn/downloads/past-releases/kibana-7-6-1
下载完毕后,解压需要很久!是一个标准的工程
好处:开箱即用,拆箱即用。
默认端口:5601
http://localhost:5601/
1.访问测试
kibana.bat
![[外链图片转存失败,源站可能有防盗链机制,建议将图片保存下来直接上传(img-v47BM7qD-1651715841862)(C:\Users\lenovo\AppData\Roaming\Typora\typora-user-images\image-20220502162248621.png)]](https://img-blog.csdnimg.cn/c1fe62ddc8c34f31bcc52fc3512df9d5.png)
![[外链图片转存失败,源站可能有防盗链机制,建议将图片保存下来直接上传(img-RQ9Ur3Pd-1651715841862)(C:\Users\lenovo\AppData\Roaming\Typora\typora-user-images\image-20220502162417849.png)]](https://img-blog.csdnimg.cn/afc5a6e4aa984234851113884c7f3ae0.png)
我们之后的所有操作都在设置写。
2.汉化
config/kibana.yml
将配置修改为i18n.locale: “zh-CN”
即可进行汉化
![[外链图片转存失败,源站可能有防盗链机制,建议将图片保存下来直接上传(img-tWS2Aqi4-1651715841863)(C:\Users\lenovo\AppData\Roaming\Typora\typora-user-images\image-20220502163756860.png)]](https://img-blog.csdnimg.cn/0c1e403acf704f9b9f5ff8e9e345cd8d.png)
3.Elasticsearch界面
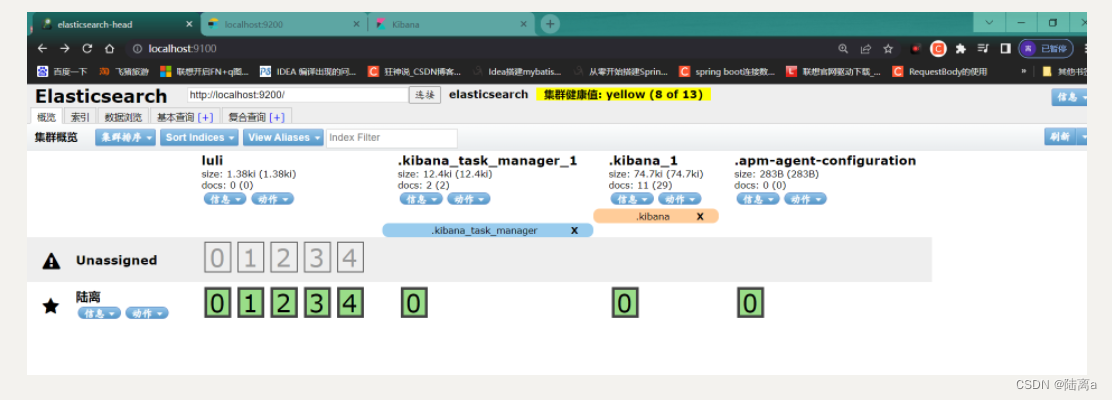
七.Elasticsearch核心概念
- 索引
- 字段类型(mapping)
- 文档(document)
| Relational DB(Mysql) | Elasticsearch |
|---|---|
| 数据库(tables) | 索引(indices) |
| 表(table) | types慢慢会弃用 |
| 行(rows) | document(文档) |
| 字段(columns) | fields |
物理设计
Elasticsearch在后台把每个索引划分为多个分片,每分分片可以在集群中的不同服务器间迁移。默认集群就是elasticsearch
![[外链图片转存失败,源站可能有防盗链机制,建议将图片保存下来直接上传(img-VpeP8GPE-1651715841868)(C:\Users\lenovo\AppData\Roaming\Typora\typora-user-images\image-20220502163845920.png)]](https://img-blog.csdnimg.cn/5ae1c2e251ee48d4ae1ef33a2ed6f623.png)
逻辑设计
elasticsearch中,每个索引就相当于一个库,这就是术语的使用,,在elasticsearch中,索引被分为多个分片,每个分片是一个Lucene的索引。所以一个elasticsearch索引是由多个Lucene索引组成的,因为elasticsearch的底层是Lucene,
![[外链图片转存失败,源站可能有防盗链机制,建议将图片保存下来直接上传(img-XhzK9dgb-1651715841869)(C:\Users\lenovo\AppData\Roaming\Typora\typora-user-images\image-20220502165359365.png)]](https://img-blog.csdnimg.cn/59c6d1e4f21e48d78b5a08255aaf4c9d.png)
例如:在博客中搜索Linux就不可能出现python。如果搜索python就不可能出现linux。
八.IK分词器
什么是IK分词器?
分词:即把一段中文或者别日得划分为一个个的关键字。我们在搜索的时候会把自己的信息进行分词,,会把数据库中或者索引库厚葬的数据进行分词,饭后进行一个匹配操作,默认的中文分词是将每一个字看成一个词,比如“什么是IK分词”会被分为“什”,“么”,“是”·····这显然是不符合要求的,所以我们需要安装中文分词器ik来解决这个问题。
如果使用中文,建议使用ik分词器!
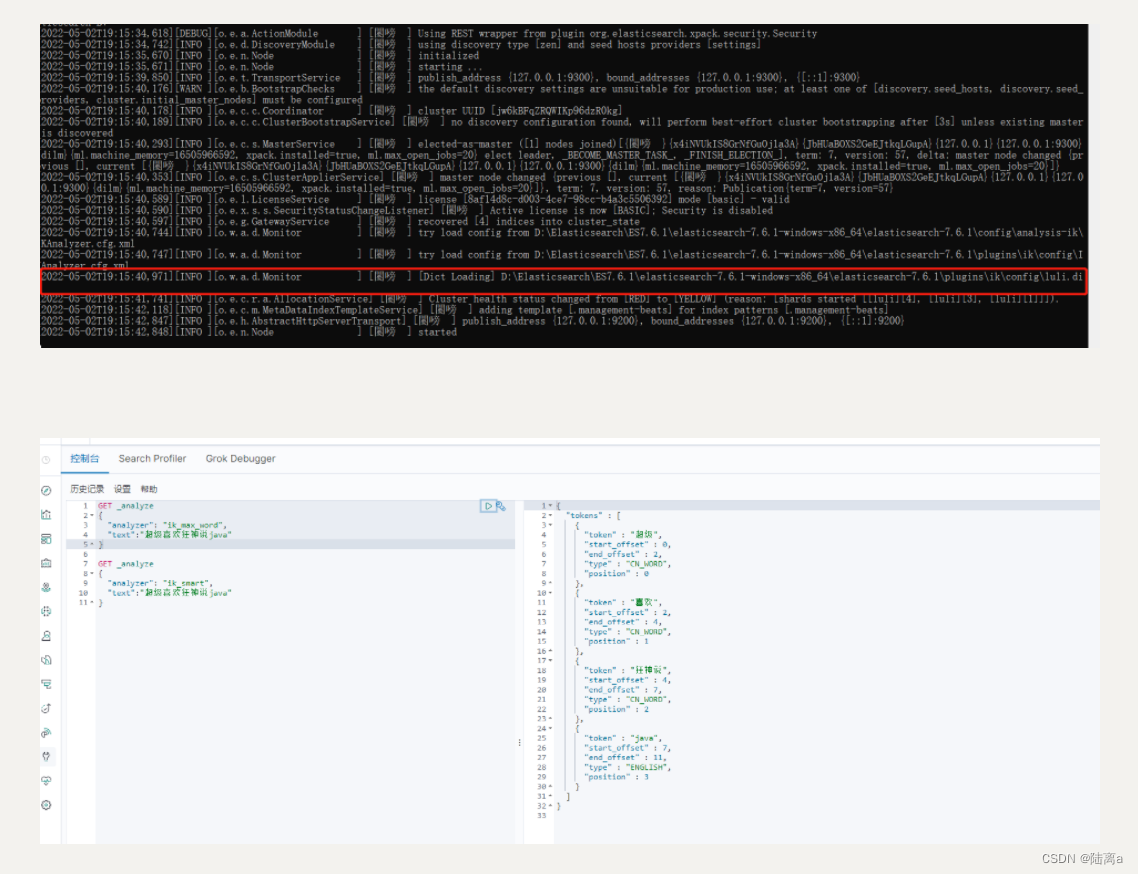
ik提供了亮哥哥分词算法:ik_smart和ik_max_word,其中ik_smart字少切分,ik_max_word为最细粒度划分!
1.下载(版本需要对应)
https://github.com/medcl/elasticsearch-analysis-ik/releases?page=5
https://github.com/medcl/elasticsearch-analysis-ik/releases/tag/v7.6.1
2.下载完毕放入elasticsearch即可
下载后解压到plugins
D:\Elasticsearch\ES7.6.1\elasticsearch-7.6.1-windows-x86_64\elasticsearch-7.6.1\plugins\ik
重启ES
![[外链图片转存失败,源站可能有防盗链机制,建议将图片保存下来直接上传(img-4DpK1Mfy-1651715841870)(C:\Users\lenovo\AppData\Roaming\Typora\typora-user-images\image-20220502183921731.png)]](https://img-blog.csdnimg.cn/d4bfdfa34851495da59b524087dcafae.png)
3.查看ES插件命令
D:\Elasticsearch\ES7.6.1\elasticsearch-7.6.1-windows-x86_64\elasticsearch-7.6.1\bin>elasticsearch-plugin.bat list
![[外链图片转存失败,源站可能有防盗链机制,建议将图片保存下来直接上传(img-HLZn6TLw-1651715841871)(C:\Users\lenovo\AppData\Roaming\Typora\typora-user-images\image-20220502184406791.png)]](https://img-blog.csdnimg.cn/04da184c453748ab8c091deea626bae4.png)
4.重启Kibana
kibana.bat
5.使用kibana测试
? 查看分词效果
ik_smart为最少切分
![[外链图片转存失败,源站可能有防盗链机制,建议将图片保存下来直接上传(img-SgkP5AD8-1651715841871)(C:\Users\lenovo\AppData\Roaming\Typora\typora-user-images\image-20220502190149478.png)]](https://img-blog.csdnimg.cn/ed982cbd4a064637847c5d261a82def7.png)
ik_max_word最细力度切分
![[外链图片转存失败,源站可能有防盗链机制,建议将图片保存下来直接上传(img-f0m46cq3-1651715841872)(C:\Users\lenovo\AppData\Roaming\Typora\typora-user-images\image-20220502190318352.png)]](https://img-blog.csdnimg.cn/f1b2e78cc087459bb2147b68d9756e7c.png)
问题
可能有时候分词会将你想要的词语分开,所以就需要自己加到自己的字典中(IKAnalyzer.cfg.xml)
D:\Elasticsearch\ES7.6.1\elasticsearch-7.6.1-windows-x86_64\elasticsearch-7.6.1\plugins\ik\config\IKAnalyzer.cfg.xml
添加自己的字典文件
![[外链图片转存失败,源站可能有防盗链机制,建议将图片保存下来直接上传(img-b7xiEGMq-1651715841873)(C:\Users\lenovo\AppData\Roaming\Typora\typora-user-images\image-20220502191246110.png)]](https://img-blog.csdnimg.cn/4083569497384f31b6613abf5f6be71d.png)
将自己的字典值文件引入到xml中
![[外链图片转存失败,源站可能有防盗链机制,建议将图片保存下来直接上传(img-Eh7rrAEg-1651715841873)(C:\Users\lenovo\AppData\Roaming\Typora\typora-user-images\image-20220502191329378.png)]](https://img-blog.csdnimg.cn/c673b435ac494a7fb71820db51349f65.png)
重启es
九.Rest风格操作
![[外链图片转存失败,源站可能有防盗链机制,建议将图片保存下来直接上传(img-ChiMhDyN-1651715841876)(C:\Users\lenovo\AppData\Roaming\Typora\typora-user-images\image-20220502191808786.png)]](https://img-blog.csdnimg.cn/0c032a7ef37c45b8b807dd37b65552bf.png)
根据不同的功能设置不同的请求方式。
集成测试
1.新增一个索引PUT
PUT /索引名/~类型名(之后会弃用)~/文档id
{
    请求题
}

PUT /test/type/1
{
 "name":"自我测试",
 "age":18
}
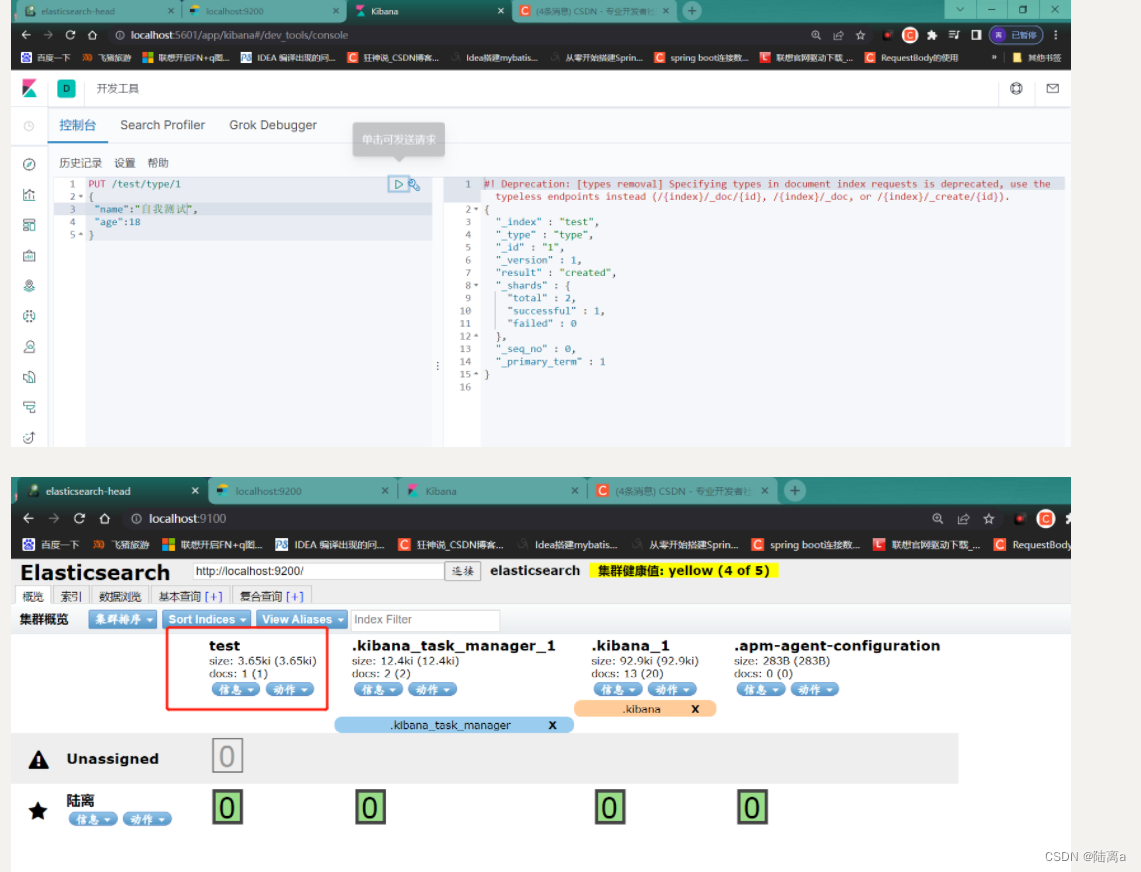

通过postMan
![[外链图片转存失败,源站可能有防盗链机制,建议将图片保存下来直接上传(img-c5sZz4Sk-1651715841878)(C:\Users\lenovo\AppData\Roaming\Typora\typora-user-images\image-20220502193323833.png)]](https://img-blog.csdnimg.cn/4c2fc93e633349268399a4e4fca4f17d.png)
也可以访问到数据
指定类型
PUT /test2
{
 "mappings": {
   "properties": {
     "name":{
       "type": "text"
     },
     "age":{
       "type": "long"
     },
     "birthday":{
       "type": "date"
     }
   }
 }
}
![[外链图片转存失败,源站可能有防盗链机制,建议将图片保存下来直接上传(img-wwSlELRL-1651715841879)(C:\Users\lenovo\AppData\Roaming\Typora\typora-user-images\image-20220502193800749.png)]](https://img-blog.csdnimg.cn/ac1e9008ab3c4d44aa975ec91bed67ad.png)
2.查询GET表信息
\[外链图片转存失败,源站可能有防盗链机制,建议将图片保存下来直接上传(img-wDkJLsWZ-1651715841879)(C:\Users\lenovo\AppData\Roaming\Typora\typora-user-images\image-20220502194058527.png)\]
3.查看默认信息
![[外链图片转存失败,源站可能有防盗链机制,建议将图片保存下来直接上传(img-Xkcl8Rx0-1651715841880)(C:\Users\lenovo\AppData\Roaming\Typora\typora-user-images\image-20220502194454487.png)]](https://img-blog.csdnimg.cn/5e8c6ce7019546d68ff3447a650c7538.png)
世界上太多优秀的人了,我们显得十分渺小,只有虚心学习,才能使自己有一点点的进步。
- 查看健康值
GET _cat/health
------展示信息---------
1651492099 11:48:19 elasticsearch yellow 1 1 6 6 0 0 3 0 - 66.7%
- 查看版本
GET _cat/indices?v
------展示信息---------
health status index                    uuid                   pri rep docs.count docs.deleted store.size pri.store.size
yellow open   test2                    y_jYidoDTw-pdHp5z8T-Sg   1   1          0            0       283b           283b
yellow open   test3                    eoDnH0RPTm6RJjKNUQWjBw   1   1          1            0      9.9kb          9.9kb
yellow open   test                     O5GCHSGJTTOPumacO6ungA   1   1          1            0      3.7kb          3.7kb
green  open   .kibana_task_manager_1   iGM1YKWlR_mv2Cmb1FQA-g   1   0          2            0     12.4kb         12.4kb
green  open   .apm-agent-configuration MGZzjUG4RYm1CVF9QMrjng   1   0          0            0       283b           283b
green  open   .kibana_1                0ldaoVAHS8e0ssmCK6l9hQ   1   0         15           38    142.1kb        142.1kb
![**[外链图片转存失败,源站可能有防盗链机制,建议将图片保存下来直接上传(img-XLssHkwr-1651715841880)(C:\Users\lenovo\AppData\Roaming\Typora\typora-user-images\image-20220502195032857.png)]**](https://img-blog.csdnimg.cn/599e0492826f4ec49957c0b92b9090bf.png)
4.修改索引PUT,直接覆盖或者使用
通过POST请求,在索引后加一个==_update==,doc中只对应的字段值即可
POST /test3/_doc/1/_update
{
  "doc":{
    "age":23
  }
}
------展示信息---------
_version(版本) 第几次操作数据
result 做了什么操作
#! Deprecation: [types removal] Specifying types in document update requests is deprecated, use the endpoint /{index}/_update/{id} instead.
{
  "_index" : "test3",
  "_type" : "_doc",
  "_id" : "1",
  "_version" : 3,
  "result" : "updated",
  "_shards" : {
    "total" : 2,
    "successful" : 1,
    "failed" : 0
  },
  "_seq_no" : 2,
  "_primary_term" : 1
}
5.删除索引
所有的删除命令使用delete
DELETE test
------展示信息---------
{
  "acknowledged" : true
}
十.关于文档的基本操作
1.添加一条数据
PUT /operate/_doc/1
{
 "name":"lzp",
 "age":22,
 "sex":"男",
 "birthday":"1999-11-28",
 "desc":"一枚小小的程序员",
 "tags":["技术控","胖子","工作狂"]
}
2.更新数据PUT
PUT /operate/_doc/3
{
 "name":"张三",
 "age":25,
 "sex":"人妖",
 "birthday":"1996-11-13",
 "desc":"不男不女",
 "tags":["泰国","丑女"]
}
3.Post _update,推荐使用这种模板
这种模板只修改需要需改的数据,如果是put形式的请求,其他不修改的数据将会置空
POST /operate/_doc/4/_update
{
"doc":{
   "name":"王五",
   "age":29,
   "tags":["山西","test"]
  }
}


GET /operate/_doc/4
4.GET简单查询
GET /operate/_doc/4
5.条件查询
注意点!!!!!
严重提示由于kibana内在机制,如果光标所在位置不在操作行将会报错
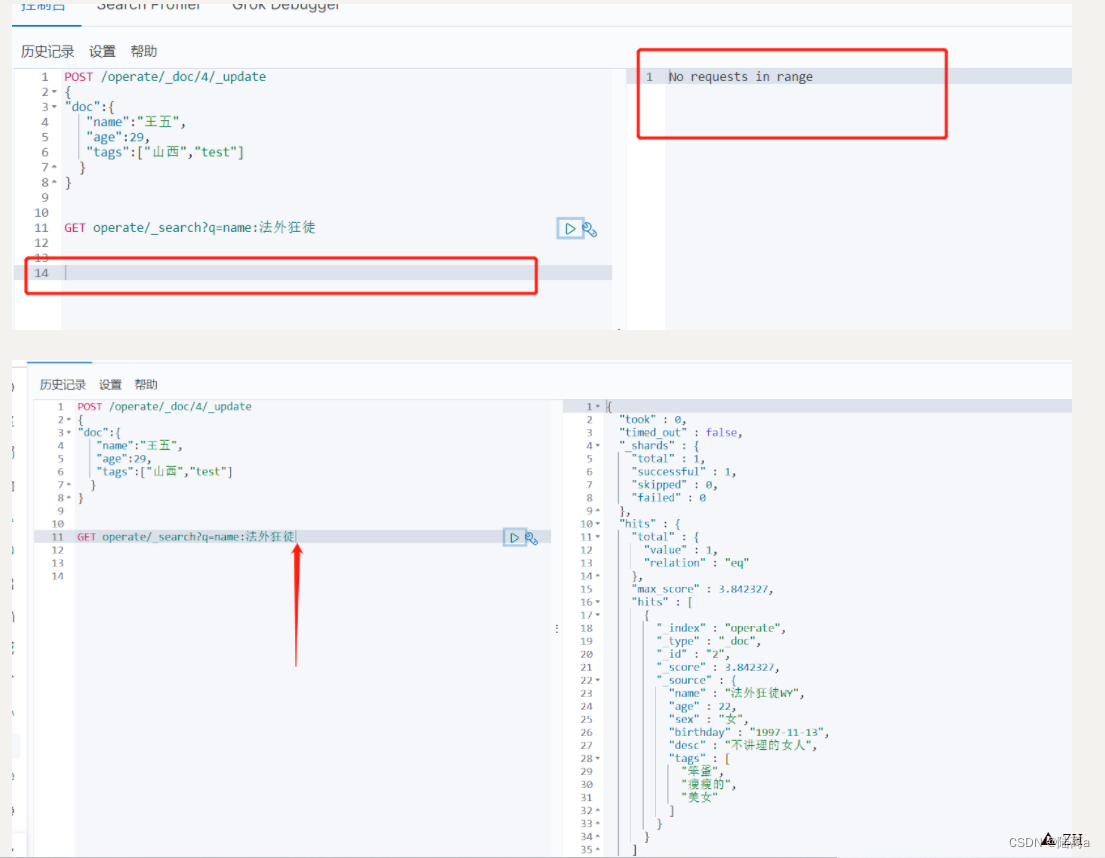
查询operate所有数据
GET /operate/_search
带条件查询
GET 索引名(表)/_search?q=字段名:查询数据
----------------------------------
GET operate/_search?q=name:法外狂徒
十一.复杂搜索
搜索一般根据权重进行匹配查询,_score峰值越高,查询顺序越靠前。
![[外链图片转存失败,源站可能有防盗链机制,建议将图片保存下来直接上传(img-UN64lLW4-1651715841882)(C:\Users\lenovo\AppData\Roaming\Typora\typora-user-images\image-20220502220915153.png)]](https://img-blog.csdnimg.cn/67cad1ab78b5440fa0d9e00c565d6041.png)
1.简单查询
name:字段名


GET operate/_search
{
  "query": {
    "match": {
      "name": "王五"
    }
  }
}
hits:查询出的是索引和文档信息
查询结果
查询总数total
relation匹配形式
通过_score判断谁是更为精准的查询结果
{
  "took" : 1,
  "timed_out" : false,
  "_shards" : {
    "total" : 1,
    "successful" : 1,
    "skipped" : 0,
    "failed" : 0
  },
  "hits" : {
    "total" : {
      "value" : 3,
      "relation" : "eq"
    },
    "max_score" : 1.5801352,
    "hits" : [
      {
        "_index" : "operate",
        "_type" : "_doc",
        "_id" : "3",
        "_score" : 1.5801352,
        "_source" : {
          "name" : "王五五",
          "age" : 30,
          "sex" : "人妖",
          "birthday" : "1994-11-13",
          "desc" : "男",
          "tags" : [
            "俄罗斯",
            "狗贼"
          ]
        }
      },
     ·········
    ]
  }
}
2.查询指定字段
“_source”: [“字段名1”,“字段名2”,·······,“字段名n”]
sort:排序 order:排序方式
分页: from 从第几条开始查,size返回多少条数据 类似于sql中的limit
GET operate/_search
{
  "query": {
    "match": {
      "name": "王五"
    }
  },
  "_source": ["name","age"]
  ,"sort": [
    {
      "age": {
        "order": "asc"
      }
    }
  ]
  , "from": 0
  , "size": 2
}
3.多条件查询(布尔值)
1.must(类似于and)
select name,age from “operate/_search ” where name like “王五” and age=30;
GET operate/_search
{
  "query": {
    "bool": {
      "must": [
        {
          "match": {
            "name": "王五"
          }
        },
        {
          "match": {
            "age": "30"
          }
        }

      ]
    }
  }
  ,"_source": ["name","age"]
}
![[外链图片转存失败,源站可能有防盗链机制,建议将图片保存下来直接上传(img-2eWBSH18-1651715841883)(C:\Users\lenovo\Desktop\总结文档\自我总结\前段复习\image-20220502224514281.png)]](https://img-blog.csdnimg.cn/9dda13c806d7419e9f23d2bb18d6bf74.png)
2.should(类似or)
select name,age from “operate/_search ” where name like “六” or age=29;
![[外链图片转存失败,源站可能有防盗链机制,建议将图片保存下来直接上传(img-eERqCHcs-1651715841883)(C:\Users\lenovo\AppData\Roaming\Typora\typora-user-images\image-20220502224838952.png)]](https://img-blog.csdnimg.cn/07cf2b35849f4256940bf86b493a35e6.png)
3.must_not(不等于<> !=)
select name,age,sex from “operate/_search ” where name !=“王五” and sex!=“女”;
GET operate/_search
{
  "query": {
    "bool": {
      "must_not": [
        {
          "match": {
            "name": "王五"
          }
        },
        {
          "match": {
            "sex": "女"
          }
        }

      ]
    }
  }
  ,"_source": ["name","age","sex"]
}
4.filter(过滤) gte > ; lte<
select name,age,sex from “operate/_search ” where name like “王五” and age >= 30 and age <= 40;
也可以单独查
GET operate/_search
{
  "query": {
    "bool": {
      "must": [
        {
          "match": {
            "name": "王五"
          }
        }
      ]
      , "filter": {
        "range": {
          "age": {
            "gte": 30,
            "lte": 40
          }
        }
      }
    }
  }
  ,"_source": ["name","age","sex"]
}
- gt 大于
- gte 大于等于
- lt 小于
- lte 小于等于
5.多条件查询使用空格分开(满足其一即可)
select * from “operate/_search” where tags like “山西” or like “胖子”;
GET operate/_search
{
  "query": {
    "bool": {
      "must": [
        {
          "match": {
            "tags": "山西 胖子"
          }
        }
      ]
    }
  }
}
![[外链图片转存失败,源站可能有防盗链机制,建议将图片保存下来直接上传(img-Z5ZhiF1L-1651715841884)(C:\Users\lenovo\AppData\Roaming\Typora\typora-user-images\image-20220502233504231.png)]](https://img-blog.csdnimg.cn/930c63ce11414f4c876babdc584e44d9.png)
6.精确查询term 倒排索引进行精确查询
关于分词:
term,直接进行精确查询
match,先使用分词解析!(先分析文档,然后再通过分析的文档进行查询)
7.测试一波
1.新建表
PUT testdb
{
"mappings": {
  "properties": {
      "name":{
        "type": "text"
      },
      "desc":{
        "type": "keyword"
      }
    }
  }


  -------------展示 -------------
  {
  "acknowledged" : true,
  "shards_acknowledged" : true,
  "index" : "testdb"
}
2.插入数据
PUT testdb/_doc/1
{
  "name":"用户1",
  "desc":"用户说明1"
}


  -------------展示 -------------
{
  "_index" : "testdb",
  "_type" : "_doc",
  "_id" : "1",
  "_version" : 4,
  "result" : "created",
  "_shards" : {
    "total" : 2,
    "successful" : 1,
    "failed" : 0
  },
  "_seq_no" : 3,
  "_primary_term" : 1
}
3.查看所有插入的数据
GET testdb/_search
4.两个类型text keyword
keyword未被拆分
GET _analyze
{
  "analyzer": "keyword",
  "text": ["用户说明2"]
}

  -------------展示 -------------
{
  "tokens" : [
    {
      "token" : "用户说明2",
      "start_offset" : 0,
      "end_offset" : 5,
      "type" : "word",
      "position" : 0
    }
  ]
}
standard可以看到被拆分了
GET _analyze
{
  "analyzer": "standard",
  "text": ["用户说明2"]
}
-------------展示 -------------
{
  "tokens" : [
    {
      "token" : "用",
      "start_offset" : 0,
      "end_offset" : 1,
      "type" : "<IDEOGRAPHIC>",
      "position" : 0
    },
    {
      "token" : "户",
      "start_offset" : 1,
      "end_offset" : 2,
      "type" : "<IDEOGRAPHIC>",
      "position" : 1
    },
    {
      "token" : "说",
      "start_offset" : 2,
      "end_offset" : 3,
      "type" : "<IDEOGRAPHIC>",
      "position" : 2
    },
    {
      "token" : "明",
      "start_offset" : 3,
      "end_offset" : 4,
      "type" : "<IDEOGRAPHIC>",
      "position" : 3
    },
    {
      "token" : "2",
      "start_offset" : 4,
      "end_offset" : 5,
      "type" : "<NUM>",
      "position" : 4
    }
  ]
}
细节总结,text和keyword的区别
如果type是text将会被分词解析,如果是keyword将不能被分词解析
![[外链图片转存失败,源站可能有防盗链机制,建议将图片保存下来直接上传(img-l7ffLvVN-1651715841884)(C:\Users\lenovo\AppData\Roaming\Typora\typora-user-images\image-20220502235753949.png)]](https://img-blog.csdnimg.cn/3434eb605c984c4a97b16e644b5edcc9.png)
因为没有分词解析所以查询不到,只能精确匹配
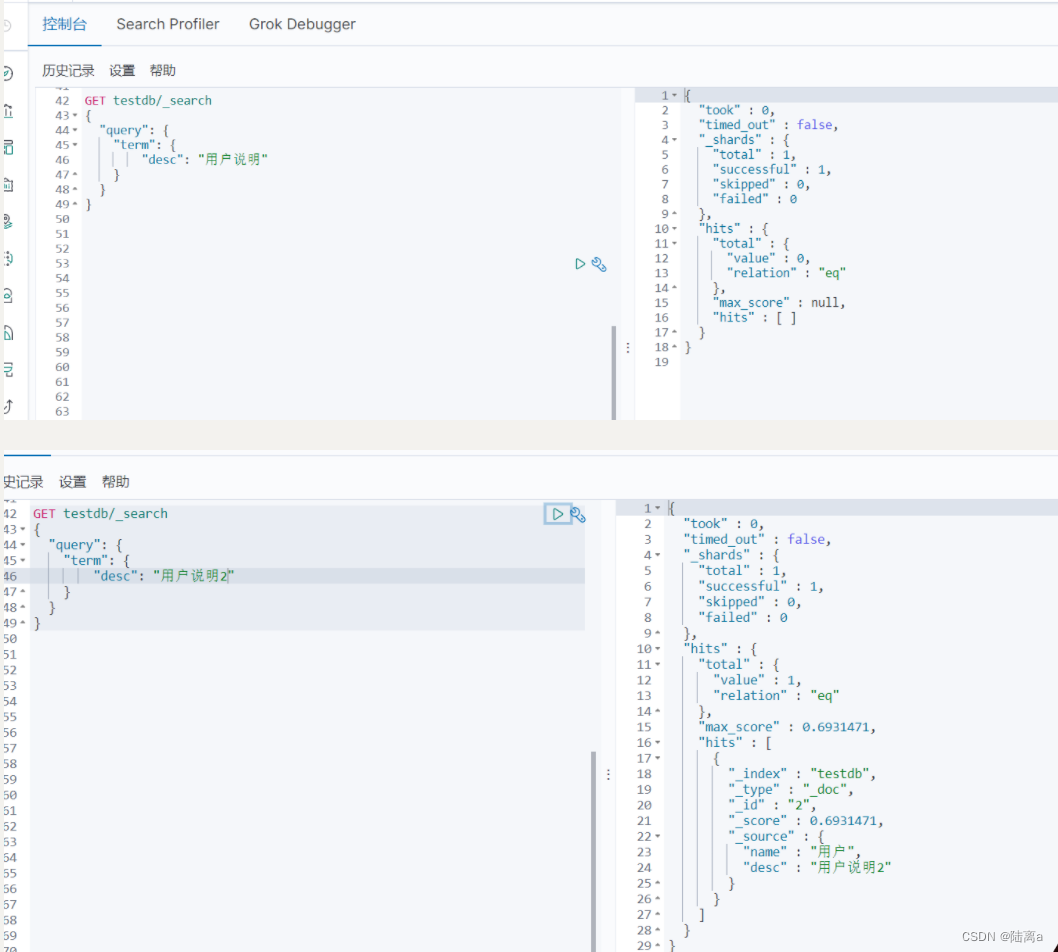
因为type为text,所以可以被分词解析,即可得到模糊查询的数据
![[外链图片转存失败,源站可能有防盗链机制,建议将图片保存下来直接上传(img-wkMzRVi9-1651715841886)(C:\Users\lenovo\AppData\Roaming\Typora\typora-user-images\image-20220502235956549.png)]](https://img-blog.csdnimg.cn/8c13e08a00854b7ea0dd5b1a0396bacb.png)
5.查询t1为22或者33的数据
1插入测试数据
PUT testdb/_doc/3
{
  "t1":"22",
  "t2":"2022-04-21"
}

PUT testdb/_doc/4
{
  "t1":"33",
  "t2":"2023-11-21"
}
2查询
GET  testdb/_search
{
  "query": {
    "bool": {
      "should": [
        {
          "term": {
              "t1": "22"
          }
        },
        {
          "term": {
              "t1": "33"
          }
        }
      ]
    }
  }
}
4.高亮查询(重要点)
当指定highlight的属性值之后,所查询的json数据将会被高亮显示
GET  operate/_search
{
  "query": {
    "match": {
      "name": "五六"
    }
  }
  , "highlight": {
    "fields": {
      "name": {}
    }
  }
}
![[外链图片转存失败,源站可能有防盗链机制,建议将图片保存下来直接上传(img-p81I0tfC-1651715841887)(C:\Users\lenovo\AppData\Roaming\Typora\typora-user-images\image-20220503001802430.png)]](https://img-blog.csdnimg.cn/fa54314428f4477082bbbfcacd1cf5ef.png)
5.自定义搜索高亮条件
pre_tags:相当于前置标签
post_tags:相当于闭合标签
GET  operate/_search
{
  "query": {
    "match": {
      "name": "五六"
    }
  }
  , "highlight": {
    "pre_tags": "<p class='key' style='color:red'>",
    "post_tags": "</p>",
    "fields": {
      "name": {}
    }
  }
}
![[外链图片转存失败,源站可能有防盗链机制,建议将图片保存下来直接上传(img-JrdZjz0Y-1651715841887)(C:\Users\lenovo\AppData\Roaming\Typora\typora-user-images\image-20220503002128003.png)]](https://img-blog.csdnimg.cn/b809d02dce254746859758d3bfd936b9.png)
#小结
这些查询mysql都能做,只是mysql效率比较低
- 匹配查询
- 按照条件查询
- 精确查询
- 区间范围查询
- 区间字段过滤查询
- 多条件查询
- 高亮查询
- 倒排索引
十二.集成SpringBoot
引入的以来版本要和安装的es版本一致
<dependency>
    <groupId>org.springframework.boot</groupId>
    <artifactId>spring-boot-starter-data-elasticsearch</artifactId>
    <version>7.6.1</version>
</dependency>

<!--fastjson版本为1.2.62-->
<dependency>
    <groupId>com.alibaba</groupId>
    <artifactId>fastjson</artifactId>
    <version>1.2.62</version>
</dependency>
配置config文件
/**
 * 陆离
 * 2022/5/3 2:45:13
 */
@Configuration
public class ElasticsearchClientConfig {
    @Bean
    public RestHighLevelClient restHighLevelClient(){
        RestHighLevelClient client = new RestHighLevelClient(
                RestClient.builder(
                        new HttpHost("127.0.0.1",9200,"http")
                )
        );
        return client;
    }
}
1.创建索引
/**
     * 测试索引的创建 Request
     */
@Test
void testCreateIndex() throws IOException {
    //1.创建索引请求
    CreateIndexRequest request = new CreateIndexRequest("luli");
    //2.执行请求
    CreateIndexResponse createIndexResponse = client.indices().create(request, RequestOptions.DEFAULT);
    System.out.println(createIndexResponse);
}
![[外链图片转存失败,源站可能有防盗链机制,建议将图片保存下来直接上传(img-M2tk3t2e-1651715841888)(C:\Users\lenovo\AppData\Roaming\Typora\typora-user-images\image-20220503141541482.png)]](https://img-blog.csdnimg.cn/71115d2390a14ee482d5068f663a3181.png)
2.获取索引
/**
* 测试索引的获取 Request
*/
@Test
void testGetIndex() throws IOException {
    //1.获取索引
    GetIndexRequest request = new GetIndexRequest("luli2");
    //2.判断索引是否存在
    boolean exists = client.indices().exists(request, RequestOptions.DEFAULT);
    System.out.println(exists);
}
![[外链图片转存失败,源站可能有防盗链机制,建议将图片保存下来直接上传(img-NDy2Sn8N-1651715841888)(C:\Users\lenovo\AppData\Roaming\Typora\typora-user-images\image-20220503142206472.png)]](https://img-blog.csdnimg.cn/b769488282364792867d06d9e6672df1.png)
3.删除索引
/**
* 测试索引的删除 Request
*/
@Test
void testDeleteIndex() throws IOException {
    //1.获取索引
    DeleteIndexRequest request = new DeleteIndexRequest("luli2");
    //2.判断索引是否存在
    AcknowledgedResponse delete = client.indices().delete(request, RequestOptions.DEFAULT);
    //3.是否存在
    System.out.println(delete.isAcknowledged());
}

/**
* 测试索引的删除进阶版
*/
@Test
void testDeleteIndexs() throws IOException {
    //1.获取索引
    GetIndexRequest requests = new GetIndexRequest("luli");
    //2.判断索引是否存在
    boolean exists = client.indices().exists(requests, RequestOptions.DEFAULT);
    if (exists) {
        //1.获取索引
        DeleteIndexRequest request = new DeleteIndexRequest("luli");
        //2.判断索引是否存在
        AcknowledgedResponse delete = client.indices().delete(request, RequestOptions.DEFAULT);
        System.out.println("索引删除成功:" + delete.isAcknowledged());
        } else {
        System.out.println("索引不存在");
    }
}
![[外链图片转存失败,源站可能有防盗链机制,建议将图片保存下来直接上传(img-9WBhLJtT-1651715841889)(C:\Users\lenovo\AppData\Roaming\Typora\typora-user-images\image-20220503142907820.png)]](https://img-blog.csdnimg.cn/adba381aad064ef59bbd93517db61ae4.png)
4.新增数据
    /**
     * 测试添加文档
     * 纯新的数据
     * @throws IOException
     */
    @Test
    void testAddDocuments() throws IOException {
        //创建对象
        List<Users> users = usersService.getUsers("小李");
        Users users1 = new Users(null, "ES数据测试数据", "13934084972", "山西省晋中市榆次区", "2022-05-03", "一枚程序猿");
        //创建请求
        IndexRequest request = new IndexRequest("luli2");

        //规则
        request.id("1");
        //超时设置为1秒
        request.timeout(TimeValue.timeValueSeconds(1));


        //将数据放入请求 json 注意在pom文件中需要引入fastjson
        String userData = JSON.toJSONString(users1);
        request.source(userData, XContentType.JSON);

        //客户端发送请求,获取响应的结果
        IndexResponse indexResponse = client.index(request, RequestOptions.DEFAULT);
        System.out.println(indexResponse.toString());
        //获取状态 CREATED创建
        System.out.println(indexResponse.status());
    }
![[外链图片转存失败,源站可能有防盗链机制,建议将图片保存下来直接上传(img-8jnSYr9r-1651715841889)(C:\Users\lenovo\AppData\Roaming\Typora\typora-user-images\image-20220503144834581.png)]](https://img-blog.csdnimg.cn/932bf96c380040afba322b8d142b3fdd.png)
![[外链图片转存失败,源站可能有防盗链机制,建议将图片保存下来直接上传(img-Jll4VQJ6-1651715841890)(C:\Users\lenovo\AppData\Roaming\Typora\typora-user-images\image-20220503144845175.png)]](https://img-blog.csdnimg.cn/497301bf0cc94c0b9b354b93764896f1.png)
5.判断该条数据是否存在
    /**
     * 获取文档,判断文档是否存在
     * @throws IOException
     */
    @Test
    void testGetDocuments() throws IOException {
        GetRequest getRequest = new GetRequest("luli2", "1");
        //不获取返回的_sorce的上下文了
        getRequest.fetchSourceContext(new FetchSourceContext(false));
        //不获取返回的排序字段
        getRequest.storedFields("_none_");

        boolean exists = client.exists(getRequest, RequestOptions.DEFAULT);
        System.out.println(exists);
    }
![[外链图片转存失败,源站可能有防盗链机制,建议将图片保存下来直接上传(img-s4kWLc77-1651715841891)(C:\Users\lenovo\AppData\Roaming\Typora\typora-user-images\image-20220503150001110.png)]](https://img-blog.csdnimg.cn/7cd6f1cdb5a84bffa08d08304754e3cb.png)
6.获得数据的信息
    /**
     * 获取文档信息
     * @throws IOException
     */
    @Test
    void teseGetDocument() throws IOException {
        GetRequest getRequest = new GetRequest("luli2", "1");
        GetResponse getResponse = client.get(getRequest, RequestOptions.DEFAULT);

        //通过Map类型返回
        Map<String, Object> sourceAsMap = getResponse.getSourceAsMap();
        System.out.println("通过Map类型返回:"+sourceAsMap);
        //通过String类型返回
        String sourceAsString = getResponse.getSourceAsString();
        System.out.println("通过String类型返回:"+sourceAsString);
        //返回整体数据
        System.out.println(getResponse);
    }
![[外链图片转存失败,源站可能有防盗链机制,建议将图片保存下来直接上传(img-phO6OUKg-1651715841891)(C:\Users\lenovo\AppData\Roaming\Typora\typora-user-images\image-20220503150558781.png)]](https://img-blog.csdnimg.cn/303db5fdc77445f5a77e7fd55d7abd56.png)
7.修改数据信息
  /**
     * 更新文档信息
     *
     * @throws IOException
     */
    @Test
    void teseUpdateDocument() throws IOException {
        //更新luli2中1号的文档信息
        UpdateRequest updateRequest = new UpdateRequest("luli2", "1");
        updateRequest.timeout("1s");
        //创建一个修改对象
        Users users1 = new Users(null, "ES数据测试数据修改", "13934084972", "山西省晋中市榆次区庄子乡", "2022-06-03", "程序猿");
        updateRequest.doc(JSON.toJSONString(users1), XContentType.JSON);
        UpdateResponse update = client.update(updateRequest, RequestOptions.DEFAULT);
        System.out.println("状态:" + update.status());
    }
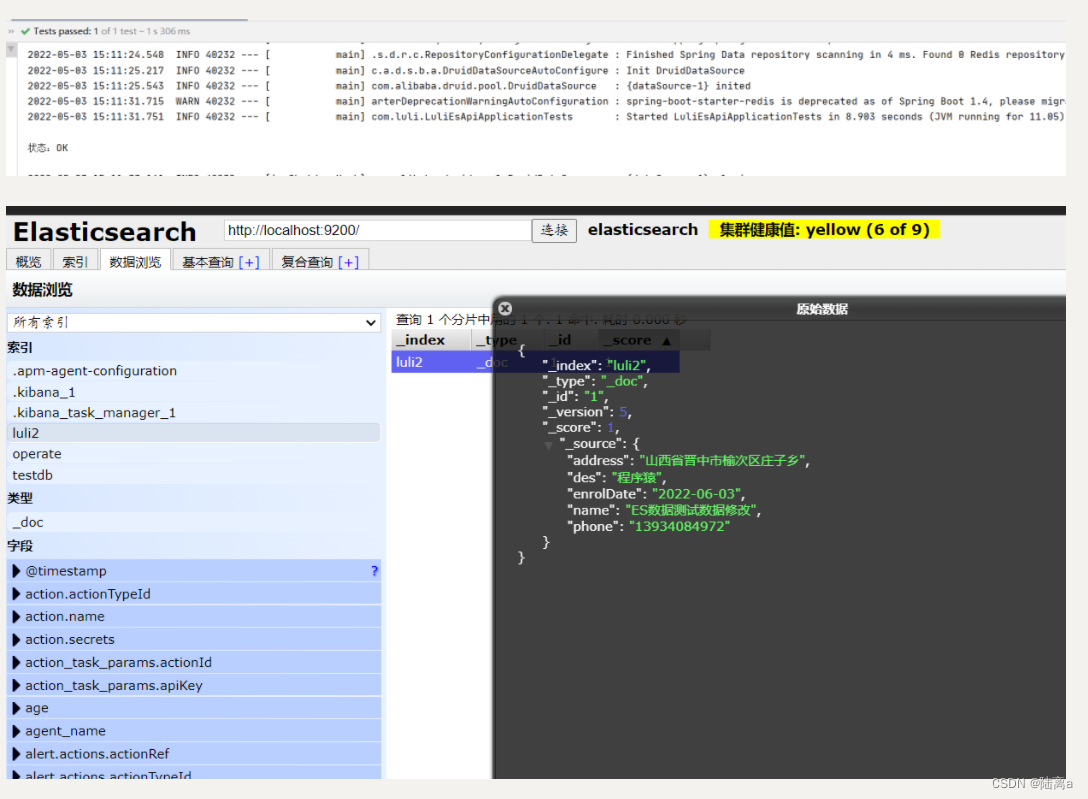
8.删除数据
    /**
     * 删除文档信息
     *
     * @throws IOException
     */
    @Test
    void teseDeleteDocument() throws IOException {
        DeleteRequest request = new DeleteRequest("luli2", "3");
        //超时请求,超过指定事件将不会再被请求
        request.timeout("1s");

        DeleteResponse delete = client.delete(request, RequestOptions.DEFAULT);
        //NOT_FOUND 不存在 OK成功
        System.out.println("状态:" + delete.status());

    }
![[外链图片转存失败,源站可能有防盗链机制,建议将图片保存下来直接上传(img-K05y8JXC-1651715841893)(C:\Users\lenovo\AppData\Roaming\Typora\typora-user-images\image-20220503151903735.png)]](https://img-blog.csdnimg.cn/41433635f468406587ad4dfc196a9f2a.png)
9.批量执行(新增)
    /**
     * 批量文档文档插入
     * 也可以进行批量的删除和修改
     *
     * @throws IOException
     */
    @Test
    void teseBulkRequeRequest() throws IOException {
        //创建批量请求
        BulkRequest bulkRequest = new BulkRequest();
        bulkRequest.timeout("10s");
        //数据库拿到数据
        List<Users> users = usersService.getUsers(null);
        //批量插入
        for (int i = 0; i < users.size(); i++) {
            bulkRequest.add(
                    new IndexRequest("luli3")
                            .id("" + (i+1))
                            .source(JSON.toJSONString(users.get(i)), XContentType.JSON)
            );
        }
        BulkResponse bulkResponse = client.bulk(bulkRequest, RequestOptions.DEFAULT);
        //是否执行失败 true是失败 false是成功
        System.out.println("是否执行失败:" + bulkResponse.hasFailures());
    }
![[外链图片转存失败,源站可能有防盗链机制,建议将图片保存下来直接上传(img-DxX03wsT-1651715841894)(C:\Users\lenovo\AppData\Roaming\Typora\typora-user-images\image-20220503154048802.png)]](https://img-blog.csdnimg.cn/77df8925bd6f4bfbb19526ba050c19c8.png)
10.精确匹配
注意点
查询的时候
QueryBuilders.termQuery(key,value);
可能会查询失败在key值后一定 要交(.keyword)才可以查询到。
   /**
     *
     * @throws IOException termQuery 精确匹配
     *                     SearchRequest 搜索请求
     *                     SearchSourceBuilder 条件构造
     *                     HighlightBuilder 构建高亮
     *                     TermQueryBuilder 精确查询
     *                     QueryBuilders.termQuery("字段名" + ".keyword" ,"value值");
     */
    @Test
    void testSearch() throws IOException {
        //新建查询索引
        SearchRequest searchRequest = new SearchRequest("luli3");
        //构建搜索条件 构造器
        SearchSourceBuilder sourceBuilder = new SearchSourceBuilder();
        //QueryBuilders.matchAllQuery() 全量匹配
        //查询条件 使用QueryBuilders快速匹配
        //ueryBuilders.termQuery 精确匹配
        //QueryBuilders.matchAllQuery() 匹配所有

        //要设定keyword否则将无法查询出结果
        TermQueryBuilder termQueryBuilder = QueryBuilders.termQuery("name" + KEY_WORD, "小李");
        sourceBuilder.query(termQueryBuilder);
        sourceBuilder.timeout(new TimeValue(60, TimeUnit.SECONDS));
        //作为分页使用,空值为默认数值
//        sourceBuilder.from();
//        sourceBuilder.size();
        searchRequest.source(sourceBuilder);
        SearchResponse searchResponse = client.search(searchRequest, RequestOptions.DEFAULT);
        System.out.println(JSON.toJSONString(searchResponse.getHits()));
        System.out.println("================================");
        for (SearchHit documentFields : searchResponse.getHits().getHits()) {
            System.out.println(documentFields.getSourceAsMap());
        }
    }
十三.爬虫
数据问题?数据库获取,消息队列获取,都可以成为数据源头,爬虫!
爬取数据:(获取请求返回页面信息,筛选出我们想要的数据就可以了)
jsoup包
<dependency>
    <groupId>org.jsoup</groupId>
    <artifactId>jsoup</artifactId>
    <version>1.10.2</version>
</dependency>
1.java爬取数据工具类
package com.luli.Utils;

import com.luli.entity.Content;
import org.elasticsearch.action.search.SearchRequest;
import org.elasticsearch.action.search.SearchResponse;
import org.elasticsearch.client.RequestOptions;
import org.elasticsearch.client.RestHighLevelClient;
import org.elasticsearch.common.unit.TimeValue;
import org.elasticsearch.index.query.QueryBuilders;
import org.elasticsearch.index.query.TermQueryBuilder;
import org.elasticsearch.search.SearchHit;
import org.elasticsearch.search.builder.SearchSourceBuilder;
import org.jsoup.Jsoup;
import org.jsoup.nodes.Document;
import org.jsoup.nodes.Element;
import org.jsoup.select.Elements;
import org.springframework.beans.factory.annotation.Autowired;

import javax.naming.directory.SearchResult;
import java.io.IOException;
import java.net.MalformedURLException;
import java.net.URL;
import java.util.ArrayList;
import java.util.List;
import java.util.Map;
import java.util.concurrent.TimeUnit;

/**
 * 陆离
 * 2022/5/3 19:31:07
 * 解析网页工具类
 */
public class HtmlParseUtils {

    @Autowired
    RestHighLevelClient restHighLevelClient;

    public  List<Content> parseID(String keywords) throws IOException {
        //获取请求 https://search.jd.com/Search?keyword=
        //前提需要链接网络 不能获取ajax数据
        String url = "https://search.jd.com/Search?keyword=" + keywords;
        //解析网页返回的就是js页面  document对象
        Document document = Jsoup.parse(new URL(url), 3000);
        //所有在js中使用的方法都能用了
        Element element = document.getElementById("J_goodsList");
        //获取所有li元素
        Elements li = element.getElementsByTag("li");

        List<Content> contentList = new ArrayList<>();
        //获取元素中的内容 每一个li标签
        for (Element el : li) {
            //关于图片很多的网址,所有的图片都是延迟加载的
            String img = el.getElementsByTag("img").eq(0).attr("data-lazy-img");
            String price = el.getElementsByClass("p-price").eq(0).text();
            String title = el.getElementsByClass("p-name").eq(0).text();
            String words = el.getElementsByClass("promo-words").eq(0).text();
            Content content = new Content();
            content.setImg(img);
            content.setPrice(price);
            content.setTitle(title);
            content.setWords(words);
            contentList.add(content);
        }
        return contentList;
    }

    /**
     * 获取数据,实现搜索功能
     * @param keyword
     * @param pageNo
     * @param pageSize
     * @return
     */
    public  List<Map<String, Object>> searchPage(String keyword, int pageNo, int pageSize) throws IOException {
        if (pageNo <= 1) {
            pageNo = 1;
        }
        //条件搜素
        SearchRequest searchRequest = new SearchRequest("jd_goods");
        SearchSourceBuilder sourceBuilder = new SearchSourceBuilder();

        //分页
        sourceBuilder.from(pageNo);
        sourceBuilder.size(pageSize);

        //精准匹配关键字
        TermQueryBuilder termQueryBuilder = QueryBuilders.termQuery("title", keyword);
        sourceBuilder.query(termQueryBuilder);
        sourceBuilder.timeout(new TimeValue(60, TimeUnit.SECONDS));

        //执行搜索
        searchRequest.source(sourceBuilder);
        SearchResponse searchResponse = restHighLevelClient.search(searchRequest, RequestOptions.DEFAULT);

        //解析结果
        List<Map<String, Object>> list = new ArrayList<>();
        for (SearchHit documentFields : searchResponse.getHits().getHits()) {
            list.add(documentFields.getSourceAsMap());
        }
        return list;
    }


}
2.集成vue
cmd面板集成初始化
E:\wwwwwwwwwwwwwwww\elasticsearch\luli-es-vue>npm init
This utility will walk you through creating a package.json file.
It only covers the most common items, and tries to guess sensible defaults.

See `npm help init` for definitive documentation on these fields
and exactly what they do.

Use `npm install <pkg>` afterwards to install a package and
save it as a dependency in the package.json file.

Press ^C at any time to quit.
package name: (luli-es-vue)
version: (1.0.0)
description:
entry point: (index.js)
test command:
git repository:
keywords:
author:
license: (ISC)
About to write to E:\wwwwwwwwwwwwwwww\elasticsearch\luli-es-vue\package.json:

{
  "name": "luli-es-vue",
  "version": "1.0.0",
  "description": "",
  "main": "index.js",
  "scripts": {
    "test": "echo \"Error: no test specified\" && exit 1"
  },
  "author": "",
  "license": "ISC"
}


Is this OK? (yes) y
下载vue
E:\wwwwwwwwwwwwwwww\elasticsearch\luli-es-vue>npm install vue
npm notice created a lockfile as package-lock.json. You should commit this file.
npm WARN luli-es-vue@1.0.0 No description
npm WARN luli-es-vue@1.0.0 No repository field.

+ vue@3.2.33
added 21 packages from 43 contributors and audited 21 packages in 39.092s

1 package is looking for funding
  run `npm fund` for details

found 0 vulnerabilities
下载通信
E:\wwwwwwwwwwwwwwww\elasticsearch\luli-es-vue>npm install axios
npm WARN luli-es-vue@1.0.0 No description
npm WARN luli-es-vue@1.0.0 No repository field.

+ axios@0.27.2
added 8 packages from 11 contributors and audited 29 packages in 21.875s

2 packages are looking for funding
  run `npm fund` for details

found 0 vulnerabilities
![[外链图片转存失败,源站可能有防盗链机制,建议将图片保存下来直接上传(img-aQdpMVH0-1651715841894)(C:\Users\lenovo\AppData\Roaming\Typora\typora-user-images\image-20220503211803725.png)]](https://img-blog.csdnimg.cn/960124427e664288933efa8bd53cb476.png)
在E:\wwwwwwwwwwwwwwww\elasticsearch\luli-es-vue\node_modules\axios\dist路径下把axios.min.js放入java的js目录下
在E:\wwwwwwwwwwwwwwww\elasticsearch\luli-es-vue\node_modules\vue\dist路径下把vue.min.js放入java的js目录下
在index中导入vue
<script src="https://unpkg.com/axios/dist/axios.min.js"></script>
<script src="https://cdn.jsdelivr.net/npm/vue@2/dist/vue.js"></script>
<script>
    new Vue({
        el: "#app",
        data: {
            "keyword": '', // 搜索的关键字
            "results": [] // 后端返回的结果
        },
        methods: {
            searchKey() {
                var keyword = this.keyword;
                console.log(keyword);
                axios.get('searchHighLight/' + keyword + '/0/20').then(response => {
                    console.log(response);
                    this.results = response.data;
                })
            }
        }
    });
