无论是基本的简单转换和聚合,还是基于窗口的计算,我们都是针对一条流上的数据进行处理的。而在实际应用中,可能需要将不同来源的数据连接合并在一起处理,也有可能需要将一条流拆分开,所以经常会有对多条流进行处理的场景。本章我们就来讨论 Flink 中对多条流进行转换的操作。
简单划分的话,多流转换可以分为“分流”和“合流”两大类。目前分流的操作一般是通过侧输出流(side output)来实现,而合流的算子比较丰富,根据不同的需求可以调用 union、connect、join 以及 coGroup 等接口进行连接合并操作。下面我们就进行具体的讲解。
分流
所谓“分流”,就是将一条数据流拆分成完全独立的两条、甚至多条流。也就是基于一个DataStream,得到完全平等的多个子 DataStream,
一般来说,我们会定义一些筛选条件,将符合条件的数据拣选出来放到对应的流里。
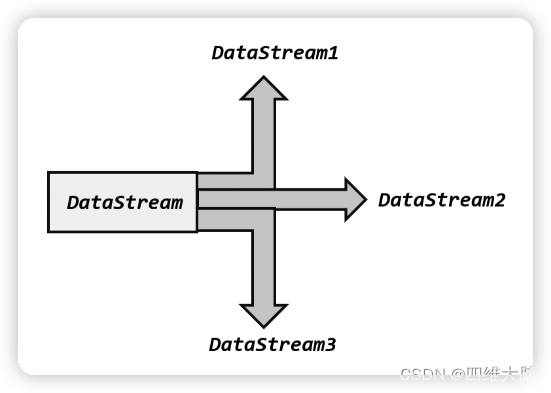
其实根据条件筛选数据的需求,本身非常容易实现:只要针对同一条流多次独立调用.filter()方法进行筛选,就可以得到拆分之后的流了。
例如,我们可以将电商网站收集到的用户行为数据进行一个拆分,根据类型(type)的不同,分为“Mary”的浏览数据、“Bob”的浏览数据等等。那么代码就可以这样实现:
import org.apache.flink.api.common.functions.FilterFunction;
import org.apache.flink.streaming.api.datastream.DataStream;
import org.apache.flink.streaming.api.datastream.SingleOutputStreamOperator;
import org.apache.flink.streaming.api.environment.StreamExecutionEnvironment;

public class SplitStreamByFilter {
    public static void main(String[] args) throws Exception {
        StreamExecutionEnvironment env = StreamExecutionEnvironment.getExecutionEnvironment();
        env.setParallelism(1);
        SingleOutputStreamOperator<Event> stream = env.addSource(new ClickSource());
        // 筛选 Mary 的浏览行为放入 MaryStream 流中
        DataStream<Event> MaryStream = stream.filter(new FilterFunction<Event>() {
            @Override
            public boolean filter(Event value) throws Exception {
                return value.user.equals("Mary");
            }
        });
        // 筛选 Bob 的购买行为放入 BobStream 流中
        DataStream<Event> BobStream = stream.filter(new FilterFunction<Event>() {
            @Override
            public boolean filter(Event value) throws Exception {
                return value.user.equals("Bob");
            }
        });
        // 筛选其他人的浏览行为放入 elseStream 流中
        DataStream<Event> elseStream = stream.filter(new FilterFunction<Event>() {
            @Override
            public boolean filter(Event value) throws Exception {
                return !value.user.equals("Mary") && !value.user.equals("Bob");
            }
        });
        MaryStream.print("Mary pv");
        BobStream.print("Bob pv");
        elseStream.print("else pv");
        env.execute();
    }
}
输出结果是:
Bob pv> Event{user='Bob', url='./home', timestamp=2021-06-23 17:30:57.388}
else pv> Event{user='Alice', url='./home', timestamp=2021-06-23 17:30:58.399}
else pv> Event{user='Alice', url='./home', timestamp=2021-06-23 17:30:59.409}
Bob pv> Event{user='Bob', url='./home', timestamp=2021-06-23 17:31:00.424}
else pv> Event{user='Alice', url='./prod?id=1', timestamp=2021-06-23 17:31:01.441}
else pv> Event{user='Alice', url='./prod?id=1', timestamp=2021-06-23 17:31:02.449}
Mary pv> Event{user='Mary', url='./home', timestamp=2021-06-23 17:31:03.465}
这种实现非常简单,但代码显得有些冗余——我们的处理逻辑对拆分出的三条流其实是一样的,却重复写了三次。而且这段代码背后的含义,是将原始数据流 stream 复制三份,然后对每一份分别做筛选;这明显是不够高效的。我们自然想到,能不能不用复制流,直接用一个算子就把它们都拆分开呢?
在早期的版本中,DataStream API 中提供了一个.split()方法,专门用来将一条流“切分”成多个。它的基本思路其实就是按照给定的筛选条件,给数据分类“盖戳”;然后基于这条盖戳之后的流,分别拣选想要的“戳”就可以得到拆分后的流。这样我们就不必再对流进行复制了。不过这种方法有一个缺陷:因为只是“盖戳”拣选,所以无法对数据进行转换,分流后的数据类型必须跟原始流保持一致。这就极大地限制了分流操作的应用场景。现在 split 方法已经淘汰掉了,我们以后分流只使用下面要讲的侧输出流。
侧输出流
在 Flink 1.13 版本中,已经弃用了.split()方法,取而代之的是直接用处理函数(process function)的侧输出流(side output)。
我们知道,处理函数本身可以认为是一个转换算子,它的输出类型是单一的,处理之后得到的仍然是一个 DataStream;而侧输出流则不受限制,可以任意自定义输出数据,它们就像从“主流”上分叉出的“支流”。尽管看起来主流和支流有所区别,不过实际上它们都是某种类型的 DataStream,所以本质上还是平等的。利用侧输出流就可以很方便地实现分流操作,而且得到的多条 DataStream 类型可以不同,这就给我们的应用带来了极大的便利。
关于处理函数中侧输出流的用法,我们已经在 7.5 节做了详细介绍。简单来说,只需要调用上下文 ctx 的.output()方法,就可以输出任意类型的数据了。而侧输出流的标记和提取,都离不开一个“输出标签”(OutputTag),它就相当于 split()分流时的“戳”,指定了侧输出流的id 和类型。
import org.apache.flink.api.java.tuple.Tuple3;
import org.apache.flink.streaming.api.datastream.SingleOutputStreamOperator;
import org.apache.flink.streaming.api.environment.StreamExecutionEnvironment;
import org.apache.flink.streaming.api.functions.ProcessFunction;
import org.apache.flink.util.Collector;
import org.apache.flink.util.OutputTag;

public class SplitStreamByOutputTag {

    // 定义输出标签,侧输出流的数据类型为三元组(user, url, timestamp)
    private static OutputTag<Tuple3<String, String, Long>> MaryTag = new OutputTag<Tuple3<String, String, Long>>("Mary-pv") {};
    private static OutputTag<Tuple3<String, String, Long>> BobTag = new OutputTag<Tuple3<String, String, Long>>("Bob-pv") {};

    public static void main(String[] args) throws Exception {
        StreamExecutionEnvironment env = StreamExecutionEnvironment.getExecutionEnvironment();
        env.setParallelism(1);
        SingleOutputStreamOperator<Event> stream = env.addSource(new ClickSource());
        SingleOutputStreamOperator<Event> processedStream = stream.process(new ProcessFunction<Event, Event>() {
            @Override
            public void processElement(Event value, Context ctx, Collector<Event> out) throws Exception {
                if (value.user.equals("Mary")) {
                    ctx.output(MaryTag, new Tuple3<>(value.user, value.url, value.timestamp));
                } else if (value.user.equals("Bob")) {
                    ctx.output(BobTag, new Tuple3<>(value.user, value.url, value.timestamp));
                } else {
                    out.collect(value);
                }
            }
        });
        processedStream.getSideOutput(MaryTag).print("Mary pv");
        processedStream.getSideOutput(BobTag).print("Bob pv");
        processedStream.print("else");
        env.execute();
    }
}
输出结果是:
Bob pv> (Bob,./prod?id=1,1624442886645)
Mary pv> (Mary,./prod?id=1,1624442887664)
Bob pv> (Bob,./home,1624442888673)
Mary pv> (Mary,./prod?id=1,1624442889676)
else> Event{user='Alice', url='./prod?id=1', timestamp=2021-06-23 18:08:10.693}
else> Event{user='Alice', url='./prod?id=1', timestamp=2021-06-23 18:08:11.697}
else> Event{user='Alice', url='./prod?id=1', timestamp=2021-06-23 18:08:12.702}
Mary pv> (Mary,./cart,1624442893705)
Bob pv> (Bob,./cart,1624442894710)
else> Event{user='Alice', url='./cart', timestamp=2021-06-23 18:08:15.722}
Mary pv> (Mary,./prod?id=1,1624442896725)
这里我们定义了两个侧输出流,分别拣选 Mary 的浏览事件和 Bob 的浏览事件;由于类型已经确定,我们可以只保留(用户 id, url, 时间戳)这样一个三元组。而剩余的事件则直接输出到主流,类型依然保留 Event,就相当于之前的 elseStream。这样的实现方式显然更简洁,也更加灵活。
合流
既然一条流可以分开,自然多条流就可以合并。在实际应用中,我们经常会遇到来源不同的多条流,需要将它们的数据进行联合处理。所以 Flink 中合流的操作会更加普遍,对应的API 也更加丰富。
联合(Union)
最简单的合流操作,就是直接将多条流合在一起,叫作流的“联合”(union),联合操作要求必须流中的数据类型必须相同,合并之后的新流会包括所有流中的元素,数据类型不变。这种合流方式非常简单粗暴,就像公路上多个车道汇在一起一样。
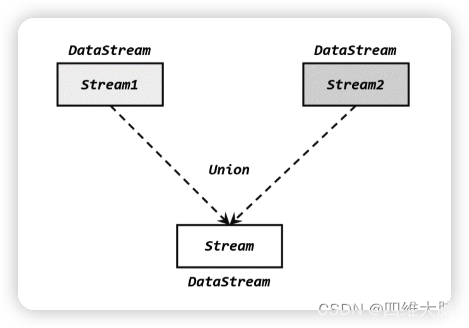
在代码中,我们只要基于 DataStream 直接调用.union()方法,传入其他 DataStream 作为参数,就可以实现流的联合了;得到的依然是一个 DataStream:
stream1.union(stream2, stream3, ...)
注意:union()的参数可以是多个 DataStream,所以联合操作可以实现多条流的合并。
这里需要考虑一个问题。在事件时间语义下,水位线是时间的进度标志;不同的流中可能水位线的进展快慢完全不同,如果它们合并在一起,水位线又该以哪个为准呢?
还以要考虑水位线的本质含义,是“之前的所有数据已经到齐了”;所以对于合流之后的水位线,也是要以最小的那个为准,这样才可以保证所有流都不会再传来之前的数据。换句话说,多流合并时处理的时效性是以最慢的那个流为准的。我们自然可以想到,这与之前介绍的并行任务水位线传递的规则是完全一致的;多条流的合并,某种意义上也可以看作是多个并行任务向同一个下游任务汇合的过程。
import org.apache.flink.api.common.eventtime.SerializableTimestampAssigner;
import org.apache.flink.api.common.eventtime.WatermarkStrategy;
import org.apache.flink.streaming.api.datastream.SingleOutputStreamOperator;
import org.apache.flink.streaming.api.environment.StreamExecutionEnvironment;
import org.apache.flink.streaming.api.functions.ProcessFunction;
import org.apache.flink.util.Collector;

import java.time.Duration;

public class UnionExample {
    public static void main(String[] args) throws Exception {
        StreamExecutionEnvironment env = StreamExecutionEnvironment.getExecutionEnvironment();
        env.setParallelism(1);

        SingleOutputStreamOperator<Event> stream1 = env.socketTextStream("localhost", 7777)
                .map(data -> {
                    String[] field = data.split(",");
                    return new Event(field[0].trim(), field[1].trim(), Long.valueOf(field[2].trim()));
                })
                .assignTimestampsAndWatermarks(WatermarkStrategy.<Event>forBoundedOutOfOrderness(Duration.ofSeconds(2))
                        .withTimestampAssigner(new SerializableTimestampAssigner<Event>() {
                            @Override
                            public long extractTimestamp(Event element, long recordTimestamp) {
                                return element.timestamp;
                            }
                        })
                );
        stream1.print("stream1");

        SingleOutputStreamOperator<Event> stream2 = env.socketTextStream("localhost", 7777)
                .map(data -> {
                    String[] field = data.split(",");
                    return new Event(field[0].trim(), field[1].trim(), Long.valueOf(field[2].trim()));
                })
                .assignTimestampsAndWatermarks(WatermarkStrategy.<Event>forBoundedOutOfOrderness(Duration.ofSeconds(5))
                        .withTimestampAssigner(new SerializableTimestampAssigner<Event>() {
                            @Override
                            public long extractTimestamp(Event element, long recordTimestamp) {
                                return element.timestamp;
                            }
                        })
                );
        stream2.print("stream2");

        // 合并两条流
        stream1.union(stream2)
                .process(new ProcessFunction<Event, String>() {
                    @Override
                    public void processElement(Event value, Context ctx, Collector<String> out) throws Exception {
                        out.collect(" 水 位 线 : " + ctx.timerService().currentWatermark());
                    }
                }).print();
        env.execute();
    }
}
这里为了更清晰地看到水位线的进展,我们创建了两条流来读取 socket 文本数据,并从数据中提取时间戳作为生成水位线的依据。用 union 将两条流合并后,用一个 ProcessFunction来进行处理,获取当前的水位线进行输出。我们会发现两条流中每输入一个数据,合并之后的流中都会有数据出现;而水位线只有在两条流中水位线最小值增大的时候,才会真正向前推进。
在合流之后的 ProcessFunction 对应的算子任务中,逻辑时钟的初始状态如图所示
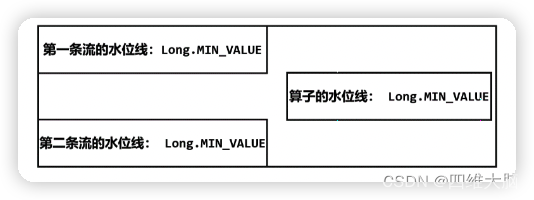
由于 Flink 会在流的开始处,插入一个负无穷大(Long.MIN_VALUE)的水位线,所以合流后的 ProcessFunction 对应的处理任务,会为合并的每条流保存一个“分区水位线”,初始值都是 Long.MIN_VALUE;而此时算子任务的水位线是所有分区水位线的最小值,因此也是Long.MIN_VALUE。
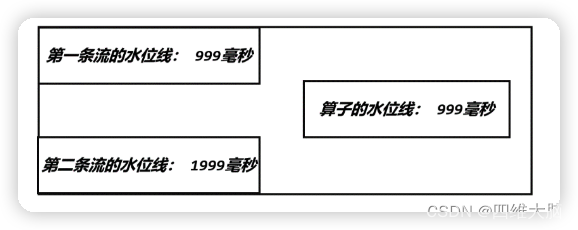
我们在第一条 socket 文本流输入数据[Alice, ./home, 1000] 时,水位线不会立即改变,只有到水位线生成周期的时间点(200ms 一次)才会推进到 1000 - 1 = 999 毫秒;这与我们在对事件时间定时器的测试是一致的。不过即使第一条水位线推进到了 999,由于另一条流没有变化,所以合流之后的 Process 任务水位线仍然是初始值。
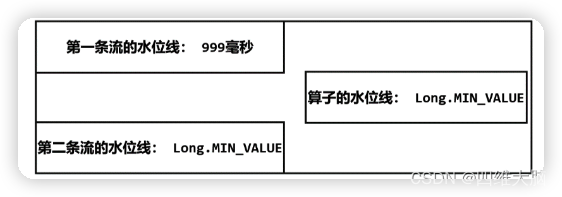
如果这时我们在第二条 socket 文本流输入数据[Alice, ./home, 2000],那么第二条流的水位线会随之推进到 2000 – 1 = 1999 毫秒,Process 任务所保存的第二条流分区水位线更新为 1999;这样两个分区水位线取最小值,Process 任务的水位线也就可以推进到 999 了。
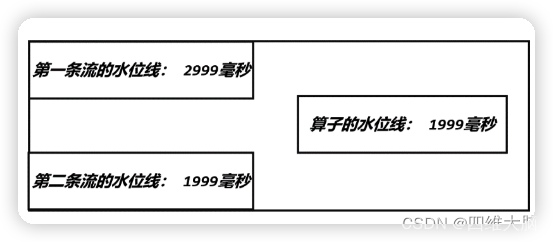
进而如果我们继续在第一条流中输入数据[Alice, ./home, 3000],Process 任务的第一条流分区水位线就会更新为 2999,同时将算子任务的时钟推进到 1999。
连接(Connect)
流的联合虽然简单,不过受限于数据类型不能改变,灵活性大打折扣,所以实际应用较少出现。除了联合(union),Flink 还提供了另外一种方便的合流操作——连接(connect)。顾名思义,这种操作就是直接把两条流像接线一样对接起来。
1. 连接流(ConnectedStreams)
为了处理更加灵活,连接操作允许流的数据类型不同。但我们知道一个 DataStream 中的数据只能有唯一的类型,所以连接得到的并不是 DataStream,而是一个“连接流”(ConnectedStreams)。连接流可以看成是两条流形式上的“统一”,被放在了一个同一个流中;事实上内部仍保持各自的数据形式不变,彼此之间是相互独立的。要想得到新的 DataStream,还需要进一步定义一个“同处理”(co-process)转换操作,用来说明对于不同来源、不同类型的数据,怎样分别进行处理转换、得到统一的输出类型。所以整体上来,两条流的连接就像是“一国两制”,两条流可以保持各自的数据类型、处理方式也可以不同,不过最终还是会统一到同一个 DataStream 中
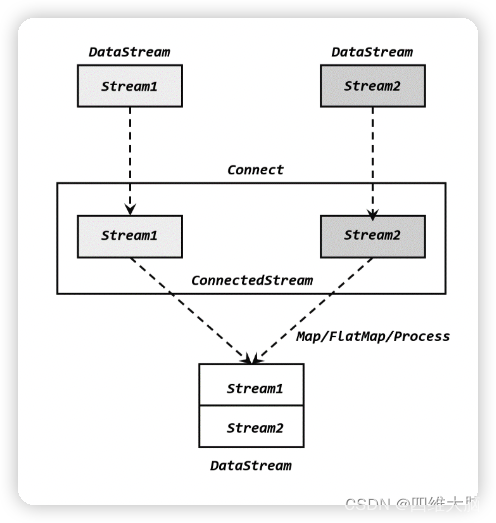
在代码实现上,需要分为两步:首先基于一条 DataStream 调用.connect()方法,传入另外一条 DataStream 作为参数,将两条流连接起来,得到一个 ConnectedStreams;然后再调用同处理方法得到 DataStream。这里可以的调用的同处理方法有.map()/.flatMap(),以及.process()方法。
import org.apache.flink.streaming.api.datastream.ConnectedStreams;
import org.apache.flink.streaming.api.datastream.DataStream;
import org.apache.flink.streaming.api.datastream.SingleOutputStreamOperator;
import org.apache.flink.streaming.api.environment.StreamExecutionEnvironment;
import org.apache.flink.streaming.api.functions.co.CoMapFunction;

public class CoMapExample {

    public static void main(String[] args) throws Exception {
        StreamExecutionEnvironment env = StreamExecutionEnvironment.getExecutionEnvironment();
        env.setParallelism(1);
        DataStream<Integer> stream1 = env.fromElements(1, 2, 3);
        DataStream<Long> stream2 = env.fromElements(1L, 2L, 3L);
        ConnectedStreams<Integer, Long> connectedStreams = stream1.connect(stream2);
        SingleOutputStreamOperator<String> result = connectedStreams.map(new CoMapFunction<Integer, Long, String>() {
            @Override
            public String map1(Integer value) {
                return "Integer: " + value;
            }

            @Override
            public String map2(Long value) {
                return "Long: " + value;
            }
        });
        result.print();
        env.execute();
    }
}
输出结果:
Integer: 1
Integer: 2
Integer: 3
Long: 1
Long: 2
Long: 3
上面的代码中,ConnectedStreams 有两个类型参数,分别表示内部包含的两条流各自的数据类型;由于需要“一国两制”,因此调用.map()方法时传入的不再是一个简单的 MapFunction,而是一个 CoMapFunction,表示分别对两条流中的数据执行 map 操作。这个接口有三个类型参数,依次表示第一条流、第二条流,以及合并后的流中的数据类型。需要实现的方法也非常直白:.map1()就是对第一条流中数据的 map 操作,.map2()则是针对第二条流。这里我们将一条 Integer 流和一条 Long 流合并,转换成 String 输出。所以当遇到第一条流输入的整型值时,调用.map1();而遇到第二条流输入的长整型数据时,调用.map2():最终都转换为字符串输出,合并成了一条字符串流。
值得一提的是,ConnectedStreams 也可以直接调用.keyBy()进行按键分区的操作,得到的还是一个 ConnectedStreams:
connectedStreams.keyBy(keySelector1, keySelector2);
这里传入两个参数 keySelector1 和 keySelector2,是两条流中各自的键选择器;当然也可以直接传入键的位置值(keyPosition),或者键的字段名(field),这与普通的 keyBy 用法完全一致。ConnectedStreams 进行 keyBy 操作,其实就是把两条流中 key 相同的数据放到了一起,然后针对来源的流再做各自处理,这在一些场景下非常有用。另外,我们也可以在合并之前就将两条流分别进行 keyBy,得到的 KeyedStream 再进行连接(connect)操作,效果是一样的。要注意两条流定义的键的类型必须相同,否则会抛出异常。
两条流的连接(connect),与联合(union)操作相比,最大的优势就是可以处理不同类型的流的合并,使用更灵活、应用更广泛。当然它也有限制,就是合并流的数量只能是 2,而 union可以同时进行多条流的合并。这也非常容易理解:union 限制了类型不变,所以直接合并没有问题;而 connect 是“一国两制”,后续处理的接口只定义了两个转换方法,如果扩展需要重新定义接口,所以不能“一国多制”
2. CoProcessFunction
对于连接流 ConnectedStreams 的处理操作,需要分别定义对两条流的处理转换,因此接口中就会有两个相同的方法需要实现,用数字“1”“2”区分,在两条流中的数据到来时分别调用。我们把这种接口叫作“协同处理函数”(co-process function)。与 CoMapFunction 类似,如果是调用.flatMap()就需要传入一个 CoFlatMapFunction,需要实现 flatMap1()、flatMap2()两个方法;而调用.process()时,传入的则是一个 CoProcessFunction。
public abstract class CoProcessFunction<IN1, IN2, OUT> extends AbstractRichFunction {
	...
	public abstract void processElement1(IN1 value, Context ctx, Collector<OUT> out) throws Exception;
	public abstract void processElement2(IN2 value, Context ctx, Collector<OUT> out) throws Exception;
	public void onTimer(long timestamp, OnTimerContext ctx, Collector<OUT> out) throws Exception {}
	public abstract class Context {...}
	...
}
我们可以看到,很明显 CoProcessFunction 也是“处理函数”家族中的一员,用法非常相似。它需要实现的就是 processElement1()、processElement2()两个方法,在每个数据到来时,会根据来源的流调用其中的一个方法进行处理。CoProcessFunction 同样可以通过上下文 ctx 来访问 timestamp、水位线,并通过 TimerService 注册定时器;另外也提供了.onTimer()方法,用于定义定时触发的处理操作。
下面是 CoProcessFunction 的一个具体示例:我们可以实现一个实时对账的需求,也就是app 的支付操作和第三方的支付操作的一个双流 Join。App 的支付事件和第三方的支付事件将会互相等待 5 秒钟,如果等不来对应的支付事件,那么就输出报警信息。
import org.apache.flink.api.common.eventtime.SerializableTimestampAssigner;
import org.apache.flink.api.common.eventtime.WatermarkStrategy;
import org.apache.flink.api.common.state.ValueState;
import org.apache.flink.api.common.state.ValueStateDescriptor;
import org.apache.flink.api.common.typeinfo.Types;
import org.apache.flink.api.java.tuple.Tuple3;
import org.apache.flink.api.java.tuple.Tuple4;
import org.apache.flink.configuration.Configuration;
import org.apache.flink.streaming.api.datastream.SingleOutputStreamOperator;
import org.apache.flink.streaming.api.environment.StreamExecutionEnvironment;
import org.apache.flink.streaming.api.functions.co.CoProcessFunction;

import org.apache.flink.util.Collector;

// 实时对账
public class BillCheckExample {
    public static void main(String[] args) throws Exception {
        StreamExecutionEnvironment env = StreamExecutionEnvironment.getExecutionEnvironment();
        env.setParallelism(1);

        // 来自 app 的支付日志
        SingleOutputStreamOperator<Tuple3<String, String, Long>> appStream = env.fromElements(
                Tuple3.of("order-1", "app", 1000L),
                Tuple3.of("order-2", "app", 2000L)
        ).assignTimestampsAndWatermarks(WatermarkStrategy.<Tuple3<String, String, Long>>forMonotonousTimestamps()
                .withTimestampAssigner(new SerializableTimestampAssigner<Tuple3<String, String, Long>>() {
                    @Override
                    public long extractTimestamp(Tuple3<String, String, Long> element, long recordTimestamp) {
                        return element.f2;
                    }
                })
        );

        // 来自第三方支付平台的支付日志
        SingleOutputStreamOperator<Tuple4<String, String, String, Long>> thirdpartStream = env.fromElements(
                Tuple4.of("order-1", "third-party", "success", 3000L),
                Tuple4.of("order-3", "third-party", "success", 4000L)
        ).assignTimestampsAndWatermarks(WatermarkStrategy.<Tuple4<String, String, String, Long>>forMonotonousTimestamps()
                .withTimestampAssigner(new SerializableTimestampAssigner<Tuple4<String, String, String, Long>>() {
                    @Override
                    public long extractTimestamp(Tuple4<String, String, String, Long> element, long recordTimestamp) {
                        return element.f3;
                    }
                })
        );

        // 检测同一支付单在两条流中是否匹配,不匹配就报警
        appStream.connect(thirdpartStream)
                .keyBy(data -> data.f0, data -> data.f0)
                .process(new OrderMatchResult())
                .print();
        env.execute();
    }

    // 自定义实现 CoProcessFunction
    public static class OrderMatchResult extends CoProcessFunction<Tuple3<String, String, Long>, Tuple4<String, String, String, Long>, String> {
        // 定义状态变量,用来保存已经到达的事件
        private ValueState<Tuple3<String, String, Long>> appEventState;
        private ValueState<Tuple4<String, String, String, Long>> thirdPartyEventState;

        @Override
        public void open(Configuration parameters) throws Exception {
            appEventState = getRuntimeContext().getState(new ValueStateDescriptor<Tuple3<String, String, Long>>("app-event", Types.TUPLE(Types.STRING, Types.STRING, Types.LONG)));
            thirdPartyEventState = getRuntimeContext().getState(new ValueStateDescriptor<Tuple4<String, String, String, Long>>("thirdparty-event", Types.TUPLE(Types.STRING, Types.STRING, Types.STRING, Types.LONG)));
        }

        @Override
        public void processElement1(Tuple3<String, String, Long> value, Context ctx, Collector<String> out) throws Exception {
            // 看另一条流中事件是否来过
            if (thirdPartyEventState.value() != null) {
                out.collect(" 对 账 成 功 : " + value + " " + thirdPartyEventState.value());
                 // 清空状态
                thirdPartyEventState.clear();
            } else {
                // 更新状态
                appEventState.update(value);
                // 注册一个 5 秒后的定时器,开始等待另一条流的事件
                ctx.timerService().registerEventTimeTimer(value.f2 + 5000L);
            }
        }

        @Override
        public void processElement2(Tuple4<String, String, String, Long> value, Context ctx, Collector<String> out) throws Exception {
            if (appEventState.value() != null) {
                out.collect("对账成功:" + appEventState.value() + " " + value);
                // 清空状态
                appEventState.clear();
            } else {
                // 更新状态
                thirdPartyEventState.update(value);
                // 注册一个 5 秒后的定时器,开始等待另一条流的事件
                ctx.timerService().registerEventTimeTimer(value.f3 + 5000L);
            }
        }

        @Override
        public void onTimer(long timestamp, OnTimerContext ctx, Collector<String> out) throws Exception {
            // 定时器触发,判断状态,如果某个状态不为空,说明另一条流中事件没来
            if (appEventState.value() != null) {
                out.collect("对账失败:" + appEventState.value() + " " + "第三方支付 平台信息未到");
            }
            if (thirdPartyEventState.value() != null) {
                out.collect("对账失败:" + thirdPartyEventState.value() + " " + "app 信息未到");
            }
            appEventState.clear();
            thirdPartyEventState.clear();
        }
    }
}
输出结果是:
对账成功:(order-1,app,1000) (order-1,third-party,success,3000)
对账失败:(order-2,app,2000) 第三方支付平台信息未到
对账失败:(order-3,third-party,success,4000) app 信息未到
在程序中,我们声明了两个状态变量分别用来保存 App 的支付信息和第三方的支付信息。App 的支付信息到达以后,会检查对应的第三方支付信息是否已经先到达(先到达会保存在对应的状态变量中),如果已经到达了,那么对账成功,直接输出对账成功的信息,并将保存第三方支付消息的状态变量清空。如果 App 对应的第三方支付信息没有到来,那么我们会注册一个 5 秒钟之后的定时器,也就是说等待第三方支付事件 5 秒钟。当定时器触发时,检查保存app 支付信息的状态变量是否还在,如果还在,说明对应的第三方支付信息没有到来,所以输出报警信息。
3. 广播连接流(BroadcastConnectedStream)
关于两条流的连接,还有一种比较特殊的用法:DataStream 调用.connect()方法时,传入的参数也可以不是一个 DataStream,而是一个“广播流”(BroadcastStream),这时合并两条流得到的就变成了一个“广播连接流”(BroadcastConnectedStream)。
这种连接方式往往用在需要动态定义某些规则或配置的场景。因为规则是实时变动的,所以我们可以用一个单独的流来获取规则数据;而这些规则或配置是对整个应用全局有效的,所以不能只把这数据传递给一个下游并行子任务处理,而是要“广播”(broadcast)给所有的并行子任务。而下游子任务收到广播出来的规则,会把它保存成一个状态,这就是所谓的“广播状态”(broadcast state)。
广播状态底层是用一个“映射”(map)结构来保存的。在代码实现上,可以直接调用DataStream 的.broadcast()方法,传入一个“映射状态描述器”(MapStateDescriptor)说明状态的名称和类型,就可以得到规则数据的“广播流”(BroadcastStream):
MapStateDescriptor<String, Rule> ruleStateDescriptor = new MapStateDescriptor<>(...);
BroadcastStream<Rule> ruleBroadcastStream = ruleStream.broadcast(ruleStateDescriptor);
接下来我们就可以将要处理的数据流,与这条广播流进行连接(connect),得到的就是所谓的“广播连接流”(BroadcastConnectedStream)。基于 BroadcastConnectedStream 调用.process()方法,就可以同时获取规则和数据,进行动态处理了。
这里既然调用了.process()方法,当然传入的参数也应该是处理函数大家族中一员——如果对数据流调用过 keyBy 进行了按键分区,那么要传入的就是 KeyedBroadcastProcessFunction;如果没有按键分区,就传入 BroadcastProcessFunction。
DataStream<String> output = stream
	.connect(ruleBroadcastStream)
	.process( new BroadcastProcessFunction<>() {...} );
BroadcastProcessFunction 与 CoProcessFunction 类似,同样是一个抽象类,需要实现两个方法,针对合并的两条流中元素分别定义处理操作。区别在于这里一条流是正常处理数据,而另一条流则是要用新规则来更新广播状态,所以对应的两个方法叫作.processElement()和.processBroadcastElement()。源码中定义如下:
public abstract class BroadcastProcessFunction<IN1, IN2, OUT> extends BaseBroadcastProcessFunction {
...
public abstract void processElement(IN1 value, ReadOnlyContext ctx, Collector<OUT> out) throws Exception;
public abstract void processBroadcastElement(IN2 value, Context ctx, Collector<OUT> out) throws Exception;
...
}
基于时间的合流——双流联结(Join)
对于两条流的合并,很多情况我们并不是简单地将所有数据放在一起,而是希望根据某个字段的值将它们联结起来,“配对”去做处理。例如用传感器监控火情时,我们需要将大量温度传感器和烟雾传感器采集到的信息,按照传感器 ID 分组、再将两条流中数据合并起来,如果同时超过设定阈值就要报警。
我们发现,这种需求与关系型数据库中表的 join 操作非常相近。事实上,Flink 中两条流的 connect 操作,就可以通过 keyBy 指定键进行分组后合并,实现了类似于 SQL 中的 join 操作;另外 connect 支持处理函数,可以使用自定义状态和 TimerService 灵活实现各种需求,其实已经能够处理双流合并的大多数场景。
不过处理函数是底层接口,所以尽管 connect 能做的事情多,但在一些具体应用场景下还是显得太过抽象了。比如,如果我们希望统计固定时间内两条流数据的匹配情况,那就需要设置定时器、自定义触发逻辑来实现——其实这完全可以用窗口(window)来表示。为了更方便地实现基于时间的合流操作,Flink 的 DataStrema API 提供了两种内置的 join 算子,以及coGroup 算子。本节我们就来做一个详细的讲解。
注:SQL 中 join 一般会翻译为“连接”;我们这里为了区分不同的算子,一般的合流操作connect 翻译为“连接”,而把 join 翻译为“联结”。
窗口联结(Window Join)
基于时间的操作,最基本的当然就是时间窗口了。我们之前已经介绍过 Window API 的用法,主要是针对单一数据流在某些时间段内的处理计算。那如果我们希望将两条流的数据进行合并、且同样针对某段时间进行处理和统计,又该怎么做呢?
Flink 为这种场景专门提供了一个窗口联结(window join)算子,可以定义时间窗口,并将两条流中共享一个公共键(key)的数据放在窗口中进行配对处理。
-
窗口联结的调用
窗口联结在代码中的实现,首先需要调用 DataStream 的.join()方法来合并两条流,得到一个 JoinedStreams;接着通过.where()和.equalTo()方法指定两条流中联结的 key;然后通过.window()开窗口,并调用.apply()传入联结窗口函数进行处理计算。通用调用形式如下:
stream1.join(stream2)
.where(<KeySelector>)
.equalTo(<KeySelector>)
.window(<WindowAssigner>)
.apply(<JoinFunction>)
上面代码中.where()的参数是键选择器(KeySelector),用来指定第一条流中的 key; 而.equalTo()传入的 KeySelector 则指定了第二条流中的 key。两者相同的元素,如果在同一窗口中,就可以匹配起来,并通过一个“联结函数”(JoinFunction)进行处理了。
这里.window()传入的就是窗口分配器,之前讲到的三种时间窗口都可以用在这里:滚动窗口(tumbling window)、滑动窗口(sliding window)和会话窗口(session window)。
而后面调用.apply()可以看作实现了一个特殊的窗口函数。注意这里只能调用.apply(),没有其他替代的方法。
传入的 JoinFunction 也是一个函数类接口,使用时需要实现内部的.join()方法。这个方法有两个参数,分别表示两条流中成对匹配的数据。JoinFunction 在源码中的定义如下:
public interface JoinFunction<IN1, IN2, OUT> extends Function, Serializable {
	OUT join(IN1 first, IN2 second) throws Exception;
}
这里需要注意,JoinFunciton 并不是真正的“窗口函数”,它只是定义了窗口函数在调用时对匹配数据的具体处理逻辑。
当然,既然是窗口计算,在.window()和.apply()之间也可以调用可选 API 去做一些自定义,比如用.trigger()定义触发器,用.allowedLateness()定义允许延迟时间,等等。
2. 窗口联结的处理流程
JoinFunction 中的两个参数,分别代表了两条流中的匹配的数据。这里就会有一个问题:什么时候就会匹配好数据,调用.join()方法呢?接下来我们就来介绍一下窗口 join 的具体处理流程。
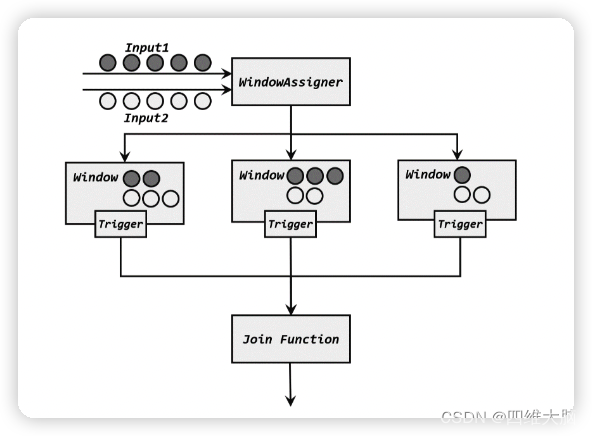
两条流的数据到来之后,首先会按照 key 分组、进入对应的窗口中存储;当到达窗口结束时间时,算子会先统计出窗口内两条流的数据的所有组合,也就是对两条流中的数据做一个笛卡尔积(相当于表的交叉连接,cross join),然后进行遍历,把每一对匹配的数据,作为参数(first,second)传入 JoinFunction 的.join()方法进行计算处理,得到的结果直接输出如图所示。所以窗口中每有一对数据成功联结匹配,JoinFunction 的.join()方法就会被调用一次,并输出一个结果。
除了 JoinFunction,在.apply()方法中还可以传入 FlatJoinFunction,用法非常类似,只是内部需要实现的.join()方法没有返回值。结果的输出是通过收集器(Collector)来实现的,所以对于一对匹配数据可以输出任意条结果。
其实仔细观察可以发现,窗口 join 的调用语法和我们熟悉的 SQL 中表的 join 非常相似:
SELECT * FROM table1 t1, table2 t2 WHERE t1.id = t2.id;
这句 SQL 中 where 子句的表达,等价于 inner join … on,所以本身表示的是两张表基于 id的“内连接”(inner join)。而 Flink 中的 window join,同样类似于 inner join。也就是说,最后处理输出的,只有两条流中数据按 key 配对成功的那些;如果某个窗口中一条流的数据没有任何另一条流的数据匹配,那么就不会调用 JoinFunction 的.join()方法,也就没有任何输出了。
3. 窗口联结实例
在电商网站中,往往需要统计用户不同行为之间的转化,这就需要对不同的行为数据流,按照用户 ID 进行分组后再合并,以分析它们之间的关联。如果这些是以固定时间周期(比如1 小时)来统计的,那我们就可以使用窗口 join 来实现这样的需求。
import org.apache.flink.api.common.eventtime.SerializableTimestampAssigner;
import org.apache.flink.api.common.eventtime.WatermarkStrategy;
import org.apache.flink.api.common.functions.JoinFunction;
import org.apache.flink.api.java.tuple.Tuple2;
import org.apache.flink.streaming.api.datastream.DataStream;
import org.apache.flink.streaming.api.environment.StreamExecutionEnvironment;
import org.apache.flink.streaming.api.windowing.assigners.TumblingEventTimeWindows;
import org.apache.flink.streaming.api.windowing.time.Time;

// 基于窗口的 join
public class WindowJoinExample {
    public static void main(String[] args) throws Exception {
        StreamExecutionEnvironment env = StreamExecutionEnvironment.getExecutionEnvironment();
        env.setParallelism(1);
        DataStream<Tuple2<String, Long>> stream1 = env.fromElements(
                Tuple2.of("a", 1000L),
                Tuple2.of("b", 1000L),
                Tuple2.of("a", 2000L),
                Tuple2.of("b", 2000L)
        ).assignTimestampsAndWatermarks(
                WatermarkStrategy.<Tuple2<String, Long>>forMonotonousTimestamps().withTimestampAssigner(
                        new SerializableTimestampAssigner<Tuple2<String, Long>>() {
                            @Override
                            public long extractTimestamp(Tuple2<String, Long> stringLongTuple2, long l) {
                                return stringLongTuple2.f1;
                            }
                        })
        );

        DataStream<Tuple2<String, Long>> stream2 = env.fromElements(
                Tuple2.of("a", 3000L),
                Tuple2.of("b", 3000L),
                Tuple2.of("a", 4000L),
                Tuple2.of("b", 4000L)
        ).assignTimestampsAndWatermarks(WatermarkStrategy.<Tuple2<String, Long>>forMonotonousTimestamps().withTimestampAssigner(
                        new SerializableTimestampAssigner<Tuple2<String, Long>>() {
                            @Override
                            public long extractTimestamp(Tuple2<String, Long> stringLongTuple2, long l) {
                                return stringLongTuple2.f1;
                            }
                        }
                )
        );

        stream1
                .join(stream2)
                .where(r -> r.f0)
                .equalTo(r -> r.f0)
                .window(TumblingEventTimeWindows.of(Time.seconds(5)))
                .apply(new JoinFunction<Tuple2<String, Long>, Tuple2<String, Long>, String>() {
                    @Override
                    public String join(Tuple2<String, Long> left, Tuple2<String, Long> right) throws Exception {
                        return left + "=>" + right;
                    }
                })
                .print();
        env.execute();
    }
}
输出结果:
(a,1000)=>(a,3000)
(a,1000)=>(a,4000)
(a,2000)=>(a,3000)
(a,2000)=>(a,4000)
(b,1000)=>(b,3000)
(b,1000)=>(b,4000)
(b,2000)=>(b,3000)
(b,2000)=>(b,4000)
间隔联结(Interval Join)
在有些场景下,我们要处理的时间间隔可能并不是固定的。比如,在交易系统中,需要实时地对每一笔交易进行核验,保证两个账户转入转出数额相等,也就是所谓的“实时对账”。两次转账的数据可能写入了不同的日志流,它们的时间戳应该相差不大,所以我们可以考虑只
统计一段时间内是否有出账入账的数据匹配。这时显然不应该用滚动窗口或滑动窗口来处理— —因为匹配的两个数据有可能刚好“卡在”窗口边缘两侧,于是窗口内就都没有匹配了;会话窗口虽然时间不固定,但也明显不适合这个场景。 基于时间的窗口联结已经无能为力了。
为了应对这样的需求,Flink 提供了一种叫作“间隔联结”(interval join)的合流操作。顾名思义,间隔联结的思路就是针对一条流的每个数据,开辟出其时间戳前后的一段时间间隔,看这期间是否有来自另一条流的数据匹配。
1. 间隔联结的原理
间隔联结具体的定义方式是,我们给定两个时间点,分别叫作间隔的“上界”(upperBound)和“下界”(lowerBound);于是对于一条流(不妨叫作 A)中的任意一个数据元素 a,就可以开辟一段时间间隔:[a.timestamp + lowerBound, a.timestamp + upperBound],即以 a 的时间戳为中心,下至下界点、上至上界点的一个闭区间:我们就把这段时间作为可以匹配另一条流数据的“窗口”范围。所以对于另一条流(不妨叫 B)中的数据元素 b,如果它的时间戳落在了这个区间范围内,a 和 b 就可以成功配对,进而进行计算输出结果。所以匹配的条件为:
a.timestamp + lowerBound <= b.timestamp <= a.timestamp + upperBound
这里需要注意,做间隔联结的两条流 A 和 B,也必须基于相同的 key;下界 lowerBound应该小于等于上界 upperBound,两者都可正可负;间隔联结目前只支持事件时间语义。

下方的流 A 去间隔联结上方的流 B,所以基于 A 的每个数据元素,都可以开辟一个间隔区间。我们这里设置下界为-2 毫秒,上界为 1 毫秒。于是对于时间戳为 2 的 A 中元素,它的可匹配区间就是[0, 3],流 B 中有时间戳为 0、1 的两个元素落在这个范围内,所以就可以得到匹配数据对(2, 0)和(2, 1)。同样地,A 中时间戳为 3 的元素,可匹配区间为[1, 4],B 中只有时间戳为 1 的一个数据可以匹配,于是得到匹配数据对(3, 1)。
所以我们可以看到,间隔联结同样是一种内连接(inner join)。与窗口联结不同的是,interval join 做匹配的时间段是基于流中数据的,所以并不确定;而且流 B 中的数据可以不只在一个区间内被匹配。
2. 间隔联结的调用
间隔联结在代码中,是基于 KeyedStream 的联结(join)操作。DataStream 在 keyBy 得到KeyedStream 之后,可以调用.intervalJoin()来合并两条流,传入的参数同样是一个 KeyedStream,两者的 key 类型应该一致;得到的是一个 IntervalJoin 类型。后续的操作同样是完全固定的:先通过.between()方法指定间隔的上下界,再调用.process()方法,定义对匹配数据对的处理操作。调用.process()需要传入一个处理函数,这是处理函数家族的最后一员:“处理联结函数”ProcessJoinFunction。
stream1
	.keyBy(<KeySelector>)
	.intervalJoin(stream2.keyBy(<KeySelector>))
	.between(Time.milliseconds(-2), Time.milliseconds(1))
	.process (new ProcessJoinFunction<Integer, Integer, String(){
			@Override
			public void processElement(Integer left, Integer right, Context ctx,
			Collector<String> out) {
			out.collect(left + "," + right);
	}
});
可以看到,抽象类 ProcessJoinFunction 就像是 ProcessFunction 和 JoinFunction 的结合,内部同样有一个抽象方法.processElement()。与其他处理函数不同的是,它多了一个参数,这自然是因为有来自两条流的数据。参数中 left 指的就是第一条流中的数据,right 则是第二条流中与它匹配的数据。每当检测到一组匹配,就会调用这里的.processElement()方法,经处理转换之后输出结果。
3. 间隔联结实例
在电商网站中,某些用户行为往往会有短时间内的强关联。我们这里举一个例子,我们有两条流,一条是下订单的流,一条是浏览数据的流。我们可以针对同一个用户,来做这样一个联结。也就是使用一个用户的下订单的事件和这个用户的最近十分钟的浏览数据进行一个联结查询。
import org.apache.flink.api.common.eventtime.SerializableTimestampAssigner;
import org.apache.flink.api.common.eventtime.WatermarkStrategy;
import org.apache.flink.api.java.tuple.Tuple3;
import org.apache.flink.streaming.api.datastream.SingleOutputStreamOperator;
import org.apache.flink.streaming.api.environment.StreamExecutionEnvironment;
import org.apache.flink.streaming.api.functions.co.ProcessJoinFunction;
import org.apache.flink.streaming.api.windowing.time.Time;
import org.apache.flink.util.Collector;

// 基于间隔的 join
public class IntervalJoinExample {
    public static void main(String[] args) throws Exception {

        StreamExecutionEnvironment env = StreamExecutionEnvironment.getExecutionEnvironment();
        env.setParallelism(1);

        SingleOutputStreamOperator<Tuple3<String, String, Long>> orderStream = env.fromElements(
                Tuple3.of("Mary", "order-1", 5000L),
                Tuple3.of("Alice", "order-2", 5000L),
                Tuple3.of("Bob", "order-3", 20000L),
                Tuple3.of("Alice", "order-4", 20000L),
                Tuple3.of("Cary", "order-5", 51000L)
        ).assignTimestampsAndWatermarks(WatermarkStrategy.<Tuple3<String, String, Long>>forMonotonousTimestamps()
                .withTimestampAssigner(new SerializableTimestampAssigner<Tuple3<String, String, Long>>() {
                    @Override
                    public long extractTimestamp(Tuple3<String, String, Long> element, long recordTimestamp) {
                        return element.f2;
                    }
                })
        );

        SingleOutputStreamOperator<Event> clickStream = env.fromElements(
                new Event("Bob", "./cart", 2000L),
                new Event("Alice", "./prod?id=100", 3000L),
                new Event("Alice", "./prod?id=200", 3500L),
                new Event("Bob", "./prod?id=2", 2500L),
                new Event("Alice", "./prod?id=300", 36000L),
                new Event("Bob", "./home", 30000L),
                new Event("Bob", "./prod?id=1", 23000L),
                new Event("Bob", "./prod?id=3", 33000L)
        ).assignTimestampsAndWatermarks(WatermarkStrategy.<Event>forMonotonousTimestamps()
                .withTimestampAssigner(new SerializableTimestampAssigner<Event>() {
                    @Override
                    public long extractTimestamp(Event element, long recordTimestamp) {
                        return element.timestamp;
                    }
                })
        );

        orderStream.keyBy(data -> data.f0)
                .intervalJoin(clickStream.keyBy(data -> data.user))
                .between(Time.seconds(-5), Time.seconds(10))
                .process(new ProcessJoinFunction<Tuple3<String, String, Long>, Event, String>() {
                    @Override
                    public void processElement(Tuple3<String, String, Long> left, Event right, Context ctx, Collector<String> out) throws Exception {
                        out.collect(right + " => " + left);
                    }
                }).print();
        env.execute();
    }
}
输出结果:
Event{user='Alice', url='./prod?id=100', timestamp=1970-01-01 08:00:03.0} => (Alice,order-2,5000)
Event{user='Alice', url='./prod?id=200', timestamp=1970-01-01 08:00:03.5} => (Alice,order-2,5000)
Event{user='Bob', url='./home', timestamp=1970-01-01 08:00:30.0} => (Bob,order-3,20000)
Event{user='Bob', url='./prod?id=1', timestamp=1970-01-01 08:00:23.0} => (Bob,order-3,20000)
窗口同组联结(Window CoGroup)
除窗口联结和间隔联结之外,Flink 还提供了一个“窗口同组联结”(window coGroup)操作。它的用法跟 window join 非常类似,也是将两条流合并之后开窗处理匹配的元素,调用时只需要将.join()换为.coGroup()就可以了。
stream1.coGroup(stream2)
	.where(<KeySelector>)
	.equalTo(<KeySelector>)
	.window(TumblingEventTimeWindows.of(Time.hours(1)))
	.apply(<CoGroupFunction>)
与 window join 的区别在于,调用.apply()方法定义具体操作时,传入的是一个CoGroupFunction。这也是一个函数类接口,源码中定义如下:
public interface CoGroupFunction<IN1, IN2, O> extends Function, Serializable {
void coGroup(Iterable<IN1> first, Iterable<IN2> second, Collector<O> out) throws Exception;
}
内部的.coGroup()方法,有些类似于 FlatJoinFunction 中.join()的形式,同样有三个参数,分别代表两条流中的数据以及用于输出的收集器(Collector)。不同的是,这里的前两个参数不再是单独的每一组“配对”数据了,而是传入了可遍历的数据集合。也就是说,现在不会再去计算窗口中两条流数据集的笛卡尔积,而是直接把收集到的所有数据一次性传入,至于要怎样配对完全是自定义的。这样.coGroup()方法只会被调用一次,而且即使一条流的数据没有任何另一条流的数据匹配,也可以出现在集合中、当然也可以定义输出结果了。
所以能够看出,coGroup 操作比窗口的 join 更加通用,不仅可以实现类似 SQL 中的“内连接”(inner join),也可以实现左外连接(left outer join)、右外连接(right outer join)和全外连接(full outer join)。事实上,窗口 join 的底层,也是通过 coGroup 来实现的。
下面是一段 coGroup 的示例代码:
import org.apache.flink.api.common.eventtime.SerializableTimestampAssigner;
import org.apache.flink.api.common.eventtime.WatermarkStrategy;
import org.apache.flink.api.common.functions.CoGroupFunction;
import org.apache.flink.api.java.tuple.Tuple2;
import org.apache.flink.streaming.api.datastream.DataStream;
import org.apache.flink.streaming.api.environment.StreamExecutionEnvironment;
import org.apache.flink.streaming.api.windowing.assigners.TumblingEventTimeWindows;
import org.apache.flink.streaming.api.windowing.time.Time;
import org.apache.flink.util.Collector;

// 基于窗口的 join
public class CoGroupExample {
    public static void main(String[] args) throws Exception {

        StreamExecutionEnvironment env = StreamExecutionEnvironment.getExecutionEnvironment();
        env.setParallelism(1);
        DataStream<Tuple2<String, Long>> stream1 = env.fromElements(
                Tuple2.of("a", 1000L),
                Tuple2.of("b", 1000L),
                Tuple2.of("a", 2000L),
                Tuple2.of("b", 2000L)
        ).assignTimestampsAndWatermarks(WatermarkStrategy.<Tuple2<String, Long>>forMonotonousTimestamps().withTimestampAssigner(
                new SerializableTimestampAssigner<Tuple2<String, Long>>() {
                    @Override
                    public long extractTimestamp(Tuple2<String,
                            Long> stringLongTuple2, long l) {
                        return stringLongTuple2.f1;
                    }
                })
        );

        DataStream<Tuple2<String, Long>> stream2 = env.fromElements(
                Tuple2.of("a", 3000L),
                Tuple2.of("b", 3000L),
                Tuple2.of("a", 4000L),
                Tuple2.of("b", 4000L)
        ).assignTimestampsAndWatermarks(WatermarkStrategy.<Tuple2<String, Long>>forMonotonousTimestamps().withTimestampAssigner(
                new SerializableTimestampAssigner<Tuple2<String, Long>>() {
                    @Override
                    public long extractTimestamp(Tuple2<String,
                            Long> stringLongTuple2, long l) {
                        return stringLongTuple2.f1;
                    }
                })
        );

        stream1
                .coGroup(stream2)
                .where(r -> r.f0)
                .equalTo(r -> r.f0)
                .window(TumblingEventTimeWindows.of(Time.seconds(5)))
                .apply(new CoGroupFunction<Tuple2<String, Long>, Tuple2<String, Long>, String>() {
                    @Override
                    public void coGroup(Iterable<Tuple2<String, Long>> iter1,
                                        Iterable<Tuple2<String, Long>> iter2, Collector<String> collector) throws Exception {
                        collector.collect(iter1 + "=>" + iter2);
                    }
                })
                .print();
        env.execute();
    }
}
输出结果是:
[(a,1000), (a,2000)]=>[(a,3000), (a,4000)]
[(b,1000), (b,2000)]=>[(b,3000), (b,4000)]
