1、源码编译实现LNMP发布Discuz论坛,MYSQL采用主主架构+MYSQL-PROXY读写分离。论坛配置文件写MYSQL-PROXY的IP+3306端口。
2、以上实验Nginx单独1台,PHP-FPM单独1台,MYSQL 主从2台,MYSQL-PROXY 1台(可以部署在Nginx上)。Nginx和PHP-FPM不能部署在一台机器哦。写出所有部署过程和划出架构图。
1、架构
| 服务 | 服务器ip | 服务器名称 |
|---|---|---|
| nginx | 192.168.142.100 | node01 |
| php-fpm | 192.168.142.101 | node02 |
| mysql-proxy | 192.168.142.103 | node03 |
| mariadb | 192.168.142.104 | node04 |
| mariadb | 192.168.142.105 | node05 |
2、部署mysql主从
由于机器限制,安装mariadb并部署主从
1、安装mariadb5.5
yum install -y mariadb*
#注意:安装前查看进程以及端口,避免其他版本mysql启动
2、修改配置文件
#192.168.142.104
server-id=1
log-bin=jfedu1-bin-log

#192.168.142.105
server-id=2
log-bin=jfedu2-bin-log
3、启动mariadb并查看数据目录
systemctl start mariadb
ls /var/lib/mysql
#192.168.142.104
aria_log.00000001  ib_logfile1            jfedu1-bin-log.index
aria_log_control   jfedu1-bin-log.000001  mysql
ibdata1            jfedu1-bin-log.000002  performance_schema
ib_logfile0        jfedu1-bin-log.000003  test

#192.168.142.105
aria_log.00000001  ib_logfile1            jfedu2-bin-log.index
aria_log_control   jfedu2-bin-log.000001  mysql
ibdata1            jfedu2-bin-log.000002  performance_schema
ib_logfile0        jfedu2-bin-log.000003  test
4、登入数据库,创建用户并配置互为主从
1、配置192.168.142.104为主库
#授权
MariaDB [(none)]> grant all privileges on *.* to 'jfedu1'@'192.168.142.%' identified by '123456';Query OK, 0 rows affected (0.00 sec)
#创建库
MariaDB [(none)]> create database jfedu01;
Query OK, 1 row affected (0.01 sec)
#切换库
MariaDB [(none)]> use jfedu01
Database changed
#创建表
MariaDB [jfedu01]> create table student(
    -> id int(20) primary key auto_increment,
    -> name varchar(20),
    -> class varchar(20)
    -> );
Query OK, 0 rows affected (0.00 sec)
#查看192.168.142.104为主库时候状态
MariaDB [jfedu01]> show master status;
+-----------------------+----------+--------------+------------------+
| File                  | Position | Binlog_Do_DB | Binlog_Ignore_DB |
+-----------------------+----------+--------------+------------------+
| jfedu1-bin-log.000004 |      745 |              |                  |
+-----------------------+----------+--------------+------------------+
1 row in set (0.00 sec)
#192.168.142.105为从库配置
MariaDB [(none)]> change master to
    -> master_host='192.168.142.104',
    -> master_user='jfedu1',
    -> master_password='123456',
    -> master_log_file='jfedu1-bin-log.000004',
    -> master_log_pos=745;
Query OK, 0 rows affected (0.01 sec)
MariaDB [(none)]> start slave;
Query OK, 0 rows affected (0.00 sec)
MariaDB [(none)]> show slave status\G
*************************** 1. row ***************************
               Slave_IO_State: Waiting for master to send event
                  Master_Host: 192.168.142.104
                  Master_User: jfedu1
                  Master_Port: 3306
                Connect_Retry: 60
              Master_Log_File: jfedu1-bin-log.000004
          Read_Master_Log_Pos: 745
               Relay_Log_File: mariadb-relay-bin.000002
                Relay_Log_Pos: 534
        Relay_Master_Log_File: jfedu1-bin-log.000004
             Slave_IO_Running: Yes
            Slave_SQL_Running: Yes
              Replicate_Do_DB:
          Replicate_Ignore_DB:
           Replicate_Do_Table:
...
1 row in set (0.00 sec)
2、配置192.168.142.105为主库
#授权
grant all privileges on *.* to 'jfedu2'@'192.168.142.%' identif
ied by '123456';
#查看192.168.142.105为主库时候状态
MariaDB [jfedu01]> show master status ;
+-----------------------+----------+--------------+------------------+
| File                  | Position | Binlog_Do_DB | Binlog_Ignore_DB |
+-----------------------+----------+--------------+------------------+
| jfedu2-bin-log.000004 |      473 |              |                  |
+-----------------------+----------+--------------+------------------+
1 row in set (0.00 sec)

#192.168.142.104为从库配置
MariaDB [jfedu01]> change master to
    -> master_host='192.168.142.105',
    -> master_user='jfedu2',
    -> master_password='123456',
    -> master_log_file='jfedu2-bin-log.000004',
    -> master_log_pos=473;
Query OK, 0 rows affected (0.00 sec)

MariaDB [jfedu01]> start slave;
Query OK, 0 rows affected (0.00 sec)
MariaDB [jfedu01]> show slave status \G
*************************** 1. row ***************************
               Slave_IO_State: Waiting for master to send event
                  Master_Host: 192.168.142.105
                  Master_User: jfedu2
                  Master_Port: 3306
                Connect_Retry: 60
              Master_Log_File: jfedu2-bin-log.000004
          Read_Master_Log_Pos: 473
               Relay_Log_File: mariadb-relay-bin.000002
                Relay_Log_Pos: 534
        Relay_Master_Log_File: jfedu2-bin-log.000004
             Slave_IO_Running: Yes
            Slave_SQL_Running: Yes
              Replicate_Do_DB:
          Replicate_Ignore_DB:
...
#此刻互为104和105已经互为主从
授权用户mysql-proxy权限
grant all on *.* to 'mysql-proxy'@'192.168.142.%' identified by '123456';
修改root@localhost的密码
set password=password('123456');
flush privileges;
3、部署mysql-proxy 192.168.142.103
1、下载mysql-proxy
wget http://ftp.ntu.edu.tw/pub/MySQL/Downloads/MySQL-Proxy/mysql-proxy-0.8.4-linux-el6-x86-64bit.tar.gz
2、创建用户
useradd -r mysql-proxy
3、解压并移动mysql-proxy
tar  xf  mysql-proxy-0.8.4-linux-el6-x86-64bit.tar.gz  -C  /data
mv  /data/mysql-proxy-0.8.4-linux-el6-x86-64bit  /data/mysql-proxy
4、修改环境变量配置文件
#vim /etc/profile
export  PATH=$PATH:/data/mysql-proxy/bin/
#刷新环境变量
source /etc/profile
5、启动MYSQL-Proxy中间件
/data/mysql-proxy/bin/mysql-proxy --daemon --log-level=debug --user=mysql-proxy --keepalive --log-file=/var/log/mysql-proxy.log --proxy-address=0.0.0.0:3306 --plugins="proxy" --proxy-backend-addresses="192.168.142.104:3306" --proxy-read-only-backend-addresses="192.168.142.105:3306" --proxy-lua-script="/data/mysql-proxy/share/doc/mysql-proxy/rw-splitting.lua" --plugins=admin --admin-username="admin" --admin-password="admin" --admin-lua-script="/data/mysql-proxy/lib/mysql-proxy/lua/admin.lua"
–proxy-address=0.0.0.0:3306 默认为4040 服务端连接端口这里更改为3306

- 参数详解
--help-all   				         #获取全部帮助信息;
--proxy-address=host:port 	         #代理服务监听的地址和端口,默认为4040;
--admin-address=host:port  	         #管理模块监听的地址和端口,默认为4041;
--proxy-backend-addresses=host:port   #后端mysql服务器的地址和端口;
--proxy-read-only-backend-addresses=host:port #后端只读mysql服务器的地址和端口;
--proxy-lua-script=file_name          #完成mysql代理功能的Lua脚本;
--daemon  						 	#以守护进程模式启动mysql-proxy;
--keepalive 					 	 #在mysql-proxy崩溃时尝试重启之;
--log-file=/path/to/log_file_name 	 #日志文件名称;
--log-level=level 					 #日志级别;
--log-use-syslog 					 #基于syslog记录日志;
--plugins=plugin					 #在mysql-proxy启动时加载的插件;
--user=user_name  				     #运行mysql-proxy进程的用户;
--defaults-file=/path/to/conf_file_name #默认使用的配置文件路径,其配置段使用[mysql-proxy]标识;
--proxy-skip-profiling 				 #禁用profile;
--pid-file=/path/to/pid_file_name 	 #进程文件名;
6、安装mysql或者mariadb
yum install mariadb -y
mysql -h 192.168.142.103 -uadmin -padmin -P 4041;
+------------------------+------------------------------------+
| command                | description                        |
+------------------------+------------------------------------+
| SELECT * FROM help     | shows this help                    |
| SELECT * FROM backends | lists the backends and their state |
+------------------------+------------------------------------+
2 rows in set (0.00 sec)

MySQL [(none)]> select * from backends;
+-------------+----------------------+---------+------+------+-------------------+
| backend_ndx | address              | state   | type | uuid | connected_clients |
+-------------+----------------------+---------+------+------+-------------------+
|           1 | 192.168.142.104:3306 | unknown | rw   | NULL |                 0 |
|           2 | 192.168.142.105:3306 | unknown | ro   | NULL |                 0 |
+-------------+----------------------+---------+------+------+-------------------+
2 rows in set (0.00 sec)
7、使用后端用户名密码登入
[root@node3 ~]# mysql -ujfedu1 -p123456 -h192.168.142.103 -P 3306
Welcome to the MariaDB monitor.  Commands end with ; or \g.
Your MariaDB connection id is 11
Server version: 5.5.68-MariaDB MariaDB Server

Copyright (c) 2000, 2018, Oracle, MariaDB Corporation Ab and others.

Type 'help;' or '\h' for help. Type '\c' to clear the current input statement.

MariaDB [(none)]>
刷新mysql-proxy的状态需要执行命令来刷新,所以使用-e参数
[root@node3 ~]# mysql -ujfedu1 -p123456 -h192.168.142.103 -P 3306 -e "show databases;"
+--------------------+
| Database           |
+--------------------+
| information_schema |
| jfedu01            |
| jfedu03            |
| jfedu06            |
| mysql              |
| performance_schema |
| test               |
+--------------------+
#多执行几次,4041的状态才会刷新
[root@node3 ~]# mysql -uadmin -padmin -h192.168.142.103 -P 4041
Welcome to the MariaDB monitor.  Commands end with ; or \g.
Your MySQL connection id is 1
Server version: 5.0.99-agent-admin

Copyright (c) 2000, 2018, Oracle, MariaDB Corporation Ab and others.

Type 'help;' or '\h' for help. Type '\c' to clear the current input statement.

MySQL [(none)]> select * from backends;
+-------------+----------------------+-------+------+------+-------------------+
| backend_ndx | address              | state | type | uuid | connected_clients |
+-------------+----------------------+-------+------+------+-------------------+
|           1 | 192.168.142.104:3306 | up    | rw   | NULL |                 0 |
|           2 | 192.168.142.105:3306 | up    | ro   | NULL |                 0 |
+-------------+----------------------+-------+------+------+-------------------+
2 rows in set (0.00 sec)
4、部署php-fpm 192.168.142.101
1、安装依赖
yum install libxml2 libxml2-devel gzip bzip2 -y
2、下载php包
wget -c http://mirrors.sohu.com/php/php-5.6.28.tar.bz2
3、解压php包
tar xf php-5.6.28.tar.bz2
4、预编译、编译并安装
#预编译
cd php-5.6.28
./configure --prefix=/data/php5 \
--with-config-file-path=/data/php5/etc  \
--enable-fpm \
--enable-mysqlnd \
--with-mysqli=mysqlnd \
--with-pdo-mysql=mysqlnd \
--with-fpm-group=www \
--with-fpm-user=www
#编译并安装
make
make install

Installing shared extensions:     /data/php5/lib/php/extensions/no-debug-non-zts-20131226/
Installing PHP CLI binary:        /data/php5/bin/
Installing PHP CLI man page:      /data/php5/php/man/man1/
Installing PHP FPM binary:        /data/php5/sbin/
Installing PHP FPM config:        /data/php5/etc/
Installing PHP FPM man page:      /data/php5/php/man/man8/
Installing PHP FPM status page:   /data/php5/php/php/fpm/
Installing PHP CGI binary:        /data/php5/bin/
Installing PHP CGI man page:      /data/php5/php/man/man1/
Installing build environment:     /data/php5/lib/php/build/
Installing header files:           /data/php5/include/php/
Installing helper programs:       /data/php5/bin/
  program: phpize
  program: php-config
Installing man pages:             /data/php5/php/man/man1/
  page: phpize.1
  page: php-config.1
Installing PEAR environment:      /data/php5/lib/php/
[PEAR] Archive_Tar    - installed: 1.4.0
[PEAR] Console_Getopt - installed: 1.4.1
[PEAR] Structures_Graph- installed: 1.1.1
[PEAR] XML_Util       - installed: 1.3.0
[PEAR] PEAR           - installed: 1.10.1
Wrote PEAR system config file at: /data/php5/etc/pear.conf
You may want to add: /data/php5/lib/php to your php.ini include_path
/root/php5/build/shtool install -c ext/phar/phar.phar /data/php5/bin
ln -s -f phar.phar /data/php5/bin/phar
Installing PDO headers:           /data/php5/include/php/ext/pdo/
5、拷贝压缩包里默认的配置文件到目录并修改
mv /root/php-5.6.28 /root/php5
cp  /root/php5/php.ini-development /data/php5/etc/php.ini
cp  /data/php5/etc/php-fpm.conf.default  /data/php5/etc/php-fpm.conf
grep -vE '^$|;' /data/php5/etc/php-fpm.conf > /data/php5/etc/1.tet
mv /data/php5/etc/1.tet /data/php5/etc/php-fpm.conf

vim /data/php5/etc/php-fpm.conf
[global]

[www]
user = www
group = www
listen = 0.0.0.0:9000
listen.allowed_clients = 127.0.0.1,192.168.142.100

pm = dynamic
pm.max_children = 10
pm.start_servers = 4
pm.min_spare_servers = 5
pm.max_spare_servers = 35
6、复制php启动文件到/etc/init.d来管理
[root@node2 html]# cp /root/php5/sapi/fpm/init.d.php-fpm /etc/init.d/php-fpm
[root@node2 html]# chmod o+x /etc/init.d/php-fpm
7、创建用户、创建发布目录并授权www用户、上传Discuz压缩包
[root@node2 html]# useradd -s /sbin/nologin www -M

[root@node2 html]# mkdir -p /data/php5/html/www
[root@node2 html]# cd /data/php5/html
[root@node2 html]# chown -R www:www www
[root@node2 html]# ll
总用量 4
drwxr-xr-x 15 www www 4096 5月  11 15:47 www
[root@node2 html]# cd www
[root@node2 www]# rz Discuz_X3.2_SC_UTF8.zip
[root@node2 www]# unzip Discuz_X3.2_SC_UTF8.zip
[root@node2 www]# rz Discuz_X3.2_SC_UTF8.zip
[root@node2 www]# mv upload/* ./
[root@node2 www]# chown -R www:www .
[root@node2 html]# /etc/init.d/php-pfm start   #或者使用 service php-fpm start
5、部署nginx
1、下载安装包,解压并预编译
[root@node1 ~]# rz nginx-1.20.2.tar.gz
[root@node1 ~]# tar xf nginx-1.20.2.tar.gz
[root@node1 ~]# cd nginx-1.20.2
[root@node1 nginx-1.20.2]# ./configure --prefix=/data/nginx --user=www --group=www --with-http_stub_status_module --with-http_realip_module
[root@node1 nginx-1.20.2]# make && make install
#nginx配置文件/data/nginx/conf/nginx.conf
user  www;
worker_processes  1;
events {
    worker_connections  1024;
}
http {
    include       mime.types;
    default_type  application/octet-stream;
    sendfile        on;
    keepalive_timeout  65;
    server {
        listen       80;
        server_name  localhost;
        charset utf-8;
        location / {
            root   /data/nginx/html;
            index  index.php index.html index.htm;
        }
        location ~ \.php$ {
            root           /data/php5/html/www;
            fastcgi_pass   192.168.142.101:9000;
            fastcgi_index  index.php;
            fastcgi_param  SCRIPT_FILENAME  $document_root$fastcgi_script_name;
            include        fastcgi_params;
        }
    }
}
2、做软链接方便启停
[root@node1 nginx-1.20.2]# ln -s /data/nginx/sbin/nginx /usr/bin/nginx
3、删除多余的html文件
[root@node1 nginx-1.20.2]# rm -f /data/nginx/html/*
4、上传Discuz文件包,并解压
[root@node1 nginx-1.20.2]# cd /data/nginx/html/
[root@node1 html]# rz Discuz_X3.2_SC_UTF8.zip
[root@node1 html]# unzip Discuz_X3.2_SC_UTF8.zip
[root@node1 html]# mv Discuz_X3.2_SC_UTF8.zip  /tmp/
5、移动并且授权
[root@node1 html]# mv upload/* ./
[root@node1 html]# chown -R www:www /data/nginx/html

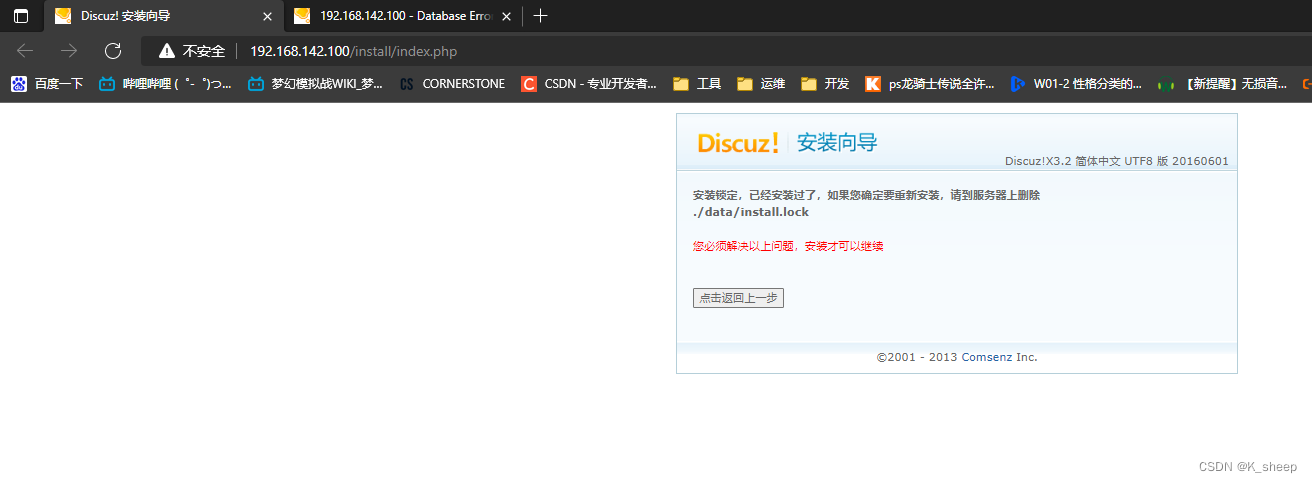
安装中出现的报错:

返回

[root@node2 ~]# find / -name install.lock
/data/php5/html/www/data/install.lock
/data/php5/html/www/uc_server/data/install.lock
[root@node2 ~]# rm -f /data/php5/html/www/data/install.lock
[root@node2 ~]# rm -f /data/php5/html/www/uc_server/data/install.lock

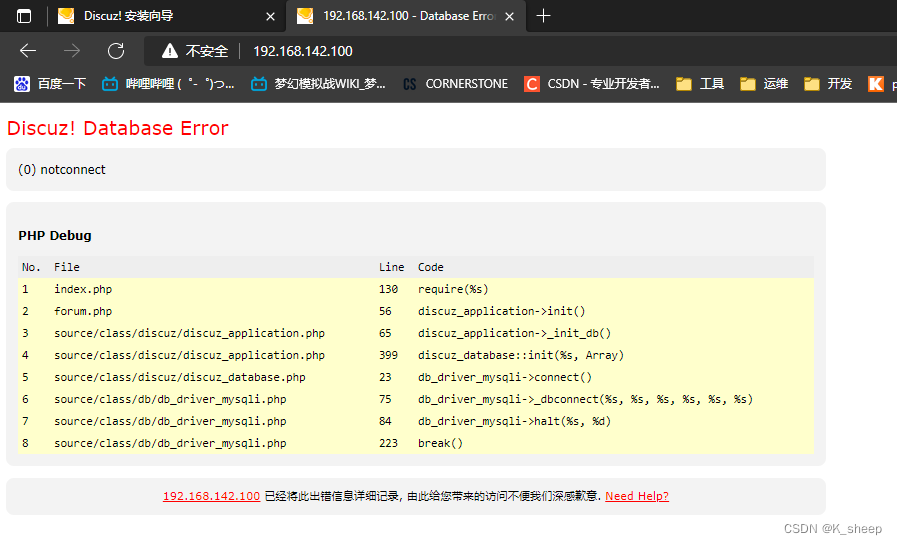
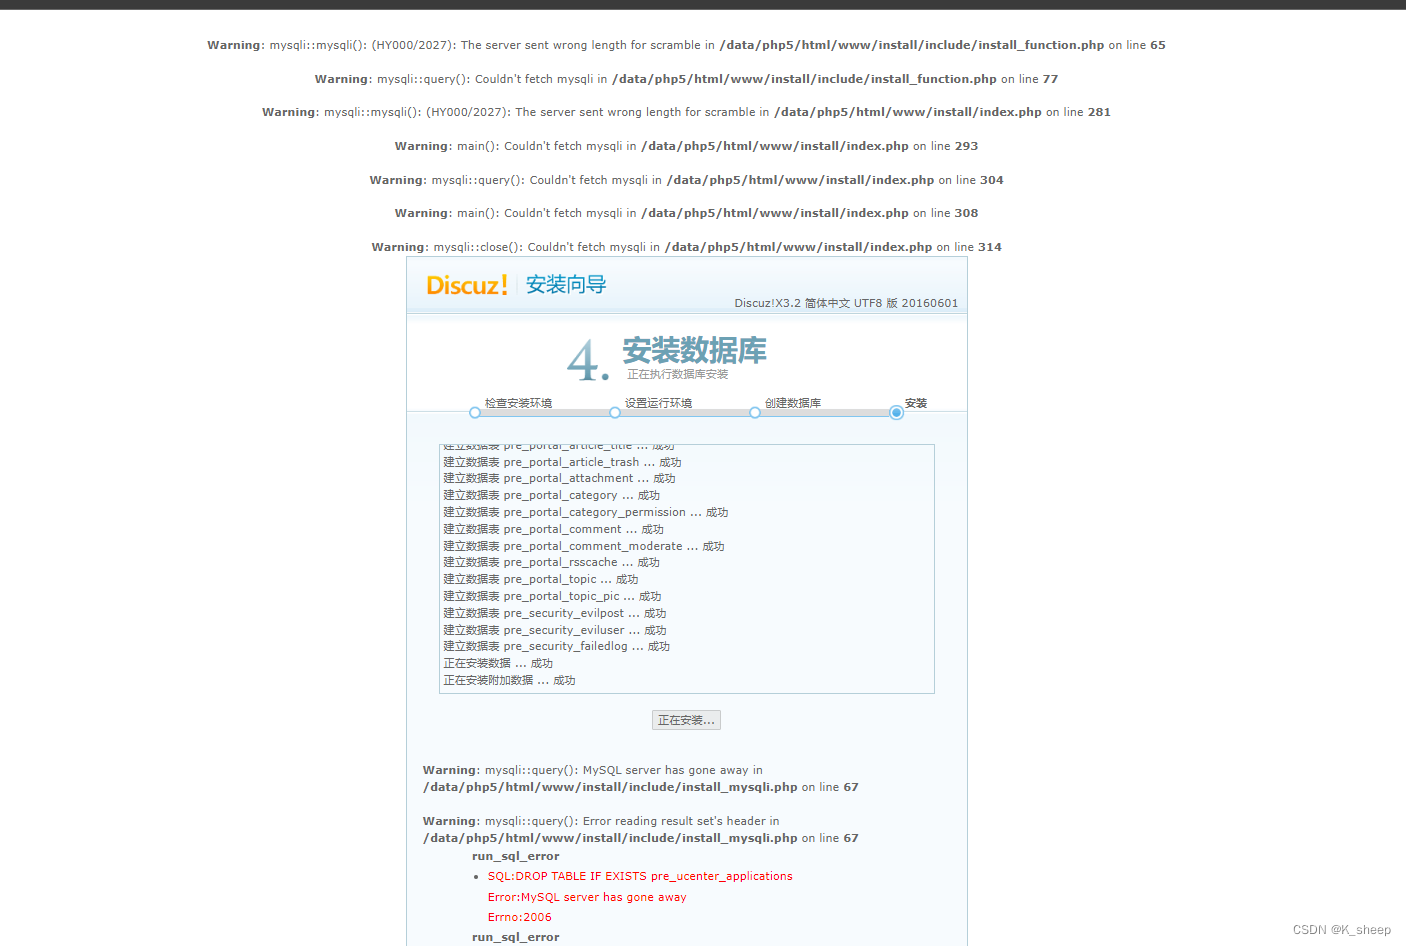
安装完结果发现没有画面。重新安装也不行。。

105机器yum安装php-fpm
#安装PHP-FPM软件服务;
yum install -y php-fpm php php-devel php-mysql
#启动PHP-FPM服务;
systemctl start php-fpm
#查看FPM服务进程;
ps -ef|grep fpm
#查看FPM监听端口;
netstat -tnlp|grep 9000
#配置文件位置,并拷贝
cd  /etc/php-fpm.d/
cp www.conf www.conf.bak
#过滤多余空格以及;追加至文件并覆盖原有配置未见
grep -vE "^$|;" www.conf > 1.conf
mv 1.conf www.conf
vim www.conf
listen = 127.0.0.1:9000
listen.allowed_clients = 127.0.0.1

user = apache
group = apache
修改为
listen = 0.0.0.0:9000 #允许外部访问
listen.allowed_clients = 127.0.0.1,192.168.142.106 #增加nginx访问地址

user = www
group = www
#创建www用户
useradd www -s /sbin/nologin -M
#到php的网页目录上床Discuz包解压并移动upload
cd /usr/share/php/
rz Discuz_X3.2_SC_UTF8.zip
unzip Discuz_X3.2_SC_UTF8.zip
mv upload/* .
chown -R www:www /usr/share/php
#启动php-fpm
systemctl start php-fpm
6、修改nginx到php-fpm的目标机器
user  www;
worker_processes  1;
events {
    worker_connections  1024;
}
http {
    include       mime.types;
    default_type  application/octet-stream;
    sendfile        on;
    keepalive_timeout  65;
    server {
        listen       80;
        server_name  localhost;
        charset utf-8;
        location / {
            root   /data/nginx/html;
            index  index.php index.html index.htm;
        }
        location ~ \.php$ {
            root           /data/php5/html/www;
            fastcgi_pass   192.168.142.105:9000;
            fastcgi_index  index.php;
            fastcgi_param  SCRIPT_FILENAME  $document_root$fastcgi_script_name;
            include        fastcgi_params;
        }
    }
}

成功了,不知道为什么编译安装php-fpm会失败。。
修改vim /usr/share/php/www/config/config_global.php
// ----------------------------  CONFIG DB  ----------------------------- //
$_config['db']['1']['dbhost'] = '192.168.142.103:3306';
$_config['db']['1']['dbuser'] = 'root';
$_config['db']['1']['dbpw'] = '123456';
$_config['db']['1']['dbcharset'] = 'utf8';
$_config['db']['1']['pconnect'] = '0';
$_config['db']['1']['dbname'] = 'Discuz';
$_config['db']['1']['tablepre'] = 'pre_';
$_config['db']['slave'] = '';
$_config['db']['common']['slave_except_table'] = '';
重启php-fpm
systemctl restart php-fpm
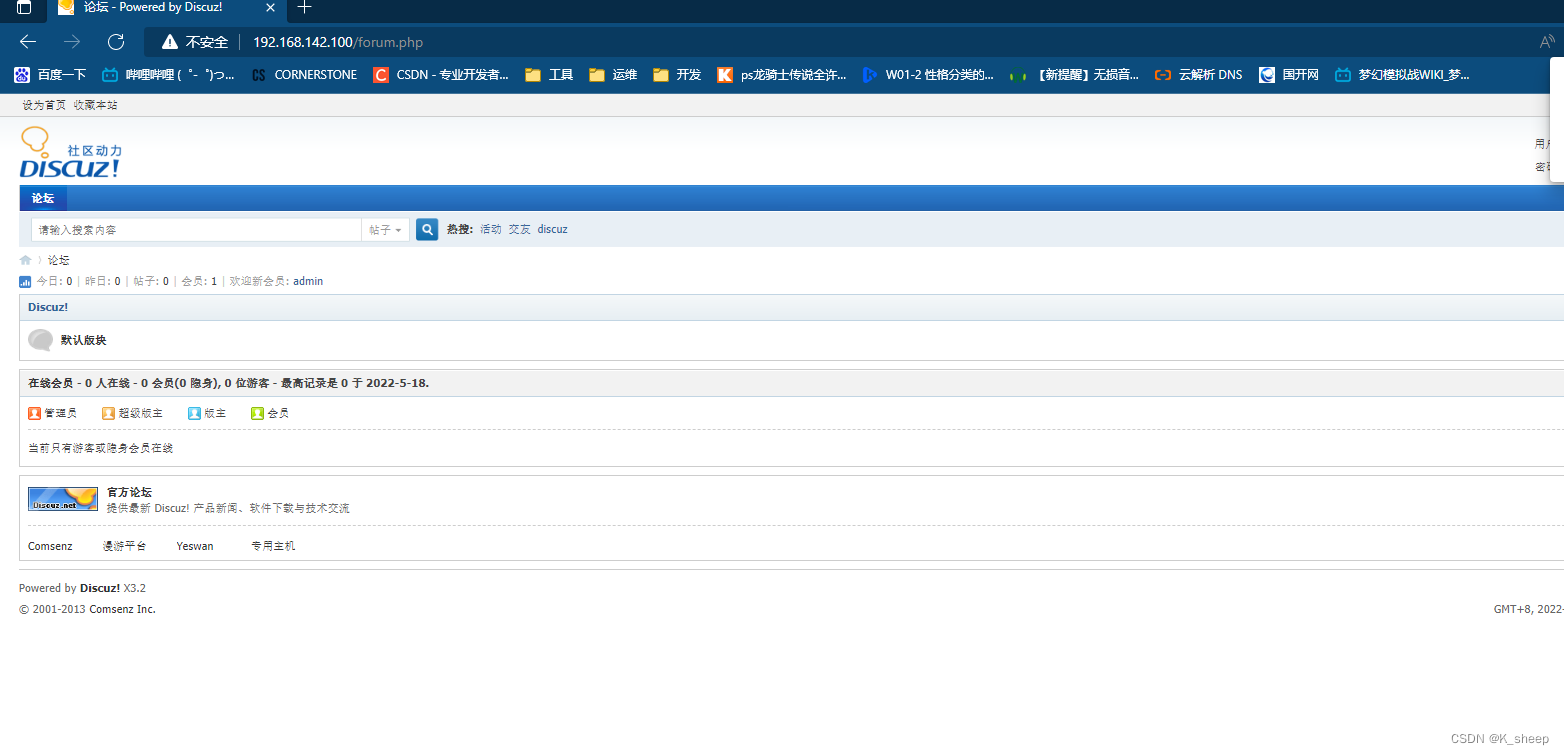
刷新网页,连接成功,写入帖子,使用正常!

