docker compose部署nginx+redis+mysql
由于本地服务器部署服务的话,进度慢,并且容易混乱,不好处理。于是,想到用docker容器部署服务应用。
1、准备好相关的文件,目录
注意:请提前安装docker和docker-compose并自行配置镜像加速。
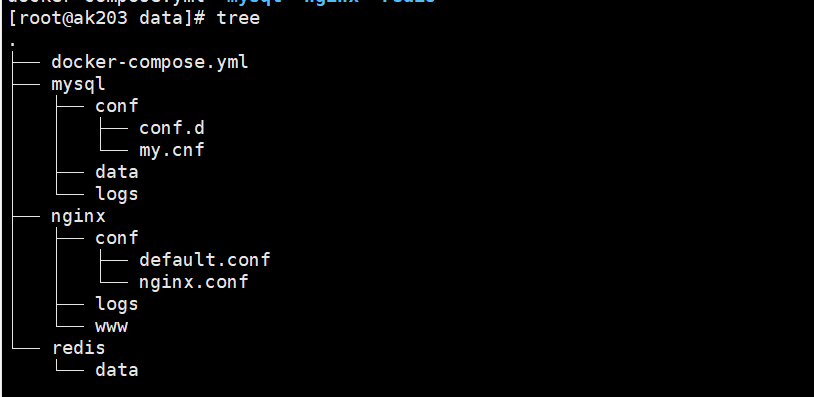
(1)目录、文件结构图:

(2)提前pull 相关镜像
docker pull mysql:8.0.29
docker pull nginx:latest
docker pull redis:latest
2、编写docker-compose.yml文件
version: '3'
services:
  mysql:
    image: mysql:laster
    restart: always
    ports:
      - 13306:3306
    networks:
      - front-ms
    privileged: true
    container_name: mysql
    environment:
      - "MYSQL_ROOT_PASSWORD=aike@2022"
      - "MYSQL_DATABASE=test"
      - "TZ=Asia/Shanghai"
    command:
      --default-time-zone='+8:00'
	  --default-authentication-plugin=mysql_native_password
      --character-set-server=utf8mb4
      --collation-server=utf8mb4_general_ci
      --max_connections=1000
      --innodb_lock_wait_timeout=500
    volumes:
	  - /etc/localtime:/etc/localtime:ro
      - /home/cmcc/mysql/data:/var/lib/mysql/
      - /home/cmcc/mysql/logs:/var/log/mysql
      - /home/cmcc/mysql/conf/conf.d:/etc/mysql/conf.d/
      - /home/cmcc/mysql/conf/my.cnf:/etc/mysql/my.cnf
  redis:
    image: redis:latest
    restart: always
    ports:
      - 16379:6379
    networks:
      - front-ms
    privileged: true
    environment:
      - "TZ=Asia/Shanghai"
    container_name: redis
    volumes:
      - /home/cmcc/redis/data:/data
    command: redis-server --requirepass 123456 --appendonly yes
  nginx:
    image: nginx:latest
    container_name: nginx
    privileged: true
    restart: always
    ports:
      - 18080:80
    volumes:
      - /home/cmcc/nginx/logs:/var/log/nginx/
      - /home/cmcc/nginx/conf/nginx.conf:/etc/nginx/nginx.conf
      - /home/cmcc/nginx/conf/default.conf:/etc/nginx/conf.d/default.conf
      - /home/cmcc/nginx/www/:/usr/share/nginx/html/
    command: /bin/bash -c "nginx -g 'daemon off;'"
networks:
  front-ms:
    driver: bridge
3、编写其他几个配置文件
(1)nginx配置文件:default.conf 和nginx.conf
vi default.conf

server {
    listen       80;
    server_name  localhost;
    charset utf-8;

    #access_log  /var/log/nginx/host.access.log  main;

    location / {
        root   /usr/share/nginx/html;
        index  index.html index.htm;
    }

    #error_page  404              /404.html;

    # redirect server error pages to the static page /50x.html
    #
    error_page   500 502 503 504  /50x.html;
    location = /50x.html {
        root   /usr/share/nginx/html;
    }

    # proxy the PHP scripts to Apache listening on 127.0.0.1:80
    #
    #location ~ \.php$ {
    #    proxy_pass   http://127.0.0.1;
    #}

    # pass the PHP scripts to FastCGI server listening on 127.0.0.1:9000
    #
    #location ~ \.php$ {
    #    root           html;
    #    fastcgi_pass   127.0.0.1:9000;
    #    fastcgi_index  index.php;
    #    fastcgi_param  SCRIPT_FILENAME  /scripts$fastcgi_script_name;
    #    include        fastcgi_params;
    #}

    # deny access to .htaccess files, if Apache's document root
    # concurs with nginx's one
    #
    #location ~ /\.ht {
    #    deny  all;
    #}
}
vi nginx.conf

user  nginx;
worker_processes  auto;

error_log  /var/log/nginx/error.log notice;
pid        /var/run/nginx.pid;


events {
    worker_connections  10240;
}


http {
    include       /etc/nginx/mime.types;
    default_type  application/octet-stream;

    log_format  main  '$remote_addr - $remote_user [$time_local] "$request" '
                      '$status $body_bytes_sent "$http_referer" '
                      '"$http_user_agent" "$http_x_forwarded_for"';

    access_log  /var/log/nginx/access.log  main;

    sendfile        on;
    #tcp_nopush     on;

    keepalive_timeout  65;

    #gzip  on;

    include /etc/nginx/conf.d/*.conf;
}
(2)mysql配置文件:my.cnf
vi my.cnf

[mysqld]
user=mysql
character-set-server=utf8
default_authentication_plugin=mysql_native_password
secure_file_priv=/var/lib/mysql
expire_logs_days=7
sql_mode=STRICT_TRANS_TABLES,NO_ZERO_IN_DATE,NO_ZERO_DATE,ERROR_FOR_DIVISION_BY_ZERO,NO_ENGINE_SUBSTITUTION
max_connections=1000

[client]
default-character-set=utf8

[mysql]
default-character-set=utf8
在docker-compose.yml 文件路径下 启动nginx、redis、mysql服务
docker-compose up -d

4、docker启动java项目
#1、在nginx 同级目录下创建一个project目录
mkdir project

#2、将jar 包上传到project目录下
#3、编写Dockerfile文件
vi Dockerfile
# 基础镜像
FROM java:8
MAINTAINER taopan
RUN mkdir -p /home/project
WORKDIR /home/project
ADD project.jar /project.jar
EXPOSE 8080
ENTRYPOINT  ["java","-jar","-Xmx512m","-Xms512m","/home/project/project.jar"]

# 4、构建、运行镜像
docker build -t project .
docker run -di --restart=always --name 容器名称 -e TZ=Asia/Shanghai -p 8080:8080 镜像名称
