Zabbix5.0+Ubuntu18.04+Mysql+Nginx安装部署
服务器版本及软件版本说明 :
本次安装选择以下软件版本:Zabbix5.0+Ubuntu18.04+Mysql+Nginx
其他服务器平台请参考官网说明文档:官方文档传送门
安装配置 Zabbix server
安装 Zabbix repository
# Ubuntu系统如果操作用户不是root用户,也可以使用有sudo权限的用户安装;
# 下载Zabbix所需要的安装包至本地服务器(Ubuntu18.04);
sudo wget https://repo.zabbix.com/zabbix/5.0/ubuntu/pool/main/z/zabbix-release/zabbix-release_5.0-1+bionic_all.deb
# 安装下载的Zabbix的deb包;
sudo dpkg -i zabbix-release_5.0-1+bionic_all.deb
# 更新镜像源。
sudo apt update
安装Zabbix server,Web前端,Nginx,agent
上一步已经sudo apt update更新了镜像源,所以直接使用以下命令安装Zabbix所需的软件
sudo apt install zabbix-server-mysql zabbix-frontend-php zabbix-nginx-conf zabbix-agent
创建初始数据库
zabbix-server-mysql 安装成功后,登录MySQL创建初始数据库
sudo mysql -uroot -p
password	#输入root密码
在数据库主机上运行以下代码
mysql> create database zabbix character set utf8 collate utf8_bin;
mysql> create user zabbix@localhost identified by '123456';		# 配置密码为123456
mysql> grant all privileges on zabbix.* to zabbix@localhost;
mysql> quit;
导入初始架构和数据,系统将提示您输入新创建的密码(密码为123456)。
查看 /usr/share/doc/zabbix-sql-scripts/mysql/server.sql.gz 该文件是否存在,如果存在运行以下命令;(不存在的话需要重新安装)
sudo zcat /usr/share/doc/zabbix-server-mysql*/create.sql.gz | mysql -uzabbix -p zabbix
为Zabbix server配置数据库
编辑配置文件 /etc/zabbix/zabbix_server.conf
DBHost=localhost
DBName=zabbix
DBUser=zabbix
DBPassword=123456
配置完成后查看:grep -v "^#" /etc/zabbix/zabbix_server.conf | grep -v "^$"
LogFile=/var/log/zabbix/zabbix_server.log
LogFileSize=0
PidFile=/var/run/zabbix/zabbix_server.pid
SocketDir=/var/run/zabbix
DBHost=localhost
DBName=zabbix
DBUser=zabbix
DBPassword=123456
SNMPTrapperFile=/var/log/snmptrap/snmptrap.log
Timeout=4
AlertScriptsPath=/usr/lib/zabbix/alertscripts
ExternalScripts=/usr/lib/zabbix/externalscripts
FpingLocation=/usr/bin/fping
Fping6Location=/usr/bin/fping6
LogSlowQueries=3000
StatsAllowedIP=127.0.0.1
为Zabbix前端配置PHP
编辑配置文件 /etc/zabbix/nginx.conf,可修改端口号(默认80)和server_name;
listen 8090;
server_name 192.168.34.123;		# 改为了服务器的IP,如果有DNS解析的话,可以隐藏IP,例如example.com
编辑配置文件 /etc/zabbix/php-fpm.conf,打开以下行的注释,并修改为中国的时钟;
php_value[date.timezone] = Asia/Shanghai
为Zabbix前端配置Nginx
安装成功后,上一步配置的文件会自动软链接到/etc/nginx/conf.d/zabbix.conf和/etc/php/7.2/fpm/pool.d/zabbix.conf,如果没有请使用如下命令手动链接:
sudo ln -sf /etc/zabbix/nginx.conf /etc/nginx/conf.d/zabbix.conf
sudo ln -sf /etc/zabbix/php-fpm.conf /etc/php/7.2/fpm/pool.d/zabbix.conf
启动Zabbix server和agent进程
启动Zabbix server和agent进程,并为它们设置开机自启:
sudo systemctl restart zabbix-server zabbix-agent nginx php7.2-fpm
sudo systemctl enable zabbix-server zabbix-agent nginx php7.2-fpm
配置Zabbix前端页面
连接到新安装的Zabbix前端: http://192.168.34.123:8090/
点击 下一步 按钮,您应该看到以下页面:
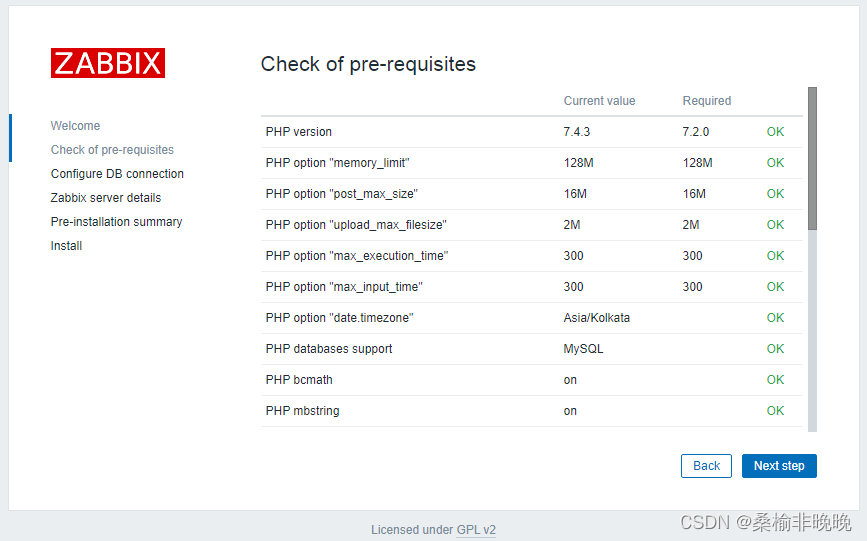
确保服务器满足所有要求,然后单击 下一步 按钮,您应该看到以下页面(密码是123456):
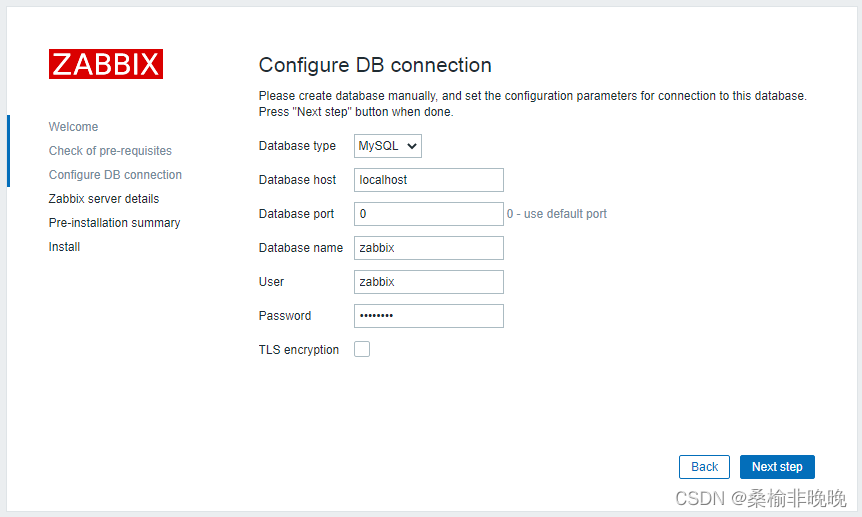
提供您在上述步骤中创建的数据库凭据,然后单击 下一步 按钮,您应该看到以下页面:
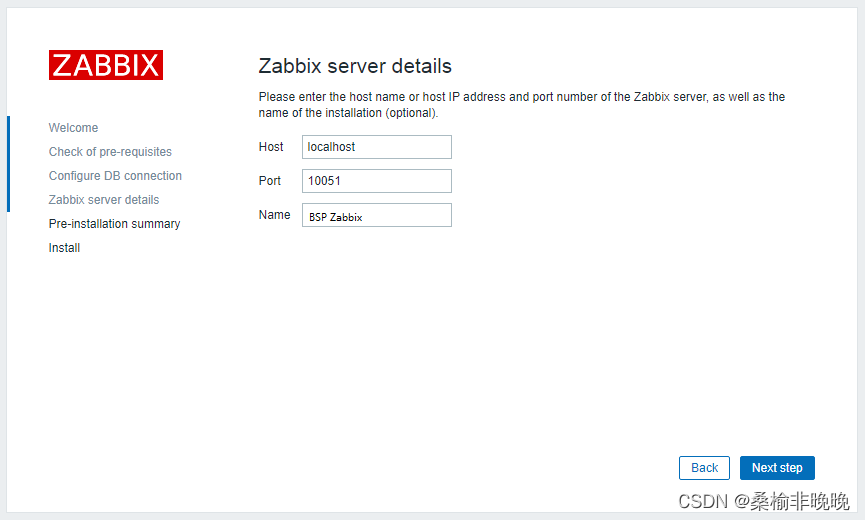
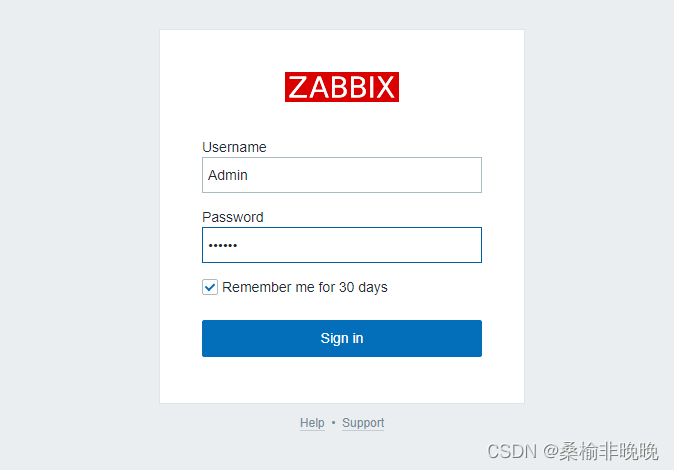
点击Finish按钮,您将被重定向到Zabbix登录页面,如下所示:
Username: Admin
Password: zabbix
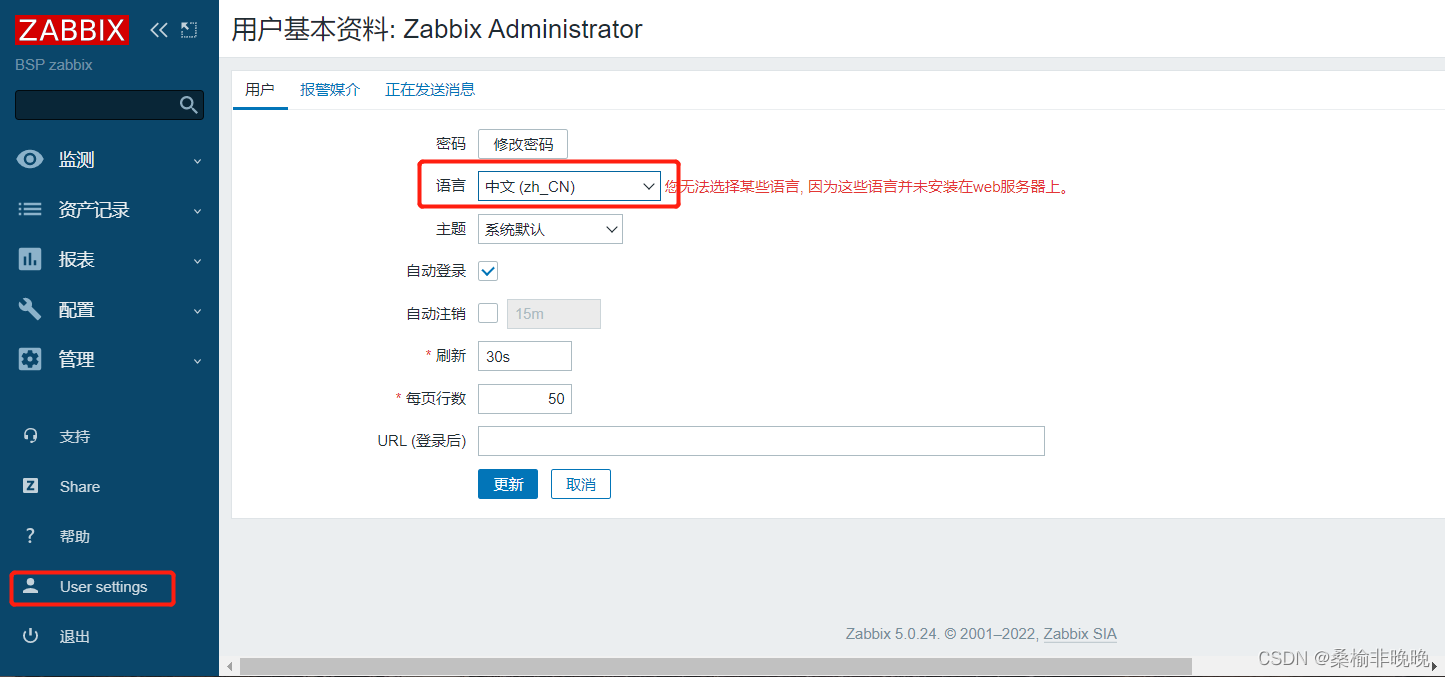
登陆之后,可以修改语言为中文:
遇到的问题
问题1
Nginx服务启动时报错,80端口被占用:
$ sudo service nginx restart
Job for nginx.service failed because the control process exited with error code.
See "systemctl status nginx.service" and "journalctl -xe" for details.
$
$ journalctl -xe
-- The start-up result is RESULT.
6月 20 17:39:01 BJ-PC426 CRON[30201]: pam_unix(cron:session): session opened for user root by (uid=0)
6月 20 17:39:01 BJ-PC426 CRON[30202]: (root) CMD (  [ -x /usr/lib/php/sessionclean ] && if [ ! -d /run/systemd/system ]; then /usr/lib/php/sessionclean; fi)
6月 20 17:39:01 BJ-PC426 CRON[30201]: pam_unix(cron:session): session closed for user root
6月 20 17:39:26 BJ-PC426 sudo[30348]:    nreal : TTY=pts/0 ; PWD=/etc/apache2/sites-available ; USER=root ; COMMAND=/usr/bin/killall -9 nginx
6月 20 17:39:26 BJ-PC426 sudo[30348]: pam_unix(sudo:session): session opened for user root by nreal(uid=0)
6月 20 17:39:26 BJ-PC426 systemd[1]: nginx.service: Main process exited, code=killed, status=9/KILL
6月 20 17:39:26 BJ-PC426 systemd[1]: nginx.service: Killing process 23966 (nginx) with signal SIGKILL.
6月 20 17:39:26 BJ-PC426 sudo[30348]: pam_unix(sudo:session): session closed for user root
6月 20 17:39:26 BJ-PC426 systemd[1]: nginx.service: Failed with result 'signal'.
6月 20 17:39:30 BJ-PC426 sudo[30377]:    nreal : TTY=pts/0 ; PWD=/etc/apache2/sites-available ; USER=root ; COMMAND=/usr/sbin/service apache2 restart
6月 20 17:39:30 BJ-PC426 sudo[30377]: pam_unix(sudo:session): session opened for user root by nreal(uid=0)
6月 20 17:39:30 BJ-PC426 systemd[1]: Starting The Apache HTTP Server...
-- Subject: Unit apache2.service has begun start-up
-- Defined-By: systemd
-- Support: http://www.ubuntu.com/support
--
-- Unit apache2.service has begun starting up.
6月 20 17:39:30 BJ-PC426 apachectl[30383]: AH00558: apache2: Could not reliably determine the server's fully qualified domain name, using 127.0.1.1. Set the 'ServerName' directive globally to suppress this message
6月 20 17:39:30 BJ-PC426 systemd[1]: Started The Apache HTTP Server.
-- Subject: Unit apache2.service has finished start-up
-- Defined-By: systemd
-- Support: http://www.ubuntu.com/support
--
-- Unit apache2.service has finished starting up.
--
-- The start-up result is RESULT.
6月 20 17:39:30 BJ-PC426 sudo[30377]: pam_unix(sudo:session): session closed for user root
6月 20 17:40:11 BJ-PC426 sudo[30683]:    nreal : TTY=pts/0 ; PWD=/etc/apache2/sites-available ; USER=root ; COMMAND=/usr/sbin/service nginx restart
6月 20 17:40:11 BJ-PC426 sudo[30683]: pam_unix(sudo:session): session opened for user root by nreal(uid=0)
6月 20 17:40:11 BJ-PC426 systemd[1]: Starting A high performance web server and a reverse proxy server...
-- Subject: Unit nginx.service has begun start-up
-- Defined-By: systemd
-- Support: http://www.ubuntu.com/support
--
-- Unit nginx.service has begun starting up.
6月 20 17:40:11 BJ-PC426 nginx[30690]: nginx: [emerg] bind() to 0.0.0.0:80 failed (98: Address already in use)
6月 20 17:40:11 BJ-PC426 nginx[30690]: nginx: [emerg] bind() to [::]:80 failed (98: Address already in use)
6月 20 17:40:11 BJ-PC426 nginx[30690]: nginx: [emerg] bind() to 0.0.0.0:80 failed (98: Address already in use)
6月 20 17:40:11 BJ-PC426 nginx[30690]: nginx: [emerg] bind() to [::]:80 failed (98: Address already in use)
6月 20 17:40:12 BJ-PC426 nginx[30690]: nginx: [emerg] bind() to 0.0.0.0:80 failed (98: Address already in use)
6月 20 17:40:12 BJ-PC426 nginx[30690]: nginx: [emerg] bind() to [::]:80 failed (98: Address already in use)
6月 20 17:40:12 BJ-PC426 nginx[30690]: nginx: [emerg] bind() to 0.0.0.0:80 failed (98: Address already in use)
6月 20 17:40:12 BJ-PC426 nginx[30690]: nginx: [emerg] bind() to [::]:80 failed (98: Address already in use)
6月 20 17:40:13 BJ-PC426 nginx[30690]: nginx: [emerg] bind() to 0.0.0.0:80 failed (98: Address already in use)
6月 20 17:40:13 BJ-PC426 nginx[30690]: nginx: [emerg] bind() to [::]:80 failed (98: Address already in use)
6月 20 17:40:13 BJ-PC426 nginx[30690]: nginx: [emerg] still could not bind()
6月 20 17:40:13 BJ-PC426 systemd[1]: nginx.service: Control process exited, code=exited status=1
6月 20 17:40:13 BJ-PC426 systemd[1]: nginx.service: Failed with result 'exit-code'.
6月 20 17:40:13 BJ-PC426 systemd[1]: Failed to start A high performance web server and a reverse proxy server.
-- Subject: Unit nginx.service has failed
-- Defined-By: systemd
-- Support: http://www.ubuntu.com/support
--
-- Unit nginx.service has failed.
--
-- The result is RESULT.
6月 20 17:40:13 BJ-PC426 sudo[30683]: pam_unix(sudo:session): session closed for user root
$
原因:有可能服务器还装有Apache占用了80端口。
解决办法:
# 杀掉所以的Nginx进程
sudo killall -9 nginx
# 修改Nginx配置文件中的80端口为8090
vim /etc/nginx/sites-enabled/default
# 重启ngInx服务
sudo service nginx restart
问题2
配置Zabbix前端页面,配置DB链接时,Database type 无法选择到MySQL:
原因:PHP环境没有支持mysql;
解决办法:sudo apt install php-mysql
其他知识
#Nginx日志文件目录:
/var/log/nginx
#查看Nginx进程:
ps -ef | grep nginx
#重启nginx服务:
sudo service nginx restart
#ubuntu中查看防火墙状态:
sudo ufw status
#ubuntu开启防火墙:
sudo ufw enable
#ubuntu关闭防火墙:
sudo ufw disable