我是一个菜鸡,如果有写的不对的地方希望勿喷,可以评论告诉我改正。
最近在搞flutter的项目,其中有需要变更组件的状态,大家应该都会,只要在StatefulWidget里调用setState就可以变更状态刷新组件,但是这样的刷新你会发现只是在单个widget里的,其他的组件并不会一起刷新,所以这时候就需要我们用到redux——跨组件的状态管理。变更状态后,所有使用到这个状态的组件都会同时发生变化。
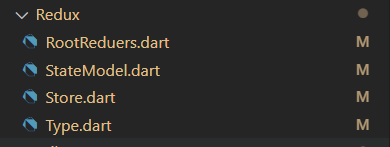
首先创建一个Redux文件夹,然后在文件夹中创建4个dart文件,见下图:

1、Type.dart
这个文件内的代码是最简单的,其中包含的只是需要用到的属性的名称
代码如下:
enum Types {
  deviceList,
  DeviceState,
  remainTime,
  remainTotalTime,
  childLock,
  currentWasherProgram,
  dryLevel,
  temperature,
  anticrease,
  antiTwining,
  orderTime,
  washerPhase,
  washerProcess,
  timeReverse,
}
就是那么简单,有需要用新属性的时候往里面加就好了。
2、StateModel.dart
上面的type中的属性名称定义完了,就需要写一个model类去规定属性的内容
代码如下:
class DeviceInfo {
  DeviceInfo({
    this.deviceState,
    this.remaintime,
    this.childLock,
    this.remainTotalTime,
    this.currentWasherProgram,
    this.dryLevel,
    this.temperature,
    this.anticrease,
    this.antiTwining,
    this.orderTime,
    this.washerPhase,
    this.washerProcess,
    this.timeReverse,
    this.deviceList,
  });
  RemainTime remaintime;
  DeviceState deviceState;
  ChildLock childLock;
  RemainTotalTime remainTotalTime;
  CurrentWasherProgram currentWasherProgram;
  DryLevel dryLevel;
  Temperature temperature;
  Anticrease anticrease;
  AntiTwining antiTwining;
  OrderTime orderTime;
  WasherPhase washerPhase;
  WasherProcess washerProcess;
  TimeReverse timeReverse;
  List deviceList;
}


class DeviceState {
  DeviceState({
    this.state,
  });
  String state;
}

class RemainTime {
  RemainTime({this.time});
  String time = '68';
}

class ChildLock {
  ChildLock({
    this.lock,
  });
  String lock = 'off';
}

class RemainTotalTime {
  RemainTotalTime({this.time});
  String time;
}
这里我就不全贴出来了稍微举几例子,照着自己增加自己改就可以了。
3、RootReduers.dart
属性的内容明确后就要为写方法为属性赋值了,这样才能改变属性的值
代码如下:
DeviceInfo Device1(DeviceInfo deviceInfo, dynamic action) {
  if (action['type'] == Types.DeviceState) {
    deviceInfo.deviceState.state = action['value'];
  } else if (action['type'] == Types.remainTime) {
    deviceInfo.remaintime.time = action['value'];
  } else if (action['type'] == Types.childLock) {
    deviceInfo.childLock.lock = action['value'];
  } else if (action['type'] == Types.remainTotalTime) {
    deviceInfo.remainTotalTime.time = action['value'];
  }
  return deviceInfo;
}
这里同样贴出部分代码,有更多的属性就继续else if 一直添加下去就可以了
4、Store.dart
这个文件的内容我就不解释了,因为有的代码我也不知道是干什么的,就比如下面的logger1,希望有大佬可以评论解释一下,这里的代码是干嘛的
logger1(Store<DeviceInfo> store, action, NextDispatcher next) {
  print('${new DateTime.now()}: $action');
  next(action);
}
Store<DeviceInfo> createStore1() {
  Store<DeviceInfo> store = new Store<DeviceInfo>(Device1,
      initialState: new DeviceInfo(
        deviceState: new DeviceState(state: 'off'),
        remaintime: new RemainTime(time: '68'),
        childLock: new ChildLock(lock: 'off'),
        remainTotalTime: new RemainTotalTime(time: '68'),
      ),
      middleware: [logger1]);

  return store;
}
这里同样贴出部分代码,有更多的属性就继续添加下去就可以了。
好了,到这里redux的文件就全部写完了
你以为这就结束了?
NO ! NO ! NO !
还需要在widget里面调用啊,不然写的这些全是白搭。
还要在你APP的起始代码页加点料
main.dart
代码如下:
void main() {
  runApp(My(store: store));
}
class My extends StatelessWidget {
  My({Key key, this.store});
  final Store<DeviceInfo> store;
  @override
  Widget build(BuildContext context) {
    return new StoreProvider(
        store: store,
        child: MaterialApp(
          home: login(),
        ));
  }
}
注意:如果初始页直接写页面逻辑,即直接runApp(login(store:store)),没有这里的My中转的话,当我退出登陆返回到到login页面的时候,会提示store是null的报错信息,所以我把runApp和我的首页login分开写,这样退出登录跳转到login页面的时候就不会报错了。
最后就是在有逻辑的页面调用这个store了,附上我login页面的使用代码:
Store<DeviceInfo> store = createStore1();
class login extends StatelessWidget {
  login({Key key, this.store});
  final Store<DeviceInfo> store;
  @override
  Widget build(BuildContext context) {
    return MaterialApp(
      initialRoute: '/Login',
      routes: {
        "/WashPrepare_jide_specDry": (context) => WashPrepare_jide_specDry(),
      },
    );
  }
}
以上代码只是我项目中的使用情况,大家应该可以按照实际情况自己变更添加的位置。
WashPrepare_jide_specDry 的代码
class WashPrepare_jide_specDry extends StatefulWidget {
  @override
  _WashPrepare_jide_specDryState createState() =>
      _WashPrepare_jide_specDryState();
}
class _WashPrepare_jide_specDryState extends State<WashPrepare_jide_specDry> {
  @override
  Widget build(BuildContext context) {
    ct = context;
    width = MediaQuery.of(context).size.width;
    var height = MediaQuery.of(context).size.height;
    /**
     * 重点!!!
     * 在StoreConnector这个组件中不能存在store.state,否则会找不到state而报错,
     * 需要把用到store.state的组件拿出去单独写成widget,在StoreConnector引用。
     */
    return StoreConnector<DeviceInfo, dynamic>(
        converter: (Store<DeviceInfo> store) {
      return {
        'state': store.state,
      };
    }, builder: (BuildContext context, store) {
      return Container(
      child:childrenLuck()
      /**
      * store.state.deviceState.state == 'off'?
      * Text('off'):Text('standby')
      * 这种使用方式是错误的,直接在StoreConnector使用,会找不到store.state而报错,
      * 正确的使用方法是写一个方法或者widget,在方法或者widget中使用store.state,然后在StoreConnector中引用这个方法或者widget。
      *//
      );
    });
  }
}
//下面是我举的例子
childrenLuck(){
if (store.state.childLock.lock == 'on') {
      return IconButton(
        onPressed: () {
        //这里是改变状态的方法,把off赋给了childLock属性
          store.dispatch({'type': Types.childLock, 'value': 'off'});
        },
        icon: Icon(Icons.child_care),
        color: Colors.green,
      );
    } else {
      return IconButton(
        onPressed: () {
          store.dispatch({'type': Types.childLock, 'value': 'on'});
        },
        icon: Icon(Icons.child_care),
        color: Colors.white,
      );
    }
}
这样就结束了。