TextView
用于显示文本的一个控件
文本的字体尺寸单位为sp;
sp:scaled pixels(放大像素)主要用于字体显示
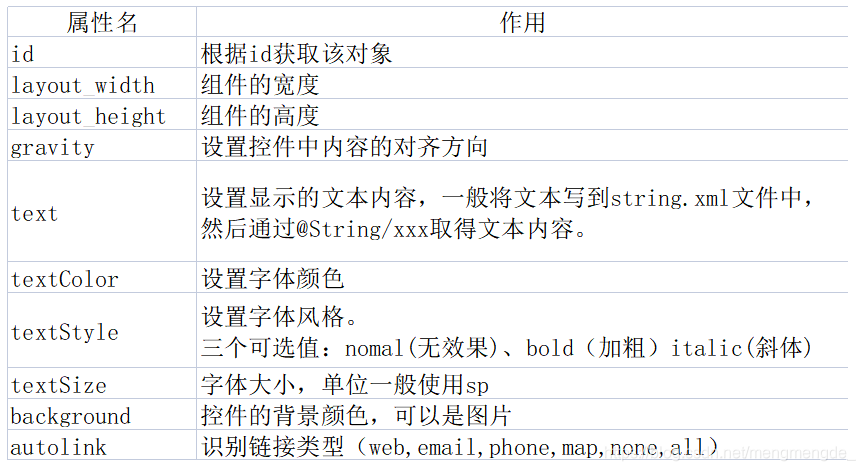
1.常用属性
Shpe
可以定义控件的一些展示效果,例如圆角,渐变,填充,描边,大小,边距;shape子标签就可以实现这些效果,shape子标签有下面几个属性:corners,gradient,padding,size,solid,stroke;
可以替换图片,减少app所占用的空间。
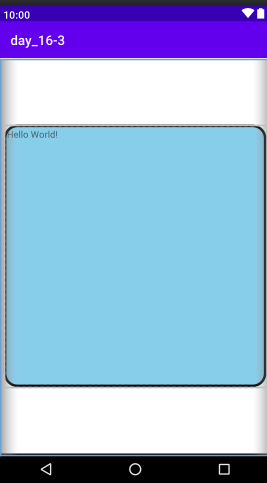
1.使用shape给TextView自定义形状和图片
1.在res/drawable下新建shape.xml文件
2.编写shape.xml文件
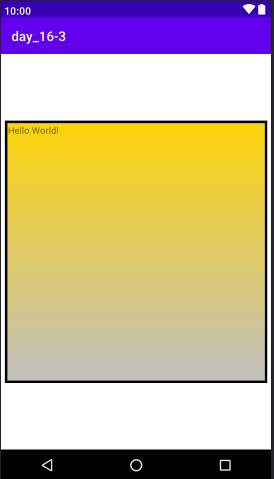
设置渐变
<?xml version="1.0" encoding="utf-8"?>
<shape xmlns:android="http://schemas.android.com/apk/res/android">
    设置一个黑色边框
    <stroke
        android:width="10px"
        android:color="#000000"/>
    <!--渐变 -->
    <gradient
        android:angle="270"
        android:endColor="#c0c0c0"
        android:startColor="#fcd209"/>
    <!--设置一下边距,让空间大一点-->
    <padding
        android:left="5dp"
        android:top="5dp"
        android:right="5dp"
        android:bottom="5dp"/>
</shape>
设置圆角
<?xml version="1.0" encoding="utf-8"?>
<shape xmlns:android="http://schemas.android.com/apk/res/android">
    设置一个黑色边框
    <stroke
        android:width="10px"
        android:color="#000000"/>
    <!--设置透明背景色-->
    <solid
        android:color="#87ceeb"/>
    <!--设置圆角-->
    <corners
        android:bottomLeftRadius="50px"
        android:bottomRightRadius="50px"
        android:topLeftRadius="50px"
        android:topRightRadius="50px"/>
    <!--设置一下边距,让空间大一点-->
    <padding
        android:left="5dp"
        android:top="5dp"
        android:right="5dp"
        android:bottom="5dp"/>
</shape>
3.使用shape.xml文件

3.效果展示
EditText(输入框)
EditText输入框,集成与TextView,也继承其属性。
1.EditText特有属性

2.运用
<?xml version="1.0" encoding="utf-8"?>
<LinearLayout xmlns:android="http://schemas.android.com/apk/res/android"
    xmlns:app="http://schemas.android.com/apk/res-auto"
    xmlns:tools="http://schemas.android.com/tools"
    android:layout_width="match_parent"
    android:layout_height="match_parent"
    android:orientation="vertical"
    tools:context=".MainActivity">

    <TextView
        android:id="@+id/text_1"
        android:layout_width="match_parent"
        android:layout_height="100dp"
        android:gravity="center"
        android:text="登录页面"
        android:textSize="30dp"
        android:textStyle="bold"/>

    <LinearLayout
        android:layout_width="match_parent"
        android:layout_height="wrap_content"
        android:orientation="horizontal"
        android:layout_marginTop="20dp">

        <TextView
            android:layout_width="0dp"
            android:layout_height="wrap_content"
            android:text="用户名:"
            android:layout_weight="1"
            android:textColor="#000000"
            android:textSize="20dp" />
        <EditText
            android:layout_width="0dp"
            android:layout_height="wrap_content"
            android:selectAllOnFocus="true"
            android:hint="请输入用户名"
            android:text="可爱多一点"
            android:layout_weight="4"/>
    </LinearLayout>

    <LinearLayout
        android:layout_width="match_parent"
        android:layout_height="wrap_content"
        android:orientation="horizontal"
        android:layout_marginTop="20dp">

        <TextView
            android:layout_width="0dp"
            android:layout_height="wrap_content"
            android:text="密    码:"
            android:layout_weight="1"
            android:textColor="#000000"
            android:textSize="20sp"/>
        <EditText
            android:layout_width="0dp"
            android:layout_height="wrap_content"
            android:selectAllOnFocus="true"
            android:hint="请输入密码"
            android:inputType="textPassword"
            android:layout_weight="4"/>
    </LinearLayout>
</LinearLayout>
3.效果展示

Button(按钮)
Button控件继承TextView,拥有TextView的属性。
ImageView(图像视图)
ImageView继承View
1. src属性与background属性的区别
在API文档中我们发现ImagView有两个可以设置图片,分别是src和background:
1.background通常指的都是背景,而src指的是内容;
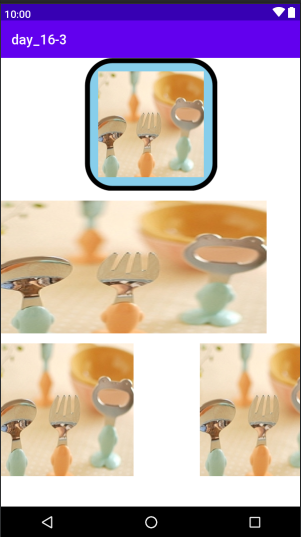
2.当使用src填入图片时,是按照图片大小直接填充,并不会进行拉伸,而使用background填入图片,则是会根据ImageView给定的宽度来进行拉伸。
<?xml version="1.0" encoding="utf-8"?>
<LinearLayout xmlns:android="http://schemas.android.com/apk/res/android"
    xmlns:app="http://schemas.android.com/apk/res-auto"
    xmlns:tools="http://schemas.android.com/tools"
    android:layout_width="match_parent"
    android:layout_height="match_parent"
    android:orientation="vertical"
    tools:context=".MainActivity">

    <ImageView
        android:layout_width="200dp"
        android:layout_height="200dp"
        android:layout_gravity="center"
        android:background="@drawable/shape"
        android:src="@drawable/a1"
        android:padding="20dp"/>
  <!--
      <ImageView
        android:layout_width="wrap_content"
        android:layout_height="wrap_content"
        android:background="@drawable/a1"/>
  -->
    <ImageView
        android:layout_width="400dp"
        android:layout_height="wrap_content"
        android:background="@drawable/a1"
        android:layout_marginTop="15dp"/>
    <LinearLayout
        android:layout_width="match_parent"
        android:layout_height="match_parent">
    <ImageView
        android:layout_width="wrap_content"
        android:layout_height="wrap_content"
        android:src="@drawable/a1"
        android:layout_marginTop="15dp"/>
    <ImageView
        android:layout_width="400dp"
        android:layout_height="wrap_content"
        android:src="@drawable/a1"
        android:layout_marginTop="15dp"/>
    </LinearLayout>
</LinearLayout>
效果展示
注:最后一张图片由于我选的图片原本尺寸有点大,所以出去了。但可以看出来使用src的时候图片是没有拉伸的。
2.绘制圆形的ImageView
1.新建一个java文件

 CircleImageView.java文件
import android.annotation.SuppressLint;
import android.content.Context;
import android.graphics.Bitmap;
import android.graphics.BitmapShader;
import android.graphics.Canvas;
import android.graphics.Matrix;
import android.graphics.Paint;
import android.graphics.Shader;
import android.graphics.drawable.BitmapDrawable;
import android.graphics.drawable.Drawable;
import android.util.AttributeSet;

import androidx.annotation.Nullable;

public class CircleImageView extends androidx.appcompat.widget.AppCompatImageView {

    //画笔
    private Paint mPaint;
    //圆形图片的半径
    private int mRadius;
    //图片的宿放比例
    private float mScale;

    public CircleImageView(Context context) {
        super(context);
    }

    public CircleImageView(Context context, @Nullable AttributeSet attrs) {
        super(context, attrs);
    }

    public CircleImageView(Context context, @Nullable AttributeSet attrs, int defStyleAttr) {
        super(context, attrs, defStyleAttr);
    }

    @Override
    protected void onMeasure(int widthMeasureSpec, int heightMeasureSpec) {
        super.onMeasure(widthMeasureSpec, heightMeasureSpec);
        //由于是圆形,宽高应保持一致
        int size = Math.min(getMeasuredWidth(), getMeasuredHeight());
        mRadius = size / 2;
        setMeasuredDimension(size, size);
    }

    @SuppressLint("DrawAllocation")
    @Override
    protected void onDraw(Canvas canvas) {

        mPaint = new Paint();

        Drawable drawable = getDrawable();

        if (null != drawable) {
            Bitmap bitmap = ((BitmapDrawable) drawable).getBitmap();

            //初始化BitmapShader,传入bitmap对象
            BitmapShader bitmapShader = new BitmapShader(bitmap, Shader.TileMode.CLAMP, Shader.TileMode.CLAMP);
            //计算缩放比例
            mScale = (mRadius * 2.0f) / Math.min(bitmap.getHeight(), bitmap.getWidth());

            Matrix matrix = new Matrix();
            matrix.setScale(mScale, mScale);
            bitmapShader.setLocalMatrix(matrix);
            mPaint.setShader(bitmapShader);
            //画圆形,指定好坐标,半径,画笔
            canvas.drawCircle(mRadius, mRadius, mRadius, mPaint);
        } else {
            super.onDraw(canvas);
        }
    }

}
2.引用
<?xml version="1.0" encoding="utf-8"?>
<LinearLayout xmlns:android="http://schemas.android.com/apk/res/android"
    xmlns:app="http://schemas.android.com/apk/res-auto"
    xmlns:tools="http://schemas.android.com/tools"
    android:layout_width="match_parent"
    android:layout_height="match_parent"
    android:orientation="vertical"
    tools:context=".MainActivity">

    <com.example.day_16_3.CircleImageView
        android:layout_width="100dp"
        android:layout_height="100dp"
        android:padding="20dp"
        android:src="@drawable/m1" />
</LinearLayout>
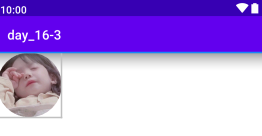
3.效果展示
