网格视图(GridView)
GridView是按照行列的形式来显示内容,一般用于图片、图标的显示。GridView 也可以像第4章介绍ListView一样,以列表的形示来显示内容。首先来看一下GridView的一些基本属性。
- android:columnWidth :GridView中每一列的宽度
- android:gravity : 控件上面信息的位置
- android:numColumns : 设置GridView的列数
- android:horizontalSpacing : 设置水平之间的间距
- android:verticalSpacing :设置垂直之间的间距
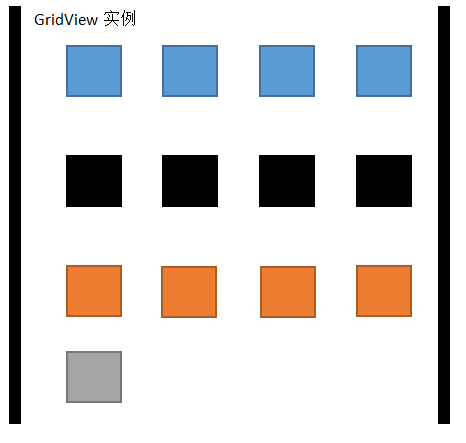
如果要显示内容,同样要为GridView设置一个适配器(Adapter) 。在这里我们也是写一个类继承BaseAdapter类,重写其中的方法,主要是重写getView()方法设置图片的格式,下面通过一个简单的实例来说明它的用法,运行效果如图1所示。

图1Gridview实例
在图1中,以每行4个图片排列,这可以通过android:numColumns属性或代码进行设置。所显示的内容是通过一个适配器来提供的。然后通过GridView的setAdapter方法设置适配器,下面来看看适配器的实现:
//图片数组
private int[] images . (R. drawable. sample thumb_ 0, R. drawable. sample thumb_ 1

R. drawable.sample thumb 2, R.drawable.sample thumb 3, R. drawable.sample thumb_ 4,R.drawable.sample_ thumb 5, R.drawable.sample thumb 6, R. drawable.sample thumb_ 7,R.drawable.sample thumb 1,R.drawable.sample_ thumb_ 5, R.drawable. sample_ thumb_ 4,R. drawable.sample thumb 4, R. drawable.sample thumb_ 4);

private Context context;

public MyAdapter (Context context) {

this. context = context;
}
public int getCount () {

return images . length ;
}
public object getItem(int position) {

return position;
}
public long getItemId(int position) (return position;

public View getView(int position, View convertView, ViewGroup parent) {
lmageView imageView; //图片控件

if (convertView = null) {

//实例化 ImageView 对象

imageView = new ImageView (context) ;

//设置ImageView对象的布局

imageView.setLayoutParams (nеw GridView. LayoutParams (45,45));

//设置边界对齐

imageView. setAdjus tViewBounds (true) ;

imageView. setScaleType (ImageView ScaleType . CENTER CROP) ;

//设置间距

imageView.setPadding(8, 8, 8, 8);

)else(

imageView = (ImageView) convertView;

//这是ImageView设图片资源

imageView. setImageResource (images[position]);

return imageView;
关于GriView的布局文件如下:
<?xml version="1.0" encoding="utf-8"?>

<LinearLayout xmlns : android "http:/ 1 schemas . android . com/ apk/ res/android"
android: layout_ width="fill_parent"
android: layout height="fill_parent"
android: background="#ffffff"
android:orientation="vertical" >

<TextView

android: layout _width="fill_parent "
android: layout_ height="wrap content"
android:textSize="18dip"
android: textColor = "#000000"
android: text="GridView 实例">

<GridView

android:id="@+id/gridView"
android:layout_width="fill parent "
android: layout_ height="wrap_content"
android: horizontalSpacing="5dip"
android:verticalSpacing="5dip">
滚动视图(ScrollView)
有时内容很多,一页显示不完,此时可以把有些控件加入到滚动视图中。所以滚动视图是指在内容很多,一屏幕显示不完全的情况下,需要借助滚动来显示内容。
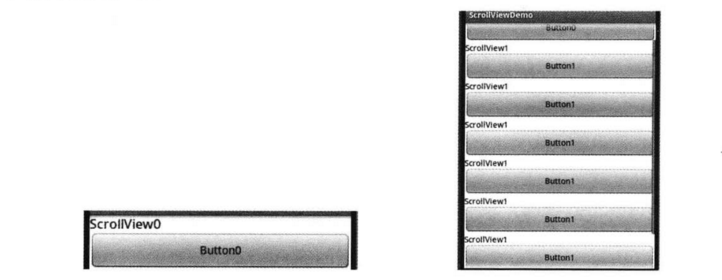
例如,一个相册,一页显示不完时,我们就可以使用滚动视图。如图2所示,这个界面只有一个按钮,当我们不断单击这个按钮时,就会增加一个TextView和一个Button, 随着不断的单击,界面就会显示一个滚动条,如图2所示,这是因为整个布局文件都放在了滚动视图(ScrollView) 中。

图2
下面来看看实现以上效果的代码。
(1)布局文件。此布局文件最外面采用的ScrollView,嵌套了一个线性布局,按钮和文本框都在线性布局中;
<?xml version="1.0" encoding="utf-8"?>

<ScrollView xm1ns: android =http://schemas. android. com/apk/res/android"
android: id="@+id/ScrollView01"
android:layout_width="fill_parent"
android: layout_height="wrap_content"
android : background="#ffffff"
>

<LinearLayout xmlns: android="http://schemas . android. com/apk/ res/ android"
android:layout_ width="fill_parent"
android:layout_height="fill_parent"
android:id="@+id/LinearLayout01"
android :orientation="vertical" >

<TextView
android: layout_width="fill_parent"
android: layout_height="wrap content"
android:id="@+id/textview"
android: textSize="17sp"
android: textColor "#000000"
android: text-"ScrollView0" />

<Button
android:id="@+id/button"
android: layout_ width="fill_parent"
android: layout_height="wrap_content "
android: text="Button0"
/>
</ LinearLayout>
</ScrollView>
(2)按钮事件的实现。单击按钮增加一个线性布局,这个布局文件中添加了一个按钮( Button)和文本框( TextView)
//按钮事件:单击按钮增加一个文本框和按钮

private OnClickListener listener = new OnClickListener (){

public void onClick (View v) {

TextView textView1 = new TextView (ScrollViewDemoActivity.this) ;
textView1.setText ("ScrollView"+index) ;
textView1.setTextcolor (Color.BLACK) ;
LinearLayout.LayoutParams layoutParams = new LinearLayout .

LayoutParams (LinearLayout.LayoutParams.FILL PARENT,Linearlayout.LayoutParams.WRAP_CONTENT) ;
layout.addView (textView1, layoutParams); //把TextView增加到布局中
//实例化一个按钮
Button btn =  new Button (ScrollViewDemoActivity. this) ;
btn. setText ("Button"+index) ;
//把Button增加到布局中
layout.addView (btn, layoutParams) ;
}
};
由上面的例子可以知道,ScrollView的主要作用是在一屏幕无法完全显示时,可以考虑ScrollView。